


Quick Start: Build and Install Your First App
Preview Feature
This Preview feature is still being developed. We do not recommend using it in a production environment, because the feature might not be fully tested or optimized for performance, and related documentation could be incomplete.
Please continue to submit feedback through normal Cribl support channels, but assistance might be limited while the feature remains in Preview.
This guide walks you through creating, previewing, and deploying your first App. With an AI (artificial intelligence) coding assistant, you can move from a blank project to a working App in your Cribl.Cloud Organization in a few minutes.
Before You Begin
You need the following:
- A Cribl.Cloud Organization.
- Workspace Administrator access in the Organization (or in a dedicated App development Workspace) where you use Create App and Live Preview. See Roles, Permissions, and Governance in the Admin Guide.
- Node.js (version 18 or later) on your local machine.
- A terminal (macOS Terminal, a Linux shell, or Windows with Git Bash or WSL).
- An AI coding assistant, such as Cursor or Claude Code. The scaffolded project is designed to work with these tools.
Browser Permissions for Live Preview
For Live Preview, use Chrome, Edge, or Firefox. Safari blocks the embedded HTTP dev server on localhost when the Cribl UI is HTTPS. You can still test by packaging and installing the App.
Live Preview loads your App from a development server on your machine (often at a loopback address such as 127.0.0.1). The Cribl UI is served over HTTPS, so the browser can treat that as the public Cribl origin reaching your local network or local device. Recent Google Chrome and Microsoft Edge versions may block the connection until you explicitly allow it. For background, see Local Network Access in Chrome and Local Network Access in Microsoft Edge.
- If the browser shows a permission prompt for your Cribl site, select Allow. The exact label may refer to local network or devices on your machine, depending on the browser and operating system.
- If Live Preview stays blank and you do not see a prompt, open your browser’s site settings for your Cribl URL and enable access to the local network (or equivalent wording) for that origin.
- On macOS, also check System Settings > Privacy & Security > Local Network and ensure your browser is allowed to access the local network. See Control access to your local network on Mac.
This requirement applies to Live Preview and other workflows where the embedded App is served from your computer. Installed Apps that load entirely from Cribl normally do not need this permission.
Step 1: Open Apps and Describe What You Are Building
On the top bar within any Cribl product, select Apps.
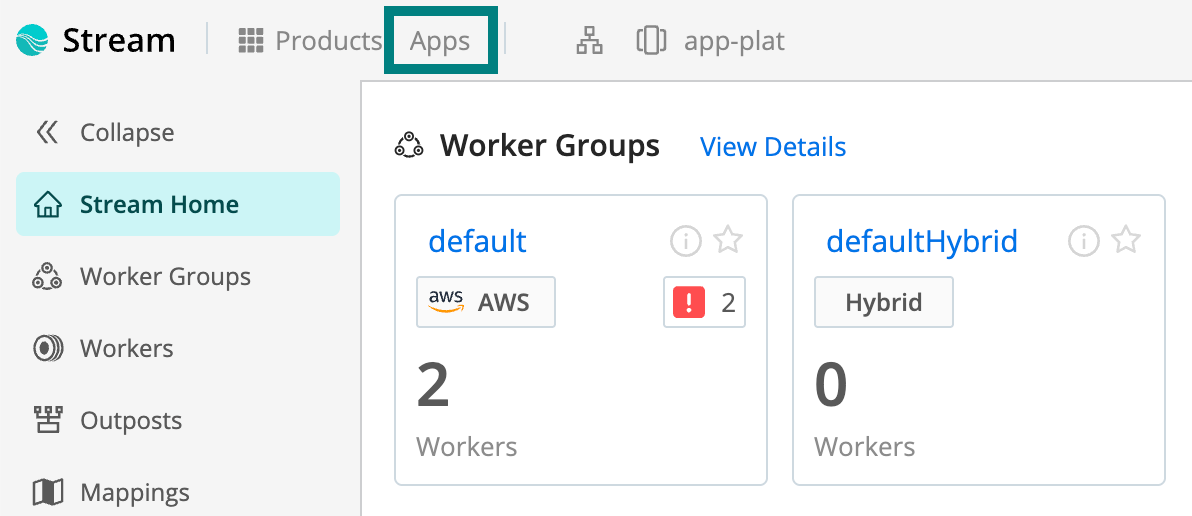
Apps menu item on the Cribl product top bar Select Create App. On the Create your app screen, describe what you want to start building. Then select Next.

Create your app screen with purpose field and Next
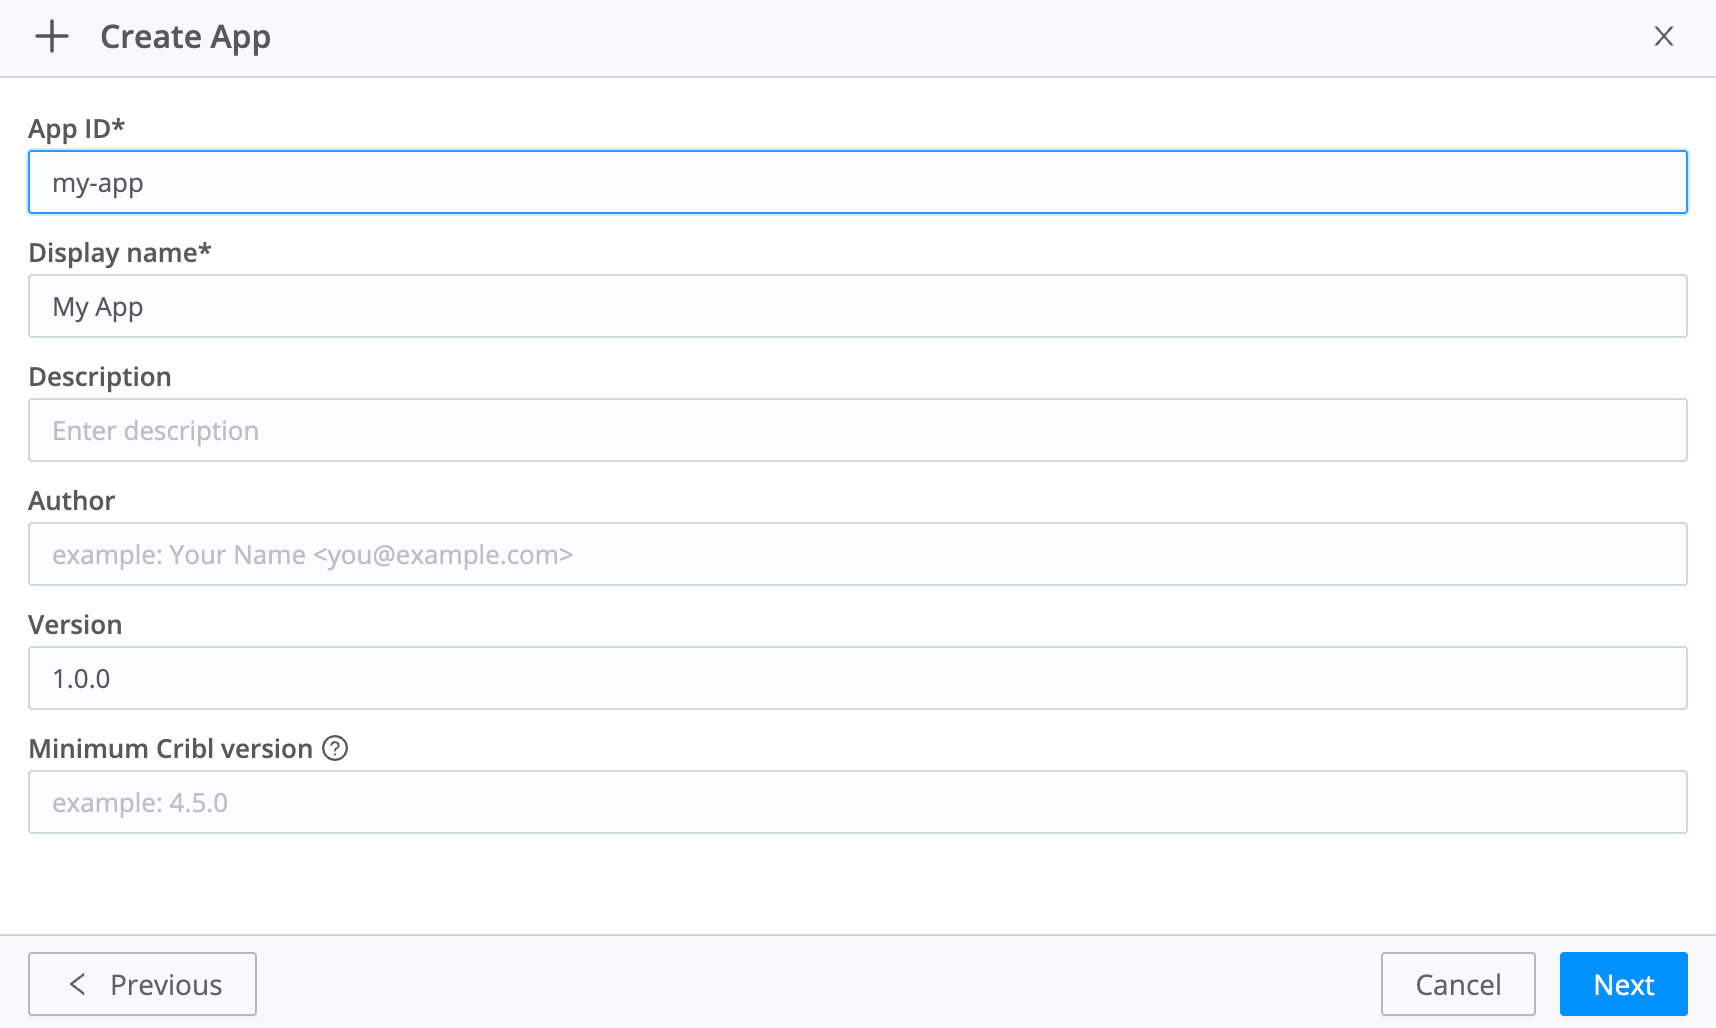
Step 2: Enter App Metadata
On the next screen, enter App ID, Display Name, Description, Author, Version, and Minimum Cribl version. See 1. Create and Scaffold for details on each field. Select Next.
Step 3: Scaffold the Project From the Script
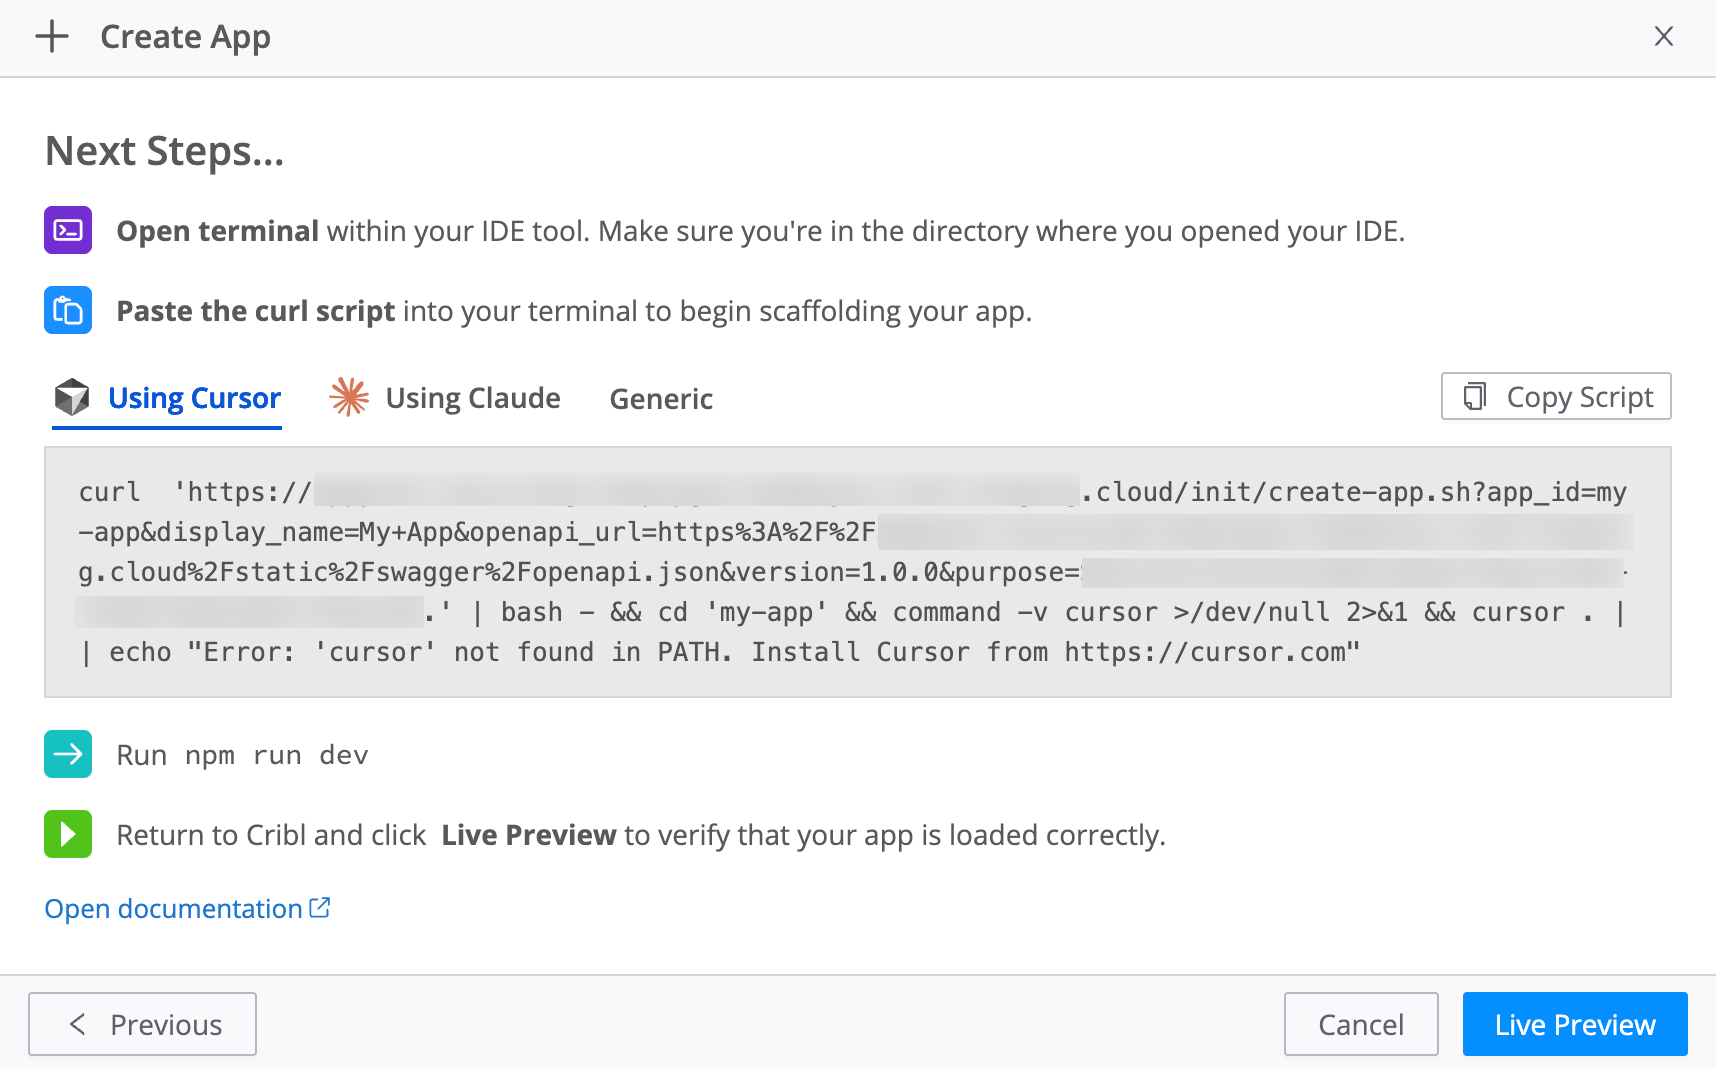
The wizard Next Steps list shows how to scaffold the App from a terminal on your machine. It tells you to run npm run dev after scaffolding and to return to Cribl to select Live Preview when the server is ready. The Live Preview control is on this same step.
- Open a terminal. Go to the parent folder where you want this App’s project folder created.
- Select the tab that matches how you want to work: Using Cursor, Using Claude, or Generic. Each tab shows a command for that workflow.
- Select Copy Script, paste the script into your terminal, and run it. For Using Cursor and Using Claude, the script scaffolds the App and launches Cursor or Claude Code. For Generic, the
curlscript scaffolds the project only. Open your editor and assistant yourself.
You still start the local development server from the project directory with npm run dev, as described in Step 4.
The script creates a folder named after your App ID. The folder contains a Node.js starter project, including:
- A working App skeleton you can extend immediately.
- A local development proxy that routes API calls to Cribl securely.
- The OpenAPI specification so your AI assistant knows which Cribl APIs are documented and available to the App.
AGENTS.md, an instruction file that describes how to build a compliant App, authenticate, and use the key-value (KV) store in Apps (Preview) (including requiring encrypted KV for API keys and secrets). For REST paths, quotas, and encryption rules, see The KV Store in the Builder Guide.
Leave the Create App wizard open in the browser while you run the dev server and open Live Preview from this step.
Step 4: Run the Dev Server and Open Live Preview
Use Chrome, Edge, or Firefox for Live Preview. Safari blocks the embedded HTTP dev server on localhost when the Cribl UI is HTTPS. See Browser Support.
In the scaffolded project directory, start the local development server as the wizard reminds you to do:
npm run devKeep this terminal session running.
Return to the Create App wizard in Cribl (the scaffold and Live Preview step from the previous section).
Select Live Preview to open the embedded preview pane.
Your starter App appears inside Cribl. The preview uses live reload: when your AI assistant changes code locally, the Cribl view updates without a full page refresh.
If you later use Live Preview in a different Workspace, Organization, or deployment (for example, switching between Cribl.Cloud and a local environment), stop the development server and run npm run dev again first. Otherwise the App might not initialize in the preview iframe.
Step 5: Generate the App
This is where you shape the App for your use case. Your AI assistant reads AGENTS.md automatically, which gives it context on Apps (Preview) limits and APIs.
In your AI assistant, describe what you want to build. You can paste this prompt verbatim:
“Create an App that displays a table of Worker Groups, the number of Worker Nodes, and the number of integrations running in each Worker Group.”
Press Enter and let the tool build a plan and write the code.
When the run finishes, check the Live Preview window. The preview updates to show a working table that queries your live Cribl data.
To extend the App, continue prompting. For example: “Now let me select a Worker Group to see its list of integrations and view their configurations.” Describe the behavior you want, confirm it in Live Preview, and repeat as needed. Expect several iterations: assistants can drift from Apps (Preview) rules, so paste console errors back into the tool and ground changes in AGENTS.md. For a fuller discussion, see Expectations for Agent-Assisted Development in the Builder Guide.
Step 6: Deploy
When you are satisfied with the App, publish it from the preview.
- Select Deploy in the corner of Live Preview. This packages the App locally and uploads it to Cribl in one step. Each time, the UI shows a Confirm deploy modal with fixed copy. Acknowledge it to finish the deploy.
- In the terminal, stop the development server with Ctrl+C.
Share and discovery: Deploy updates the installed App in a way that can narrow who finds it under Apps > Installed compared with an administrator Upgrade of the same App. If teammates suddenly cannot see the App, ask an Organization administrator to open Share on that App and assign App user for the members or teams who need it. For production rollouts where many people must keep access without reworking Share, ship a .tgz and ask an administrator to use Upgrade instead. See Deploy From Create App and Upgrade an App in the Admin Guide.
Step 7: Launch Your App
- On the top bar, select Apps.
- Select your App to open it.
The App runs inside Cribl, so you don’t need a local server.
Continue Local Development
To resume work on an App you already created:
- Open the local project folder and run
npm run devagain. - In the Cribl UI, go to Apps > Create App and advance through the wizard until you reach the scaffold and Live Preview step (use the same App ID as the existing project when the wizard asks for metadata).
- Select Live Preview to reconnect the local server to the UI.
Troubleshooting
| Problem | Resolution |
|---|---|
| Live Preview shows an empty screen | On Safari, use Chrome, Edge, or Firefox for Live Preview, or test with a packaged install. See Browser Support. Otherwise verify that the dev server is running (npm run dev). Confirm your browser allows the Cribl origin to access your local network or local device (see Browser Permissions for Live Preview). In your browser Developer Tools, attach the console to the iframe context and check for errors. If you recently switched Workspaces, Organizations, or environments, stop the server (Ctrl+C) and start npm run dev again. |
npm errors or warnings | Switch your environment to Node.js 22.22.2 (for example with nvm install 22.22.2 and nvm use 22.22.2, or the equivalent in your version manager). Open a new terminal and run the npm command again. |
cursor not found in PATH | If the scaffold script fails with Error: 'cursor' not found in PATH. Install Cursor from https://cursor.com, Cursor is installed but the CLI is not on your PATH. From Cursor, enable or reinstall the shell command so cursor resolves in the terminal, or add Cursor’s install directory to PATH following Cursor documentation. Retry the script in a new shell. |
| Changes don’t appear in the iframe | Confirm that the dev server is still running. If you changed build configuration, reload the full Cribl browser tab. |
| Deploy fails | Ensure that npm run dev is still running. Packaging reads the bundle from your local dev server. |
| App not visible after deploy | Stop the local server, then refresh the Apps list. If the row still does not appear for some accounts, Deploy can switch the App to stricter discovery rules: ask an Organization administrator to open Share for that App and assign App user for the people or teams who need it. See Step 6: Deploy. |
| API calls return 403 after deploy | You might lack the required access for the resources the App requests. See Understand Permissions and Errors in the User Guide and Permissions and Access in the Builder Guide. |