These docs are for Cribl Edge 4.0 and are no longer actively maintained.
See the latest version (4.17).
Cribl.Cloud SSO Setup
This document outlines how, with a Cribl.Cloud Enterprise plan, you can set up a Single Sign-On (SSO) integration between your identity provider and your Cribl.Cloud portal. It covers both OIDC and SAML authentication options, in the following sections:
SSO integration requires you to perform certain configuration steps in your identity provider (IDP), and to then submit corresponding information to Cribl. As of Cribl Edge 4.0, you can submit these details directly on your Cribl.Cloud portal’s Organization page.
This document covers both sides of the process. For additional details specifically about integrating Cribl Edge with Okta, see SSO/Okta Configuration.
SSO Setup Overview
The general steps here are:
Invite at least one SSO admin to your Cribl.Cloud Organization from a fallback, separate email domain.
In your identity provider (IDP), configure user groups that map to Cribl.Cloud’s four predefined Roles.
In your IDP, create an OIDC or SAML application.
If creating an OIDC application, you must use backchannel authentication. Cribl.Cloud does not support front-channel authentication via OIDC.
Submit your app’s configuration details to Cribl on your Cribl.Cloud portal’s Organization page > SSO tab. (This will complete your SSO setup on the Cribl side.)
In your IDP, assign groups to your users, matching the Role that each group of users should have in Cribl.Cloud.
In your IDP, assign the OIDC/SAML app to the Organization’s owner, and to other Cribl.Cloud users.
Common Initial Steps
Whether you’re configuring SSO via OIDC or SAML, these initial preparation steps are the same.
Set Up Fallback Access
On your Cribl.Cloud Organization, ensure that at least one Owner creates a local account, using an email domain that’s separate from the corporate domain on which you’re configuring SSO. This will ensure backup access if SSO configuration breaks.
Configure Groups
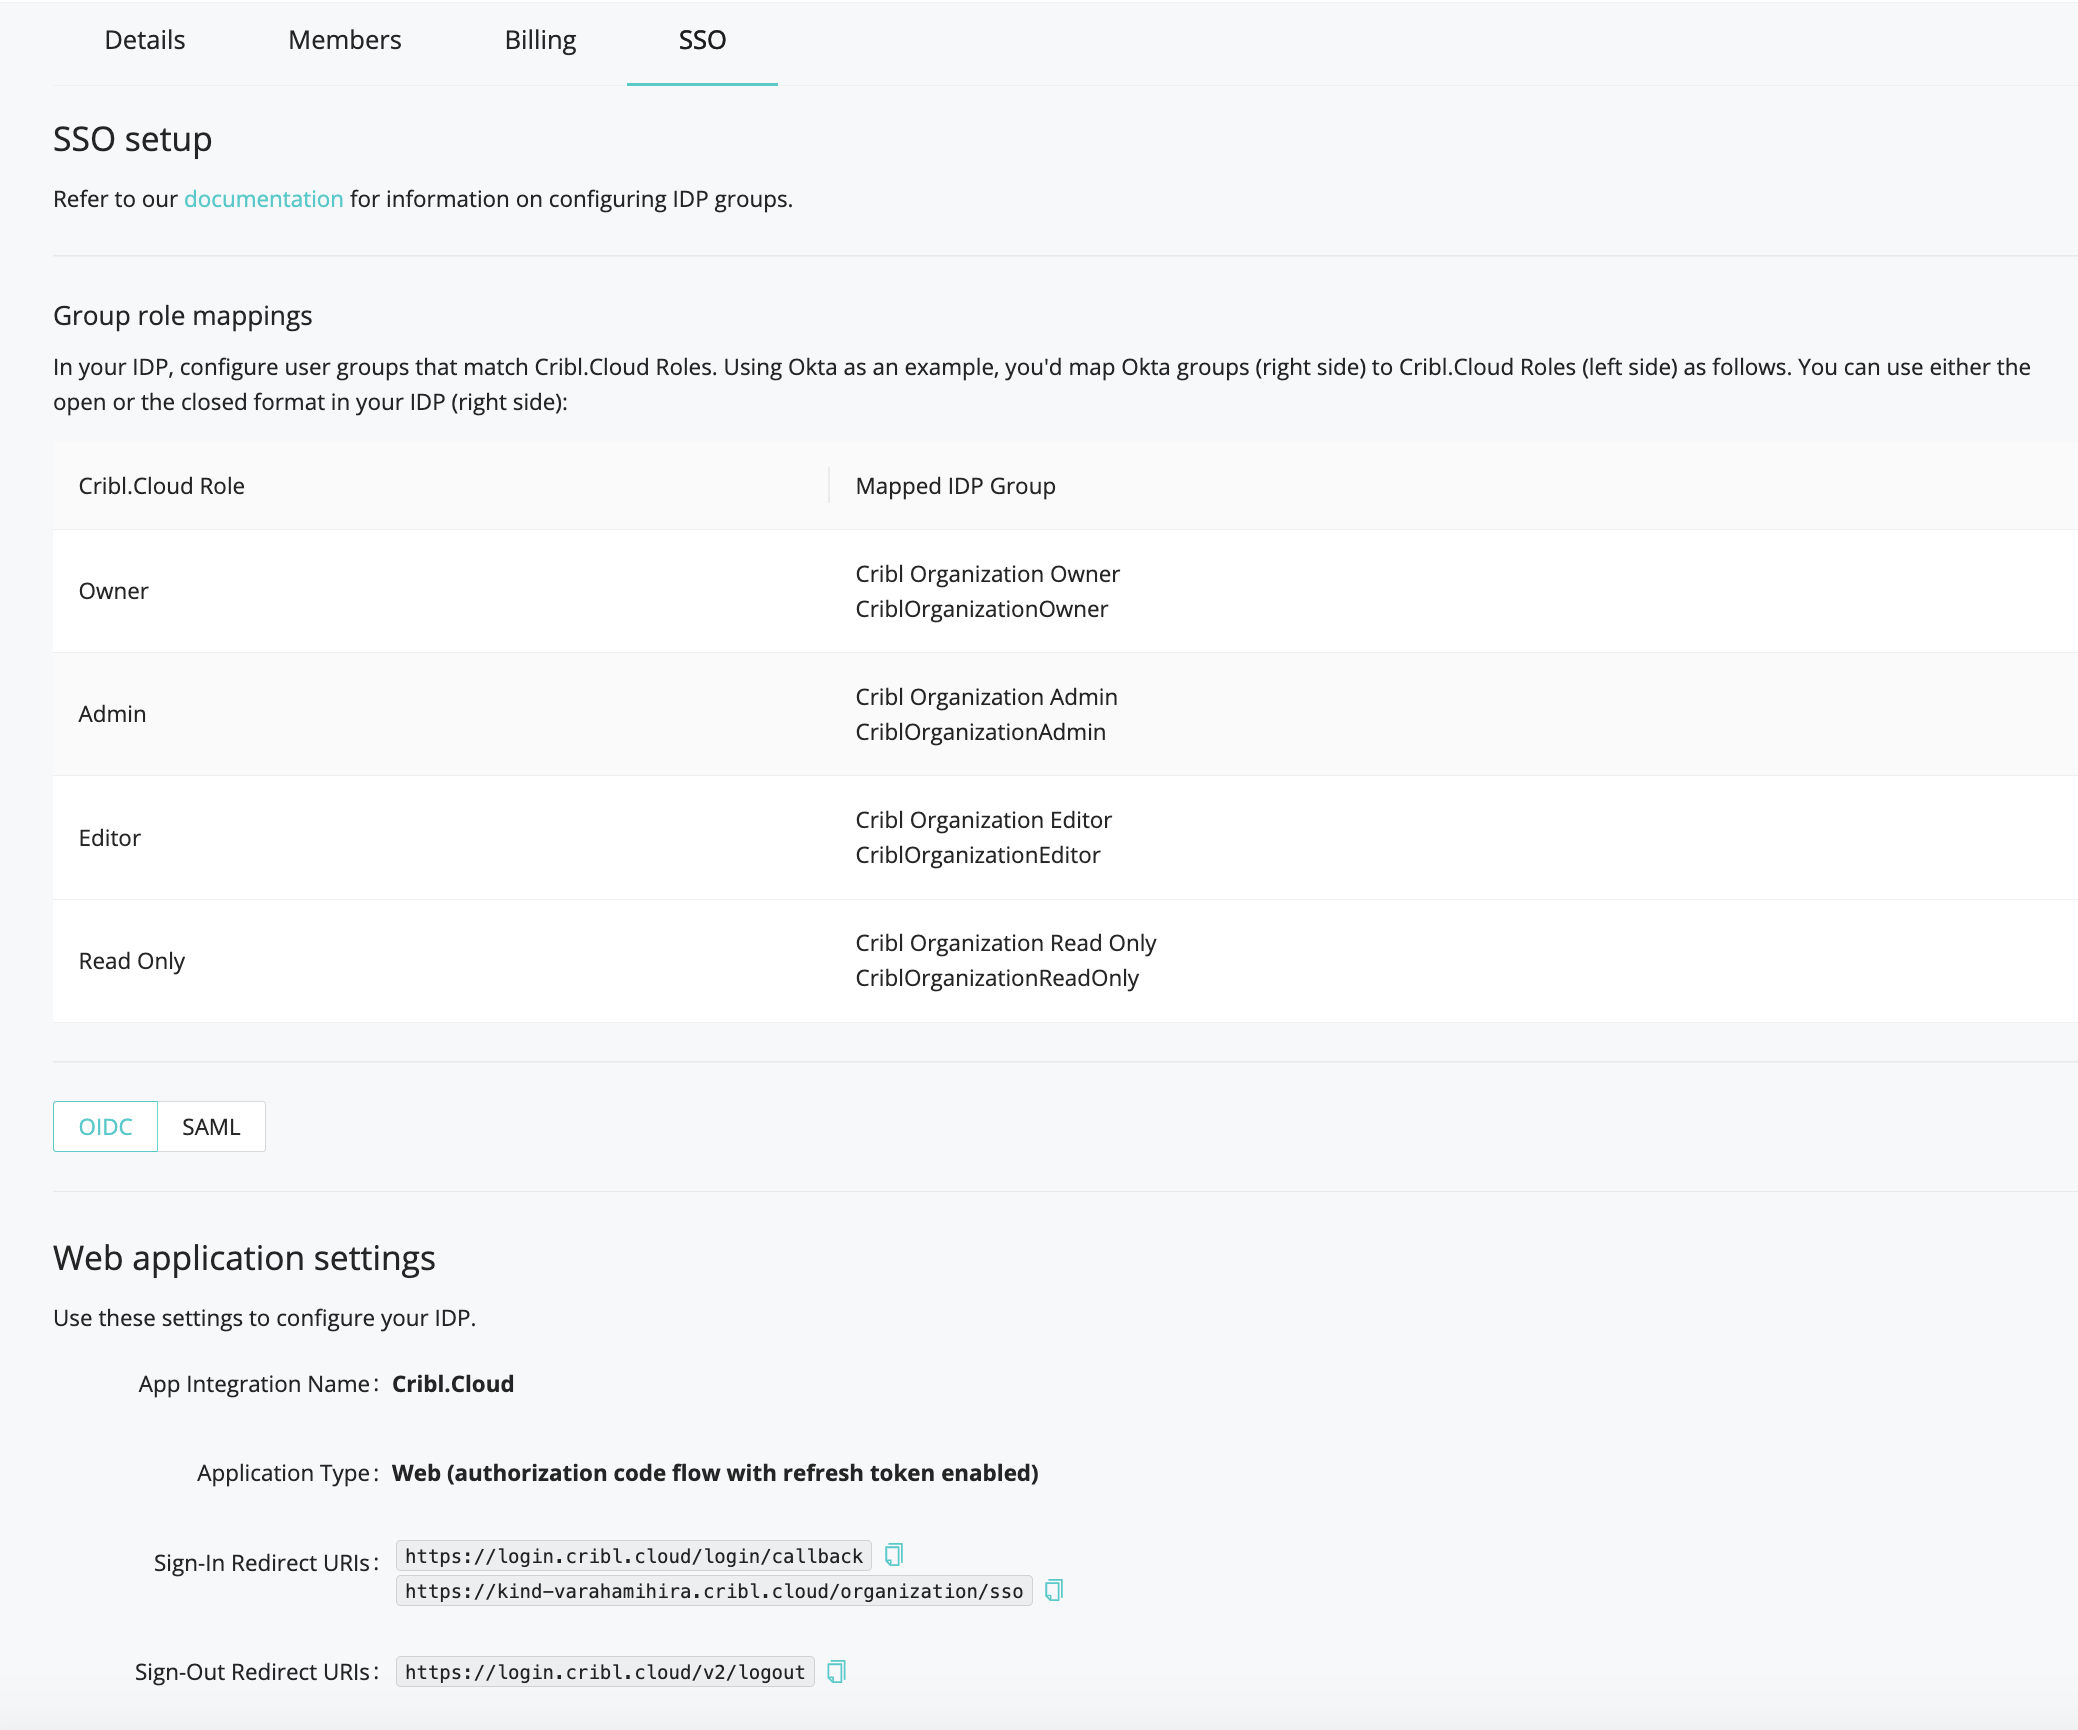
In your IDP, configure user groups that match Cribl.Cloud Roles. Using Okta as an example, you’d map Okta groups (right side) to Cribl.Cloud Roles (left side) as follows.
You can use either the open or the closed format in your IDP (right side). You can also add prefixes or suffixes, as outlined below in Group Configuration Options.
| Cribl.Cloud Role | IDP Group Name |
|---|---|
| Owner | Cribl Organization Owner /or/ CriblOrganizationOwner |
| Admin | Cribl Organization Admin /or/ CriblOrganizationAdmin |
| Editor | Cribl Organization Editor /or/ CriblOrganizationEditor |
| Read-Only | Cribl Organization Read Only /or/ Cribl OrganizationReadOnly |
Group Configuration Best Practices
- Only one user can be in the Cribl.Cloud Owner Role.
- That user should be in both the Owner and Admin groups in your IDP.
(This enables them to acquire all needed permissions across Cribl’s two corresponding Roles.) - Aside from dual-assigning the Owner, you should assign every other user only one group in your IDP. (Cribl’s Admin and Editor Roles include all the permissions of the Roles below them.)
Group Configuration Options
You can freely add prefixes or suffixes to Group Names that follow the above examples’ formats. Cribl will ignore these additions when mapping IDP groups to Cribl Roles. Examples:
SOME-LABEL-12345-CriblOrganizationOwnerCriblOrganizationEditor-420
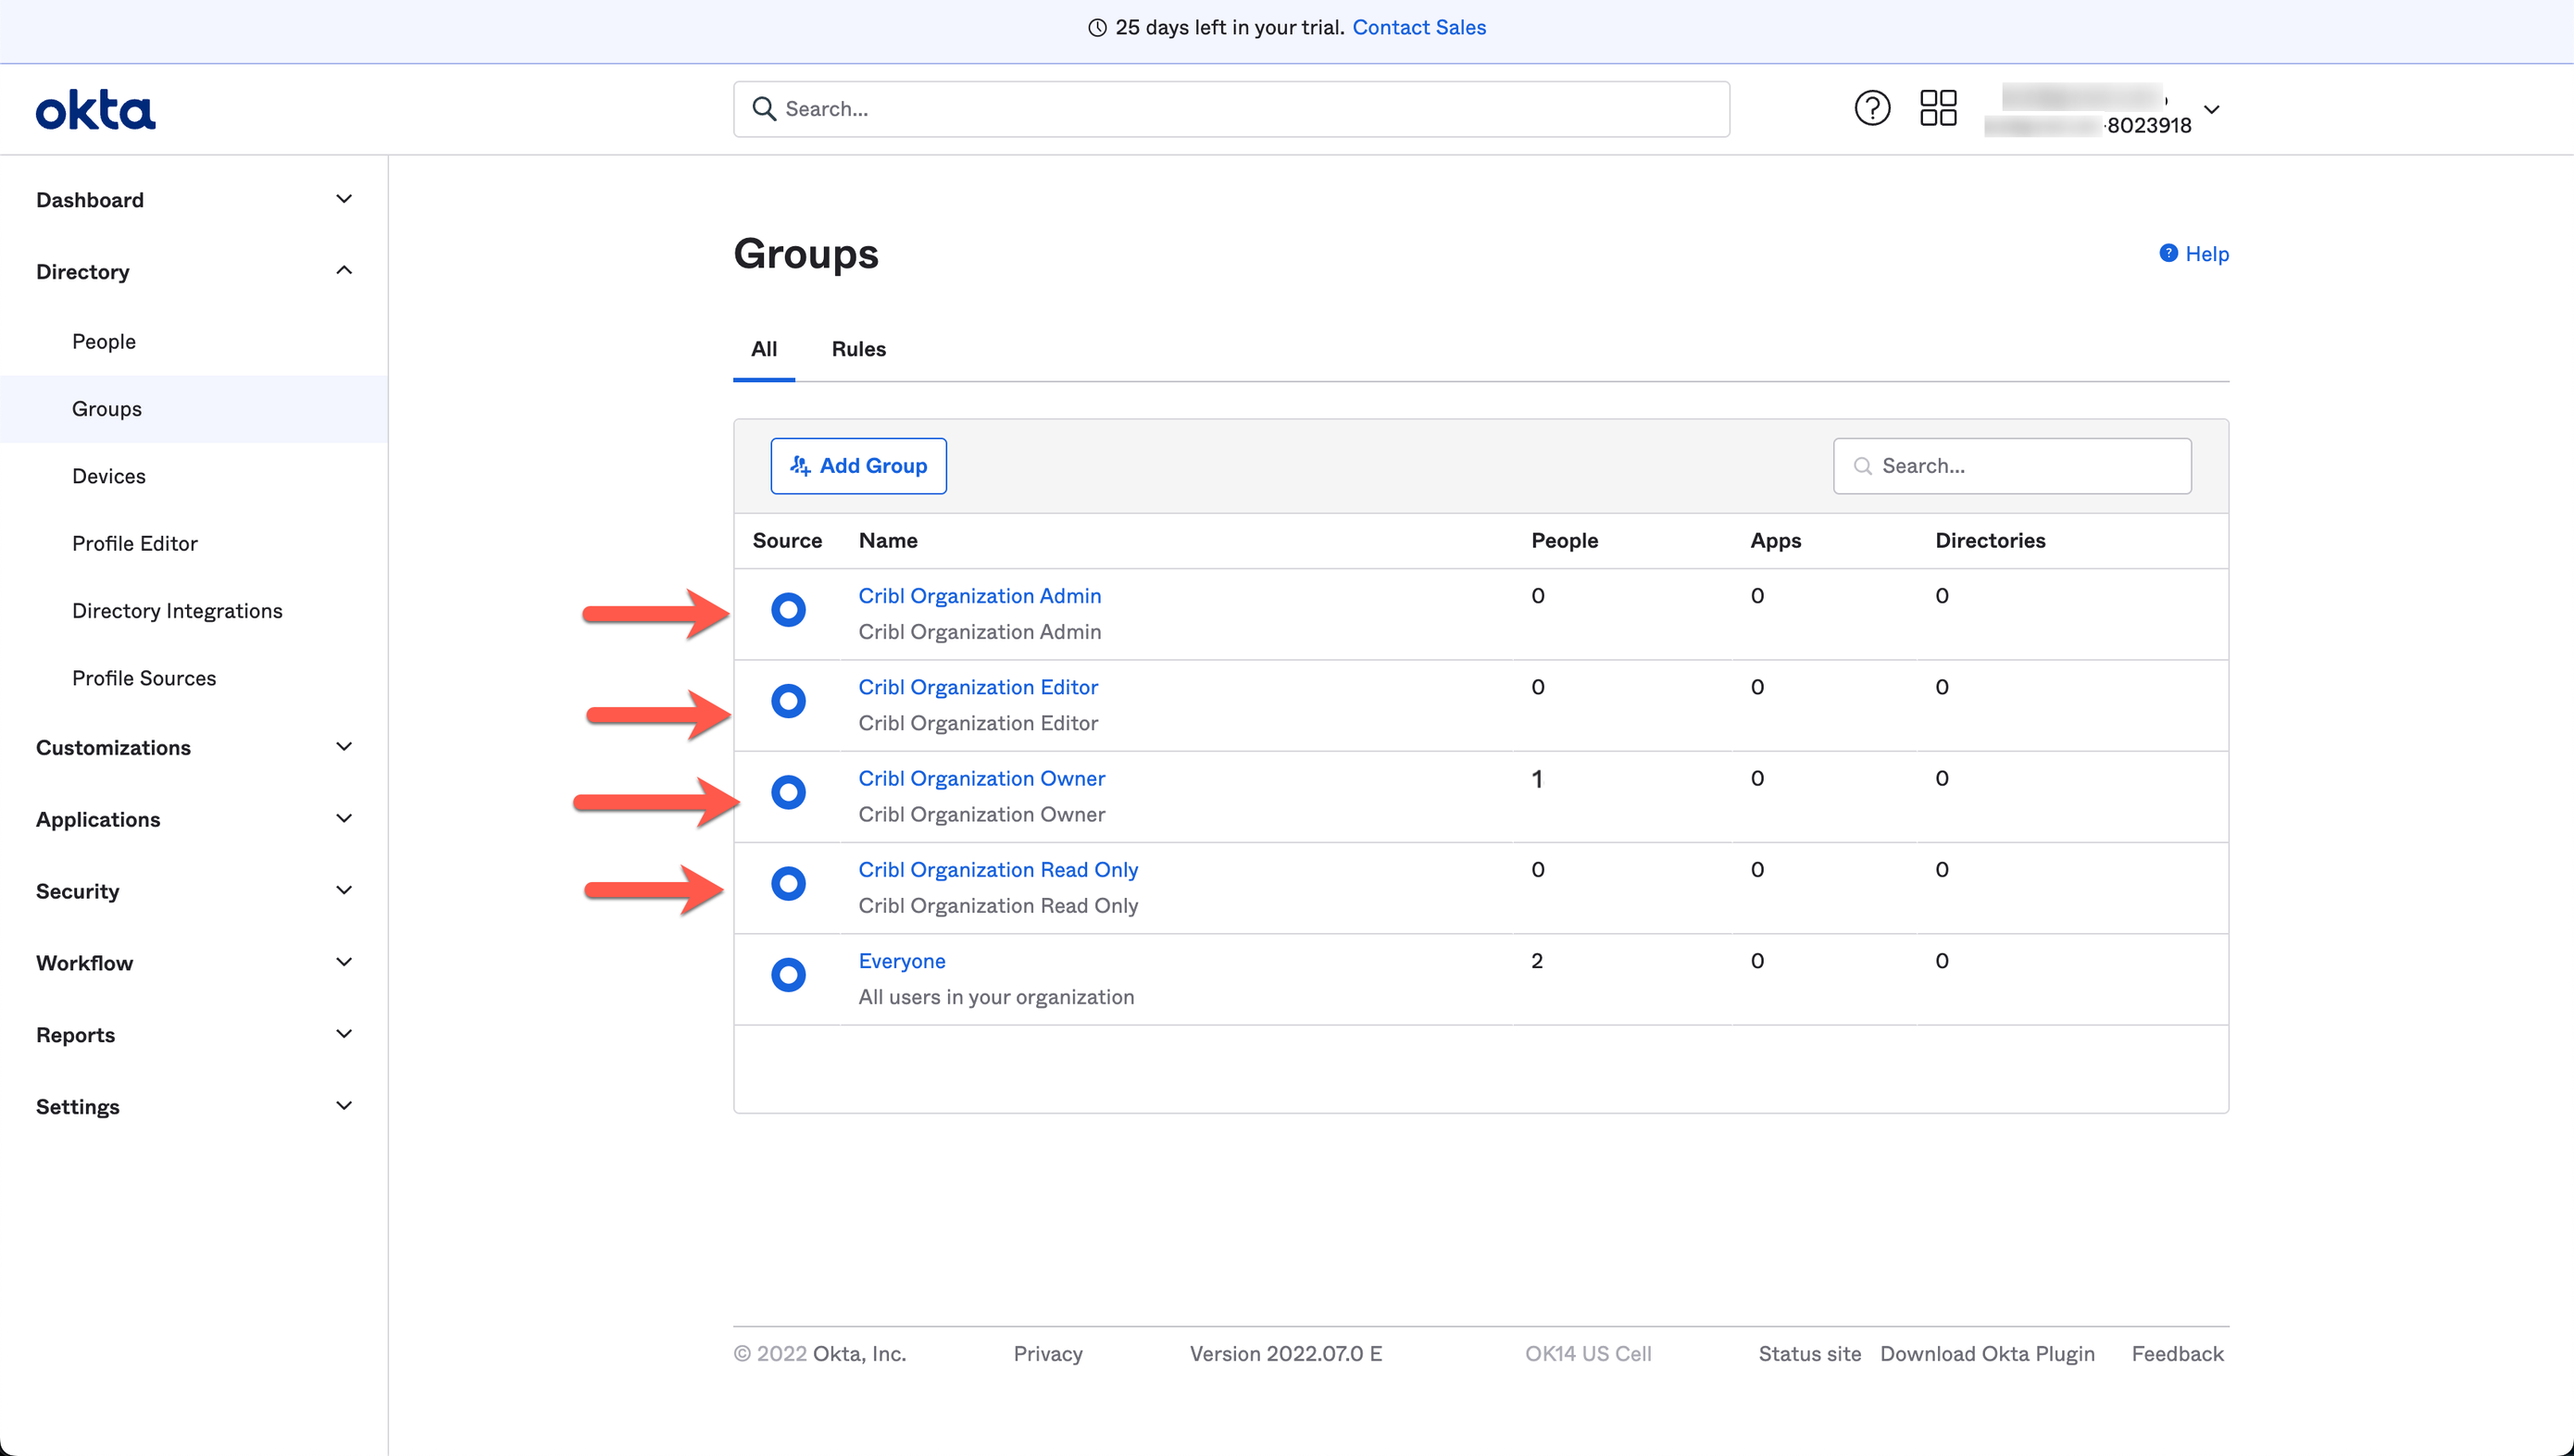
Here’s an example of how groups configuration (at an early stage) might look in Okta’s UI:
OIDC/Okta Setup Example
This section expands on the above overview for OIDC, offering a detailed walkthrough with Okta as the example IDP.
As mentioned above, Cribl.Cloud supports only OIDC backchannel authentication, not front-channel.
Create OIDC App Integration
To create your app integration within Okta, start here:
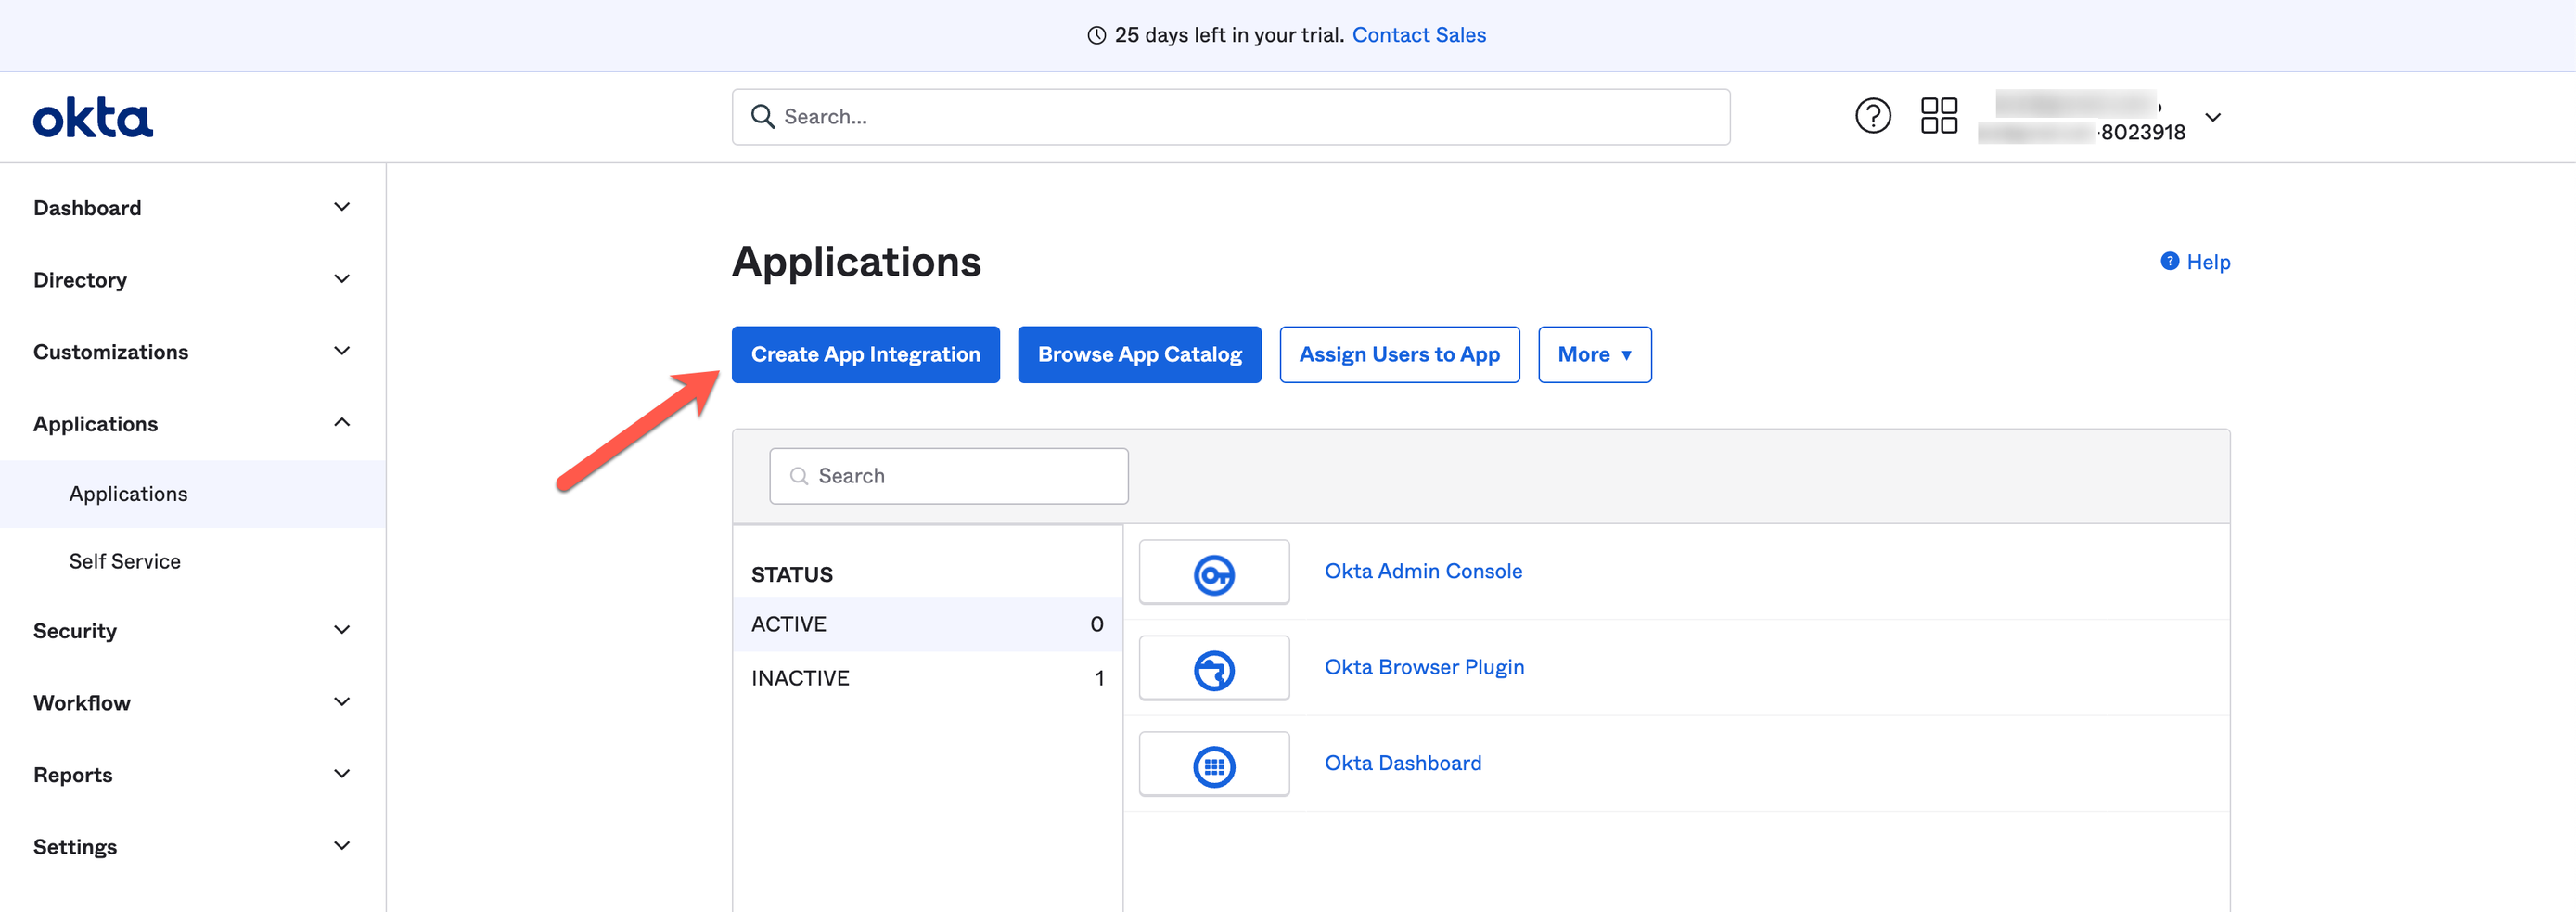
Next, configure the app integration with the options below.
- Sign-in method:
OIDC - OpenID Connect - Application type:
Web Application

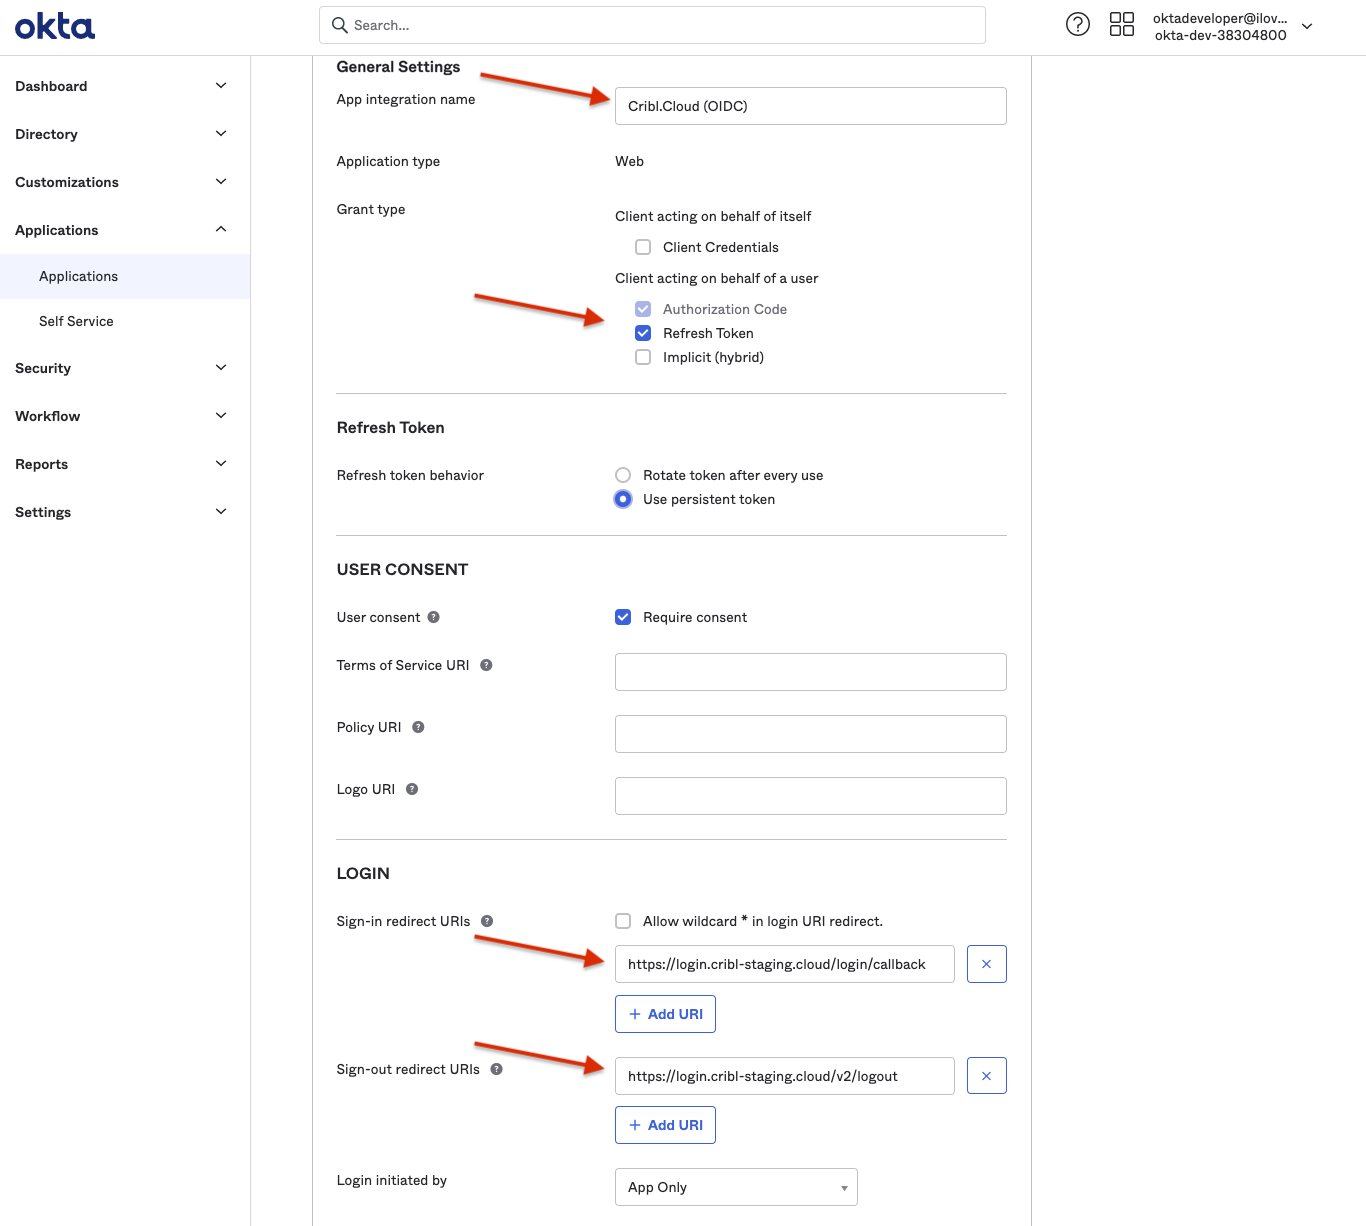
General Settings
Configure the app integration’s General Settings with the options below.
- App Integration Name:
Cribl.Cloud - Sign-In Redirect URIs: https://login.cribl.cloud/login/callback
- Sign-Out Redirect URIs: https://login.cribl.cloud/v2/logout
- Grant Type:
Authorization Code,Refresh Token - Scopes:
openid profile email groups
If your IDP is PingOne, you must also configure this (non-Okta) option:
- Authentication Options:
Allow Client Secret
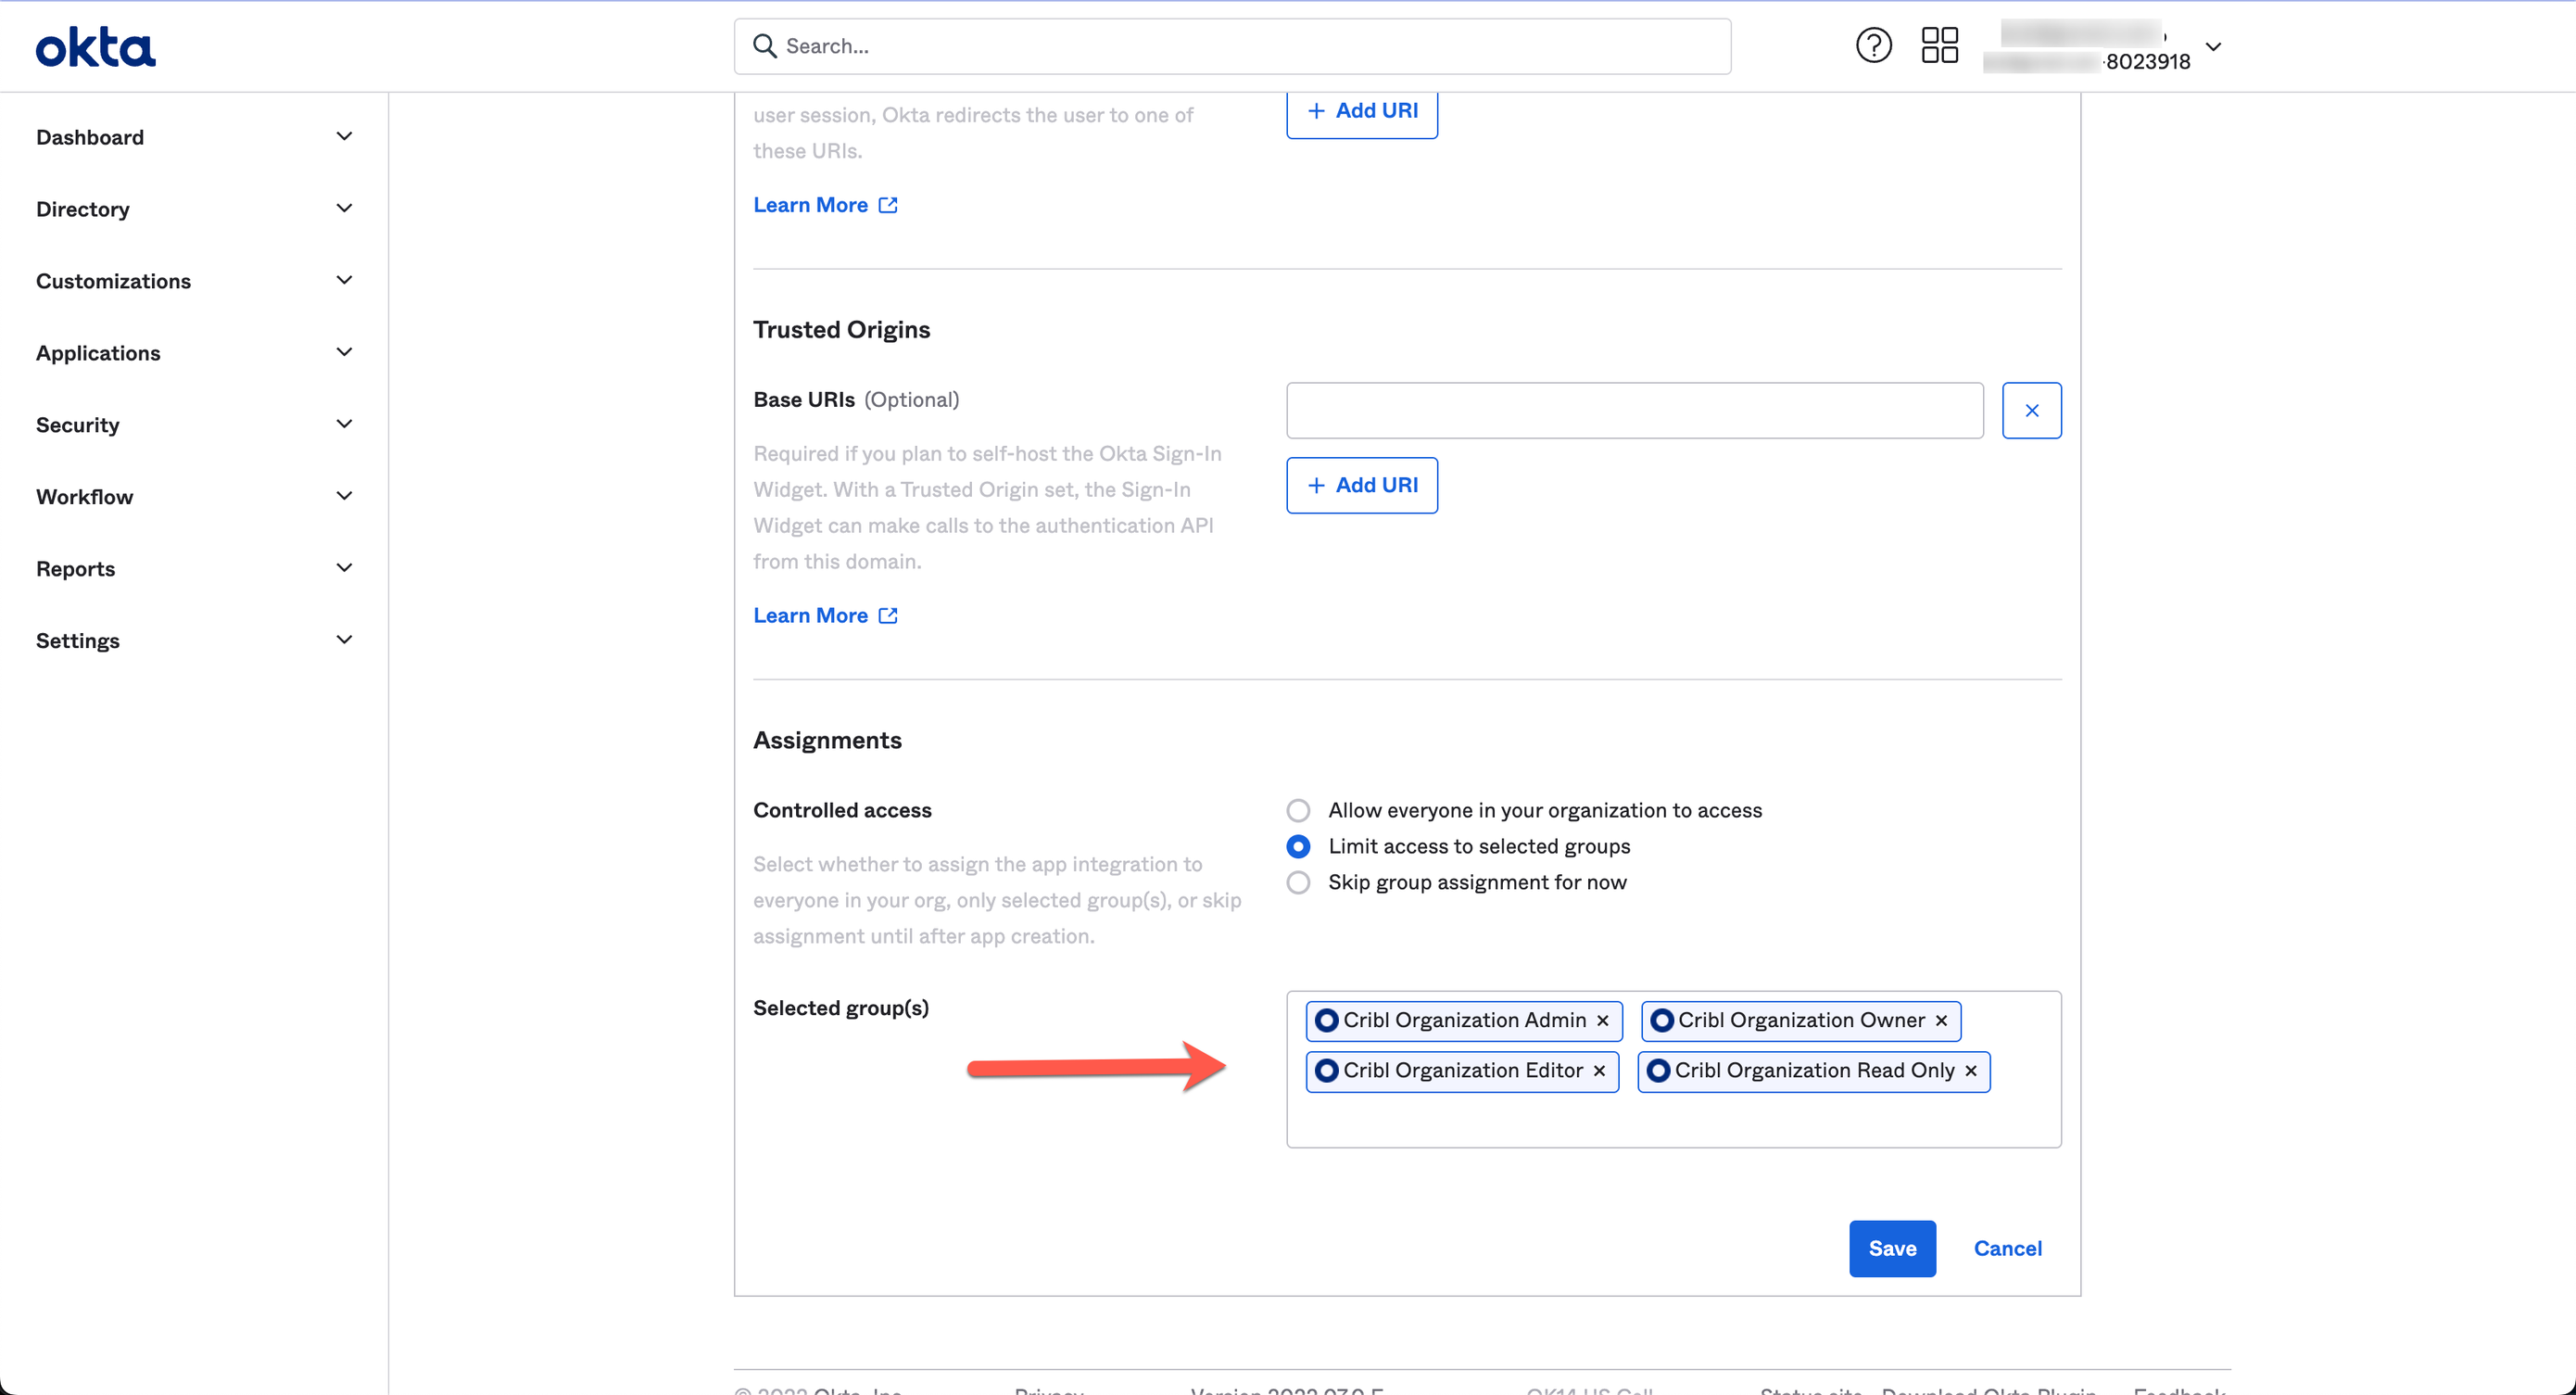
Assignments
Configure the Assignments pane with the options below.
- Controlled access:
Limited access to selected groups - Selected groups: <The groups you mapped earlier in Configuring Groups>
Sign-On Tab
Edit the OpenID Connect ID Token section, as shown here:

Set the Groups claim filter to: groups : Starts with : Cribl, as shown below:
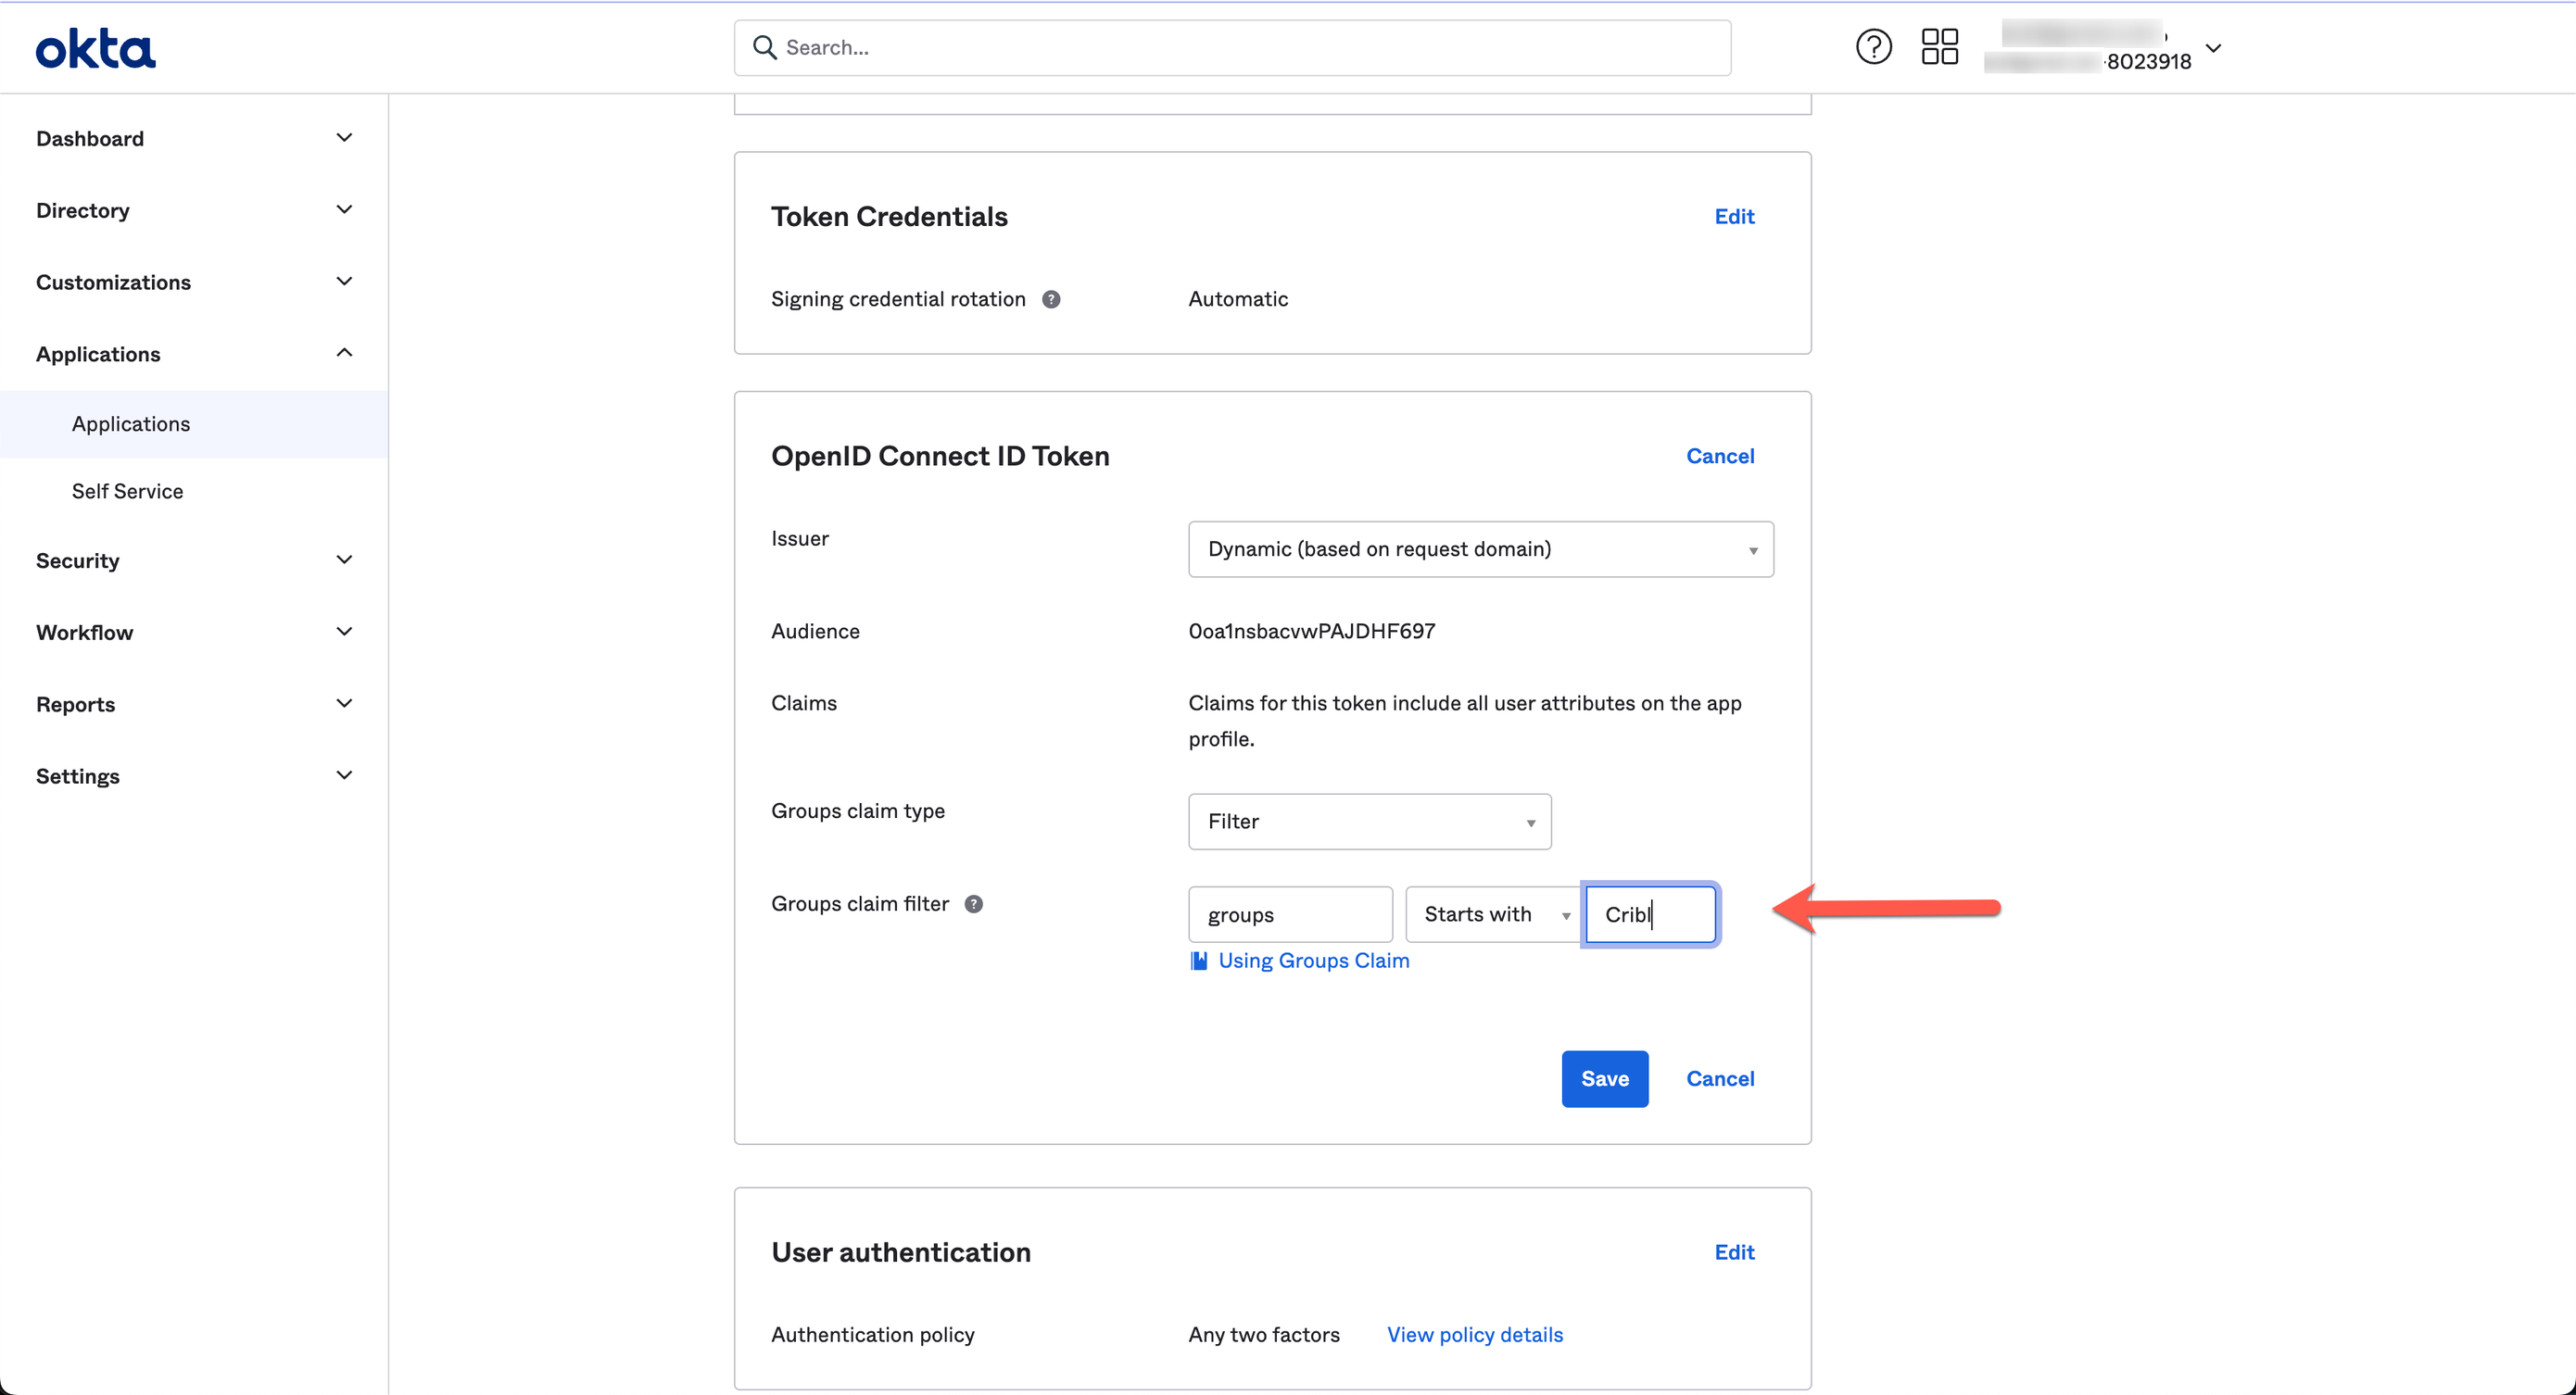
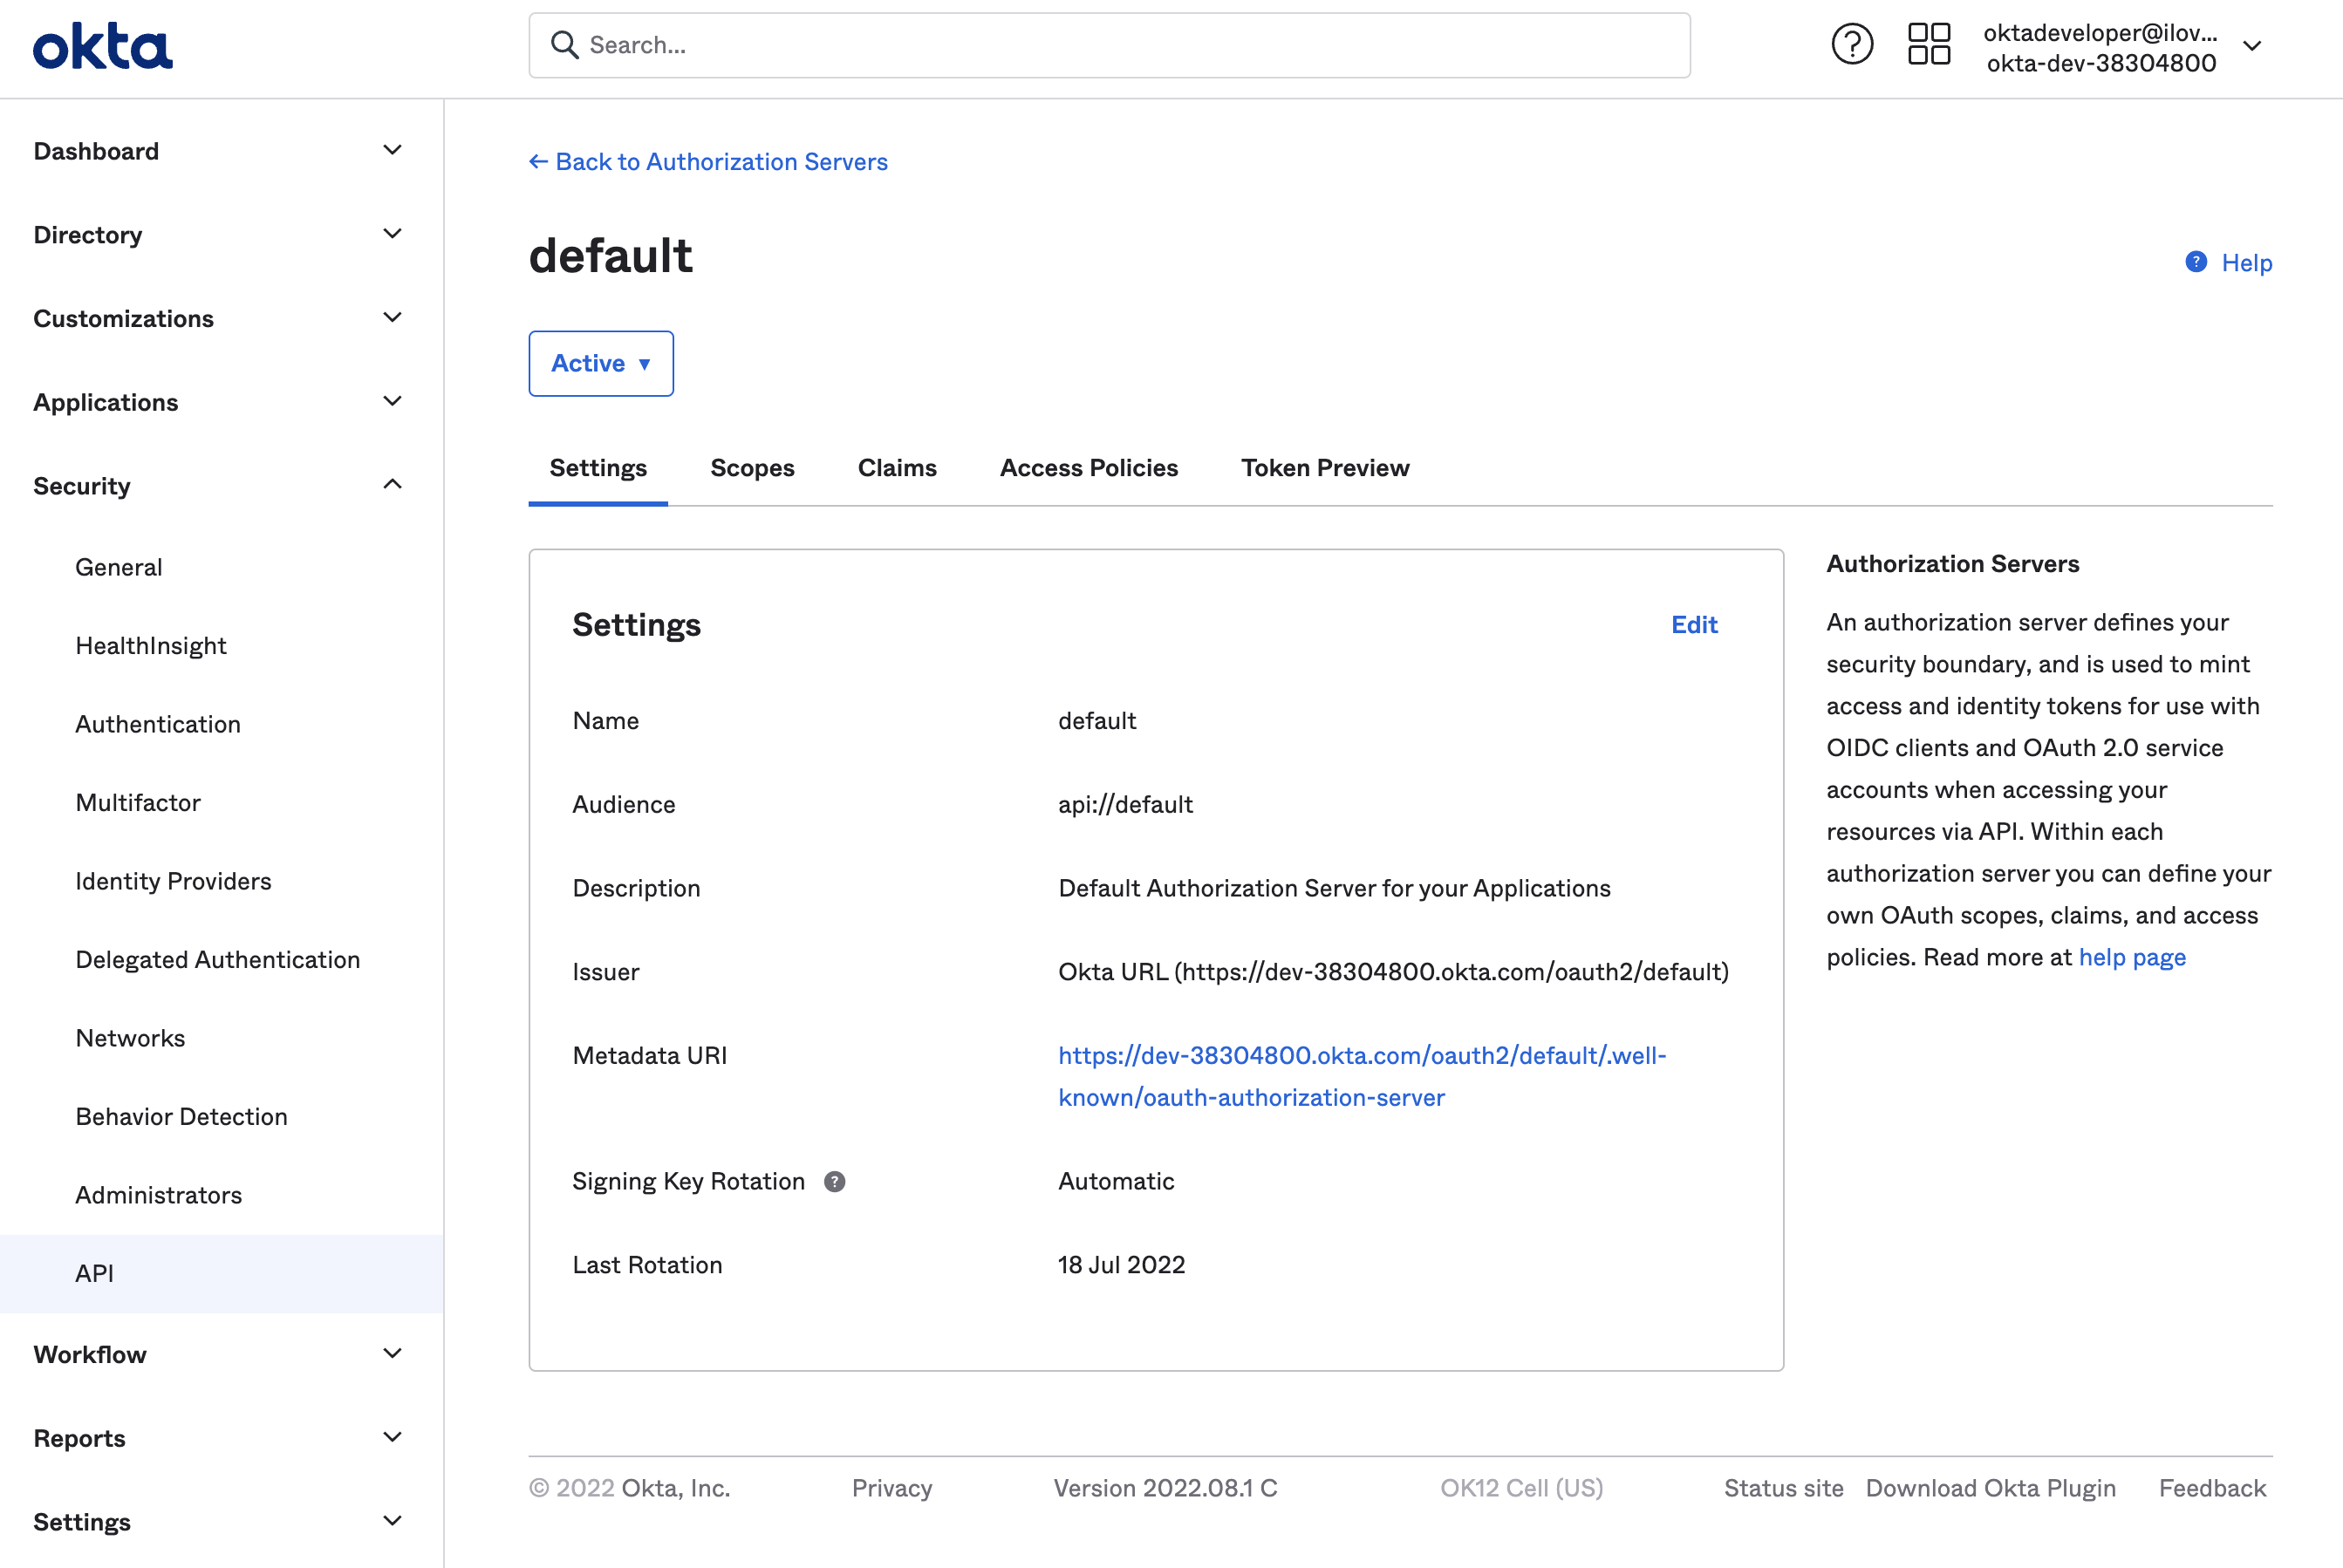
Change the Issuer from Dynamic to Okta URL, to get the Issuer URL to provide to Cribl in the next section:
Submit Your App Info to Cribl
This concludes the setup you need to do in Okta (or other IDP). Next, provide Cribl essential details about your application, to implement SSO setup on the Cribl side.
On your Cribl.Cloud portal’s Organization page > SSO tab, select the OIDC lower tab.
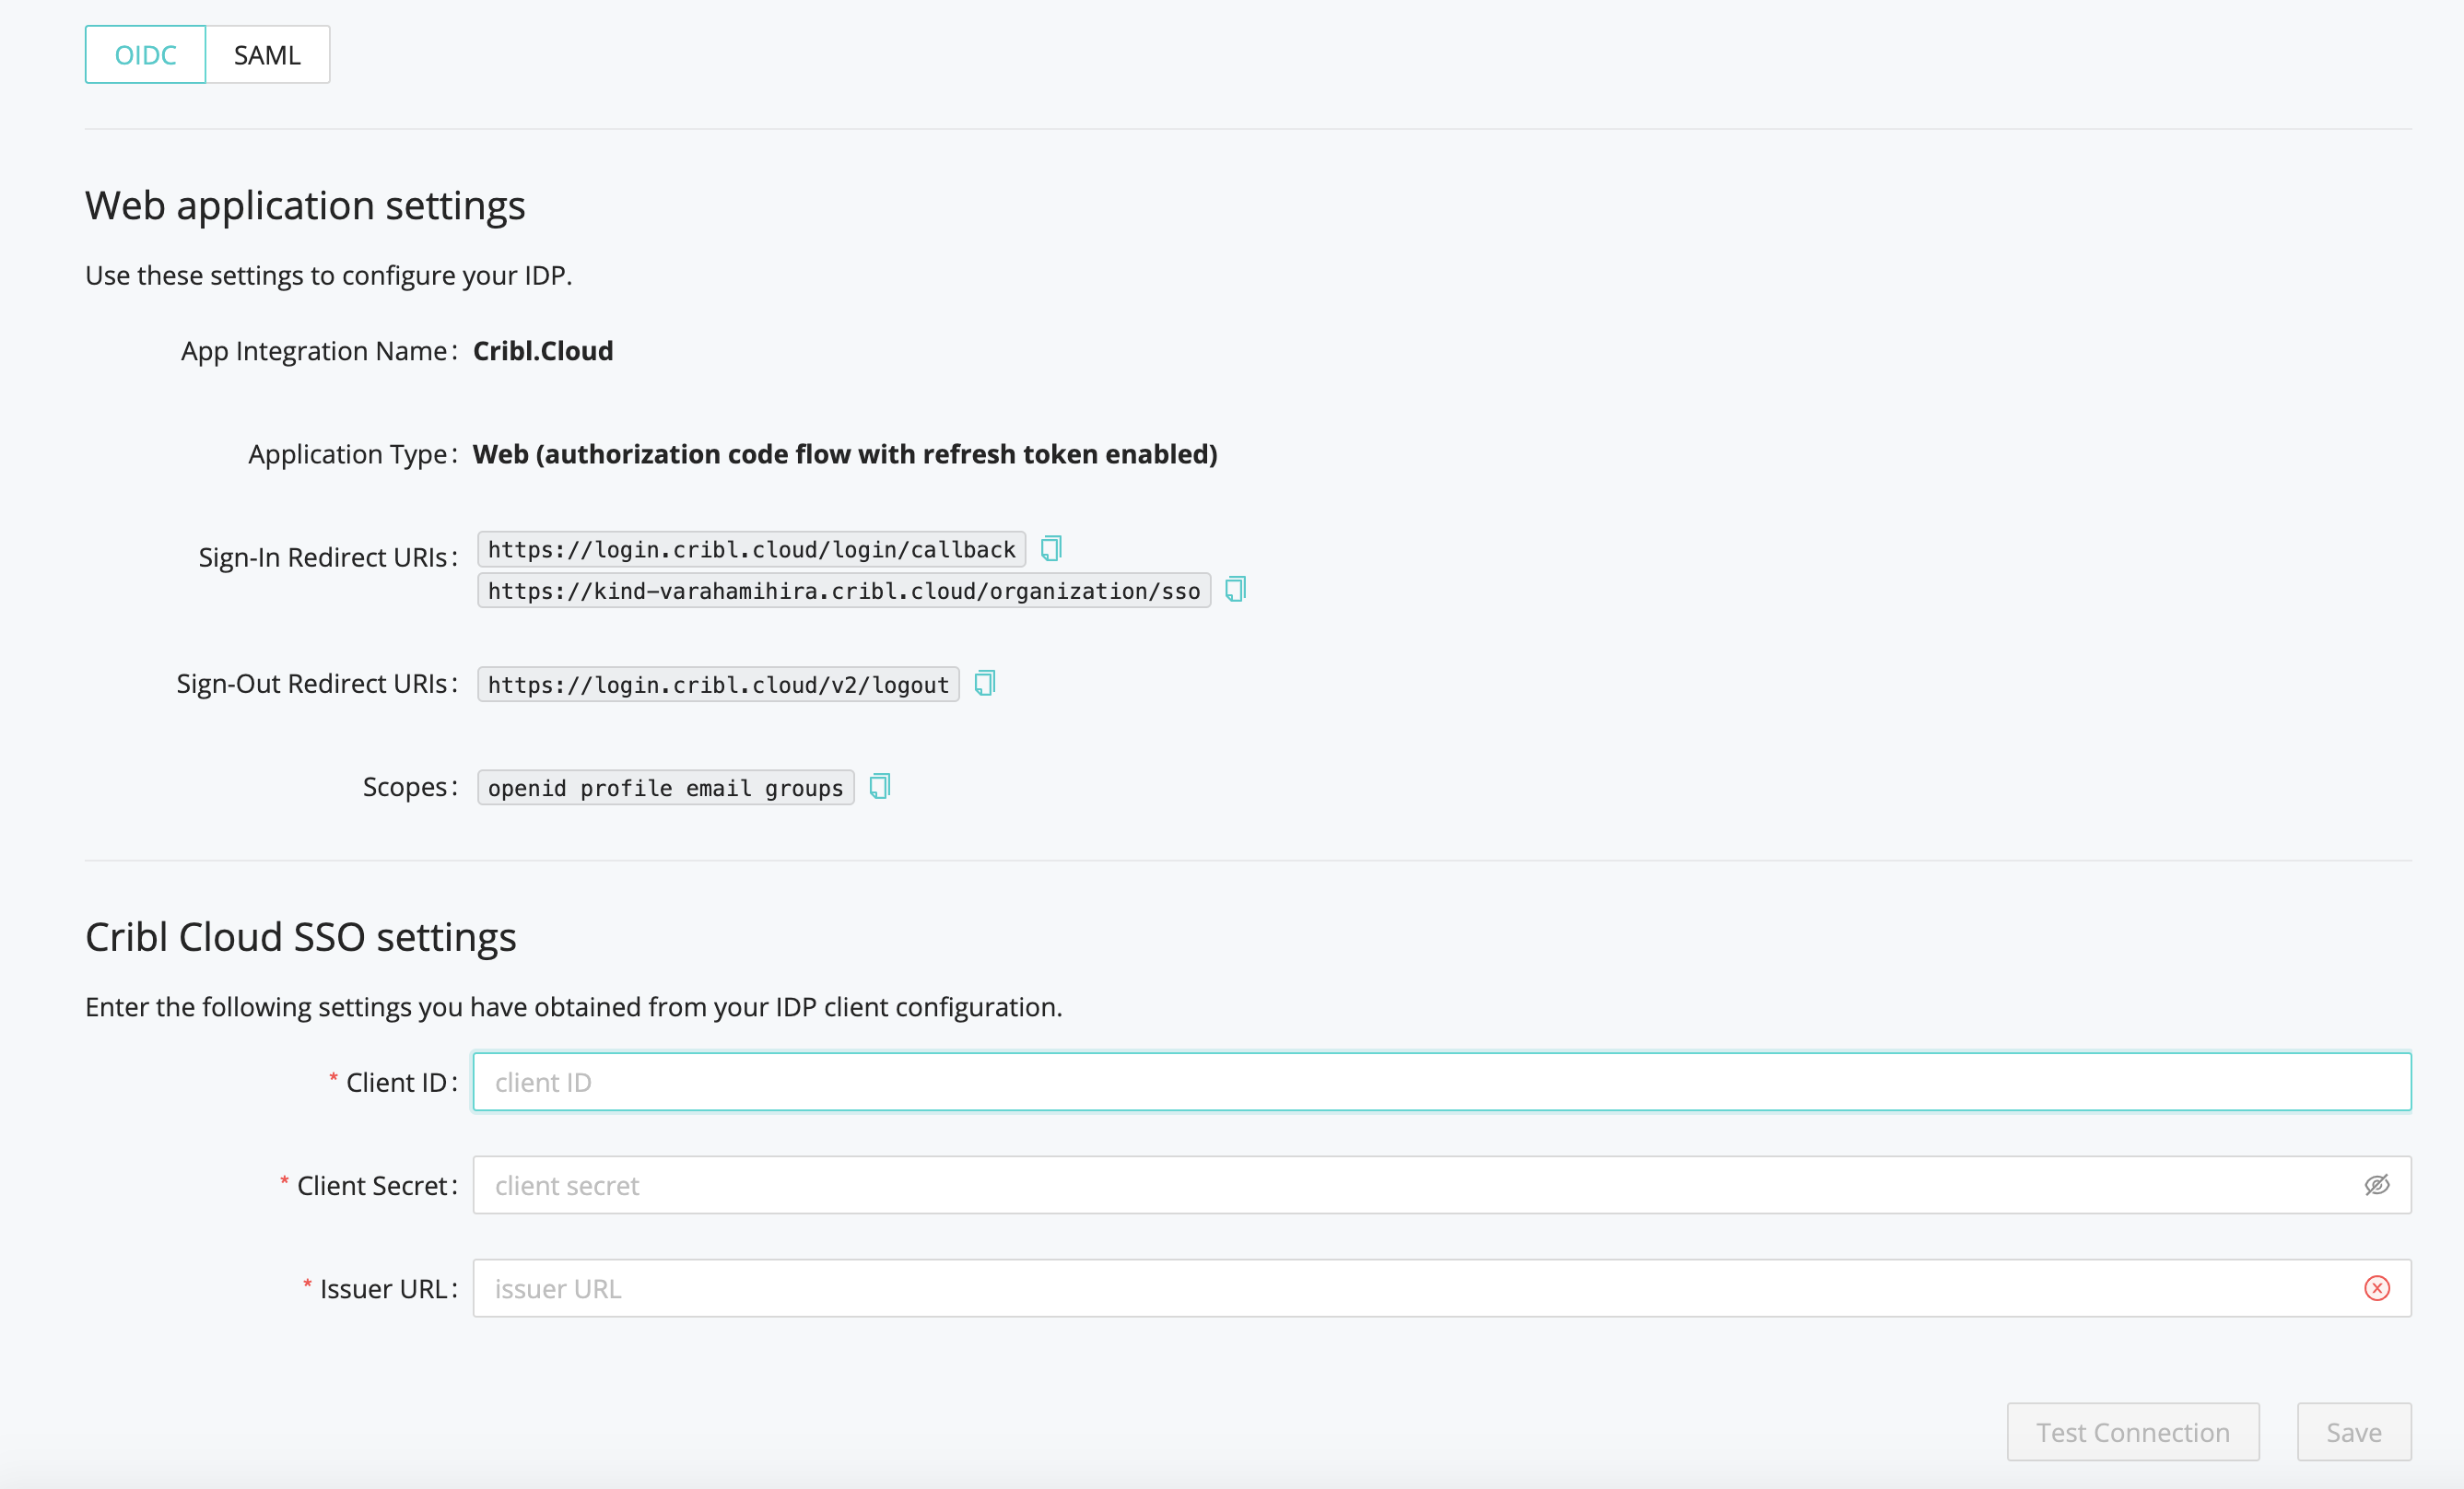
The Web Application Settings are prefilled for you, so you only need to fill in the Cribl Cloud SSO Settings section with the following details from your IDP client configuration:
- Client ID
- Client Secret
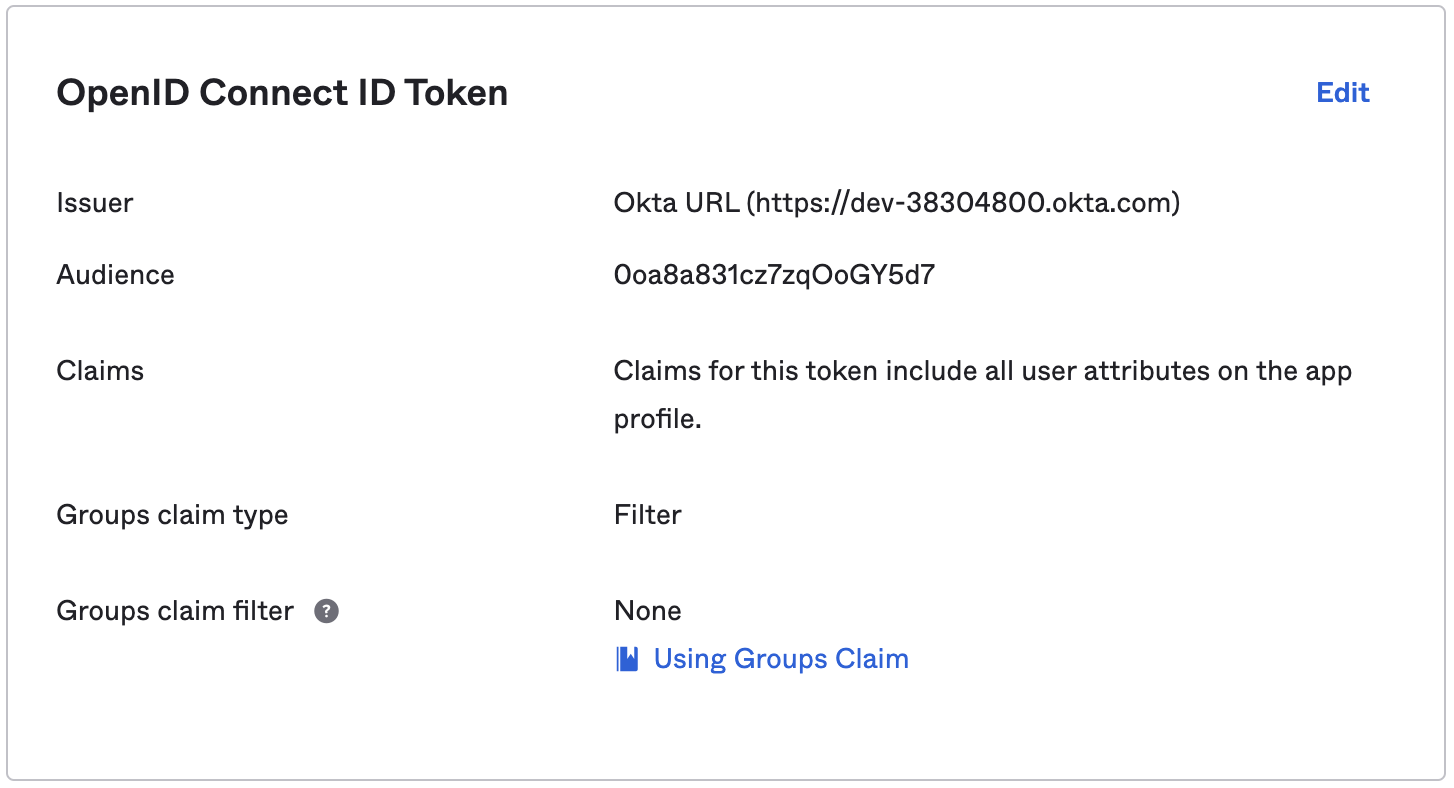
- Issuer URL. Make sure Issuer URL does not contain a trailing space.
Continuing with our Okta example, here’s where you’d copy the Issuer URL from your Okta app:
OIDC/Okta Chiclet Setup (Optional)
If you want to initiate login from your Okta instance with OIDC authentication configured, an Okta admin can configure an app integration as follows:
From Okta’s left nav, select the Applications page.
Find the OIDC application created earlier in the OIDC/Okta Setup Example.
Click that application, and select General Settings > Edit.
In the Initiate login URI field, enter
https://portal.cribl.cloud/login?connection=<organizationID>(where<organizationID>is your Cribl.Cloud Organization’s ID).
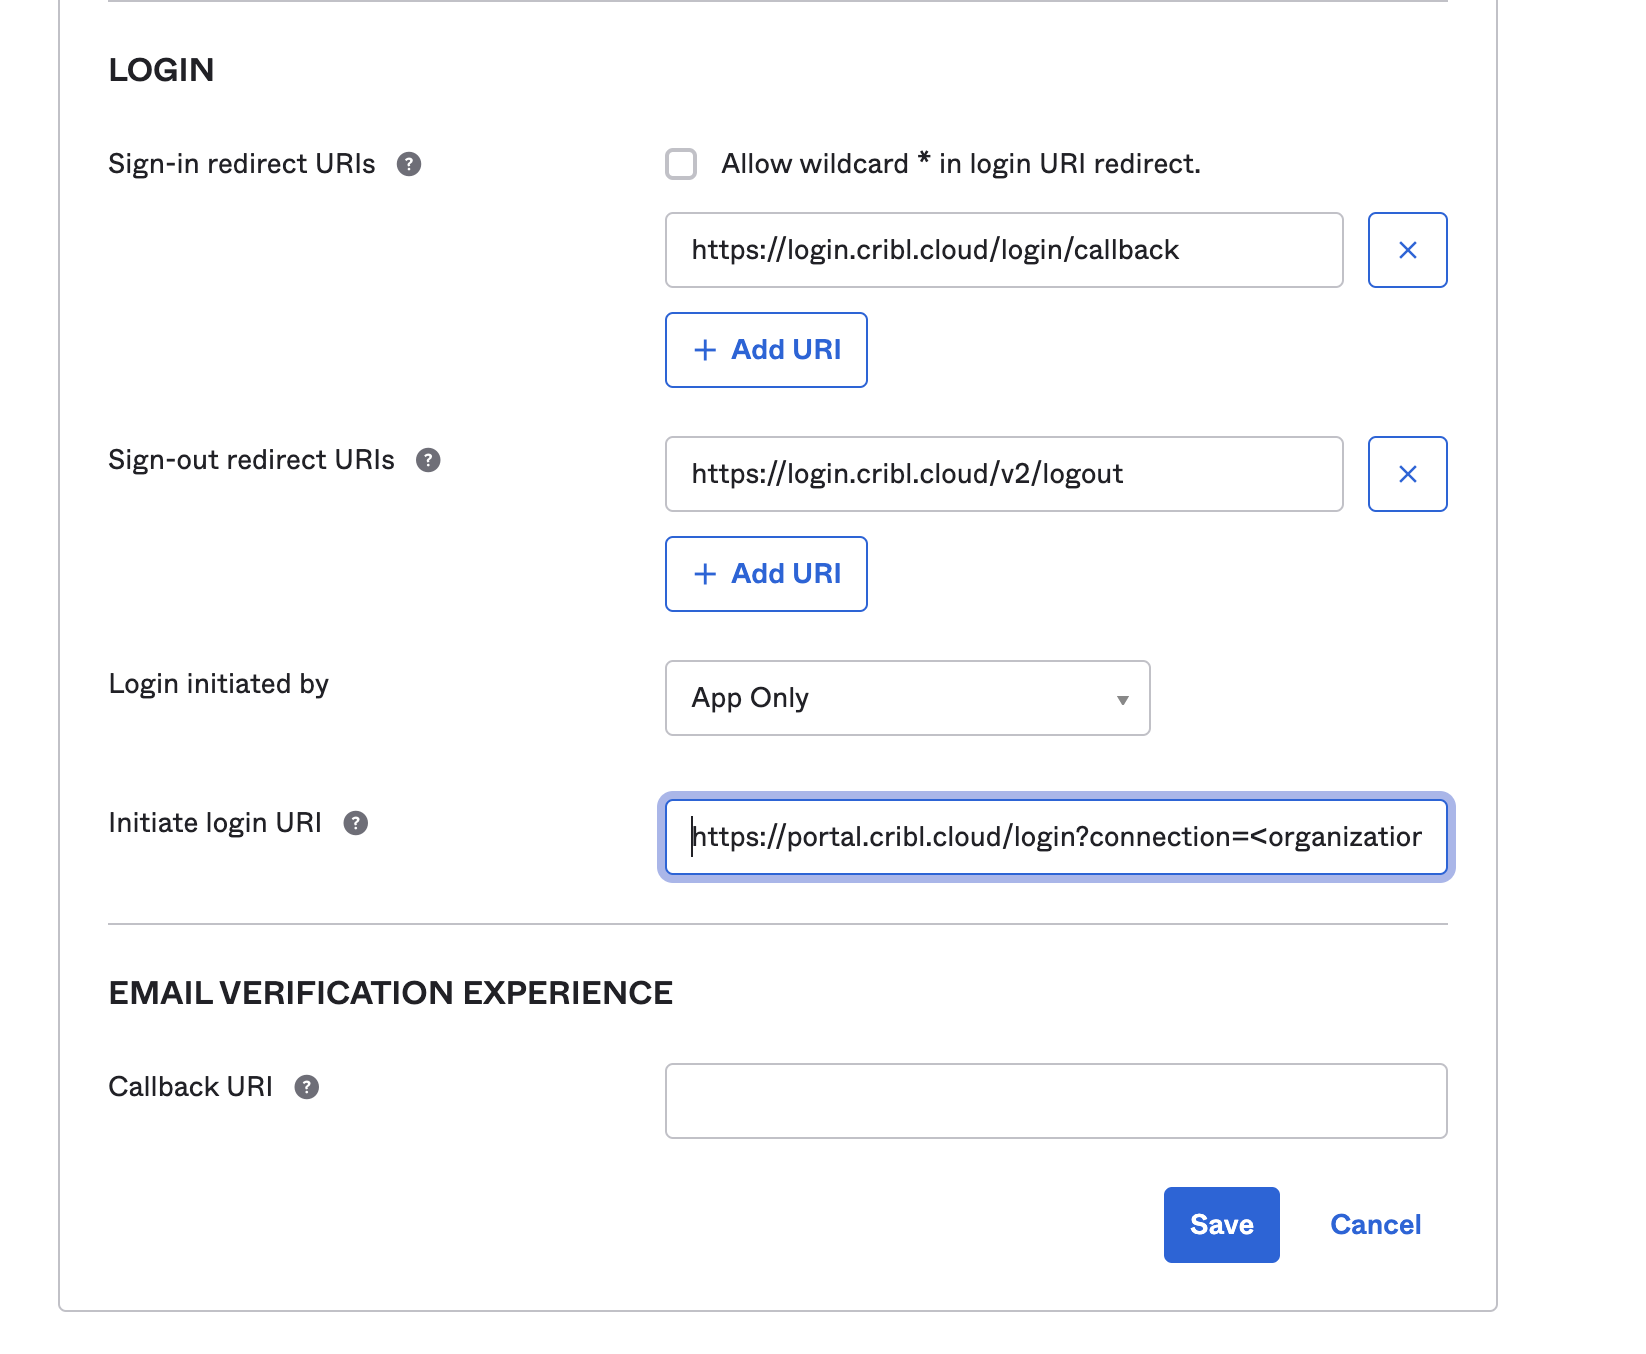
- Click Save to complete the chiclet.
SAML Setup Examples
This section outlines integrating SAML SSO with Cribl.Cloud. It includes examples of both Okta and Azure Active Directory integrations.
Okta/SAML
This example uses Okta as the identity provider (IDP).
Get URL and ID from Cribl
Cribl will provide the following information about your Cribl.Cloud Organization, to include in the SAML application that you create in your IDP:
Assertion Consumer Service URL.
Okta calls this a “Single sign-on URL,” and this is the first of two URLs that your Cribl Organization’s SSO > SAML tab lists under the same label. Example:
https://login.cribl.cloud/login/callback?connection=<$organizationID>Test SSO URL.
Required to test your connection. Okta accepts this under “Other Requestable SSO URLs,” and this is the second URL that your SSO > SAML tab lists under “Single sign-on URL.” Example:
https://<$organizationID>.cribl.cloud/api/assertEntity ID.
Okta calls this an “Audience URI (SP Entity ID),” and your SSO > SAML tab calls it just an “Audience URI.” Example:
urn:auth0:cribl-cloud-prod:<$organizationID>
Create SAML 2.0 App Integration
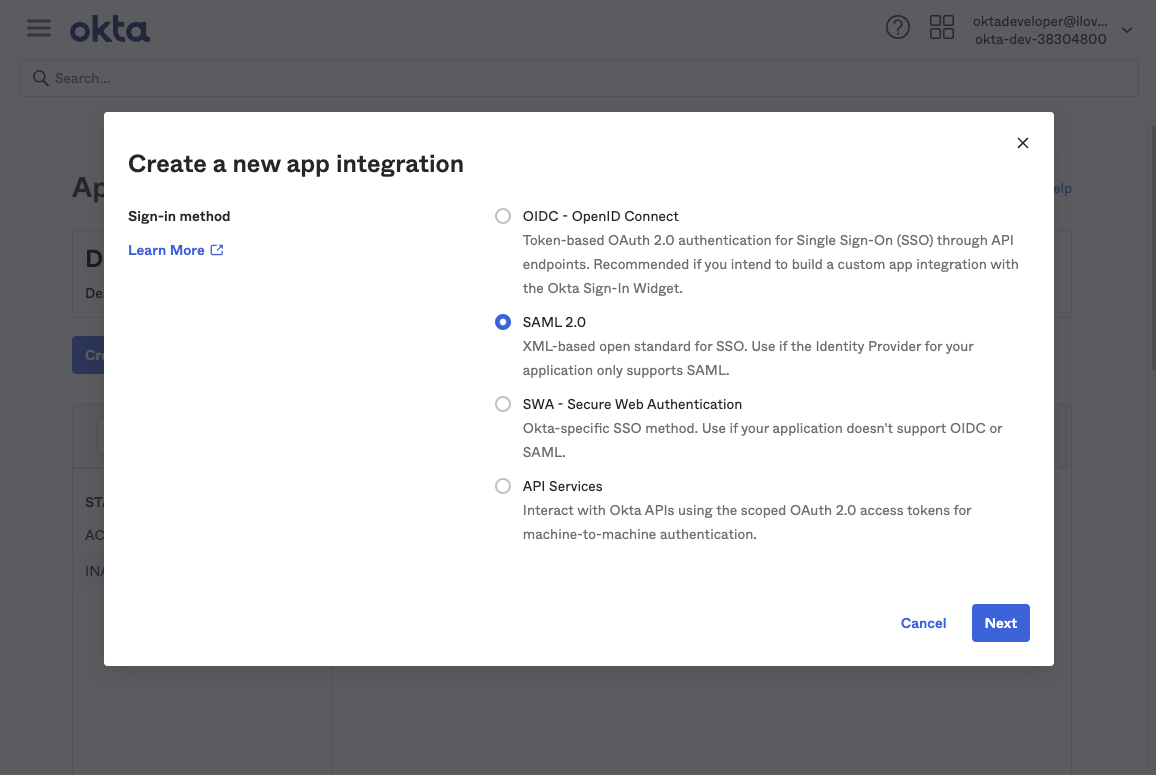
Using Okta as our example, create a SAML app integration. Start here:
Next, create the app integration with Sign-in method: SAML 2.0.
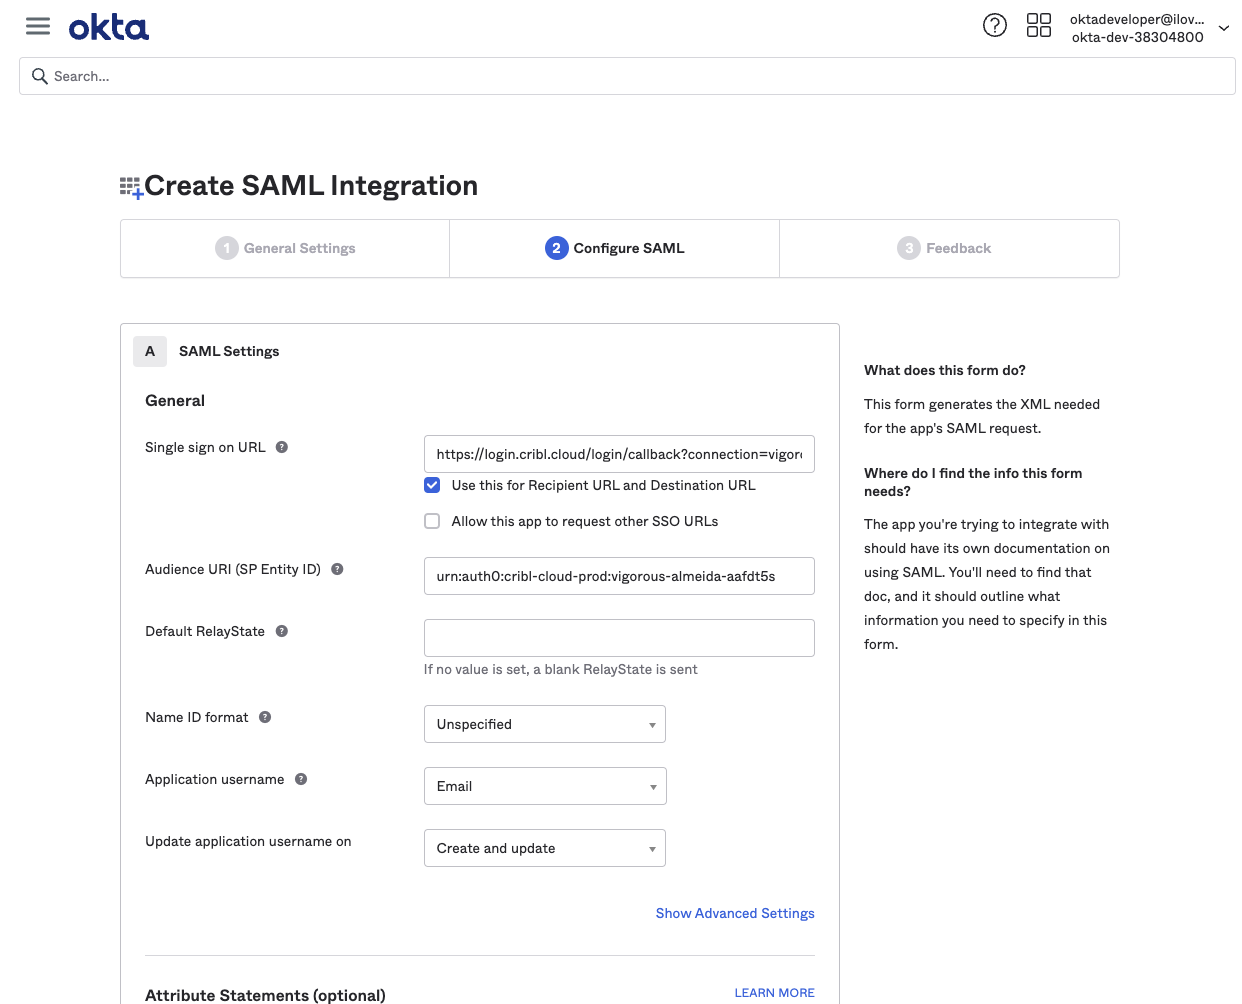
Configure SAML Settings
In the app integration SAML Settings section, configure the following options.
Single sign-on URL (Assertion Consumer Service URL):
https://login.cribl.cloud/login/callback?connection=<$organizationID>Audience URI (SP Entity ID):
urn:auth0:cribl-cloud-prod:<$organizationID>Application username:
EmailThe
nameidentifierassertion in SAML responses must be the user’sEmail.
Next, click the SAML Settings section’s ‘Show Advanced Settings link. Then navigate down to configure a single row of Other Requestable SSO URLs, as follows:
URL: From your Cribl.Cloud Organization’s SSO > SAML tab, this is the second Single sign-on URL. It will be in this format:
https://<$organizationID>.cribl.cloud/api/assertIndex: Set this to
0.

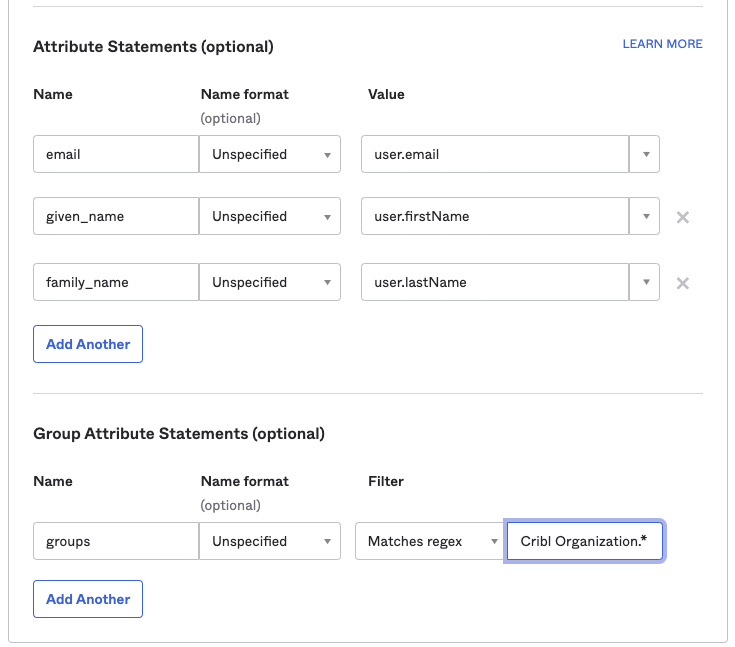
Configure Attribute Statements
Configure Attribute Statements for these attributes, as shown below. Then save your app integration:
emailgiven_namefamily_namegroups
Submit Your App Info to Cribl
After you’ve created the SAML app integration in your IDP, provide Cribl essential metadata about your application, to implement SSO setup on the Cribl side.
On your Cribl.Cloud portal’s Organization page > SSO tab, select the SAML lower tab.
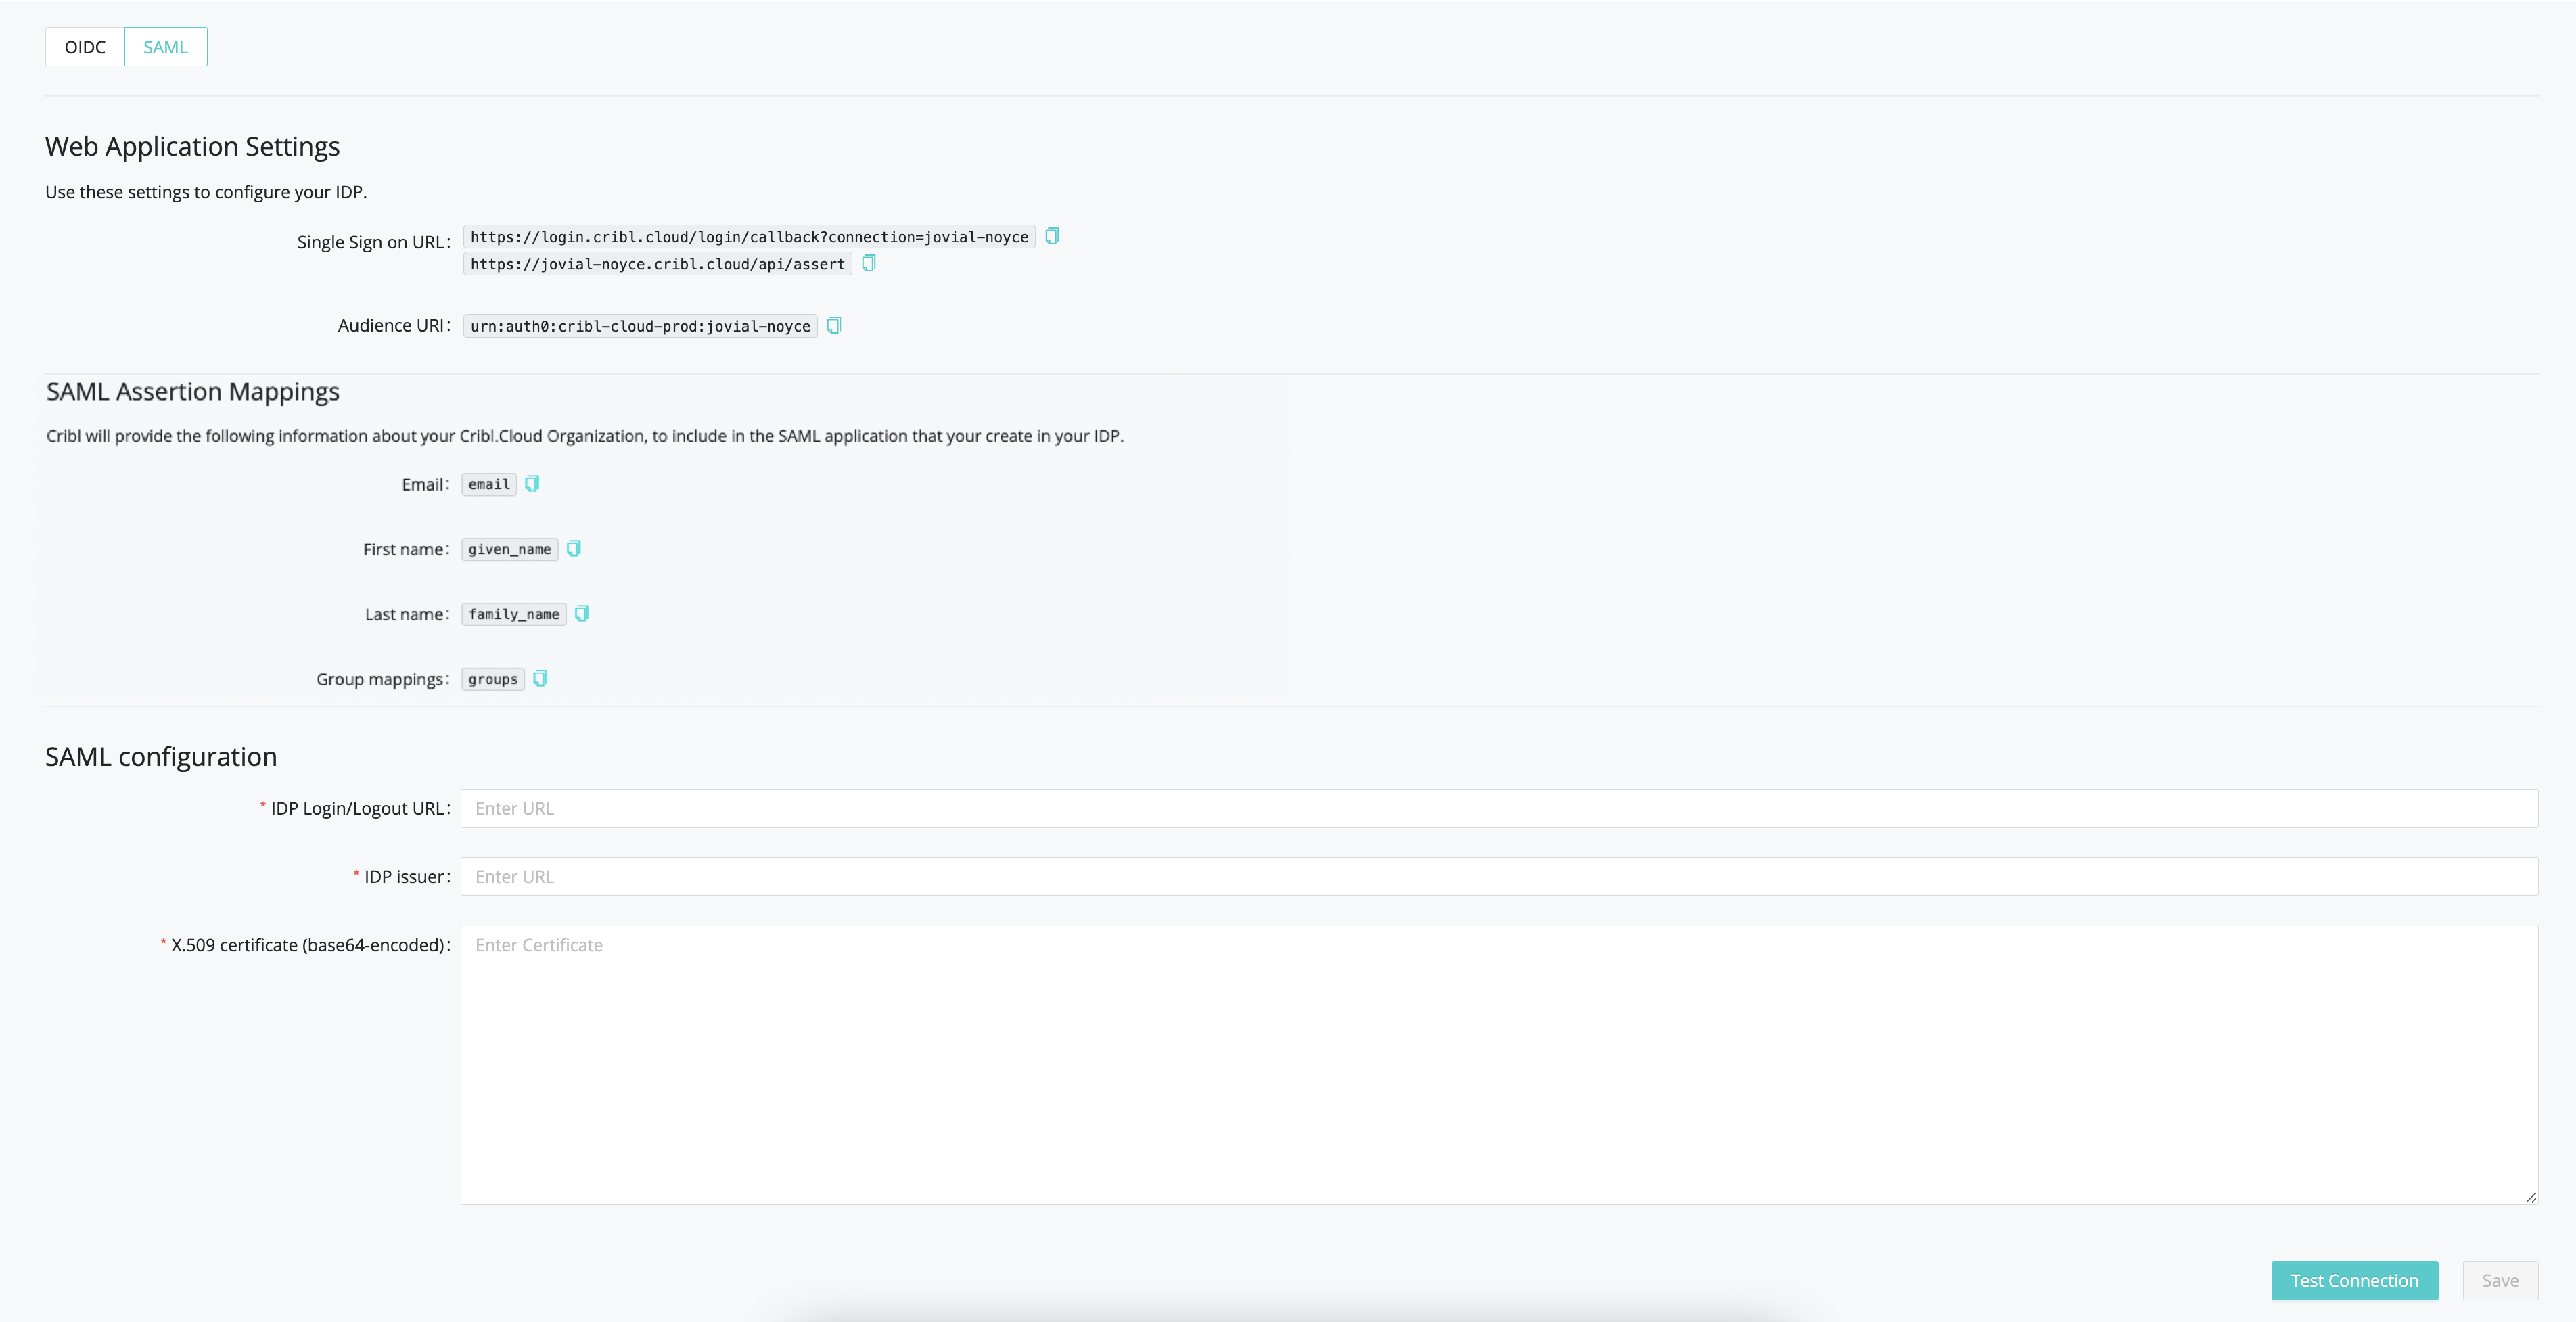
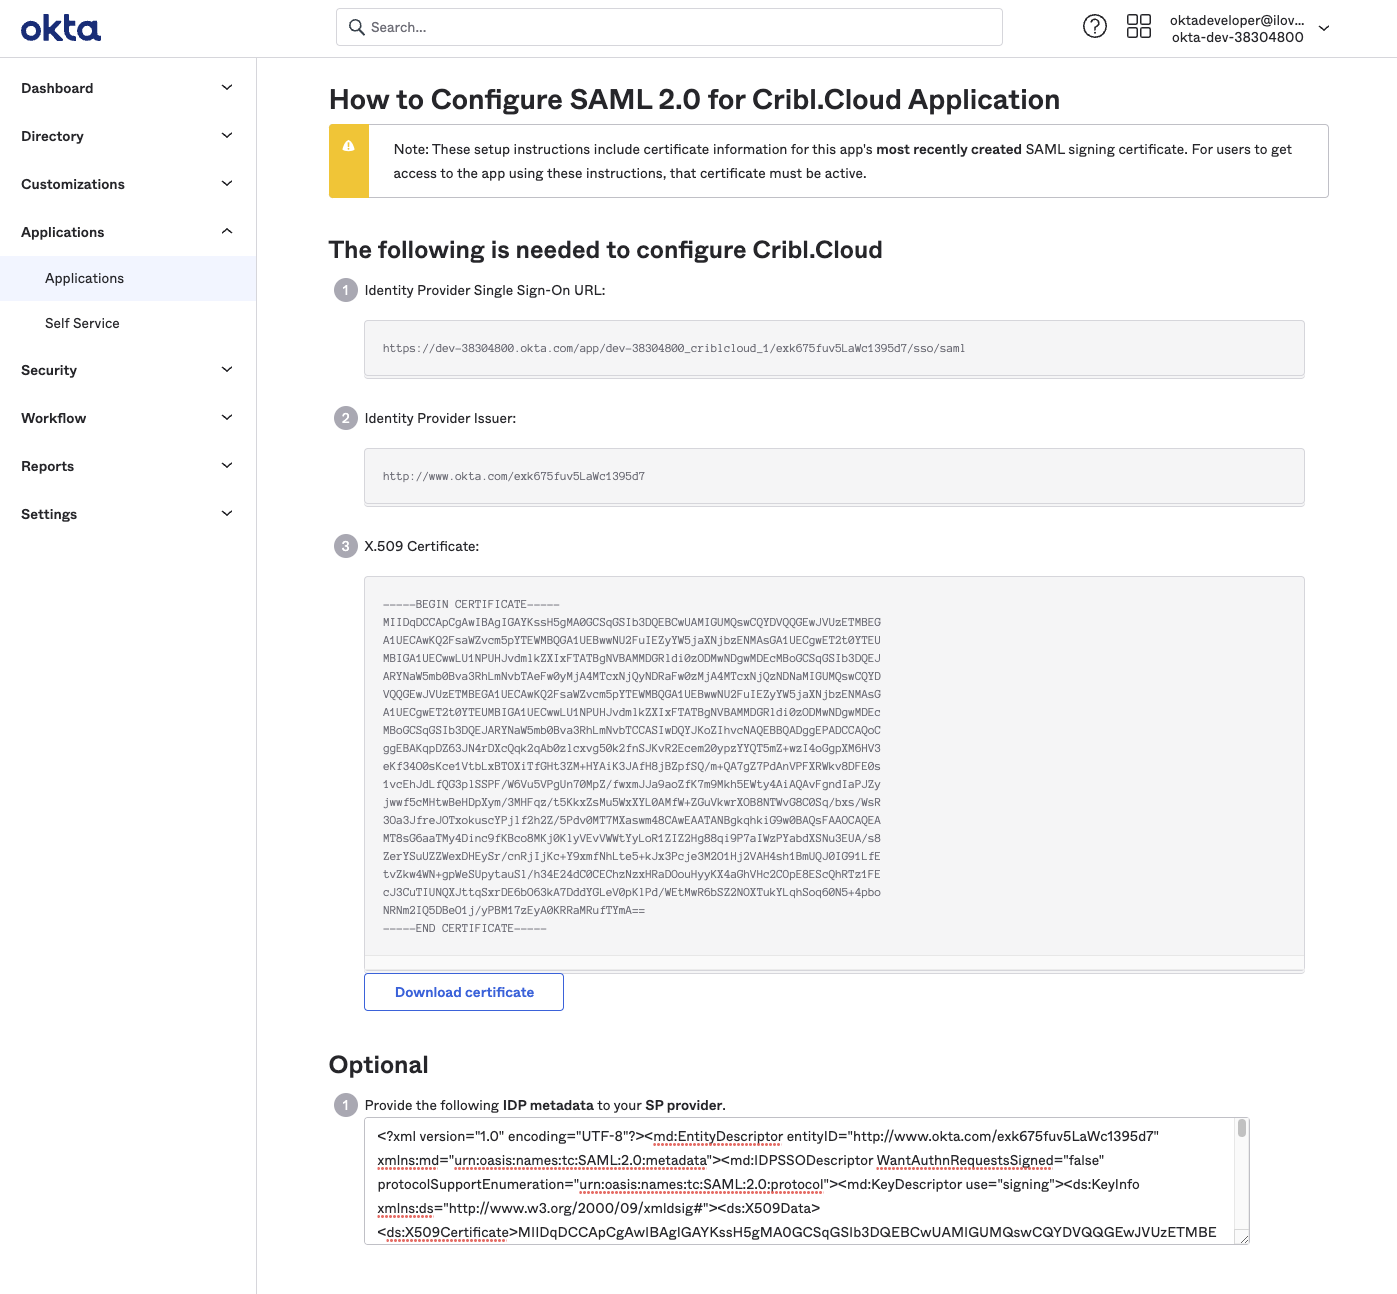
The Web Application Settings will be prefilled for you, and Cribl will also prefill the SAML Assertion Mappings based on the information you’ve registered with Cribl. So you only need to fill in the SAML Configuration section with the following details from your IDP client configuration:
- IDP SSO
- IDP Issuer
- X.509 Certificate
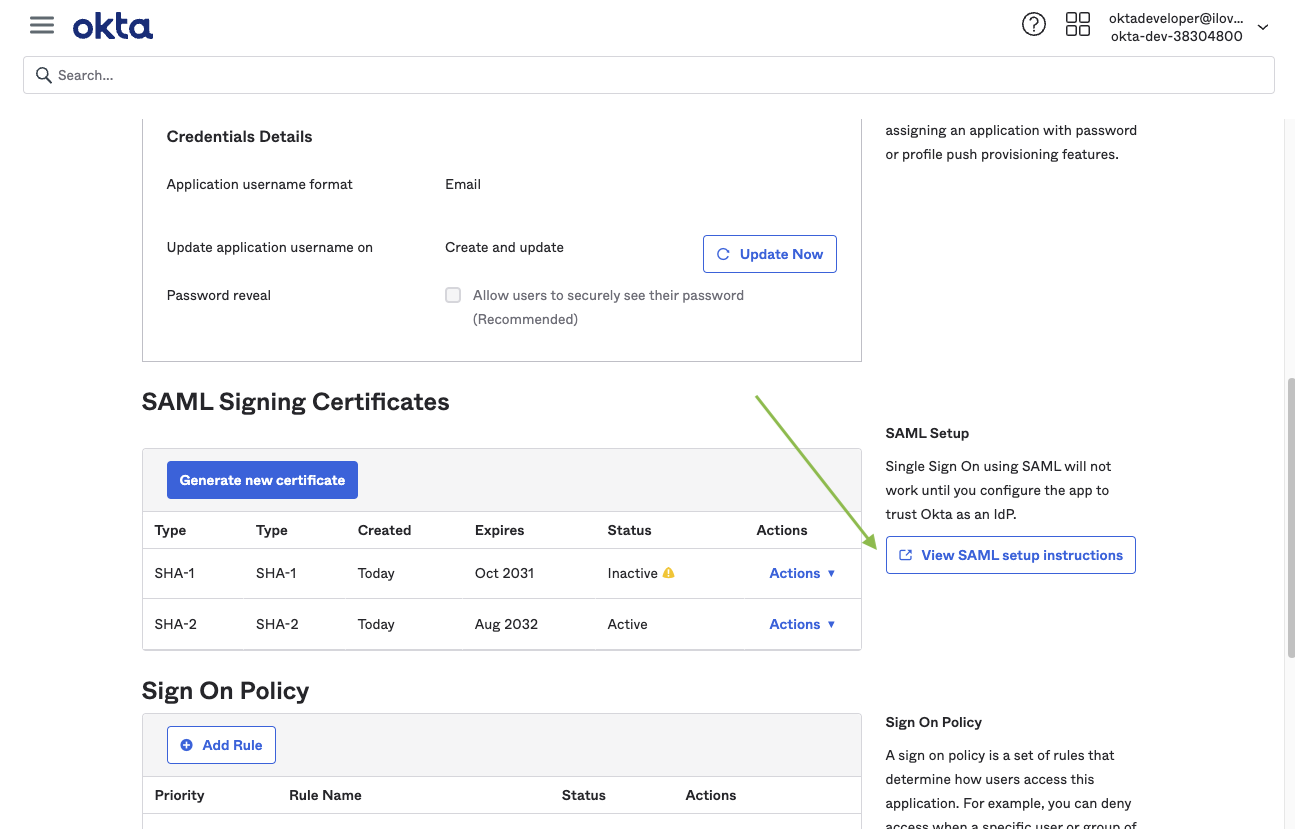
Continuing with our Okta example, these screenshots show how you’d export these metadata details from your Okta app:
SAML/Okta Chiclet Setup (Optional)
If you want to initiate login from your Okta instance with SAML authentication configured, an Okta admin can configure an app integration as follows:
From Okta’s left nav, select the Applications page.
Click Browse App Catalog.
From the resulting catalog, use the search bar to find and select the
Bookmark Appapplication.From that application’s page, click Add Integration.
On the General settings page, enter an Application label that will identify this app as supporting Cribl.Cloud login. (
Cribl.Cloudis a good choice, but the label is arbitrary.)In the URL field, enter
https://portal.cribl.cloud/login?connection=<organizationID>(where<organizationID>is your Cribl.Cloud Organization’s ID).
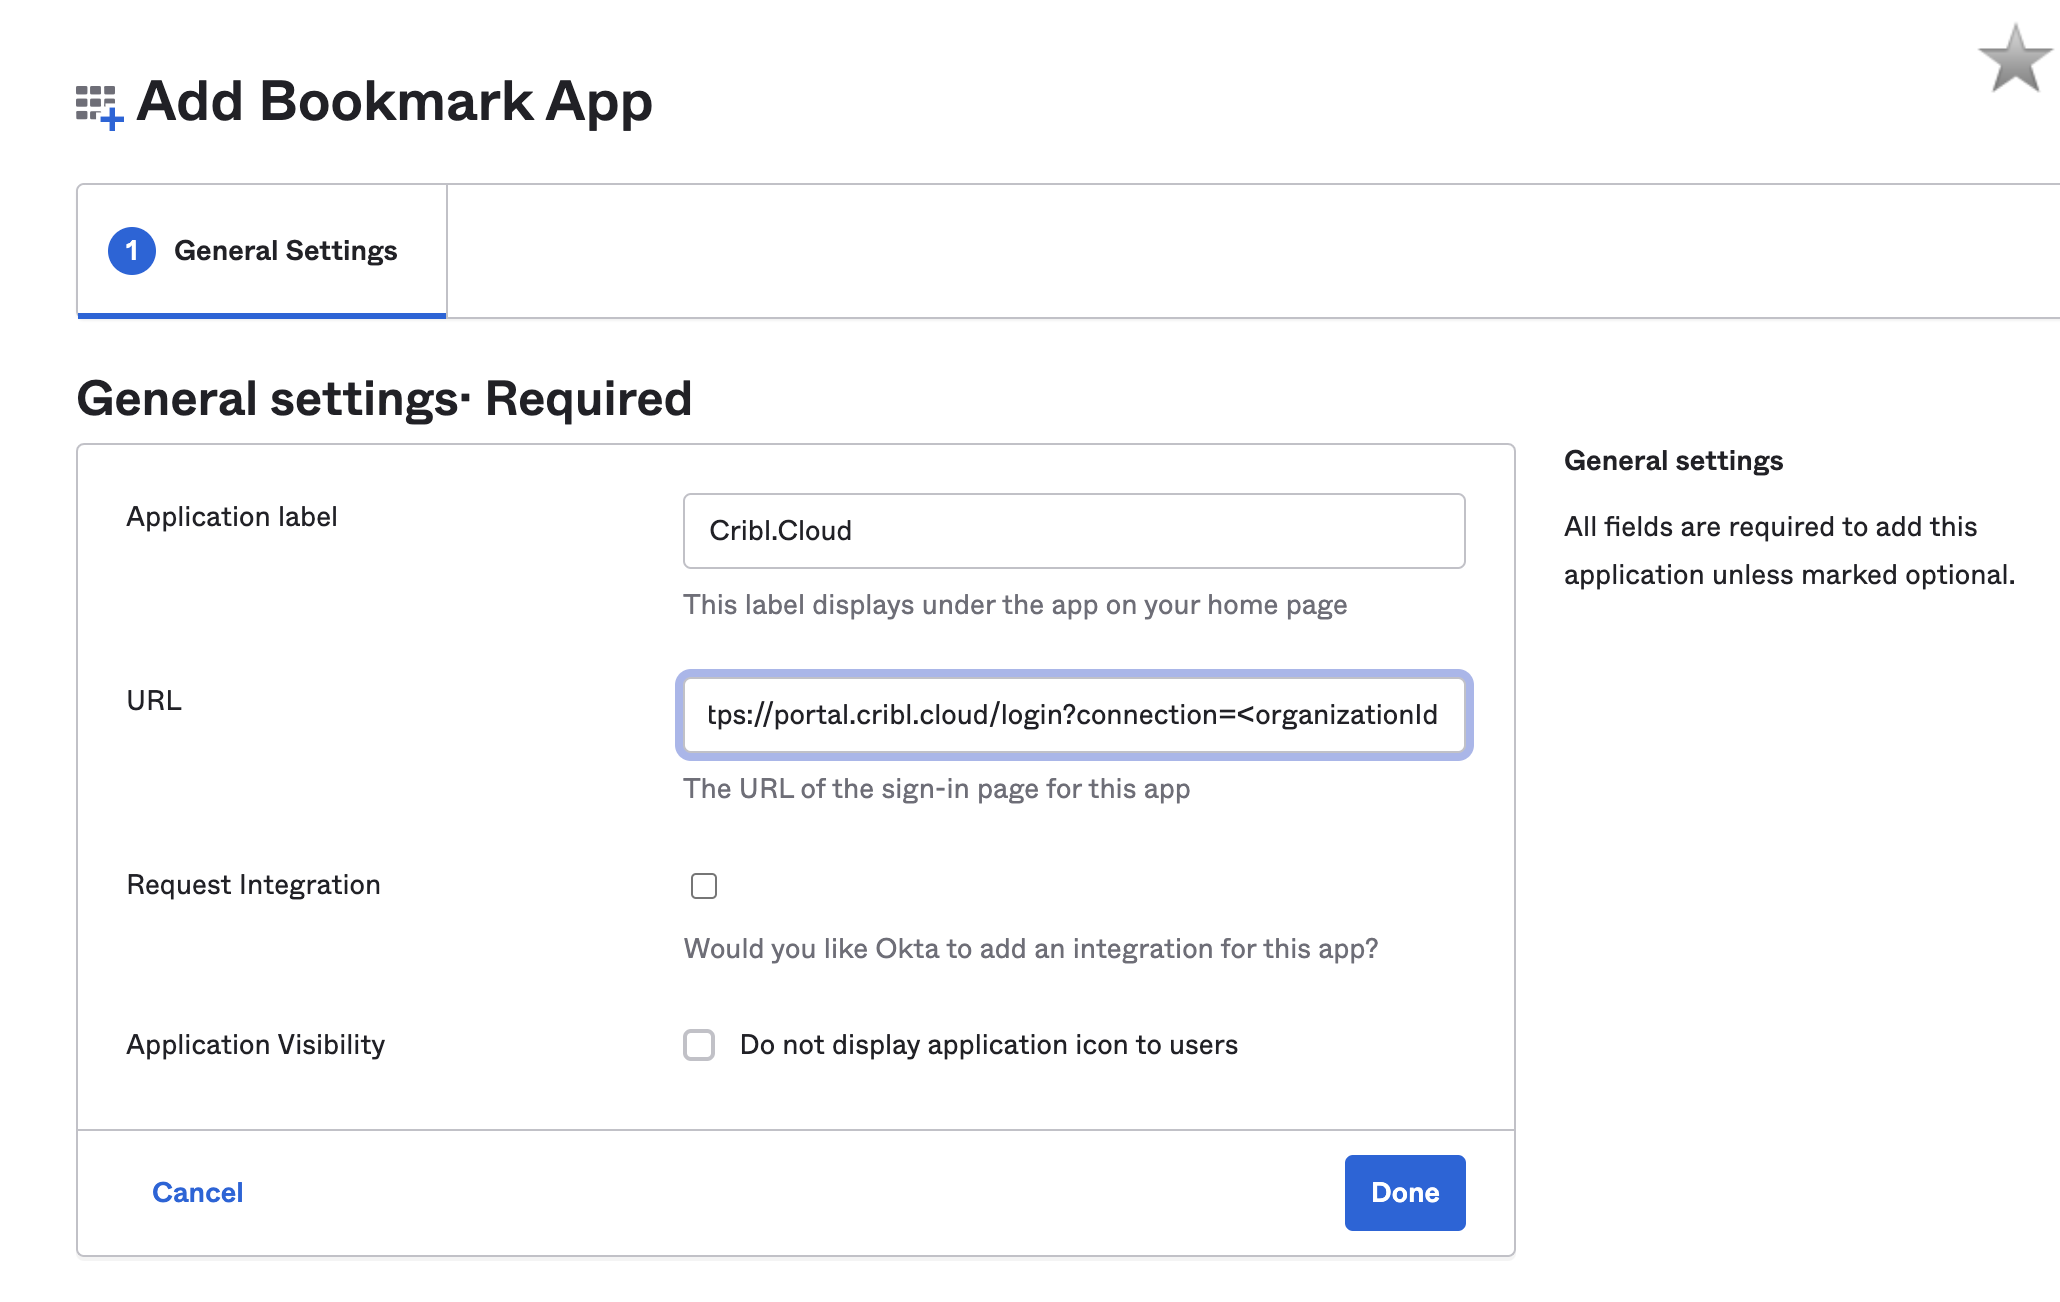
Click Done.
Click the Assign button, and assign all of the Cribl.Cloud groups to the application.
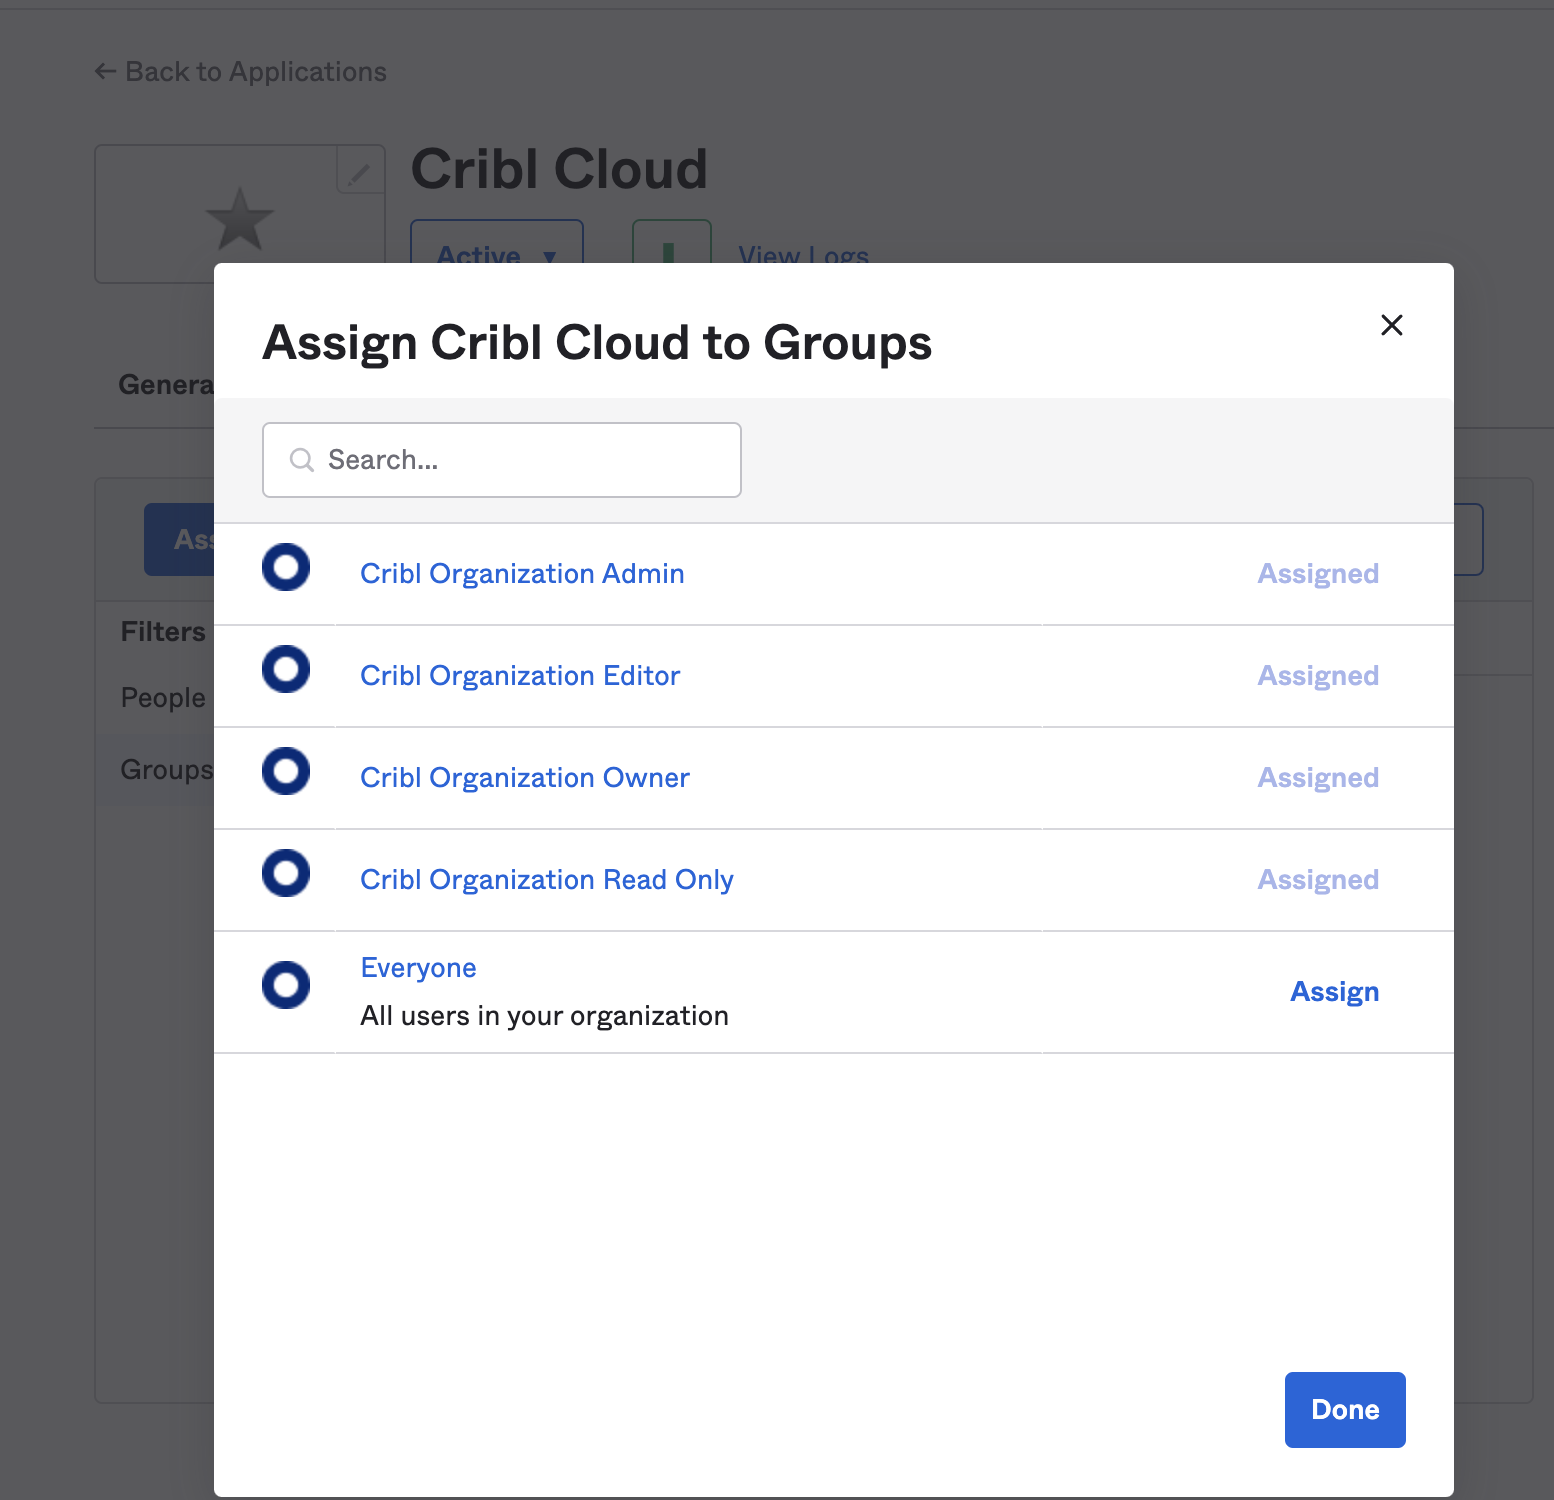
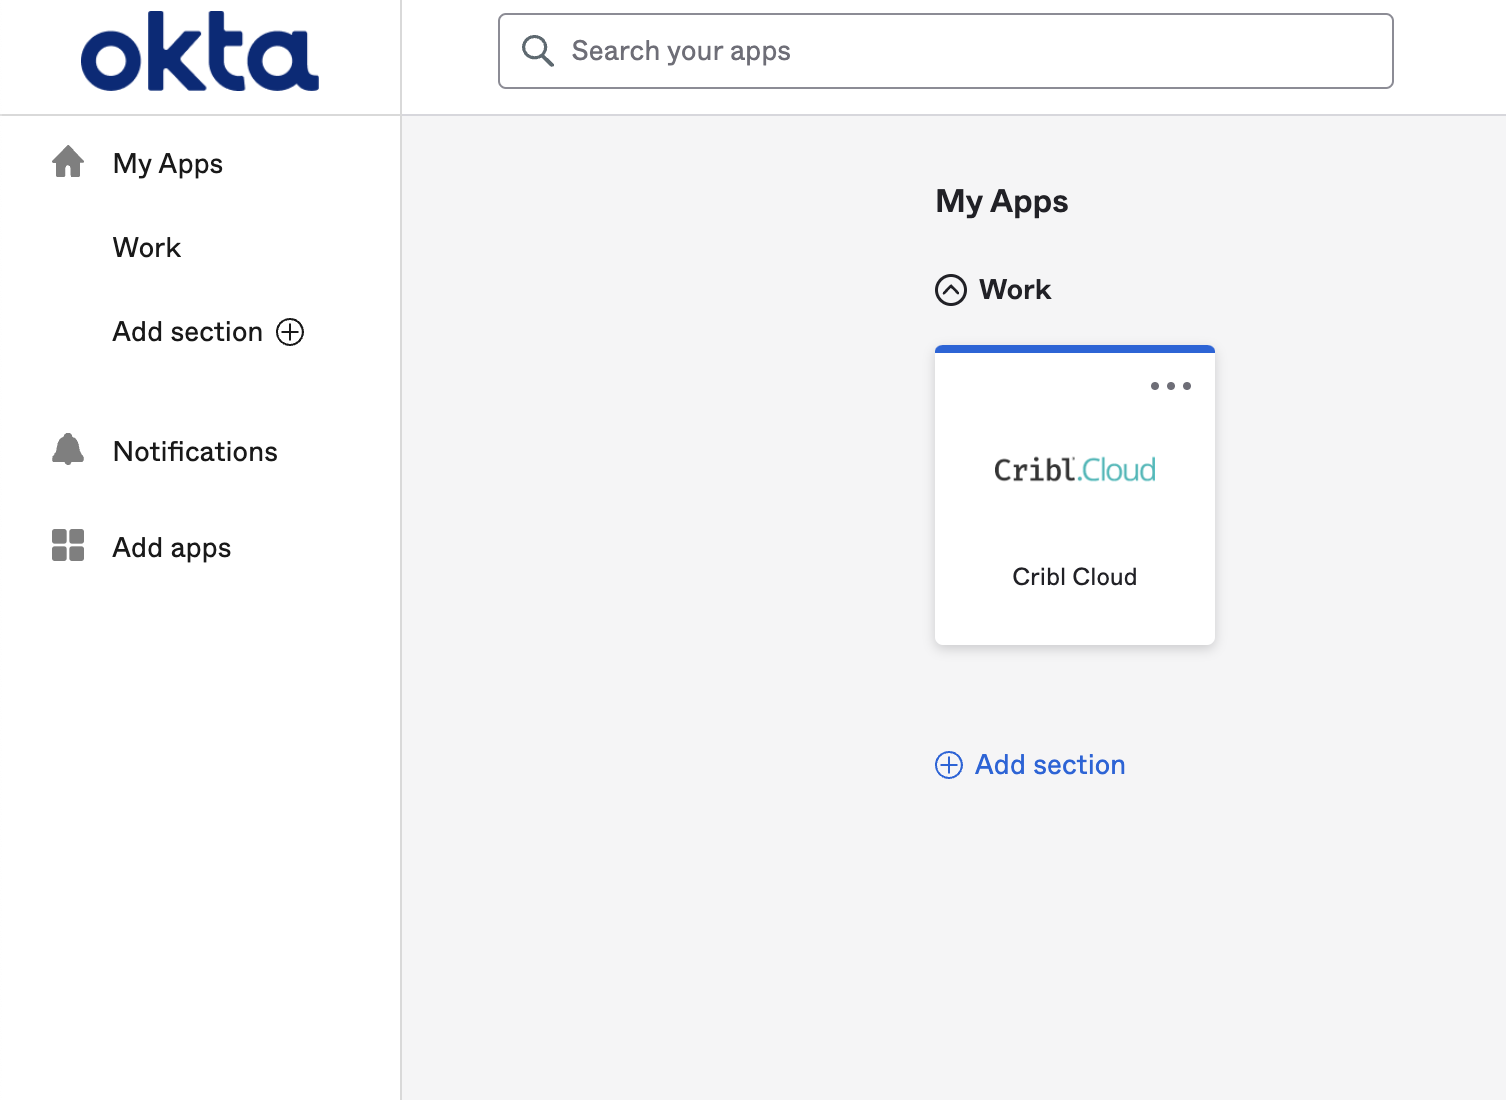
- The Cribl.Cloud chiclet should now be available for all users in the Cribl groups you’ve assigned.
Azure AD/SAML
This example uses Azure Active Directory as the identity provider (IDP).
Get URL and ID from Cribl
Cribl’s terminology corresponds to Azure AD’s terminology as follows:
| Cribl.Cloud | Microsoft Entra ID |
|---|---|
| Single Sign-On URL | Reply URL (Assertion Consumer Service URL) |
| Audience URI | Identifier (Entity ID) |
Create an Enterprise Application
In Microsoft Entra ID:
- Select Enterprise applications (on the left) > New application > Create your own application.
- Name your new app
Cribl.Cloud(or any name you prefer). - Select Integrate any other application you don’t find in the gallery (Non-gallery).
- Click Create.
Assign Groups
From Microsoft Entra ID’s left nav:
- Select Users and groups.
- Select Add user/group.
- Add the Cribl groups you created earlier in Configure Groups.
- Click Assign after selecting Groups.
Configure Single Sign-On
From Microsoft Entra ID’s left nav:
- Select Single sign-on > SAML.
- Edit the Basic SAML Configuration as follows.
- Select Add identifier, and enter the Audience URI value from Cribl.Cloud’s SAML setup page.
- Select Add reply URL, and enter the Single Sign-on URL value from Cribl.Cloud’s SAML setup page.
- Test the connection with both of the above values in place.
- Save the new settings.
Configure Attributes and Groups Claims
In Microsoft Entra ID, edit Attribute & Claims as follows. Start with the claim names:
- Change
surnametofamily_name. - Change
emailaddresstoemail. - Change
givennametogiven_name.
Next, add a group claim:
- Select Groups assigned to the application.
- As the Source Attribute, select:
Cloud-only group display names (Preview). - Accept the defaults for everything else, and save the new settings.

Submit Your App Info to Cribl
After you’ve created the SAML app integration in your IDP, provide Cribl essential metadata about your application, to implement SSO setup on the Cribl side.
- On your Cribl.Cloud portal’s Organization page > SSO tab, select the SAML lower tab.
- Set the IDP Login/Logout URL to your Azure AD’s Set up CloudSAML section > Login URL value.
- Set the IDP issuer to your Azure AD’s Set up CloudSAML section > Azure AD Identifier value.
- To set the X.509 certificate (base64-encoded), navigate to Azure AD’s SAML Certificates section and download your Base64 Certificate.
- Click Test Connection.
- When you’ve verified the connection, click Save to complete your submission.
Common Final Steps
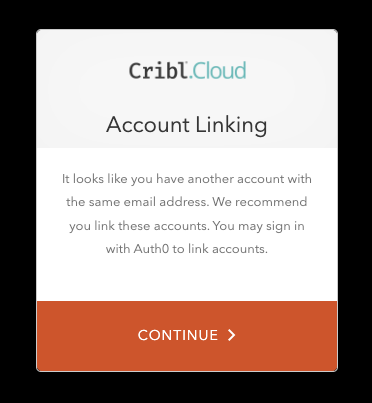
Whether you’re integrating with OIDC or SAML, there’s one more step for users who had an existing username/password-based login on Cribl.Cloud before SSO was set up:
Upon first login with SSO, these users will see a prompt to link their identities. They should accept this prompt, to ensure that their existing profile is linked with their SSO profile. (This can be a multi-step flow.)