


These docs are for Cribl Edge 4.0 and are no longer actively maintained.
See the latest version (4.17).
Launch Guide
The fast alternative to downloading and self-hosting Cribl Edge software is to launch Cribl.Cloud. This SaaS version, whether free or paid, places the Leader and the Edge Node in Cribl.Cloud, where Cribl assumes responsibility for managing the infrastructure.
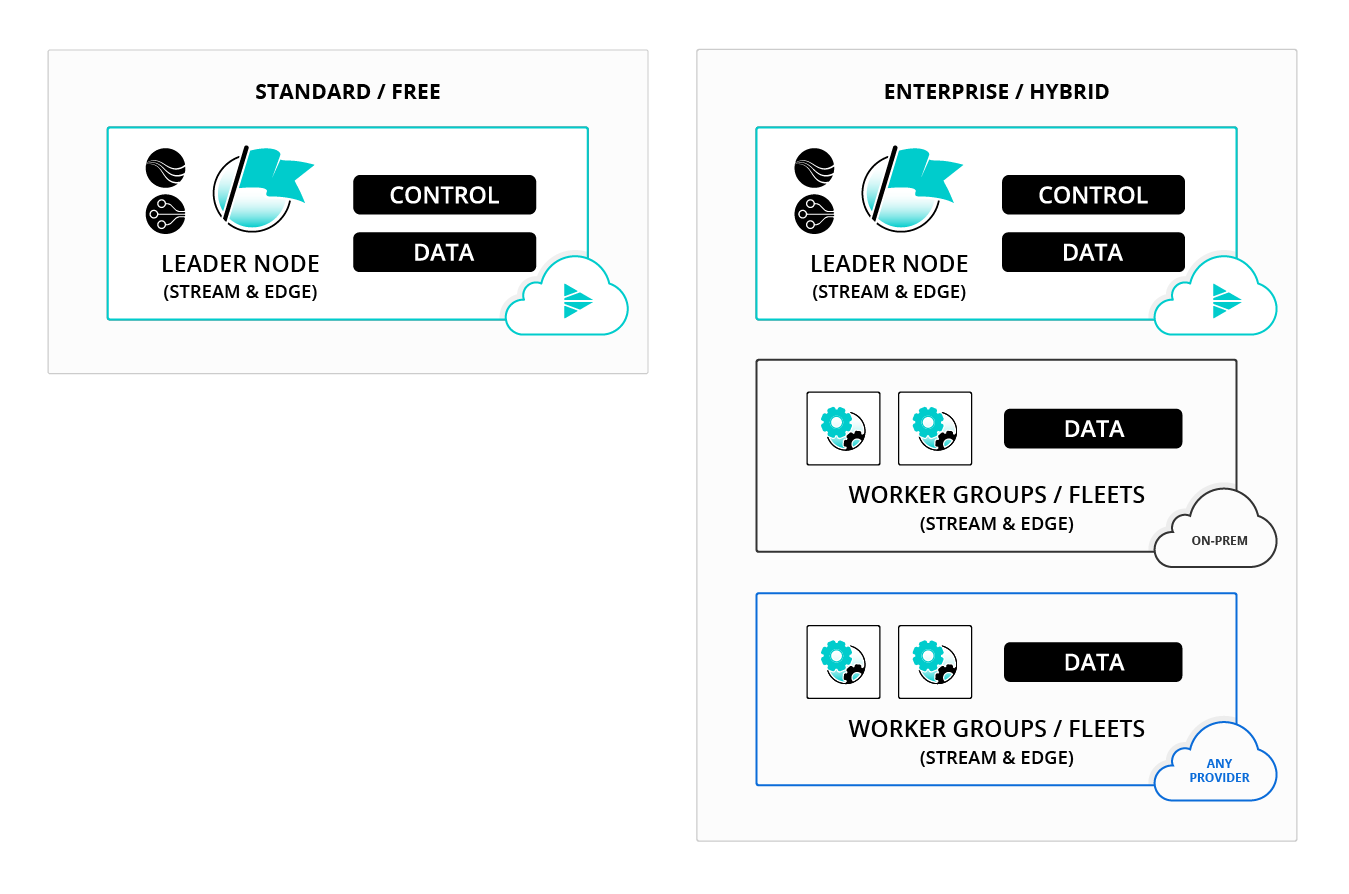
By upgrading to a Cribl.Cloud Enterprise plan, you can implement a hybrid deployment of any complexity. In hybrid deployments, the Leader (the control plane) resides in Cribl.Cloud, while the Workers that process the data (the data plane) can reside in any combination of Cribl-managed Cloud Workers, on-prem or private cloud instances that you manage, and your data centers.
For an overview of additional features available on Enterprise plans, see Pricing.
Why Use Cloud Deployment? (Advantages)
Cribl.Cloud is designed to simplify deployment, and to provide certain advantages over using your own infrastructure, in exchange for some current restrictions (because Cribl will manage some configuration on your behalf):
- Tap Cribl Edge’s power, with no responsibility to install or manage software. Cribl.Cloud is fully hosted and managed by Cribl. so you can launch a configured instance within minutes.
- Automated delivery of upgrades and new features.
- Encrypted data at rest (configuration, sample files, etc.) at the disk level for Leader and Cribl-managed Worker instances.
- Free, up to 1 TB/day of data throughput (data ingress + egress) for all new accounts.
- Quickly expand your Cribl.Cloud deployment beyond the free tier’s limits by purchasing credits toward metered billing. Pay only for what you use.
Getting Started
Your first step is to sign up on the Cribl.Cloud portal (see Registering a Cribl.Cloud Portal below), to create your Cribl.Cloud Organization.
Your Organization will display a dedicated Portal, a network and access boundary that isolates your Cribl resources from all other users. Each Cribl.Cloud account provisions a separate AWS account. Your instances of Cribl Stream, Cribl Edge, and Cribl Search are deployed inside a virtual private cloud (VPC) in this account.
The Portal will initially be on a free Cribl.Cloud plan. Certain throughput and administration limits apply to a free account. When you need more capacity and/or options, it’s easy to upgrade to a paid or Enterprise plan - just click the Go Enterprise button at the top of your Portal.
As of November 2022, the Cribl.Cloud Suite is listed on AWS Marketplace. When you’re ready for a paid plan, you can use your Enterprise Discount Program (EDP) credits here to run Cribl products, billed through your AWS account - with no need for a separate procurement process.
As of June 2022, Cribl completed its SOC 2 (Service Organization Control 2) Type II security compliance attestation.
About Cribl Edge (and This Document)
If you’re new to Cribl Edge, please see our Basic Concepts page and Getting Started Guide for orientation. The current topic focuses on a Cloud deployment’s differences from other deployment options - referred to below as “Cribl Edge binaries” or “customer-managed deployments.”
Cribl.Cloud always runs in distributed mode - see Simplified Distributed Architecture below for details.
Registering a Cribl.Cloud Portal
Ready to take the red pill? The next few sections explain how to register and manage a Cribl.Cloud instance.
First, if you haven’t already signed up on Cribl.Cloud:
- Start at: https://cribl.cloud/signup/
- Select the New User? Free signup option, and register with your work email address.
- Use the verification code from Cribl’s email to confirm your registration.
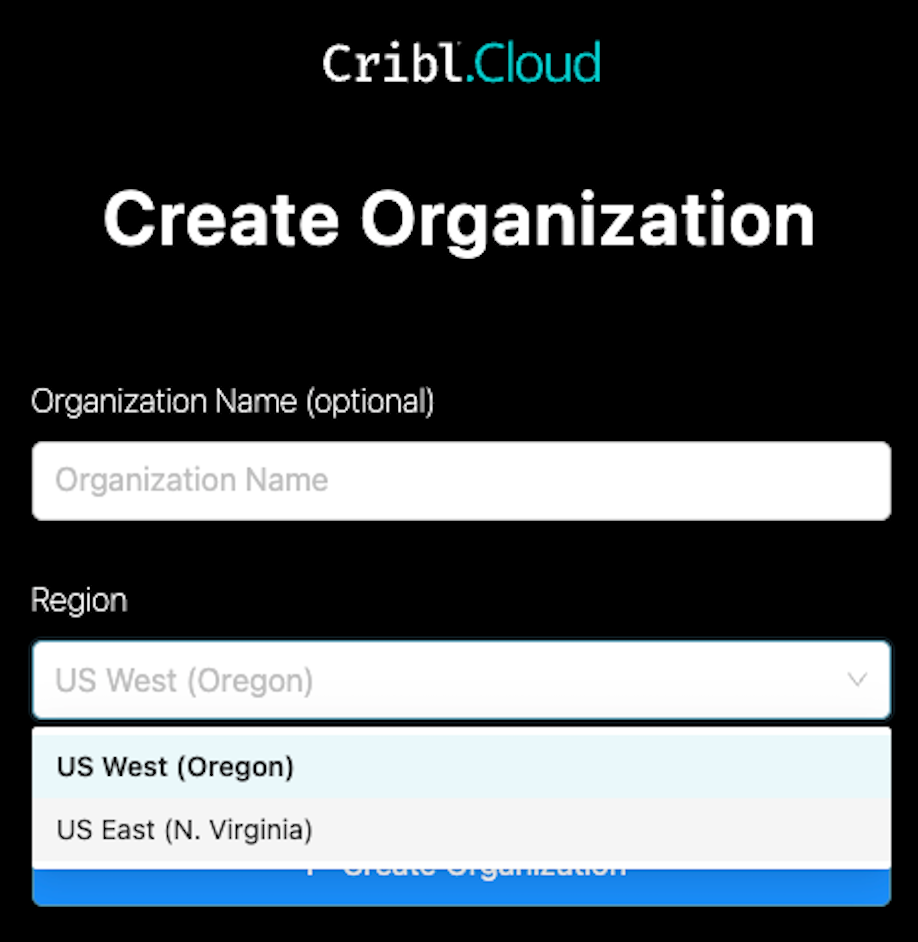
- On the Create Organization page, optionally enter an Organization Name (a friendly alias for the randomly generated ID that Cribl will assign to your Organization).
- Select an AWS Region to host your Cribl.Cloud Leader and Cribl-managed Workers. Cribl currently supports either the
US West (Oregon)orUS East (Virginia)Region. - Bookmark your Cribl.Cloud portal page, for all that follows.
Select Organization Page
When you own or are a Member of multiple Cribl.Cloud Organizations, the Select Organization splash page - displayed after you sign in - enables you to select which Organization you want to work with.
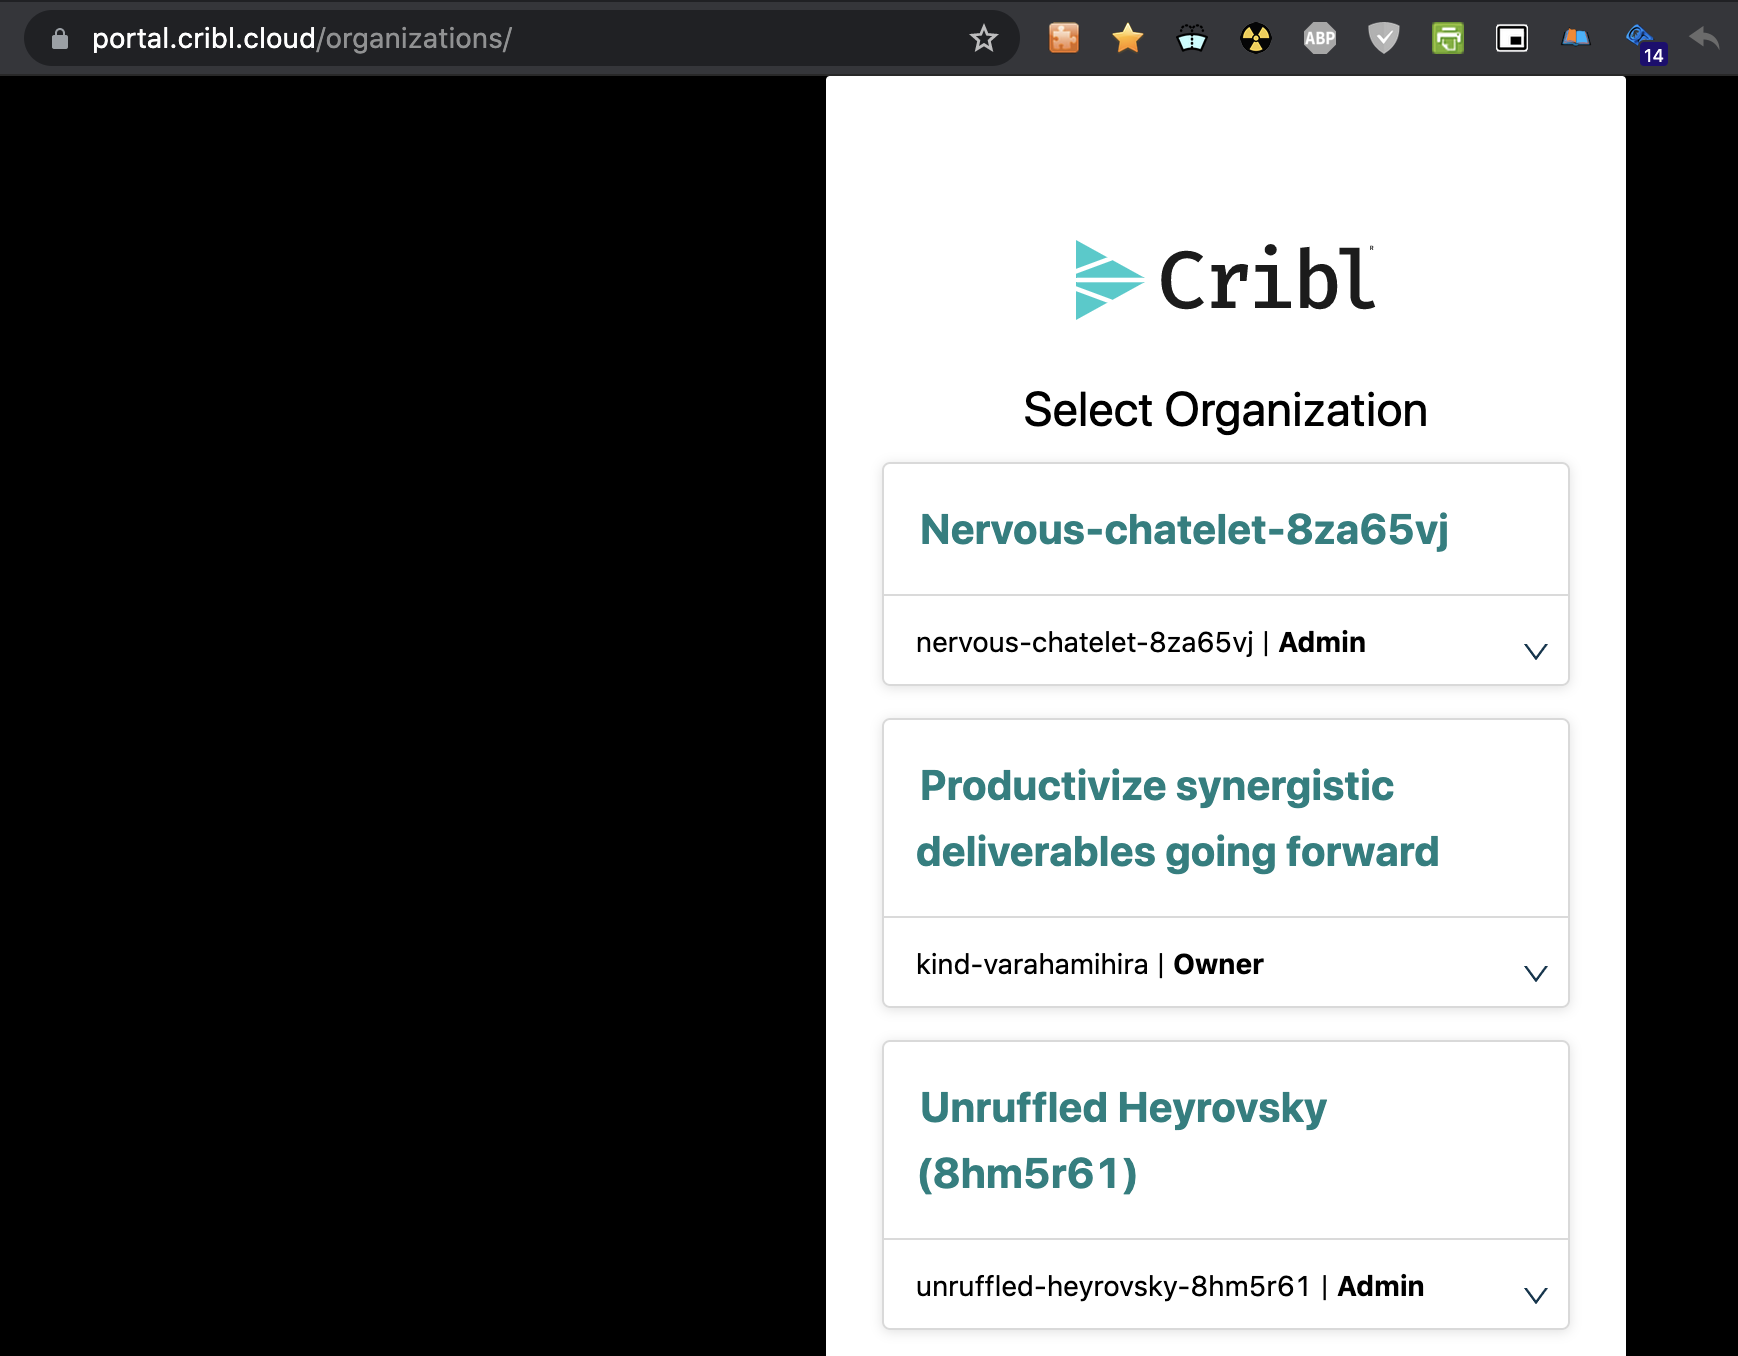
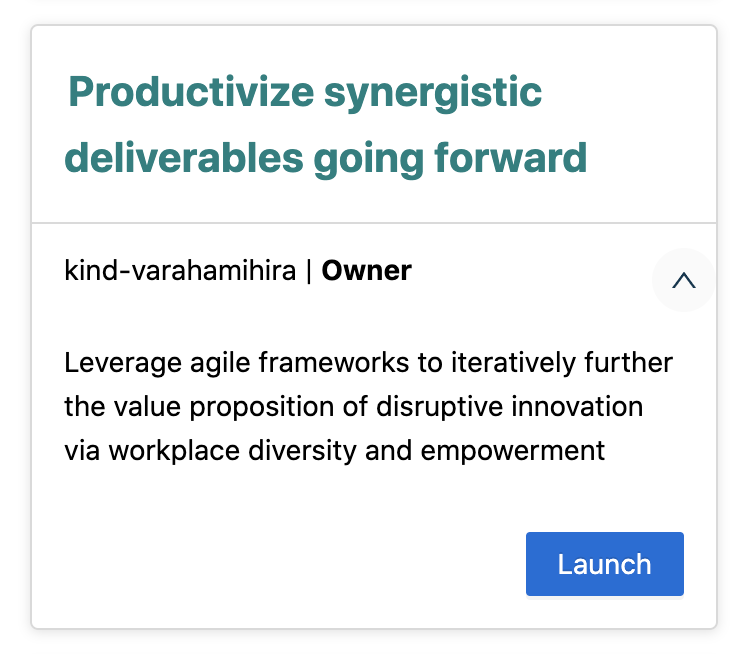
Click any tile’s \/ accordion to reveal a detailed description, if provided. Click the appropriate tile (or its open accordion’s Dashboard button) to configure that Organization.
You can click Leave if you want to remove yourself as a Member of another Owner’s Organization. This option requires confirmation - proceed only if you’re sure! (You won’t see this button on Organizations that you own.)
Exploring the Cribl.Cloud Portal
Now that you’re here - explore the furniture. The Cribl.Cloud portal’s top navigation allows you to navigate among the following pages/links:
Portal Page (Cribl.Cloud Logo)
When you log into the Cribl.Cloud portal, you’ll land here. The main events here are the Manage Stream, Manage Edge, and Explore [Search] buttons. Click these to launch (respectively) Cribl Stream, Cribl Edge, or Cribl Search in a new tab.
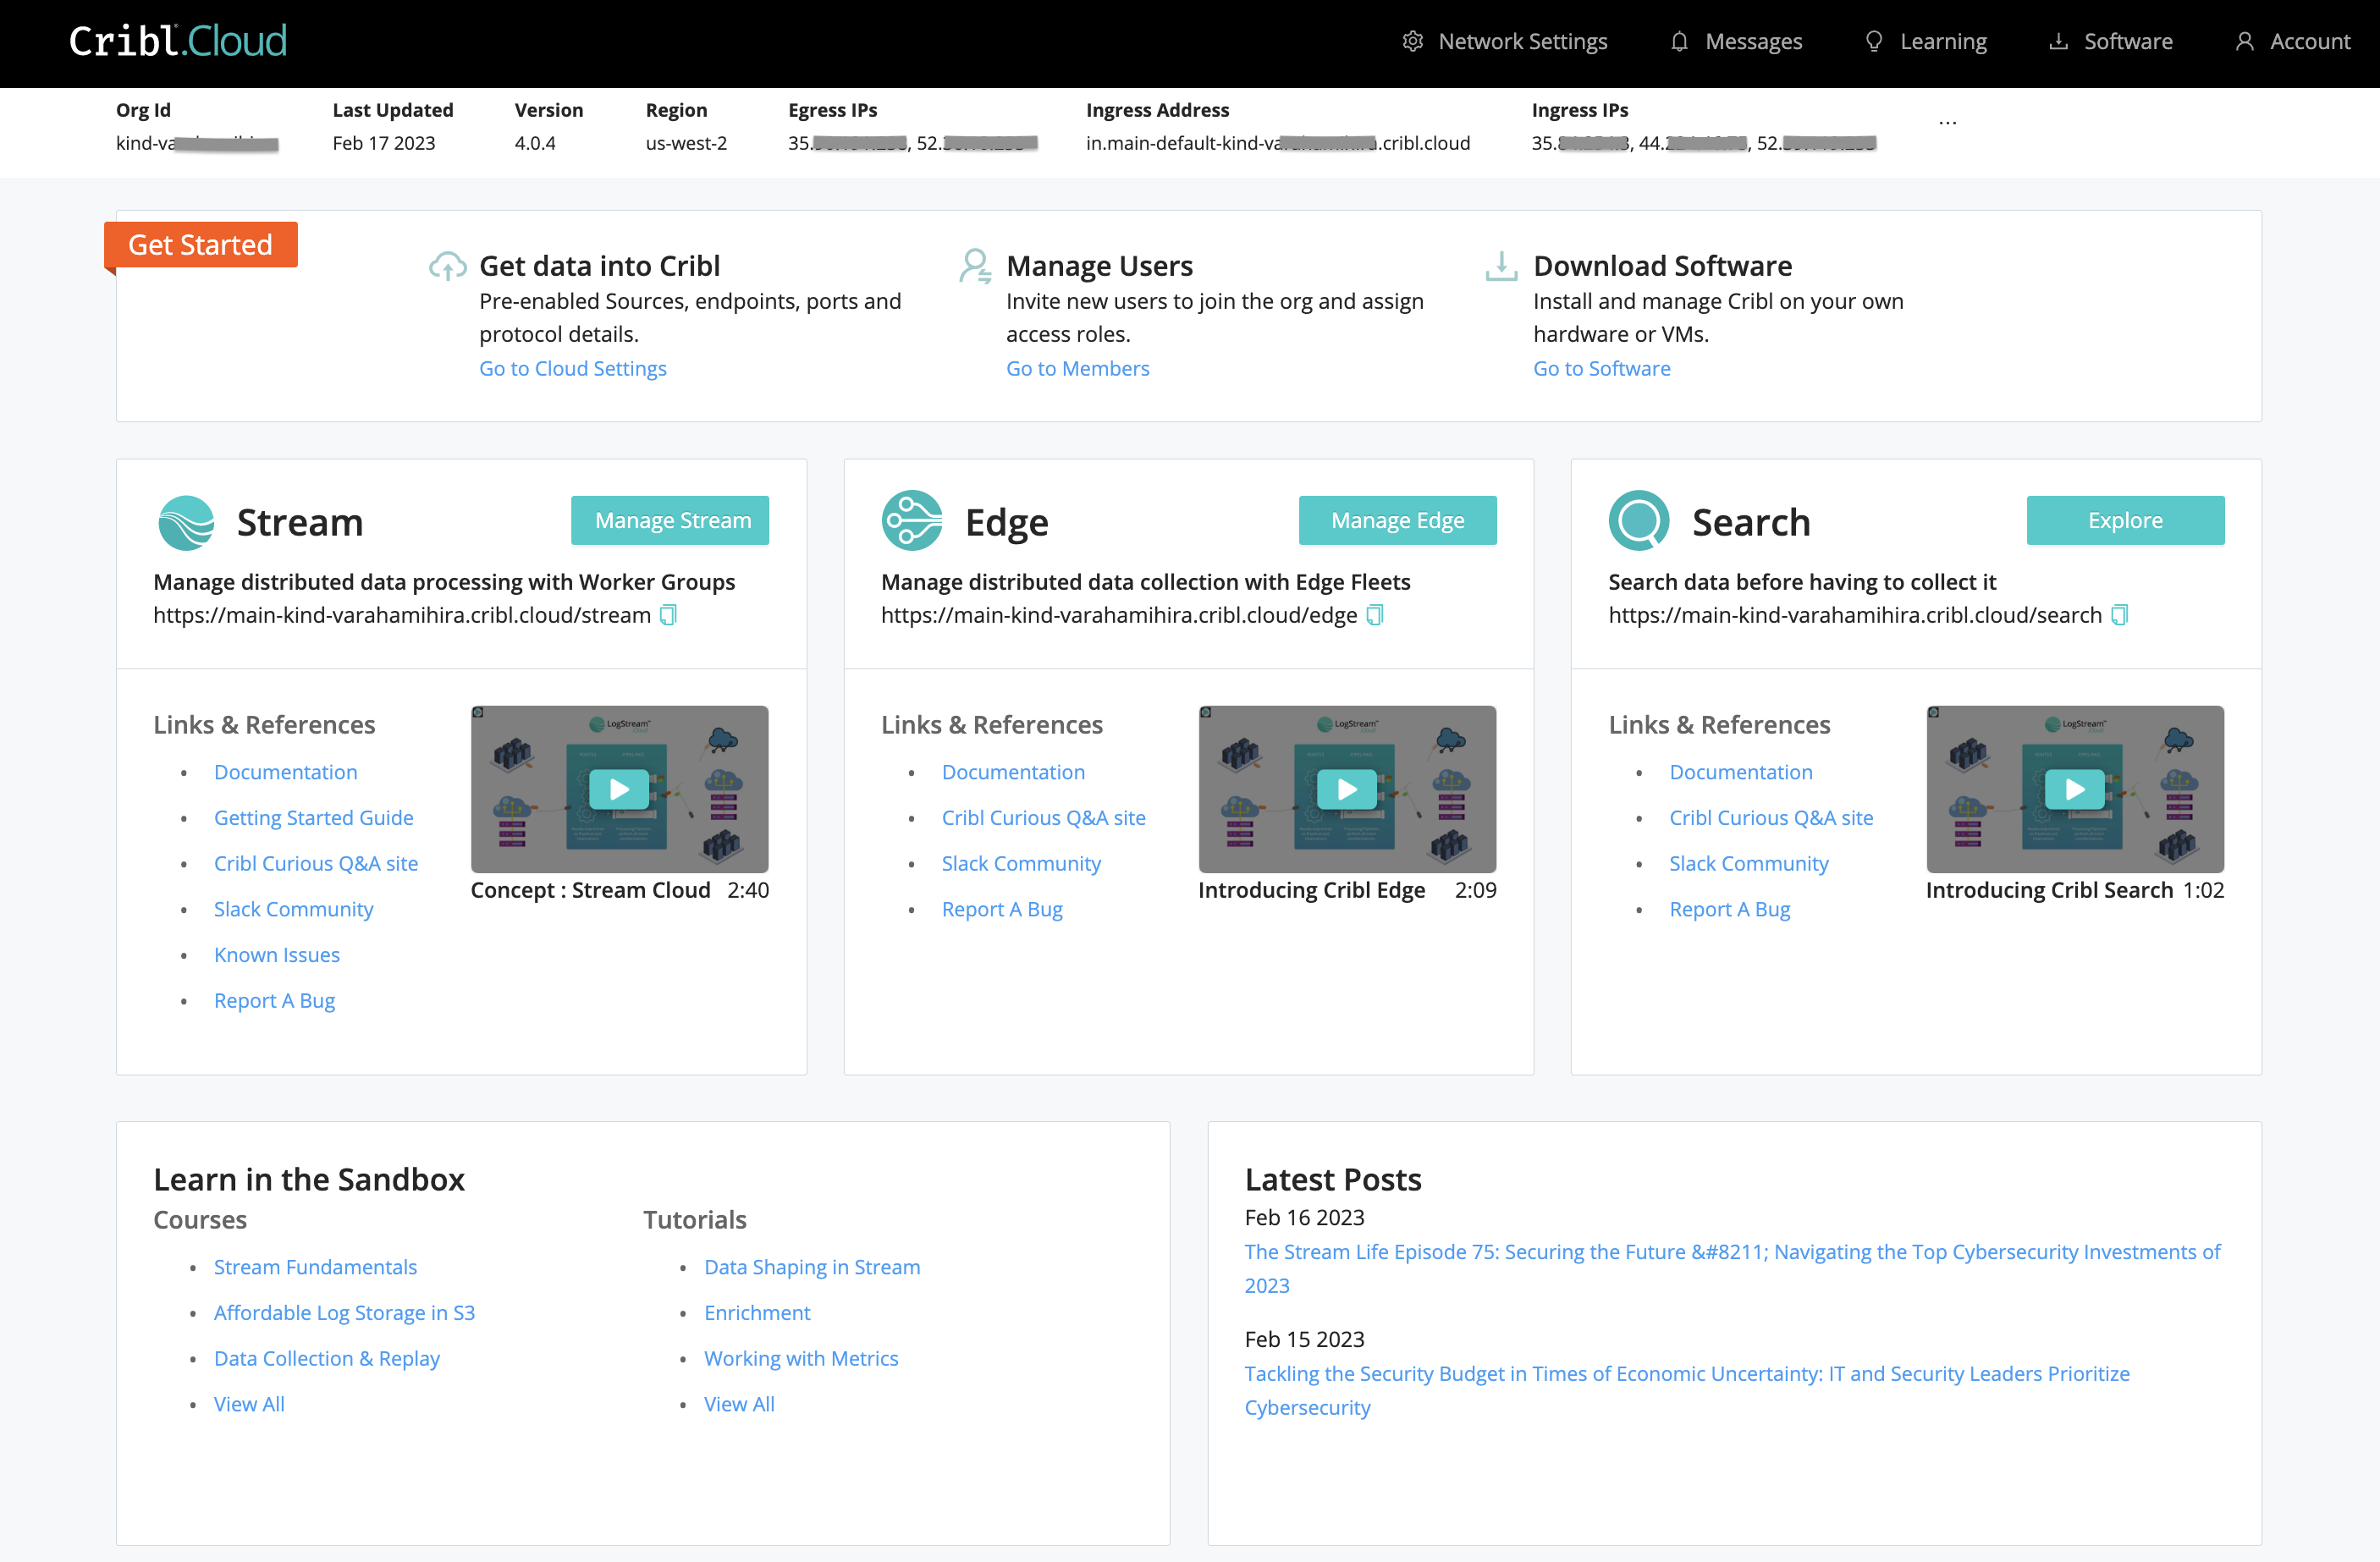
However, the surrounding page offers lots more useful information:
- On the page body, you’ll find links to multiple Cribl resources - documentation, support (Community Slack and bug reporting), free Sandbox training, and blog posts.
- In the Overview strip just below the top black menu, you’ll find detailed configuration information about your Cloud Organization.
- By clicking the top nav’s ⚙️ Network Settings link, you can check and manage connectivity details - data Sources, access control, and trust relationships - for your Cribl-managed Cloud Workers.
Overview Strip
From left to right, this upper strip displays the following config details:
Org ID: Domain at which you access the associated Cribl.Cloud Organization.
Last Updated: Date on which Cribl last pushed an infrastructure change (notably including changes to the above Egress Address).
Version: Your deployed Cribl Edge version.
Region: The AWS Region where you’re running Cribl applications. (Cribl.Cloud currently supports either the us-west-2 or us-east-1 Region.)
Egress IPs: Your Cribl.Cloud instance’s current public IP address. This address is dynamic; Cribl will occasionally update it when we need to rescale core infrastructure.
Ingress Address: Your Cribl.Cloud instance’s global domain for inbound data (before specifying ports per data type).
Ingress IPs: The IPv4 ingress addresses associated with your Cribl.Cloud endpoints. These addresses will remain constant, so you can build firewall rules around them.
Network Settings Page
Clicking the top nav’s ⚙️ Network Settings link opens a page with connectivity details, spread across three upper tabs: Data Sources, ACL, and Trust.
Data Sources Tab
The Data Sources tab lists ports, protocols, and data ingestion inputs that are open and available to use. Return to this tab to copy Ingest Addresses (endpoints) as needed. For details, see Available Ports and TLS Configurations.
ACL Tab
The default 0.0.0.0/0 rule (modifiable) imposes no limits. Click + to add more rules, or click X to remove rules. End a rule with /32 to specify a single IP address, or with /24 to enable a whole CIDR block from x.x.x.0 to x.x.x.255.
Click Save after adding, modifying, or removing rules. Each change takes up to 5 minutes to propagate. Cribl.Cloud will display an ACL update in progress... banner, notifying you that rules edits are temporarily disabled to prevent conflicts. A successful update proceeds silently - you will not see a confirmation message.
The ACL options apply only to your Cribl-managed Workers. You cannot use this technique to set access rules on hybrid Workers running in customer-managed Cribl Edge instances.
Trust Tab
The Trust tab provides a Worker ARN (Amazon Resource Name) that you can copy and paste to attach a Trust Relationship to an AWS account’s IAM role. Doing so enables the AssumeRole action, providing cross-account access. For usage details, see the AWS Cross-Account Data Collection topic’s Account B Configuration section.
This option applies only to your Cribl-managed Workers. You cannot use this technique to enable access to hybrid Workers on customer-managed Cribl Edge instances.
Cribl Edge UI Access
Clicking the Manage Stream or Manage Edge button opens (respectively) your Stream or Edge Leader in a new browser tab. All of the application’s Cloud-supported features are available from this landing page.
Messages Drawer
Clicking the top nav’s Messages link opens the Message Center right drawer. Here, you will find Cribl.Cloud status and update notifications from Cribl, with Unread messages above the Read group.
Learning Page
Clicking the top nav’s Learning link opens the Learning page, which provides links to everything you need to learn about Cribl Edge in order to goat forth and do great things:
- Sandboxes (free, interactive tutorials on fully hosted integrations).
- Documentation.
- Product and plans overview (pricing comparison).
- Cribl events (including future and archived Webinars).
- Concept/demo videos.
Software Page
If you prefer to take the blue pill, this page offers download links for Cribl Edge, Cribl Edge, and AppScope software. You can download either binaries or Docker containers (hosting Ubuntu 20.04), to install and manage on your own hardware or virtual machines.
Account Menu
This menu offers a self-explanatory Sign Out link, and an Organization Selection submenu (fly-out) that works like the Select Organization page: click its links to traverse to other Organizations. For an Organization’s owner only, it also includes a link to the Organization page.

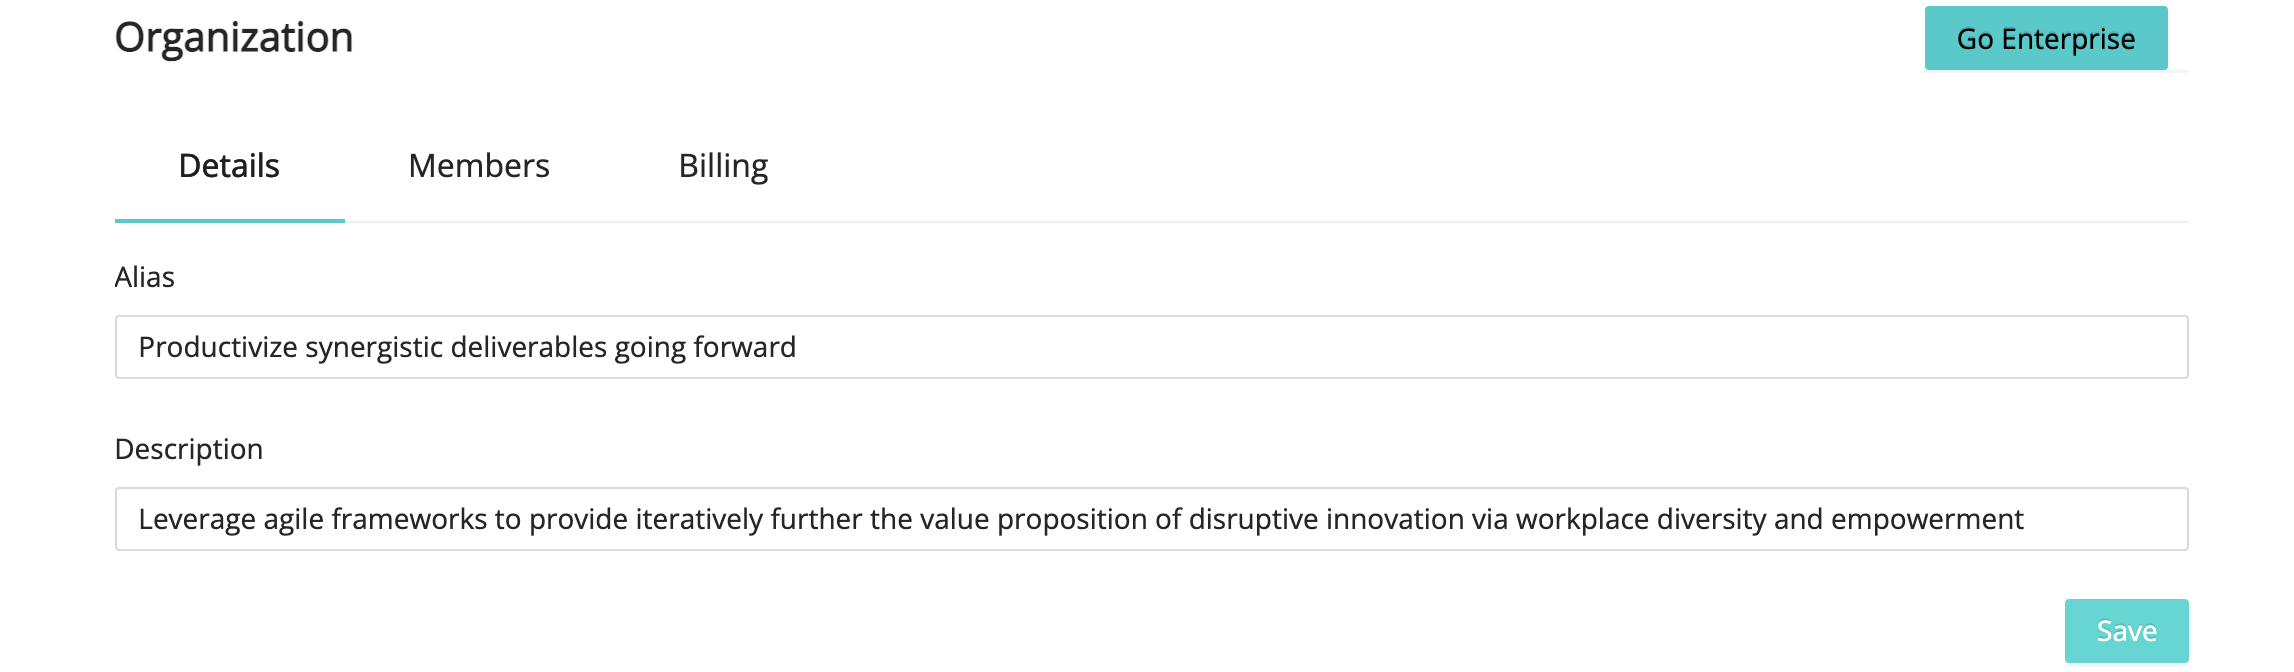
Organization Page
Displayed only to an Organization’s owner, this page offers Details, Members, and (where applicable) Billing and SSO tabs along its top.
Details Tab
The Organization > Details tab offers these controls to make your Cribl.Cloud deployment more recognizable than its randomly generated Organization ID (displayed at the top):
Alias: Optionally, enter a “friendly” name for your Organization. Upon signing in, Members will see this alias above the Organization ID on the Select Organization page.
Description: Optionally, use this field to add further details about your Organization. On the Select Organization page, Members can view these details by expanding the Organization’s tile.
Opt in to beta features: If displayed, this toggle enables access to new options that Cribl has not yet made generally available. As with all beta features, expect some instability in exchange for advancing to the cutting edge of your Cloud.
Click Save to immediately apply your changes.
Members Tab
The Organization > Members upper tab provides access to inviting and managing other users.
Billing Tab
The Organization > Billing upper tab is displayed only to owners of an Organization on a paid license plan. It provides Plan and Metrics left tabs.
Plan Tab
The Plan left tab displays a mercury bar of available Credits on your account, an expandable Plan details accordion, and expandable Monthly Usage History rows offering details about your data throughput volume in current and prior months.
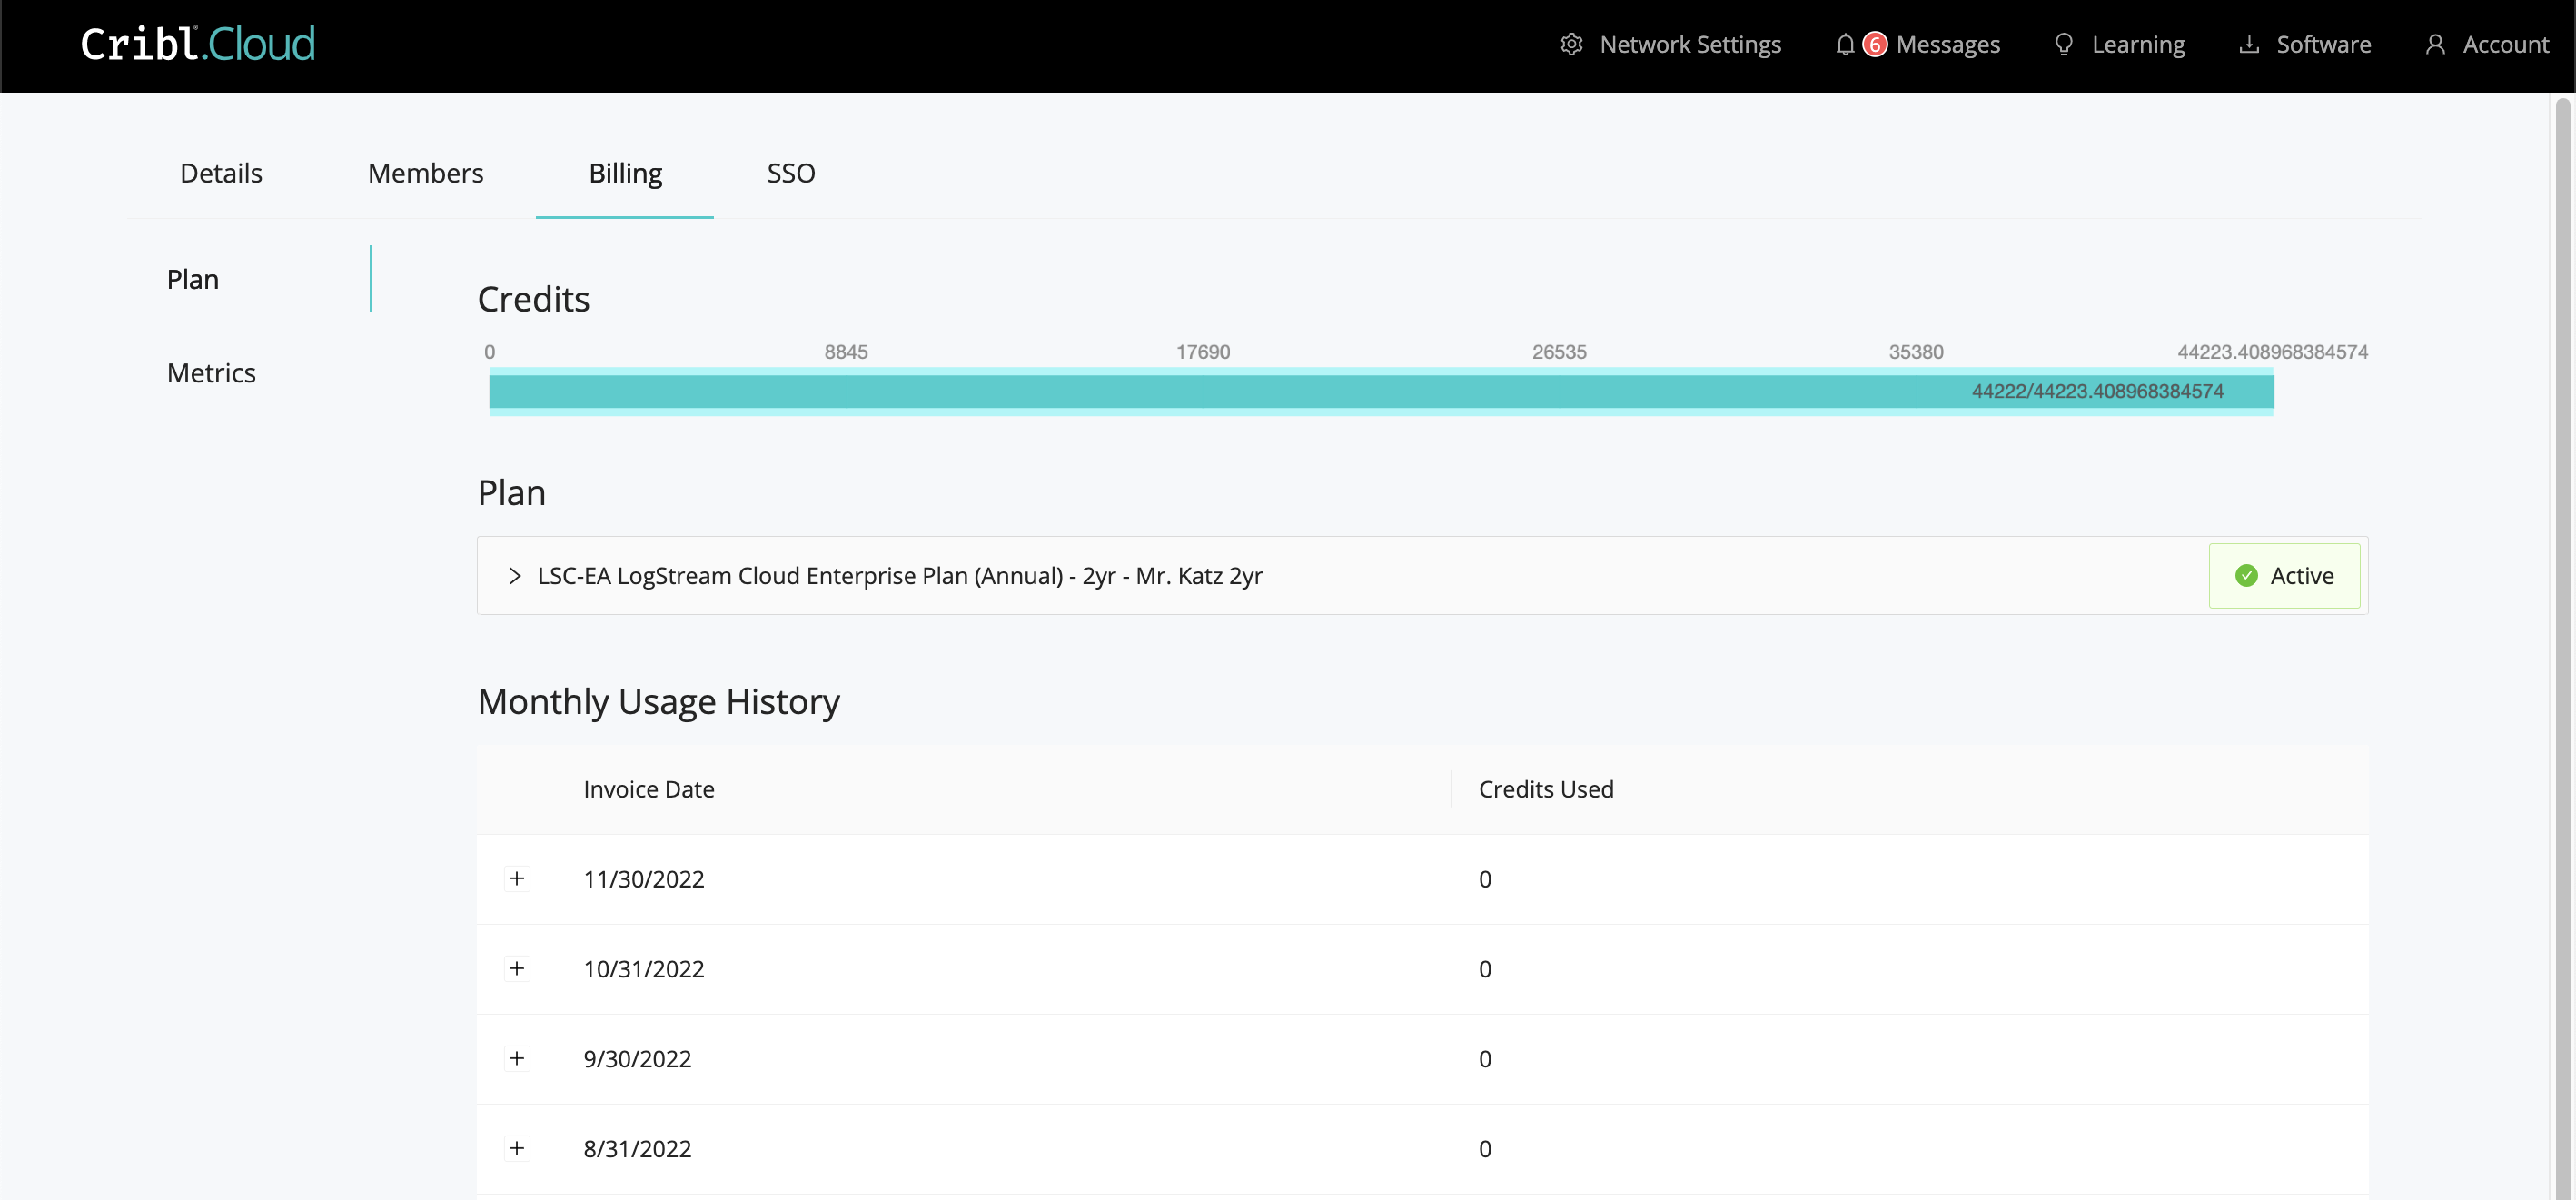
Credits carry over across billing periods, as long as you renew your Cribl.Cloud plan.
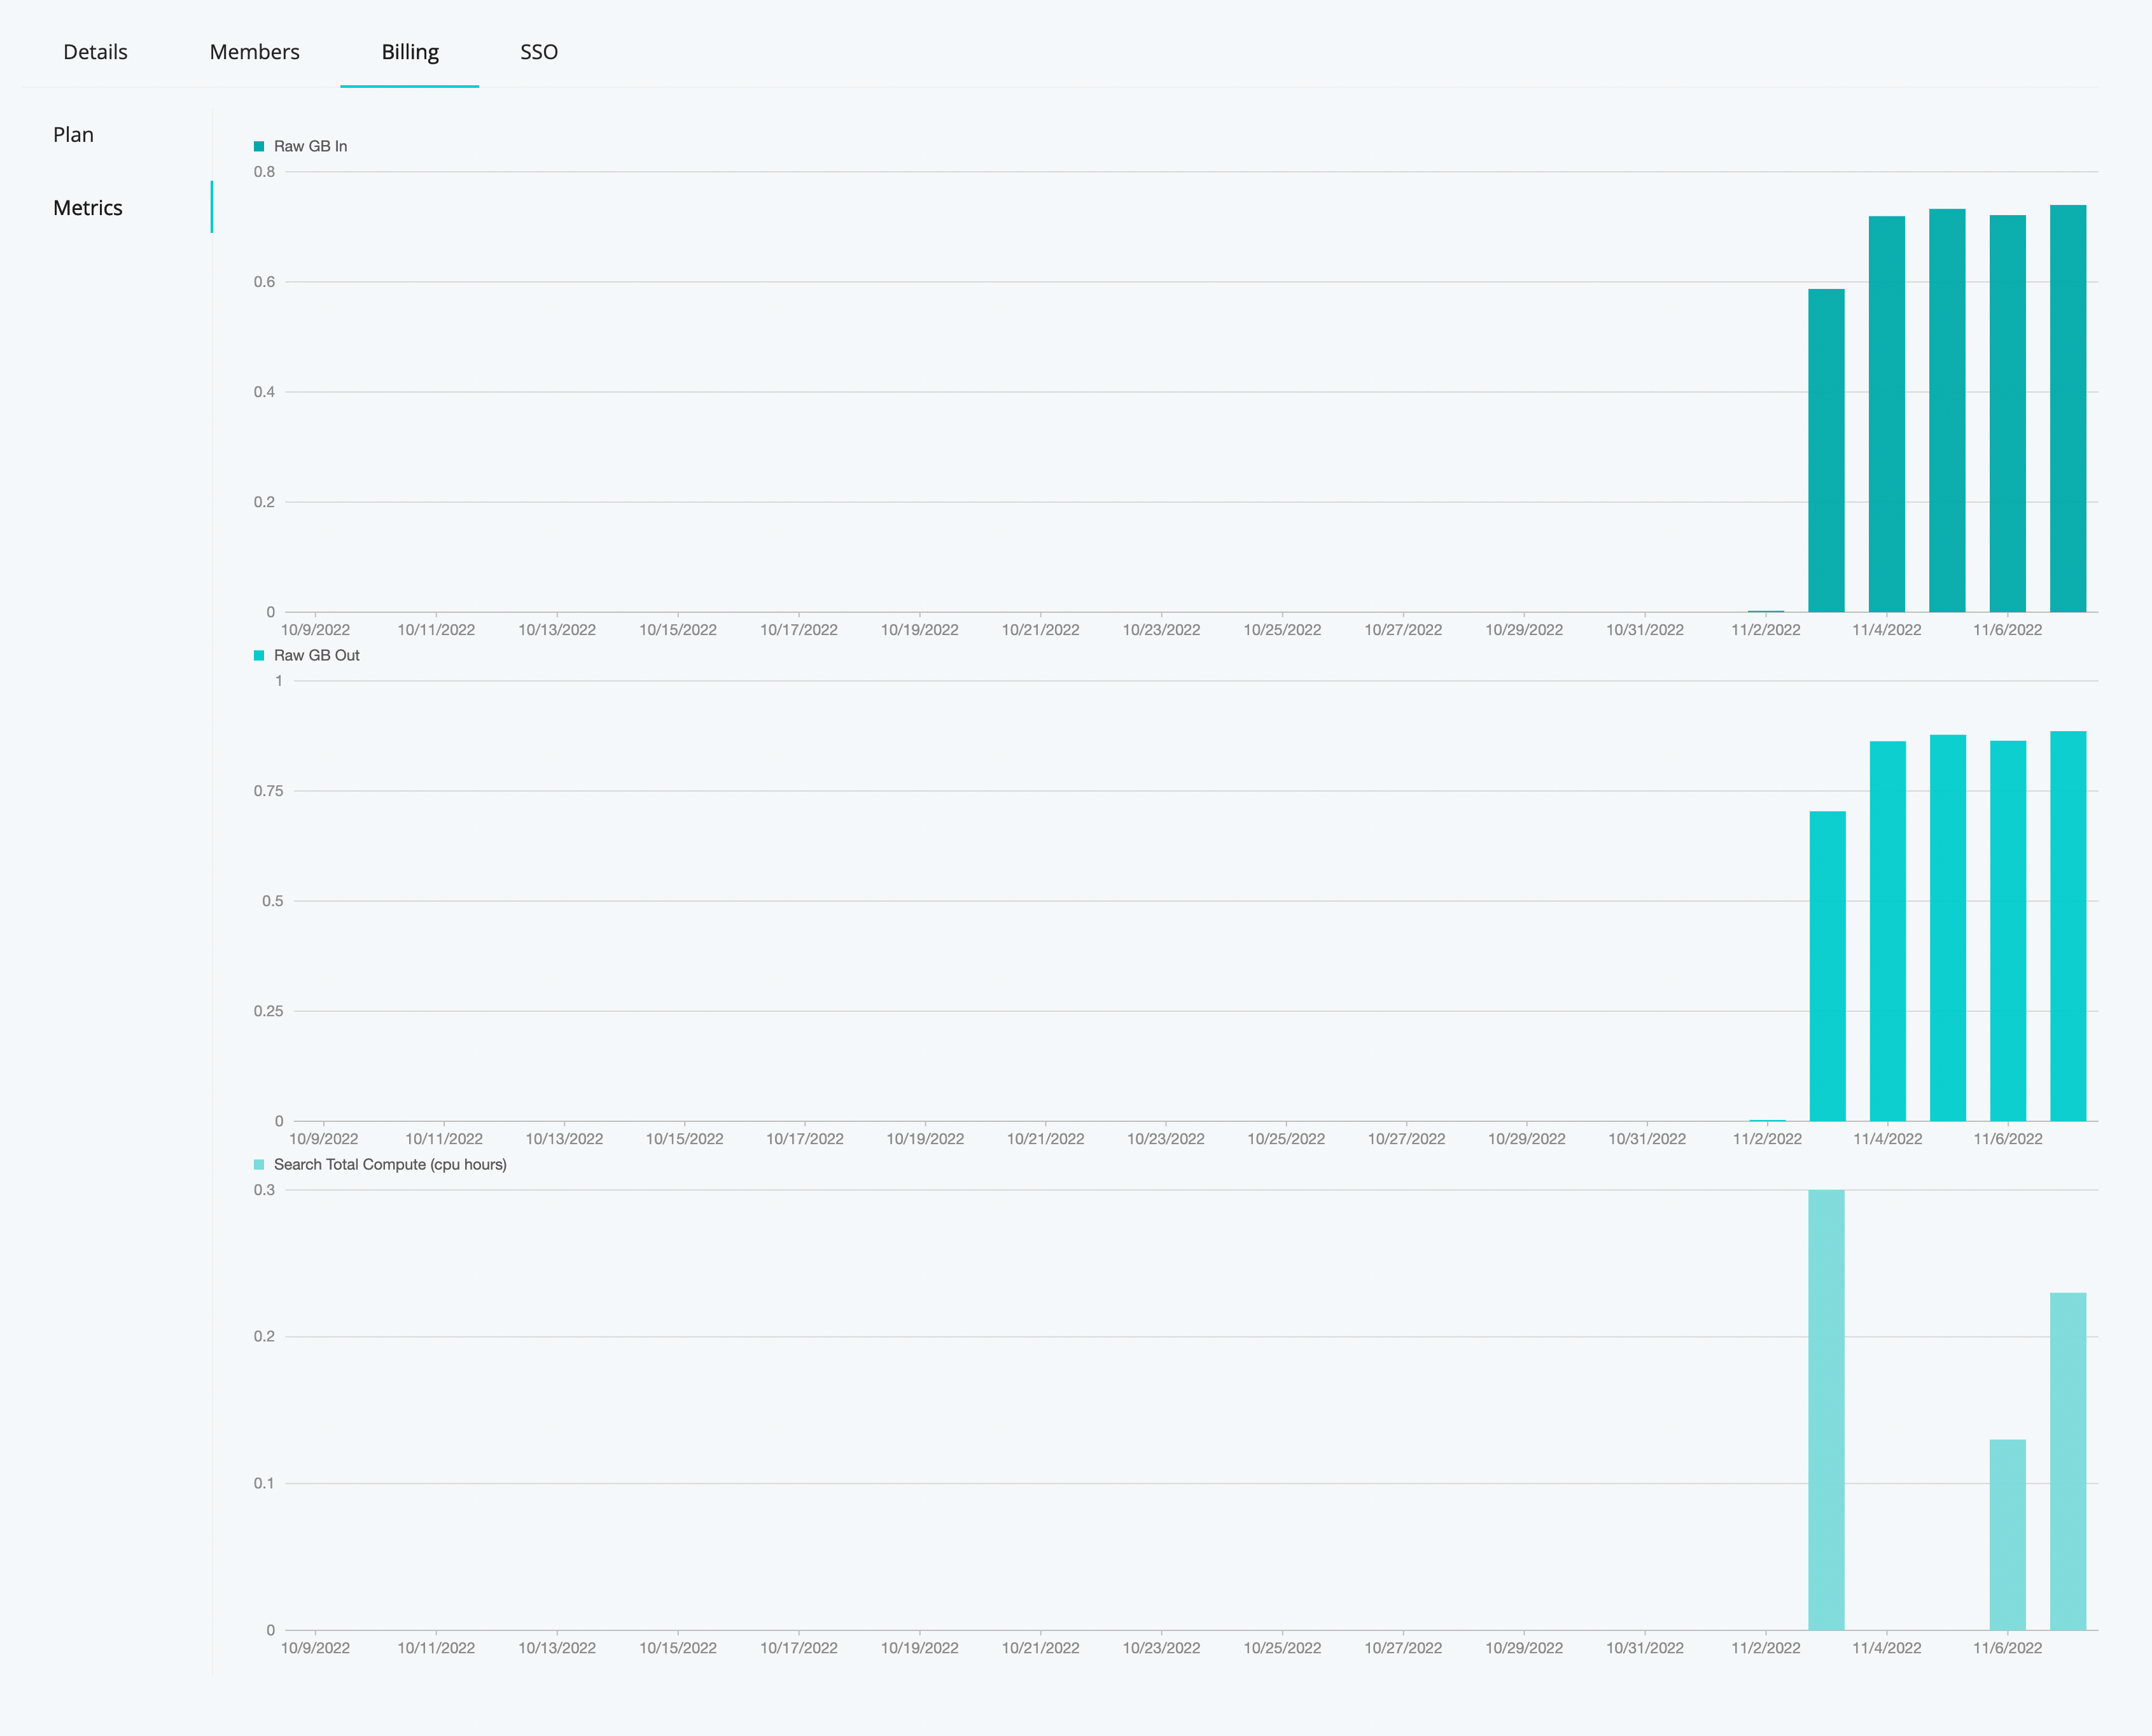
Metrics Tab
The Metrics left tab provides bar graphs showing Raw GB In and Raw GB Out for each day over the last month.
SSO Tab
This tab appears on an Enterprise plan, enabling you to configure federated authentication to your Cribl.Cloud Organization from an OIDC or SAML identity provider. For details, see Cribl.Cloud SSO Setup.
Managing Cribl.Cloud
Once you’ve registered on the portal, here’s how to access Cribl.Cloud:
- Sign in to your Cribl.Cloud portal page.
- Select the Organization to work with.
- From the portal page, select Manage Stream, Manage Edge, or Explore [Search].
- The selected application’s UI will open in a new tab or window - ready to goat!
Note the Cribl.Cloud link at the Cribl.Cloud home page’s upper left, under the Welcome! message. You can click this link to reopen the Cribl.Cloud portal page and all its resources.

Inviting and Managing Other Users
From the Organization > Members tab, an Organization’s owner can invite new users to join the Organization, assign access Roles to new and existing Members, and remove pending invites and/or existing Members.
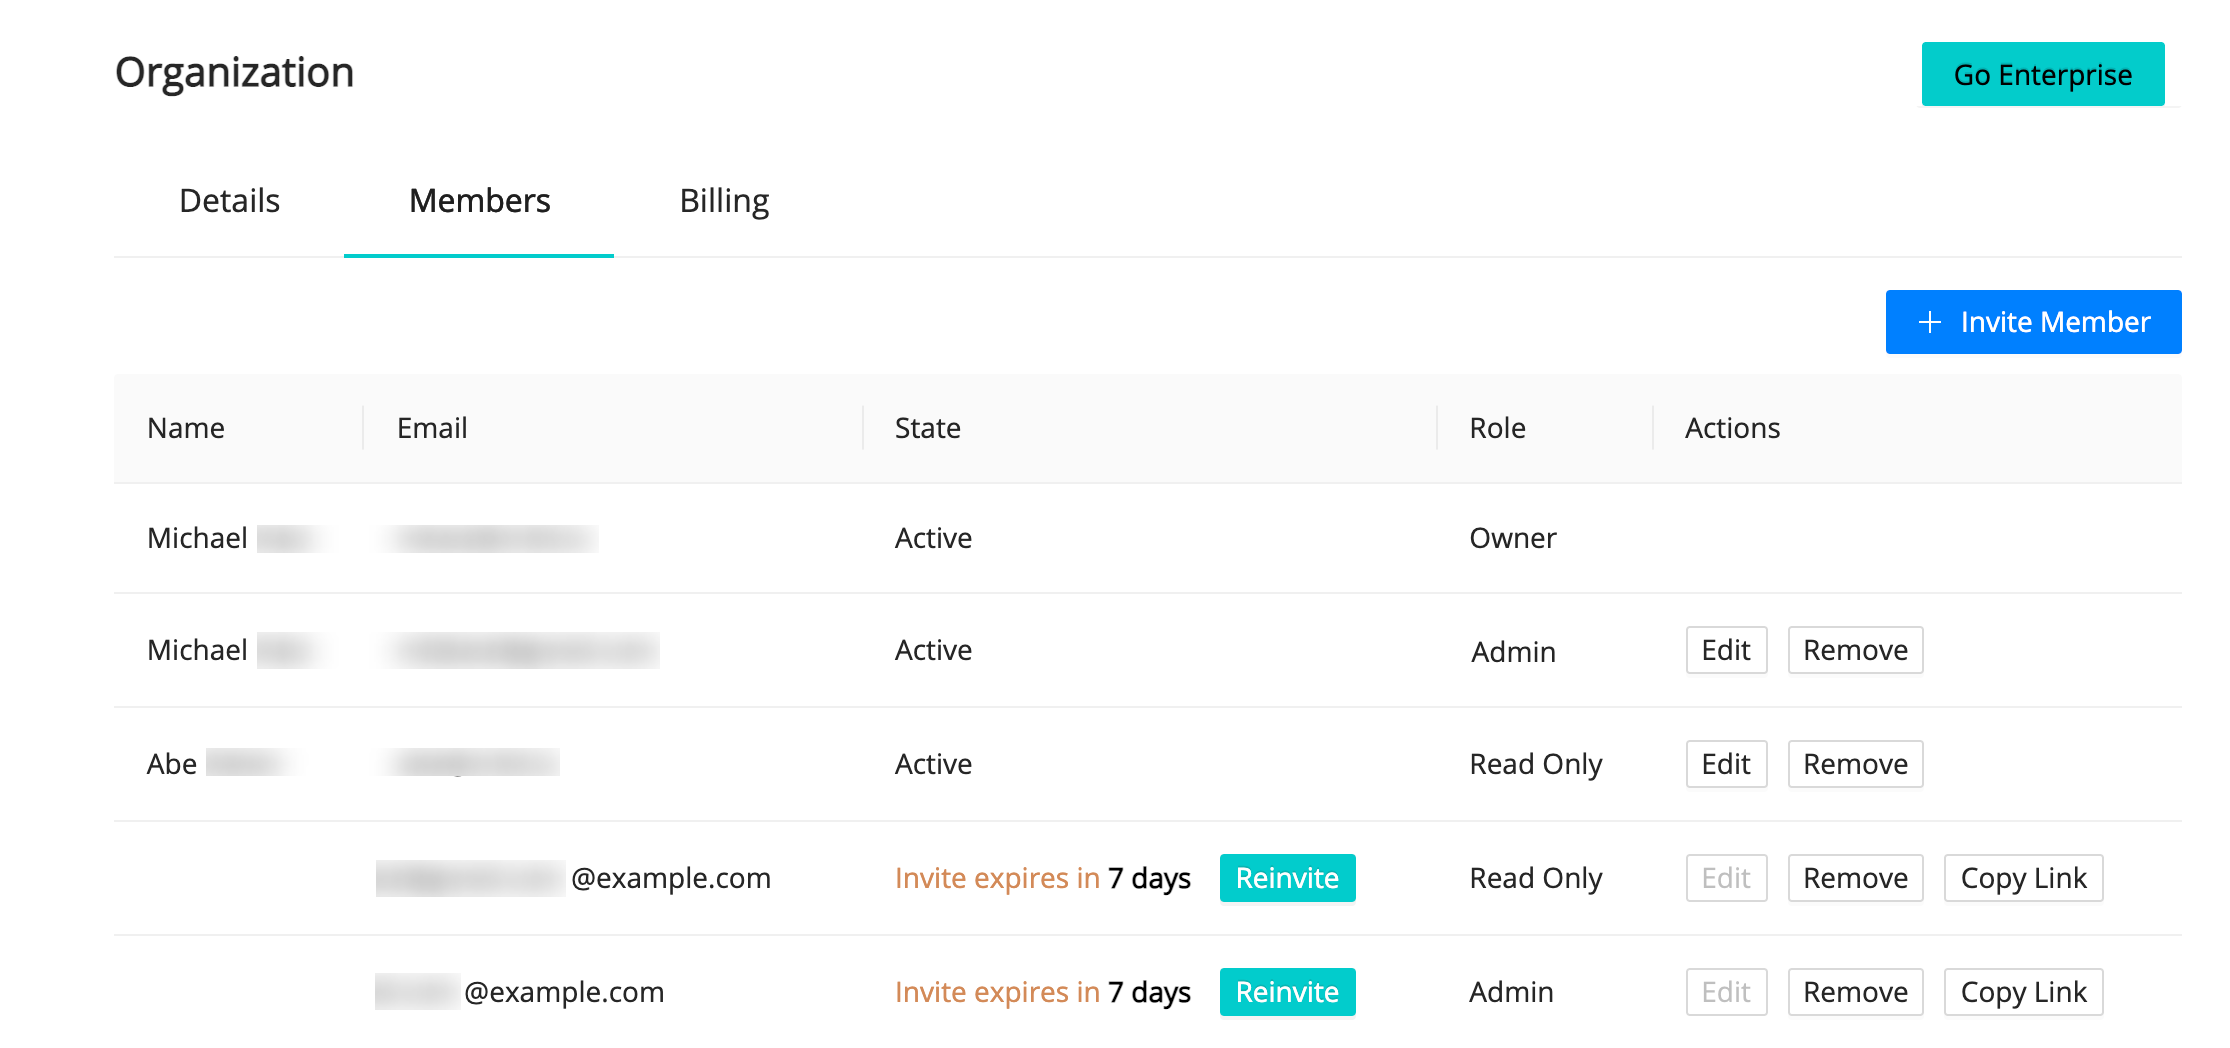
Inviting Members
Click + Invite Member to open the modal shown below. Enter the Email address of the new user you want to invite, assign them a Role (explained just below), and then click Invite to send the invitation.
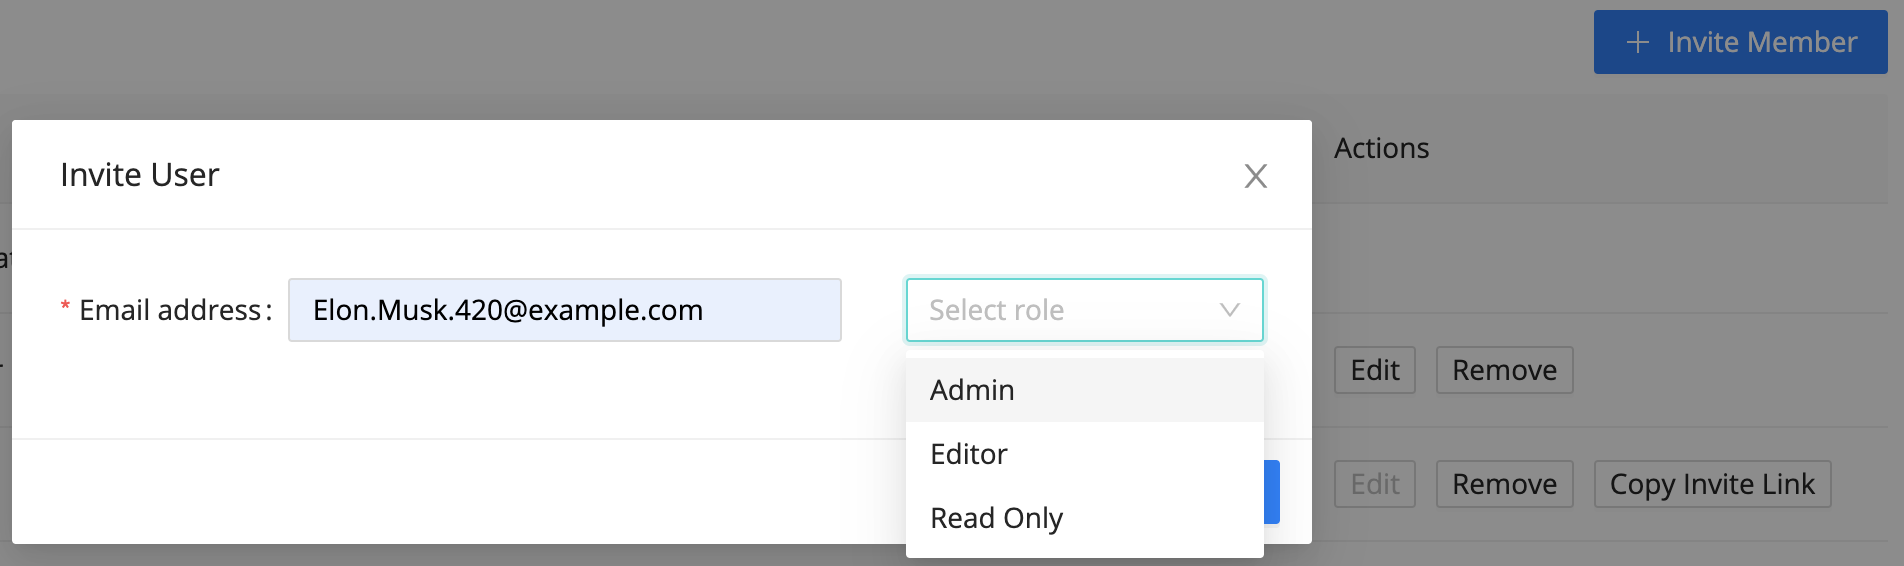
Member Roles
Each Role that you can assign to Members confers a default Role within the Organization’s Cribl.Cloud instance. Here are the Roles, their corresponding permissions, and who can assign each:
| Member Role | Cribl Edge Role | Options/Restrictions |
|---|---|---|
Admin | admin | Any Organization owner can assign |
Editor | editor_all | Assignable only with Enterprise plan |
Read-Only | reader_all | Assignable only with Enterprise plan |
Owner | admin | Can’t be assigned, but can manage Organization details |
Note that:
Owners of non-Enterprise Cribl.Cloud Organizations can assign only the
AdminRole in the Invite User modal shown above.Expanded role-based access control - i.e., the ability to manage the
EditorandRead-OnlyRoles shown above - is available only with an Enterprise plan. (For all available Enterprise features, see Pricing.)
Only an Organization’s Owner can manage the Organization’s details.
You assign Roles per individual user, when you invite them to your Organzation. Cribl.Cloud does not currently support globally predefining or assigning group Roles, as with on-prem Cribl Edge. However, Admins can change users’ Roles after those users join their Organization.
Cribl.Cloud Roles Rule Cribl Edge Access
When you assign a Cribl.Cloud Member Role, it is mapped to a Cribl Edge Role as described above. However, these users will not be visible as local users within the UI of Cribl Edge Cloud instances managed by Cribl.
Also, within these instances’ UI: modifying Roles not mapped above will have no effect; and adding local users will have no effect.
Responding to Invites
At the address you entered, the new Member receives an email with an Accept Invitation link to either sign into their existing Cribl.Cloud account, or else sign up to create an account and its credentials.
After signing in, they’ll have access to your Organization and Cribl Edge instance at the Role level you’ve specified.
Managing Invites
While an invite is pending, the Organization > Members tab offers you these options to deal with commonly encountered issues:
Reinvite: If your invited Member didn’t receive your invitation email, you can click this button to resend it.
Copy Link: If emails aren’t getting through at all, click this button to copy and share a URL that will take the invitee directly to the signup page. This target page encapsulates the same identity, Organization, and Role you specified in the original email invite.
Remove: This is for scenarios where you need to revoke a pending invite. (You sent someone a duplicate invite, your invitee is spending too much time in space to be a productive collaborator, etc.) After clicking this button, you’ll see a confirmation dialog.
After 7 days, if an invite has been neither accepted nor revoked, it expires. In this case, it is removed from the Members tab.

Managing Members
Once a user has accepted an invite, the Organization > Members tab offers you these options to modify their membership in your Organization:
Edit: Switch this Member to a different Role. (The Edit option is displayed only if you have an Enterprise plan.)
Remove: Remove this Member from your Organization. After clicking this button, you’ll see a confirmation dialog. (Proceeding will not affect this user’s access to any other Cribl.Cloud Organizations they might own or be Members of.)
Cloud Pricing
Beyond the free tier, an optional paid Cribl.Cloud account - whether Standard or Enterprise - offers direct support, plus expanded daily data throughput according to your needs. At the top of your Cribl.Cloud portal, select Go Enterprise to submit an inquiry about upgrading your free account, and Cribl will respond.
You’ll pay only for what you use - the data you send to Cribl Edge, and the data sent to external destinations. However, data sent to your AWS S3 storage is always free. For details, see Pricing.
Differences from Self-Hosted Cribl Edge
A Cribl.Cloud deployment can differ from an on-prem/customer-managed Cribl Edge deployment in the following ways. Keep in mind all these differences as you navigate Cribl Edge’s current UI, in-app help (including tooltips), and documentation.
Simplified Administration
Cribl.Cloud has been designed with options to accommodate everyone - from first-time evaluators, to Enterprise customers managing a worldwide network of private-cloud, public-cloud, and/or data-center deployments.
Cribl.Cloud’s free offering is designed to help you launch Cribl Edge - and to start processing data - as quickly and easily as possible. Cribl manages many features on your behalf, allowing for a streamlined Settings left nav.
Below are the key options streamlined out of the free Cloud offering. Bear in mind that upgrading to an Enterprise plan will make many of these options configurable:
Simplified Distributed Architecture
Cribl.Cloud is preconfigured as a distributed deployment. With a Free or Standard plan, there is a single Worker button and Worker.
Compared to self-hosted Cribl Edge, the Settings > Worker Processes and Settings > Distributed Settings links are omitted, as are Worker Groups and Mappings links.
With an Enterprise plan, Cribl always provides at least two Workers, and will scale up further Workers as needed to meet your peak load. With an Enterprise plan, you also have the option to configure additional hybrid Workers and Worker Groups.
Git Preconfigured
Without an Enterprise plan, the Settings > Global Settings > System > Git Settings section is omitted. A local git client is preconfigured in your Cribl.Cloud portal. On Cribl.Cloud’s top nav, use the Global Config link (branched icon) to commit/push changes to git. Select Deploy to deploy your committed changes. Cribl.Cloud does not support Git remote repos.
Automatic Restarts and Upgrades
Without an Enterprise plan, the Settings > Controls and Settings > Upgrade links are omitted. Cribl handles restarts and version upgrades automatically on your behalf.
Simplified Access Management and Security
In Cribl.Cloud, you can manage access control for your Organization by clicking **Account **> Organization and selecting the Members tab. The options on this tab will vary depending on your plan.
If you have a Cribl.Cloud Enterprise plan, you can use the Key Management Service (KMS), which maintains the keys Cribl Edge uses to encrypt secrets on Fleets and Edge Nodes. Go to Settings > Security > KMS to configure KMS.
If you add an Enterprise Plan, Cloud and hybrid Leaders support Local and Google SSO authentication, along with OpenID Connect (OIDC) and SAML federated authentication. Cribl.Cloud does not currently support LDAP.
Role-based access control (RBAC) is simplified in Cribl.Cloud. For details, see Member Roles.
Transparent Licensing
The top nav’s Settings > Global Settings > Licensing link is omitted. Your license is managed by your parent Cribl.Cloud portal, where you can check credits and usage history on the Billing tab.
Other Simplified Settings
Cribl is gradually narrowing the limitations listed in this section, as Cribl.Cloud gains feature parity with on-prem deployments:
- The Script Collector is available only on hybrid, customer-managed Workers. (This feature is currently not available on Cribl-managed Workers.)
- The System State Source is unavailable on Cribl-managed Workers.
- The AppScope Source’s Filter Settings are unavailable on Cribl-managed Workers.
- The top nav’s Settings > Global Settings > Scripts link is omitted from Cribl.Cloud, which currently does not support configuring or running shell scripts on hybrid or Cribl-managed Workers.
- The Filesystem Collector and Filesystem Destination are available only on hybrid Workers. (Cribl-managed Workers have no local filesystem to read from or write to.)
- Persistent Queues can be configured on both hybrid and Cribl-managed Workers, with an Enterprise plan. On hybrid Workers, you can freely define the Max queue size, based on the disk space you provision. On Cribl-managed Workers, each Source or Destination’s queue is allocated a maximum of 1 GB disk space per Worker Process. (Given this automatic configuration, Cribl-managed Sources and Destinations expose only limited PQ controls.)
- File-based Destinations support staging directories only on hybrid (not Cribl-managed) Workers.
- The Tee Function is available only on hybrid (not Cribl-managed) Workers.
Support Options
At Settings > Diagnostics, you can generate diagnostic bundles and send them directly to Cribl Support. Currently, you cannot download diags. For all support options, see Get Product Help.
Available Ports and TLS Configurations
To get data into Cribl.Cloud, your Cribl.Cloud portal provides several Sources and ports already enabled for you, plus 11 additional TCP ports (20000-20010) that you can use to add and configure more Cribl Edge Sources.
The Cribl.Cloud portal’s Data Sources tab displays the pre-enabled Sources, their endpoints, the reserved and available ports, and protocol details. For each existing Source listed here, Cribl recommends using the preconfigured endpoint and port to send data into Cribl Edge.
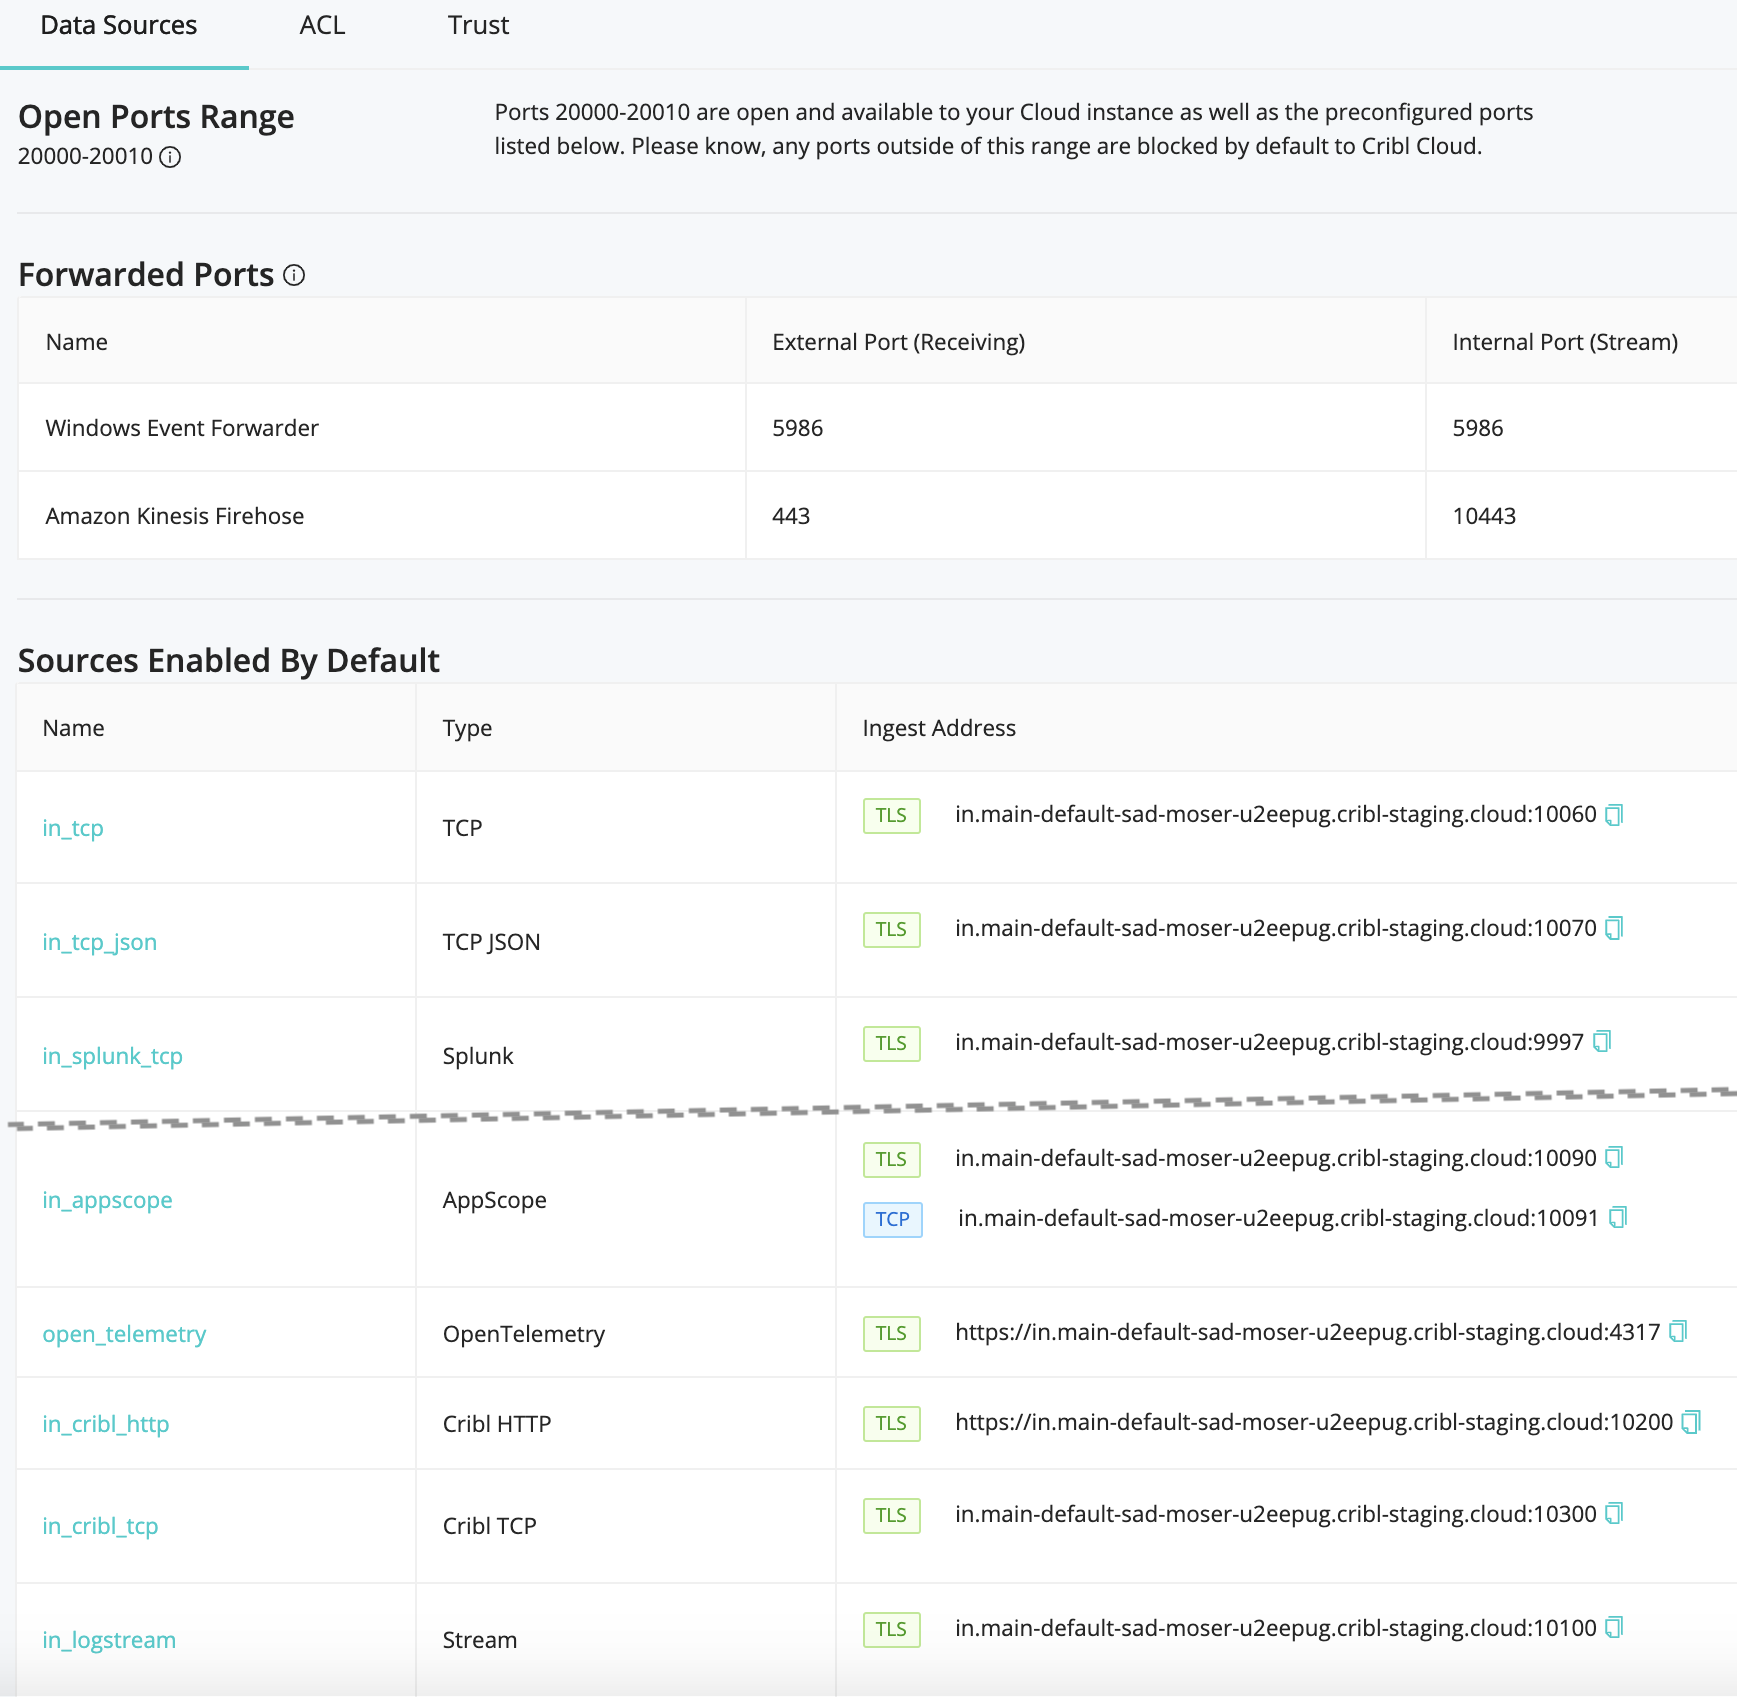
TLS Details
TLS encryption is pre-enabled for you on several Sources, also indicated on the Cribl.Cloud portal’s Data Sources tab. All TLS is terminated by individual Nodes.
To enable TLS settings for additional Sources, use these configuration settings:
- Private key path:
/opt/criblcerts/criblcloud.key - CA certificate path:
/opt/criblcerts/criblcloud.crt - Minimum TLS version:
TLSv1.2
Currently, Cribl.Cloud does not enable you to import your own certificates for mutual TLS authentication. Cribl.Cloud uses TLS to provide encryption in the wire, but leaves authentication at the protocol layer - e.g., Splunk HEC or S2S tokens, Kafka authorization, etc.
Cribl HTTP and Cribl TCP Sources/Destinations
Use the Cribl HTTP Destination and Source, and/or the Cribl TCP Destination and Source, to relay data between Edge Nodes connected to the same Leader. This traffic does not count against your ingestion quota, so this routing prevents double-billing. (For related details, see Exemptions from License Quotas.)
Simplified Source, Collector, and Destination Configuration
Several commonly used Sources are preconfigured for you within Cribl.Cloud’s UI, and are ready to use.
The Cribl Internal Source is omitted from Cribl.Cloud instances, because Cribl manages these instances’ uptime and diagnostics on your behalf. Also, the Exec Source, available in self-hosted v.3.3 and above, is unavailable in Cribl.Cloud instances.
In a preconfigured Source’s configuration, never change the Address field, even though the UI shows an editable field. If you change these fields’ value, the Source will not work as expected.
After you create a Source and deploy the changes, it can take a few minutes for the Source to become available in Cribl.Cloud’s load balancer. However, Cribl Edge will open the port, and will be able to receive data, immediately.
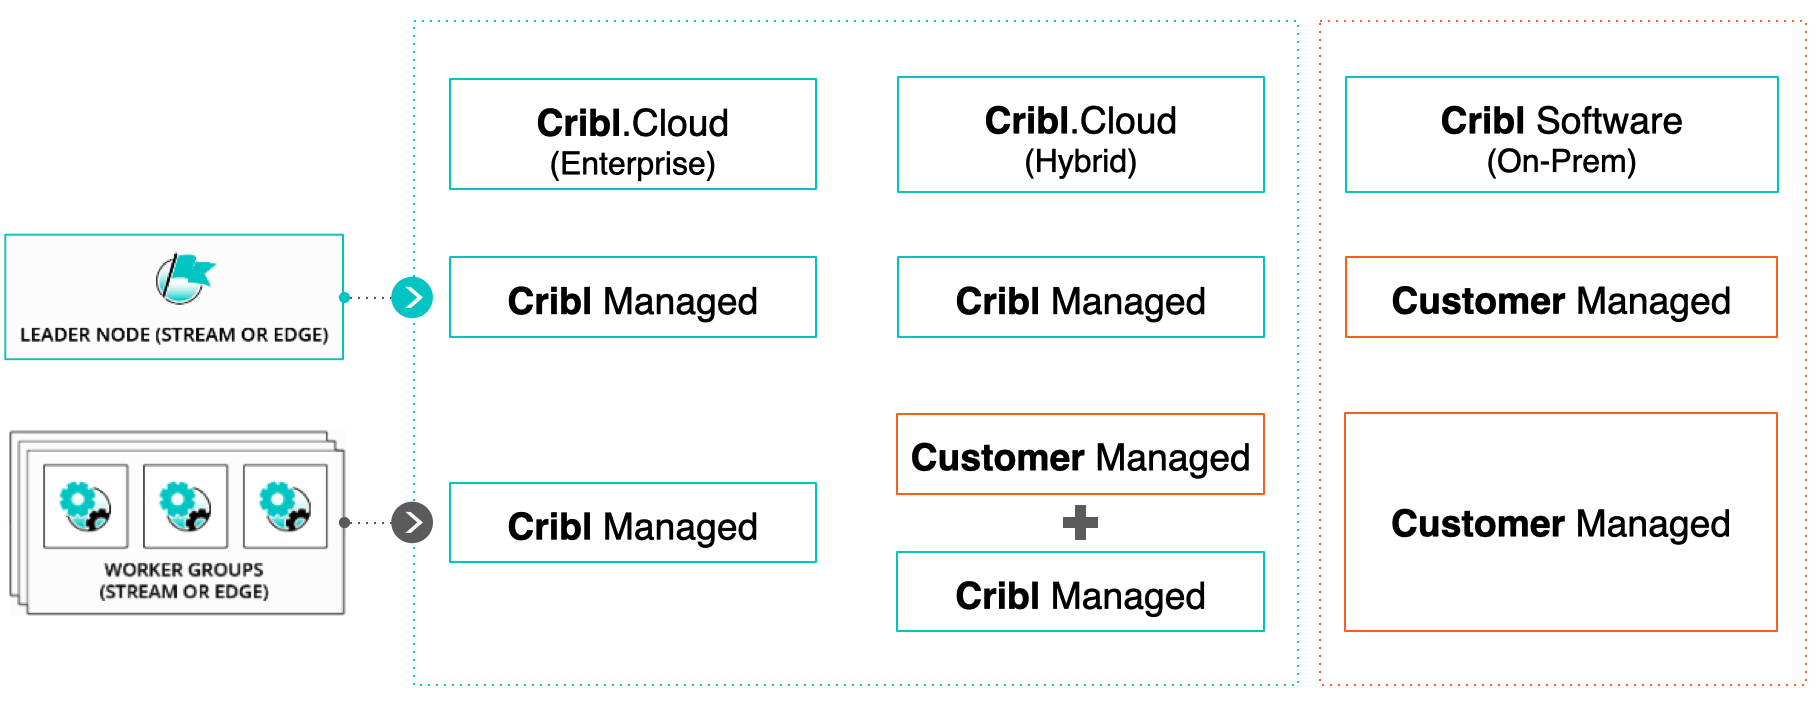
Enterprise Cloud
With a Cribl.Cloud Enterprise plan, you have the same options and flexibility as with an Enterprise license for an on-prem Cribl Edge distributed deployment - and more. (See Pricing for comparisons between Cloud plans and on-prem licenses.)
These options include configuring and managing multiple Worker Groups or Fleets, Notifications, Google SSO authentication, and Role-based access control to Cribl Edge resources.
For other Enterprise features, see Pricing.
Cribl.Cloud Enterprise also adds:
- Full control of Member Roles on your Cribl.Cloud Organization.
- The hybrid deployment option, described just below.
- The Leader resides in Cribl.Cloud, with access to diverse Worker deployments. Cribl manages the Leader’s availability.
Hybrid Deployment
The diagrams below show the comparative flexibility of a Cribl.Cloud hybrid deployment. The Leader (control plane) resides in Cribl.Cloud, while the Workers that process the data can be in any combination of the following environments:
- In Cribl.Cloud, managed by Cribl.
- In public or private cloud instances that you manage.
- On-prem in your data centers.
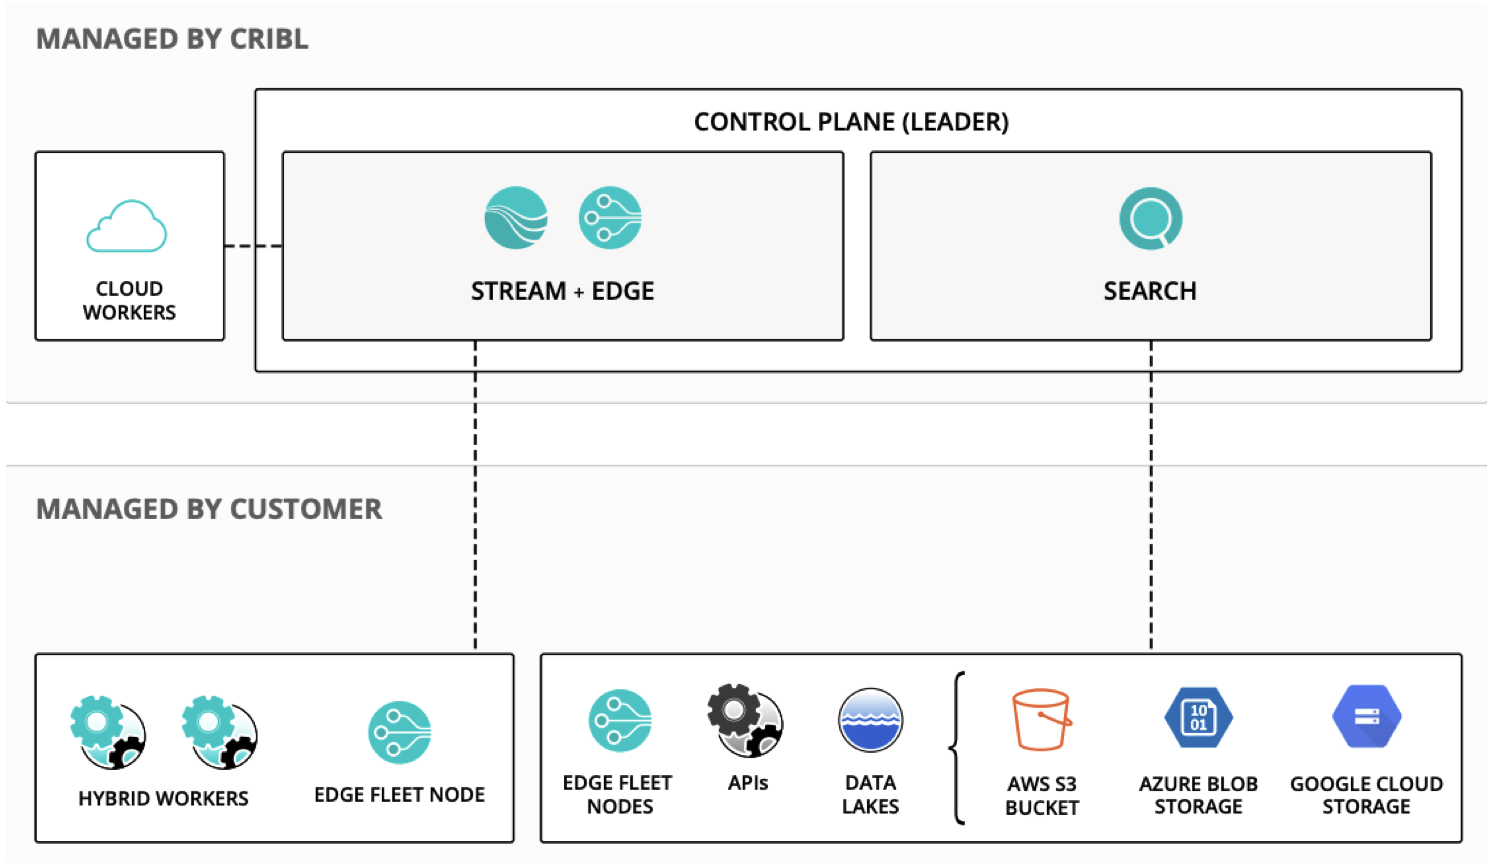
As the footprint of your operations grows or changes, this flexibility makes it easy to reconfigure Cribl Edge in tandem. You can rapidly expand Cribl Edge observability into new cloud regions - and replace monitored hardware data centers with cloud instances - all while maintaining one centralized point of control.
You can also add Workers, and reassign them to different Worker Groups, by easily auto-generating command-line scripts within Cribl Edge’s UI.
Hybrid Requirements
A hybrid deployment imposes these configuration requirements:
- Hybrid Workers (meaning, Workers that you deploy on-prem, or in cloud instances that you yourself manage) must be assigned to a different Worker Group than the Cribl-managed
defaultGroup - which can contain its own Workers. - All Workers’ hosts must allow outbound communication to the Cribl.Cloud Leader’s port 4200 at
https://main-<Organization-name>.cribl.cloud:4200, to enable configuration and workload management by the Leader. - On all Workers’ hosts, firewalls must allow outbound communication on port 443 to the Leader, and on port 443 to
https://cdn.cribl.io. - If this traffic must go through a proxy, see System Proxy Configuration for configuration details.
- To verify your Leader’s Region and public URL, open the Access Details modal.
Note that you are responsible for data encryption and other security measures on Worker instances that you manage.
Adding (Bootstrapping) Workers
To add Workers to your Cloud hybrid deployment, Cribl recommends that you use the script outlined in Bootstrap Workers from Leader. Hosts for the new Workers must open the same ports (4200 and 443) listed in Hybrid Requirements.
You have three options for generating the script, outlined in these subsections of the Bootstrap topic linked above:
- Auto-generate it from the Leader’s UI.
- Make a
GETAPI request to the Leader. - curl the same API request.
In Cribl Edge, you access all these bootstrap options via the Manage Edge Nodes page’s Add/Update Edge Node control.
Hybrid Cribl HTTP/Cribl TCP Configuration
If you use the Cribl HTTP Destination and Source pair, or the Cribl TCP Destination and Source pair, to relay data between Edge Nodes connected to the same Leader, configuring hybrid Workers demands particular care:
- The Edge Nodes that host each pair’s Destination and Source must specify exactly the same Leader Address. Otherwise, token verification will fail - breaking the connection, and preventing data flow.
- Configure hybrid Workers by logging directly into their UI, then selecting Settings > Global Settings > Distributed Settings. Make sure the Mode is set to Managed Worker or Managed Edge (which might require a restart).
- Then select the Leader Settings left tab, and ensure a consistent entry in the Address field.
- In Cloud hybrid deployments, the Leader’s Address format is
main-<your-Org-ID>.cribl.cloud. When configuring a hybrid Worker, use that format in the Address field.