


These docs are for Cribl Edge 4.10 and are no longer actively maintained.
See the latest version (4.17).
Splunk TCP Source
Cribl Edge supports receiving Splunk data from Universal or Heavy Forwarders.
Type: Push | TLS Support: YES | Event Breaker Support: YES
For examples of optimizing incoming Splunk events for downstream services, see our Splunk Stream to Cribl Stream, Splunk to Elasticsearch, and Splunk to Exabeam guides.
Also examine several Splunk Forwarder/UF Packs on the Cribl Packs Dispensary. These provide processing Pipelines to optimize Splunk Windows events and Universal Forwarder internal events. You can directly import these and adapt them to your needs.
Configure Cribl Edge to Receive Splunk TCP Data
Cribl Edge ships with a Splunk TCP Source preconfigured to listen on Port 9997. You can clone or directly modify this Source to further configure it, and then enable it.
In Cribl Edge, configure Splunk TCP:
- On the top bar, select Products, and then select Cribl Edge. Under Fleets, select a Fleet. Next, you have two options:
- To configure via QuickConnect, navigate to Routing > QuickConnect (Stream) or Collect (Edge). Select Add Source and select the Source you want from the list, choosing either Select Existing or Add New.
- To configure via the Routes, select Data > Sources (Stream) or More > Sources (Edge). Select the Source you want. Next, select Add Source.
- Configure the following under General Settings:
- Input ID: Enter a unique name. The default Source is prefilled with the value
in_splunk_tcp, which can’t be changed via the UI. If you clone this Source, Cribl Edge will add-CLONEto the original Input ID. - Description: Optionally, enter a description.
- Address: Enter hostname/IP to listen for Splunk data. For example,
localhostor0.0.0.0. - Port: Enter port number.
- Input ID: Enter a unique name. The default Source is prefilled with the value
- Next, you can configure the following Optional Settings:
- Tags: Optionally, add tags that you can use to filter and group Sources in Cribl Edge’s UI. These tags aren’t added to processed events. Use a tab or hard return between (arbitrary) tag names.
- Optionally, you can adjust the TLS, Persistent Queue Settings, Processing, Auth tokens and Advanced settings, or Connected Destinations outlined in the sections below.
- Select Save, then Commit & Deploy.
TLS Settings (Server Side)
Enabled: Defaults to toggled off. When toggled on:
Certificate name: Name of the predefined certificate.
Private key path: Server path containing the private key (in PEM format) to use. Path can reference $ENV_VARS.
Passphrase: Passphrase to use to decrypt private key.
Certificate path: Server path containing certificates (in PEM format) to use. Path can reference $ENV_VARS.
CA certificate path: Server path containing CA certificates (in PEM format) to use. Path can reference $ENV_VARS.
Authenticate client (mutual auth): Require clients to present their certificates. Used to perform mutual authentication using SSL certs. Default is toggled off. When toggled on:
Validate client certs: Reject certificates that are not authorized by a CA in the CA certificate path, or by another trusted CA (for example, the system’s CA). Default is toggled on.
Common Name: Regex that a peer certificate’s subject attribute must match in order to connect. Defaults to
.*. Matches on the substring afterCN=. As needed, escape regex tokens to match literal characters. (For example, to match the subjectCN=worker.cribl.local, you would enter:worker\.cribl\.local.) If the subject attribute contains Subject Alternative Name (SAN) entries, the Source will check the regex against all of those but ignore the Common Name (CN) entry (if any). If the certificate has no SAN extension, the Source will check the regex against the single name in the CN.
Minimum TLS version: Optionally, select the minimum TLS version to accept from connections.
Maximum TLS version: Optionally, select the maximum TLS version to accept from connections.
Persistent Queue Settings
In the Persistent Queue Settings tab, you can optionally specify persistent queue storage, using the following controls. Persistent queue buffers and preserves incoming events when a downstream Destination has an outage or experiences backpressure.
Before enabling persistent queue, learn more about persistent queue behavior and how to optimize it with your system:
On Cribl-managed Cloud Workers (with an Enterprise plan), this tab exposes only the Enable Persistent Queue toggle. If enabled, PQ is automatically configured in
Always Onmode, with a maximum queue size of 1 GB disk space allocated per PQ-enabled Source, per Worker Process.The 1 GB limit is on uncompressed inbound data, and the queue does not perform any compression. This limit is not configurable. For configurable queue size, compression, mode, and other options below, use a hybrid Group.
Enable Persistent Queue: Default is toggled off. When toggled on:
Mode: Select a condition for engaging persistent queues.
Always On: This default option will always write events to the persistent queue, before forwarding them to the Cribl Stream data processing engine.Smart: This option will engage PQ only when the Source detects backpressure from the Cribl Stream data processing engine.
Smartmode only engages when necessary, such as when a downstream Destination becomes blocked and the Max buffer size reaches its limit. When persistent queue is set toSmartmode, Cribl attempts to flush the queue when every new event arrives. The only time events stay in the buffer is when a downstream Destination becomes blocked.
Max buffer size: The maximum number of events to hold in memory before reporting backpressure to the sender and writing the queue to disk. Defaults to 1000. This buffer is for all connections, not just per Worker Process. For that reason, this can dramatically expand memory usage. Connections share this limit, which may result in slightly lower throughput for higher numbers of connections. For higher numbers of connections, consider increasing the limit.
Commit frequency: The number of events to send downstream before committing that Stream has read them. Defaults to 42.
Max file size: The maximum data volume to store in each queue file before closing it and (optionally) applying the configured Compression. Enter a numeral with units of KB, MB, and so forth. If not specified, Cribl Stream applies the default 1 MB.
Max queue size: The maximum amount of disk space that the queue is allowed to consume on each Worker Process. Once this limit is reached, this Source will stop queueing data and block incoming data. Required, and defaults to 5 GB. Accepts positive numbers with units of KB, MB, GB, and so forth. Can be set as high as 1 TB, unless you’ve configured a different Worker Process PQ size limit in Group/Fleet settings.
Queue file path: The location for the persistent queue files. Defaults to $CRIBL_HOME/state/queues. To this field’s specified path, Cribl Stream will append /<worker-id>/inputs/<input-id>.
Compression: Optional codec to compress the persisted data after a file closes. Defaults to None; Gzip is also available.
In Cribl Stream 4.1 and later, the Source persistent queue default Mode is
Always on, to best ensure events’ delivery. For details on optimizing this selection, see Optimize Source Persistent Queues (sPQ).You can optimize Workers’ startup connections and CPU load at Group/Fleet settings > Worker Processes.
Processing Settings
Event Breakers
Event Breakers are applied only to raw, unparsed data. Data originating from Splunk Heavy Forwarders or Universal Forwarders with sourcetypes configured for event breaking or indexed extractions bypasses Event Breakers, as it is already segmented into discrete events.
Event Breaker rulesets: A list of event breaking rulesets that will be applied to the input data stream before the data is sent through the Routes. Defaults to System Default Rule.
Event Breaker buffer timeout: How long (in milliseconds) the Event Breaker will wait for new data to be sent to a specific channel, before flushing out the data stream, as-is, to the Routes. Minimum 10 ms, default 10000 (10 sec), maximum 43200000 (12 hours).
Fields
In this section, you can add Fields to each event, using Eval-like functionality.
Name: Field name.
Value: JavaScript expression to compute field’s value, enclosed in quotes or backticks. (Can evaluate to a constant.)
Pre-Processing
In this section’s Pipeline drop-down list, you can select a single existing Pipeline or Pack to process data from this input before the data is sent through the Routes.
Auth Tokens
Add Token : Click to add authorization tokens. Each token’s section provides the fields listed below. If no tokens are specified, unauthenticated access will be permitted.
Token: Shared secrets to be provided by any Splunk forwarder (Authorization: <token>). Click Generate to create a new secret.
Description: Optional description for this token.
Advanced Settings
Enable Proxy Protocol: Toggle on if the connection is proxied by a device that supports Proxy Protocol v1 or v2.
IP allowlist regex: Regex matching IP addresses that are allowed to establish a connection. Defaults to .* (such as, all IPs).
Max active connections: Maximum number of active connections allowed per Worker Process. Defaults to 1000. Set a lower value if connection storms are causing the Source to hang. Set 0 for unlimited connections.
Socket idle timeout (seconds): The duration that Cribl Edge will wait for activity on an idle TCP socket before closing the connection. Disabled when set to 0, the default.
Forced socket termination timeout (seconds): The extra time the server waits before forcibly closing a socket that has been idle (TCP socket idle timeout) or exceeded its maximum lifespan (TCP socket max lifespan) but has not yet properly closed. This prevents resource leaks caused by unresponsive clients or network issues. Configure based on network latency and client behavior. Default: 30 seconds. Set to 0 to disable.
Socket max lifespan (seconds): The duration that a socket is allowed to remain open, regardless of activity. This setting prevents resource exhaustion (such as TCP pinning) by limiting the lifespan of connections. Configure based on expected connection durations and resource availability. Disabled when set to 0, the default.
Max S2S version: The highest version of the Splunk-to-Splunk protocol to expose during handshake. Defaults to v4; v3 is also available.
Use Universal Forwarder time zone: Displayed (and enabled by default) only when Max S2S version is set to v4. Provides Event Breakers with a __TZ field, which derives events’ time zone from UF-provided metadata. See Using the UF Time Zone and Configuring a Splunk Forwarder, below.
Drop control fields: Toggle on (default) to drop Splunk control fields such as crcSalt and savedPort. Toggle off if you want to retain these fields and store the data in the __ctrlFields internal field.
Extract metrics: Toggle on if you’re using Splunk’s S2S protocol. When enabled, Cribl will identify and handle Splunk metric events, ensuring that metric events generated by Splunk are processed and forwarded as metrics.
Environment: If you’re using GitOps, optionally use this field to specify a single Git branch on which to enable this configuration. If empty, the config will be enabled everywhere.
Connected Destinations
Select Send to Routes to enable conditional routing, filtering, and cloning of this Source’s data via the Routing table.
Select QuickConnect to send this Source’s data to one or more Destinations via independent, direct connections.
Using the UF Time Zone
Under Advanced Settings, the Use Universal Forwarder time zone toggle mitigates cases where incoming events have timestamp strings but no time zone information. For example:
12-15-2022 14:57:22.080 WARN TcpOutputFd [1607 TcpOutEloop] - Connect to 172.17.0.1:9997 failed. Connection refusedThis gap can be problematic, especially if the originating Universal Forwarder is in a different time zone from the processing Edge Node.
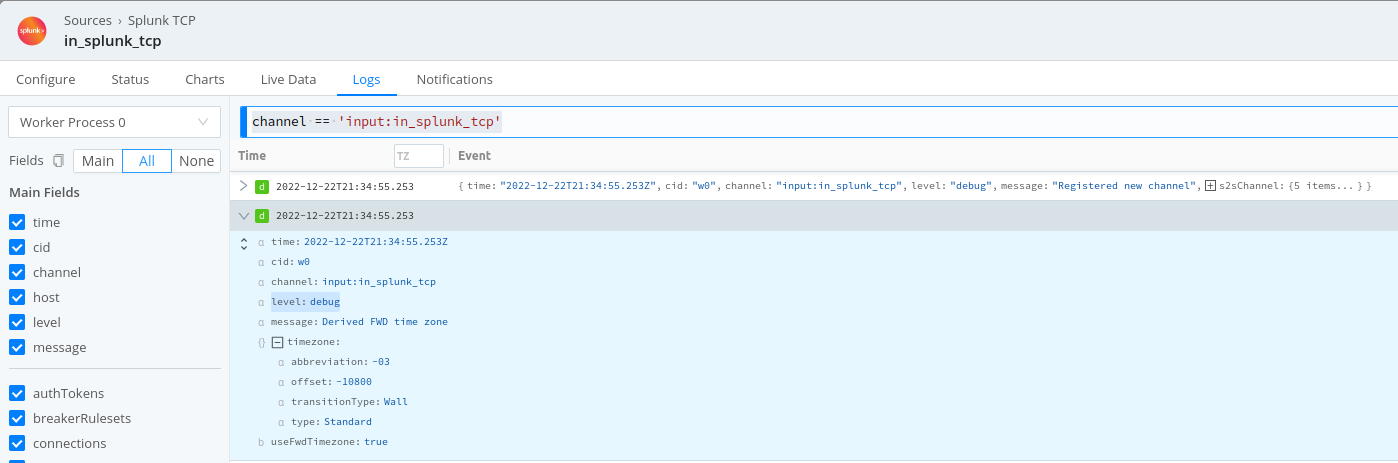
The __TZ field is the solution. Event Breakers use the __TZ field to derive time zone information, enabling them to set the _time field correctly. Derived time zone information will appear in Cribl Edge’s own logs as shown below:
Setting the Log Level for Connection Messages
When a Splunk forwarder connects to Cribl Edge, Cribl Edge logs the following message at the debug level: Connection with forwarder has been established successfully.
To see this message, set the :forwarders level to debug.
Each message contains details specific to the forwarder, such as the protocol, Splunk version, or remote host, to name a few.
In some situations, logging each incoming connection can produce many messages, which can make it hard to find other messages.
You can adjust the level of these connection messages. To do so, follow these steps:
Select Settings > Global Settings > Logging > Levels.
Search for the channel that logs the connection messages. It will have a name in the form
input:<source-id>:forwarders. For example:input:in_splunk_tcp:forwarders.Set the channel to the log level you prefer, such as
debugorsilly.Click Save to save your setting.
Commit and deploy the change.
Internal Fields
Cribl Edge uses a set of internal fields to assist in handling of data. These “meta” fields are not part of an event, but they are accessible, and Functions can use them to make processing decisions.
Fields for this Source:
__inputId__ctrlFields__s2sVersion- value can be eitherv3orv4__source__srcIpPort__TZ- see above
Configuring a Splunk Forwarder
To configure a Splunk forwarder (UF, HF) use the following sample outputs.conf stanzas:
[tcpout]
disabled = false
defaultGroup = cribl, <optional_clone_target_group>, ...
enableOldS2SProtocol = true

[tcpout:cribl]
server = [<cribl_ip>|<cribl_host>]:<port>, [<cribl_ip>|<cribl_host>]:<port>, ...
compressed = false
sendCookedData = true
# As of Splunk 6.5, using forceTimebasedAutoLB is no longer recommended. Ensure this is left at default for UFs
# forceTimebasedAutoLB = false[tcpout]
disabled = false
defaultGroup = cribl
enableOldS2SProtocol = true
[tcpout:cribl]
server = default.main.<Your-Org-ID>.cribl.cloud:9997
# sslVerifyServerCert = true
sslRootCAPath = $SPLUNK_HOME/etc/auth/cacert.pem
compressed = false
useSSL = true
sendCookedData = trueWith a Cribl.Cloud Enterprise plan, generalize the above URL’s default.main substring to <group-name>.main when sending to other Fleets.
If your use case requires compression, use useClientSSLCompression vs compressed on forwarder to compress the data stream.
Preventing Data Loss with v3
If you set Max S2S version to
v3and are using Splunk 9.1.0 or later, Cribl recommends that you use theenableOldS2SProtocol = truesetting shown above to avoid data loss. If you are working withv3and a Splunk version earlier than 9.1.0, you should usenegotiateProtocolLevel = 0. Depending on your environment, enablingnegotiateProtocolLevelwith a non-0value could cause Cribl Edge to not accept data from the forwarder.If you set Max S2S version to
v4, these settings are not necessary. The Splunk receiver will detect which version is in use and automatically use the correct handler.See Internal Fields for information on the
__s2sVersionfield.
Troubleshooting
The Source’s configuration modal has helpful tabs for troubleshooting:
Live Data: Try capturing live data to see real-time events as they are ingested. On the Live Data tab, click Start Capture to begin viewing real-time data.
Logs: Review and search the logs that provide detailed information about the ingestion process, including any errors or warnings that may have occurred.
You can also view the Monitoring page that provides a comprehensive overview of data volume and rate, helping you identify ingestion issues. Analyze the graphs showing events and bytes in/out over time.
Splunk Forwarder Performance Issues
If you encounter performance issues with a Splunk Forwarder, Cribl recommends increasing the number of parallel ingestion Pipelines or increasing forwarder throughput. You can experiment with either or both of these settings.
To increase the number of parallel ingestion Pipelines, adjust the setting for parallelIngestionPipelines in server.conf. Experiment with values ranging from 2-4.
To adjust forwarder throughput, increase the maxKBps value in limits.conf. The default value is 256. A value of 0 removes all throttling from the forwarder.
“Connection rejected” with a reason of “Too many connections”
The maximum number of active Splunk TCP connections has been exceeded per Worker Process. The default is 1000.
Recommendation
In the Splunk TCP input’s Advanced Settings configuration, increase the Max Active Connections value, set it to 0 for unlimited, and/or increase the # of Worker Processes the Worker Node(s) are using.