


These docs are for Cribl Edge 4.11 and are no longer actively maintained.
See the latest version (4.17).
SSO with Ping Identity and SAML (On-Prem)
Cribl Edge supports setting up SSO using SAML to provide user authentication (login/password) and authorization (by mapping SSO users to Cribl Roles).
This page presents a walkthrough of setting up a SAML SSO, using Ping Identity as the example. Before you begin, make sure to enable TLS for UI access.
This page is a guide for configuring SSO for an on-prem installation. For Cribl.Cloud, see SSO with Ping Identity and SAML (Cribl.Cloud).
Set Up Fallback Access
To ensure fallback access for local users if SSO authentication fails, enable local authentication in Cribl.
In the sidebar, select Settings > Global.
Under Access Management, select Authentication.
Toggle Allow login as Local User to Yes to allow users to log in using Cribl local authentication. This enables the Log in as Local User button on the login page.
To prevent lockout, Cribl strongly recommends enabling Allow login as Local User until you’re certain that external authentication is working as intended. If you do get locked out, see Manual Password Replacement.
Generate URLs in Cribl
In Cribl Edge, generate the URLs you will need to create your Ping Identity application for SSO.
In the sidebar, select Settings > Global.
Under Access Management, select Authentication.
From the Type dropdown, choose
SAML 2.0.In the Audience (SP entity ID) field, enter the base URL of your Cribl Edge instance (for example,
https://yourDomain.com:9000). Do not append a trailing slash, and make sure that your URL uses the HTTPS protocol.If you have a Distributed deployment with a fallback Leader configured, modify the Audience (SP entity ID) field to point to the load balancer instead of the Leader Node.
The Sign-on callback URL automatically populates based on the URL that you enter in the Audience (SP entity ID) field. You will use these URLs to create your Ping Identity application in the next step.
Leave the Authentication page open in Cribl–you will complete the Cribl configuration with information from your Ping Identity application in a later step.
Create SAML 2.0 Application in Ping Identity
To create your SAML 2.0 application in Ping Identity:
In Ping Identity, in the sidebar, select Environments and choose your desired environment.
In the right panel, select Manage Environment.
Follow the Ping Identity tutorial to add a SAML application. Enter the URLs that you generated in Cribl as follows:
Field in Ping Identity Field in Cribl ACS URLs Sign-on callback URL Entity ID Audience (SP entity ID) After you save the application, select it to display the Single Signon Service, Issuer ID, and Download Signing Certificate button. You will need this information to complete the Cribl configuration.
Complete the Cribl Configuration
Return to Cribl Edge to complete the configuration:
In the Authentication page, enter the information from your Ping Identity application as follows:
Field in Cribl Field in Ping Identity Issuer (IDP entity ID) Issuer ID Single sign-on (SSO) URL Single Signon Service Response validation certificate Signing Certificate Select Save.
Map Ping Identity Groups to Cribl Edge Roles
Mapping IDP groups to Cribl Roles is possible only for Cribl Edge deployments that are in Distributed mode, with an Enterprise license. With a Standard license, all your external users will be imported to Cribl Edge in the admin role.
If you are running Cribl Edge in Single-instance mode, you cannot map Ping Identity groups to Cribl Edge Roles, although you can still set up SSO with Ping Identity.
As you think through how best to map your Ping Identity groups to Cribl Edge Roles, keep these principles in mind:
- A Ping Identity group can map to more than one Cribl Edge Role.
- A Cribl Edge Role can map to more than one Ping Identity group.
- If a user has multiple Roles, Cribl Edge applies the union of the most permissive levels of access.
- Cribl Edge automatically assigns the default Role to any user who has no mapped Roles.
For details on mapping your external identity provider’s configured groups to corresponding Cribl Edge user access Roles, see External Groups and Roles.
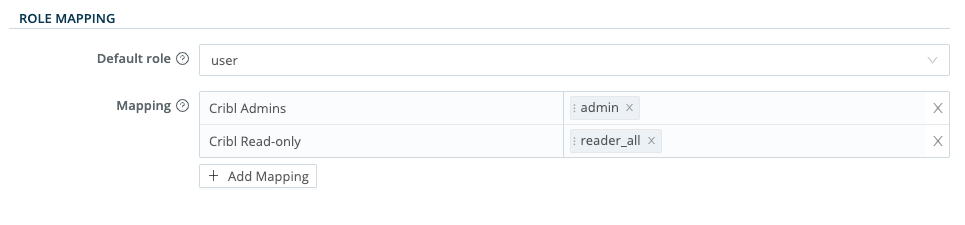
You can assign a Cribl Edge Role to each Ping Identity group name, and you can specify a default Role for users who are not in any groups.
In Cribl Edge, in the sidebar, select Settings > Global.
Under Access Management, select Authentication.
Scroll down to Role Mapping. We recommend that you set the
defaultRole touser, meaning that this Role will be assigned to users who are not in any groups.Add mappings as needed. The Ping Identity group names in the left column are case-sensitive, and must match the values returned by Ping Identity.
Verify that SSO with Ping Identity Is Working
Log out of Cribl Edge, and verify that the Log in with Saml 2.0 option appears on the login page.
Select Log in with Saml 2.0.
You should be redirected to Ping Identity to authenticate yourself, and the SAML connect flow should complete the authentication process.
Troubleshooting
If you encounter issues when setting up SSO integration, refer to SSO Troubleshooting.