


These docs are for Cribl Edge 4.12 and are no longer actively maintained.
See the latest version (4.17).
Share Packs
Packs allow you to share your configurations, including Sources, Destinations, Routes, Pipelines, and Knowledge Objects, between Fleets and deployments.
If you are developing your resources with the intent of sharing them, you can start building them up inside a Pack.
However, you can also copy or move your existing setup into a Pack for the purpose of sharing.
Plan Your Pack
Before you start creating a Pack, first consider your setup and identify which resources you need to include in it.
Identify elements (Sources, Destinations, Pipelines, Routes, Event Breakers, and Data Samples) you want to share in the Pack.
Create a Pack
Navigate to the Packs page and select Add Pack.
From the submenu, select Create Pack.
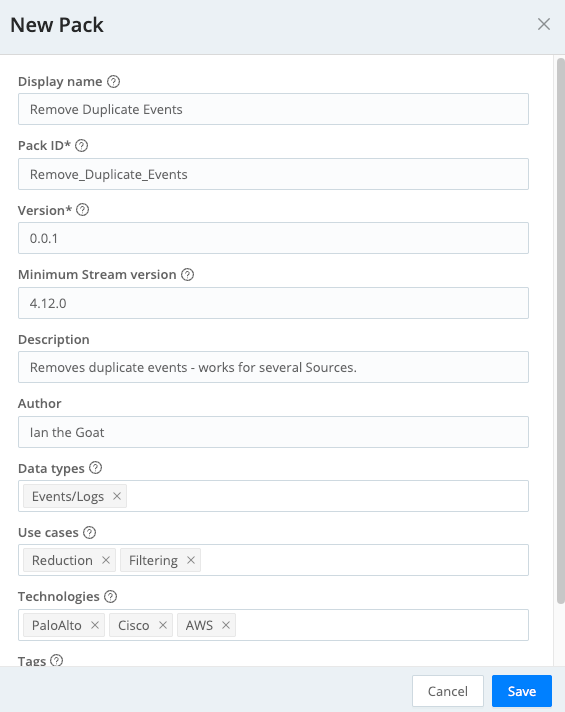
Enter a unique Pack ID and other details:
- Each Pack within a Fleet must have a separate Pack ID, but you can assign arbitrary Display names.
- Version is a required field identifying the Pack’s own versioning.
- Minimum Edge version is an optional field specifying the lowest compatible version of Cribl Edge software. If you intend to include Sources or Destinations in your Pack, set the minimum version to 4.12.0.
- Description and Author are optional identifiers.
- Data type, Use cases, and Technologies are optional combo boxes. You can insert one or multiple keywords to help users filter Packs that you post publicly on the Cribl Packs Dispensary.
- Tags are optional, arbitrary labels that you can use to filter/search and organize Packs.
Select Save.
Copy Resources
Now, go through all the resources you’ve listed, copying each of them to the new Pack.
Copy Pipelines
To copy a Pipeline into a Pack:
- In the sidebar, select Fleets, then select a Fleet.
- On the Fleets submenu, select More, then Pipelines.
- Locate the Pipeline you want to copy and open the Options ••• menu on its row
- Select Copy.
- Navigate to your new Pack and, in the Pack submenu, select Pipelines.
- Select Paste Pipeline
 on the filter bar, confirm the Pipeline name and select Save.
Copy Routes
To copy a Route into a Pack:
- In the sidebar, select Fleets, then select a Fleet.
- On the Fleets submenu, select More, then Routes.
- Locate the Route you want to copy and open the Options ••• menu on its row
- Select Copy.
- Navigate to your new Pack and, in the Pack submenu, select Routes.
- Select Paste route
on the filter bar.
- Reorder the Route according to your needs.
Copy Sources
Packs can’t contain Collectors and Collector-based Sources, as well as System Metrics, Windows Metrics, System State, Windows Event Logs, K8s Metrics, K8s Logs, K8s Events, and Cribl Internal Sources in Cribl Edge.
To copy a Source into a Pack:
- In the sidebar, select Fleets, then select a Fleet.
- On the Fleets submenu, select More, then Sources.
- Locate the Source you want to copy and open it.
- Select Manage as JSON on the Configure tab.
- In the Manage as JSON modal, select Export and save the exported file.
- Navigate to your new Pack and, in the Pack submenu, select Sources.
- Choose the type of Source you are copying, and select Add Source.
- Select Manage as JSON, select Import, and choose the exported Source file.
- Confirm with OK, then save the new Source.
If you are copying an enabled Source bound to a port, you must temporarily disable that Source before creating the copy. Once you’ve finished configuring the new Source and selected a new port, you can re-enable the original.
Copy Destinations
To copy a Destination into a Pack:
- In the sidebar, select Fleets, then select a Fleet.
- On the Fleets submenu, select More, then Destinations.
- Locate the Destination you want to copy and open it.
- Select Manage as JSON on the Configure tab.
- In the Manage as JSON modal, select Export and save the exported file.
- Navigate to your new Pack and, in the Pack submenu, select Sources.
- Choose the type of Destination you are copying, and select Add Destination.
- Select Manage as JSON, select Import, and choose the exported Destination file.
- Confirm with OK, then save the new Destination.
You can use the same method with Manage as JSON to copy Knowledge Objects such as variables, Regexes, or Event Breaker Rules.
Configure Variables
To facilitate other users integrating your Pack into their deployments, you can replace values in certain fields in your configuration with variables.
A user who imports your Pack will then be prompted to provide their own values for all the variables you define.
- Select Variable next to the field you want to configure a variable for.
- In the Variables modal, either choose an existing variable or select Add Variable.
- If you are adding a new variable, in the New Variable modal, enter the name for the variable and its value for your current deployment, then save.
- Confirm the use of the variable for the field by selecting Add.
Secrets such as passwords are removed from the variables on export. They will be replaced with a
changemevalue, prompting users to provide the value for their own deployment.
Export the Pack
Now that your Pack is ready, you can export it for sharing.
Storing your Pack in a Git repository lets you version it and collaborate on its development. You can use a private repository in any common Git hosting service. This guide uses GitHub as an example.
Create an empty private repository. To do this in GitHub, select Create New > New Repository on the top bar. Give your repository a name, an optional description, and set it to Private.
Clone the new repository locally to your system.
In Cribl Edge, navigate to the Packs page and open the Options ••• menu on the row of your Pack.
Select Export and choose the Merge export mode.
Confirm with Export and save the file locally.
Extract the
.crblfile into the repository directory.Because they are gzipped, you can extract
.crblfiles using thetarutility. For example:tar -xvzf WebdataStorage_0.0.1.crbl.Add, commit, and push the Pack content to your remote repository.
At this point you can share the repository with other users. They will be able to import the Pack by selecting Add Pack > Import from Git.
To learn more about collaborating on Packs based on a Git repository, see Collaborate on Developing Packs.