


These docs are for Cribl Edge 4.12 and are no longer actively maintained.
See the latest version (4.17).
SSO in On-Prem Deployments
The general steps to set up a Single Sign-On (SSO) integration between your identity provider and your on-prem Cribl Edge deployment are:
- In your IDP, create an application.
- Submit your app’s configuration details to Cribl.
- In your IDP, assign groups to your users, matching the Role that each group of users should have in Cribl Edge.
- Verify your connection.
- Set up fallback access.
The details of specific steps can differ depending on the IDP that you are using.
The following guides show how to configure SSO with different IDPs:
If you encounter issues when setting up SSO integration, refer to SSO Troubleshooting.
Limitations
Cribl offers an SP-initiated (Cribl-initiated) flow, but does not support an IDP-initiated SSO flow. As an alternative, you can allow users to initiate login from your IDP instance by creating a chiclet. Follow the guides for Okta/SAML or Okta/OIDC to create a chiclet.
Set Up Fallback Access
When you configure OIDC or SAML SSO, enable local authenticaton to ensure that users aren’t locked out if you have issues with SSO. Local authentication provides fallback access so that users can log in with a username and password.
In the sidebar, select Settings > Global.
Under Access Management, select Authentication.
In the Type drop-down menu, select OpenID Connect or SAML 2.0.
In the configuration options, enable Allow login as Local User. Enabling this option means that the login page will include the Log in as Local User button so that users can log in with a username and password.
After you confirm that your SSO integration is working, you can disable Allow login as Local User in the SSO configuration. If you do get locked out, see Manual Password Replacement.
Create an Application
In the IDP you are using, create a new application.
Where relevant, select the application type, such as SAML or OIDC.
If your IDP lets you configure Application Username (or similar), make sure its value is NameID.
Typically, you will need to provide to this application the callback URI for the Leader Node of your Cribl Edge deployment,
which takes the form <yourdomain>/api/v1/auth/authorization-code/callback, for example:
https://yourDomain.com:9000/api/v1/auth/authorization-code/callback.
Typically, the application will require you to provide it with URLs for connecting with your Cribl Edge deployment. You will configure them in Cribl Edge in the next step.
When you are done, return to your IDP app and complete the remaining required configuration with the values defined.
Submit App Information to Cribl
Next, provide Cribl with essential details about your application to implement the SSO setup on the Cribl side.
- In Cribl Edge, in the sidebar, select Settings, then Global.
- In Access Management, select Authentication.
- From the Type dropdown, choose
OpenID Connect/SAML 2.0.
Provider name, select your IDP, if it is present in the list. Otherwise enter an arbitrary identifier for this integration.
In the Audience (Relying Party ID) field, enter your Cribl Edge Leader’s base URL. Do not append a trailing slash.
If you have a Distributed deployment with a fallback Leader configured, modify the Audience (Relying Party ID) field to point to the load balancer instead of the Leader Node.
Fill in the remaining fields:
Cribl Edge field Description Client ID The ID of your app, copied from the IDP configuration. Client secret The secret for your app, copied from the IDP configuration. Scope List of authentication scopes. (Enterprise only) Add the scope groupsto the default space-separated list of scopes, so that it reads:openid profile email groupsAuthentication URL The authentication URL from the IDP. It can be named differently in each IDP; for example, in Entra AD, this is OAuth 2.0 authorization endpoint (v2). Token URL Access token URL from the IDP. It can be named differently in each IDP; for example, in Entra AD, this is OAuth 2.0 token endpoint (v2).
In the Audience (SP entity ID) field, enter your Cribl Edge Leader’s base URL. Do not append a trailing slash.
Adding an Audience (SP entity ID) will automatically fill in Sign-on callback URL, Logout callback URL, and Metadata URL. Depending on the IDP you are using, you will need to provide the values of these fields in the IDP configuration.
If you have a Distributed deployment with a fallback Leader configured, modify the Audience (SP entity ID) field to point to the load balancer instead of the Leader Node.
Fill in the remaining fields:
| Cribl Edge field | Description |
|---|---|
| Issuer (IDP entity ID) | The ID of your app, copied from the IDP configuration. |
| Single sign-on (SSO) URL | IDP’s single sign-on service URL. |
| Single logout (SLO) URL | IDP’s single logout URL. Setting this will enable Cribl-initiated logout (that is, when a user logs out of Cribl, they will be logged out from the IDP as well). |
| Response validation certificate | Certificate user to validate signed responses, contains the public key. PEM/Base64 format. |
The other fields on the Authentication page are not mandatory and will depend on the IDP you are using and on your specific requirements.
Configure ID Token to Include Groups Claim
If you are creating an OIDC app,
to ensure that the groups scope you configured above is respected,
in your IDP, configure the ID token to include the groups claim.
Map IDP Groups to Cribl Edge Roles
Mapping groups to Roles is possible only for Cribl Edge deployments that are in Distributed mode, with an Enterprise license.
With a Standard license, all your external users will be imported to Cribl Edge in the admin role.
If you are running Cribl Edge in Single-instance mode, you cannot map IDP groups to Cribl Edge Roles.
As you think through how best to map your IDP groups to Cribl Edge Roles, keep these principles in mind:
- An IDP group can map to more than one Cribl Edge Role.
- A Cribl Edge Role can map to more than one IDP group.
- If a user has multiple Roles, Cribl Edge applies the union of the most permissive levels of access.
- Cribl Edge automatically assigns the
defaultRole to any user who has no mapped Roles.
For details on mapping your external identity provider’s configured groups to corresponding Cribl Edge user access Roles, see External Groups and Roles.
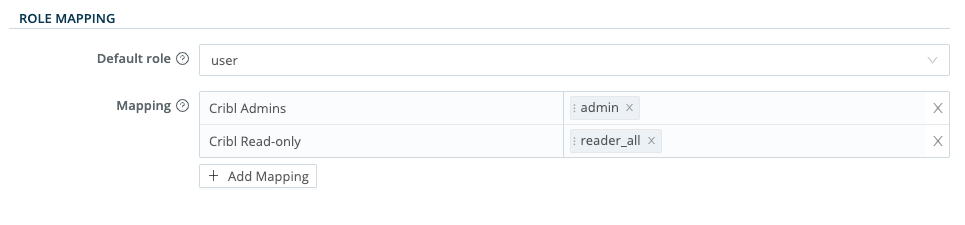
You can assign a Cribl Edge Role to each IDP group name, and you can specify a default Role for users who are not in any groups.
Depending on how you configured the group claim (GUID, Object ID, or group name), you need to have a matching value in Cribl Edge. The group name must also match the name configured in the IDP.
In Cribl Edge, in the sidebar, select Settings, go to Access Management and then select Authentication.
Scroll down to Role Mapping.
Cribl recommends that you set the
defaultRole touser, meaning that this Role will be assigned to users who are not in any groups.Add mappings as needed.
The IDP group names in the left column are case-sensitive, and must match the values returned by IDP.
Verify that SSO Connection Is Working
- Log out of Cribl Edge, and verify that your IDP is now an option on the login page.
- Select Log in with … (the button name will depend on your configured IDP).
- You should be redirected to your IDP to authenticate yourself.