


These docs are for Cribl Edge 4.12 and are no longer actively maintained.
See the latest version (4.17).
Forward Custom Data with Cribl Edge Tags
Organizations often need to add unique identifiers or metadata to each event forwarded from Cribl Edge to supported Destinations. Whether you’re managing a small deployment or thousands of nodes, incorporating Edge tags into your events provides the context needed to make sense of your data at scale. These identifiers can help:
- Track the source of events across a large enterprise
- Associate events with specific departments, teams, or business units
- Maintain custom organizational taxonomy in log data
- Enable better filtering and searching in the Destination systems
This guide will show you how to set tags during Cribl Edge Installations and use the Preprocessing Pipeline to forward custom data points to a Destination.
Embed Source Context with Cribl Edge Tags
In this guide, we will follow Data Detective Dave, an operator with a knack for getting to the bottom of data origins. His current case involves enriching data streaming from all Development servers within the Engineering Organization before it’s dispatched to a central analytics platform. Dave needs to ensure every piece of data clearly shouts its server role and department.
Here are the steps Data Detective Dave will follow:
- Set meaningful tags while installing Cribl Edge: Dave’s first move is to tag each Development server right at the Source, while installing Cribl Edge. He’ll use the installation script to attach labels
developmentandengineering– ensuring each server wears its identity from the get-go. - Gather the metadata evidence: Cribl Edge, like a good informant, automatically collects metadata, including the tags Dave just applied. He’ll double-check that the
criblmetadata option is active in the Fleet Settings, confirming that this crucial data is being gathered. - Set Up the “Interrogation Room” (Preprocessing Pipeline): Dave will create a new Pipeline in Cribl Edge, which he’ll cleverly name
host_tags. This will be his interrogation room where the data will be questioned and its secrets revealed (in this case, the tags). - Use the “Eval-uator” to surface the clues (Eval Function): Inside the
host_tagsPipeline, Dave will employ an Eval Function – his “Eval-uator.” This function will dig into the__metadata.cribl.tagsarray, where the installation tags are stashed. It will then create new, easy-to-read fields in the data:roleanddepartment, clearly displaying the tag values. - Apply the interrogation to the Source: Next, Dave will apply the
host_tagsPipeline to the specific Source(s) feeding data from the Development servers. This ensures that all incoming data undergoes interrogation and reveals its tags. - Verify the findings with Live Capture: To ensure his “Eval-uator” is working correctly, Dave will use the Live Data capture feature on the configured Source. By examining the data before it’s routed, he can confirm that the
roleanddepartmentfields are present and accurate - case closed (almost)! - Ensure the Destination doesn’t lose the evidence: Finally, Dave will make sure the central analytics platform – the Destination – is set up to receive and hold onto these newly revealed role and department fields. He might even need to set up specific routes to handle this tagged data appropriately.
If you’d like to follow along Data Detective Dave’s journey, we outlined the detailed steps for you below.
Set Tags During Edge Installation
When installing Cribl Edge, you can set tags during the installation. Regardless of your deployment environment (Docker, Linux, Windows, or Kubernetes), the Bootstrap script via the UI, gives you an option to add tags. These tags help identify and categorize your Edge Nodes such as environment type, geographic location, or server role.
As you modify the fields within the script interface, it updates in real-time, reflecting all the configuration choices you make on that screen, including any tags you’ve added. The result is a new Edge Node configured with the specific options you’ve selected.
In this example, we’re setting two tags:
- Server Role:
development - Department:
engineering

You can also add tags after you install the Edge Nodes by teleporting directly into the Node. For details, see Add Tags to Edge Nodes in Teleport View.
Configure Host Info/Metadata Collection
Cribl Edge allows you to configure Event metadata sources to enrich events with additional context. In Edge mode, all the Event metadata sources are enabled by default.
The Event metadata sources add a __metadata property to every event emitted from enabled sources. This metadata can be used to:
- Enrich events with additional context.
- Display metadata for instance exploration.
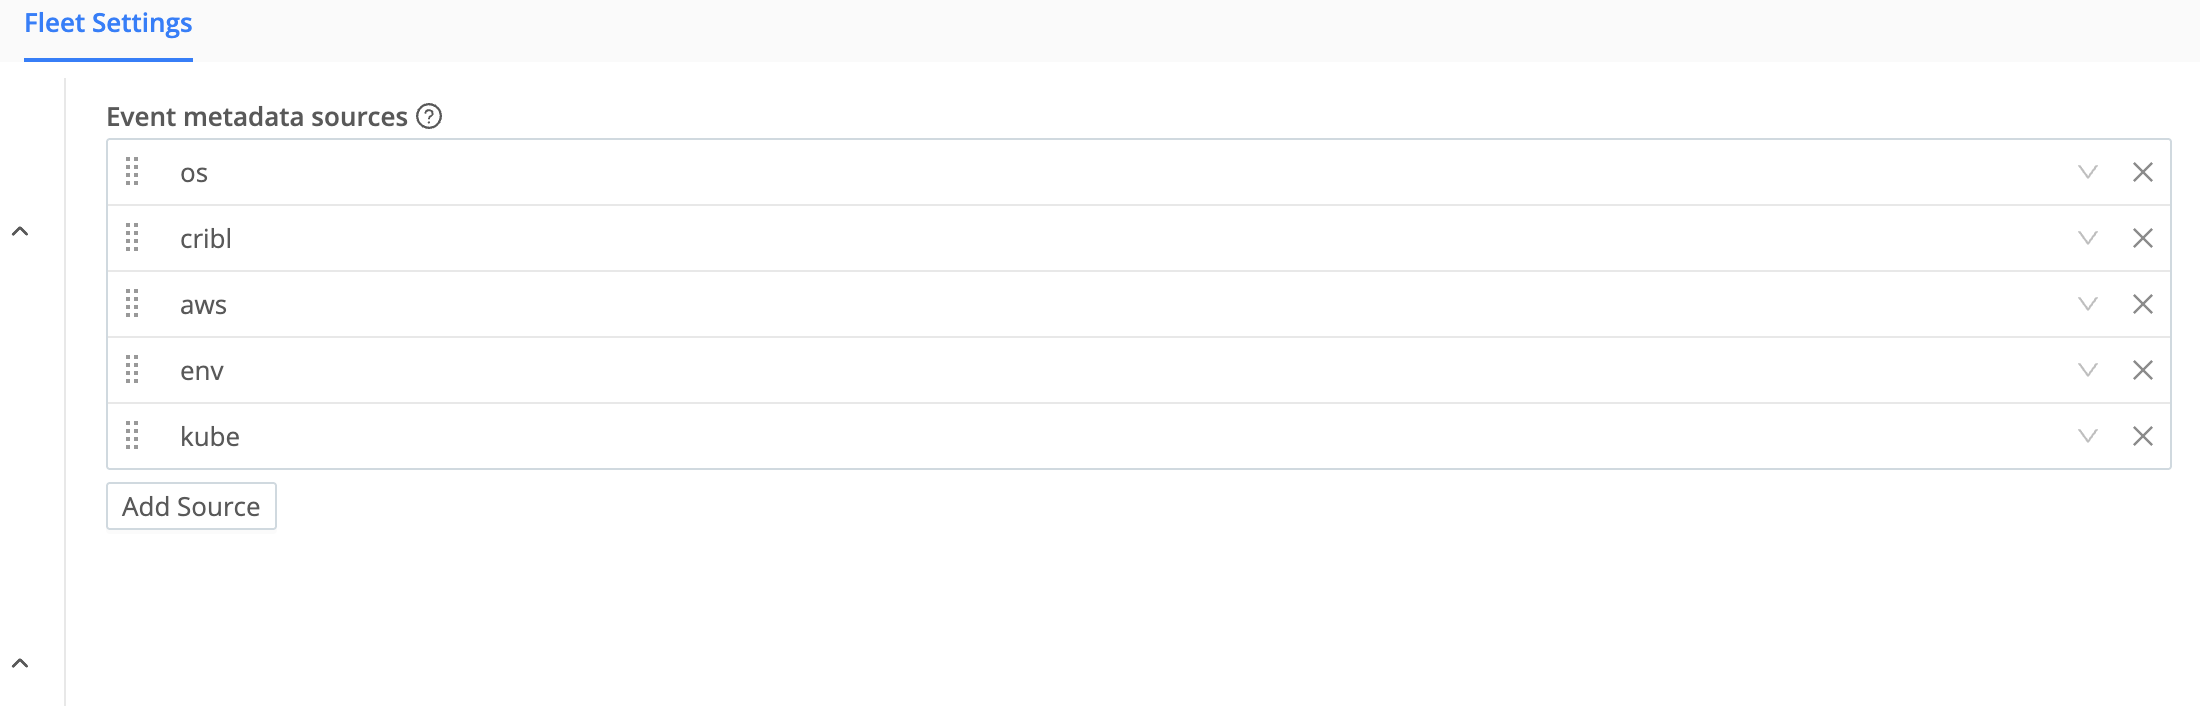
Ensure the cribl metadata option is enabled by checking in:
- Navigate to Fleet Settings > Limits > Metadata.
- Use the Event metadata sources drop-down or the Add source button to enable and select metadata sources. Ensure the
cribloption is enabled.
Create a Pre-Processing Pipeline
To add tags or other custom identifiers to events:
- Navigate to your Fleet > More > Pipelines in your Cribl Edge interface.
- Add a new Pipeline (e.g.,
host_tags). Pipelines ID can contain only letters (A-Z,a-z), numbers (0-9), and the characters_and-. - Add an Eval Function to the Pipeline.
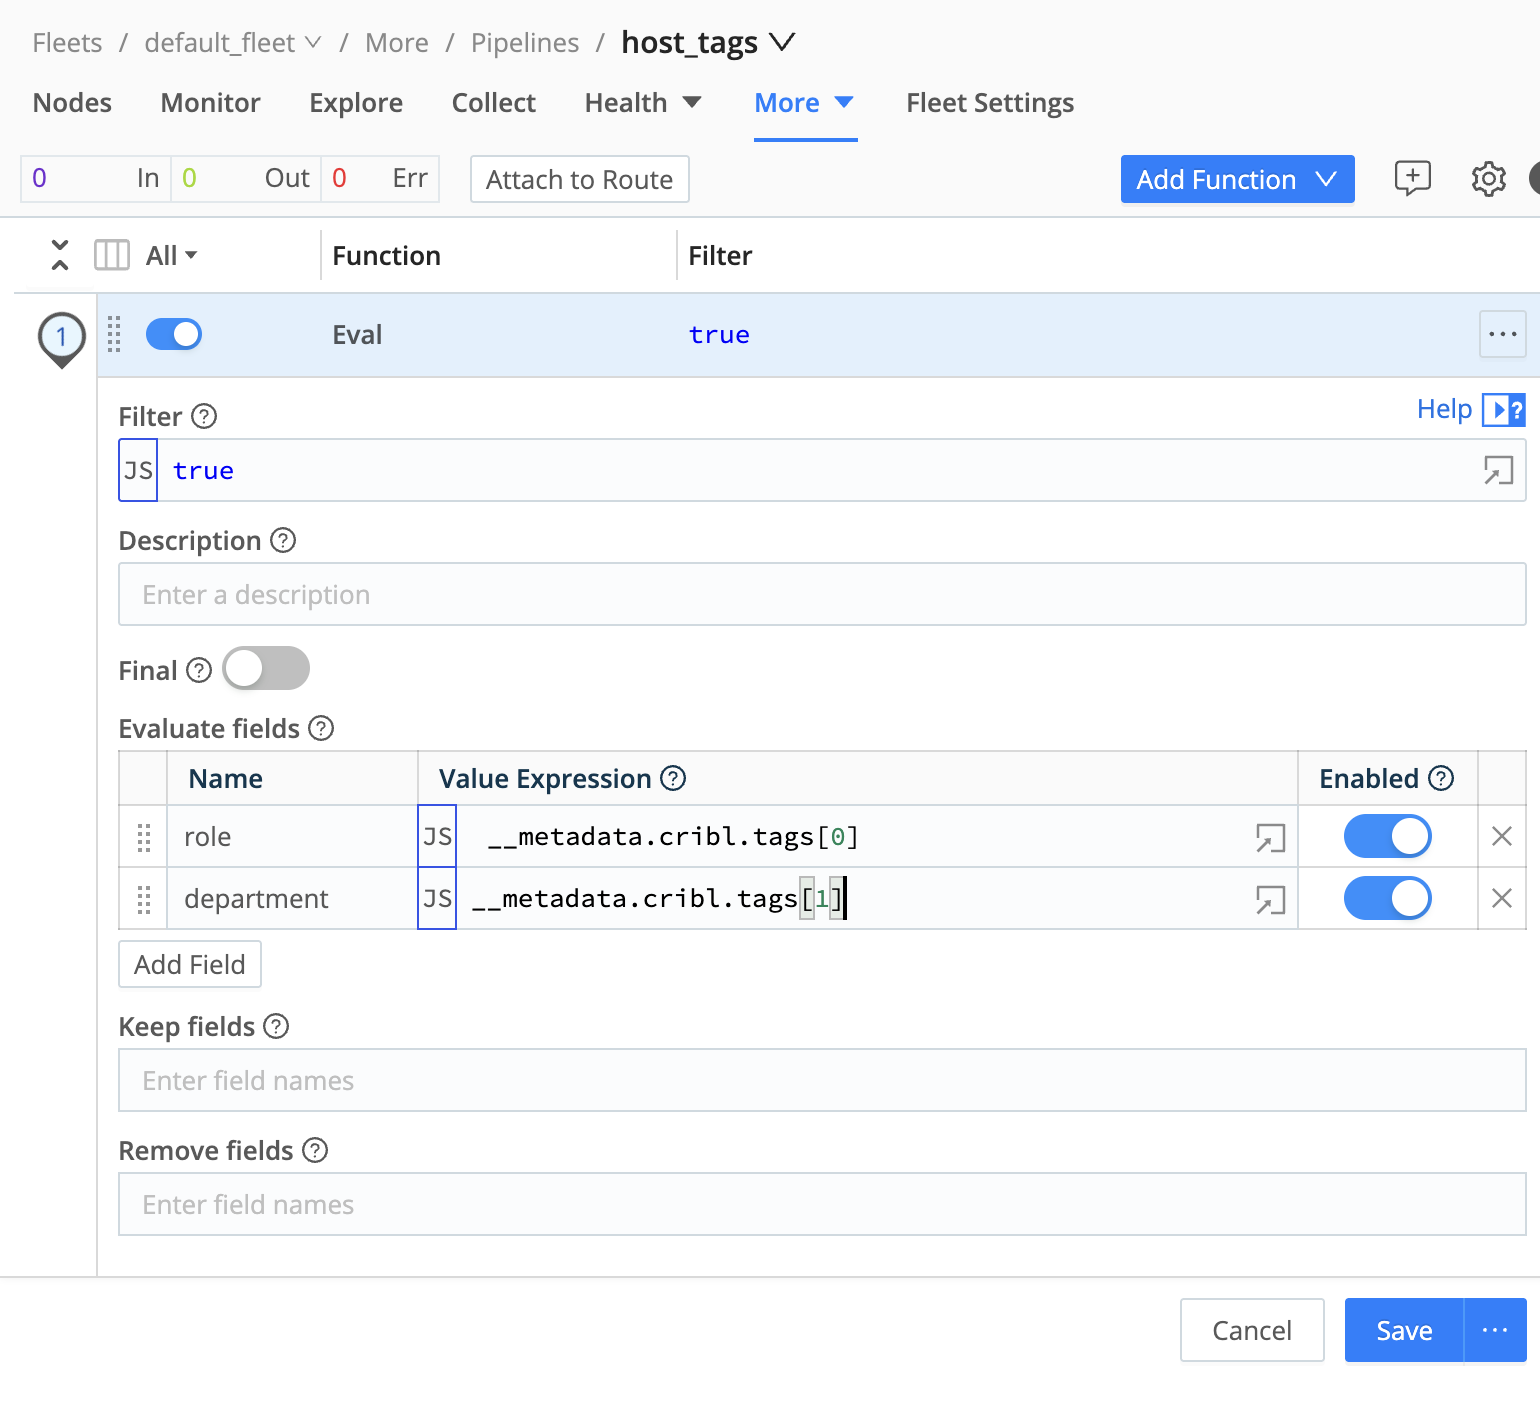
- Configure the Eval function to surface the tags by adding the following to the Evaluate fields section:
- In the first row enter:
Name:role
Value Expression:__metadata.cribl.tags[0] - Select Add Field and enter:
Name:department
Value Expression:__metadata.cribl.tags[1]
- In the first row enter:
- Save the Pipeline.
Apply the Pre-Processing Pipeline
To make sure this Pipeline runs for all your data:
- Go to Sources > [Your Source].
- In the Source configuration modal, find the Pre-Processing Pipeline option.
- Select your newly created
host_tagsPipeline. - Save the configuration.
Verify the Output
To verify that your custom fields are correctly added:
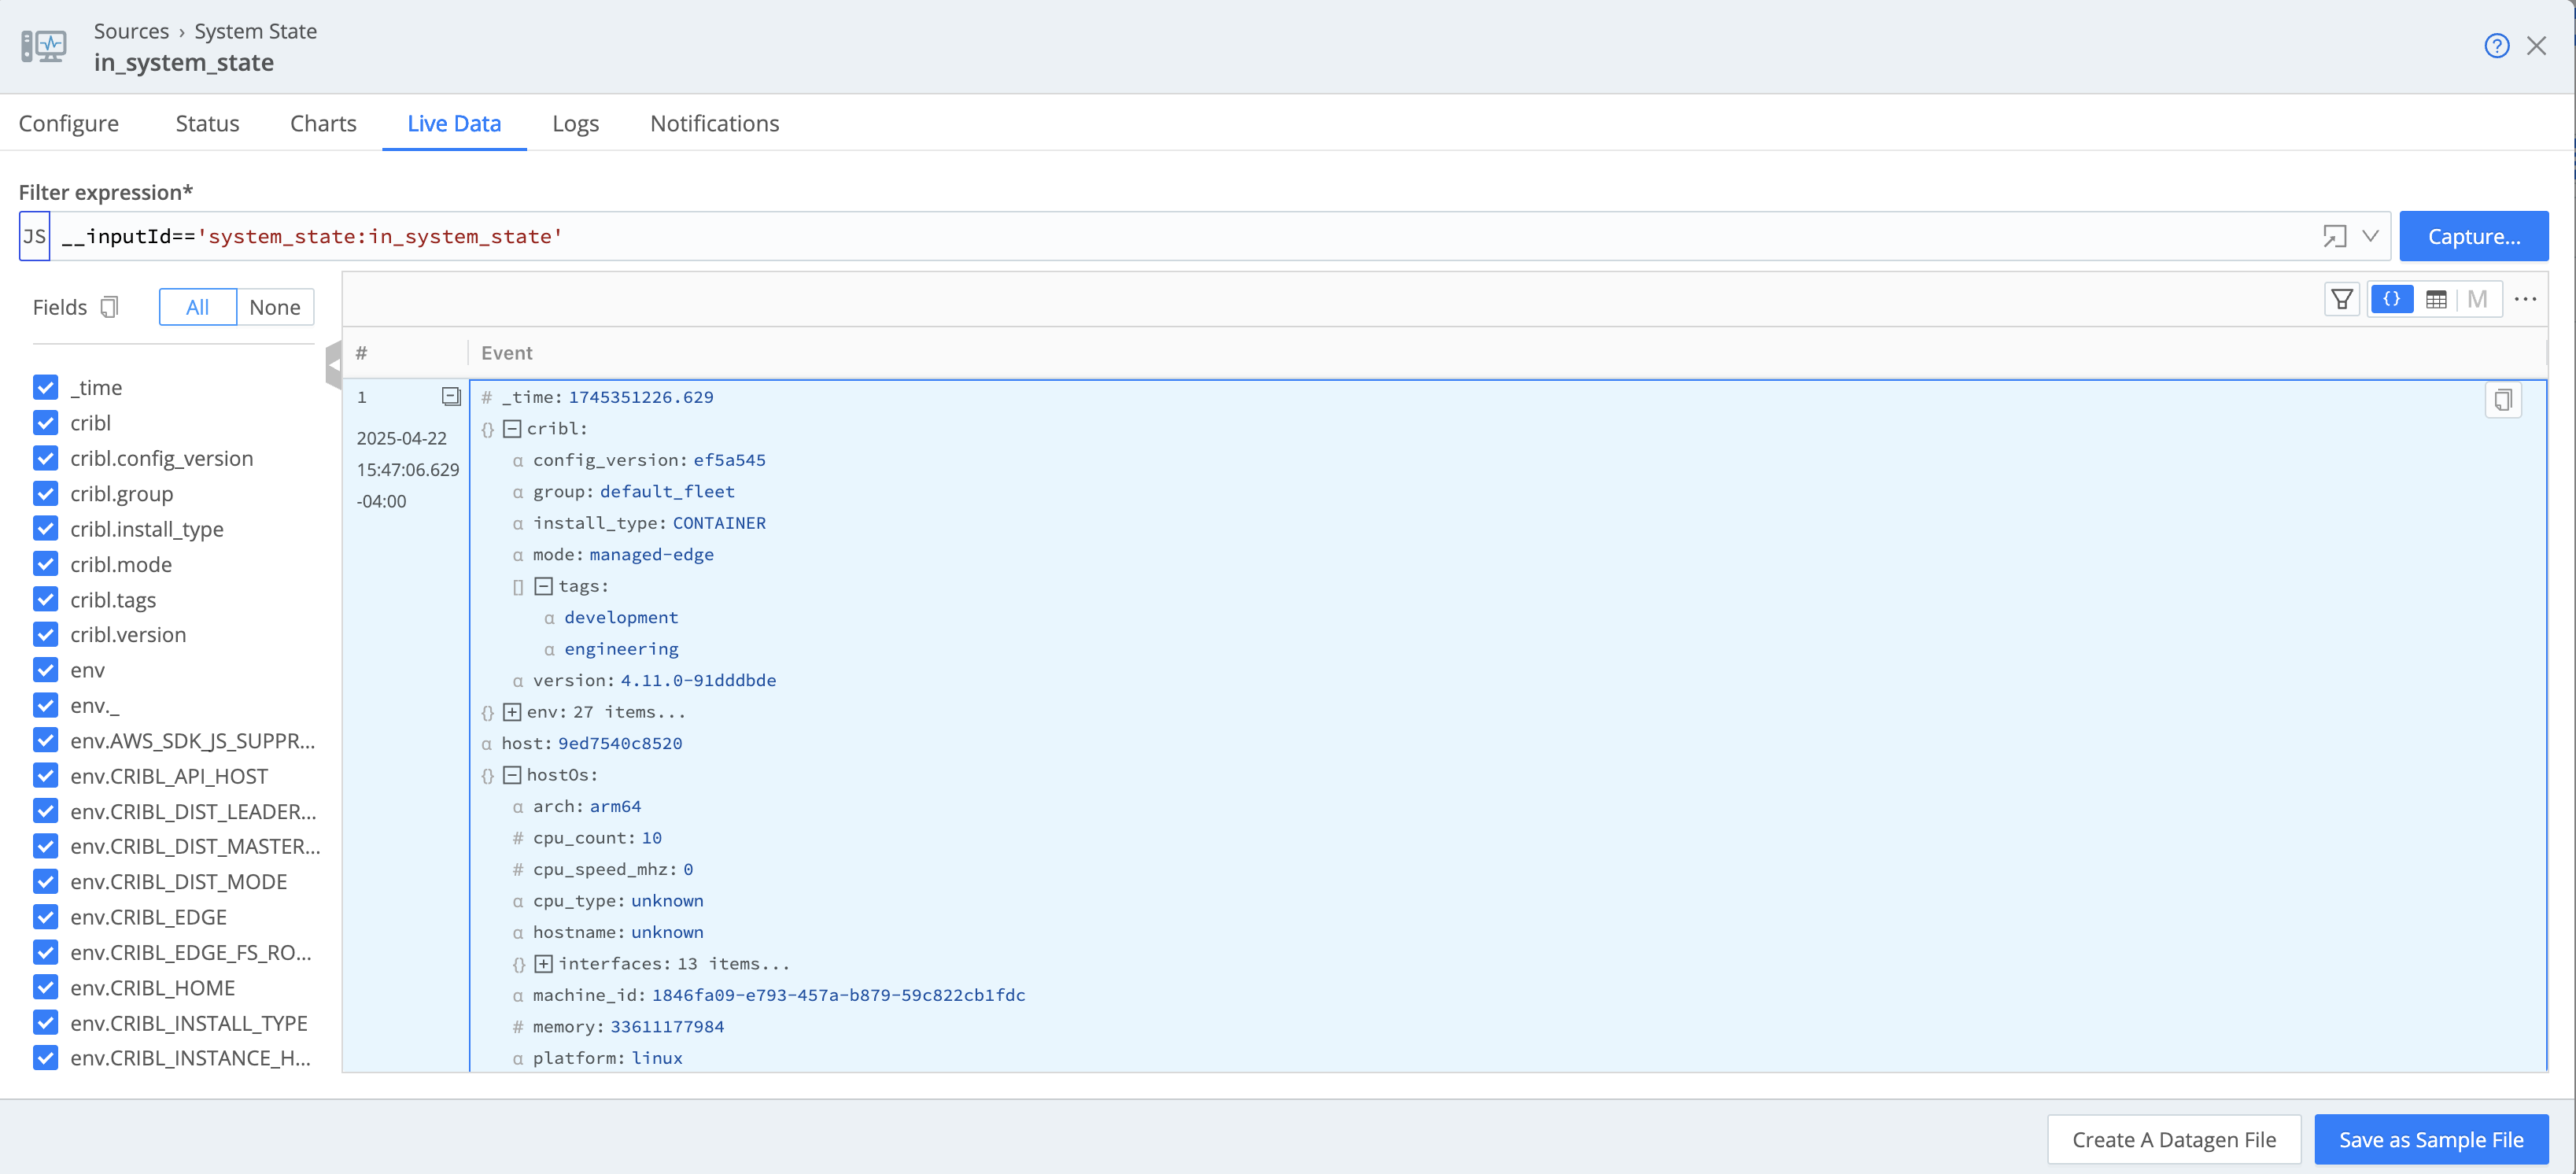
- On your Source configuration modal, select Live Data > Capture.
- In the Capture modal, under Where to capture?, select
2. Before the Routes. - Verify that the
roleanddepartmentfields appear in the events.
Destination Configuration
Ensure that your Destination configuration isn’t dropping these custom fields:
- Navigate to Data > Destinations.
- Configure the Destination.
- If needed, create a Route that specifically handles these tagged events.
- Verify the data captured includes the additional metadata fields you configured.