These docs are for Cribl Edge 4.5 and are no longer actively maintained.
See the latest version (4.16).
SSO with Okta and OIDC
Cribl Edge supports SSO/OIDC user authentication (login/password) and authorization (user’s group membership, which you can map to Cribl Roles). Using OIDC will change the default Log in button on the login page to a button labeled Log in with OIDC which redirects to the configured Identity Provider (IDP).
If you are a Cribl Edge admin and want to offer single sign-on (SSO) to your users, you can choose OpenID Connect (OIDC) as the authentication type, then configure an IDP to use OIDC within its single sign-on flow. Once configuration is complete (several steps later), the Cribl Edge login page will send users to the IDP’s login UI. Besides the IDP, some settings will refer to the Service Provider (SP), which in this context is your Cribl Edge instance.
The IDP can be Okta or Google, among others. Configuring SSO requires going back and forth between Cribl Edge and the IDP’s UI. In this page, we walk through the process for configuring SSO with OIDC, using Okta as the IDP.
The last part of the walkthrough is a complete description of the @{product Authentication settings (with OIDC selected as the authentication method). Skip directly to this section if you just need a UI reference, or if your IDP is not Okta. For non-Okta deployments, please join us on Cribl’s Community Slack at https://cribl-community.slack.com/ and share your questions.
Make sure you don’t get locked out of Cribl Edge! Enable the Allow login as Local User toggle until you’re certain that external auth is working as intended. If you do get locked out, refer to Manual Password Replacement for the remedy.
Like other external auth methods, OpenID Connect requires either an Enterprise or a Standard license. It is not supported with a Free license.
Plan Your Mapping of Okta Groups to Cribl Edge Roles
In Okta, admins organize their users in groups. In Cribl Edge, there are no user groups, but there are Roles. Your task includes mapping Okta groups to Cribl Edge Roles.
- Mapping groups to Roles is possible only for Cribl Edge deployments that are in Distributed mode, with an Enterprise license applied.
- If you are running Cribl Edge in Single-instance mode, you cannot map Okta groups to Cribl Edge Roles, although you can still set up SSO with Okta.
As you think through how best to map your Okta groups to Cribl Edge Roles, keep these principles in mind:
An Okta group can map to more than one Cribl Edge Role.
A Cribl Edge Role can map to more than one Okta group.
If a user has multiple Roles, Cribl Edge applies the union of the most permissive levels of access.
Cribl Edge automatically assigns the
defaultRole to any user who has no mapped Roles.
The example below illustrates how multiple mappings work: The groups in Mapping b and c each map to multiple Roles, while both the reader_all and editor_cloud Roles map to multiple groups.
| Mapping | Okta Group | Cribl Edge Role(s) |
|---|---|---|
| a. | Cribl Admins | admin |
| b. | Cloud Admins | reader_all, editor_cloud |
| c. | Security Team | reader_all, editor_cloud, editor_firewall |
Cribl Edge Roles and role mapping are supported only with an Enterprise license. With a Standard license, all your external users will be imported to Cribl Edge in the admin role.
Integrate Okta with Cribl Edge
Log in to your Okta tenant admin console.
In the left nav, select Applications > Applications.
Click Create App Integration.
For Sign-in method, select
OIDC - OpenID Connect.For Application type, select
Web Application.
Click Next to open the New Web App Integration page.
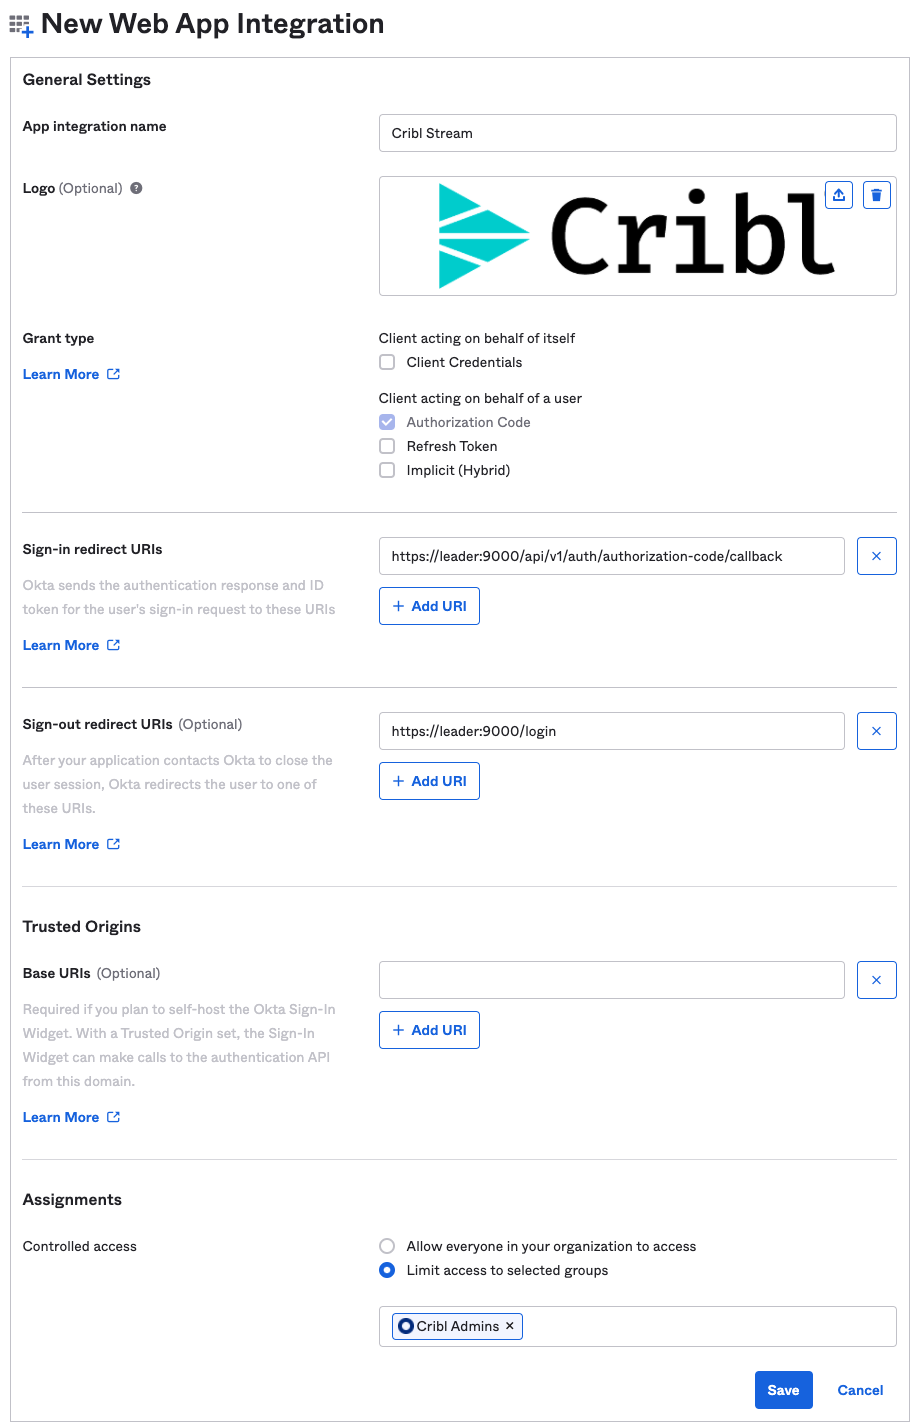
In the App name field, enter Cribl Edge.
(Optional) In the Logo field, upload the Cribl logo. You can use a logo from the Cribl Media Kit.
(Optional) If you wish to keep your OIDC app hidden, check the App visibility check box.
In the Sign-in redirect URIs field, replace the default with your Leader base URL, and with
/api/v1/auth/authorization-code/callbackas the path. This is the Cribl Edge callback API endpoint.(Optional) In the Sign-out redirect URIs field, append
/loginto the pre-filled path.In the Assignments > Controlled access area:
- If all your Okta users need access to Cribl Edge, select Allow everyone in your organization to access.
- To permit specific Okta groups to access Cribl Edge, select Limit access to selected groups. Then, in the field below, add the groups you want to include. After you finish creating the app, if you need to add or remove groups, do that in the Applications > Assignments tab.
Click Save.
Okta should show an Application Created Successfully message.

Copy Your Okta App’s Client ID and Client Secret
In the Client Credentials panel, copy both the Client ID and Client Secret, and temporarily store them locally. You will need them in the next step, when you configure Cribl Edge.
Begin Configuring OIDC Auth in Cribl Edge
The only OAuth 2.0 flow that Cribl Edge supports is the Authorization Code Grant flow.
In version 3.0 and higher, Cribl Edge’s former “master” application components are renamed “leader.” Above, while some legacy terminology remains within URLs, this document will reflect that.
In Cribl Edge, select Settings > Access Management > Authentication.
Choose
OpenID Connectfrom the Type dropdown.Choose
Oktafrom the Provider dropdown.In the Audience field, enter your Cribl Edge UI base URL. Do not append a trailing slash.
In the Client ID and Client secret fields, enter the respective values that you copied from the Okta UI in the previous step.
If your Cribl Edge is in Enterprise Distributed mode:
In the Scope field, add the scope
groupsto the default space-separated list of scopes, which is:openid profile email.Obtain the authentication, token, user info, and logout URLs for your Okta app, by sending a request to the OpenID Connect Discovery endpoint.
- This endpoint has the URL:
https://<tenant>.okta.com/.well-known/openid-configuration
…where
<tenant>is your Okta tenant name. For example:https://dev-12345678.okta.com/.well-known/openid-configuration- You can view the discovery document in your web browser, or use jq to extract the needed values, as in the following example:
curl -s https://<tenant>.okta.com/.well-known/openid-configuration | jq '. | {"auth": (.authorization_endpoint), "token":(.token_endpoint), "userinfo":(.userinfo_endpoint), "logout": (.end_session_endpoint)}'- Sample response:
{ "auth": "https://dev-416897.oktapreview.com/oauth2/v1/authorize", "token": "https://dev-416897.oktapreview.com/oauth2/v1/token", "userinfo": "https://dev-416897.oktapreview.com/oauth2/v1/userinfo", "logout": "https://dev-416897.oktapreview.com/oauth2/v1/logout" }- This endpoint has the URL:
Populate the Authentication URL Token URL fields with the respective
authandtokenURLs.If you configured Okta to use groups, populate the User info URL field with the
userinfoURL.This is necessary because Okta does not send group information in the
id_tokenpassed to Cribl Edge.If you want Account > Log out in Cribl Edge to log the user out globally, populate the Logout URL field with the
logoutURL. This means that when a user clicks the Accounts > Log out link in Cribl Edge, they are logged out of both Cribl Edge and Okta.

Configure Response to Okta /userinfo Endpoint
An Okta tenant’s user groups can be mastered either inside Okta, outside Okta, or both.
When the /userinfo endpoint is queried, Okta returns the appropriate groups membership of the user back to Cribl Edge:
For groups mastered inside Okta only, the app should pass a
Filtertype groups claim to Cribl Edge.For groups mastered outside Okta (such as Active Directory), or both inside and outside, the app should pass an
Expressiontype groups claim back to Cribl Edge.
See the Okta documentation on dynamic allow lists and using Okta together with Active Directory.
In Okta, you should still be in the panel for the app you created. If not, you can get there by opening Applications > Applications and selecting the app.
For groups mastered inside Okta only, complete this procedure.
For groups mastered outside Okta, or both inside and outside, complete this procedure.
Configure Groups Inside of Okta
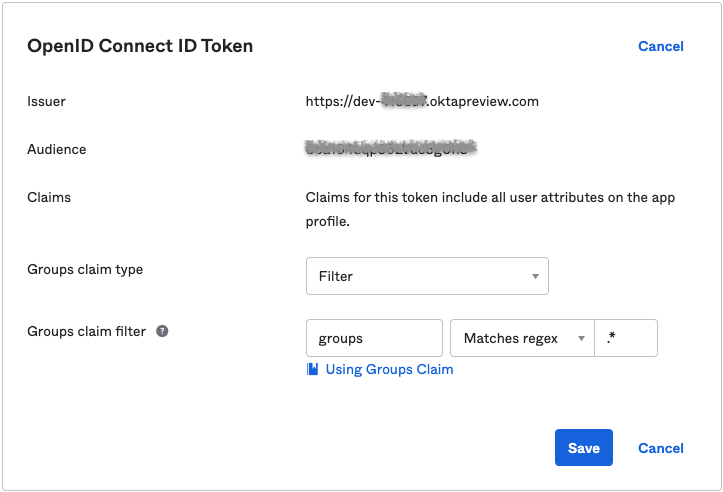
Open the Sign On tab. Then, in the OpenID Connect ID Token panel:
Click Edit to change the value of Groups claim filter to
groupsand show filter options.Leave Groups claim type set to
Filter.Choose Matches regex from the dropdown, and enter
.*as the regex.Click Save.

Configure Groups Outside of Okta
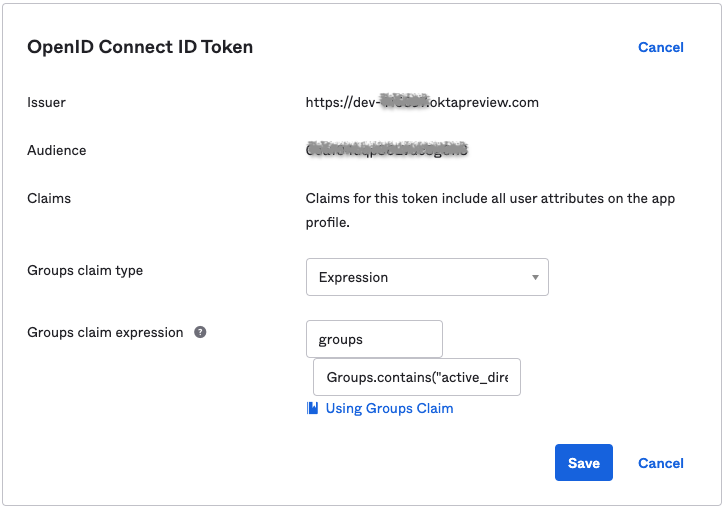
Open the Sign On tab, if necessary. Then, in the OpenID Connect ID Token panel:
Click Edit to change the value of Groups claim filter to
groupsand show filter options.Set Groups claim type set to
Expression.In the Groups claim expression, enter an expression field that matches the groups you want passed to Cribl Edge. See the Okta documentation for more details.
For example, to match on Active Directory groups that contain the string
okta, use the following expression:Groups.contains("active_directory", "cribl", 10)Click Save.

Configure ID Token to Include Groups Claim
Okta can recognize your groups only if your ID token includes your groups claim, as you’ll configure here.
In Okta, open the Security > API page.
In the Authorization Servers tab, click the edit (pencil) button for the desired Authorization Server.
In the resulting page, click the Claims tab.
If your groups claim already exists, click the edit (pencil) button. Otherwise, click Add Claim.
In the Include in token type drop-downs, choose
ID TokenandAlways, respectively.

Configure the remaining settings in the way that suits your groups claim.
Click Save (or Create if you’re adding the claim for the first time).
Finish Configuring OIDC Auth in Cribl Edge
This section documents the entire Cribl Edge Authentication UI. If you have been working through the procedures from earlier in this page, you will have completed some of the following steps already.
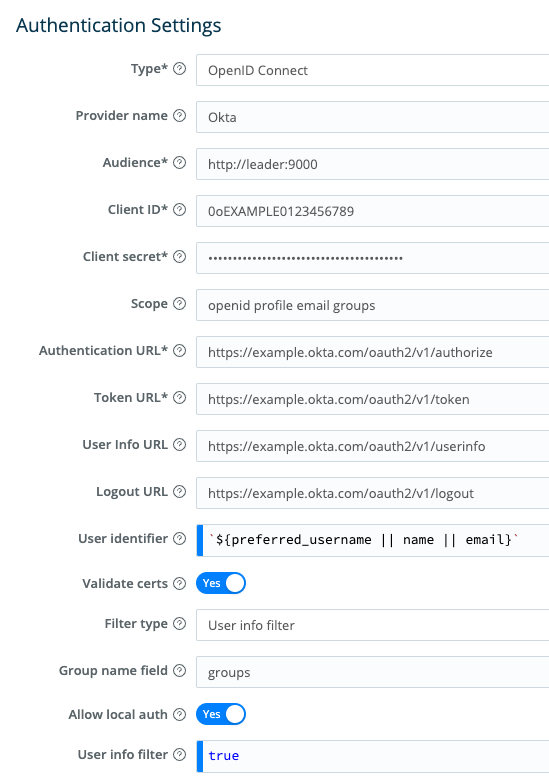
Navigate to Settings > [Global Settings >] Access Management > Authentication > Type and select OpenID Connect. This exposes the following controls.
Provider name: The name of the identity provider service. You can select Google or Okta, both supported natively. Manual entries are also allowed.
Audience (SP entity ID): The base URL, for example:
https://leader.yourDomain.com:9000for a distributed environment. For the IDP, this serves as a unique identifier for the SP (that is, your Cribl Edge instance).For distributed environments with a second Leader configured, modify the Audience field to point to the load balancer instead of the Leader Node.
Client ID: The
client_idfrom provider configuration.Client secret: The
client_secretfrom provider configuration.Scope: Space-separated list of authentication scopes. The default list is:
openid profile email. If you populate the User info URL field, you must addgroupsto this list.Authentication URL: The full path to the provider’s authentication endpoint. Be sure to configure the callback URL at the provider as
<masterServerFQDN>:9000/api/v1/auth/authorization-code/callback, for example:https://leader.yourDomain.com:9000/api/v1/auth/authorization-code/callback.Token URL: The full path to the provider’s access token URL.
User info URL: The full path to the provider’s user info URL. Optional; if not provided, Cribl Edge will attempt to gather user info from the ID token returned from the Token URL.
Logout URL: The full path to the provider’s logout URL. Leave blank if the provider does not support logout or token revocation.
User identifier: JavaScript expression used to derive
userIdfrom theid_tokenreturned by the OpenID provider.Validate certs: Whether to validate certificates. Defaults to
Yes. Toggle toNoto allow insecure self-signed certificates.Filter type: Select either Email allowlist or User info filter. This selection displays one of the following fields:
- Email allowlist: Wildcard list of emails/email patterns that are allowed access.
- User info filter: JavaScript expression to filter against user profile attributes. For example:
name.startsWith("someUser") && email.endsWith("domain.com")
Group name field: Field in the User info URL response (if configured); otherwise,
id_tokenthat contains the user groups. Defaults togroups.Allow login as Local User: Toggle to
Yesto also users to log in using Cribl Edge’s local authentication. This enables an extra button calledLog in as Local Useron the Cribl Edge login page. (This option ensures fallback access for local users if SSO/OpenID authentication fails.)To prevent lockout, Cribl strongly recommends enabling Allow login as Local User until you’re certain that external auth is working as intended. If you do get locked out, see Manual Password Replacement.
Email allowlist: Wildcard list of emails/email patterns that are allowed access.
Note the following details when filling in the form - for example, when using Okta:
<Issuer URI>is the account at the identity provider.Audienceis the URL of the host that will be connecting to the Issuer (for example,https://leader.yourDomain.com:9000for a distributed environment). The issuer (Okta, in this example) will redirect back to this site upon authentication success or failure.User info URLis required, because Okta doesn’t encode groups inid_token. Azure AD and Google also rely on this field.
Role Mapping Settings
This section is displayed only on distributed deployments (Edge, Stream) with an Enterprise License. For details on mapping your external identity provider’s configured groups to corresponding Cribl Edge user access Roles, see External Groups and Roles. The controls here are:
Default role: Default Cribl Edge Role to assign to all groups not explicitly mapped to a Role.
Mapping: Add a mapping for each external user group that you want to map to one or more Cribl roles. Then enter the group and select the role(s).
See also the explanation of role mapping above.
Role Mapping Example
Role mapping UIs will differ from one IDP to another. For this example, we’ll look at Okta’s.
You can assign a Cribl Edge Role to each Okta group name, and you can specify a default Role for users who are not in any groups.
In Cribl Edge, select Settings > Access Management > Authentication.
Scroll down to the ROLE MAPPING section.
Cribl recommends that you set the
defaultRole touser, meaning that this Role will be assigned to users who are not in any groups.Add mappings as needed.
The Okta group names in the left column are case-sensitive, and must match the values returned by Okta (those you saw earlier when configuring Okta and OIDC).

Verify that SSO with Okta Is Working
- Log out of Cribl Edge, and verify that Okta is now an option on the login page.
Click Log in with Okta.
You should be redirected to Okta to authenticate yourself.
The OpenID connect flow should complete the authentication process.
Get Temporary Access Credentials for AWS S3 Buckets
You can use your SSO/OIDC IDP to issue temporary access credentials so your on-prem Edge Node can access AWS S3 buckets.
Set the AWS_WEB_IDENTITY_TOKEN_FILE environment variable. This variable defines a path to a file that contains the OAuth/OIDC provided by the SSO IDP. You’ll also need to define AWS_ROLE_ARN and AWS_ROLE_SESSION_NAME.
You can use curl/Postman to make the required API calls.
Troubleshooting Resources
Cribl University’s Troubleshooting Criblet on SSO Integration for Stream On-Prem - Okta walks you through this whole configuration flow. To follow the direct course link, first log into your Cribl University account. (To create an account, select the Sign up link. You’ll need to click through a short Terms & Conditions presentation, with chill music, before proceeding to courses - but Cribl’s training is always free of charge.) Once logged in, check out other useful Troubleshooting Criblets and Advanced Troubleshooting short courses.


