


These docs are for Cribl Edge 4.6 and are no longer actively maintained.
See the latest version (4.17).
Managing Edge Nodes
If you have an Enterprise or Standard license, you can click the Manage tab in the left nav to open the Manage Fleets page. This page has three upper tabs: Fleets, Edge Nodes and Mappings.
Fleets Tab
The Manage Fleets page provides a list of all configured Fleets and Subfleets in the instance.
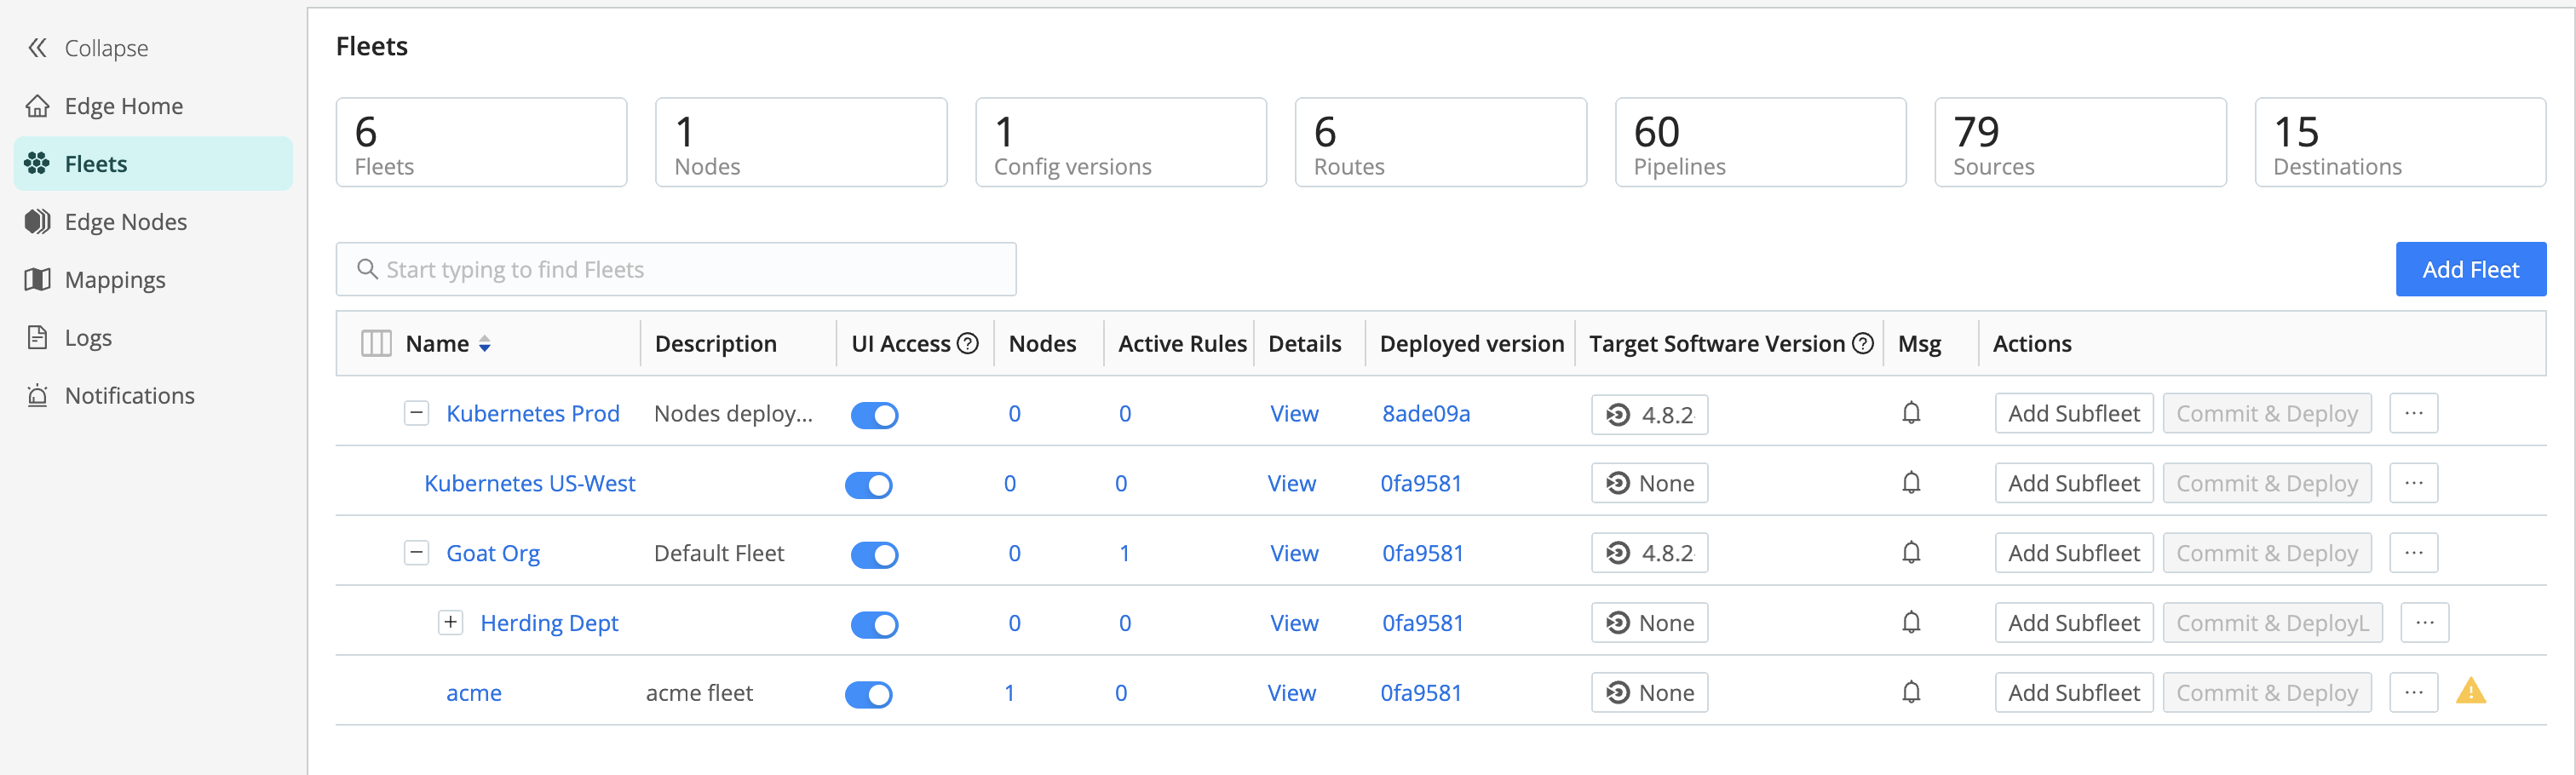
The top header now shows you the number of configured Fleets (2), along with other statistics. Clicking on the Fleet’s Name redirects you to its Fleet Landing Page where you can explore more information for each of your configured Edge Nodes.
Edge Nodes Tab
The Edge Nodes tab on the Manage Edge Nodes page provides status information for each Edge Node in the selected Fleet.

- To export the list of Edge Nodes, click the Export list as drop-down.
Select
JSONorCSVas the export file format. If you filter the list before exporting, the exported list will also be filtered. You can export the entire list by removing all filters. - To display additional details and controls, click each row.
- To teleport from the Leader into the Edge Node, click the Edge Node GUID link.
Add/Update Edge Nodes
You can use the Add/Update Edge Node control at upper right to update an existing Node, or to add a new Node by generating a bootstrap script. Cribl Edge admins can use the UI to concatenate and copy/paste the bootstrap script, automating several steps below. You can use an adjacent option to grab a script that updates an Edge Node’s Fleet assignment. You also have the option of generating a bootstrap script for the following Edge Nodes:
- Docker: For details, see Running in a Docker Container.
- Kubernetes: For details, see Deploying via Kubernetes.
- Linux: For details, see Installing Cribl Edge on Linux.
- Windows: For details, see Installing Cribl Edge on Windows.

The Update option in the UI adjusts the Leader connection details for the currently installed software. To upgrade the Edge Node - that is, install a newer version of the software - see Upgrading.
Add/Bootstrap a New Edge Node
All Edge Nodes’ hosts must enable ongoing outbound communication to the Leader’s port 4200, to enable the Leader to manage the Nodes. While the bootstrap script runs, firewalls on each Nodes’s host must also allow outbound communication on the following ports:
- Port 443 to
https://cdn.cribl.io. - Port 443 to a Cribl.Cloud Leader.
- Port 9000 to an on-prem Leader.
The details below differ slightly depending on which deployment option you select.
From Cribl Edges’s top nav, select Manage > Edge Nodes.
On the resulting Edge Nodes tab, click Add/Update Edge Node at the upper right.
Select the deployment option as shown in the composite screenshots below.
In the resulting modal, the Install package location defaults to
Cribl CDN. If desired, change this toDownload URL.As needed, correct the target Fleet, as well as the Leader hostname/IP (URI).
As needed, correct the User and User Group to run Cribl as. Defaults to
cribl.As needed, correct the Installation directory. Defaults to
/opt/cribl.Optionally, add Tags that you can use for filtering and grouping in Cribl Edge. Use a tab or hard return between (arbitrary) tag names.
Copy the resulting script to your clipboard.
Click either Done or X to close the modal.
Paste the script onto your Edge Node’s command line and execute it, to add the Edge Node.
Cribl Edge 4.7.2 and newer includes a Powershell-specific bootstrap script.
The provided Cribl Edge bootstrap command might not work directly in PowerShell due to unescaped quotes in the
APPLICATIONROOTDIRECTORYvariable. When running the bootstrap command in PowerShell, escape the double quotes within theAPPLICATIONROOTDIRECTORYvariable. Use backticks as escape characters.
Troubleshooting the Display
If you see unexpected results on the Edge Nodes tab, keep in mind that:
- Edge Nodes that miss 5 heartbeats, or whose connections have closed for more than 30 seconds, will be removed from the list.
- For a newly created Fleet, the Config Version column can show an indefinitely spinning progress spinner for that Fleet. This happens because the Edge Nodes are polling for a config bundle that has not yet been deployed. To resolve this, click the Deploy option to force a deploy.
- For details on collocating multiple Cribl products, see Cribl Edge and Cribl Stream on the Same Host.
- For details on overriding default ports, see Overriding Default Ports.
Mappings Tab
Click the Mappings tab (Manage > Mappings) to display status and controls for the active Mapping Ruleset. This page displays a maximum of 10,000 results.
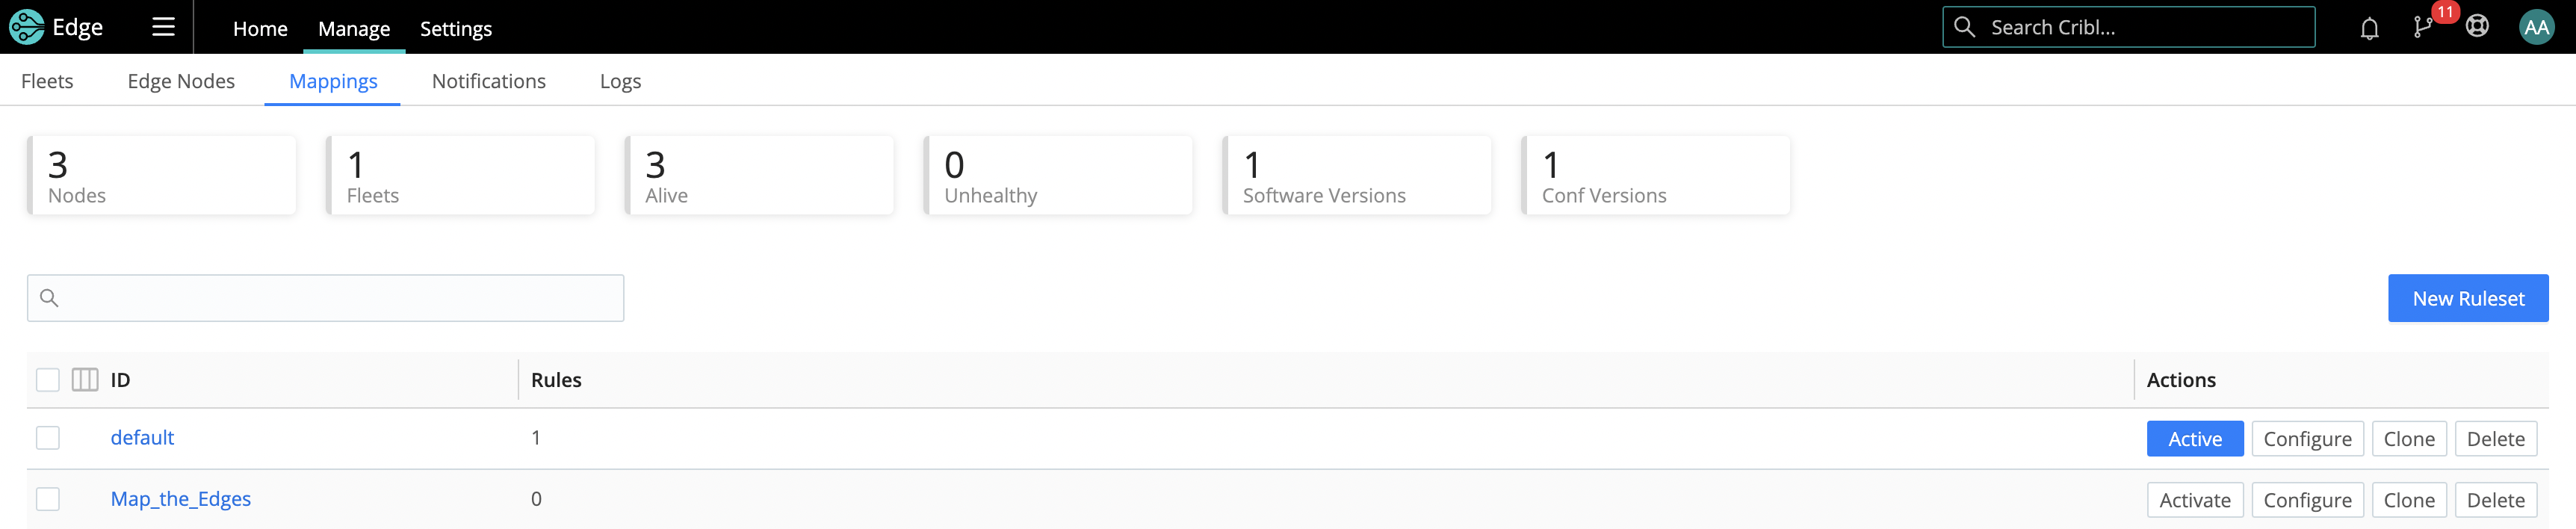
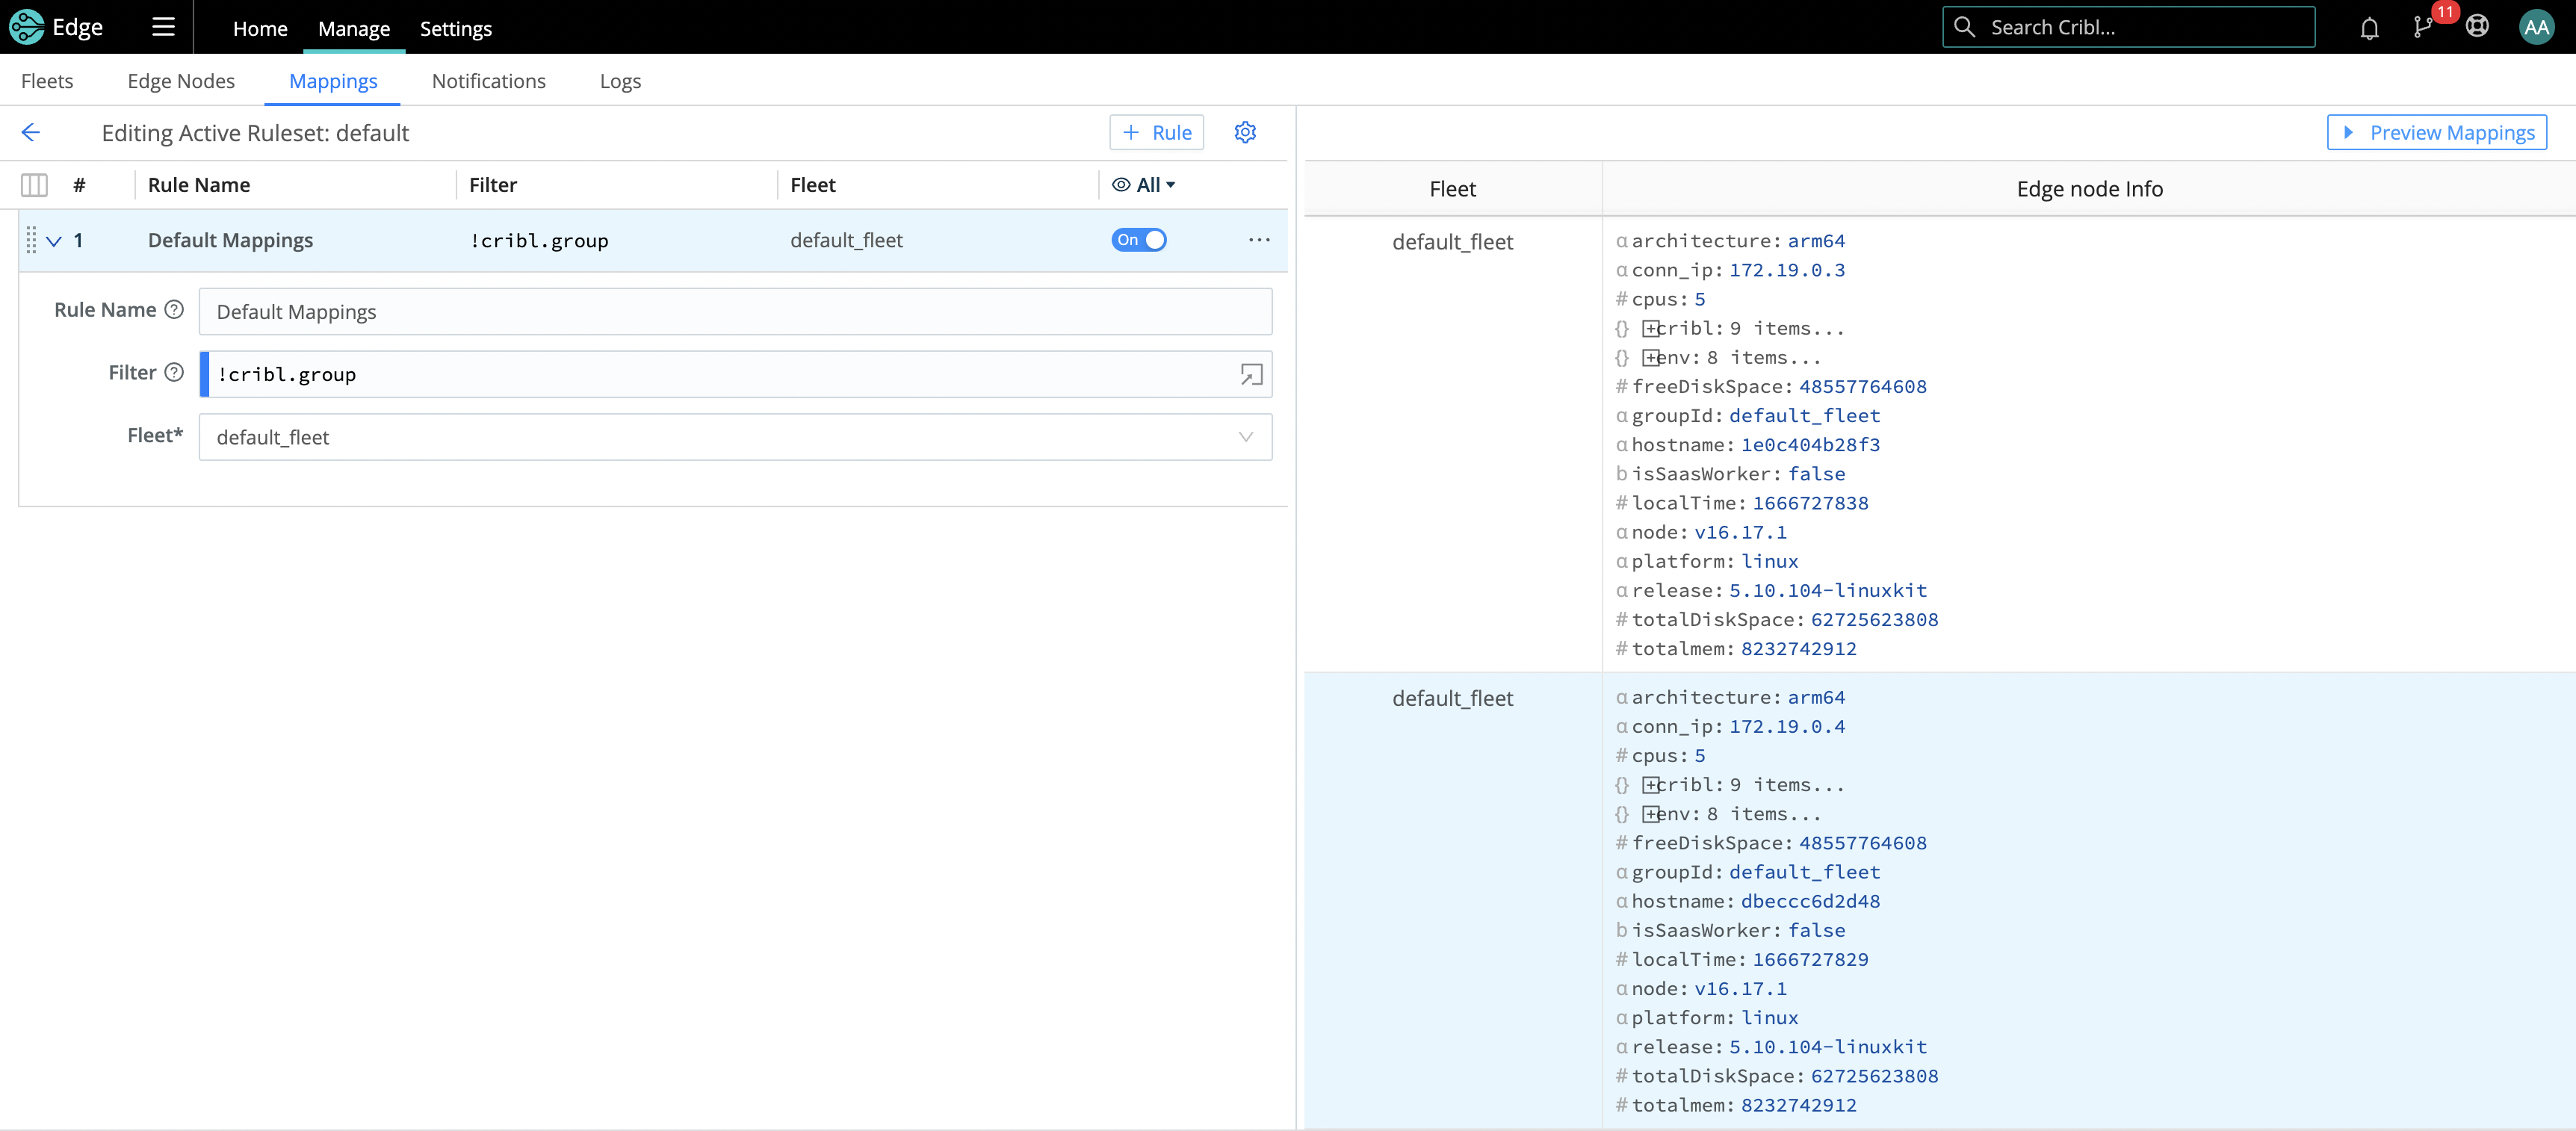
To manage and preview the Rules in a Ruleset, click into it.
Collecting AWS EC2 Tag Metadata
If Edge is connected to an AWS EC2 instance, the Mappings tab can gather metadata for AWS instance tags. You can use tags to map EC2 nodes to the correct Edge Fleet. You must allow access to tags in the EC2 instance metadata for Cribl Edge to obtain them.
How Edge Nodes and Leader Work Together
The Leader Node has two primary roles:
Serves as a central location for Edge Nodes’ operational metrics. The Leader ships with a monitoring console that has a number of dashboards, covering almost every operational aspect of the deployment.
Serves as a central location for authoring, validating, deploying, and synchronizing configurations across Fleets.
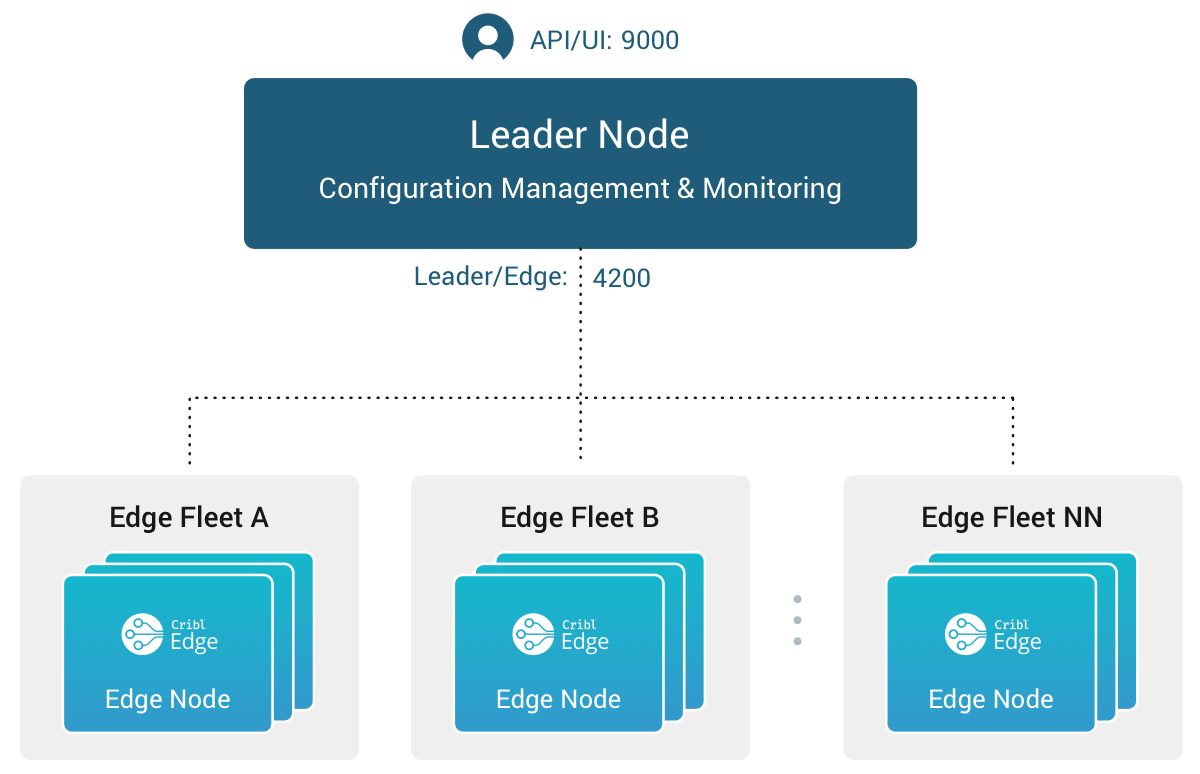
Network Port Requirements (Defaults)
- UI access to Leader Node: TCP 9000.
- Edge Node to Leader Node: TCP 4200. Used for Heartbeat/Metrics/Leader requests/notifications to clients (for example: live captures, teleporting, status updates, config bundle notifications, and so on).
- Edge Node to Leader Node: HTTPS 4200. Used for config bundle downloads.
- Edge Node boostrapping/update: TCP 443.
Leader/Edge Node Communication
Edge Nodes will send a heartbeat to the Leader every 60 seconds. This heartbeat includes information about the Nodes and a set of current system metrics. The heartbeat payload includes facts - such as hostname, IP address, GUID, tags, environment variables, current software/configuration version, etc. - that the Leader tracks with the connection.
When an Edge Node checks in with the Leader:
- It sends a heartbeat to Leader with “facts” about itself.
- The Leader uses Edge Node’s facts and Mapping Rules to map it to a Fleet.
- The Edge Node pulls its Fleet’s updated configuration bundle, if necessary.
Edge Nodes that don’t maintain their connection to the Leader will eventually disappear from the Edge Nodes page.
The Leader is unaware of Edge Nodes’ platforms (i.e, Linux or Windows) within a Fleet. So the ConfigHelper omits platform-specific limitations. Therefore, when you manage Edge Nodes on heterogeneous platforms, create a Windows-specific Fleet and mapping. See Managing Edge Nodes on Multiple Platforms.
Config Bundle Management
Config bundles are compressed archives of all config files and associated data that an Edge Node needs to operate. The Leader creates bundles upon Deploy, and manages them as follows:
- Bundles are wiped clean on startup.
- While running, at most 5 bundles per group are kept.
- Bundle cleanup is invoked when a new bundle is created.
The Edge Node pulls bundles from the Leader and manages them as follows:
- Last 5 bundles and backup files are kept.
- At any point in time, all files created in the last 10 minutes are kept.
- Bundle cleanup is invoked after a reconfigure.
Bundle in S3
You can store bundles in an AWS S3 bucket to reduce the Leader load. This offloads bundle distribution from the Leader to your designated S3 bucket. Edge Nodes will pull bundles directly from S3, minimizing Leader strain.
You can configure bundling in S3 through the following ways:
- UI: When configuring Leader Settings on a Leader Node, specify an S3 bucket (format:
s3://${bucket}) for remote bundle storage in the S3 Bundle Bucket URL field. - YAML: In the
instance.ymlconfig file, specify the S3 bucket inmaster.configBundles.remoteUrl. - Environment Variable: Use the
CRIBL_DIST_LEADER_BUNDLE_URLenvironment variable.