


Convert Data into a Custom Schema
Copilot Editor is an interactive AI assistant that helps you build Pipelines more easily in Cribl Edge. It specializes in designing Pipelines that transform your data to match specific schemas, whether they are industry-standard or custom-defined.
With Copilot Editor, you can:
- Structure raw data into a standard schema, such as OCSF, UDM, and ECS.
- Convert data from one standard schema to another.
- Transform data into a custom schema that you define.
Copilot Editor supports many schemas out of the box. See Supported Schemas for a complete list.
You can also define your own custom schema or adapt a standard schema for your needs. Copilot Editor can use your custom schema definition to help you generate a Pipeline that transforms your data to your specifications.
See Create Pipelines With Cribl Copilot Editor for a broader introduction, including how to launch it and build your first Pipeline.
Overview of the Custom Schema Workflow
The workflow for building a custom schema has five phases:
Get an example of the target schema: Start by identifying a sample event that represents your desired output format. If you already have a fully defined target schema, you can skip the first two steps and upload it directly to Cribl Edge.
Convert the example into JSON: Follow best practices to convert your example into a data schema using valid JSON.
Upload the schema: Add the JSON object to your Knowledge library so that Copilot Editor can reference that file.
Build a Pipeline to transform your data schema: Use Copilot Editor to create a Pipeline that can transform your data into the target schema.
Validate the schema output: Validate the data outputs to ensure you get the intended results. Then, make adjustments as needed.
Get an Example of the Target Schema
To build a custom data schema, start by identifying what you want your output data to look like. This step is optional if you already have a complete target schema ready to upload to Cribl Edge.
Find or create a sample event that closely matches your desired output. Choose an example that represents the type of event you want to map and reflects the ideal structure for your schema.
This guide uses the following sample event as a reference:
{
    "timestamp": "2025-07-08T14:30:00Z",
    "level": "INFO",
    "message": "User creation successful",
    "user": {
      "id": 12345,
      "username": "johndoe"
    },
    "session": {
      "session_id": "abcde12345",
      "device": "Chrome on Mac OS"
    }
}Convert the Example into JSON
Next, convert your sample event into a data schema using valid JSON object format. You’ll upload this schema to Cribl Edge in a later step, allowing Copilot Editor to reference it when building your Pipeline.
Copilot Editor requires all schemas to be structured as valid JSON objects so it can parse and validate them correctly.
You can ensure that Copilot Editor can easily consume and successfully process your data schema by the best practices outlined in the following sections. The following example shows a well-formed JSON schema that follows best practices and serves as a reference in these sections:
| |
Define the Field Names, Types, and Descriptions
Copilot Editor can map your log data more accurately if you provide meaningful context when defining each field in your schema.
For every field in your JSON schema, always include:
- The field name name of the field.
- The field’s data type (such as a string, integer, or boolean).
- A brief description of the field’s purpose or contents.
Here’s an example illustrating these best practices, taken from the reference schema (lines 18-21):
| |
In this example:
- Line 1 indicates the field name:
message. - Line 2 defines the data type:
string. - Line 3 provides a description:
A description of the event.
List Allowed Values for Restricted Fields
If a field should only accept a specific set of values, use an enum to define the allowed options. This helps Copilot Editor understand the valid inputs for that field and ensures consistent schema mapping.
For example, see this section of the reference JSON schema (lines 13-17):
| |
In this example, line 3 defines the allowed values for the level field using an enum array.
Mark Required Fields
Clearly define which fields are required so Copilot Editor knows which values it must always include in the generated mapping. Use a required array inside each object to mark fields that are mandatory within that scope, and add a top-level required array to indicate which fields are required across the entire schema.
For example, see this portion from of the reference schema (lines 36-58):
| |
In this example:
- Line 13 includes a required array that marks
session_idas mandatory:"required": ["session_id"]. - Line 22 is the top-level array of required fields, indicating which fields are mandatory across the entire object:
"required": ["timestamp", "level", "user"].
Add an Unmapped Fields Section
Consider adding an additional or unmapped field as a catch-all for any data that doesn’t fit cleanly into your defined schema. This lets you retain important information from the original event without forcing it into a specific predefined field.
Upload the Schema
Once you have your schema defined in a JSON object, you can upload it to the Knowledge library so that Copilot Editor can reference that file:
On the top bar, select Products, and then select Cribl Edge. Under Worker Groups, select a Worker Group.
Navigate to Processing, then Knowledge. Select Schemas from the side menu.
Select Add Schema. In the New Schema modal, configure the following settings:
- ID: Enter a unique name for the schema.
- Description: Optionally, add a short description of the schema’s contents or purpose.
- Schema: Use the built-in editor to paste the JSON file into the window.
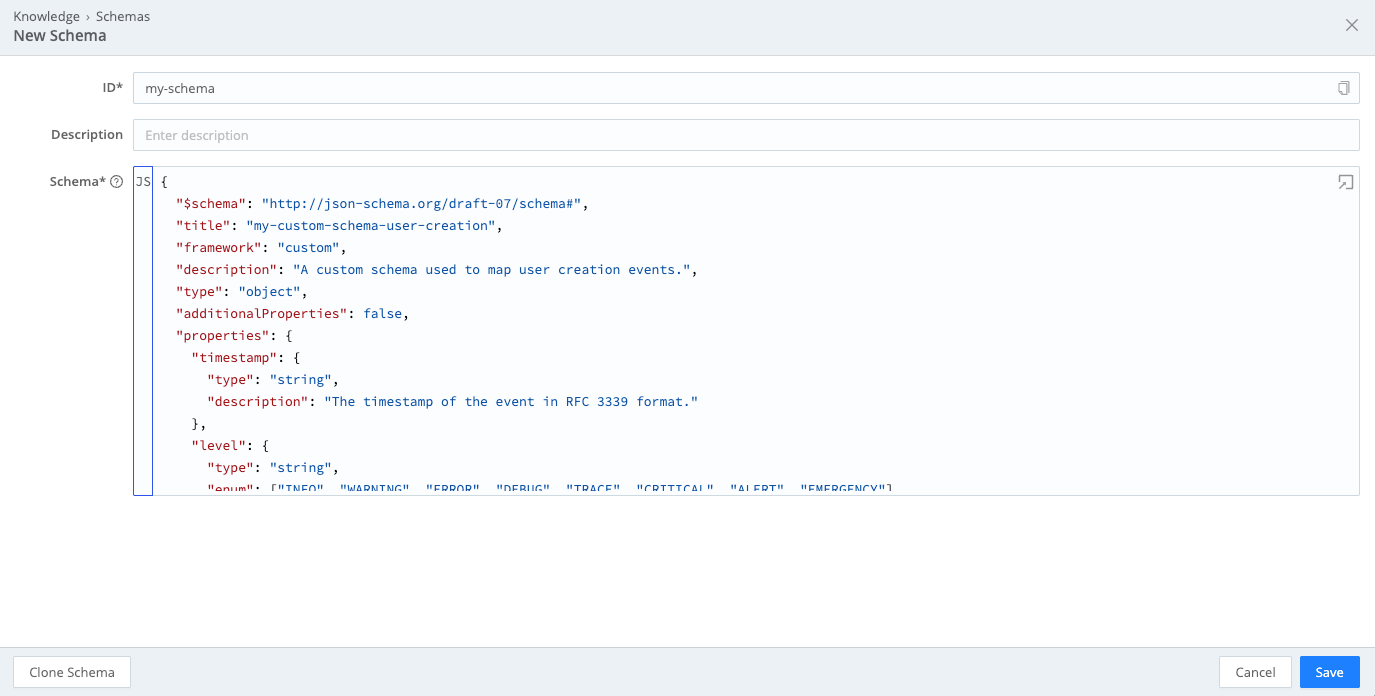
Add a schema to the Knowledge library Select Save. Cribl Edge checks your input to ensure it is valid JSON and flags any errors you need to correct before attempting to save again. Select the error icon for more information about the errors that need to be fixed.
Confirm that your schema file appears in the list of schemas. Then,commit and deploy the changes to your Fleets.
Consider using Cribl Copilot to help you write commit messages. It analyzes the diff and recommends a message that describes the update.
Build a Pipeline to Transform Your Data Schema
Once you have uploaded your schema to the Knowledge library, you can then reference it when building a Pipeline with Copilot Editor:
Check that you have enabled Copilot Editor and then launch Copilot Editor.
Follow the chat prompts to capture or import sample data. The chat window may also prompt you to select a data source.
When the chat window prompts you to choose an objective, select Convert my input events to a specific target schema.
To use your custom schema, select Pick from our library. Use the dropdown menu to select Custom, then select your custom schema name from the list. Select Confirm.
Copilot Editor limits the size of custom schemas to 100,000 characters. If your file exceeds this limit, you might not receive an error message. Instead, Copilot Editor might suggest using the recommended schema instead. To use your custom schema, reduce its character count and upload it again.
View the target schema on side pane to ensure it looks correct, then select Confirm again.
View and edit the suggested Pipeline plan that Copilot Editor generates. It outlines:
- Assumptions it made when generating the plan.
- Transformations that it recommends based on your objectives.
- Fields to keep and drop.
If needed, select Edit to further customize the proposed plan before confirming. For example, you could rename any fields as needed. Be aware that any changes you make to the schema inside the Copilot Editor interface do not get applied to the original schema object you upload to Cribl Edge. You need to update the schema manually to ensure changes are permanent.
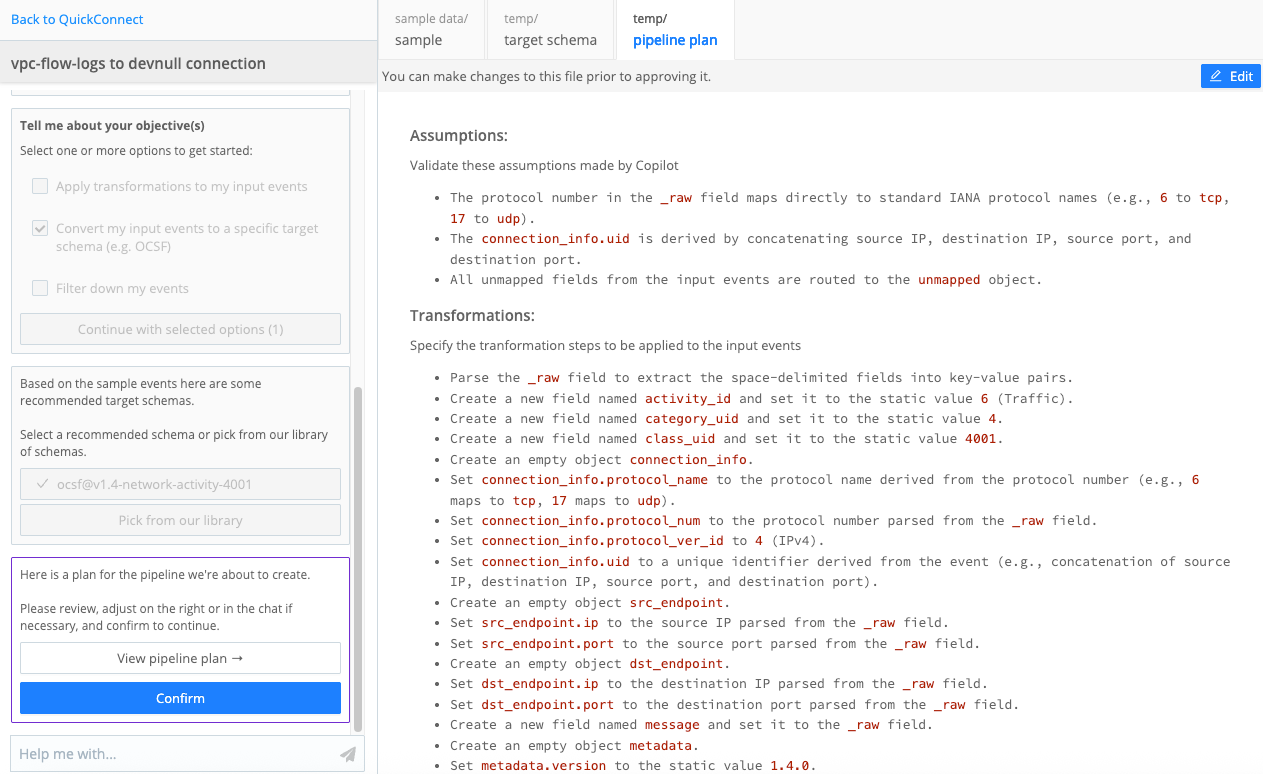
Copilot Editor Pipeline Plan Confirm the Pipeline plan and build the Pipeline, continuing to edit the Pipeline as needed.
Validate Schema Output
As you begin building a Copilot Editor Pipeline with your schema, validate the outputs to ensure you get the intended results. You can validate the outputs by:
- Reviewing the Pipeline plan produced by Copilot Editor.
- Checking the outbound data in the Data Preview pane of the Pipeline page.
You can edit the schema within Copilot Editor and make adjustments as needed. However, any changes you make to the schema inside the Copilot Editor interface do not get applied to the original schema object you upload to Cribl Edge. If you adjust the schema within the Copilot Editor interface, make sure you make those changes in the JSON object file stored in your Knowledge library (accessed in Processing > Knowledge > Schemas).