


Create a Pack
Now that you have a clear plan for the Cribl Edge elements you want to version control, you can start building an initial Pack to test your basic configuration management workflow.
You can create a new Pack from scratch or you can create a Pack, then copy any configurations you developed in your Cribl Edge deployment into the Pack.
Best Practices for Working With Packs
When creating and working with Packs, keep these considerations in mind:
Keep the Pack simple at first. For the purposes of setting up the initial Pack-based workflow, make your initial Pack simple to start and then test the version control workflow by adding more configurations in later steps.
Consider using Pack logos to help you remember the Pack context. You might understandably lose track of whether you are creating Cribl Edge configurations in a local Pack context or a global context. To give yourself a visual cue that you are working in a local Pack, consider adding a logo to your Pack in the Pack settings. The logo will show up in the top breadcrumb bar so that you can clearly see when you are working in a local Pack context. When you don’t see that logo, that will be your cue that you are working in a global context outside of the Pack.
Create a New Pack
Start by creating a new Pack based on the scope and goals you defined in your configuration plan:
On the top bar, select Products, and then select Cribl Edge. Under Fleets, select a Fleet.
Navigate to Processing, then Packs and select Add Pack. From the submenu, select Create Pack.
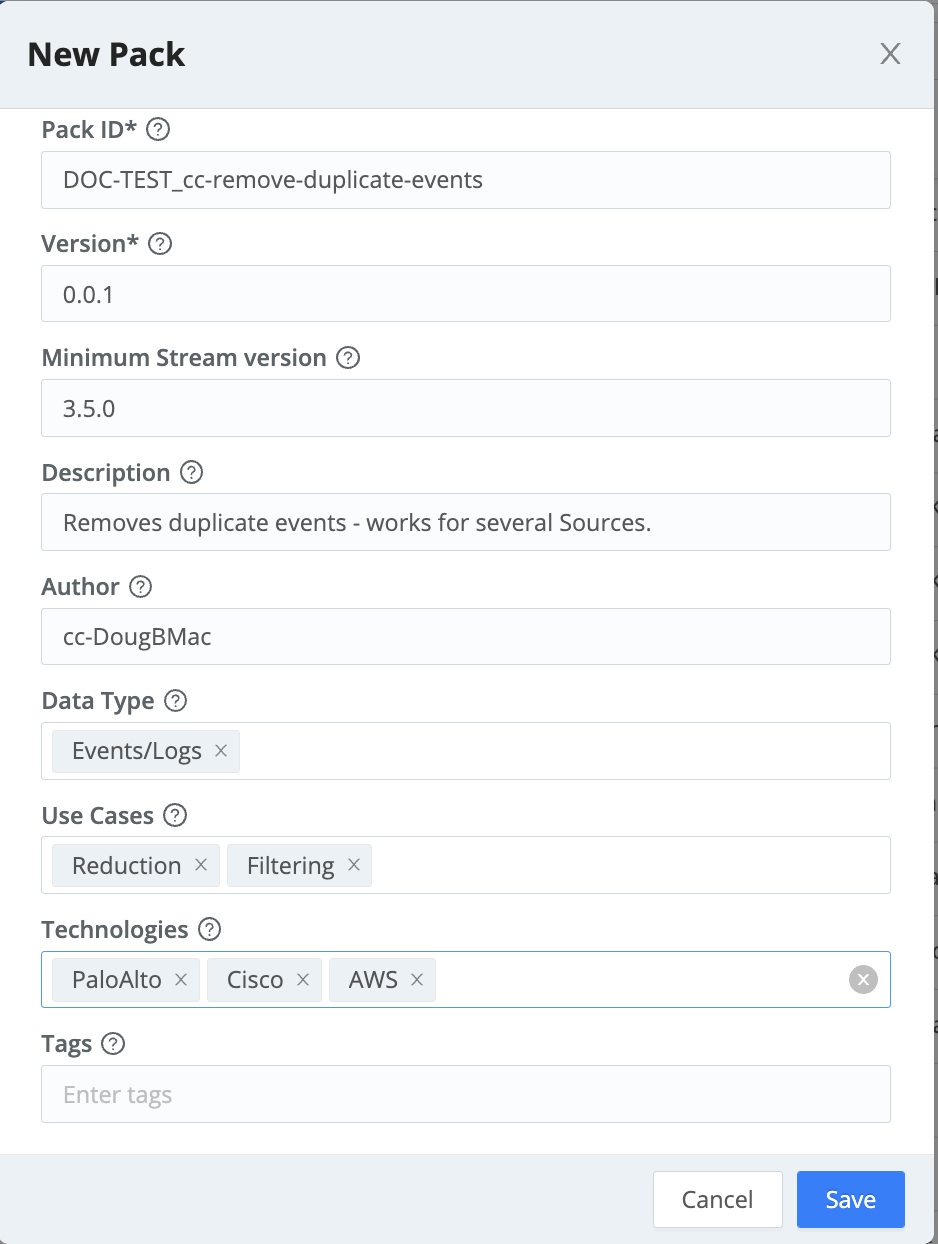
Enter a unique Pack ID and other details:
Pack ID: Required. Each Pack within a Fleet must have a unique alphanumeric Pack ID. Some characters like hyphens or underscores are allowed, but spaces are not.
Pack IDs must be all lowercase. If you enter uppercase letters when creating a Pack ID (such as
MyPack), Cribl Edge automatically converts the ID to lowercase (mypack).Version: Required. Set the initial Pack version. The default is
0.0.1.Minimum Edge version: Specify the lowest compatible version of Cribl Edge software. For example, if the Pack uses a feature that was introduced in a specific release, set the version to that release number.
Description: Add an optional description of the Pack’s purpose or contents.
Author: Optionally indicate the author of the Pack.
Data type, Use cases, and Technologies are optional combo boxes. You can insert one or multiple keywords to help users filter Packs that you post publicly on the Cribl Packs Dispensary.
Tags are optional labels that you can use to filter, search, and organize Packs.
Select Save.
Creating a Pack On the Packs page, select the new Pack’s row to open the Pack.

Manage Packs page Use the standard Cribl Edge controls to configure the elements you want to include in the Pack. As you save changes in the UI, they’re saved to the Pack.
Copy Resources Into the Pack (Optional)
If you developed configurations outside of a Pack context, you can manually copy configurations from one part of Cribl Edge into a Pack. This section provides steps for copying various resources into your newly created Pack. Select the tab for the type of resource you want to copy over:
To copy a Pipeline into a Pack:
- In the sidebar, select Fleets, then select a Fleet.
- On the Fleets submenu, select More, then Pipelines.
- Locate the Pipeline you want to copy and open the Options ••• menu on its row
- Select Copy.
- Navigate to your new Pack and, in the Pack submenu, select Pipelines.
- Select Paste Pipeline

on the filter bar, confirm the Pipeline name and select Save.
To copy a Route into a Pack:
- In the sidebar, select Fleets, then select a Fleet.
- On the Fleets submenu, select More, then Routes.
- Locate the Route you want to copy and open the Options ••• menu on its row
- Select Copy.
- Navigate to your new Pack and, in the Pack submenu, select Routes.
- Select Paste route
on the filter bar.
- Reorder the Route according to your needs.
To copy a Source or Collector into a Pack:
- In the sidebar, select Fleets, then select a Fleet.
- On the Fleets submenu, select More, then Sources.
- Locate the Source you want to copy and open it.
- Select Manage as JSON on the Configure tab.
- In the Manage as JSON modal, select Export and save the exported file.
- Navigate to your new Pack and, in the Pack submenu, select Sources.
- Choose the type of Source you are copying, and select Add Source.
- Select Manage as JSON, select Import, and choose the exported Source file.
- Confirm with OK, then save the new Source.
If you are copying an enabled Source bound to a port, you must temporarily disable that Source before creating the copy. Once you’ve finished configuring the new Source and selected a new port, you can re-enable the original.
To copy a Destination into a Pack:
- In the sidebar, select Fleets, then select a Fleet.
- On the Fleets submenu, select More, then Destinations.
- Locate the Destination you want to copy and open it.
- Select Manage as JSON on the Configure tab.
- In the Manage as JSON modal, select Export and save the exported file.
- Navigate to your new Pack and, in the Pack submenu, select Sources.
- Choose the type of Destination you are copying, and select Add Destination.
- Select Manage as JSON, select Import, and choose the exported Destination file.
- Confirm with OK, then save the new Destination.
You can use the same method with Manage as JSON to copy Knowledge Objects such as variables, Regexes, or Event Breaker Rules.
Configure Variables and Secrets
To make your Packs portable and reusable across different environments, replace fixed values in your configuration with variables and secrets. This practice, known as templatization, allows your Pack to adapt to different environments without you having to manually edit it each time. See Pack Variables and Sensitive Data and Secrets for a reminder about how variables and secrets work.
As you build the Pack, design your variables with their ultimate scope in mind. The portability of Packs comes from the relationship between the Pack itself and the Fleet context. This hierarchy allows a Pack to be environmentally aware, meaning it knows where it is and which local values it should use.
| Variable | Description and Use Case | Behavior |
|---|---|---|
| Pack | Bundled directly within the Pack. These are best used for internal logic that should remain constant no matter where the Pack is deployed. | When you copy the Pack, these variables move with it automatically. |
| Fleet | Allow you to define regional or environment-specific values that the Pack inherits once it is installed. For example, AWS regions (us-west-2 vs. us-east-1), VPC endpoints, or local port assignments. | When you port a Pack into a new Fleet, the Pack’s configuration fields use the Fleet’s context to populate these values. |
When you reference a Fleet variable in a Pack, Cribl adds a prefix to indicate that it is a Fleet variable. In Stream, these variables are prefixed with
cribl.. In Edge, they are prefixed withedge..
Create a New Variable
To create a new variable:
From inside the Pack context, select Knowledge, then Variables. The Variables UI has tabs that allow you to select the correct scope for your variable. Select either Pack Variables or Fleet Variables depending on the desired variable scope.
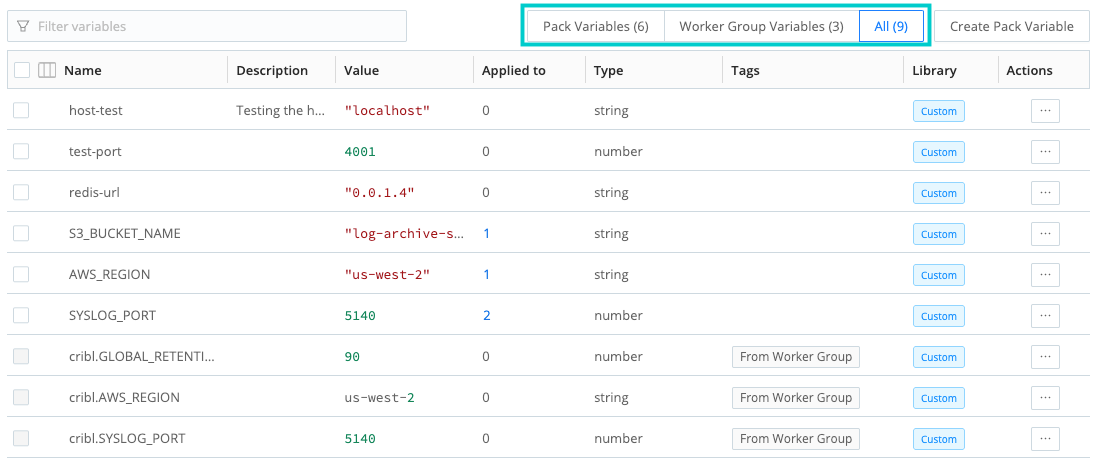
Select the correct tab Select Create Pack Variable and configure the variable settings:
Name: Enter a unique name for the variable.
Description: Optionally, enter a description.
Type: Select the type of variable you want to create. See the Variables Library reference page for a detailed explanation of variable types.
Value: Enter the value, data structure, or JavaScript expression for this variable. This input must match the format required by the selected variable type. For example, Expressions should have JavaScript syntax. The system validates the input when you save.
Tags: Optionally, add tags that you can use for filtering and grouping in the variable list view. Use a tab or hard return between (arbitrary) tag names.
Save the variable. The system validates the Value field to ensure it matches the specified Type when it saves.
You can also add new variables directly in the field where you want to reference that variable.
Use Variables in a Pack
Fields that can accept variables have a Variable icon
 next to them. Select this icon to open the Add Variable modal. You can select an existing variable from this list or create a new one.
Fleet variables are designed specifically for configuration binding. They are not accessible using the C.vars expression in Pipeline Functions. You can only bind these variables to Source and Destination configuration fields that display the Variable icon
The only exception is the Redis Function, which can resolve Fleet variables at runtime to manage external state or lookups.
Delete Variables
Before deleting a variable, identify where it is currently applied. When you delete a variable that is bound to a Source or Destination, the system performs the following actions:
Converts to static values: The system replaces the variable reference with its last known value. For example, if a field was bound to an
AWS_REGIONvariable with a value of"us-west-2", the field will now contain the hard-coded string"us-west-2".Breaks environmental awareness: Because the value is now hard-coded, the configuration will no longer adapt if you move the Pack to a different Fleet or update the Pack or variable at the Fleet context.
Prevents batch updates: You can no longer update multiple Sources or Destinations by changing a single variable. You must manually edit each component to update its settings.
This action is permanent and cannot be undone. To restore variable binding, you must manually re-bind each field to a new variable.
Copy a Pack
After building and validating Packs, you can then copy or import that Pack to multiple Fleets, making small adjustments to the logic to allow for specific differences that are unique to that Fleet. For example, you could adjust the Fleet-level variables that account for regional differences (such as different AWS regions), VPC endpoints, or local port assignments.
When you move a Pack, it carries its entire data processing ecosystem with it, including Pipelines, Knowledge objects, and sensitive resources. This ensures that the core data processing business logic remains intact while adapting to the local requirements of its new Fleet context. It also allows you to easily make updates to Packs and deploy those updates with minimal overhead.
To copy a Pack:
In Cribl Edge, navigate to the Packs page and open the Options ••• menu on the row of your Pack.
Select Copy to another Fleet.
In the modal, define the destination and content:
Export mode: Select one of the three available export modes. See Export Mode for more detailed information about each mode.
Fleet: Type or select the target Fleet.
Overwrite: Select this option if you want to replace all configurations, Pipelines, and variables in the target Fleet with the versions from this Pack. Enabling this will permanently overwrite any local modifications made to the Pack in the target Fleet.
Include external dependencies (certificates, secrets, variables): Bundle all certificates, secrets, and variables required for the Pack to function. This ensures the target Fleet has the necessary credentials to run the Pack immediately. Existing resources in the target group are maintained, while only new or missing dependencies are added.
Select Copy.
Update Variables After Import or Update
When you import or copy a Pack into a new Fleet, Cribl prompts you to configure the variables for that Fleet context by displaying a message that indicates the import was successful. Select Configure Variables in this message to go to the Variables list. From here, you can see the list of variables available to the Pack, including its Pack variables. You can then update the variables to their custom value for that Fleet.
The Applied to column displays the number of active references for each variable. Select the value to open a modal listing all Sources and Destinations that reference this variable.

Connect Packs to Global Sources and Destinations
After you export a Pack to a new Fleet, you can optionally set up the ability to transfer data in and out of Packs to other Sources and Destinations that are available at the Fleet level. See Design the Pack Data Flow for an explanation of how to plan an effective data flow strategy.
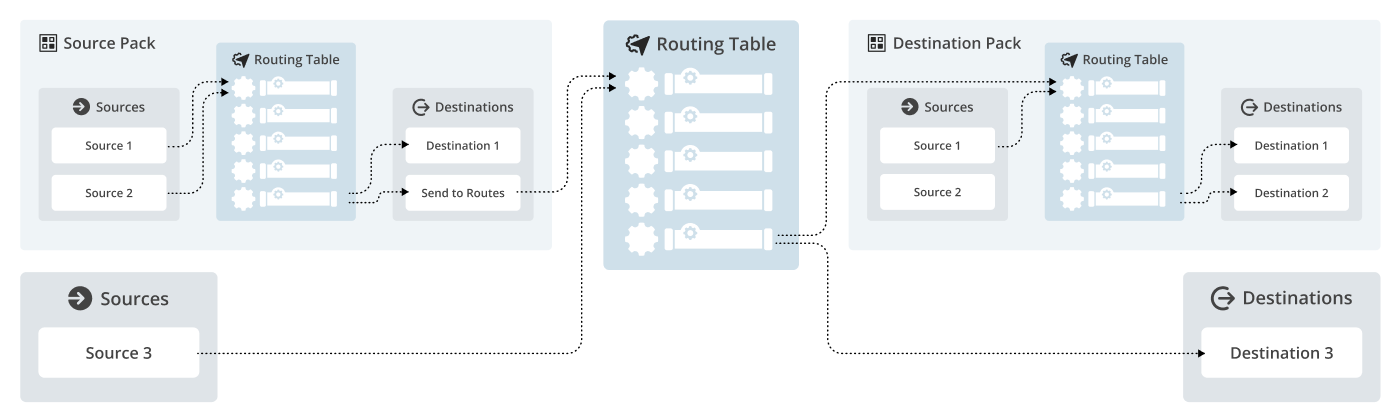
Send Data From a Global Source to a Pack
To route data from a Source that exists at the Fleet level to a Pack containing a Destination:
Ensure the target Pack contains a valid Destination.
On the top bar, select Products, and then select Cribl Edge. Under Fleets, select a Fleet.
Navigate to Routing, then Data Routes.
Add a new Route or expand an existing Route.
In the Destination field, select your Pack from the menu.
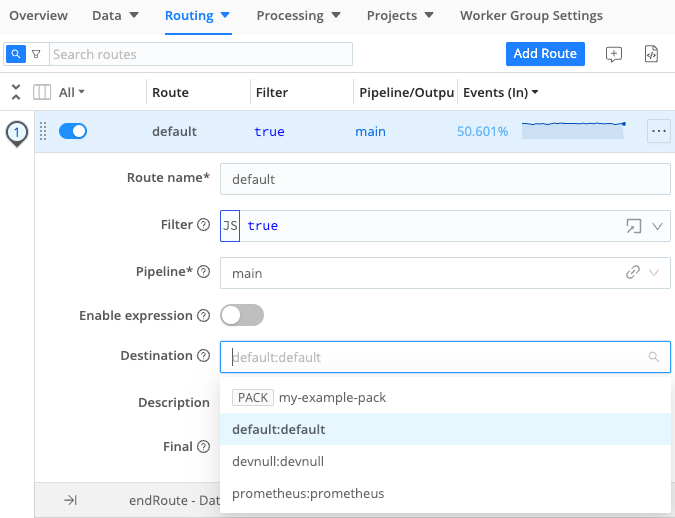
Box labels distinguish Packs from other objects in the Destination field Verify that data is flowing as expected.
A Pack only appears as an available target in the Destination field if it contains at least one configured Destination. System-provided Destinations, such as Default or DevNull, do not fulfill this requirement and will not make the Pack visible in the selection menu.
Send Data From a Pack to a Global Destination
To route data originating in a Pack to a Destination that exists outside a Pack at the Fleet level:
From inside the Pack context, select Routes from the top bar.
Add a new Route or expand an existing Route.
In the Destination field, select Send to Worker Group Routes. This sends any data matching the Route filter to the global Route table at the Fleet level.
Verify that data is flowing as expected.
Process Data in a Pipeline Contained in a Pack
To route data from a Source that exists at the Fleet level to a Pack containing a Pipeline:
Ensure the target Pack contains a valid Pipeline.
On the top bar, select Products, and then select Cribl Edge. Under Fleets, select a Fleet.
Navigate to Routing, then Data Routes.
Add a new Route or expand an existing Route.
In the Pipeline field, select your Pack from the menu.
Verify that data is processed as expected using the Data Preview window.
A Pack only appears as an available target in the Pipeline field if it contains a Pipeline.