


Optimize Source Persistent Queues
Cribl Edge’s Source persistent queues (PQ) can supplement in-memory queues to prevent data loss during a backpressure event, such as when a configured Source sends a higher volume of data than Cribl Edge can process. See Supported Sources for more information about which Sources support persistent queueing.
Read this guide to learn how to initially optimize your Source persistent queue. This guide is helpful when you are in the initial planning and configuration stage and also when you have an active deployment that you want to performance tune. It explains:
- How Source persistent queues respond to a backpressure event.
- An in-depth discussion of the Source persistent queue configuration options and their potential impact on your system.
- The available notifications, monitoring dashboards, and troubleshooting tools for Source persistent queues.
For a general overview of persistent queues, see About Persistent Queues.
On Cribl-managed Cribl.Cloud Workers with an Enterprise plan, you can enable persistent queue for supported Sources. However, be aware that mode options and storage limits have specific restrictions in Cribl.Cloud. See For Cribl.Cloud Only:
Always Onis the Only Available Mode for more information.
How Source Persistent Queues Work
Backpressure occurs when there is a temporary imbalance between the rates of inbound and outbound data that is either coming in or going out of Cribl Edge.
Different events trigger persistent queues on Sources:
- Error conditions.
- Degraded performance–such as slowdowns or short backups–in downstream Cribl resources.
- External receivers might trigger backpressure.
When Source persistent queue engages, it writes and stores data on either a local file system in your environment or a shared storage system until the backpressure event resolves.
How Sources Handle Backpressure
When a downstream Destination experiences backpressure, Cribl Edge must manage the incoming data flow to prevent overwhelming the system. If persistent queue is not enabled, backpressure propagates back through the data Pipeline to the Sources, which can impact data flow in different ways depending on the Source type. See Backpressure Impacts to Sources for information about how backpressure affects Sources without persistent queue.
Source persistent queue can serve as a stopgap for upstream senders that don’t provide their own buffering, or whose small buffers cannot queue for long. This applies to several syslog senders and HTTP-based Sources.
Sources that have persistent queue support have the option to supplement in-memory buffering with persistent queue. When you enable persistent queue, you can choose between these Source persistent queue trigger conditions:
| Condition | Description |
|---|---|
| Always On | Uses persistent queue as a disk buffer for all events. |
| Smart | Only engages persistent queue upon backpressure from downstream receivers or Cribl internal processes. |
In Always On mode, the persistent queue constantly writes all data to a backup disk buffer regardless of whether there is a backpressure event or normal conditions. After the backpressure event ends, the persistent queue flushes every 10 seconds when it drains in Always On mode.
In Smart mode, persistent queue engages under any of these conditions:
- A connected Destination is fully down and Destination-side persistent queue is not enabled.
- A connected Destination is slow or blocking.
- A downstream Cribl Pipeline or Route is slow.
When persistent queue engages on a Source in Smart mode:
- Events queue before any pre-processing Pipeline takes effect.
- Metrics (data in) will show
0bytes/events while the system buffers events to persistent storage. - Cribl Edge Pipelines and Routes process the data with a delay as the persistent queue drains.
Smart mode only engages when necessary, such as when a downstream Destination becomes blocked and the Buffer size limit reaches its limit. When persistent queue is set to Smart mode, Cribl attempts to flush the queue when every new event arrives. The only time events stay in the buffer is when a downstream Destination becomes blocked.
If you turn off persistent queue for a Source or Destination (or shut down the whole Source or Destination) before the queues drain, you will orphan any events still in the persistent queue store.
- If data storage is local: This data is inaccessible unless you re-enable the queue on the same Edge Node.
- If data storage is shared (NFS or S3): This data remains in the S3 bucket or NFS mount. While other Edge Nodes can potentially recover this data, you should always wait for queues to drain before disabling the feature to ensure a clean transition.
See How to Safely Disable and Clear Persistent Queues for more information.
Configure Source Persistent Queue
To enable persistent queuing, you must configure settings at two levels: the individual Source and (for on-prem and hybrid deployments in Cribl Stream only) at the Worker Group level.
This section provides a configuration quick start for experienced users. However, new Cribl Edge users should consider reading the full architectural recommendations in this guide to understand how to design an optimal queueing strategy for your environment.
Before You Start
Determine whether persistent queue is right for your deployment. Consult When to Use Persistent Queues for an overview of benefits, trade-offs, and architectural requirements.
Enabling persistent queue on a Source is redundant if the upstream sender already safeguards events in its own disk buffer. Enabling persistent queue on both the sender and Cribl Edge could cause data latency. Check the settings for the sender to ensure you know how whether that specific sender already safeguards against data loss.
On Cribl-managed Cribl.Cloud Edge Nodes (Enterprise plan), most configuration options are managed automatically by Cribl to optimize performance. In the UI for Cribl.Cloud, enabling persistent queue only exposes the destructive Clear Persistent Queue button. This action is destructive and should only be used as a last resort. See How to Safely Disable and Clear Persistent Queues for more information.
Configure the Storage Substrate (Shared or Local)
Before enabling persistent queueing on a Source, you must determine where the data will be stored. For Cribl Stream, you have the option to use either a shared storage option (such as Amazon S3 or NFS) or a local storage option. By default, Cribl Stream uses local storage.
Shared storage options (S3-backed and NFS) are currently available for Cribl Stream only. Cribl Edge persistent queues must use the local filesystem storage type.
When making this decision, consider whether you require shared durability across your Worker Group. That means that if a single Node in a Worker Group goes down, the surviving Nodes can recover data from the failed Node using a shared storage location. To use shared storage, you must first configure a shared storage substrate (Amazon S3 or NFS). See Persistent Queue Shared Storage for how shared storage, orphan management, and PQ revival work.
Storage configurations are applied globally at the Fleet level, meaning all Edge Nodes within a single Fleet must use the exact same storage substrate. You cannot mix and match storage options within the same Fleet environment, such as assigning Amazon S3 to some Edge Nodes and local filesystems to others. If you require different storage strategies for different data streams, you must isolate those architectures into separate, distinct Fleets.
For help choosing the right storage type and architecture for your environment, see:
- Where to Store Data
- How Much Disk Space to Allocate
- Whether to Compress Data
- How Much Data to Store in Memory
Configure persistent queue based on your chosen storage strategy. For local storage, you can skip this configuration step and proceed directly to Configure Persistent Queue on the Source.
For shared storage (Amazon S3 or NFS):
On the top bar, select Products, and then select Cribl Stream. Under Worker Groups, select a Worker Group.
Navigate to Worker Group Settings, then System, then PQ Storage.
Select the Storage type. See Where to Store Data for guidance choosing a storage option.
Configure the settings based on your selection:
Based on your storage option selection, other settings will appear on this page. See Worker Group PQ Storage Fields for a description of each setting and recommendations. Configure these options for your storage option:
Network filesystem (NFS): Define the mount point, which is the local path on the Worker Group where the share is attached.
AWS S3: Define the S3 file limit, queue size limit, and compression settings. Also enter the connection details including the S3 bucket, key prefix, and authentication methods. Optionally, you could also modify the advanced settings to provide region and endpoint connection details. The advanced settings also contain the Optimize S3 cost setting.
For both shared storage options, configure the Queue size limit and S3 file size limit. See Worker Group PQ Storage Fields for recommendations.
When using shared storage, these limits are managed at the Worker Group level to ensure consistency across the Group. When shared storage is enabled, these fields are hidden in the individual Source settings.
Select Save. Then, Commit and Deploy your changes.
After configuring the storage substrate, proceed to Configure Persistent Queue on the Source to enable the queue for specific data streams.
Configure Persistent Queue on the Source
To configure persistent queue on a Source:
In the Persistent Queue Settings tab, toggle Enable persistent queue off. See When to Use Persistent Queues for guidance about making the decision to enable persistent queue.
For on-prem only: Configure the persistent queue behavior. For shared storage (NFS or AWS S3), these limits are defined at the Worker Group level and will not appear here. If you are using local filesystem for storage, define these settings:
Select an appropriate Mode from the available options. See When to Store Data During a Backpressure Event for information about which mode to select.
Set the Buffer size limit (bytes) to determine the maximum memory to buffer events before flushing them to persistent queue on disk. This also defines the maximum size of events to hold in memory before reporting backpressure to the sender. See When to Report Backpressure to the Sender for configuration and tuning guidance.
Set the Commit frequency to determine how many events to send downstream before committing that Cribl Stream has read them. See How Many Events to Commit During a Backpressure Event for configuration and tuning guidance..
Set the File size limit to specify the maximum amount of data stored in each queue file before the file closes and starts a new file. Set the Queue size limit to determine the maximum amount of disk space that Cribl allows the queue to consume on each Worker Process. See How Much Data to Store in Memory for configuration and tuning guidance.
Set the Queue file path to determine the location for the persistent queue files. See Where to Store Data for configuration and tuning guidance.
Optional: Set the Compression type to apply compression to the data before the queue file closes. See Whether to Compress Data for configuration and tuning guidance.
Select Save. Then, Commit and Deploy your changes.
After configuring your persistent queue settings, continue to monitor the behavior of this Source during a backpressure event and tune these settings to improve performance as needed. See How to Optimize Persistent Queues for guidance.
Key Decisions When Configuring Source Persistent Queues
This section includes guidance you should consider when implementing persistent queue on a Source. It explains the benefits and tradeoffs of different configuration settings for most use cases.
When to Store Data During a Backpressure Event
Once the backpressure queue behavior engages, you need to determine how it should write data to persistent storage. Source persistent queues have two available options (modes) for storing data during a backpressure event:
| Mode | Description |
|---|---|
| Always On | Uses persistent queue as a disk buffer for all events. |
| Smart | Only engages persistent queue upon backpressure from downstream receivers or Cribl internal processes. |
The default is Always On mode. This mode is helpful if your business has a low tolerance for data loss. However, using Always On this mode could have impacts on the persistent queue optimization metrics, such as disk space, throughput, data latency, and CPU utilization.
Considerations for using Always On mode:
- This mode can increase memory demands compared to Sources without persistent queue enabled. If memory is a constraint, you can experiment with tuning the Buffer size limit setting. However, smaller buffers will reduce the efficiency of disk writes, adding more latency.
- Always On mode has higher disk requirements than Smart mode. Cribl generally recommends that you allocate each Edge Node enough disk space for at least 1 day’s worth of queued throughput. For example: If one Source is sending 1 TB/day to two evenly distributed Worker Processes, you should provision at least 500 GB queue storage for each Worker Process. Expand this basic calculation for additional Sources. From there, expand or contract it based on the typical length of outages you experience.
- Cribl also recommends that you deploy the highest-performance storage available. This prevents IOPS (input/output operations per second) and throughput bottlenecks for both read and write operations.
Considerations for using Smart mode:
Smartmode only engages when necessary, such as when a downstream Destination becomes blocked and the Buffer size limit reaches its limit. When persistent queue is set toSmartmode, Cribl attempts to flush the queue when every new event arrives. The only time events stay in the buffer is when a downstream Destination becomes blocked.- If you’re using Smart mode and observe that it causes Source persistent queue to engage frequently, one option is to reduce the File size limit setting. Source persistent queue excessively triggers backpressure only when it reaches the last queued file and that file is large. Keeping this threshold low prevents that condition.
Consider experimenting with these modes to determine what is appropriate for your needs. Establish a baseline for system performance before you enable Always On and then observe the impacts when you turn that mode on.
For Cribl.Cloud Only: Always On is the Only Available Mode
On Cribl-managed Cribl.Cloud Workers (Enterprise), you can enable persistent queues for supported Sources. By default, Source persistent queue is not enabled, so you must explicitly decide to turn it on.
When you enable Source persistent queue in Cribl.Cloud, the only available mode is Always On, which writes data to persistent storage at all times. Smart mode is not available.
When you enable Source persistent queue in Cribl.Cloud, Cribl automatically allocates up to 1 GB of disk space per Source, per Worker Process. You cannot change this limit. This 1 GB limit applies to outbound uncompressed data, and the queue does not perform any compression. If the queue fills up, Cribl Edge blocks data flow, including outbound data.
Where to Store Data
The location of your persistent queue and the amount of disk space you need depend on whether you use local or shared storage. You must ensure the chosen location (whether local or shared) has enough capacity to handle your peak backpressure events.
Cribl Edge only allows local storage. Cribl Stream has three available storage type options:
| Option | Description | When to Use |
|---|---|---|
| Local filesystem | Stores data exclusively on the individual Edge Node’s disk. This offers the highest I/O performance but prevents other Nodes from recovering data if the Node is lost or decommissioned. | Use a local filesystem or EBS when you want the highest-performance per-node persistent queue and can manage the Node-to-volume constraints. |
| Network filesystem (NFS) | (Shared) Stores data on a shared network volume. NFS is a shared-storage option that allows multiple Nodes to access a common queue directory. | Use NFS only when your environment does not support S3-compatible object storage or when you are operating in a low-throughput environment where synchronous network-write overhead is acceptable. Avoid NFS for persistent queue when performance is important. |
| AWS S3 | (Shared) Stores data in an S3-compatible object store. This is the recommended shared storage option for elastic and cloud-native environments. It uses a local on-disk cache for high-speed writes, then asynchronously uploads data to S3. If a single Node goes down, a surviving Node can access the shared storage queue and drain queues that belonged to a dead Node. | Use S3-backed PQ when you need shared, recoverable persistent queue across Nodes in the same Fleet, especially in environments where Nodes can be replaced, redeployed, or scaled down. This prevents persistent queue data from being stranded on a single Node. See Persistent Queue Shared Storage for orphan management and PQ revival. |
Storage locations:
- Local and Network Filesystem (NFS) (Shared): Use the Queue file path setting to determine the location for the persistent queue files. The default is
$CRIBL_HOME/state/queues. When writing data, Cribl Edge will append/<worker-id>/<output-id>to this path to keep each the data separate for each Edge Node. - AWS S3 (Shared): You specify an S3 bucket and key prefix as the primary storage location. Authentication is required.
When using AWS S3 shared storage, follow these guidelines:
- Cost Optimization: Keep the Optimize S3 cost enabled (default) to batch uploads and reduce API request volume. Only disable this if your architecture requires immediate replication and you are prepared for higher S3
PUTcosts. Continue to monitor your environment to see how frequently Nodes are replaced during maintenance or autoscaling. Use these observations to tune your settings. - Reverting Storage Types: You can switch from shared storage back to a local filesystem at any time. However, data is not automatically migrated. You must drain all shared queues or explicitly clear the queue before changing the storage type to avoid data being left behind in the bucket.
- You cannot mix and match storage options within the same Fleet environment. Storage configurations are applied globally at the Fleet level, meaning all Edge Nodes within a single Fleet must use the exact same storage substrate.
How Much Disk Space to Allocate
For queuing to operate properly, you must provide sufficient disk space for the persistent substrate. The key setting to be aware of is the Queue size limit, which defines the maximum amount of disk space that the queue can consume on each Worker Process. When the queue reaches this limit, the persistent queue stops queueing data and applies the Queue-full behavior.
Local Sizing
The general recommendation is to size for the full backlog. You must provision enough disk space to hold the entire Queue size limit. If available disk space falls below this minimum threshold, Cribl Edge will stop maintaining persistent queues, and data loss will begin. The default minimum is 5 GB.
In customer-managed hybrid Fleets, this minimum disk space configuration is set on each Fleet. You can access this setting at Fleet Settings > General Settings > Limits > Min free disk space.
Network Filesystem (Shared) Sizing
For Network Filesystem (NFS) storage, the guidelines are the same as for Local Sizing. Provision enough disk space to cover the full Queue size limit for each Worker Process, ensuring that available disk space never falls below the minimum required threshold.
AWS S3 (Shared) Sizing
The general recommendation is to size for the worst-case outage. When using S3-backed shared storage, your local disk requirements are decoupled from your total queue capacity. Instead of sizing for the entire backlog, size for concurrency and contingency.
When things are in a normal state, you only need enough local space for a transient cache. Once data is successfully uploaded to S3, it is evicted from the local disk.
In an outage state where S3 becomes unreachable, the Edge Node will fall back to storing data locally. It will continue to do this until it hits the Queue size limit. While you do not need to pay for large local volumes for steady-state storage, ensure your local disk has enough headroom to absorb a full Queue size limit for every active queue in the event S3 goes offline.
Whether to Compress Data
When the queue file reaches its maximum file size, you can use the optional Compression setting to apply compression to the data before the queue file closes. Currently, the only available compression codec is Gzip.
If you enable Compression and also enter a Queue size limit, be aware of how these options interact:
- Cribl Edge currently applies the Queue size limit against the uncompressed data volume entering the queue.
- With this combination, Cribl recommends that you set the Queue size limit higher than the volume’s total available disk space, not including compression. This will maximize queue saturation and minimize data loss.
Enabling compression is highly recommended if you are using either NFS or S3-backed persistent queue as your storage type for a few reasons:
- Network efficiency: Compressing data before it leaves the Node reduces the volume of data sent across the network. This is critical for high-volume streams being sent to S3 or NFS, as it prevents the storage network from becoming a bottleneck during heavy backpressure.
- Storage optimization: Smaller data sizes result in lower long-term storage costs (especially in S3) and faster write/upload times. For S3, this reduces the time data spends in the local cache before being replicated to the bucket. For NFS, this reduces the I/O load on the network mount, ensuring the Node can drain the queue more efficiently.
How Much Data to Store in Memory
When you enable persistent queues, you can configure the File size limit setting to specify the maximum amount of data stored in each queue file before the file closes and starts a new file. You can enter a value in units such as KB, MB, and more. If left unspecified, Cribl Edge defaults to 10 MB.
Additionally, you can use the Queue size limit setting to determine the maximum amount of disk space that Cribl Edge allows the queue to consume on each Worker Process. Once the queue reaches this limit, the Source will stop queueing data and engage the configured backpressure mode. You can enter a value in units such as KB, MB, GB, or TB.
If the Queue size limit is not specified, it defaults to 5 GB. You can adjust this value to better suit your needs. For Sources with undefined Queue size limit values, queues exceeding 5 GB will trigger the configured queue-full behavior until you resize the limit.
To set a higher maximum value, navigate to Fleet Settings > General Settings > Limits > Storage > Worker Process PQ size limit. The corresponding key in the limits.yml file is maxPQSize. (See Config Files: limits.yml for more information.) The default for this setting is 1 TB. Before increasing this limit, consult Cribl Support for guidance.
The information in this section applies only to on-prem or hybrid Fleets. For Cribl-managed Cribl.Cloud Organizations using persistent queue, Cribl automatically allocates up to 1 GB of disk space per Source, per Worker Process. You cannot change this limit.
This 1 GB limit applies to outbound uncompressed data, and the queue does not perform any compression. If the queue fills up, Cribl Edge blocks data flow, including outbound data.
When to Report Backpressure to the Sender
You can use the Buffer size limit setting to determine the maximum number of events to hold in memory before reporting backpressure to the sender. Once the number of events reaches this limit, Cribl Edge begins writing the queue to persistent storage. This setting defaults to 1000.
This buffer is for all connections, not just per Worker Process. For that reason, this can dramatically expand memory usage. Connections share this limit, which may result in slightly lower throughput for higher number of connections. For higher numbers of connections, consider increasing the limit.
How Many Events to Commit During a Backpressure Event
Use the Commit frequency setting to determine how many events to send downstream before committing that Cribl Edge has read them. The defaults is 42.
Source Persistent Queue Notifications
Some Cribl licenses allow you to configure Notifications for Source persistent queues for on-prem deployments. In general, Cribl recommends setting Notifications for these events when using persistent queue to ensure you are aware of important system events. These Notifications always appear in Cribl Edge’s user interface and internal logs. You can also send them to external systems.
You can set Notifications for these Source persistent queue scenarios:
- Persistent queue files exceed a configurable percentage of allocated storage.
- A Source reaches the queue-full state, meaning it is running out of available disk space.
- Persistent Queue Usage (saturation).
See Notifications for information about adding Notifications for Sources.
Monitor Source Persistent Queues
Cribl Edge provides metrics and health indicators to monitor your Source persistent queue through the Status tab on your Source. The Status tab aggregates metrics and health from all Worker Processes, allowing you to assess the health of your persistent queues and the status of the Source in real time.
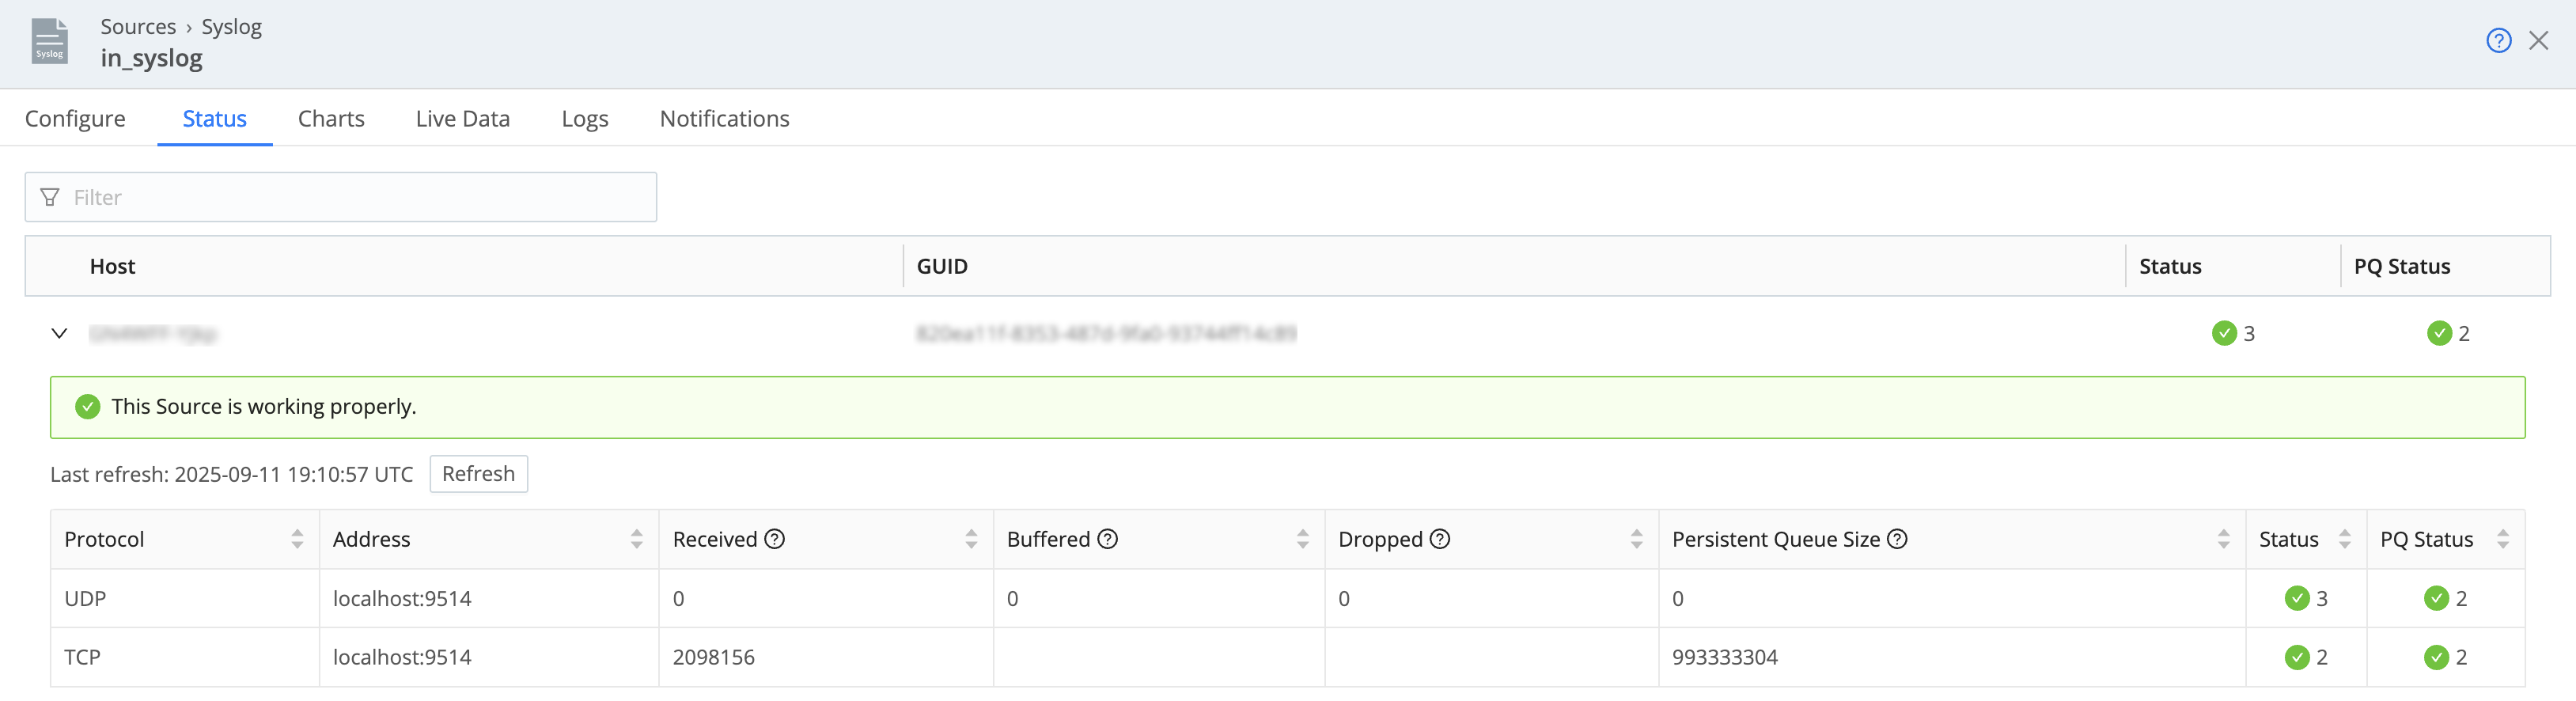
To view the Source persistent queue metrics:
On the top bar, select Products, and then select Cribl Edge. Under More, select Sources.
From the sidebar, select the type of Source you want to view.
Select the Source from the list of currently configured Sources.
In the resulting modal, select the Status tab.
Inside this view, you can expand individual Edge Nodes for more details.
For additional analysis, you can also use Monitoring dashboards:
Navigate to Monitoring on the product sidebar.
Navigate to System > Queues (Sources) and view relevant data.
In Cribl Data Insights, the topology map can show a persistent queue sidecar on configured Sources and open a PQ drawer with utilization and used/max bytes over a selectable time window. See Data Insights.
Reference
In Cribl Stream, some of the Source persistent queue settings are located on the Destination and some are controlled at the Worker Group level, depending on your selected storage type. If you set the persistent queue storage mode to Network filesystem or AWS S3 at the Worker Group level (Worker Group Settings > System > PQ Storage), some of these configurations are only managed at the Worker Group level.
The shared storage settings at the Worker Group level are only available in Cribl Stream, not Cribl Edge.
Source Persistent Queue Fields
In the Persistent Queue Settings tab, you can optionally specify persistent queue storage, using the following controls. Persistent queue buffers and preserves incoming events when a downstream Destination has an outage or experiences backpressure.
Before enabling persistent queue, learn more about persistent queue behavior and how to optimize it with your system:
On Cribl-managed Cloud Workers (with an Enterprise plan), this tab exposes only the Enable persistent queue toggle. If enabled, PQ is automatically configured in
Always Onmode, with a maximum queue size of 1 GB disk space allocated per PQ-enabled Source, per Worker Process.The 1 GB limit is on uncompressed inbound data, and the queue does not perform any compression. This limit is not configurable. For configurable queue size, compression, mode, and other options below, use a hybrid Group.
All other settings described in this section apply to on-prem and hybrid deployments only.
Enable persistent queue: Default is toggled off. When toggled on:
Mode: Select a condition for engaging persistent queues.
Always On: This default option will always write events to the persistent queue, before forwarding them to the Cribl Edge data processing engine.Smart: This option will engage PQ only when the Source detects backpressure from the Cribl Edge data processing engine.
Smartmode only engages when necessary, such as when a downstream Destination becomes blocked and the Buffer size limit reaches its limit. When persistent queue is set toSmartmode, Cribl Edge attempts to flush the queue when every new event arrives. The only time events stay in the buffer is when a downstream Destination becomes blocked.
Buffer size limit (bytes): The maximum memory to buffer events before flushing them to persistent queue on disk. Enter a value with a unit suffix. For example: 64KB, 1MB, or 10MB. Spaces between the number and unit are allowed (such as 64 KB). Units are case-insensitive. Plain byte values (like 65536) are accepted, but decimals (like 0.5MB) are not. The valid range is 64KB to 10MB. Values outside this range are rounded to the nearest limit. Defaults to 1MB.
Deprecation Notice
The Buffer size limit (bytes) setting replaces the deprecated Max buffer size setting to provide more predictable memory management in version 4.18.0. The Max buffer size setting will be removed in version 4.19.1. For upgraded Worker Groups and Fleets, the new byte-based limit defaults to
1MB. Update your configurations to the new byte-based limit to ensure optimal memory stability.
Commit frequency: The number of events to send downstream before committing that Cribl Edge has read them. Defaults to 42.
File size limit: The maximum data volume to store in each queue file before closing it and (optionally) applying the configured Compression. Enter a numeral with units of KB, MB, and so on. If not specified, Cribl Edge applies the default 10 MB. When you save the configuration, File size limit must be greater than or equal to Buffer size limit (bytes). Cribl Edge rejects invalid combinations.
Queue size limit: The maximum amount of disk space that the queue is allowed to consume on each Worker Process. Once this limit is reached, this Source will stop queueing data and block incoming data. Required, and defaults to 5 GB. Accepts positive numbers with units of KB, MB, GB, and so on. Can be set as high as 1 TB, unless you’ve configured a different Worker Process PQ size limit in Group or Fleet settings.
Queue file path: The location for the persistent queue files. Defaults to $CRIBL_HOME/state/queues. To this field’s specified path, Cribl Edge appends /<worker-id>/inputs/<input-id>.
Compression: Optional codec to compress the persisted data after a file closes. Defaults to None; Gzip is also available.
In Cribl Edge 4.1 and newer, the Source persistent queue default Mode is
Always on, to best ensure events’ delivery. For details on optimizing this selection, see Optimize Source Persistent Queues.You can optimize Workers’ startup connections and CPU load at Group/Fleet settings > Worker Processes.
Worker Group PQ Storage Fields
See Worker Group PQ Storage Fields for the description of the persistent queue settings at the Fleet level.