





Create and Manage Legacy Secrets in Cribl Edge
Legacy secrets are different from centralized global secrets, which you define once and reuse across Cribl resources. Existing legacy secrets will continue to work as you migrate to global secrets.
This topic describes legacy secrets in Cribl Edge: authorization tokens, passwords, API keys, and other sensitive values you define on Manage Secrets pages, such as for individual Fleet in a distributed deployment.
Use the Manage Secrets page to create and update legacy secrets. Reference legacy secrets programmatically with the C.Secret Function.
To ensure they can be decoded correctly, all secrets in Cribl Edge must use
latin1encoding.
How Secrets Are Protected
cribl.secret is the master encryption key used by Cribl Edge to protect sensitive values such as credentials, tokens, and other secrets stored in configuration files. It is the root of trust for securing encrypted values across the platform and is created when Cribl Edge first starts.
File Location
By default, cribl.secret is stored at:
$CRIBL_HOME/local/cribl/auth/cribl.secretWhen you configure an external KMS provider, cribl.secret is removed from disk and managed by that provider instead. Supported providers include AWS KMS and HashiCorp Vault.
Back up
cribl.secretsecurely before major changes such as enabling an external KMS or rotating keys.
When using an external KMS, ensure that IAM permissions are correctly scoped (for example, kms:Decrypt for AWS KMS). Misconfigured permissions can prevent the Leader from starting. For details, see Configure KMS Providers.
Other Security Files
When you install Cribl Edge, a keys.json file is also created. This file contains cryptographic keys used for internal operations within Cribl Edge.
Single-instance deployment - this file is located in
$CRIBL_HOME/local/cribl/auth/.Distributed deployment - this file resides on the Leader Node, in
$CRIBL_HOME/groups/<group-name>/local/cribl/auth/.
Access Secrets
- In a Single-instance deployment, select Settings > Security > Secrets.
- In a Distributed deployment with one Fleet, select Configure > Settings > Security > Secrets.
- In a Distributed deployment with multiple Fleets, secrets are managed on each Fleet. Select Fleet >
<Name>> Fleet Settings > Security > Secrets.
On the Manage Secrets page, you can configure existing legacy secrets, and/or click New Secret to define new ones.
View Secret References
To view where a secret is used in your deployment:
Select a secret from the secrets list.
View the Referenced table at the end of the secret details. This table lists all Sources, Destinations, Pipelines, or Database Connections that currently reference that secret. If a secret is not referenced in one of those resources, the Referenced By column displays No.
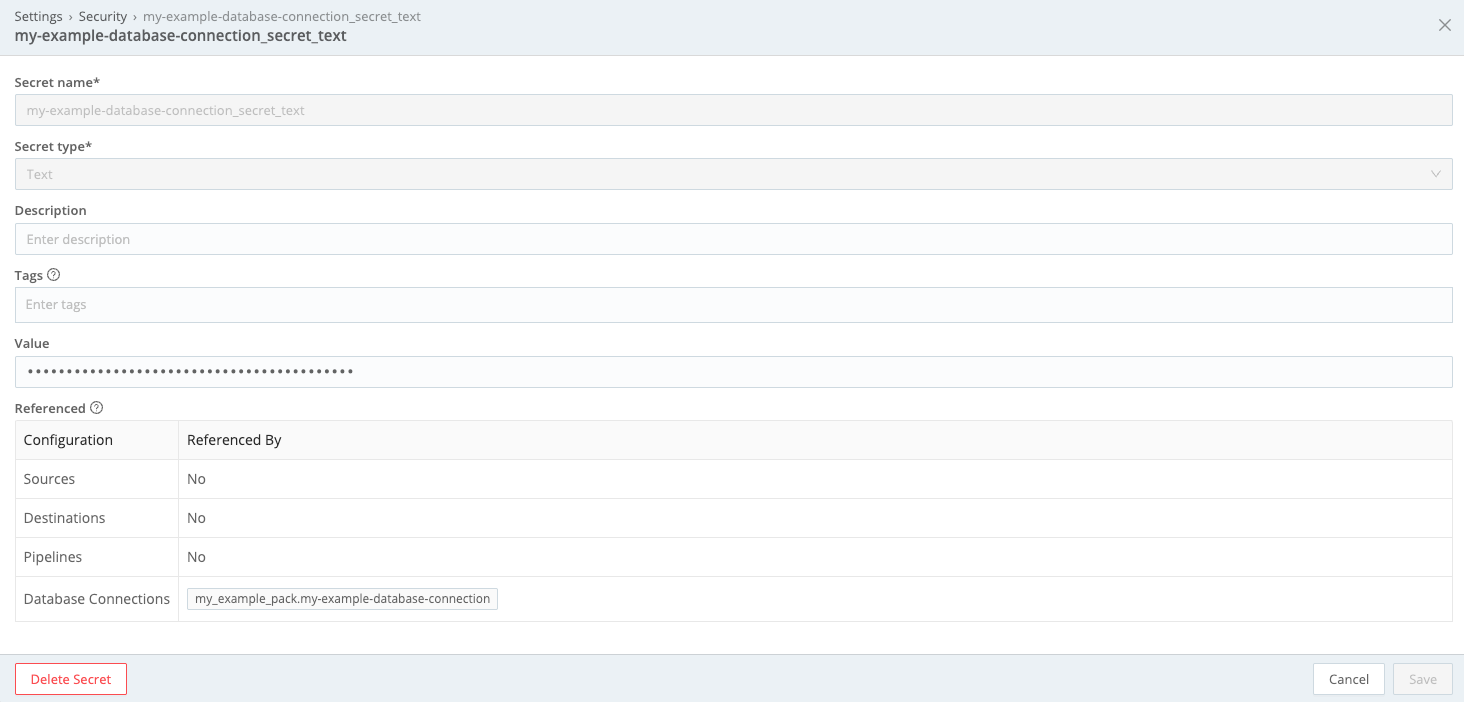
View where secrets are referenced in your deployment
Add New Secret
The New Secret modal provides the following controls:
Secret name: Enter an arbitrary, unique name for this secret.
Secret type: Some options for this field expose additional controls, as described below.
Description: Optionally, enter a description summarizing the purpose of the secret.
Tags: Optionally, enter one or multiple tags related to this secret.
Secret Type
This drop-down offers the following types:
Text: This default type exposes a Value field where you directly enter the secret.
API key and secret key: Exposes API key and Secret key fields, used to retrieve the secret from a secure endpoint. This is the only secret type that Cribl Edge supports for its AWS-based Sources, Collectors, and Destinations, and its Google Cloud Storage Destination.
Username with password: Exposes Username and Password fields, which you fill to retrieve the secret using Basic Authentication.
Encrypt Secrets Using the Command Line
You also have the option to create and encrypt sensitive values using the same mechanism Cribl Edge employs internally for all sensitive fields. This ensures consistency and leverages the built-in encryption capabilities within Cribl Edge.
This approach allows you to store all your secrets securely in a password store, keeping them out of your Git repository, and adheres to strict organizational security standards that prohibit storing secrets in version control.
Modifying credentials directly through the Cribl Edge UI won’t be possible, even in development environments. This approach prioritizes security by keeping secrets out of the UI altogether.
For details, see encrypt in the CLI Reference doc.
Recover cribl.secret
If cribl.secret is lost or inaccessible, the Leader will fail to start because it cannot decrypt protected values. Recovery depends on whether you have an unencrypted backup or only an encrypted version.
Recover from an Unencrypted Backup
If you have an unencrypted backup, restore it to the following path and restart the Leader:
$CRIBL_HOME/local/cribl/auth/cribl.secretRecover from an Encrypted Backup (AWS KMS)
If you only have an encrypted version under AWS KMS, use the AWS CLI with kms:Decrypt permissions to recover the plaintext key:
aws kms decrypt \
  --ciphertext-blob fileb://cribl.secret.encrypted.decoded \
  --region <region> \
  --key-id <KMS key ARN> \
  --output text \
--query Plaintext | base64 --decode > cribl.secretPlace the recovered file at $CRIBL_HOME/local/cribl/auth/cribl.secret and restart the Leader.
Recover After KMS Failure
If your AWS KMS integration is misconfigured and the Leader won’t start, switch back to the local KMS provider by editing:
$CRIBL_HOME/local/cribl/kms.ymlIf you only have the encrypted version cribl.secret.encrypted, use the AWS CLI decrypt command above to recover the plaintext key, then restart the Leader.
Rotate cribl.secret
To rotate the master encryption key for the Leader, follow these steps. Note that all credentials encrypted with the current key will need to be re-entered.
Take a full backup of the
$CRIBL_HOMEdirectory before proceeding. Usetarto create an archive and store it in a secure location.
Copy the current auth token from the Leader and store it securely. Navigate to Global Settings > System > Distributed Settings > Leader Settings > Auth Token.
Stop the Cribl systemd service.
Delete the
$CRIBL_HOME/local/cribl/auth/cribl.secretfile.Edit the
$CRIBL_HOME/local/cribl/auth/users.jsonfile and reset the password for at least the admin user. For details, see Manual Password Replacement.Start the Leader and log in with the new credentials.
Restore the auth token you saved earlier. Navigate to Global Settings > System > Distributed Settings > Leader Settings > Auth Token. Once restored, Edge Nodes should reconnect to the Leader.
Reset passwords for other users through the UI, if applicable.
Reconfigure TLS and SSO settings if needed.
Replace each secret in Sources, Destinations, and Fleets. Secrets are stored in
$CRIBL_HOME/local/cribl/secrets.yml. To find all references to secrets, search for strings starting with#42::grep -Rn '#42:' $CRIBL_HOME/local/cribl/For each secret, generate a new encrypted value:
cribl encrypt -v PLAINTEXT_SECRETUpdate the secret and all references with the new encrypted value.
Migrate to Global Secrets
Migrate Fleet-level and inline legacy secrets to global secrets in phases. Legacy secrets continue to work during the transition, so you do not need to replace everything at once.
Plan the Migration
Before you migrate, decide how you want to organize global secrets. Secret folders both organize and control access to global secrets, so plan folders based on real needs such as environment, team, or application. Consider which Worker Groups and Edge Fleets need each global secret.
Plan to migrate in small batches. A good starting point is inline secrets that are stored directly in resource configurations.
You do not need to migrate every legacy secret at once. Legacy Fleet-level secrets continue to work during the transition. You can migrate the supported and highest-value legacy secrets first, and complete the migration when you’re ready.
Migrate Legacy Secrets to Global Secrets
Migrating requires adding a global secret that corresponds to each legacy secret that you’re using and replacing legacy secrets in resource configurations with references to the correct global secret. Follow this pattern to migrate:
Identify a legacy secret to migrate and the resource configurations where it is used.
Open the secret folder where you want to add the global secret or add a new secret folder.
Confirm that the secret folder is accessible to the Worker Groups and Edge Fleets that need access to the global secret.
Add the global secret in the secret folder using the same value or credential pair as the legacy secret.
Confirm that each migrated global secret appears in the catalog for the Worker Groups and Edge Fleets that need it. In the Worker Group Settings > Security > Secrets page for each Group or Fleet, the global secret should appear as a read-only entry with metadata that identifies the secret folder.
Update the resource configurations to replace the legacy secret with the corresponding global secret reference.
Repeat these steps for each legacy secret that you want to migrate in the same batch.
Review the Git diff for each affected Worker Group or Edge Fleet:
- Confirm that resource configurations reference global secrets instead of legacy secrets.
- Confirm that the
global-secrets-marker.ymlmarker file for each Worker Group and Edge Fleet includes an entry for each migrated global secret.
Commit and deploy the updated configurations, and verify your migration.
Verify the Migration
Complete the following checks to verify that the migration succeeded for a Worker Group or Edge Fleet.
- Test each resource that you changed. For example, run a connection test or send sample events through the updated resource. Confirm that authentication succeeds and each resource works as you expect.
- Confirm that global secrets appear in resource configuration drop-down menus. Check a few resource configurations to confirm that the expected global secrets appear in the secret drop-down menus.
- Confirm sharing settings for each secret folder. For each global secret in a batch, open its secret folder in Global Settings > Security > Secret Folders and verify that the folder is accessible to the correct Worker Group or Edge Fleet.