



Send Data from Cribl Edge to Cribl Stream
You can send collected data from Cribl Edge Nodes to Cribl Stream Workers by using a Cribl HTTP Destination paired with a Cribl HTTP Source without incurring additional costs.
For more information about sending data between organizations and Workspaces without paying for data twice, see Transfer Data Between Workspaces or Environments.
To route data from a Cribl Edge Fleet to a Stream Worker Group, follow these steps:
- Configure a Source on Cribl Edge to collect data from Edge Nodes (for example, a System Metrics Source).
- Configure a Cribl HTTP Source in Cribl Stream to receive data from the Edge Node.
- Configure a Cribl HTTP Destination in Cribl Edge to send data to Cribl Stream.
- Configure QuickConnect to transfer the data from Cribl Edge to Cribl Stream.
This scenario uses the example of a Cribl.Cloud deployment, where we recommend communication using a Cribl HTTP Source/Destination pair. In an on-prem deployment, you can also use a Cribl TCP Source/Destination pair over a trusted local network.
For different scenarios of sending data from Cribl Edge to Cribl Stream, including between different Workspace and Organizations, see Edge → Stream Communication Matrix.
Configure the System Metrics Source on Cribl Edge
Start by configuring a Source on your Edge Node that you will use to test the data flow. You can choose any Source, but examples here will use System Metrics.
Configure the Source, then preview your data on the modal’s Live Data tab to make sure it flows correctly.
Configure the Cribl HTTP Source on Cribl Stream
In Cribl Stream, configure and enable a Cribl HTTP Source that will receive data from Cribl Edge.
In your Stream Worker Group, navigate to Data > Sources and select Cribl HTTP.
By default, you should see a predefined
in_cribl_httpSource. Select it.Revise the Source settings. Leave the Address at its default value.
Take note of the Port value (by default,
10200). You will need it later on.Revise TLS settings. You must either enable or disable TLS on both the Cribl HTTP Source and the Cribl HTTP Destination it will be receiving data from, otherwise, no data will flow.
We recommend using TLS for all communications.
Make sure Enabled is toggled on and Save.
Commit and Deploy your changes.
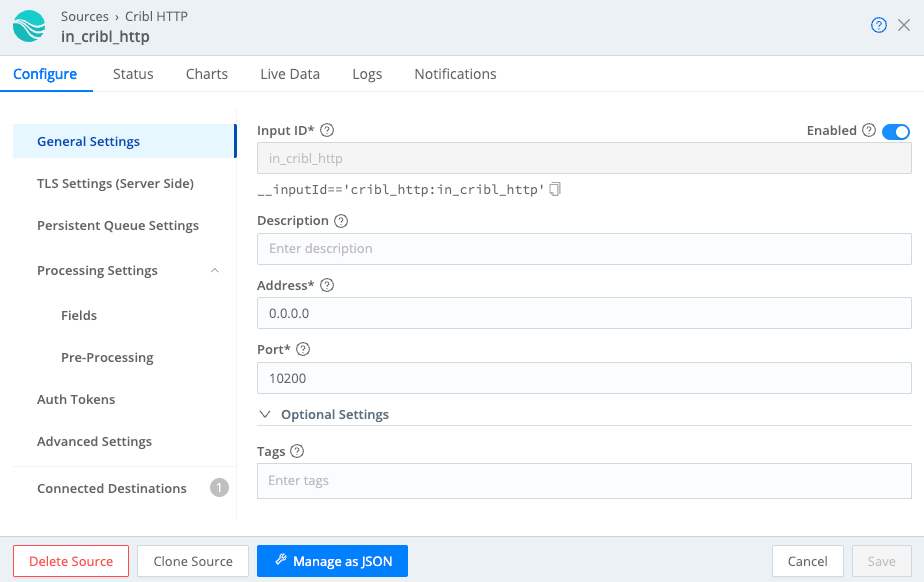
Before moving on to the next step, open the Source configuration again and navigate to the Status tab to confirm that your Source is healthy.
Configure the Cribl HTTP Destination on Cribl Edge
Next, configure the Cribl HTTP Destination on the Edge side.
In your Cribl Edge Fleet, select Collect.
In the Destinations column, select Add Destination, hover over Cribl HTTP and select Add New.
Give the new Destination a unique Output ID.
In Cribl endpoint, configure the endpoint depending on where you configured the Cribl HTTP Source.
If the Source is on a Cribl-managed Cribl.Cloud Worker Group, access your Workspace’s Data Sources page, and select the Worker Group from the Group drop-down. Locate the
in_cribl_httpSource in the Sources Enabled by Default table and copy its Ingest Address.If you are using a custom Cribl HTTP Source, not the built-in
in_cribl_httpone, replace the port in the ingest address with the port you configured for your Source.If the Source is configured on a customer-managed (hybrid) Worker Group (or if you are working in an on-prem deployment, not in Cribl.Cloud), use the Address and Port you entered on the Cribl HTTP Source.
Revise TLS settings and match them with what you selected for the Cribl HTTP Source. You must either enable or disable TLS on both the Destination and the Source, otherwise, no data will flow.
Select Save.
Commit and Deploy your changes.
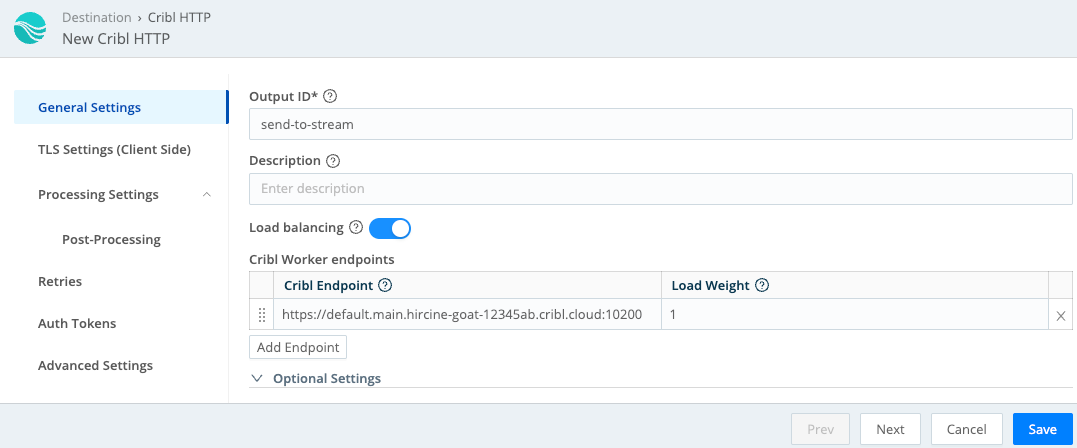
Once you’ve configured your Destination, test it to verify that your Edge Node can communicate with the Stream Worker Group.
- Open the Destination configuration modal again and select the Test tab.
- Select Run Test. If you see a success message, Cribl Edge and Cribl Stream are communicating correctly.
Send the Data
Finally, send actual data from Cribl Edge to Cribl Stream. You can do it by using QuickConnect.
- In your Cribl Edge Fleet, select Collect.
- In the Sources column, locate the Source that generates data (for example, the System Metrics Source), or select Add Source > Select Existing.
- In the Destinations column, similarly locate or add the Cribl HTTP Destination you configured.
- Drag the + icon from the Source tile to the Destination on the right.
- Confirm using the Passthru option (you can also select a Pipeline or Pack to process the data).
- Commit and Deploy your changes.
Confirm the Data Flow
To confirm that your data is flowing, navigate to Cribl Stream’s Cribl HTTP Source and run a Live Data capture. You can also check the Monitoring page > Data submenu, to isolate the throughput on your Source.
At this point, with your data flowing, you can use Cribl Stream’s capabilities to enrich, transform, and optimize the data and route it through Pipelines into selected Destinations.