


Members and Teams
Control access to Cribl products by inviting and managing Members and creating Teams.
Members are individual users who can access your Cribl deployment. You can assign Permissions to Members and Teams, which are groups that you can add Members to.
Deployment-Level Members
The deployment level differs for Cribl.Cloud and on-prem deployments. On Cribl.Cloud, the Organization is the deployment level. In on-prem deployments, the Workspace is the deployment level.
To access deployment-level Members as an Admin:
- On the top bar, select Products.
- In the sidebar, select Organization, and then select Members & Teams.
On the Members & Teams page, select an existing Member’s row to change their Permissions or other details.
- In the sidebar, select Settings > Global.
- Under Access Management, select Members and Teams.
On the Members and Teams page, select an existing Member’s row to change their Permissions or other details.
In on-prem deployments, Members and legacy Local Users are interchangeable. You can reconfigure Members using legacy Roles and Policies instead of Permissions, and Local Users that you add are also listed in Members.
Known Issue
Local Users from the legacy Roles and Policies access control model are incorrectly listed at Settings > Global > Members and Teams with the No Access Permission. However, this is a display-only issue. The Local Users’ assigned Roles still function as configured. For details, please see Known Issues.
Assign Deployment-Level Permissions
If you’re using SSO, assign deployment-level Permissions by managing group memberships within your identity provider (IdP). Make sure that your IdP group names match the core patterns for automatic Permission mapping. Permissions assigned by IdP group memberships override any Permissions that you set manually on a per-Member or per-Team basis.
If you’re using direct user login, assign deployment-level Permissions to individual Members when you invite or add them to your Organization (Cribl.Cloud) or Workspace (on-prem). You can also update Members’ deployment-level Permissions after they join.
Owners and Organization Registration (Cribl.Cloud)
On Cribl.Cloud, each Member can have Owner Permissions for multiple Organizations, and each Organization can have multiple Members with the Owner Permission. However, each Member (as defined by their email address) can register only one active Organization, and only if they are not already the Owner of a different Organization.
Invite or Add Members
To invite or add new Members at the deployment level:
On the top bar, select Products.
In the sidebar, select Organization, and then select Members & Teams.
On the Members & Teams submenu, select Invite Member.
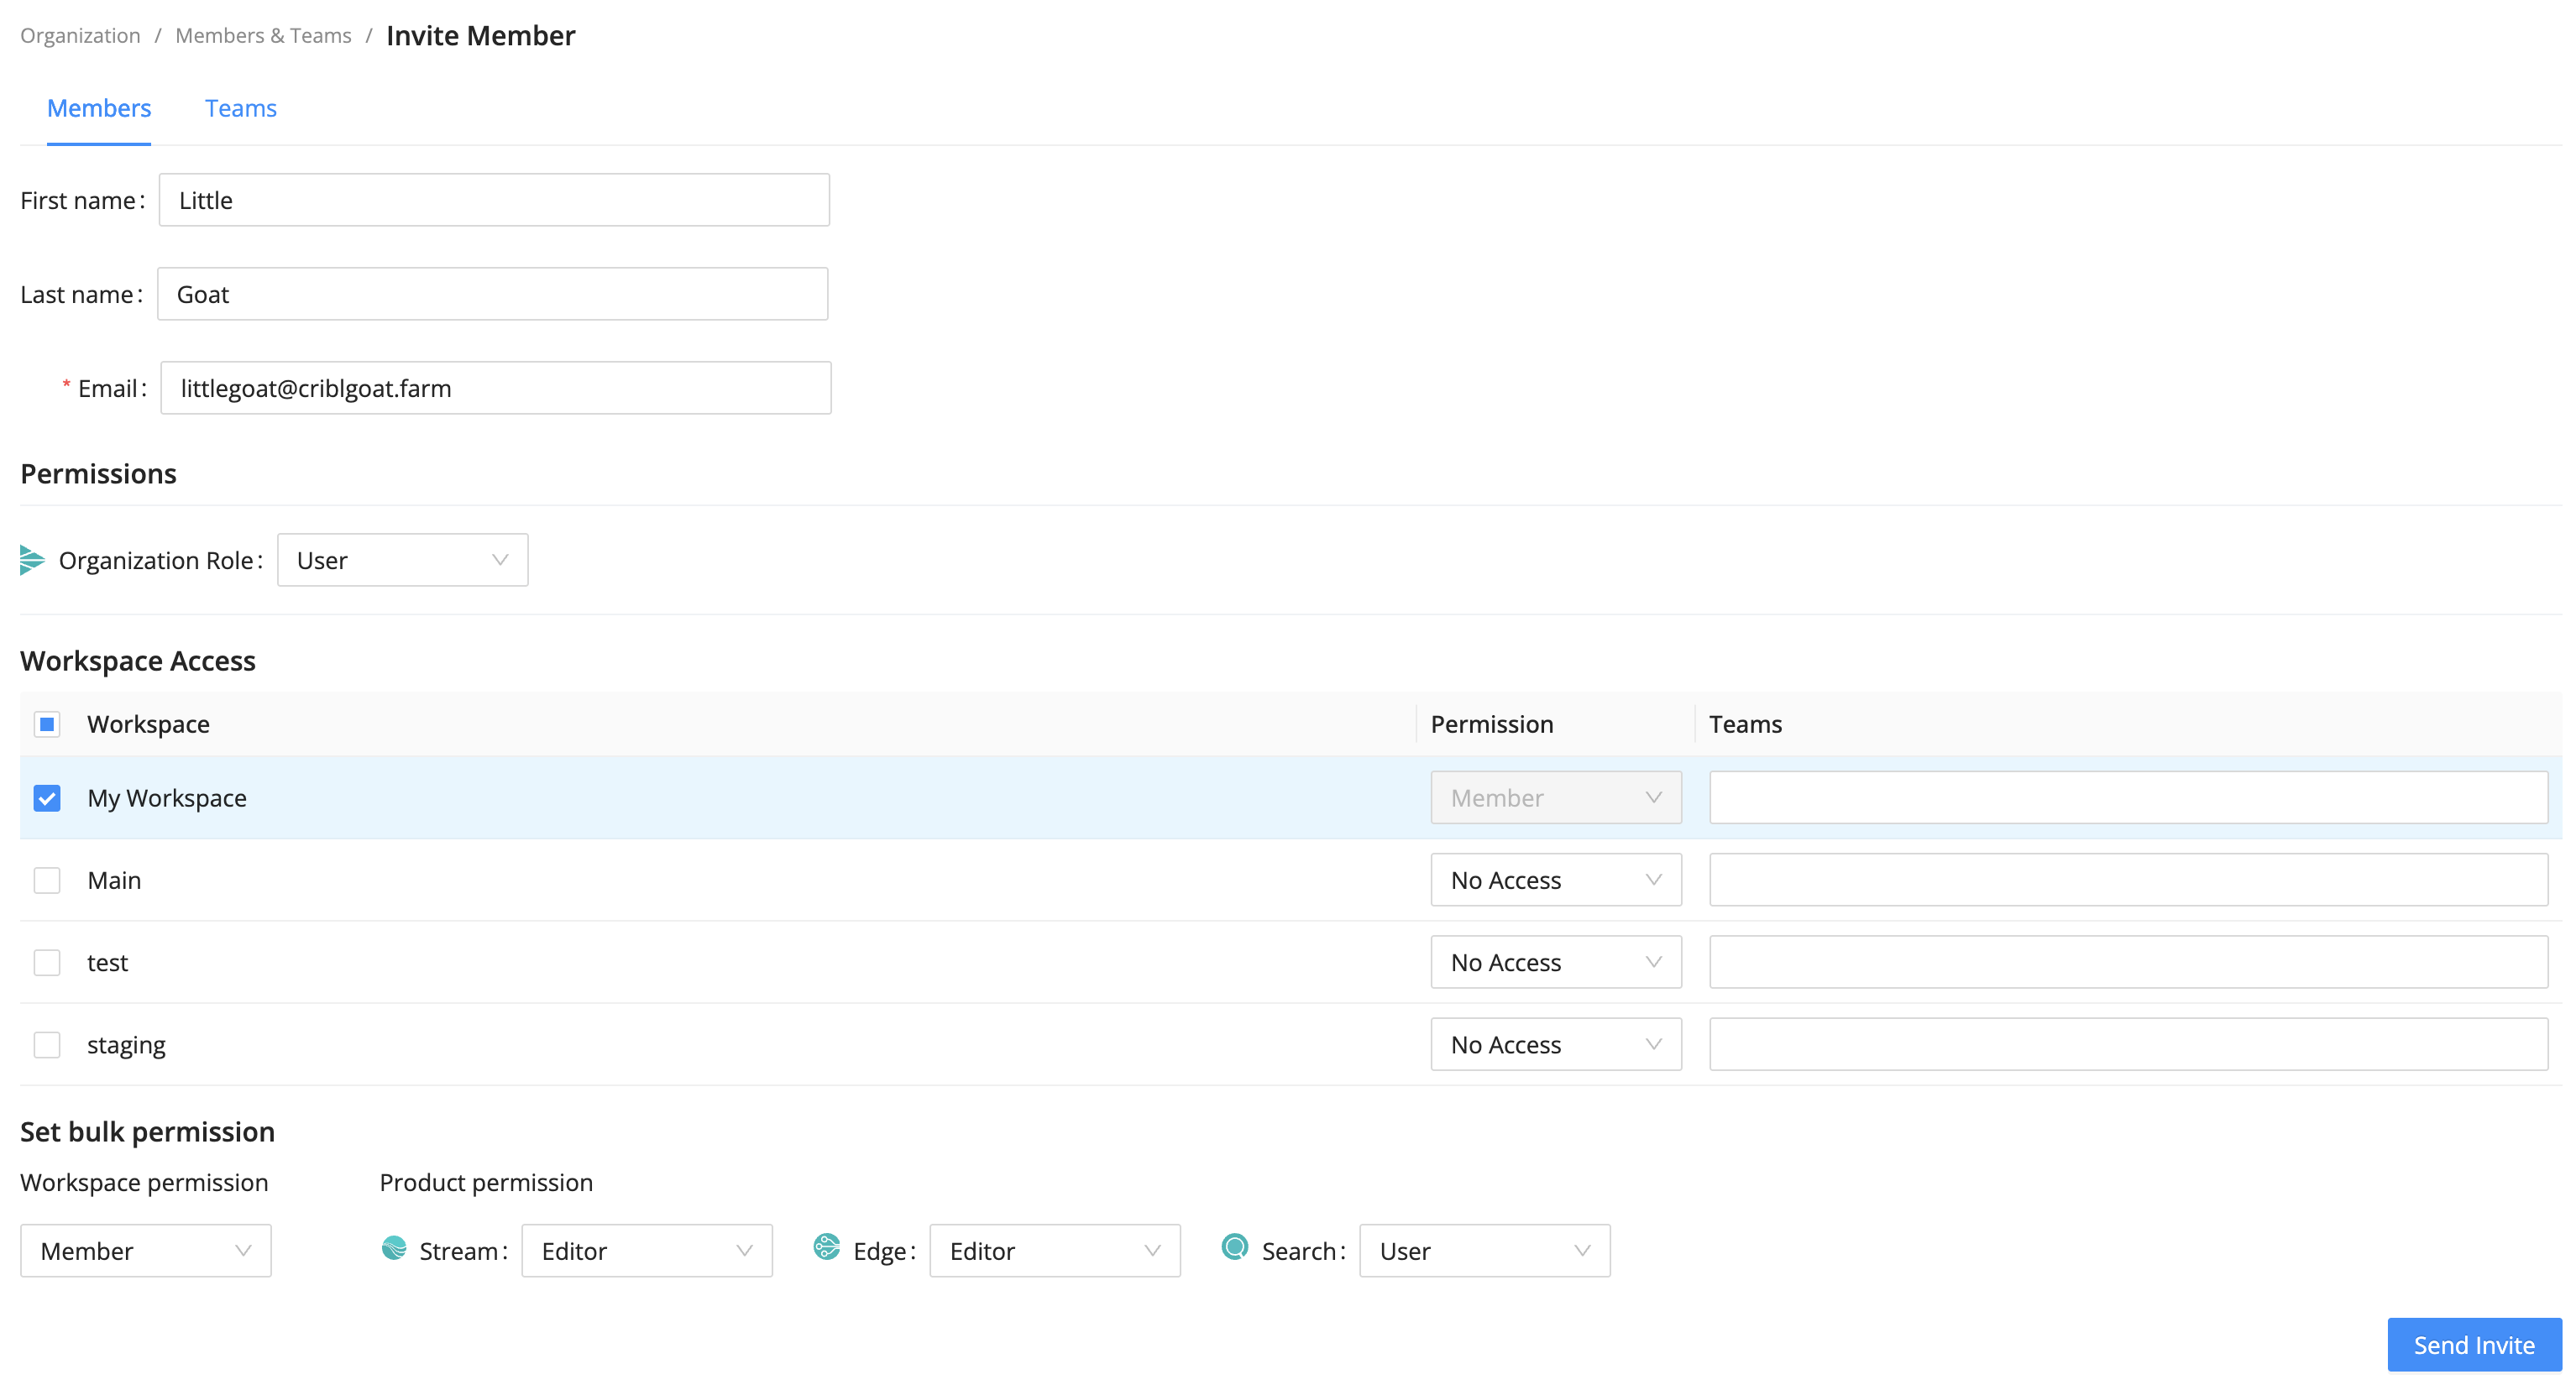
Invite Member modal Enter the Email of the new user you want to invite.
Optionally, enter the First name and Last name for the user.
Under Permissions, assign an appropriate Organization-level Permission for the Member.
If you selected the User role on the Organization, under Workspace Access, define access to specific Workspaces.
Assigning the User Permission requires an Enterprise plan. For details, see Pricing.
If you selected the Member Permission for any Workspace, select product-level Permissions for the Workspace.
Select Send Invite to send the invitation to the new user.
When you send an invite from a Cribl.Cloud deployment, the new Member receives an email with an Accept Invitation link to either sign into their existing Cribl.Cloud account or sign up to create an account and its credentials.
After the Member signs in, they have access to your deployment with the Permissions you’ve specified.
In the sidebar, select Settings, and then select Global.
Under Access Management submenu, select Members and Teams.
Select Add Member.
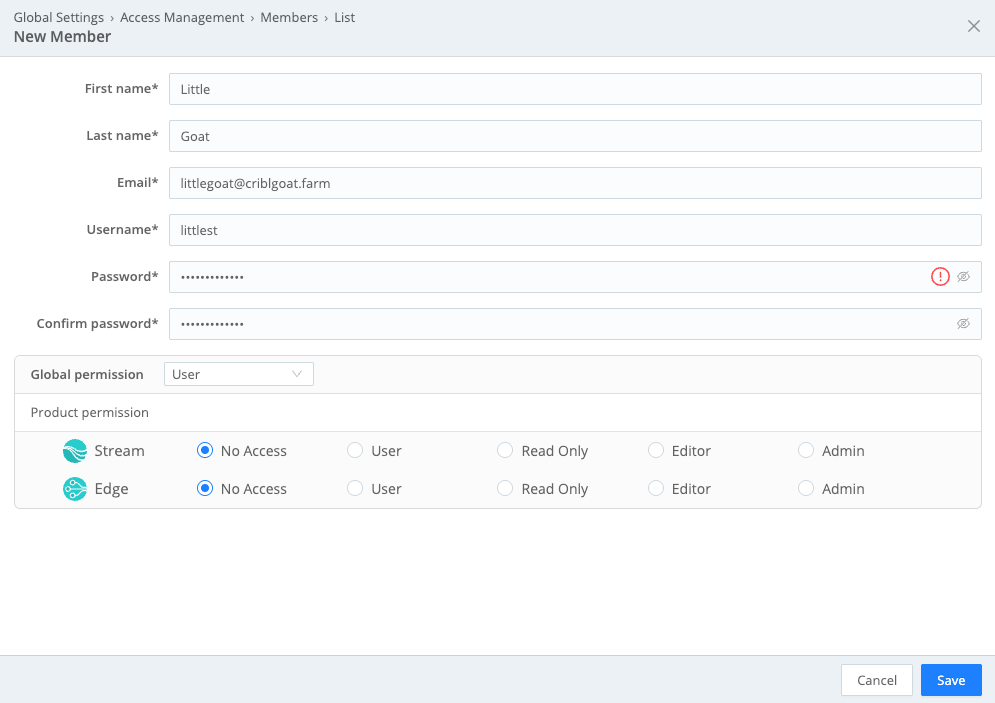
New Member modal Enter the new Member’s information, email, and password.
Under Global permission, select the permission to assign to the new Member for the whole Workspace.
If you chose the User permission, configure access for each Cribl product separately. The Admin Permission automatically grants admin access to all products.
When finished, select Save.
When you add a new Member, Cribl creates the user account immediately and does not send an invitation via invite. After the Member signs in, they have access to your deployment with the Permissions you’ve specified.
Manage Cribl.Cloud Invitations
While an invitation to a Cribl.Cloud Organization is pending, the the Action column on the Members & Teams page offers the following options for handling common issues:
- Resend Invite: If your invited Member didn’t receive your invitation email, resend it. Invitations expire after seven days if they are not accepted nor revoked and must be resent.
- Copy Invite Link: If emails aren’t getting through at all, copy and share a URL that will take the invitee directly to the signup page. This target page encapsulates the same identity, Organization or Workspace, and Permission that you specified in the original email invitation.
- Revoke Invite: Select to revoke a pending invitation. Common reasons to revoke an invitation are sending someone a duplicate invitation and an invitee who spends too much time in space to be a productive collaborator, etc.) After revoking an invitation, you’ll see a confirmation dialog.

View Workspace Members on Cribl.Cloud
On Cribl.Cloud, you can view a Workspace’s existing Members at Settings > Product (Stream or Edge) > Members and Teams.
Remove Members
To remove a Member from your deployment:
- On the top bar, select Products.
- In the sidebar, select Organization, and then select Members & Teams.
- Select Members. Next to the Member you want to remove, select
Remove Member in the Action column.
The removed Member retains access to any other Cribl.Cloud Organizations that they own or are Members of.
- In the sidebar, select Settings > Global.
- Under the Access Management submenu, select Members and Teams.
- Select Members. Next to the Member you want to remove, select
in the Action column.
Remove SSO Members
If your Cribl.Cloud Organization uses SSO, the identity provider (IdP) admin manages Members in the IdP system. When you remove a Member in the IdP, they are still listed as a Member on Cribl.Cloud.
After removing the Member in the IdP, you must also manually remove them on Cribl.Cloud to completely remove their access.
Assign Worker Group- and Edge Fleet-Level Permissions
Worker Group- and Edge Fleet-level Permissions are available only in on-prem deployments. On Cribl.Cloud, use Product-level Permissions to manage access at the Worker Group/Edge Fleet level.
To assign Permissions on a Worker Group/Edge Fleet in an on-prem deployment:
- Make sure that the Member has a Global Permission sufficient to support the access rights that you want to assign on the Worker Group or Edge Fleet.
- In the sidebar, select Settings, then Stream/Edge, then Members and Teams.
- Select each applicable Member row to open their Member Details drawer.
- Grant the Member the desired Permission on the Worker Group or Edge Fleet.
Teams
Teams are groups of Members who share the same Organization, Workspace, and product-level Permissions. Use Teams to efficiently manage access control by assigning Permissions to the Team rather than configuring Permissions each Member individually.
Teams are available only on Cribl.Cloud and in Distributed deployments.
Create a Team
To create and configure a Team:
- On the top bar, select Products.
- In the sidebar, select Organization, and then select Members & Teams.
- In the Teams tab, select Create Team.
- Provide a meaningful Name and an optional Description.
- If you have SSO configured in your Organization, in Mapping IDs, you can provide a list of IdP group names for the Team. Use the IdP group names when integrating with SSO to map Workspace and product Permissions with IdP groups.
- Select the desired Workspace and access to assign to the Team. Member allows granular product-level access.
- In Team Members, select the Members you want to add, then select Add. A Member must already exist to be added to a Team.
- The table is updated to show the Members you’ve just added.
- Select Save.
The main Teams page displays the Teams configured in your Organization. You can edit Teams by selecting their row and delete Teams as needed using the Actions column.
- In the sidebar, select Settings.
- Select Global, then Access Management, and then Members and Teams.
- In the Teams tab, select Add Team.
- Provide a meaningful Name and an optional Description.
- In Mapping ID, you can provide an external ID for the Team. Use the ID when integrating with SSO to map roles with IdP groups.
- Select the desired Workspace and product Permissions to assign to the Team. User allows granular product-level access.
- In Team Members, select the Members you want to add, then select Add. A Member must already exist to be added to a Team.
- The table is updated to show the Members you’ve just added.
- Select Save.
The main Teams page displays the Teams configured in your Workspace. You can edit Teams by selecting their row and delete Teams as needed using the Actions column.