


Roles and Policies
Use Cribl’s legacy Roles and Policies for role-based access control in on-prem Distributed deployments.
Cribl’s legacy Roles and Policies model provides role-based access control (RBAC) in on-prem Distributed deployments at the Enterprise license tier.
Roles are logical entities that are associated with one or more Policies. Policies are collections of certain access rights on specific objects. Roles are assigned to users to establish their access rights on objects.
Cribl ships with a set of default Roles and default Policies that cover common access control scenarios. You can extend the default Roles by cloning them, then adding and removing Policies and modifying the objects the Policies apply to.
Cribl.Cloud does not support the legacy Roles and Policies model. On Cribl.Cloud, you must use the Permissions model. On-prem deployments at the Enterprise license tier support both the Permissions model and the legacy Roles and Policies model.
Default Roles
The tables in this section list the default Roles that ship with Cribl ships, along with each Role’s counterpart in the Permissions model. The gitops and notification_admin Workspace-level Roles do not have a Permissions model equivalent.
Cribl strongly recommends that you do not edit or delete these default Roles. However, you can clone the default Roles and modify the duplicates to meet your needs.
Initial Installation or Upgrade
When you first install Cribl Suite with the prerequisites to enable RBAC (Distributed deployment with an Enterprise license), you will be granted the admin Role. Using this Role, you can then define and apply additional Roles for other users.
You will similarly be granted the admin Role upon upgrading an existing installation from pre-2.4 versions to v. 2.4 or higher. This maintains backwards-compatible access to everything your organization has configured under the previous version’s single Role.
Workspace-Level Roles
| Name | Description | Permissions Model Equivalent |
|---|---|---|
| admin | Superuser - authorized to do anything in the system. | Organization Admin |
| gitops | Ability to sync the deployment to a remote Git repository. | N/A |
| notification_admin | Read/write access to all Notifications. | N/A |
| org_iam_admin | Manage the SSO configuration and invite, update, and delete Members without having access to data engineering functions. | Organization IAM Admin |
| user | Default Role that gets only a home/landing page to authenticate. This is a fallback for users who have not yet been assigned a higher Role by an admin. | Organization User |
| project_user | Read/write access to the simplified Stream Projects UI and related data Subscriptions. Deprecated as of v.4.2. Use the Permissions model instead. The Stream Projects Editor Permission is most comparable. Maintainer (more permissive) and Read Only (more restrictive) are also available. | Stream Project Editor |
Cribl Stream Roles
| Name | Description | Permissions Model Equivalent |
|---|---|---|
| stream_user | Basic Role for Stream. | Stream User |
| stream_reader | Allows viewing all Members, Worker Groups, Settings, Leader commits, and legacy Local Users and Roles, with no configuration capabilities. | Stream Read Only |
| stream_editor | Allows viewing all Groups and Monitoring pages. | Stream Editor |
| stream_admin | Superuser Role at the Product level | Stream Admin |
Cribl Edge Roles
| Name | Description | Permissions Model Equivalent |
|---|---|---|
| edge_user | Basic Role for Edge. | Edge User |
| edge_reader | Allows viewing all Members, Fleets, Settings, Leader commits, and legacy Local Users and Roles, with no configuration capabilities. | Edge Read Only |
| edge_editor | Allows viewing all Groups and Monitoring pages. | Edge Editor |
| edge_admin | Superuser Role at the Product level. | Edge Admin |
Cribl Search and Cribl Lake Roles
Because Cribl Search and Cribl Lake are available only on Cribl.Cloud, they use Cribl’s Permissions model for access control. For details about managing access to these products and their resources, see:
Worker Group/Fleet-Level Roles
| Name | Description | Permissions Model Equivalent |
|---|---|---|
| owner_all | Read/write access to (and Deploy permission on) all Worker Groups/Fleets. | N/A |
| editor_all | Read/write access to all Worker Groups/Fleets. | N/A |
| reader_all | Read-only access to all Worker Groups/Fleets. | N/A |
| collect_all | Ability to create, configure, and run Collection jobs on all Worker Groups. | N/A |
Default Policies
The Cribl Suite ships with the default Policies that are described in this section.
Worker Group/Fleet-Level Policies
| Name | Description | Permission Equivalent |
|---|---|---|
GroupRead | The most basic Worker Group/Fleet-level permission. Enables users to view a Worker Group/Fleet and its configuration, but not modify or delete the config. | Worker Group/Fleet-level Read Only. |
GroupEdit | Building on GroupRead, grants the ability to also change and commit a Worker Group/Fleet configuration. | Worker Group/Fleet-level Editor. |
GroupFull | Building on GroupEdit, grants the ability to also deploy a Worker Group/Fleet. | Worker Group/Fleet-level Admin. |
GroupCollect | Grants the ability to create, configure, and run Collectors on a Worker Group. | N/A |
GroupUser | Access Worker Group/Fleet. | Worker Group/Fleet-level User. |
Project-Level Policies
| Name | Description | Permission Equivalent |
|---|---|---|
ProjectMaintain | Grants ability to edit or delete the Project and its settings. | Project-level Maintainer. |
ProjectRead | Can configure connections among the Project’s Subscriptions, Packs, and Destinations, but cannot modify or delete these resources. | Project-level Read Only. |
ProjectEdit | Can view Project and Subscription settings and connections, but not modify or delete them. | Project-level Editor. |
Product-Level Policies
| Name | Description | Permission Equivalent |
|---|---|---|
ProductUser | Makes the Member assignable to Worker Groups and resources, with no initial access to any. | Product-level User. |
LimitedProductUser | Similar to ProductUser, but omits the ability to read or act on all the endpoints within a Worker Group/Fleet. | N/A |
ProductAdmin | Superuser Permission at the Product level. | Product-level Admin. |
General Policies
| Name | Description | Permission Equivalent |
|---|---|---|
* (wildcard) | Grants all access rights on associated objects. | N/A |
Internal Policies
The following policies are internal building blocks for Product-specific Policies. Do not add them directly to Roles.
| Name | Description | Permission Equivalent |
|---|---|---|
Product | N/A | N/A |
BaseProductUser | N/A | N/A |
MaintainBase | N/A | N/A |
Use Policies As-Is
By design, the default Policies that ship with the Cribl Suite cannot be modified via the UI or API. Do not attempt to modify them by other means. Breaking the built-in model could undermine your intended access-control protections, opening your deployment and data to security vulnerabilities.
Add Roles
To add a new Role:
- In the sidebar, select Settings, then Global.
- Under Access Management, select Roles.
- Select Add Role.
- Provide the Role Name.
- Select Policies for the Role.
Add and Remove Policies
The Policies section is an expandable table. In each row, you select a Policy using the left drop-down, and apply that Policy to objects (i.e., assign access rights on those objects) using the right drop-down.
Let’s highlight an example from the above screen capture of built-in Roles: The editor_all Role has the GroupEdit Policy, with permission to exercise it on any and all Worker Groups/Fleets (as indicated by the * wildcard).

To add a new Policy to a Role:
- Select Add Policy to add a new row to the Policies table.
- Select a Policy from the left column drop-down.
- Accept the default object on the right; or select one from the drop-down.
To modify an already-assigned Policy, just edit its row’s drop-downs in the Policies table.
To remove a Policy from the Role, select the X icon at right.
In all cases, click Save to confirm your changes and close the modal.
Objects
In the Policies table’s right column, use the drop-down to select the Cribl objects on which the left column’s Policy will apply. The objects available for selection are specific Worker Groups/Fleets, or a wildcard representing all Worker Groups/Fleets. For example:
Worker Group <id>NewGroup2default(Worker Group/Fleet)*(all Worker Groups/Fleets)
Extend Default Roles
Here’s a basic example that ties together the above concepts and facilities. It demonstrates how to add a Role whose Policies are restricted to a particular Worker Group/Fleet.
Here, we’ve cloned the editor_all Role that we unpacked above. We’ve named the clone editor_default.
We’ve kept the GroupEdit Policy from editor_all. But in the right column, we’re restricting the Policy to the default Worker Group/Fleet that ships with the Cribl Suite.
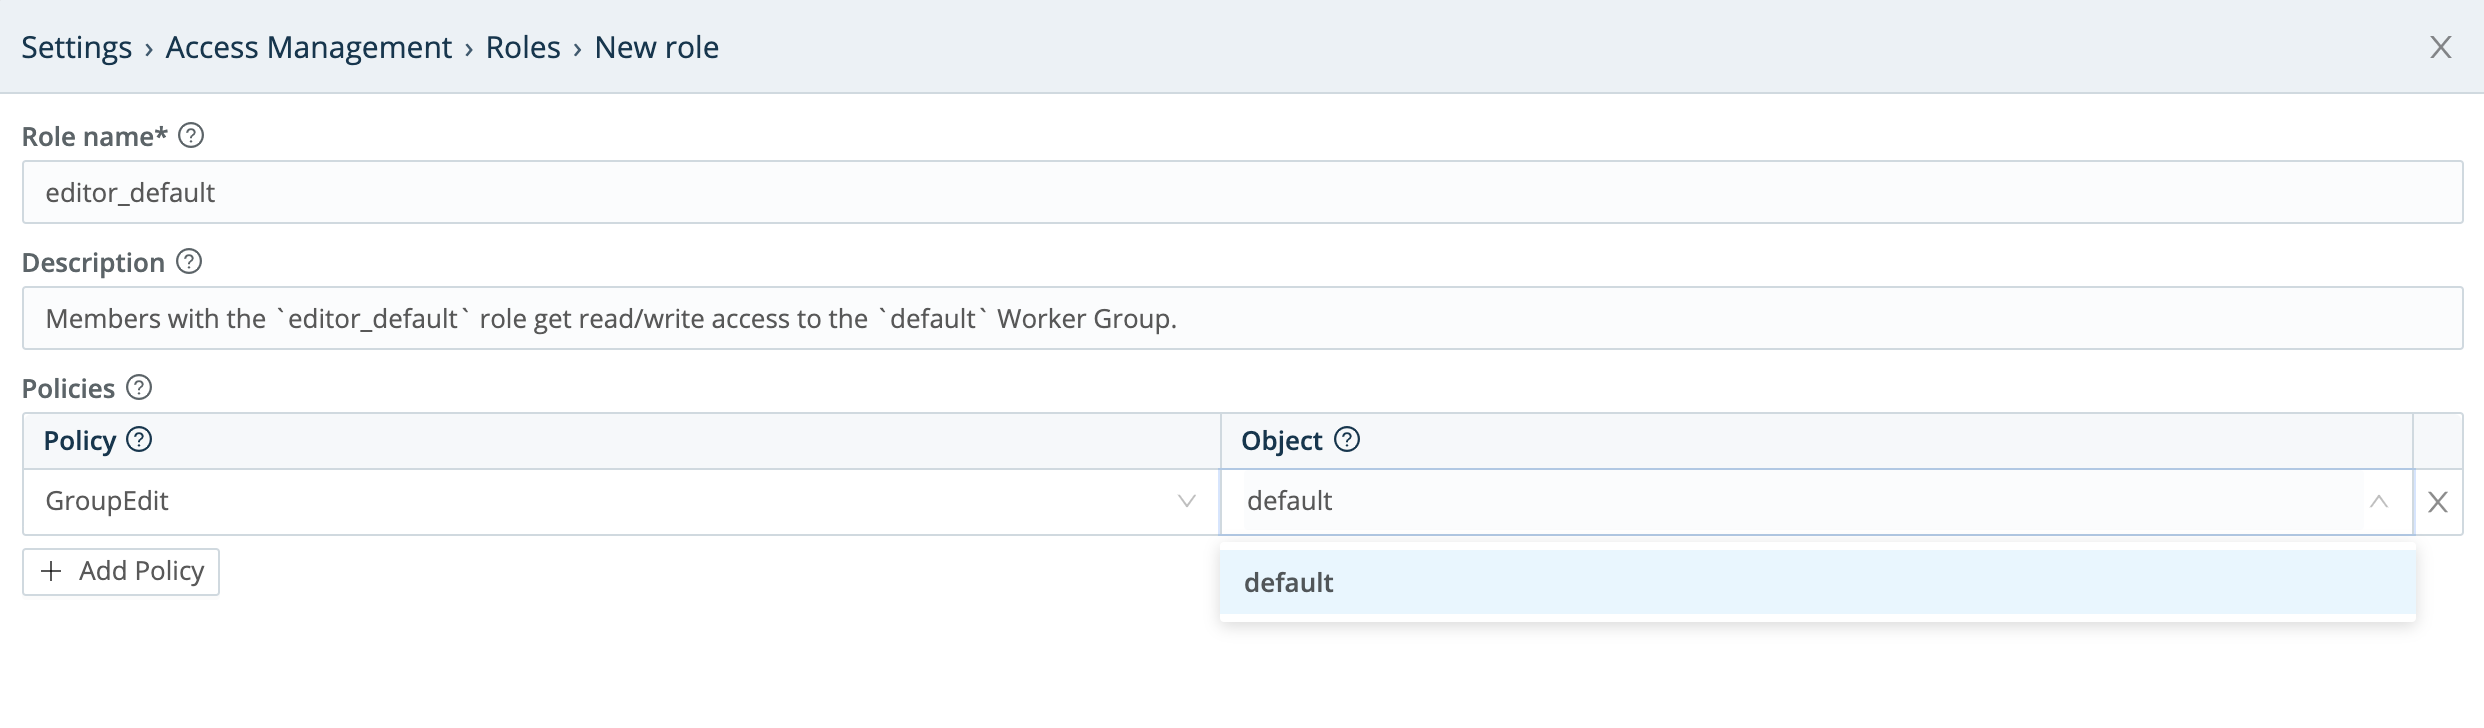
You can readily adapt this example to create a Role that has Policies on an arbitrarily named Worker Group/Fleet of your own.
Assign Roles to Users
To assign Roles to users, see Local Users.
When you assign multiple Roles to a given user, the Roles’ Policies are additive: the user is granted a superset of all the Policies contained in all the assigned Roles.
By default, Cribl logs users out upon a change in their assigned Roles. You can disable this setting at Settings > Global > General Settings > API Server Settings > Advanced > Logout on roles change.