Storage Locations (Bring Your Own Storage)
Create Datasets on storage that you directly own, achieving compliance while taking advantage of streamlined management in Cribl Lake.
You can set an Amazon S3 bucket as the Storage Location for a Cribl Lake Dataset. This enables you to maintain direct ownership of your data for regional or other compliance purposes, while taking advantage of Cribl’s streamlined provisioning, retention policies, access control, and analytics.
You’ll also see this option referred to as “bring your own storage (BYOS).” Storage Locations are available on an Enterprise plan - for details, see Cribl Pricing. See also Limitations on Storage Locations.
Buckets that you create through the Cribl Lake UI use the Amazon S3 Standard storage class. Using any S3 bucket with a Cribl Lake Storage Location will incur AWS charges in addition to Cribl Lake credits.
Configure a Storage Location
If you follow the recommended path in this section, Cribl Lake will simplify creating a new bucket on Amazon S3. After you configure initial settings in the Lake UI, Cribl will provide a ready-made CloudFormation template that you can download, then launch in the AWS CloudFormation console to create your infrastructure-as-code.
If you prefer to configure the bucket yourself on S3, see Setting Up a Dedicated Bucket Outside Cribl Lake.
Each Storage Location maps to one bucket. So you’ll repeat this section’s configuration steps for each external bucket you want to create.
Configure Initial Settings
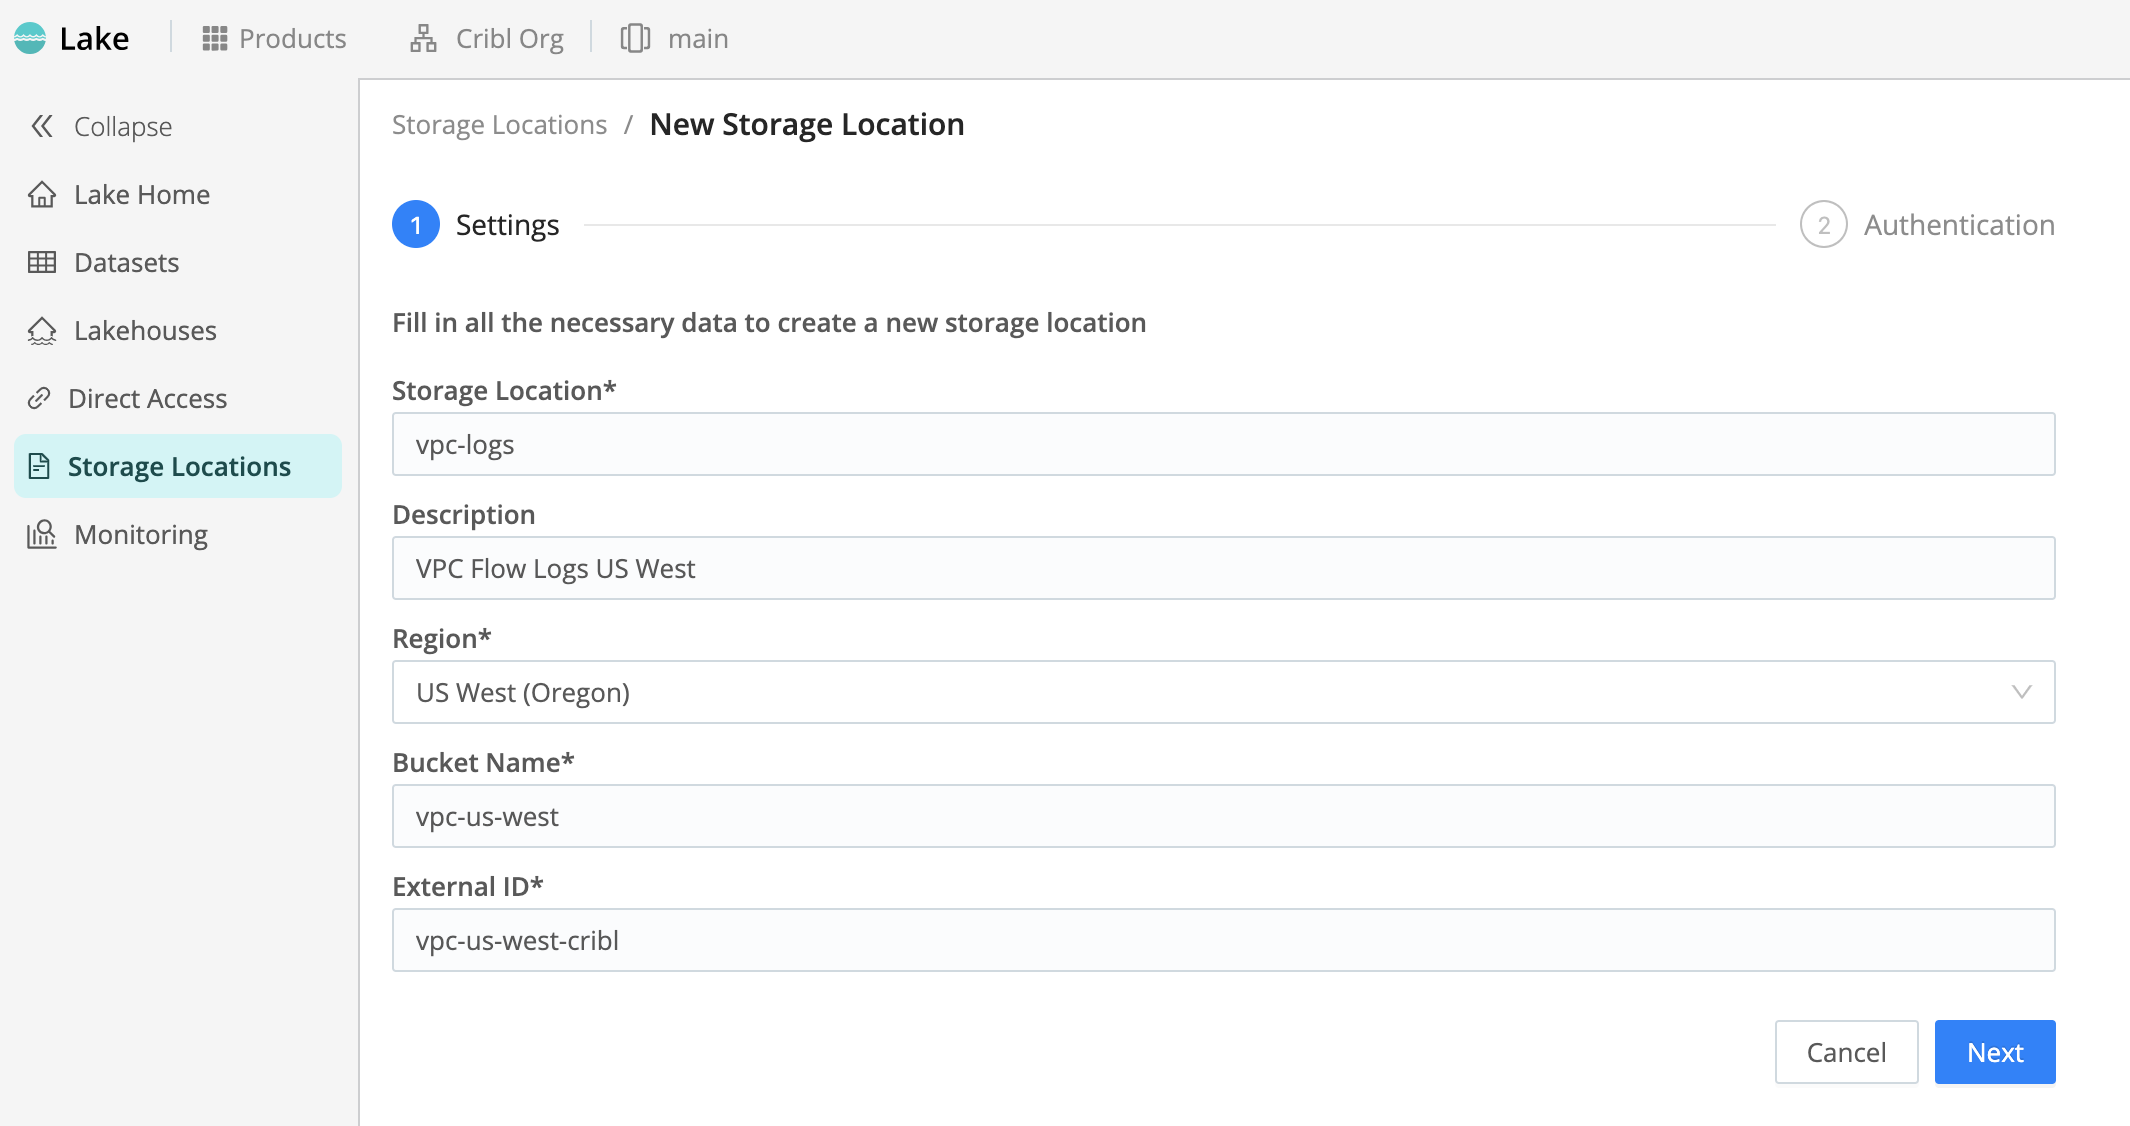
To get started, from the Cribl Lake sidebar, select Storage Locations. Then, on the resulting New Storage Location > Settings page:
- Enter a Storage Location name. This is arbitrary, and should be unique in your Cribl Lake instance.
- Optionally, enter a Description that helps other users understand the purpose of this Storage Location.
- Select a supported AWS Region in which to create the bucket.
- Enter a Bucket Name.
The Bucket Name is arbitrary, but must be unique on AWS. Cribl recommends giving your buckets a distinctive identifier. (For detailed naming recommendations, see General Purpose Bucket Naming Rules from AWS.)
- Optionally, customize the Encryption method on your bucket.
This defaults to
SSE-S3for Amazon S3-managed keys, but you can instead selectSSE-KMSfor the AWS Key Management Service (KMS). TheSSE-KMSoption offers enhanced lifecycle control (key rotation and revocation), auditability, and IAM policy customization - all of which require access through AWS interfaces. (For details, see Using Server-Side Encryption with AWS KMS Seys (SSE-KMS) from AWS.) - Generate or enter an External ID.
The External ID is arbitrary, with no uniqueness requirement. However, to provide an extra layer of security, Cribl recommends using a random UUID here. You can use the Generate button for this purpose. (For details about external IDs, see How to Use External ID When Granting Access to Your AWS Resources from AWS.)
- Click Next to proceed to the Authentication page.

Configure Authentication and Infrastructure
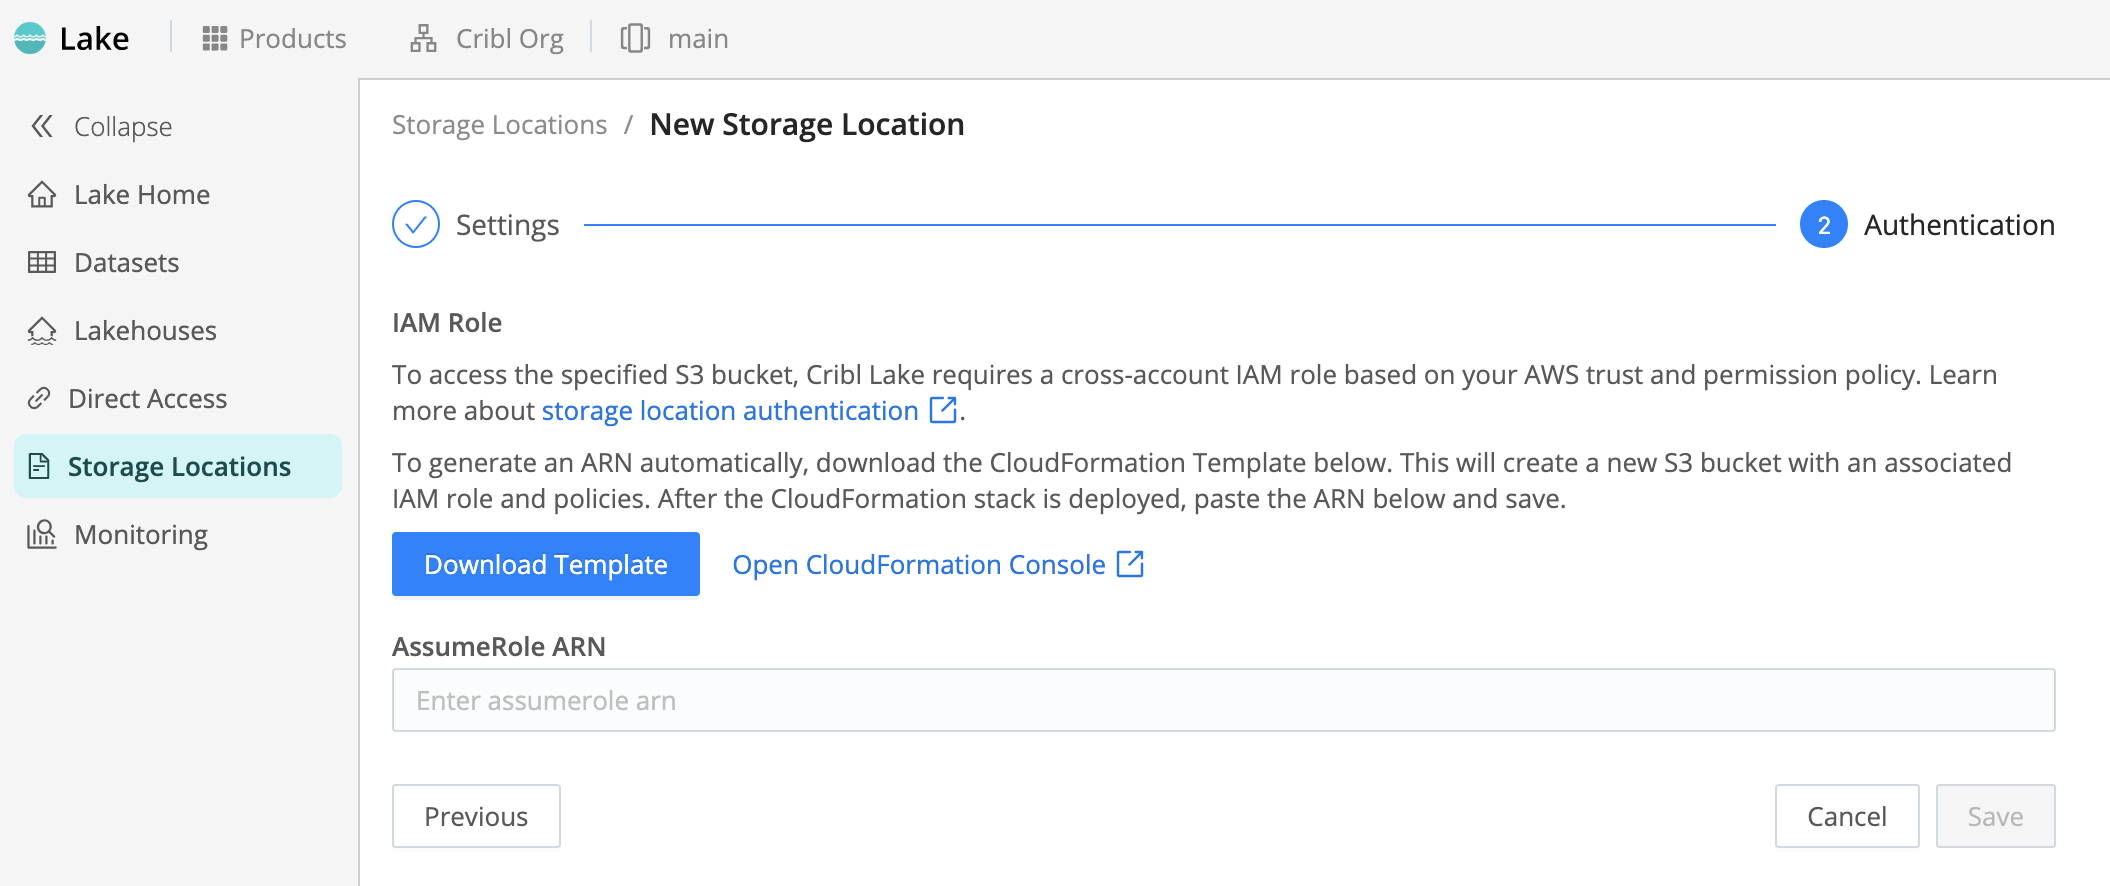
From the New Storage Location > Authentication page in Cribl Lake, you create your Amazon S3 infrastructure, and you then authenticate Cribl Lake on this infra.
For details about required AWS permissions, see Authentication.
- Select Download Template and save the resulting CloudFormation template locally.
- Select Open CloudFormation Console.

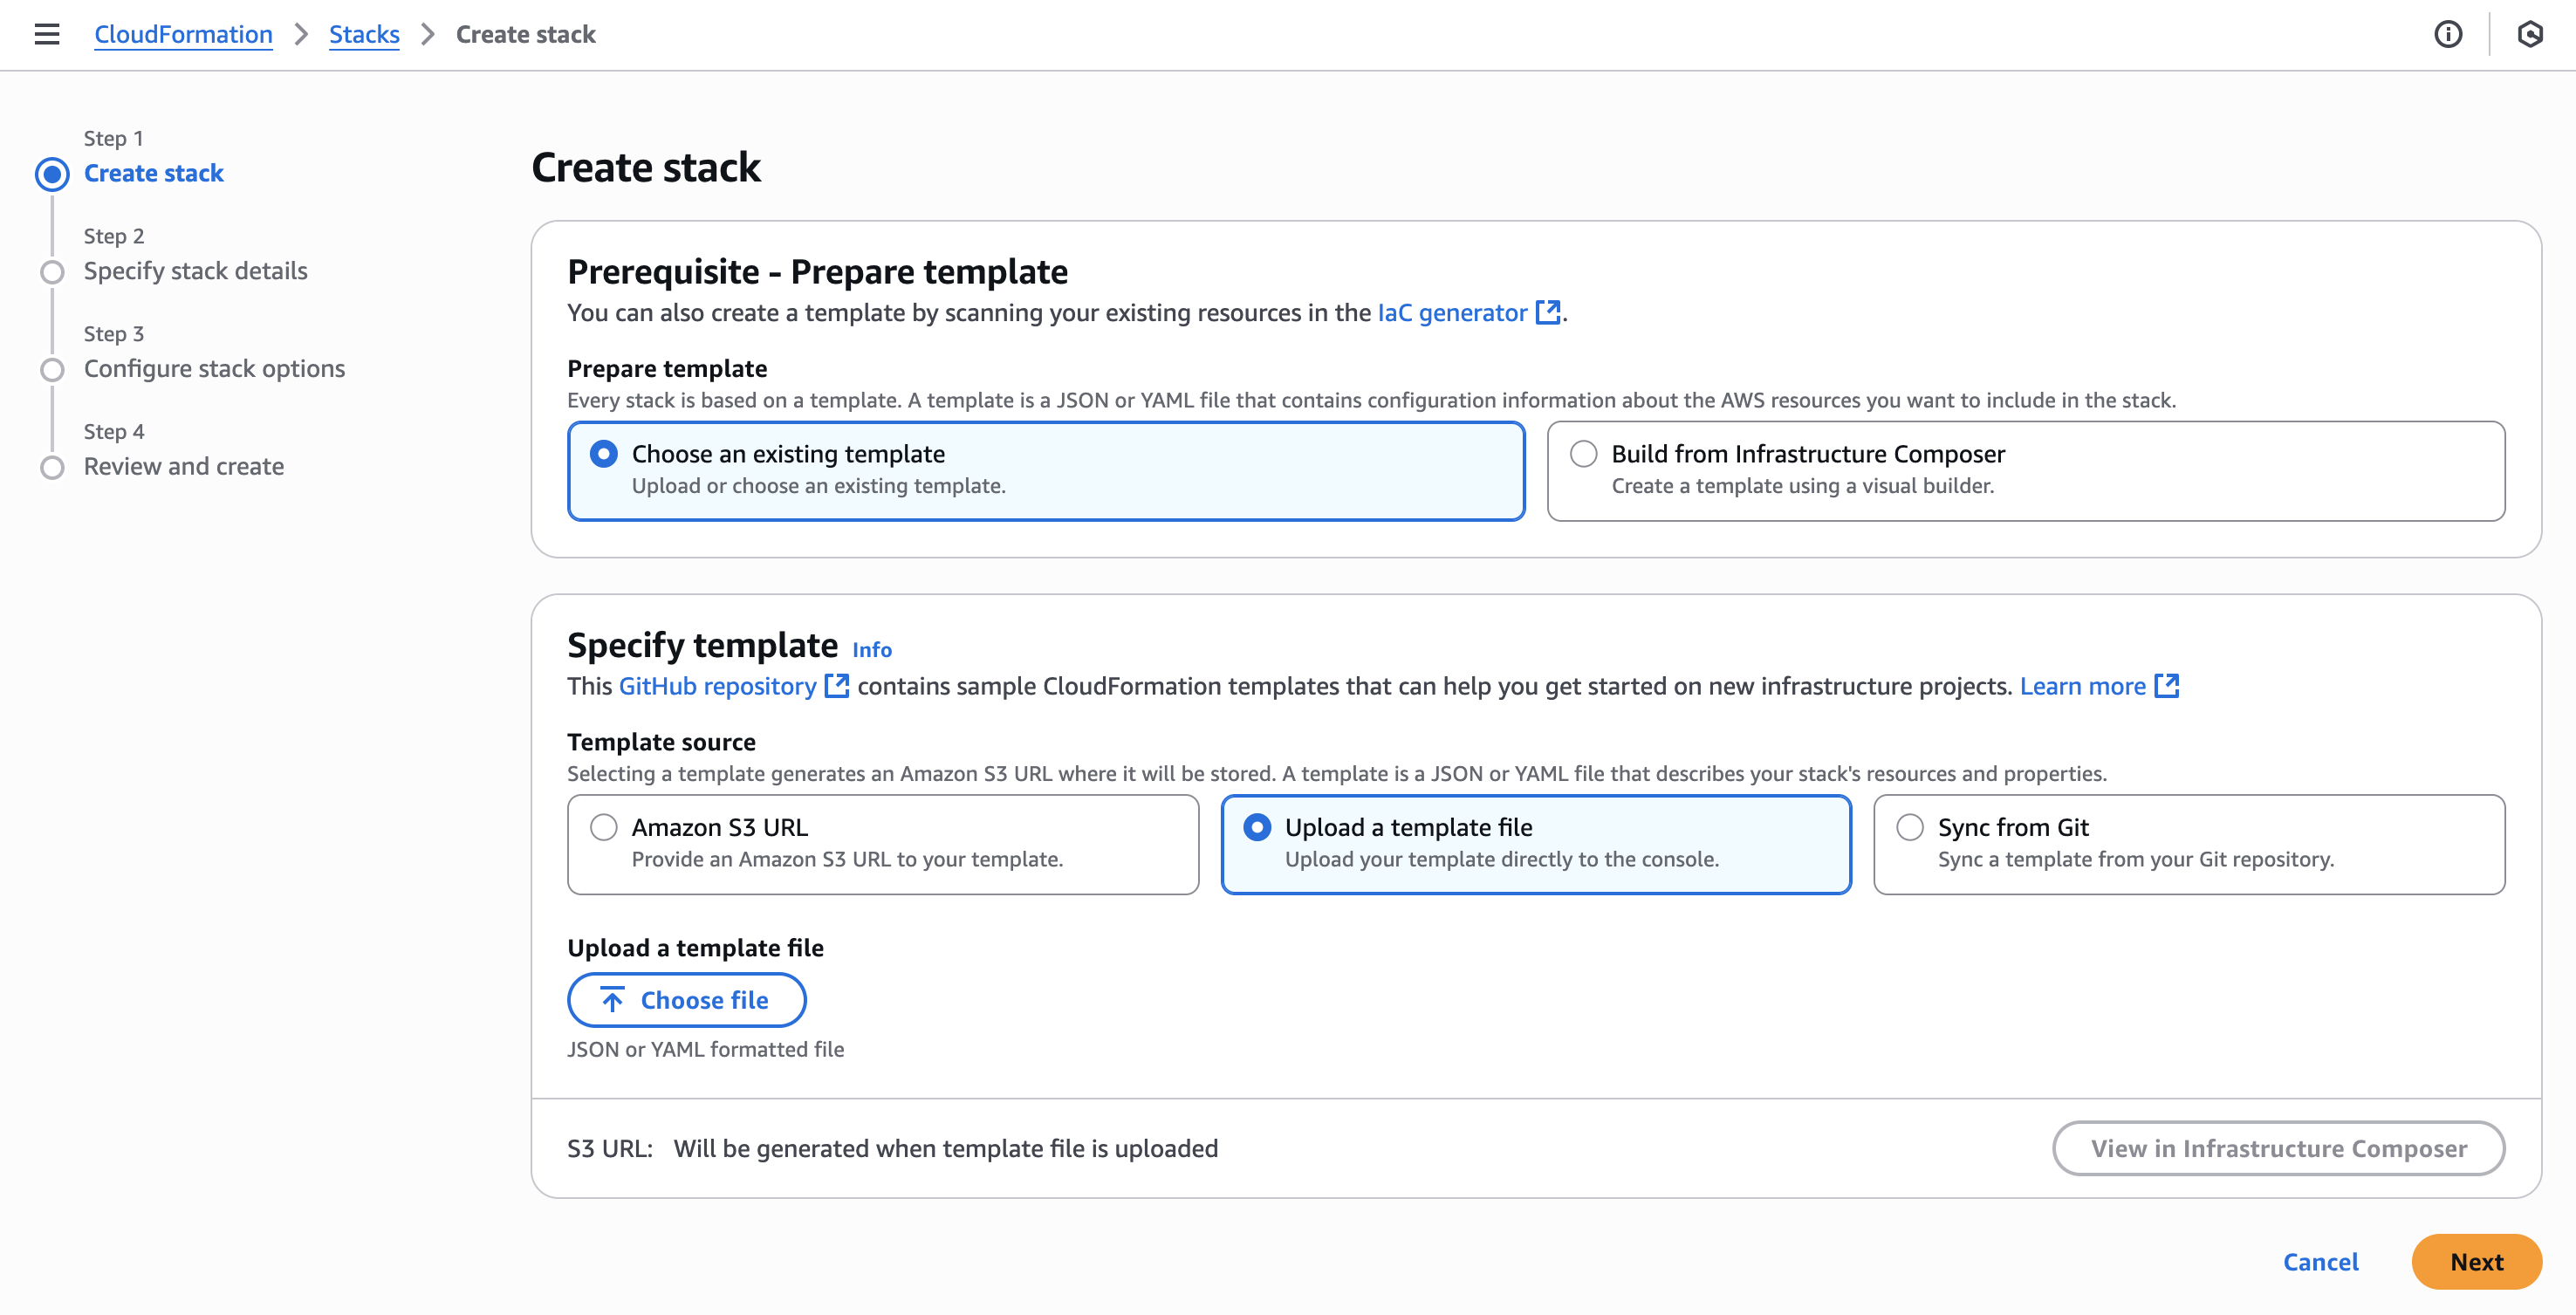
Screenshot of Authentication page, the second step in configuring a new Storage Location in Cribl Lake. - On the resulting AWS CloudFormation Stacks > Create stack page, select Upload a template file, then
Choose file.

Screenshot of AWS CloudFormation “Create stack” page, showing selected radio button to upload template from Cribl Lake. - Upload the template you saved, then select Next.
- In the resulting CloudFormation Configure stack options sequence, accept defaults, or adjust them to match your AWS practices. Then select Next.
- On the Specify stack details page, assign your stack an arbitrary name. Then complete the Configure stack options sequence, accepting defaults and acknowledgments as appropriate.
- On the Review and create page, select Submit.
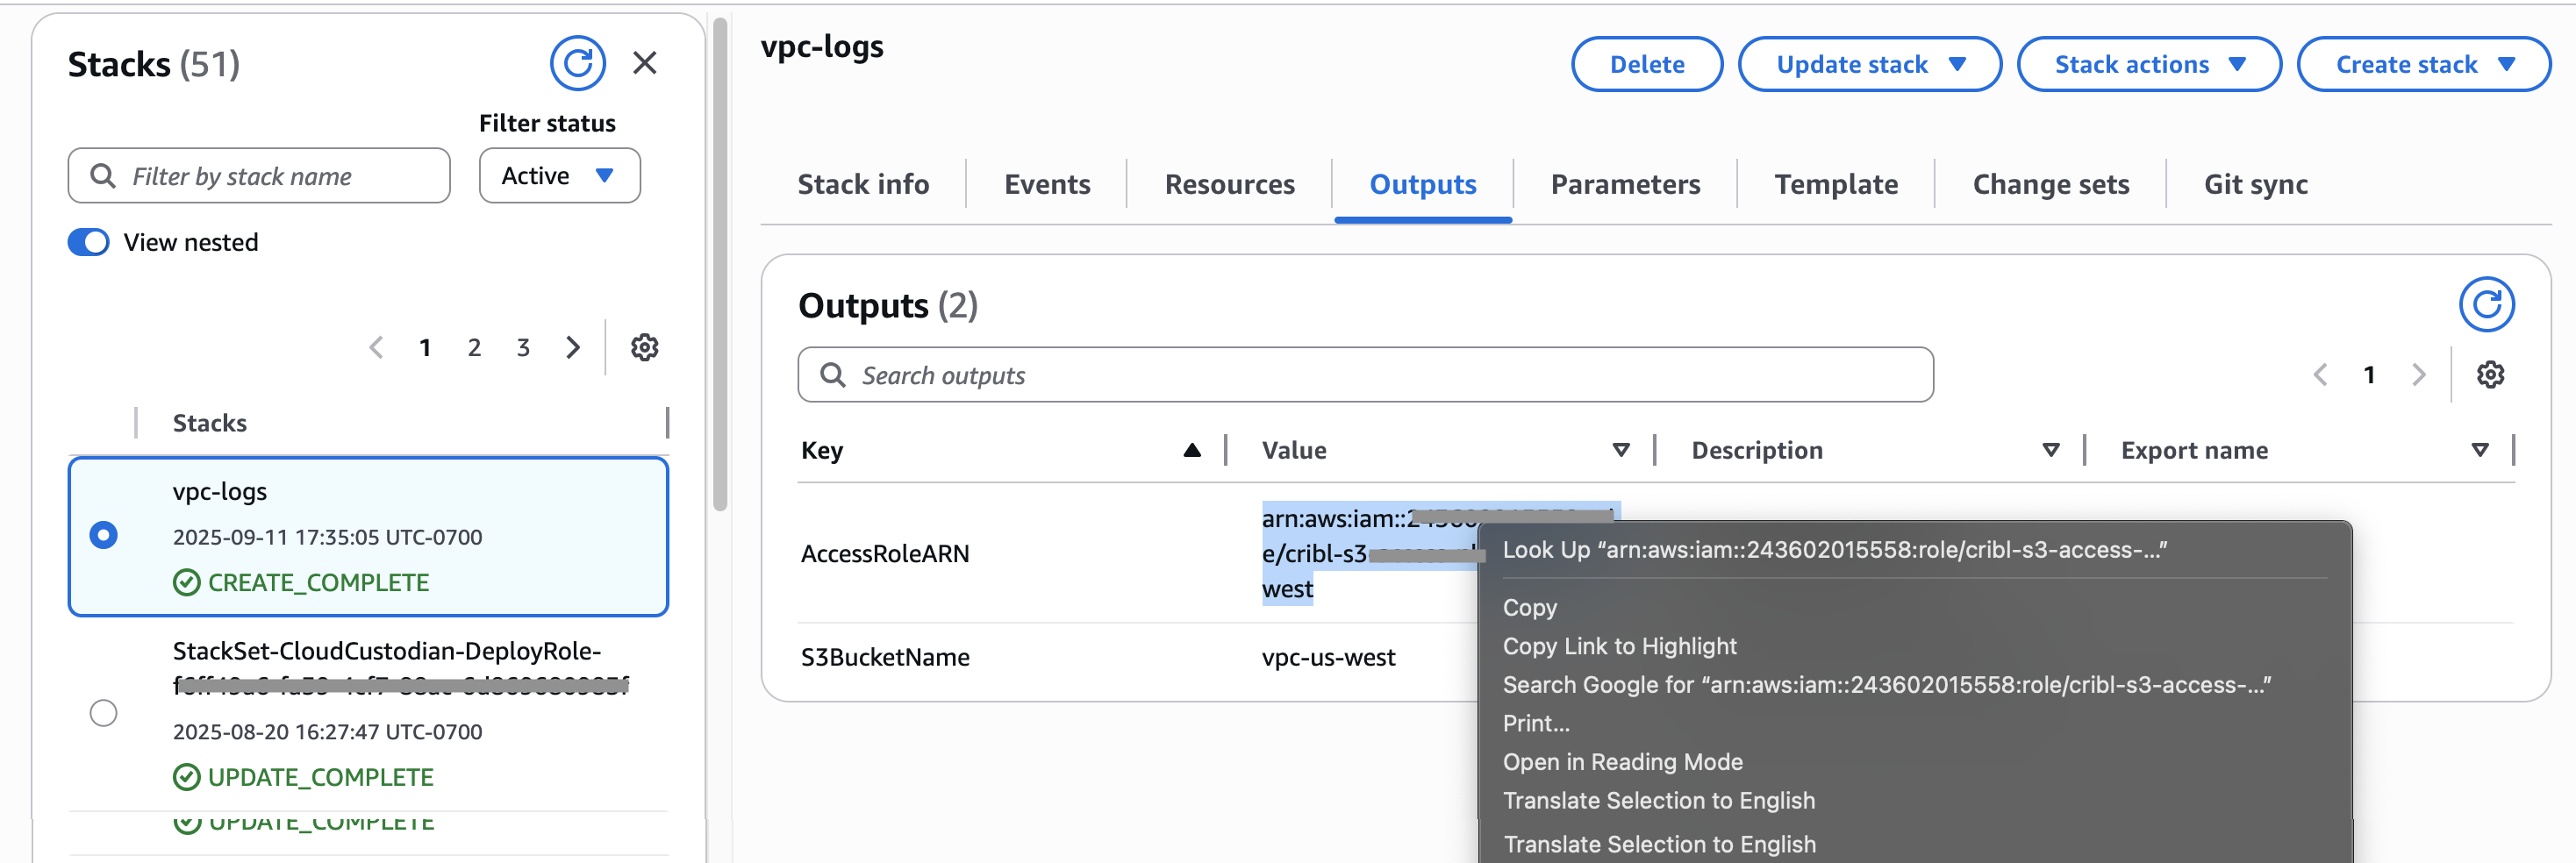
On the CloudFormation Stacks page, you will now see your new bucket progress from
CREATE_IN_PROGRESSstatus toCREATE_COMPLETE. - Select the Outputs tab, and copy your new bucket’s AccessRoleARN value to the clipboard.

Screenshot of newly created AWS stack’s Outputs tab, showing how to copy the bucket’s AccessRole ARN value. - Back on the Cribl Lake Authentication page, paste this ARN into the AssumeRole ARN field.
- Select Save to link your Cribl Lake Storage Location with your S3 bucket.
Your new Storage Location will appear on the left side of the Lake Storage Locations page.
Connect Datasets to Storage Locations
You can link multiple Connected Datasets per Storage Location.
Follow the procedure in Manage Lake Datasets to create a new Dataset, or to edit an existing Dataset. On the Dataset configuration page, select a configured Storage Location from the drop-down. Then save or resave the Dataset.
If you don’t make a selection on this drop-down, the Dataset will use the internal
Cribl Lakedefault location.

The Dataset will now use the selected (or default) Storage Location to store its data. On the Storage Location page, this Dataset will appear in the right column of Connected Datasets.
As with other Datasets, you can write to this Dataset from Cribl Stream with the Cribl Lake Destination. And you can access the Dataset contents from Cribl Search and Stream (subject to some Limitations).
The Retention period that you set in the Cribl Lake Dataset configuration will automatically be reflected in the Amazon S3 Console’s Management tab. After you’ve connected a Dataset to an external S3 bucket, do not change the retention period directly in the S3 Console.
Detach a Storage Location Connection
If you choose to detach a Storage Location, all associated Datasets will also be removed from Cribl Lake. However, your data will not be deleted from S3.
A Detach button is available on each Storage Location configuration page. If you select it, it will open a confirmation modal. Here, if you’ve already revoked Cribl Lake permissions on the S3 bucket, you can select the option labeled Proceed with detach operation despite permission errors.
Supported Regions
Each Storage Locations can map to an S3 bucket in one of the following AWS Regions:
- US East (Virginia)
- US East (Ohio)
- US West (Oregon)
- Canada (Central)
- Europe (Frankfurt)
- Europe (London)
- Europe (Zurich)
- Asia Pacific (Singapore)
- Asia Pacific (Sydney)
FedRAMP-Supported Regions
In Cribl.Cloud Gov (FedRAMP Moderate), Cribl Lake storage locations that use Amazon S3 support the following AWS regions:
us-east-1- US East (N. Virginia)us-east-2- US East (Ohio)us-west-2- US West (Oregon)
Cribl.Cloud Government currently does not support AWS GovCloud regions (such as
us-gov-west-1,us-gov-east-1) for BYOS storage locations.
API Support for Storage Locations
For automation and scripting, Members with appropriate Permissions can use Cribl storageLocations REST API endpoints.
However, in this case, Cribl does not generate a CloudFormation template. So you will need to explicitly create
corresponding S3 buckets and IAM roles with appropriate trust policy and permissions. (See Authentication for
required permissions.)
Create a Storage Location via API
Here is an example request to create a Storage Location:
POST /products/lake/lakes/{lakeId}/storage-locationsYour request body should include the Storage Location details. Here’s an example:
{
  "id": "byosLocation",
  "provider": "aws-s3",
  "credentials": {
    "method": "auto",
    "roleToAssume": "arn:aws:iam::1111111111:role/test"
  },
  "config": {
    "bucketName": "byosbucket",
    "region": "us-west-2"
  }
}Attach a Dataset via API
When adding a Dataset via API, you reference the target Storage Location instead of a bucket name. Here is an example YAML configuration:
datasets:
  - id: my_dataset
    storageLocation: my-byos-location
    retention: 30d
format: jsonSetting Up a Dedicated Bucket Outside Cribl Lake
If you follow the procedure in Configure a Storage Location, the provided CloudFormation template will create your new Amazon S3 bucket’s structure for you.
For advanced users who prefer to manage AWS resources directly, you can create a new, dedicated bucket and IAM role on S3, then link it as a Cribl Lake Storage Location. This is a more complex path, which requires you to explicitly configure access control on AWS.
Using the AWS Management Console or AWS API, you would:
- Create a simple bucket configuration in an AWS Region that Cribl Lake supports.
- Create a corresponding IAM role with an appropriate trust policy and permissions. (See Authentication for required permissions.)
Do not connect an existing S3 bucket that contains other data. Cribl Lake requires full control over lifecycle rules and S3 Inventory configuration, so each Cribl Lake Storage Location must be backed by a bucket dedicated exclusively to Cribl Lake.
Authentication
Cribl Lake accesses Amazon S3 buckets using STS Assume Role. If you follow the procedure in Configure a Storage Location, the provided CloudFormation template will create the required resources and permissions for you.
IAM Role Permissions
Read the remainder of this section only if you choose to configure access control on an S3 bucket yourself (see Setting Up a Dedicated Bucket Outside Cribl Lake. These instructions assume that you are permitted to view and manage access details on both AWS and your Cribl Organization.
Your IAM role must provide the permissions listed in the following example. Replace the <bucketName> placeholder with
your own bucket’s name:
{
  "Version": "2012-10-17",
  "Statement": [
    {
      "Sid": "BucketAdminPermissions",
      "Condition": {
        "StringEquals": {
          "aws:PrincipalTag/Actor": "admin"
        }
      },
      "Action": [
        "s3:PutLifecycleConfiguration",
        "s3:GetLifecycleConfiguration",
        "s3:PutInventoryConfiguration",
        "s3:GetInventoryConfiguration",
        "s3:PutBucketNotification",
        "s3:GetBucketNotification",
        "s3:GetEncryptionConfiguration",
        "s3:GetBucketTagging"
      ],
      "Resource": "arn:aws:s3:::<bucketName>",
      "Effect": "Allow"
    },
    {
      "Sid": "BucketObjectLevelReadWritePermissions",
      "Action": [
        "s3:GetObject",
        "s3:PutObject",
        "s3:GetObjectTagging",
        "s3:PutObjectTagging",
        "s3:AbortMultipartUpload"
      ],
      "Resource": "arn:aws:s3:::<bucketName>/*",
      "Effect": "Allow"
    },
    {
      "Sid": "BucketLevelReadPermissions",
      "Action": ["s3:ListBucket", "s3:GetBucketLocation", "s3:ListBucketMultipartUploads"],
      "Resource": "arn:aws:s3:::<bucketName>",
      "Effect": "Allow"
    }
  ]
}Also, for Cribl resources to be able to assume your IAM role, the IAM role must provide sts:AssumeRole and
sts:TagSession permissions to these Cribl roles:
role/saas/cribl-lake-admin-<workspaceId>(manages your bucket properties, like lifecycle and inventory).role/<workspaceId>-*(Workers from all Cribl Stream Worker Groups need read/write access to your bucket).role/search-exec-<workspaceId>(Cribl Search needs read/write access to be able to perform searches against your bucket).
IAM Role Trust Policy
If you choose to configure access control on an S3 bucket yourself, you must provide a trust policy comparable to the
following example. (See also the Restrictive Trust Policy option.) Replace the <CRIBL_AWS_ACCOUNT>,
<workspaceId>, and <externalId> placeholders as follows:
- In your Cribl.Cloud Organization, select Products from the top bar, then select Workspace from the sidebar.
- To insert the
<CRIBL_AWS_ACCOUNT>, select Trust from the sidebar. Then, from the displayed Worker ARN field, copy the numeric value that follows the stringarn:aws:iam::. - To insert the
<workspaceId>, select the Workspaces button on the top bar. In the resulting modal, copy the ID of the appropriate Workspace. - To insert the
<externalId>, switch to your Storage Location config, and copy the External ID value you defined there. (For details, see Configure Initial Settings.)
{
  "Version": "2012-10-17",
  "Statement": [
    {
      "Sid": "CriblLakeAdminAssumeRole",
      "Effect": "Allow",
      "Principal": {
        "AWS": "arn:aws:iam::<CRIBL_AWS_ACCOUNT>:role/saas/cribl-lake-admin-<workspaceId>"
      },
      "Action": "sts:AssumeRole",
      "Condition": {
        "StringEquals": {
          "sts:ExternalId": "<externalId>",
          "aws:RequestTag/Actor": "admin"
        }
      }
    },
    {
      "Sid": "CriblLakeAdminTagSession",
      "Effect": "Allow",
      "Principal": {
        "AWS": "arn:aws:iam::<CRIBL_AWS_ACCOUNT>:role/saas/cribl-lake-admin-<workspaceId>"
      },
      "Action": "sts:TagSession",
      "Condition": {
        "StringEquals": {
          "aws:RequestTag/Actor": "admin"
        }
      }
    },
    {
      "Sid": "CriblWorkerAssumeRole",
      "Effect": "Allow",
      "Principal": {
        "AWS": "arn:aws:iam::<CRIBL_TRUST_ACCOUNT>:root"
      },
      "Action": "sts:AssumeRole",
      "Condition": {
        "StringEquals": {
          "sts:ExternalId": "<externalId>"
        },
        "StringLike": {
          "aws:PrincipalArn": "arn:aws:iam::<CRIBL_AWS_ACCOUNT>:role/<workspaceId>-*"
        }
      }
    },
    {
      "Sid": "CriblSearchAssumeRole",
      "Effect": "Allow",
      "Principal": {
        "AWS": "arn:aws:iam::<CRIBL_AWS_ACCOUNT>:role/search-exec-<workspaceId>"
      },
      "Action": "sts:AssumeRole",
      "Condition": {
        "StringEquals": {
          "sts:ExternalId": "<externalId>"
        }
      }
    }
  ]
}Restrictive Trust Policy
The preceding model trust policy enables all Cribl Stream Worker Groups in the current Workspace to write
to the configured bucket. If you instead wish to limit write permissions to only certain Worker Groups, modify the model
policy’s CriblWorkerAssumeRole element as shown in the following listing.
Replace the <workerGroupId1> and <workerGroupId2> placeholders with the names of each Worker Group you want to
authorize. Expand or contract the number of defined Worker Groups to meet your needs:
{
  "Sid": "CriblWorkerAssumeRole",
  "Effect": "Allow",
  "Principal": {
    "AWS": [
      "arn:aws:iam::<CRIBL_AWS_ACCOUNT>:role/<workspaceId>-<workerGroupId1>",
      "arn:aws:iam::<CRIBL_AWS_ACCOUNT>:role/<workspaceId>-<workerGroupId2>"
    ]
  },
  "Action": "sts:AssumeRole",
  "Condition": {
    "StringEquals": {
      "sts:ExternalId": "<externalId>"
    }
  }
}Limitations on Storage Locations
Each bucket must reside on Amazon S3 (in an AWS Region supported by Cribl Lake), not on other S3-compatible stores.
Each Storage Location must map to one bucket.
You can’t populate an external bucket using Cribl Lake Direct Access.
You can’t assign these buckets’ Connected Datasets to Lakehouses.
Data sent to an external bucket through the Cribl Lake Destination will be accessible to Cribl Search, and to Cribl Stream for replay through its Cribl Lake Collector. However, any data that you send directly to the S3 bucket outside of Cribl products will not be visible to Cribl Search or Stream.


