


Configure Netskope Direct Access
Ship your Netskope data straight into Cribl Lake without a Pipeline, bypassing Cribl Stream.
Use the Netskope Direct Access option to land Netskope data directly into Cribl Lake for search and analysis, without manually managing AWS infrastructure. The Netskope Direct Access source supports the following Netskope telemetry:
- Cloud Access Security Broker (CASB)
- Data loss prevention (DLP)
- Network security
How Netskope Direct Access Works
Netskope Direct Access in Cribl is comprised of four main steps. Here’s an overview of the steps you’ll complete in this guide:
- In Netskope, create a Netskope Log Streaming stream with an Amazon S3 destination.
- In Cribl Lake, create a Netskope Direct Access Source and generate an External ID for Netskope. Cribl provisions a managed S3 bucket and IAM role.
- Create a Lake Dataset on the auto-created Storage Location to hold the data.
- Add Cribl connection details in Netskope to enable data transfer.
Learn About the Implementation
The Netskope Direct Access implementation has the following details:
- You can configure one Netskope Source per Cribl Lake Workspace.
- You can have many Datasets per Source.
- Data flows directly from Netskope into your S3 bucket; it doesn’t pass through Cribl infrastructure.
- Netskope Direct Access only supports v1 Datasets.
Create a Netskope Log Streaming Stream
You’ll need to set up a few things in Netskope before you create the Direct Access Source in Cribl.
- In Netskope, create a Log Streaming stream. Select Amazon S3 as the Destination.
- Don’t add a Folder Path yet - this will be the Dataset name.
- Copy the Netskope Account ID and the Region to use in Cribl.
This is the view in Netskope you’ll need:
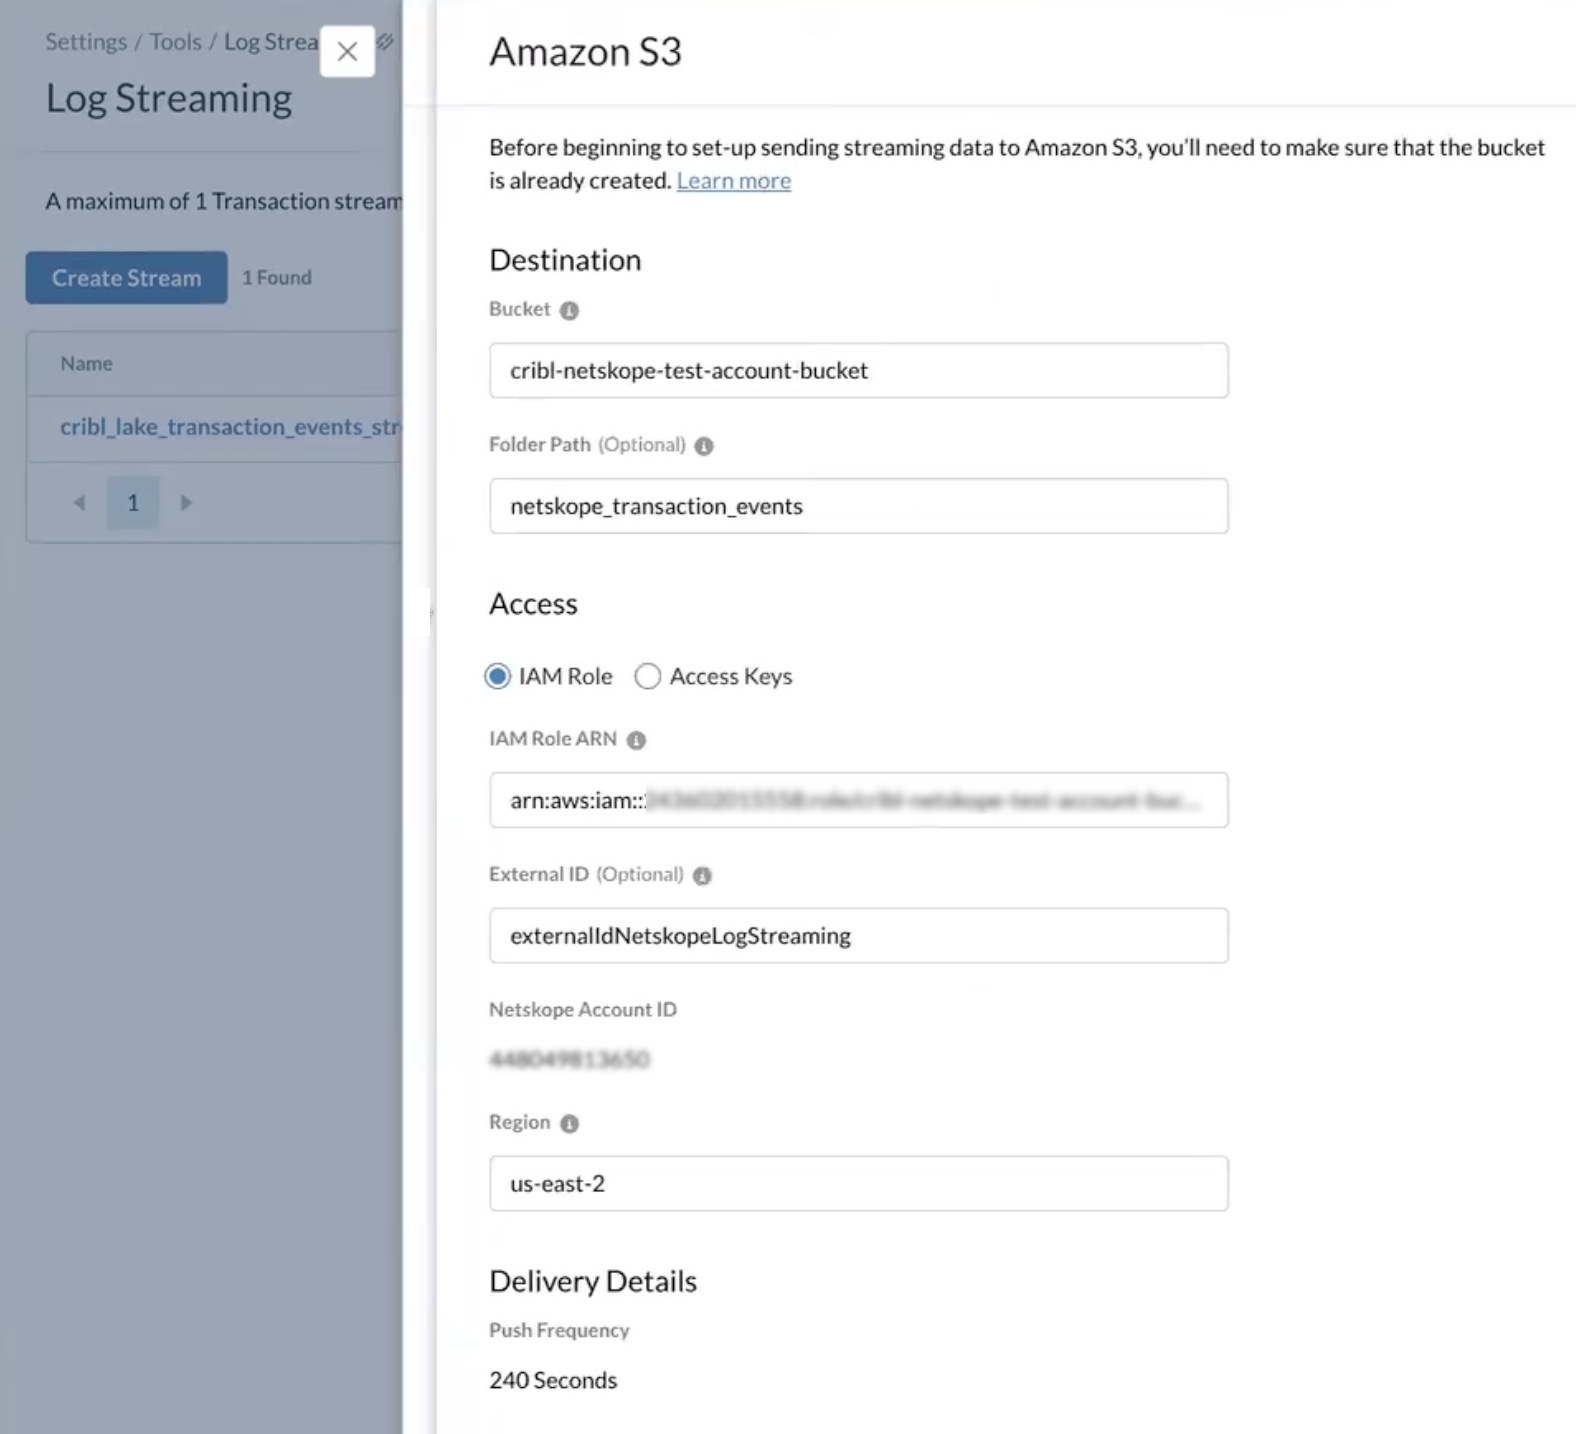
See the Netskope Stream Logs to Amazon S3 documentation for details on where to find these fields.
Create a Netskope Direct Access Source
Create the Source in Cribl Lake so that Cribl can provision the managed S3 bucket and IAM role that Netskope writes to.
In Cribl Lake, select Direct Access in the left navbar.
On the Source step, select Netskope, then select Next.
On the Configuration step, enter the required fields. You’ll need access to your Netskope stream destination to collect some of these field values.
Field Description Notes Netskope AWS Account ID The Netskope Account ID associated with the Log Streaming stream. To find this ID, consult the Netskope docs: Stream Logs to Amazon S3. Required. Description A descriptive name for this direct access connection. Optional. Region The Region where the Netskope AWS bucket resides. Required. Must match the Region you configured in the Netskope stream. External ID The Netskope ID you’ll use to form the connection to Cribl Lake. Generate an ID in Cribl and paste it into the External ID field on the Netskope Amazon S3 Destination form. Required. Select Save. After you select Save, the Netskope Source enters a
Provisioningstate while Cribl sets up infrastructure. Provisioning usually completes in a few minutes.When the provisioning completes, you can open the Netskope Direct Access Source to see the IAM role.
Create a Netskope Dataset
Create a Dataset on the auto-created Storage Location to hold and organize the incoming Netskope data.
- In Cribl Lake, navigate to Datasets.
- Select New Dataset.
- Enter an ID. You will copy this value into the Folder Path (Optional) field in Netskope.
- Select the Netskope Storage Location.
- Add a retention period and select Save.
For more detailed information on Datasets, see Cribl Lake Datasets.
Add Cribl Connection Details in Netskope
These steps are required to get data flowing correctly.
Add the IAM Role in Netskope
- Once the Source is
Readyin Cribl, open it and copy the IAM role field value. - Navigate to Netskope.
- Paste the IAM role in the Netskope IAM role ARN field.
- Select Save in Netskope.
Add the Folder Path in Netskope
- In Cribl Lake, open the Netskope Dataset.
- Copy the Dataset ID.
- Navigate to Netskope and paste the Dataset ID into the Folder Path (Optional) field. This grants Netskope the ability to write data to Cribl Lake.
Provisioning Lifecycle
A Netskope Direct Access Source will have one of these statuses after you select Save:
| Status | Description |
|---|---|
Provisioning | Cribl is provisioning the S3 bucket. Credentials are computed and visible to the Cribl Admin. |
Ready | The S3 bucket is reachable, S3 inventory is configured. You can attach Datasets to this Source. |
Failed | The provisioning timed out or hit an unrecoverable error. You must delete the Source and try again. |
Query Netskope Data with Cribl Search
Once your Netskope data lands in Cribl Lake, your Netskope Dataset is available in Cribl Search as a cribl_lake Dataset.
For details on querying your data, see Search Cribl Lake.