

Distributed Deployment
Getting started with a distributed Cribl Stream deployment
To sustain higher incoming data volumes, and/or increased processing, you can scale from a single instance up to a multi-instance, distributed deployment. The Worker instances are centrally managed by a single Leader Node, which is responsible for keeping configurations in sync, and for tracking and monitoring the instances’ activity metrics.
- See common distributed deployment use cases in Worker Groups – What Are They and Why You Should Care.
- To sustain high availability, Cribl Stream offers failover to an alternate Leader.
- For detailed system requirements and constraints not listed on this page, see Single-Instance/Basic Deployment.
As of version 3.0, Cribl Stream’s former “master” application components are renamed “leader.” While some legacy terminology remains within CLI commands/options, configuration keys/values, and environment variables, this document will reflect that.
Concepts
Single Instance – a single Cribl Stream instance, running as a standalone (not distributed) installation on one server.
Leader Node – a Cribl Stream instance running in Leader mode, used to centrally author configurations and monitor Worker Nodes in a distributed deployment.
Worker Node – a Cribl Stream instance running as a managed Worker, whose configuration is fully managed by a Leader Node. (By default, will poll the Leader for configuration changes every 10 seconds.)
Worker Group – a collection of Worker Nodes that share the same configuration. You map Nodes to a Worker Group using a Mapping Ruleset.
Worker Process – a Linux process within a Single Instance, or within Worker Nodes, that handles data inputs, processing, and output. The process count is constrained by the number of physical or virtual CPUs available; for details, see Sizing and Scaling.
Mapping Ruleset – an ordered list of filters, used to map Workers Nodes into Worker Groups.
Options and Constraints
A Worker Node’s local running config can be manually overridden/changed, but changes won’t persist on the filesystem. To permanently modify a Worker Node’s config: Save, commit, and deploy it from the Leader. See Deploying Configurations below.
With an Enterprise license, you can configure Permissions‑based (Stream 4.2 and later) or Role‑based access control at the Worker Group level. Non-administrator users will then be able to access Workers only within those Worker Groups on which they’re authorized.
Aggregating Workers
To clarify how the above concepts add up hierarchically, let’s use a military metaphor involving toy soldiers:
- Worker Process = soldier.
- Worker Node = multiple Worker Processes = squad.
- Worker Group = multiple Worker Nodes = platoon.
Multiple Worker Groups are very useful in making your configuration reflect organizational or geographic constraints. E.g., you might have a U.S. Worker Group with certain TLS certificates and output settings, versus an APAC Worker Group and an EMEA Worker Group, each with their own distinct certs and settings.
Architecture
This is an overview of a distributed Cribl Stream deployment’s components.

Here is the division of labor among components of the Leader Node and Worker Node.
Leader Node
API Process – Handles all the API interactions.
N Config Helpers – One process per Worker Group. Helps with maintaining configs, previews, etc.
Worker Node
API Process – Handles communication with the Leader Node (i.e., with its API Process) and handles other API requests.
N Worker Processes – Handle all the data processing.
Single-Instance Architecture
For comparison, here’s the simpler division of labor on a single-instance deployment, where the separate Leader versus Worker Nodes are essentially condensed into one stack:
API Process – Handles all the API interactions.
N Worker Processes – Handle all data processing,
One of the Worker Processes is called the leader Worker Process. (Not to be confused with the Leader Node.) This is responsible for writing configs to disk, in addition to data processing.
So here, the API Process handles the same responsibilities as a Leader Node’s API Process, while the Worker Processes correspond to the Worker Nodes’ Worker Processes. The exception is that one Worker Process does double duty, also filling in for one of the Leader Node’s Config Helpers.
System Requirements
Leader Node Requirements
OS:
Linux kernel >= 3.10 and glibc >= 2.17.
Example distributions: Ubuntu 16.04, Debian 9, RHEL 7, CentOS Linux 7, 8, or CentOS Stream 9, SUSE Linux Enterprise Server 12, Amazon Linux 2.
Tested so far on Ubuntu (14.04, 16.04, 18.04, and 20.04), CentOS 7.9, and Amazon Linux 2.
System:
- 1 GHz (or faster), 64-bit CPU.
- 4+ physical cores, 8 GB+ RAM – all beyond your basic OS/VM requirements.
- 5 GB free disk space.
Git:
gitmust be available on the Leader Node. See details below.Browser Support: The five most-recent versions of Chrome, Firefox, Safari, and Microsoft Edge.
We assume that 1 physical core is equivalent to 2 virtual/hyperthreaded CPUs (vCPUs). All quantities listed above are minimum requirements.
We recommend deploying the Leader on stable, highly available infrastructure, because of its role in coordinating all Worker instances.
Worker Node Requirements
See Single-Instance Deployment for requirements. (That page also covers options for enabling a Leader and Workers to automatically start on boot – including how to persist privileged port access on systemd and initd.)
See Sizing and Scaling for capacity planning details.
Port Requirements
During installation of any Leader or Worker instance, firewalls on that instance’s host must enable outbound communication to https://cdn.cribl.io on port 443.
Other ports must remain open continuously for a Distributed deployment to function.
If any of this traffic must go through a proxy – except for cluster communication, which can’t be proxied – see System Proxy Configuration for configuration details.
FIPS Mode Requirements
Federal Information Processing Standards FIPS is a set of US government standards and guidelines for information security. You can deploy Cribl Stream in FIPS mode. This mainly restricts the cryptographic algorithms used within Cribl Stream, and also enforces stricter password requirements.
See the FIPS Mode topic for system and password requirements, and instructions running in FIPS mode.
Installing on Linux
See Single-Instance Deployment, as the installation procedures are identical.
Version Control with git
Cribl Stream requires git (version 1.8.3.1 or higher) to be available locally on the host where the Leader Node will run. Configuration changes must be committed to git before they’re deployed.
If you don’t have git installed, check here for details on how to get started.
The Leader node uses git to:
- Manage configuration versions across Worker Groups.
- Provide users with an audit trail of all configuration changes.
- Allow users to display diffs between current and previous config versions.
Setting Up Leader and Worker Nodes
This section covers:
Configuring a Leader Node
You can configure a Leader Node through the UI, through the instance.yml config file, or through the command line.
Using the UI
At Settings > Distributed Settings > General Settings, select Mode: Leader.
Next, on the Leader Settings left tab, confirm or enter the required Leader settings (Address and Port). Customize the optional settings if desired. Then click Save to restart.
In Cribl Stream 4.0.3 and above, if you later configure Leader High Availability/Failover, further Distributed Settings changes will be locked in each Leader’s UI. You can still update distributed settings by modifying configuration files, as outlined on the page linked above.
UI Access (Teleporting)
This useful option enables you to click through from the Leader’s Manage Worker Nodes page to an authenticated view of each Worker’s UI. The instructions below correspond to enabling the groups.yml file’s workerRemoteAccess configuration key.
To enable (remote) UI access to Workers from the Leader’s UI:
From Cribl Stream’s top nav, click Manage > Groups.
On the Groups tab: For each desired Worker Group, toggle UI Access to
On.

On Cribl.Cloud, the Groups page adds extra columns. You’ll see each Group’s Worker type (hybrid versus Cloud/Cribl-managed) and, for Cloud Groups, the anticipated ingress rate and Provisioned status. For details, see Cribl.Cloud Worker Groups.
Select the Workers tab.
On the Manage Workers page: Click the link for any Worker you want to inspect.
To confirm that you are remotely viewing a Worker’s UI, Stream will add a magenta border, with a badge labeled Viewing host: <host/GUID>.
At the upper right, you can click Restart to restart the Worker, or click the X close button to return to the Manage Workers page. Note that any changes you make here will not be propagated to the Leader.

Any changes that you make here will not be propagated to the Leader.
Prior to Cribl Stream 3.4, Worker UI access was a global setting per deployment. If you upgrade from a pre-3.4. version to v.3.4 or higher, regardless of your prior configuration, (Remote) UI access will initially be set to
Nofor all Worker Groups. Re-enable access for each desired Group, as shown above.
Using YAML Config File
In $CRIBL_HOME/local/_system/instance.yml, under the distributed section, set mode to master:
distributed:
mode: master
master:
host: <IP or 0.0.0.0>
port: 4200
tls:
disabled: true
ipWhitelistRegex: /.*/
authToken: <auth token>
enabledWorkerRemoteAccess: false
compression: none
connectionTimeout: 5000
writeTimeout: 10000Using the Command Line
You can configure a Leader Node using a CLI command of this form:
./cribl mode-master [options] [args]
For all options, see the CLI Reference.
Auth Token
When you configure a node to work as the Leader, switching from a Single-instance to a Distributed mode, Cribl Stream generates a random auth token.
Configuring a Worker Node
On each Cribl Stream instance you designate as a Worker Node, you can configure the Worker through the UI, the instance.yml config file, environment variables, or the command line.
Temporary License Restriction on Worker Node Startup
When you first start a Worker Node, logs might warn about a limit on Worker Processes:
{
  "time": "2023-02-10T15:11:48.609Z",
  "cid": "api",
  "channel": "cribl",
  "level": "warn",
  "message": "number of worker processes has been limited by the license",
  "requested": 14,
  "licenseLimit": 10,
  "source": "cribl.log"
}Workers use the default license when they first start up, so a log entry like this one is expected. Once the worker checks with the Leader and gets a production license, the limit on Worker processes is lifted. You can ignore this message.
Using the UI
At Settings > Global Settings > Distributed Settings > General Settings, select Mode: Managed Worker (managed by Leader).
Next, on the Leader Settings left tab, confirm or enter the required Address (e.g., criblleader.mycompany.com). Customize the optional settings if desired. Then click Save to restart.
If you need to customize the Leader’s port (from its default
4200), you can do so via the CLI’s mode‑worker command.
Using YAML Config File
In $CRIBL_HOME/local/_system/instance.yml, under the distributed section, set mode to worker:
distributed:
  mode: worker
  envRegex: /^CRIBL_/
  master:
    host: <master address>
    port: 4200
    authToken: <token here>
    compression: none
    tls:
      disabled: true
    connectionTimeout: 5000
    writeTimeout: 10000
  tags:
       - tag1
       - tag2
       - tag42
group: teamstersUsing Environment Variables
You can configure Worker Nodes via environment variables, as in this example:
+CRIBL_DIST_MASTER_URL=tcp://${CRIBL_DIST_TOKEN:-criblmaster}@masterHostname:4200 ./cribl start
See the Environment Variables section for more details.
Using the Command Line
You can configure a Worker Node using CLI commands of this form:
./cribl mode-worker -H <master-hostname-or-IP> -p <port> [options] [args]The -H and -p parameters are required. For other options, see the CLI Reference. Here is an example command:
./cribl mode-worker -H 192.0.2.1 -p 4200 -u myAuthTokenCribl Stream will need to restart after this command is issued.
Troubleshooting Resources
Cribl University offers a Troubleshooting Criblet on Attaching Workers to Leaders. To follow the direct course link, first log into your Cribl University account. (To create an account, click the Sign up link. You’ll need to click through a short Terms & Conditions presentation, with chill music, before proceeding to courses – but Cribl’s training is always free of charge.) Once logged in, check out other useful Troubleshooting Criblets and Advanced Troubleshooting short courses.
Persisting Socket Connections
A distributed deployment creates socket files for inter-process communication (IPC) between the Leader and distributed processes and services. These sockets are essential for ensuring that Workers successfully connect to the Leader, and for certain metrics services. On the Leader’s host, the default location for these files is the operating system’s temp directory (e.g., /tmp).
Many Linux distros maintain a system cleaner service (e.g., systemd-tmpfiles) that removes files from this directory periodically, such as every 10 days. If Cribl’s sockets are removed, this breaks certain UI pages, such as Monitoring. You can protect the sockets in either of two ways.
Block the Cleaner
Stop the host OS from cleaning socket files out of /tmp/cribl-* subdirectories. For example, on Amazon Linux 2 instances, add a new tmp.conf file to /etc/tmpfiles.d with the line: X /tmp/cribl-*.
To restart the system cleaner here and reload its configuration, use this command:systemctl restart systemd-tmpfiles-clean.service
Then restart the Cribl server, via the UI or command line.
Move the Sockets
Alternatively, you can move Cribl’s socket files to a different directory. This directory must be relatively close to the root; and the Cribl admin must have user permissions to write to it. As one example of a protected directory, you could specify: /var/tmp
In the UI, you specify the directory at Settings > Global Settings > System > Distributed Settings > Leader Settings > Helper processes socket dir.
Menu Changes in Distributed Mode
Compared to a single-instance deployment, deploying in distributed mode changes Cribl Stream’s menu structure in a few ways, enabling you to manage Workers and their assignments.

To access the Group-specific top nav shown above, click Manage, then click the Workers tab. On the Manage Workers page click into your desired Worker Group. This contextual top nav also adds a Settings tab, through which you can manage configuration per Worker Group.
For comparison, here is a single-instance deployment’s Home page:

Commit and Deploy Controls
Distributed mode adds a second set of (Group-specific) Commit and Deploy buttons at the upper right. The division of labor between these version-control buttons versus the global Commit button (on the top nav’s Global Config dialog) is:
The upper-right buttons commit and deploy configurations for the currently selected Worker Group/Fleet.
The top nav’s Commit button commits configurations for all Groups/Fleets, and for the Leader itself – but does not deploy the new configs to Groups/Fleets.
These controls will appear slightly differently depending on whether you have changes committed but not yet deployed, and on whether you’ve enabled the Collapse actions setting.

Distributed mode’s repositioning of navigation/menu links also applies to several instructions and screenshots that you’ll see throughout this documentation.
Where procedures are written around a single-instance scenario, just click into your appropriate Group to access the corresponding navigation links.
Managing Worker Nodes
To manage Worker Nodes, click the Manage tab in the top nav. This opens the Groups landing page with these upper tabs: Groups, Workers, and Mappings. (With a paid license, you will also see a Notifications tab to their right.)
Workers Tab
The Workers tab provides status information for each Worker Node in the selected Worker Group. An Auto-refresh toggle (on by default) ensures that the Config Version icon automatically refreshes when you commit or deploy. Clicking the toggle initiates a refresh of this UI.
This option appears only in Worker Groups that contain fewer than 100 Worker Nodes. It is available in Cribl Stream beginning with v.4.4.4.
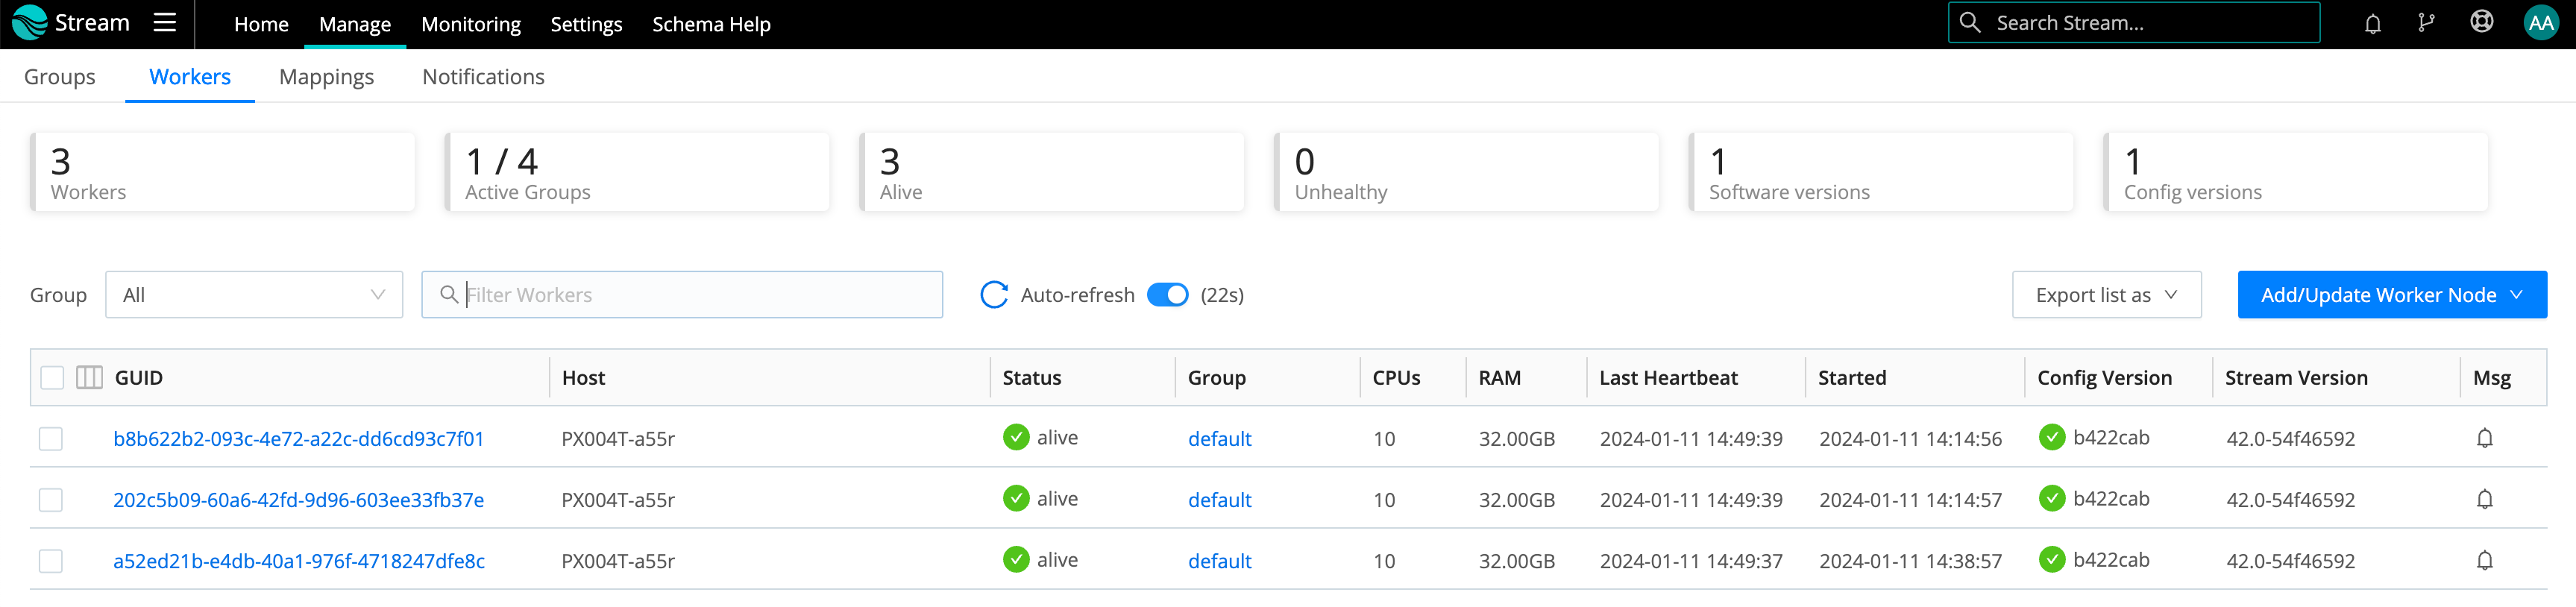
If you see unexpected results here, keep in mind that:
- Workers that miss 5 heartbeats, or whose connections have closed for more than 30 seconds, will be removed from the list.
- For a newly created Worker Group, the Config Version column can show an indefinitely spinning progress spinner for that Group’s Workers. This happens because the Workers are polling for a config bundle that has not yet been deployed. To resolve this, click the Deploy option to force a deploy.
To export the list of Worker Nodes, click the Export list as drop-down.
Select JSON or CSV as the export file format. If a list has any filters
applied, the exported list will also be filtered. To export an entire list,
remove any applied filters.
To reveal more details about a Worker Node, click anywhere on its row.

Mappings Tab
Click the Mappings tab to display status and controls for the active Mapping Ruleset:

Click into a Ruleset to manage and preview its contained Rules:

How Workers and Leader Work Together
The Leader Node has two primary roles:
Serves as a central location for Workers’ operational metrics. The Leader ships with a monitoring console that has a number of dashboards, covering almost every operational aspect of the deployment.
Serves as a central location for authoring, validating, deploying, and synchronizing configurations across Worker Groups.

Network Port Requirements (Defaults)
- UI access to Leader Node: TCP 9000.
- Worker Node to Leader Node: TCP 4200. Used for Heartbeat/Metrics/Leader requests/notifications to clients (for example: live captures, teleporting, status updates, config bundle notifications, and so on).
- Worker Node to Leader Node: HTTPS 4200. Used for config bundle downloads.
Leader/Worker Node Communication
Workers will periodically (every 10 seconds) send a heartbeat to the Leader. This heartbeat includes information about themselves, and a set of current system metrics. The heartbeat payload includes facts – such as hostname, IP address, GUID, tags, environment variables, current software/configuration version, etc. – that the Leader tracks with the connection.
A Worker Node’s failure to successfully send two consecutive heartbeat messages to the Leader will cause the respective Worker to be removed from the Workers page in the Leader’s UI, until the Leader again receives a heartbeat message from the affected Worker.
When a Worker Node checks in with the Leader:
- The Worker sends heartbeat to Leader.
- The Leader uses the Worker’s configuration, tags (if any), and Mapping Rules to map it to a Worker Group.
- The Worker Node pulls its Group’s updated configuration bundle, if necessary.
Safeguarding In-Flight Data When a Worker Node Fails
If a Worker Node goes down, it loses any data that it’s actively processing. With streaming senders (Push Sources), Cribl Stream normally handles that data only in-memory. So, to minimize the chance of data loss, configure persistent queues on Sources and/or Destinations that support it.
Leader/Worker Dependency
If the Leader goes down, Worker Groups can continue autonomously receiving and processing incoming data from most Sources. They can also continue executing Collection tasks already in process.
However, if the Leader fails, future scheduled Collection jobs will also fail. So will data collection on the Amazon Kinesis Streams, Prometheus Scraper, and all Office 365 Sources – which function as Collectors under the hood.
Config Bundle Management
Config bundles are compressed archives of all config files and associated data that a Worker needs to operate. The Leader creates bundles upon Deploy, and manages them as follows:
- Bundles are wiped clean on startup.
- While running, at most 5 bundles per group are kept.
- Bundle cleanup is invoked when a new bundle is created.
The Worker pulls bundles from the Leader and manages them as follows:
- Last 5 bundles and backup files are kept.
- At any point in time, all files created in the last 10 minutes are kept.
- Bundle cleanup is invoked after a reconfigure.
Bundle in S3
You can store bundles in an AWS S3 bucket to reduce the Leader load. This offloads bundle distribution from the Leader to your designated S3 bucket. Worker and Edge Nodes will pull bundles directly from S3, minimizing Leader strain.
You can configure bundling in S3 through the following ways:
- UI: When configuring Leader Settings on a Leader Node, specify an S3 bucket (format:
s3://${bucket}) for remote bundle storage in the S3 Bundle Bucket URL field. - YAML: In the
instance.ymlconfig file, specify the S3 bucket inmaster.configBundles.remoteUrl. - Environment Variable: Use the
CRIBL_DIST_LEADER_BUNDLE_URLenvironment variable.
Worker Groups
Worker Groups facilitate authoring and management of configuration settings for a particular set of Workers. To create a new Worker Group, click the top nav’s Manage tab, then make sure the submenu’s Groups tab is selected. From the resulting Groups tab, click Add Group.
For on-prem or Cribl.Cloud hybrid Groups, enter a unique Name and (optionally) a Description and Tags. You can Enable teleporting to Workers now or later (details here).
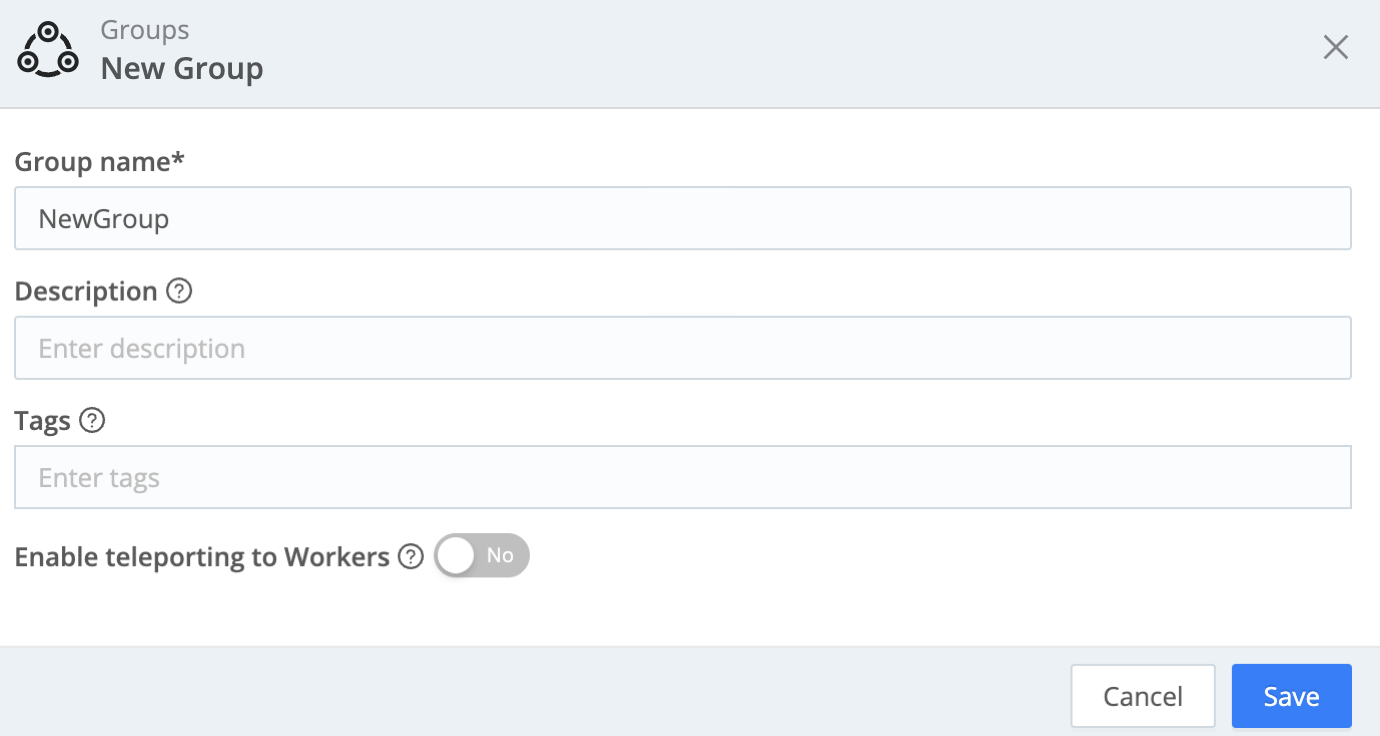
Configuring multiple Worker Groups, or configuring more than 10 Worker Processes, requires a Cribl Stream Enterprise or Standard license.
Cribl.Cloud Worker Groups
In Cribl Stream 4.1 and later, Cribl.Cloud supports multiple Groups of Cribl-managed (“Cloud”) Workers. (This expands earlier support for multiple Groups of hybrid Workers.) With this feature enabled – which requires an Enterprise plan – Cribl.Cloud’s New Group modal will provide additional controls.
Your first choice is to select either the Hybrid or the Cloud button. Selecting Cloud adds Anticipated data ingest rate and Provision infrastructure controls.
Because adding more Groups can require Cribl to provision more infrastructure for you, you must anticipate how many MB/sec of data the new Group will ingest. When you create the Group, you indicate this using the drop-down shown below. Cribl will provision corresponding capacity, assuming a 1:2 ingest:egress ratio.
For general guidance about capacity required for your deployment, see our Planning and Sizing topics.

Controlling Costs
Cribl will draw down your Cribl.Cloud credits to cover the base cost of maintaining the infrastructure, as well as your normal cost for ingested data. However, you can manage your costs. One way is to set the Anticipated data ingest rate to its minimum 12 MB/sec value. This will provision the minimum 2 Workers for this Group.
For the greatest savings, you can set Provision infrastructure to its No default. You can do so either when creating your Group, or at any later time when you are ingesting no data. With this setting, the Group will go dormant, and your base infrastructure cost for this Group will be 0. In this state, the Group will contain no Workers and will ingest no data. But Stream will retain its configuration, enabling you to easily reprovision it when needed.
Provisioning and Managing Infrastructure
If you set Provision Infrastructure to Yes, the infrastructure will be provisioned about 30 minutes later. You will receive an in-portal notification confirming the change. The new Group will then process data according to youre new configuration, until you request a new infrastructure change.
You can change all these selections at any later time from the Manage > Groups page. As shown below, to change a Group’s anticipated ingest rate, click the ••• (Options) menu on its row. and select Edit Group.
You can also disable the Group here by using the toggle on its row. This will stop data flow, and will stop infrastructure and ingest charges, while preserving the Group’s configuration.

Configuring a Worker Group
To configure a newly created Group, select the top nav’s Manage tab, then select the Groups tab below that, and then click the Group’s name. This displays a submenu from which you can configure everything for this Group as if it were a Cribl Stream single instance – using a similar visual interface for Routes, Pipelines, Sources, Destinations, and Group-specific Settings.
Managing Worker Groups
On the Groups landing page’s right side, beside each Worker Group’s Configure and Commit and Deploy buttons, an ••• (Options) menu provides selections to clone Worker Groups’ configurations to new Groups, or to delete Groups.
The Clone option copies everything configured on the original Group: Sources, Pipelines, Packs, Routes, and Destinations.

Can’t Log into the Worker Node as Admin User?
To explicitly set passwords for Worker Groups, see User Authentication.
Recovering a Worker Group
If you delete a Worker Group, you lose the context required to access the Version Control menu. As a result, you also lose the option to recover the Worker Group before it was deleted.
You can recover a deleted Worker Group, using one of the following two methods:
Creating a New Worker Group with the Same Name
- Create a new Worker Group with the same name as the one that was deleted. This action will restore the deleted Worker Group to the system.
- Select a previous version of the deleted Worker Group from the Version Control menu if you previously committed the deletion of your Worker Group.
If you did not previously commit the deletion of your Worker Group, the system will automatically restore it.
Temporarily Stopping the Cribl Server
- Stop the Cribl server.
- Identify the last commit before the Worker Group was deleted.
- Revert to that commit.
- Restart the Cribl server.
Mapping Workers to Worker Groups
Mapping Rulesets are used to map Workers to Worker Groups. Within a ruleset, a list of rules evaluate Filter expressions on the information that Workers send to the Leader.
Only one Mapping Ruleset can be active at any one time, although a ruleset can contain multiple rules. At least one Worker Group should be defined and present in the system.
The ruleset behavior is similar to Routes, where the order matters, and the Filter section supports full JavaScript expressions. The ruleset matching strategy is first-match, and one Worker can belong to only one Worker Group.
Creating a Mapping Ruleset
To create a Mapping Ruleset, click the top nav’s Manage tab, then click the submenu’s Mappings tab. Click Add Ruleset, assign a unique ID in the resulting New Ruleset modal, and click Save.
The Mappings link appears only when you have started Cribl Stream with Settings > Global Settings > Distributed Settings > Mode set to Leader.
On the resulting Manage Mapping Rulesets page, click your new ruleset’s Configure button, and start adding rules by clicking on Add Rule. While you build and refine rules, the Preview in the right pane will show which currently reporting and tracked workers map to which Worker Groups.
A ruleset must be activated before it can be used by the Leader. To activate it, go to Mappings and click Activate on the required ruleset. The Activate button will then change to an Active toggle. Using the adjacent buttons, you can also Configure or Delete a ruleset, or Clone a ruleset if you’d like to work on it offline, test different filters, etc.
Although not required, Workers can be configured to send a Group with their payload. See below how this ranks in mapping priority.
Add a Mapping Rule – Example
Within a Mapping Ruleset, click Add Rule to define a new rule. Assume that you want to define a rule for all hosts that satisfy this set of conditions:
- IP address starts with
10.10.42, AND: - More than 6 CPUs OR
CRIBL_HOMEenvironment variable containsw0, AND: - Belongs to
Group420.
Rule Configuration
- Rule Name:
myFirstRule - Filter:
(conn_ip.startsWith('10.10.42.') && cpus > 6) || env.CRIBL_HOME.match('w0') - Group:
Group420
Default Worker Group and Mapping
When a Cribl Stream instance runs as Leader, the following are created automatically:
- A
defaultWorker Group. - A
defaultMapping Ruleset,- with a
defaultRule matching all (true).
- with a
Mapping Order of Priority
Priority for mapping to a group is as follows: Mapping Rules > Group sent by Worker > default Group.
- If a Filter matches, use that Group.
- Else, if a Worker has a Group defined, use that.
- Else, map to the
defaultGroup.
Deploying Configurations
Your typical workflow for deploying Cribl Stream configurations is the following:
- Work on configs.
- Save your changes.
- Commit (and optionally push).
- Deploy.
Deployment is the last step after configuration changes have been saved and committed. Deploying here means propagating updated configs to Workers. You deploy new configurations at the Group level: Locate your desired Group and click on Deploy. Workers that belong to the group will start pulling updated configurations on their next check-in with the Leader.
Can’t Log into the Worker Node as Admin User?
When a Worker Node pulls its first configs, the admin password will be randomized, unless specifically changed. This means that users won’t be able to log in on the Worker Node with default credentials. For details, see User Authentication.
Configuration Files
On the Leader, a Worker Group’s configuration lives under:
$CRIBL_HOME/groups/<groupName>/local/cribl/.
On the managed Worker, after configs have been pulled, they’re extracted under: $CRIBL_HOME/local/cribl/.
Lookup Files
On the Leader, a Group’s lookup files live under: $CRIBL_HOME/groups/<groupName>/data/lookups.
On the managed Worker, after configs have been pulled, lookups are extracted under: $CRIBL_HOME/data/lookups. When deployed via the Leader, lookup files are distributed to Workers as part of a configuration deployment.
If you want your lookup files to be part of the Cribl Stream configuration’s version control process, we recommended deploying using the Leader Node. Otherwise, you can update your lookup file out-of-band on the individual Workers. The latter is especially useful for larger lookup files ( > 10 MB, for example), or for lookup files maintained using some other mechanism, or for lookup files that are updated frequently.
For other options, see Managing Large Lookups.
Some configuration changes will require restarts, while many others require only reloads. See here for details.
Restarts/reloads of each Worker Process are handled automatically by the Worker. Note that individual Worker Nodes might temporarily disappear from the Leader’s Workers tab while restarting.
Worker Process Rolling Restart
During a restart, to minimize ingestion disruption and increase availability of network ports, Worker Processes on a Worker Node are restarted in a rolling fashion. 20% of running processes – with a minimum of one process – are restarted at a time. A Worker Process must come up and report as started before the next one is restarted. This rolling restart continues until all processes have restarted. If a Worker Process fails to restart, configurations will be rolled back.
Auto-Scaling Workers and Load-Balancing Incoming Data
If data flows in via Load Balancers, make sure to register all instances. Each Cribl Stream Node exposes a health endpoint that your Load Balancer can check to make a data/connection routing decision.
| Health Check Endpoint | Healthy Response |
|---|---|
curl http://<host>:<port>/api/v1/health | {"status":"healthy"} |
Environment Variables
CRIBL_DIST_MASTER_URL– URL of the Leader Node. Format:<tls|tcp>://<authToken>@host:port?group=defaultGroup&tag=tag1&tag=tag2&tls.<tls-settings below>.Example:
CRIBL_DIST_MASTER_URL=tls://<authToken>@leader:4200group– The preferred Worker Group assignment.resiliency– The preferred Leader failover mode.volume– The location of the NFS directory to support Leader failover.tag– A list of tags that you can use to assign the Worker to a Worker Group.tls.privKeyPath– Private Key Path.tls.passphrase– Key Passphrase.tls.caPath– CA Certificate Path.tls.certPath– Certificate Path.tls.rejectUnauthorized– Validate Client Certs. Boolean, defaults tofalse.tls.requestCert– Authenticate Client (mutual auth). Boolean, defaults tofalse.tls.commonNameRegex– Regex matching peer certificate > subject > common names allowed to connect. Used only iftls.requestCertis set totrue.
When you include an auth token in CRIBL_DIST_MASTER_URL to deploy managed Cribl Stream or Edge Nodes, it can include only alphanumeric characters or the underscore (_). Do not include <, >, ", `, \r, \n, \t, {, }, |, \, ^, or '.
CRIBL_DIST_MODE–worker | master. Defaults toworker, if and only ifCRIBL_DIST_MASTER_URLis present.CRIBL_HOME– Auto setup on startup. Defaults to parent ofbindirectory.CRIBL_CONF_DIR– Auto setup on startup. Defaults to parent ofbindirectory.CRIBL_NOAUTH– Disables authentication. Careful here!!CRIBL_DIST_LEADER_BUNDLE_URL– AWS S3 bucket (format:s3://${bucket}) for remote bundle storage.CRIBL_TMP_DIR– Defines the root of a temporary directory.Sources use this variable to construct temporary directories in which to stage downloaded Parquet data. if
CRIBL_TMP_DIRis not set (the default), Cribl applications create subdirectories within your operating system’s default temporary directory:- For Cribl Stream:
<OS_default_temporary_directory>/stream/. - For Cribl Edge:
<OS_default_temporary_directory>/edge/.
For example, on Linux, Stream’s default staging directory would be
/tmp/stream/.If you explicitly set this
CRIBL_TMP_DIRenvironment variable, its value replaces this OS-specific default parent directory.- For Cribl Stream:
CRIBL_VOLUME_DIR– Sets a directory that persists modified data between different containers or ephemeral instances. When set,CRIBL_VOLUME_DIRoverrides$CRIBL_HOME. It also creates predefined folders in the specified directory. If that directory already contains folders with those names, they will be overwritten.CRIBL_DIST_WORKER_PROXY- Communicate to the Leader Node via a SOCKS proxy. Format:<socks4|socks5>://<username>:<password>@<host>:<port>. Only<host>:<port>are required.The default protocol is
socks5://, but you can specifysocks4://proxyhost:portif needed.To authenticate on a SOCKS4 proxy with username and password, use this format:
username:password@proxyhost:port. Theproxyhostcan be ahostname,ip4, orip6.See GitOps for a separate list of GitOps-oriented environment variables.
Deprecated Variables
These were removed as of LogStream 3.0:
CRIBL_CONFIG_LOCATION.CRIBL_SCRIPTS_LOCATION.
Workers GUID
When you install and first run the software, Cribl Stream generates a GUID which it stores in a .dat file located in CRIBL_HOME/local/cribl/auth, e.g.:
$ cat /opt/cribl/local/cribl/auth/676f6174733432.dat
{"it":1647910738,"phf":0,"guid":"e0e48340-f961-4f50-956a-5153224b34e3","lics":["license-free-3.4.0-XYZ98765"]}When deploying Cribl Stream as part of a host image or VM, be sure to remove this file, so that you don’t end up with duplicate GUIDs. Cribl Stream will regenerate the file on the next run.
Host Info/Metadata
Cribl Stream can add a __metadata property to every event produced from every enabled Source. The Host Info tab displays the metadata collected for each Worker Node.
The metadata surfaced by an Worker Node can be used to:
- Enrich events (with an internal
__metadatafield). - Display metadata to users as a part of instance exploration.
You can customize the type of metadata collected at Group Settings > Limits > Metadata. Use the Event metadata sources drop-down list (and/or the Add source button) to add and select metadata sources.
In Cribl Stream mode, all the Event metadata sources are disabled by default.
The sources that you can select here include:
os: Reports details for the host OS and host machine, like OS version, kernel version, CPU and memory resources, hostname, network addresses, etc.cribl: Reports the Cribl Stream version, distributed mode, Workers (for managed instances), and config version.aws: Reports details on an EC2 instance, including the instance type, hostname, network addresses, tags, and IAM roles. For security reasons, we report only IAM role names.env: Reports environment variables.kube: Reports details on a Kubernetes environment, including the node, Pod, and container. For details, see __metadata.kube Property
When these metadata sources are enabled (and can get data), Cribl Stream will add the corresponding property to events, with a nested property for each enabled source.
Some metadata sources work only in configured environments. For example, the
awssource is available only when running on an AWS EC2 instance. Andkubeapplies only to on-prem deployments.If your security tools report denied outbound traffic to IP addresses like
169.254.169.168or169.254.169.254, you can suppress these by removingawsfrom the metadata sources described above. If you have a proxy setup, Cribl recommends adding these IP addresses to yourno_proxyenvironment variable.
__metadata.kube Property
For the __metadata.kube property (kube on the UI) to report details on a Kubernetes environment, Cribl Stream needs to figure out where it is running. Set the KUBE_K8S_POD environment variable to the name of the Pod in which Cribl Stream is running. At this point, the __metadata.kube property will have information to report on the node and pod properties.
If the /proc/self/cgroupis working, then the container property information will be available, too.
If you leave the
KUBE_K8S_PODenvironment variable unset, and/proc/self/cgroupis not working, then Cribl Stream will not know what Pod it is running in. This state has multiple implications:
- The
Kubernetes Metrics Source will be unable to identify whether or not it is in a DaemonSet. The result will be redundant metrics from each node in the cluster.
- The Kubernetes Metadata collector will not add the
__metadata.kube property.- The