


Routes
Before incoming events are transformed by a processing Pipeline, Cribl Stream uses a set of filters to first select a subset of events to deliver to the correct Pipeline. This selection is normally made via Routes.
Don’t Need Routes?
Routes are designed to filter, clone, and cascade incoming data across a related set of Pipelines and Destinations. If all you need are independent connections that link parallel Source/Destination pairs, you can use Cribl Stream’s QuickConnect rapid visual configuration tool as an alternative to Routes.
Accessing Routes
To access Routes:
In the sidebar, select Worker Groups, then select a Worker Group.
On the Worker Groups submenu, select Routing, then Data Routes.
On a Single-instance deployment, select Routing straight from the Home submenu.
To configure a new Route, select Add Route.
How Do Routes Work
Routes apply filter expressions on incoming events to send matching results to the appropriate Pipeline or Pack. Filters are JavaScript-syntax-compatible expressions that are configured with each Route. Examples are:
truesource=='foo.log' && fieldA=='bar'
There can be multiple Routes in a Cribl Stream deployment, but each Route can be associated with only one processing Pipeline or Pack. (Sources and Destinations can also have their own attached pre-/post-processing Pipeline or Pack.)
Each Route must have a unique name. The Route Name field is case-sensitive, so entering the same characters with different capitalization will create a Route with a separate name.
Routes are evaluated in their display order, from the first Route in the list to the last. The configuration in the following screenshot means that events are evaluated first against the Route named speedtest, then against mtr, then against statsd, and so on. At the end, the default Route serves as a catch-all to explicitly route events that do not match any of the Route filters. We recommend always using a catch-all Route.
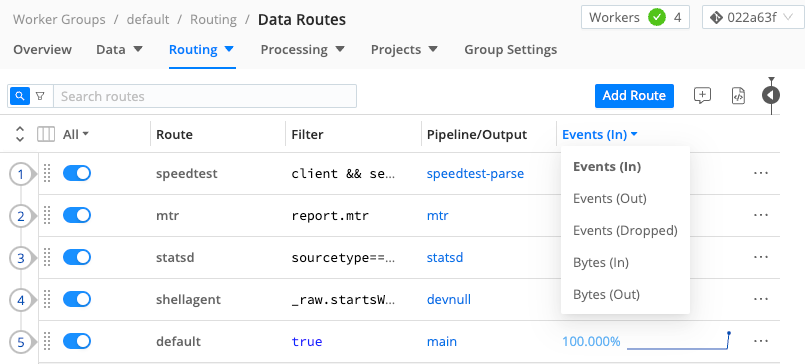
Use the drop-down menu for the Events (In) column to select whether the column displays Events In, Out, or Dropped or Bytes In or Out. The stats shown in this column are for the most recent 15 minutes.
Displayed percentages of Events or Bytes In and Out are by comparison to throughput or filtering across all Routes. For example, if you have four Routes that share an identical filter, each Route’s Events In might show approximately 25% of the total inbound traffic across all Routes.
Design data paths to move through as few Routes as possible. This usually means we want to reduce volume of events as early as possible. If most of the events being processed are sent to a Destination by the first Route, this will spare all the other Routes and Pipelines wasting processing cycles and testing against whether filter criteria are met.
Managing the Routes Page
To apply a Route before another, simply drag it vertically. Toggle Routes or or off inline, as necessary, to facilitate development and debugging.
You can press the ] (right-bracket) shortcut key to toggle between the Data Preview pane and the expanded Routes display shown above. (This works when no field has focus.)
Click a Route’s Options (•••) menu to display multiple options:
- Insert, group, move, copy, or delete Routes.
- Insert comments above or below Routes.
- Capture sample data through a selected Route.
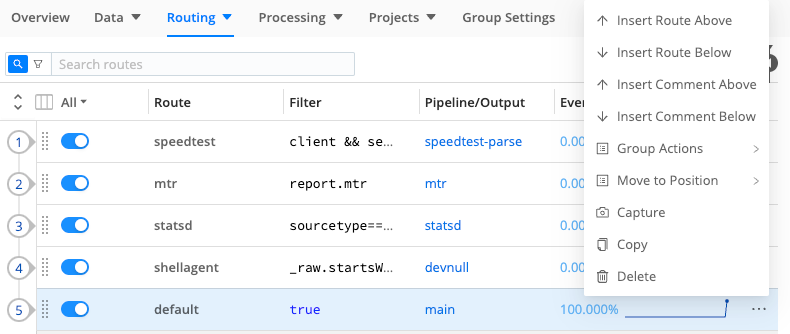
Copying a Route displays a confirmation message and adds a Paste button next to Add Route. Pasting creates an exact duplicate of the Route, with a warning indicator to change its duplicate name.
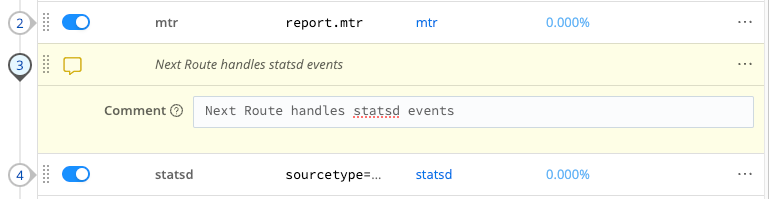
You can use comments to describe Routes’ purposes and/or interactions.
Destination
You can configure each Route to include a Destination to send events to, after they’re processed by the Pipeline or Pack.
If you toggle Enable Expression on, the Destination field changes to a Destination expression field. Here, you can enter a JavaScript expression that Cribl Stream will evaluate as the name of the Destination. Sample expression format: `myDest_${C.logStreamEnv}`. (This evaluation happens at Route construction time, not per event.)

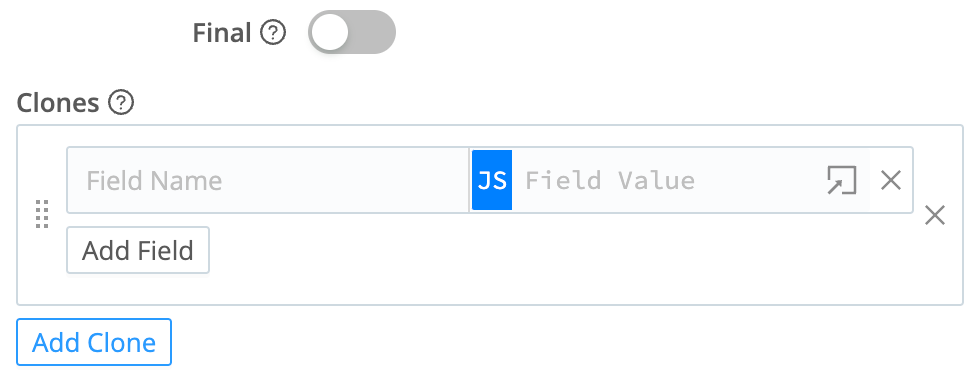
The Final Toggle
The Final toggle in Route settings controls what happens to an event after a Route-Pipeline pair matches it.
When Final is toggled on (default), the Route processes matched events and sends them to the appropriate Pipeline or Pack. Matched events do not continue to the next Route. Non-matched events do continue to the next Route.
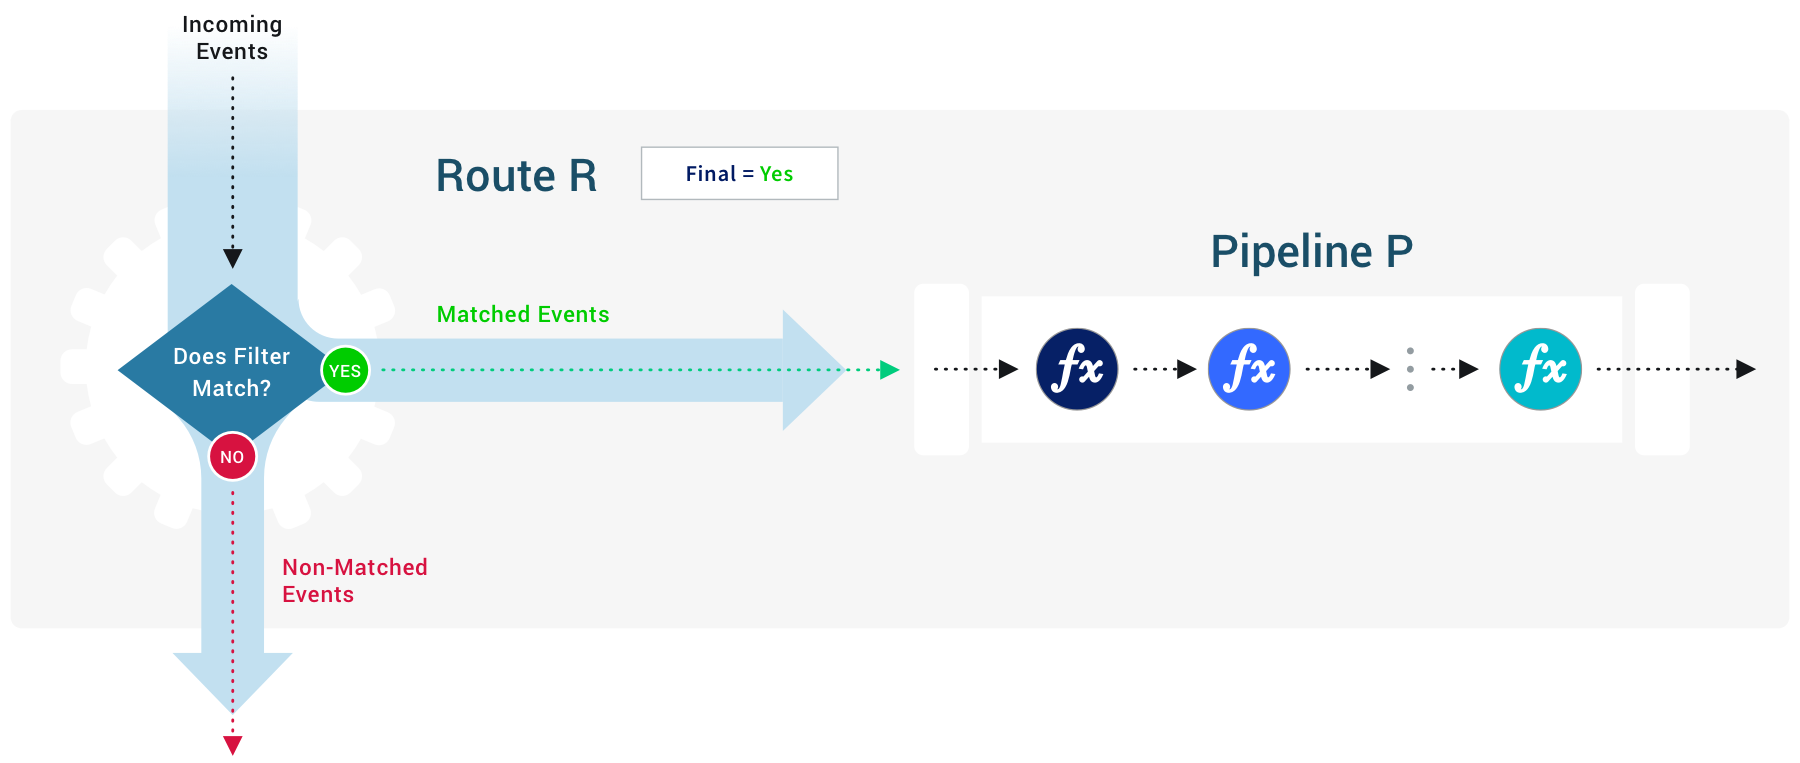
When Final is toggled off, the Route still processes matched events and sends them to a Pipeline or Pack. However, all events (matched and non-matched) continue to the next route.
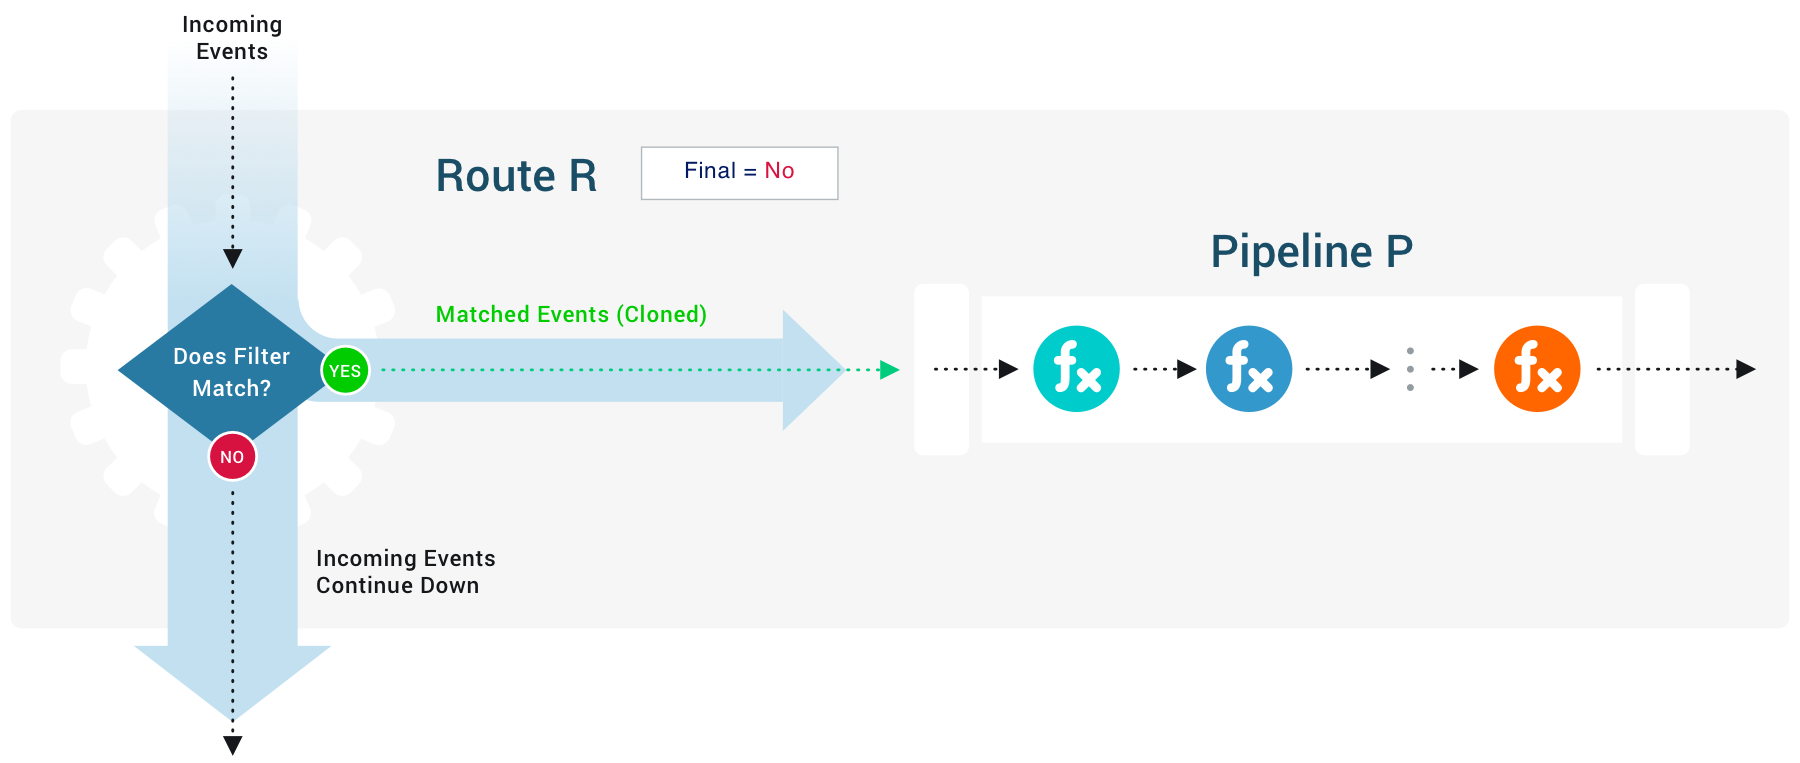
When you toggle Final off, the event sent to the current Route technically becomes a clone of the original event. The Add Clone button lets you add a fields - names and values - to the cloned events sent to this Route’s Pipeline.
Event Cloning Strategy
Depending on your cloning needs, you might want to follow a most-specific first or a most-general first processing strategy. The general goal is to minimize the number of filters/Routes an event gets evaluated against. For example:
If you don’t need to clone any events (that is, Final is toggled on everywhere), then it makes sense to start with the broadest expression at the top. This will consume as many events as early as possible.
If you need to clone a narrow set of events, then it might make sense to do that upfront. Then, follow it with a Route that consumes those clones immediately after.
Clone events as late as possible in the Routes. This will minimize the number of Functions acting on data, to the extent possible.
The endRoute Bumper
The endRoute bumper appears at the bottom of the Routing table. This is a reminder that, if no Route in the table has Final toggled on, events will continue to Cribl Stream’s configured Default Destination.
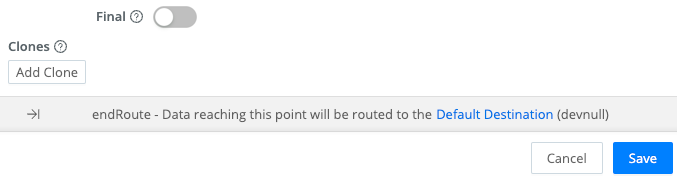
This is a backstop to ensure data flow. However, if that configured default is also configured as the Destination of a Route higher in the table, duplicate events will reach that Destination.
You can correct this either by toggling Final on for a Route or by changing the Default Destination. The bumper provides a link to the Default Destination’s config, and identifies the currently configured default in parentheses.
Route Groups
A Route Group is a collection of consecutive Routes that can be moved up and down the Route stack together. Groups help with managing long lists of Routes. They are a UI visualization only: While Routes are in a group, those Routes maintain their global position order.
Route groups work much like Function groups, offering similar UI controls and drag-and-drop options.
Unreachable Routes
Routes display an “unreachable” warning indicator (orange triangle) when data can’t reach them.
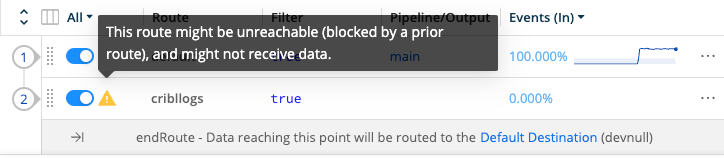
This condition will occur when, with your current configuration, any Route higher in the stack matches all three of these conditions:
- Previous Route is enabled.
- Previous Route’s Final toggle is on.
- Previous Route’s Filter expression evaluates to true, (for example,
true,1 === 1).
Note that the third condition above can be triggered intermittently by a randomizing method like Math.random(). This might be included in a previous Route’s own Filter expression, or in a Pipeline Function (such as one configured for random data sampling).
Routing with Output Router
Output Router Destinations offer another way to route data. These function as meta-Destinations, in that they allow you to send data to multiple peer Destinations based on rules. Rules are evaluated in order, top->down, with the first match being the winner.