




Create Search Datasets in Cribl Search
Add Search Datasets within your lakehouse engine, so you can group ingested data and control retention.
Highlights
- Search Datasets group data ingested into a lakehouse engine. They can be Log Datasets or
metricsDatasets.- You add Log Datasets and route logs into them with Log Dataset rules. Retention is 1 day to 10 years.
- Each engine provides one
metricsDataset, routed with Metric Dataset rules. Retention caps at 365 days.
Datasets: Search vs. Federated
A Dataset in Cribl Search is a named container that groups related data.
Federated Datasets reference your own storage, such as S3 or Azure Blob. Queries use your federated engine capacity to run searches “in place”, with no ingestion or indexing needed. For more on these, see Connect Cribl Search to External Data.
Search Datasets organize data ingested into Cribl-hosted lakehouse engines. They’re optimized for fast, schema-aware searches and AI workflows. Each Search Dataset stores either logs or metrics (not both). See Search Datasets: Logs vs. Metrics.
| Search Datasets | Federated Datasets | |
|---|---|---|
Best for | Fast search and AI workflows | Search-in-place without indexing |
| Hosted with | Cribl Search | Your external storage |
| Powered by | Lakehouse engines | Federated engine |

Search Datasets: Logs vs. Metrics
Cribl-hosted Search Datasets come in two flavors: logs or metrics.
Log Datasets hold parsed log events. You add Log Datasets yourself (except for the fallback main
Dataset), and route events into them using Log Dataset rules. A single Log Dataset can hold logs from
multiple Sources and of different Datatypes.
metrics Datasets hold metric time series. Cribl Search provides one metrics Dataset with
every lakehouse engine, and you route metrics into it with Metric Dataset rules. Datatypes
don’t apply, because Cribl Search stores every metric in the same time series shape.
| Log Datasets | metrics Datasets | |
|---|---|---|
| Holds | Log events | Metric time series |
| How many Datasets | As many as you need | One per engine |
| Created by | You (except main) | Cribl Search, with every engine |
| Routed with | Log Dataset rules | Metric Dataset rules |
| Datatypes | Yes | Not applicable |
| Retention | 1 day to 10 years | 1 to 365 days |
| Out-of-range timestamps | Reset to now() | Rejected |
| Accelerated fields | Yes | Not applicable |
The main Log Dataset
When you add your first lakehouse engine, Cribl Search creates main, a catch-all Log Dataset for unrouted events:
Events Sent to main | Value Set for _dataset_reason Field |
|---|---|
| Events that match no Log Dataset rule. | no_rules_matched |
| Events that match a rule pointing to a deleted or invalid Dataset (Orphaned data). | invalid_dataset_matched (<datasetId>) |
Events that arrive with a dataset field already set, pointing to an invalid Dataset. | invalid_dataset_provided |
If your events land in main unexpectedly, fix your Log Dataset rules to send them to the correct Log
Dataset instead.
You can change the retention period of your main Dataset, but you can’t delete it. If you delete a lakehouse engine
hosting main, you’ll need to pick another lakehouse engine to take over.
The metrics Dataset
Preview Feature
Cribl is still developing this Preview feature. We don’t recommend using it in a production environment, because the feature might not be fully tested or optimized for performance, and related documentation could be incomplete.
Please continue to submit feedback through normal Cribl support channels, but assistance might be limited while the feature remains in Preview.
Cribl Search auto-provisions a metrics Dataset for each lakehouse engine. Every Source that ingests metrics writes
into one of these Datasets, whichever one your Metric Dataset rules select.
- The first engine’s Dataset is named
metrics. Each additional engine gets a Dataset namedmetrics_<engine_id>. - The Dataset is built-in, so you can’t delete or rename it.
- The Dataset type is
cribl_searchand its provider ismetrics. - Retention runs from 1 to 365 days, and defaults to 365 days. You can change it in the Dataset configuration.
- You can control the expected time range of the Dataset with the Earliest expected timestamp and Latest expected timestamp settings. See Expected Time Range.
To review or configure the Dataset, on the Cribl.Cloud top bar select Products > Search > Data >
Datasets, then select the metrics Dataset.
Planning Your Log Datasets
Each Search Dataset auto-scales with the volume of data you route to it and the retention period you set.
Log Datasets keep data from 1 day to 10 years, and default to 1 year. After that, data is deleted.
Plan your Log Datasets ahead to estimate future storage costs. The right strategy depends on your use case, but start with this guidance.
Group logs by domain
Route firewall logs to one Log Dataset, auth logs to another, and so on. This lets you set
different retention periods per category, and scope searches precisely.
Set retention to match your investigation window
This way, you can keep the right events close, and store
long-term audit or archive data in Cribl Lake or other object storage for federated search.
Treat main as a fallback
The catch-all main Log Dataset prevents logs from being silently
lost. Treat it as a fallback mechanism, not target storage.
Estimate storage
Storage in a lakehouse engine is the amount of data retained in all of its Search Datasets over
time, measured after compression. Estimated compression ratio for logs is between 10:1 and 12:1.
The formula
below calculates estimated storage for a single Log Dataset, assuming a compression ratio of 10:1. To see how storage
translates to cost, see Cribl Search Pricing.
(Daily volume of logs routed to the Log Dataset / 10) × Days of retention = Estimated storageAdd Log Datasets
Create Log Datasets that you’ll later target with Dataset rules.
On the Cribl.Cloud top bar, select Products > Search > Data > Datasets > Add Dataset.
Under New Dataset, configure the following:
Setting Description Example ID Dataset ID, unique across your Cribl.Cloud Workspace.
Use letters (A-Z,a-z), numbers (0-9), hyphens, and underscores.
Max 512 characters.my_datasetDescription Describe your Dataset so others know what it’s for. Contains security logsTags When you have lots of Datasets, tags will help you organize them. security,logsSelect the Dataset type: Search Dataset.
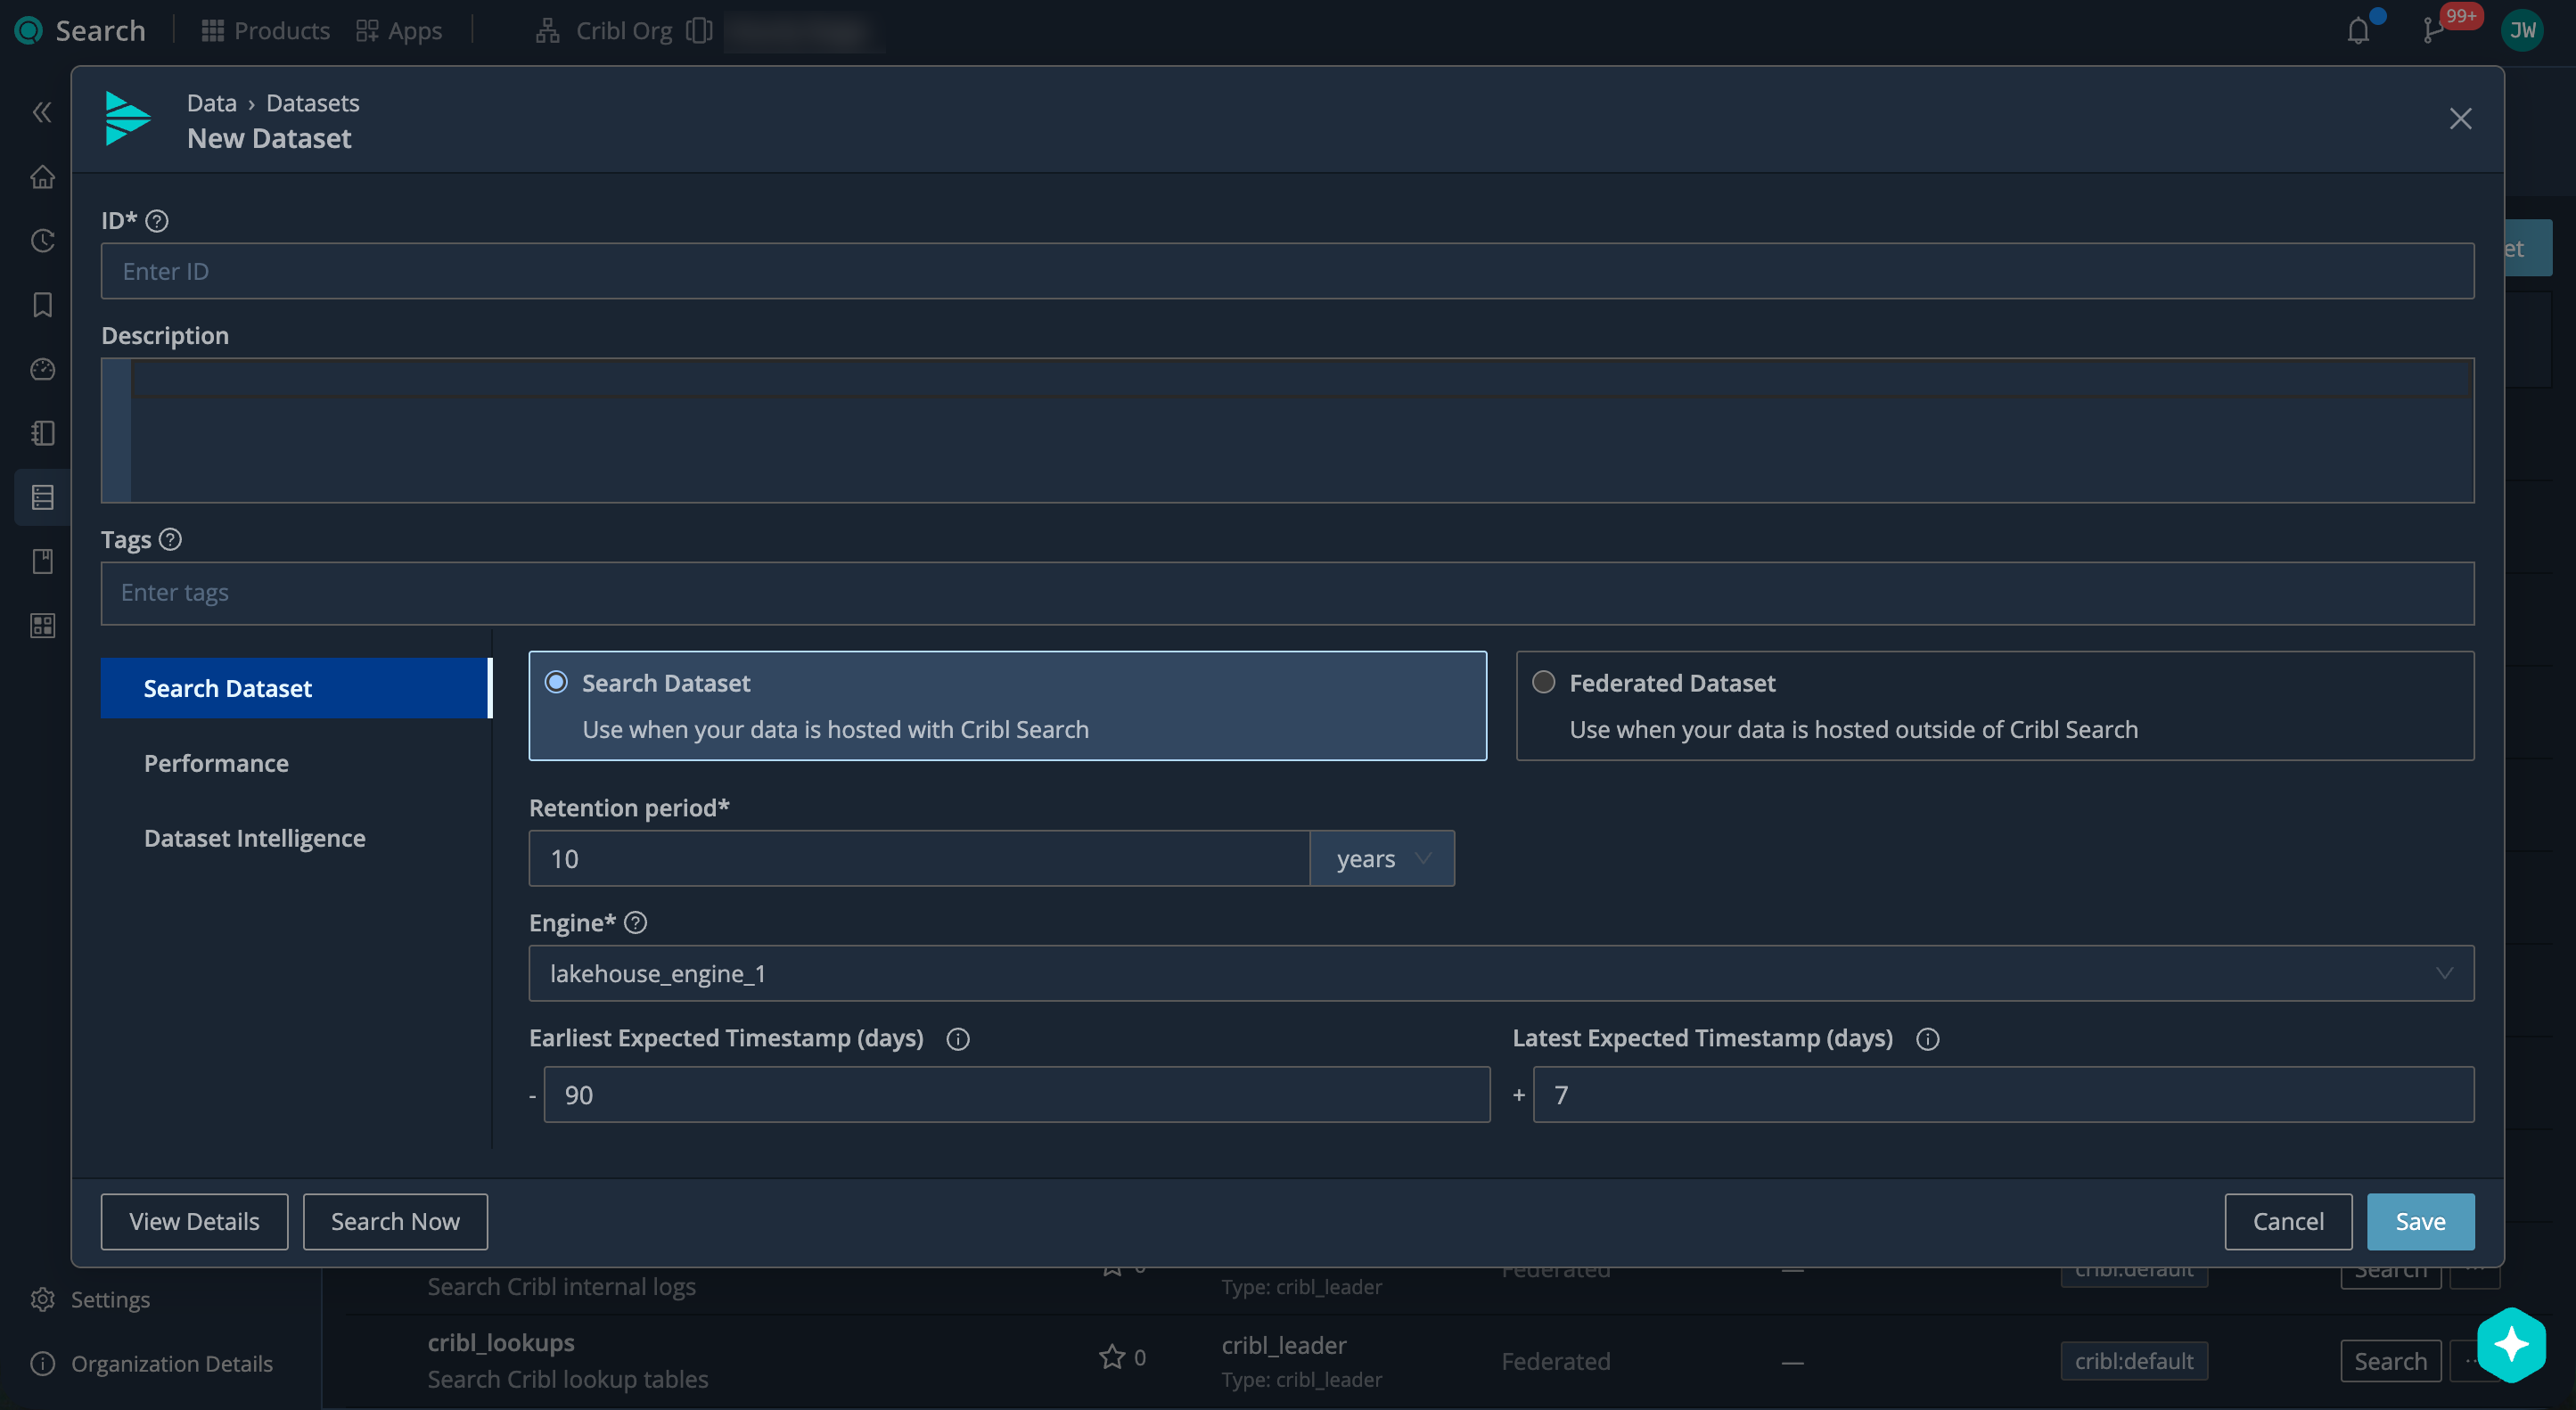
Add a new Search Dataset If you’re not seeing the Search Dataset option, wait till your first lakehouse engine is in Ready status.
Under Search Dataset, configure the following:
Setting Description Example Retention periodHow long to keep the data, from 1 day to 10 years.
See Planning Your Log Datasets.1 year(default)Engine Lakehouse engine that will store the Log Dataset. palo_alto_logsEarliest expected timestamp Lower bound for accepted timestamps. Enter as a relative time expression. Leave empty for no lower bound.
See Expected Time Range.-90dLatest expected timestamp Upper bound for accepted timestamps. Enter as a relative time expression, up to 7d.
See Expected Time Range.1d(default)To improve search performance and speed up search results, you can add accelerated fields to your Log Dataset.
Select Performance > Add Field, and enter the fields you search often.
We recommend no more than 15 fields. Accelerated fields come with additional ingest and index costs, so use them intentionally.
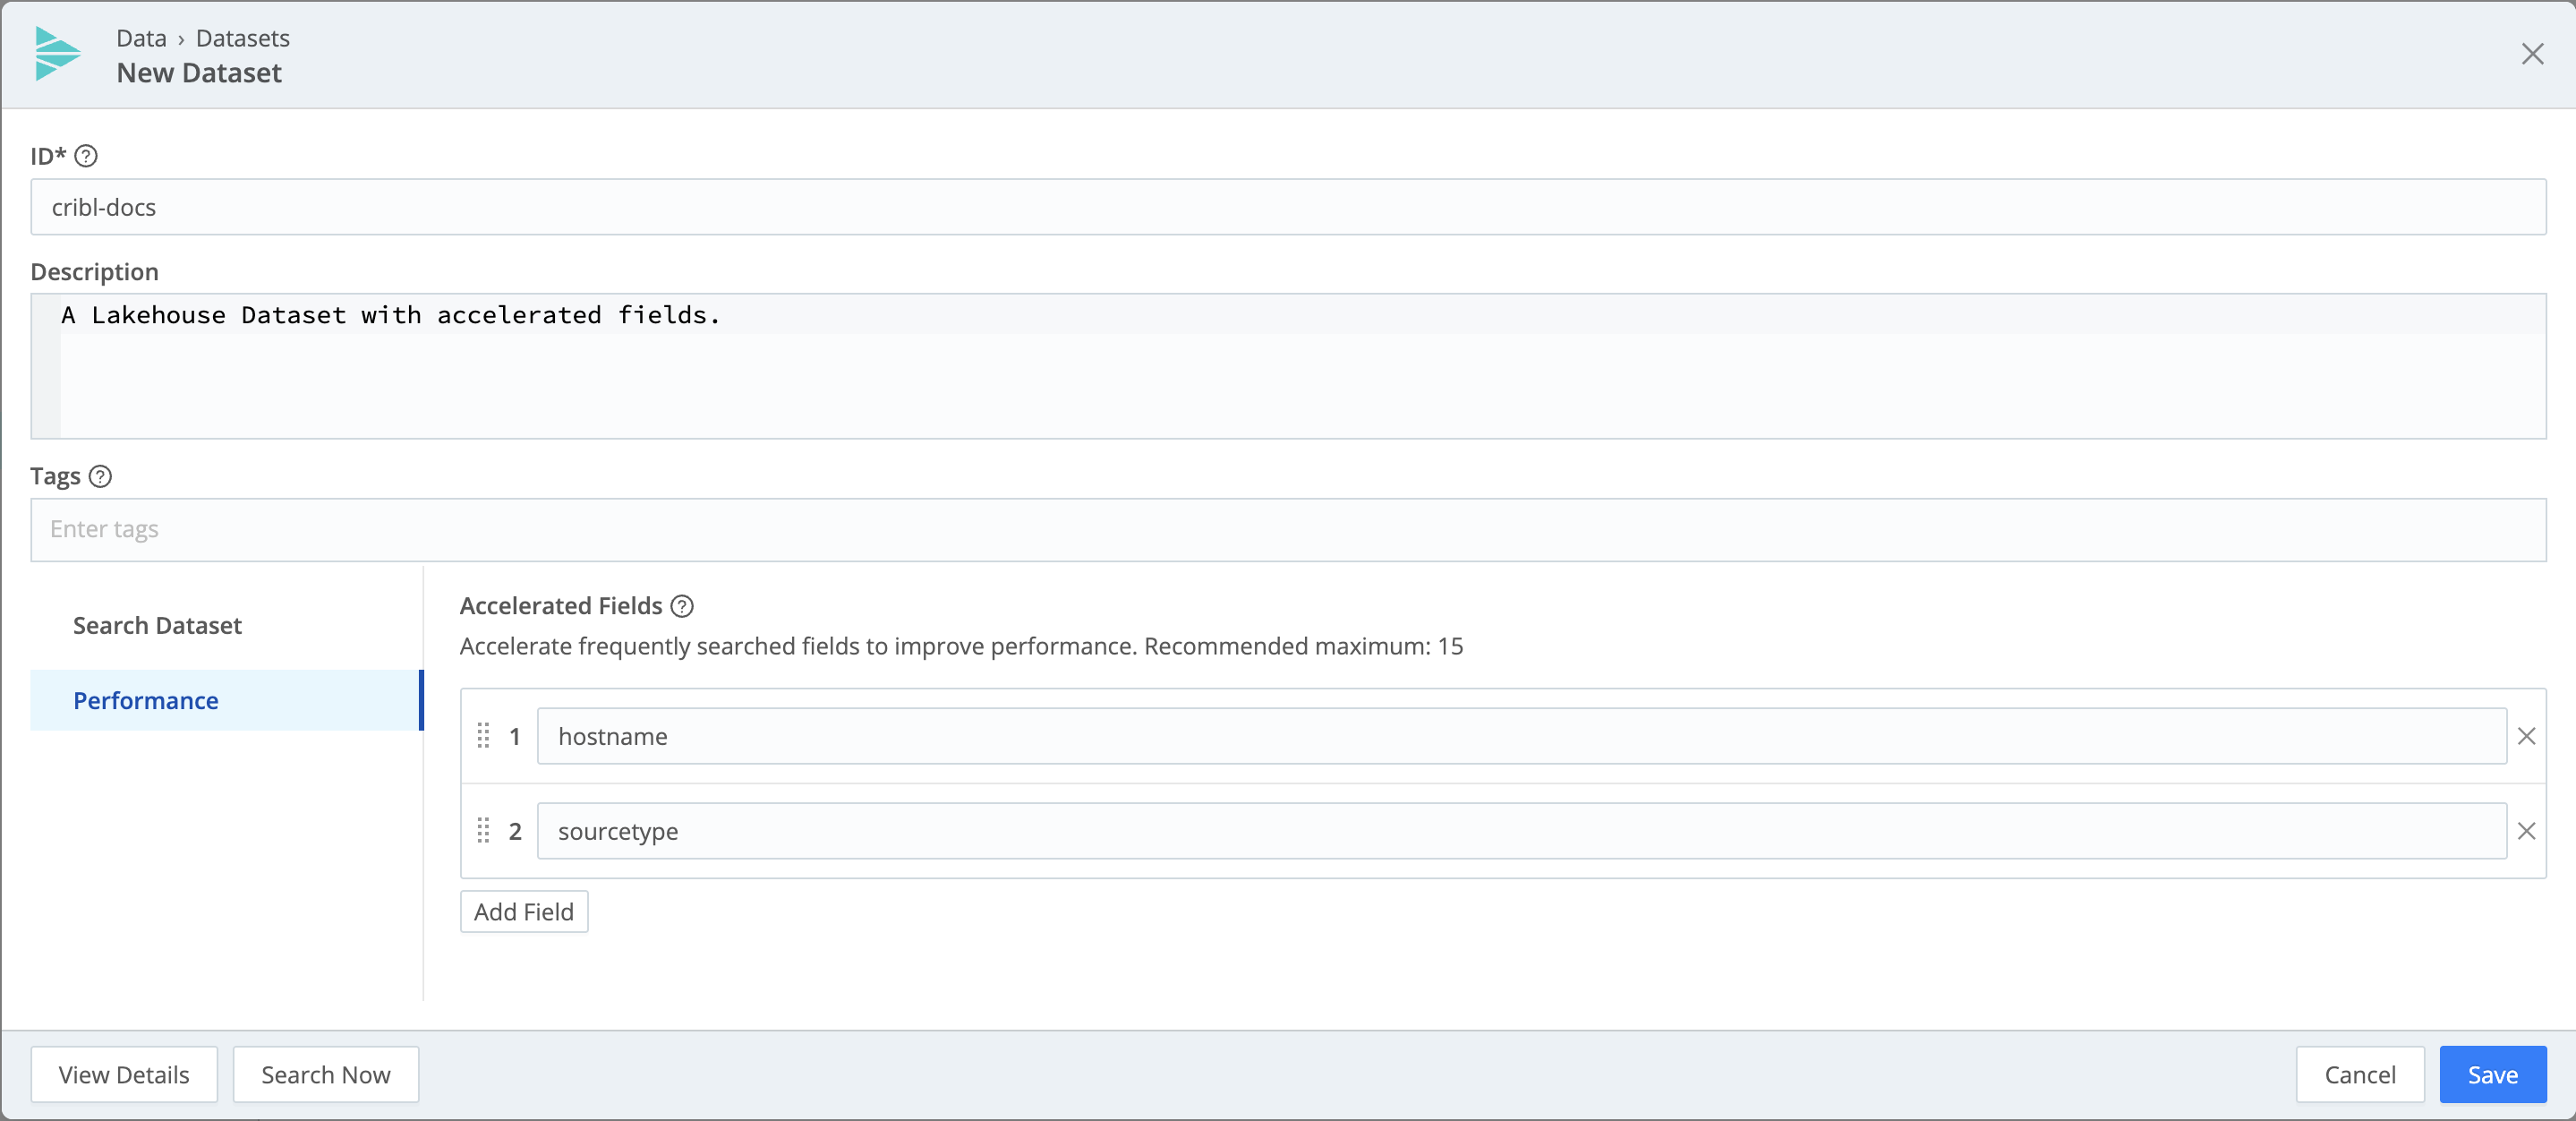
Add accelerated fields on a Log Dataset To generate an AI-powered reference file for your Log Dataset by analyzing its contents, select Dataset Intelligence > Enable Dataset Intelligence. For details, see Dataset Intelligence.
Confirm with Save.
Now you’ll be able to target the new Log Dataset with Dataset rules.
Expected Time Range
Each Search Dataset expects its data to be timestamped within a certain time range. You define that range with the
Earliest expected timestamp and Latest expected timestamp options, as a window around now(). Set them
when you add a Log Dataset, or when you edit any Search Dataset, including a
metrics Dataset.
When logs fall outside the expected time range, Cribl Search retimestamps them, while preserving the original timestamp. Metrics that fall outside the expected time range are rejected.
| Logs | Metrics | |
|---|---|---|
| When outside the window | _time reset to now(), original value preserved in _original_time | Sample rejected |
Default earliest | No lower bound | No lower bound |
| Default latest | One day after now() | 10 minutes after now() |
| Maximum latest | 7d | 7d |
Send Results to a Log Dataset
Use the export operator with the search keyword to send search results into an existing Log
Dataset.
This is useful when you want to materialize the output of a federated search or enrichment pipeline only once, and then run fast, repeated searches against the cached results instead of re-scanning the original Datasets.
dataset="cribl_search_sample"
| export to search mySearchDatasetThe target must be a Log Dataset, not a federated Dataset, and its lakehouse engine must be in
Ready status. Only Admin and Editor Search Members can run
the export operator.
To write aggregated results into a metrics Dataset instead, use the metrics keyword. See
metrics: Export to a Metrics Dataset.
For full syntax, arguments, and limitations, see the export operator reference.
Clear a Search Dataset
You can wipe data stored in a Search Dataset of either flavor, while preserving its routing rules and retention settings. This requires Maintainer access on the Dataset, and can’t be undone.
- On the Cribl.Cloud top bar, select Products > Search > Data > Datasets.
- Select the Search Dataset you want to clear.
- Select Clear Dataset.
- Type
CLEAR, and confirm with Clear Dataset.
Delete a Log Dataset
You can delete a Log Dataset, removing both its data and configuration. This requires
Maintainer access on the Dataset, and can’t be undone. You can’t delete a
metrics Dataset, because Cribl Search manages it for you.
- On the Cribl.Cloud top bar, select Products > Search > Data > Datasets.
- Select the Log Dataset you want to delete.
- Select Delete Dataset.
- Confirm with Delete.
Next Steps
Now that your Log Datasets are in place, connect your Sources to start sending data into Cribl Search.
If your Sources are already connected, target your Log Datasets with Log Dataset rules, and your
metrics Datasets with Metric Dataset rules.