


Run Investigations (Preview) with Cribl Search
Preview Feature
Cribl is still developing this Preview feature. We don’t recommend using it in a production environment, because the feature might not be fully tested or optimized for performance, and related documentation could be incomplete.
Please continue to submit feedback through normal Cribl support channels, but assistance might be limited while the feature remains in Preview.
Investigate incidents with AI guidance and capture your findings in one workspace.
The Cribl Search investigations page provides a guided workspace for investigations or explorations in your data using natural language. Cribl Search helps you analyze telemetry data, identify patterns, and document findings without manually building every query.
From this page, you can start a new investigation, explore Datasets, or resume a prior session.
Before You Start:
- Ensure you have a paid, active Cribl Search subscription or billing plan.
- Enable investigations in Global Settings > AI Settings.
- (Optional) Configure MCP Integrations to give the investigation AI access to external tools such as FireHydrant, Jira, Slack, and Bitbucket. This improves investigation quality when working from incidents or tickets.
- Enable Dataset Intelligence on your frequently searched Datasets to improve investigation accuracy and query quality.
Customize Investigations
These settings are optional but recommended: configuring them before you start an investigation gives the AI the right model, access to external information, and any custom instructions your team needs.
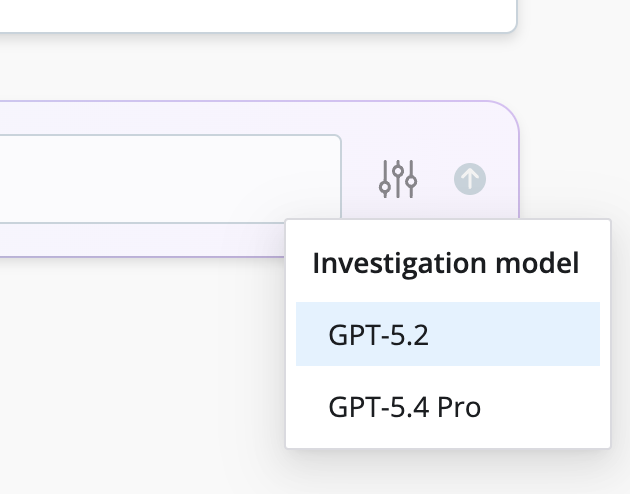
Select a Model
If your organization has configured a Bring Your Own Model (BYOM) provider in AI Settings with two or more models assigned to the reasoning model tier, a model selection control appears in the investigation chat input. Use it to choose which reasoning model Cribl Search uses for the session. The first model assigned to the reasoning tier becomes the default for all users.
The control doesn’t appear if only one model is configured or if you are using the default Cribl-managed provider.
Enable Web Search
When web search is enabled, the investigation AI can search the web to supplement its analysis with up-to-date external information, for example, looking up CVE details, vendor release notes, or known issues related to a service.
To enable web search, go to Global Settings > AI Settings and turn on the web search option.
When the AI invokes a web search during an investigation, a Searching the web… indicator appears in the chat. Results are incorporated into the AI’s response and cited inline. Each citation renders as a source tag next to the relevant statement:
- Results from
cribl.iodisplay the Cribl logo. - Results from other domains display a globe icon and the domain name.
Hover over a source tag to see the full source URL. The AI always includes both an inline citation and a source reference for every web result it uses.
When the investigation summary is generated, a Sources section appears at the bottom of the summary listing every web source referenced in the findings or conclusion. Each entry shows a globe icon and a link with the source title you can select.
Edit agents.md
agents.md is a markdown guidance file that shapes how the Cribl Search investigation AI behaves. You can use it to set custom instructions, constraints, or tone for the AI during investigations, for example, requiring it to always cite data sources or focus on a specific set of Datasets.
An agents.md button appears in the investigation toolbar whenever an active investigation session is open. Select it to open the agents.md editor modal.
Permissions:
- Admin users (org owner, workspace owner, org admin, workspace admin, or product admin) can edit the content and save changes.
- Non-admin users can open the modal and view the current contents in read-only mode, but the Save button is hidden.
To edit agents.md:
- Start or resume an investigation session.
- In the investigation toolbar, select agents.md. The editor modal opens.
- Update the markdown content with your instructions.
- Select Save.
Changes take effect immediately for all new investigation interactions.
Choose How to Start
From the Search Home page, select Run Investigation. The Cribl Search investigations page opens.
You can start by describing a scenario in the prompt box or by selecting a starting scenario card. Cribl Search will prompt you for more context.
From a Cribl Alert
Begin with a Cribl-native alert. Use this option when an alert has already fired in Cribl Search and you want the investigation to be grounded in that specific signal.
Select Select from recent alerts. Cribl Search shows a list of recent alerts from Cribl. Select one to anchor the investigation. The AI reads the alert’s title and body to extract key entities – IP addresses, domains, hostnames, usernames, error codes, and similar fields – and uses them to select relevant Datasets and build initial queries automatically.
From an External Incident
Begin with an incident from an external incident management tool such as FireHydrant. Use this option when you have an active incident ticket and want Cribl Search to pull in its metadata alongside telemetry data.
Select Select from recent incidents. Cribl Search shows a list of recent incidents from your configured incident provider. Select one (for example, “Credit Card Processing Outage”).
Connecting MCP integrations gives Cribl Search access to external tools such as FireHydrant, Jira, and Slack. This significantly improves investigation quality, especially when starting from an incident, because the AI can pull in incident metadata, linked tickets, and channel context alongside your telemetry data.
Explore Your Data
Start an open-ended exploration of your Datasets. Use this option to look for anomalies, trends, or unexpected patterns. Cribl Search helps identify relevant fields and suggests follow-up queries. Ideal for exploratory analysis or hypothesis development.
Example: “Help me investigate errors in system X over the past 2 days and suggest likely root causes and fixes.”
Resume a Prior Session
Cribl Search automatically saves your investigation sessions as you work. No manual action is required. Sessions are retained for a minimum of 30 days.
There are three ways to return to a previous session:
- Investigations landing page – Resume tile: When you first open the Investigations page, select the Resume a Prior Investigation tile. A drawer opens from the left side listing your saved sessions.
- Investigations landing page – Recents list: Scroll to the bottom of the Investigations landing page to see your most recent sessions. Select a session to open it, or select View All to open the full sessions drawer.
- Investigations toolbar: In the Investigations toolbar, select Recent investigations to open the sessions drawer at any time.
Once the drawer is open:
- Browse or filter the list. The table shows each session’s Name, Context (Investigations), Last Updated time, and Owner.
- Use the filter input to search by ID, date updated, or owner.
- Sessions from both standard and Deep Investigation modes appear together in a single unified list.
- Select a session name to restore it. The session opens in chat-only mode with your prior messages visible, scrolled to the most recent message.
Sessions and Notebooks are separate artifacts. A session records the live investigation interaction. A Notebook is a structured document you can create from a session’s findings by selecting Save to Notebook in the investigation summary.
Refine and Extend the Investigation
Run the First Step
Choose a suggested step (for example, “Select from recent incidents” or “Review recent logs for service X”). Cribl Search:
- Generates the KQL query.
- Runs it against the selected Dataset(s).
- Shows query text, a result preview, and a short natural-language summary.
Pull in External Context
If your organization has external providers configured in MCP Integrations (for example, FireHydrant, Jira, Bitbucket, Slack), you can ask Cribl Search to:
- “Search Jira for items linked to this incident.”
- “Find the Bitbucket PR mentioned in Jira ticket AI-2676.”
- “Summarize messages from the incident Slack channel around the outage time.”
Cribl Search runs dataset-backed queries (for example, dataset=jira_dataset ..., Bitbucket audit logs) and summarizes what it finds.
Use the Generic HTTP API to connect Cribl Search investigations to external context. To make tools from external systems available to Cribl AI agents via the MCP protocol, see Connect Cribl AI to External MCP Servers.
Refine and Correlate
Ask questions such as: “Is there any relationship between the Next.js version in this PR and the error seen in the credit card processing logs?” Cribl Search correlates fields across Datasets and explains the link in plain language (for example, version mismatch causing the incident).
Use Deep Investigation Mode
Deep Investigation Mode structures your analysis around hypotheses. Cribl Search proposes a list of potential root causes, you select the ones to pursue, and the AI validates each one sequentially using targeted queries and evidence gathering.
To enable it, select the Deep Investigation Mode toggle in the Investigations toolbar. The toggle is off by default and your preference persists across page reloads.
For full details on the hypothesis workflow, the Investigation Graph, and hypothesis statuses, see Deep Investigations (Preview).
Save as Notebook
When you are satisfied with the findings:
- In the investigation chat, choose Save as Notebook or type “Save a notebook with all findings and actions.”
- Cribl Search builds a Notebook containing:
- An AI-generated summary of the investigation.
- The queries it ran.
- Key results and recommendations.
You can then share or extend this Notebook as a durable investigation artifact. For more details, see Notebooks.