





Cribl Search Notebooks
Run an entire investigation in one tab, and share your work with others.
Why Use Notebooks
A Notebook is a document-like page in Cribl Search where you and other data analysts can combine search queries, data visualizations, and Markdown notes into persistent, shareable investigations. Here’s what you can do with Notebooks:
- Iterate: Run and maintain multiple searches next to one another, for faster, more-efficient investigations.
- Annotate: Add context and clarity with markdown notes for rich storytelling.
- Collaborate: Share your work through fine-grained edit or read-only access.
- Control: See who last edited your Notebook, and when.
- Organize: Track the status of each investigation and tag Notebooks by team, use case, or priority, so a long list stays navigable.
- Summarize: Use Cribl Copilot to generate summaries of your findings, and to run queries from natural-language prompts.
- Standardize: Use Notebook templates to capture repeatable investigations or operational runbooks your team can open with the same structure, queries, and notes.
Start working with Notebooks from anywhere in Cribl.Cloud: On the top bar, select Products > Search > Notebooks. On the Notebooks page, switch between the Notebooks and Templates tabs to work with saved investigations or templates.
What’s in a Notebook
A Notebook consists of Logs Search cells, Metrics Search cells, and note cells. Logs Search cells run log queries. Metrics Search cells run metrics queries and appear when Metrics is enabled. See Add a Logs Cell and Add a Metrics Cell.
When a Notebook is shared, Maintainers can add and edit cells, drag cells up and down, and clone the Notebook. Read Only users can view the cells and their results. Read more about sharing Notebooks.
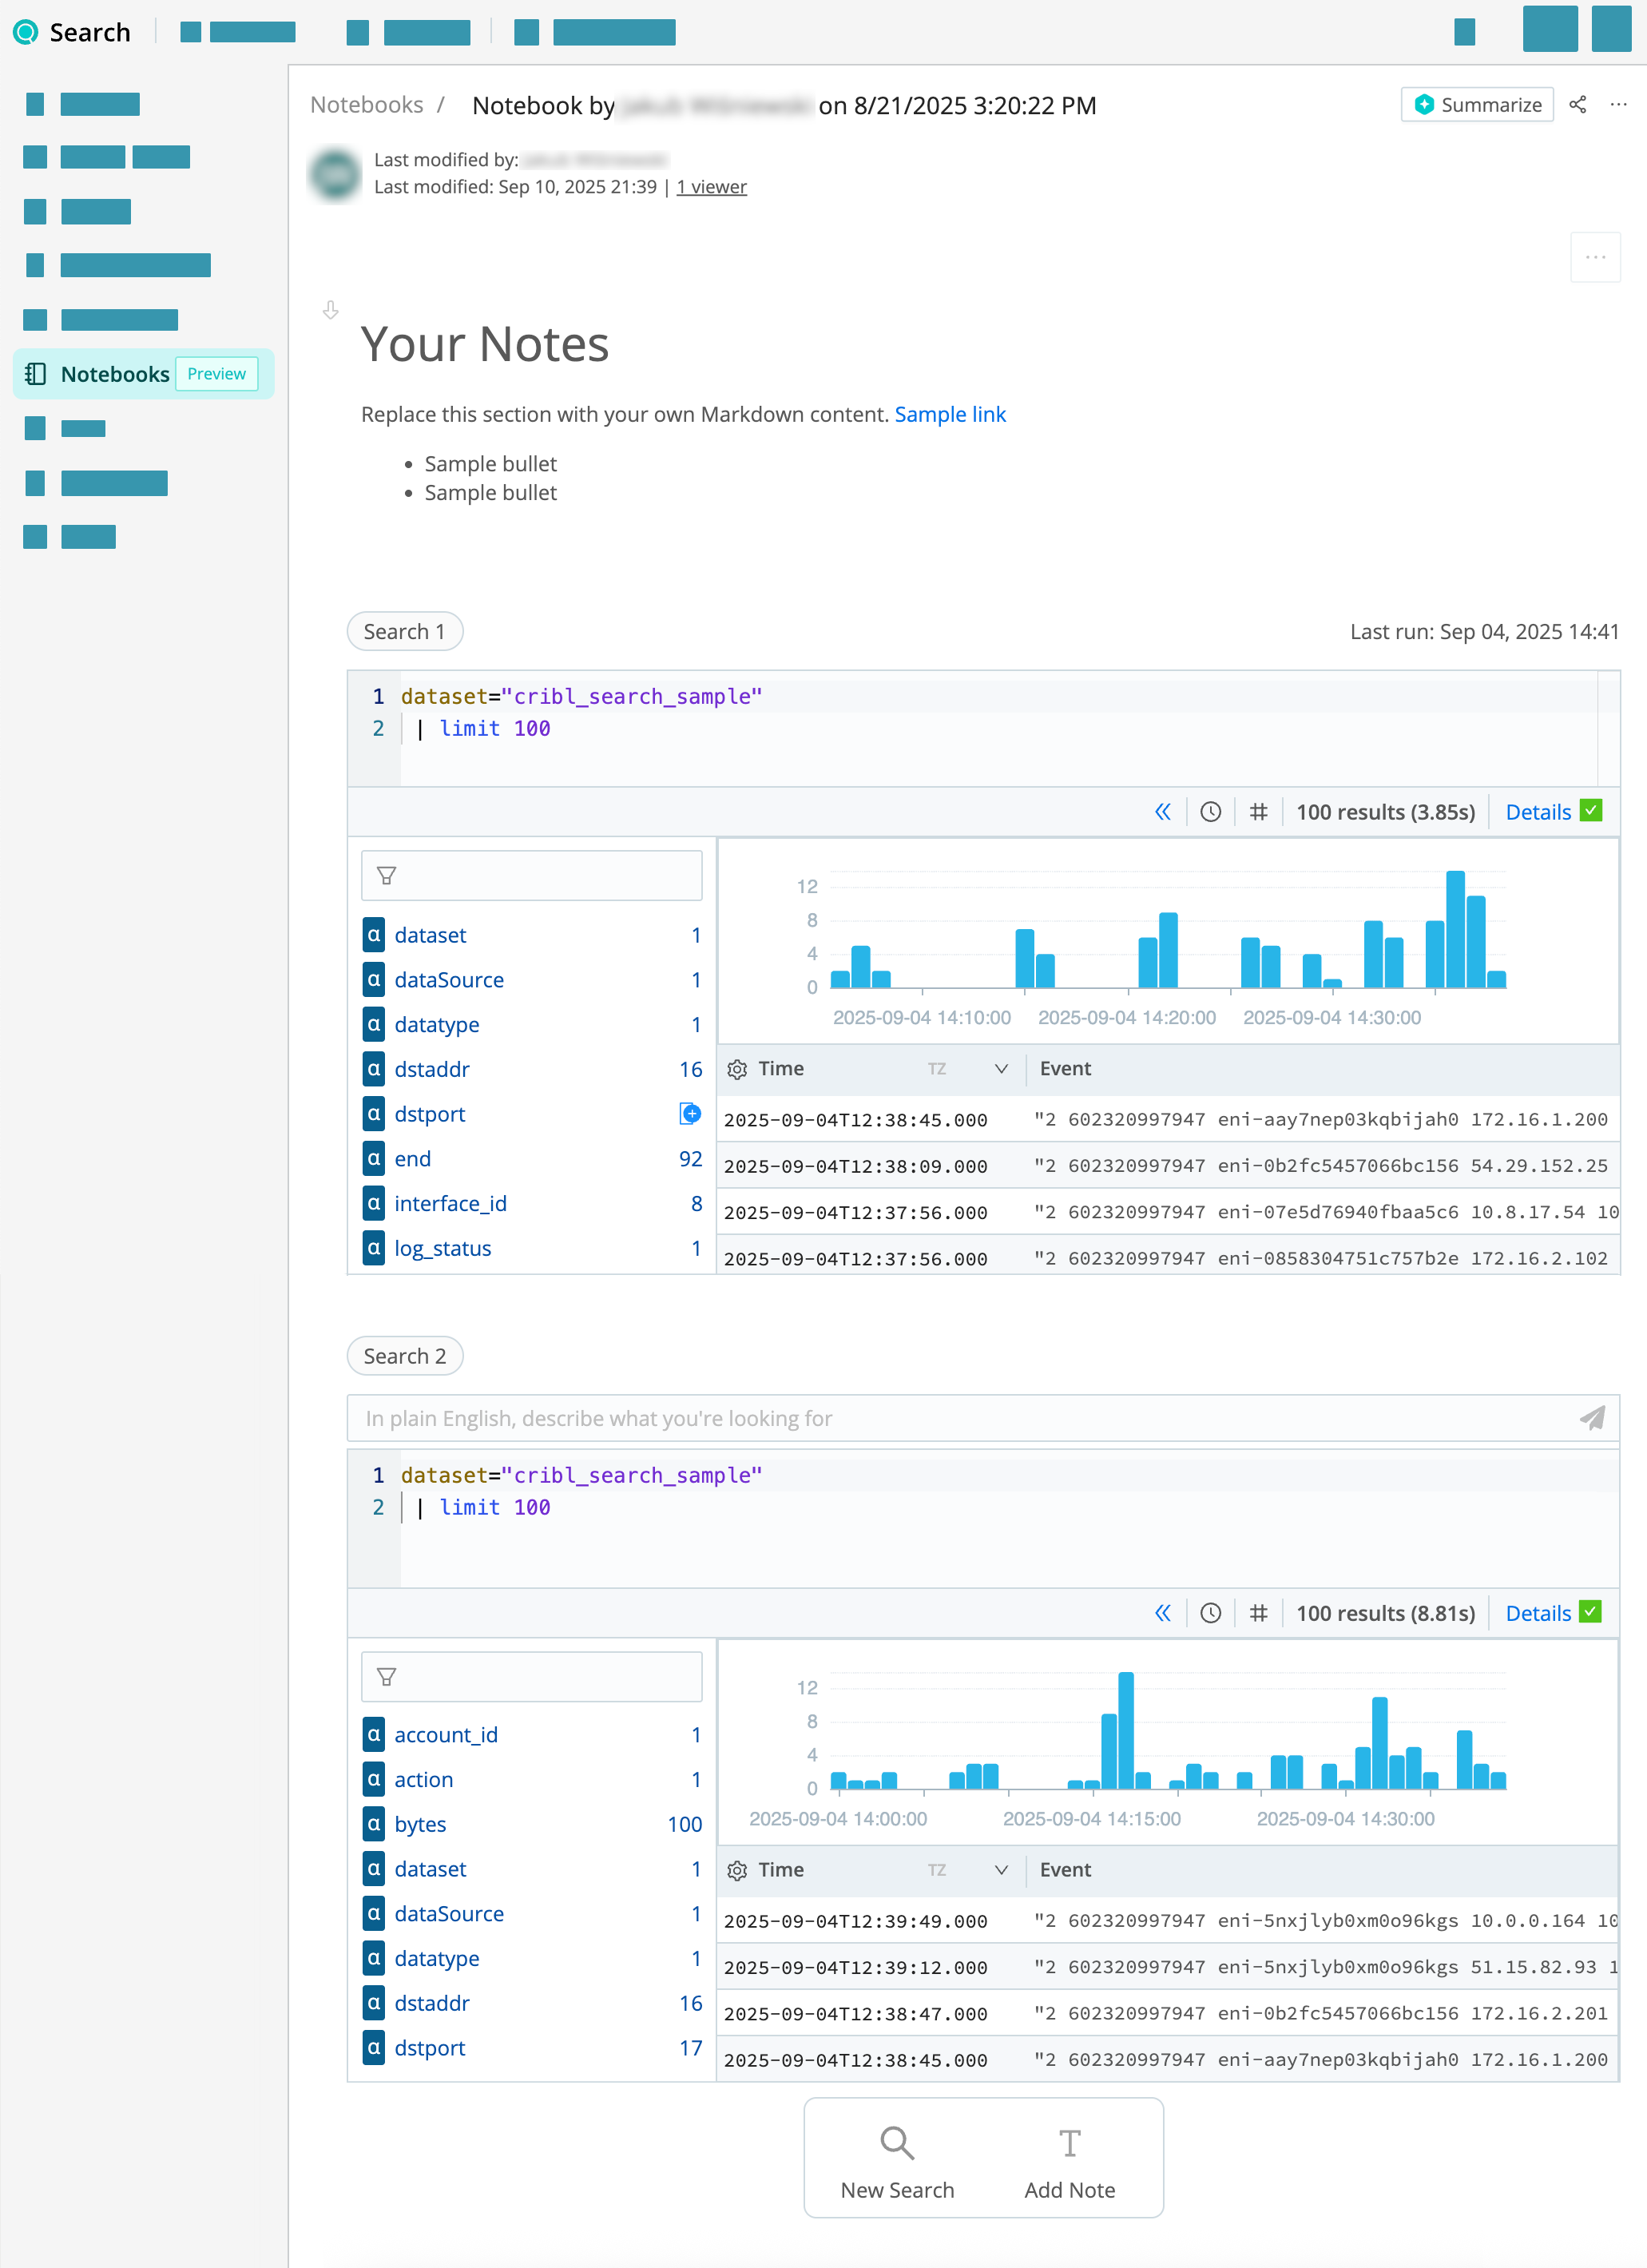
Start a New Notebook
You can create an empty Notebook, and then add searches and notes as needed.
- Go to the Notebooks page in Cribl Search: On the top bar, select Products > Search > Notebooks.
- Select Add Notebook. Your new Notebook opens and gets autosaved.
- Start running searches and adding notes.
You can start a new Notebook from a Notebook template so search cells, notes, and visualization settings are already in place.
- Go to the Notebooks page in Cribl Search: On the top bar, select Products > Search > Notebooks.
- Select Add Notebook. A new Notebook opens.
- Select Choose Template. A sidebar lists templates you can use, including custom templates and ready-made Cribl templates.
- Select a template in the list. The Notebook previews that template’s layout and content.
- Select Use Template. Cribl Search creates your Notebook from the template and opens it for you to continue the investigation.
Use Template stays disabled until you select a template from the list.
You can start a Notebook from a search you just ran.
- Start running your search from the Logs page.
- Select the Actions drop-down, and select Add to Notebook.
- Enter the Notebook name.
- Enter the Cell title. This will be the name of the search cell in your Notebook.
- Select Add & Go to Notebook.
You can turn any saved search (as long as it’s not part of a Pack) into a Notebook search cell, creating a new Notebook.
- Go the Saved Searches page in Cribl Search: On the top bar, select Products > Search > Saved Searches.
- Select the Actions button to the right of a search, and select Add to Notebook.
- Enter the Notebook name.
- Enter the Cell title. This will be the name of the search cell in your Notebook.
- Select Add & Go to Notebook.
You can turn any search kept in History into a Notebook search cell, creating a new Notebook.
Go the History page in Cribl Search: On the top bar, select Products > Search > History.
Select the Actions button to the right of a search, and select Add to Notebook.
Enter the Notebook name.
Enter the Cell title. This will be the name of the search cell in your Notebook.
Select Add & Go to Notebook.
Notebook Templates
For the Templates tab, Add Template, Edit Template, sharing, Clone, Delete, and creating templates from scratch, see Notebook templates.
When you work inside a Notebook, use the From Template tab under Start a New Notebook to start from a template, and Save as Template under Customize Notebook Display to capture the Notebook as a template.
Add a Logs Cell
You can run multiple log searches directly from your Notebook. You need to be the Notebook’s Maintainer for this.
- Open an existing Notebook or create a new one.
- At the bottom of the Notebook, select Logs Search. A cell with a query box opens.
- Run your query, as you would anywhere else in Cribl Search. To learn how, see some quick examples, or this tutorial: Write Your First Log Query. If your Organization has Cribl AI configured correctly, you can also use your search cells to run natural-language queries.
- To add another query, select Logs Search again. You can start another search while the first one is still running.
You can also add a Logs Search cell between existing cells: select Add, then select Logs Search.
Alternatively, you can create a new search cell by selecting a field within a field summary or event details panel, and then selecting Add field to new cell from the resulting context menu.
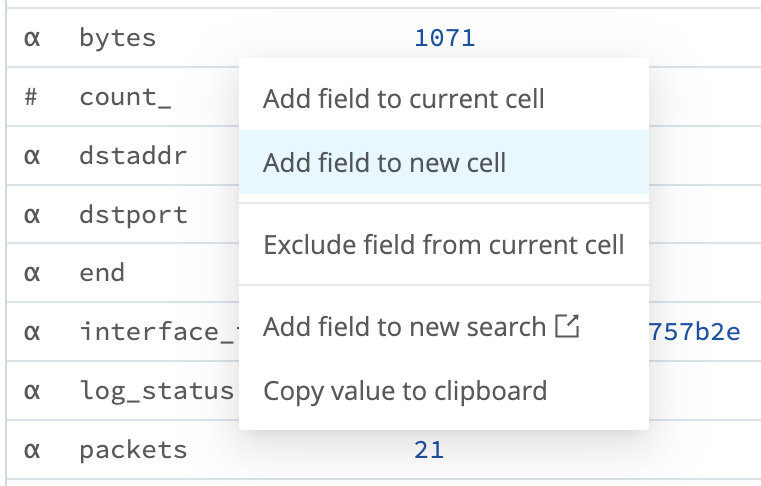
You can add a search you just ran to an existing Notebook. You need to be the Notebook Maintainer for this.
- Start running your search from the Logs page.
- Select the Actions drop-down, and select Add to Notebook.
- Select Use Existing.
- Select the Notebook.
- Enter the Cell title. This will be the name of the search cell in your Notebook.
- Select Add & Go to Notebook.
You can turn any saved search (as long as it’s not part of a Pack) into a Notebook search cell, adding it to an existing Notebook. You need to be the Notebook Maintainer for this.
- Go the Saved Searches page in Cribl Search: On the top bar, select Products > Search > Saved Searches.
- Select the Actions button to the right of a search, and select Add to Notebook.
- Select Use Existing.
- Select the Notebook.
- Enter the Cell title. This will be the name of the search cell in your Notebook.
- Select Add & Go to Notebook.
You can turn any search kept in History into a Notebook search cell, adding it to an existing Notebook. You need to be the Notebook Maintainer for this.
- Go the History page in Cribl Search: On the top bar, select Products > Search > History.
- Select the Actions button to the right of a search, and select Add to Notebook.
- Select Use Existing.
- Select the Notebook.
- Enter the Cell title. This will be the name of the search cell in your Notebook.
- Select Add & Go to Notebook.
Add a Metrics Cell (Preview)
Preview Feature
Cribl is still developing this Preview feature. We don’t recommend using it in a production environment, because the feature might not be fully tested or optimized for performance, and related documentation could be incomplete.
Please continue to submit feedback through normal Cribl support channels, but assistance might be limited while the feature remains in Preview.
With the Metrics experience enabled, a Notebook can include a dedicated metrics cell alongside its log search cells and note cells. This lets you combine metrics analysis, log queries, and Markdown notes in one investigation.
You can add a metrics cell in two ways:
- From a Notebook: Select Metrics Search in the Notebook.
- From the Metrics Explorer: Build a query in Metrics, then add it to a new or existing Notebook.
You need to be the Notebook Maintainer to add cells.
- Open an existing Notebook or create a new one.
- At the bottom of the Notebook, select Metrics Search. A metrics cell opens.
- Build your metrics query in the cell, as you would in the Metrics Explorer.
- In the cell header, select Run to execute the query and show its results.
You can also add a Metrics Search cell between existing cells: select Add, then select Metrics Search.
A metrics cell keeps its query visible after you run it, the same way a Logs Search query box does.
Each query appears as its own card (Query A, Query B, and so on), with Visual and Code (PromQL) views.
If you are the Notebook Maintainer, select the query to enter edit mode and refine it in the cell.
To open the query in the Metrics Explorer, select ⋯, then Open in Metrics.
To add a log search cell instead, select Logs Search. To add a note, select Add Note.
Build a query in the Metrics Explorer, then add it to a Notebook as a metrics cell. Cribl Search saves a snapshot of the current results with the cell.
- Open the Metrics Explorer and build your metrics query.
- Select ⋯ (take action), then Add to Search notebook.
- Choose a new or existing Notebook.
- Enter the Cell title.
- Select Add or Add & Go.
When you open the Notebook, the metrics cell shows the saved chart and the query. Select the query to refine it in the cell, or select ⋯, then Open in Metrics.
Add Notes to Your Notebook
You can add markdown-formatted notes to your Notebook using headings, lists, links, and more. See Markdown Guide for basic syntax.
You need to be the Notebook Maintainer for this.
- Open an existing Notebook or create a new one.
- At the bottom of the Notebook, select Add Note. A new note cell opens.
- Write your notes using markdown. The Notebook gets autosaved.
Summarize Your Notebook with Cribl Copilot
If your Organization has Cribl AI configured correctly, you can generate an AI summary of your Notebook findings.
- Open an existing Notebook or create a new one.
- In the top-right corner, select Summarize.
A summary of your Notebook appears in a new note cell at the top of the Notebook. You can edit the summary as needed.
Start an Investigation from a Notebook
You can launch an investigation directly from a Notebook, using the Notebook’s searches and notes as a starting point. This is useful when a Notebook already holds relevant context and you want Cribl Search to dig deeper.
- Open the Notebook you want to investigate from.
- In the Notebook toolbar, select New Investigation.
Cribl Search opens investigations, seeded from that Notebook. Cribl Search summarizes the contents of the Notebook and confirms an investigation goal with you before it starts investigating.
Customize Notebook Display
To make your Notebook easier to skim, you can manage how much detail the Notebook displays. In the top-left corner of each cell, a Collapse/Expand toggle enables you to reduce the cell’s vertical depth to a summary view.
In the top-right corner of the Notebook itself, the Actions drop-down provides options to manage the appearance of the whole Notebook and to capture the layout as a template:
Select Collapse All Cells or Expand All Cells to control the vertical spread of all cells at once.
Select Wide Layout or Default Layout to control the horizontal width available for Notebook contents.
Select Save as Template to create a new template from the current Notebook. See Save an existing Notebook as a template.
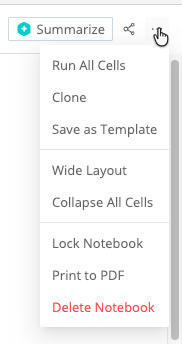
Navigate with the Table of Contents
The Table of Contents panel shows an outline of the Notebook that Cribl Search builds from your note headings and search cells. Use it to jump between cells instead of scrolling a long investigation, and to give a colleague picking up your work a structure they can scan for context.
Open and Close the Panel
In the Notebook header, on the Last modified row, select Table of Contents. The outline opens in a panel to the left of the Notebook. To close it, select Table of Contents again, or select the close icon in the panel header.
The panel starts out closed. After that, Cribl Search remembers whether you left it open and applies that choice to every Notebook and Notebook template you open next. This preference lives in your browser, so it does not follow you to another browser or device.
Anyone who can open the Notebook can use the panel, including Read Only collaborators and anyone viewing a locked Notebook.
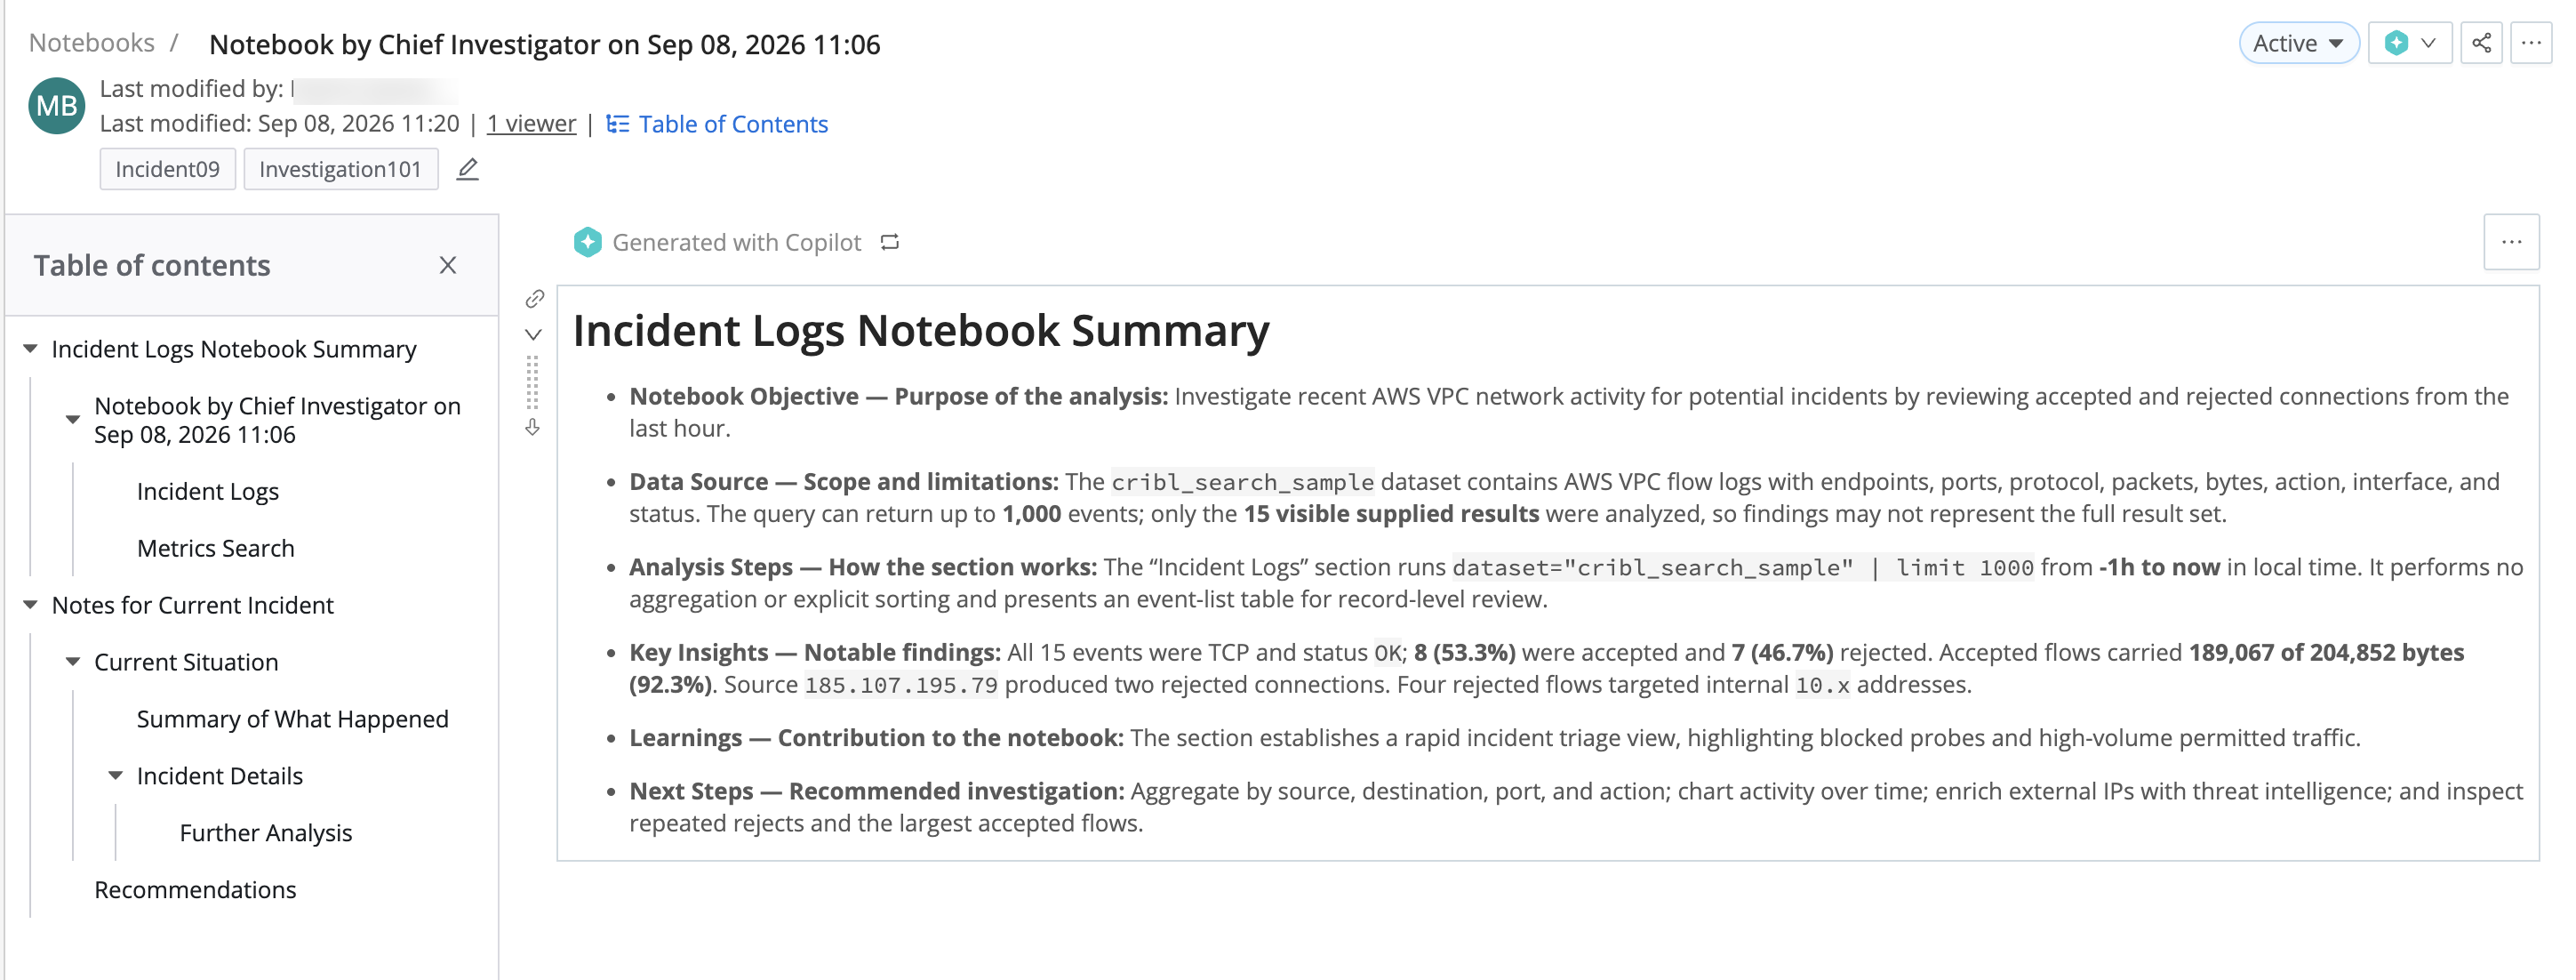
What Appears in the Outline
Cribl Search decides what to list based on the cell type:
- A note cell contributes an entry only when its first line is a Markdown heading, from
#through######. The heading text becomes the label. A note whose first line is anything else does not appear in the outline at all, and neither does a heading further down inside a note. Put the heading at the top of the note cell whenever you want that note to anchor a section. - A Logs Search cell always contributes an entry, labeled with the cell title. Untitled cells fall back to Logs Search 1, Logs Search 2, and so on.
- A Metrics Search cell behaves the same way, falling back to Metrics Search 1, Metrics Search 2, and so on.
Entries nest the way they would in a document outline:
- A heading nests under the closest preceding heading that is a level higher. An
##heading nests under an earlier#heading, for example. A heading with no higher-level heading before it stays at the top level. - A search cell nests under the closest preceding heading, at whatever level that heading is. Search cells that come before the first heading stay at the top level.
Where an entry has children, select the caret beside it to collapse or expand that branch. Labels longer than two lines are truncated.
Jump to a Cell and Reorder Cells
Select any entry to scroll its cell into view.
To reorder the Notebook, drag an entry to a new position in the outline. Note that this moves only the single cell that the entry represents. Cells nested under a heading do not travel with it, so moving a whole section means moving each of its cells in turn.
Dragging requires Maintainer access on a Notebook that is not locked. Otherwise the entries remain clickable, but you cannot drag them.
Export Notebook Search Results
You can export the results of a Notebook search as a CSV or NDJSON file.
- Open an existing Notebook or create a new one.
- In a search cell, select the Actions button.
- From the drop-down, select Export as, and then either Export Results as CSV or Export Results as NDJSON.
Export a Notebook Chart
You can export a Chart contained in a Notebook search cell, as a JPG or PNG file.
- Open an existing Notebook or create a new one.
- In a search cell, select the Actions button.
- From the drop-down, select Export as, and then either Export Chart as JPG or Export Results as PNG.
Export Your Notebook as a PDF
You can download your Notebook as a PDF file.
- Open an existing Notebook or create a new one.
- In the top-right corner, select the Actions button.
- From the drop-down, select Print to PDF, and then save the file.
Organize Notebooks
Continuous investigative work builds up a long list of Notebooks. To keep that list navigable, give each Notebook a Status and a set of Tags. Status records where an investigation stands. Tags group Notebooks by team, use case, priority, or whatever else you track. You can also read and set both through the Cribl Search API.
You need to be a Maintainer on the Notebook to set a status or edit tags, and the Notebook must not be locked. Everyone who can open the Notebook sees both, and anyone can filter the Notebooks list by them.
Set the Status of a Notebook
A Notebook has one of three statuses:
| Status | Meaning |
|---|---|
| None | The default for a new Notebook. The Status cell in the Notebooks list stays empty. |
| Active | The investigation is in progress. |
| Closed | The investigation is finished. |
To set the status:
- Open the Notebook.
- In the Notebook header, select the status pill. On a Notebook that has no status yet, the pill reads Add Status.
- Select Active or Closed. To return the Notebook to None, select Clear status.
Cribl Search saves the new status with the Notebook. When you clone a Notebook, the copy starts at None rather than inheriting the status from the original. Notebook templates do not have a status, so saving a Notebook as a template drops it.
Without Maintainer access, or on a locked Notebook, the pill still shows the status but you cannot change it.
Status also appears on the Notebooks tab in the details panel for a Dataset, so you can see which investigations involving that Dataset are still open.
Tag a Notebook
Tags are free-form labels. A Notebook can carry as many as you need, and the same tag can appear on any number of
Notebooks and templates. Tags are case-sensitive, so Triage and triage are two different tags.
- Open the Notebook.
- Below the Notebook header, select the Edit tags icon. On a Notebook that has no tags yet, the tag area reads Add tags.
- Enter one or more tags, separating them with commas. As you type, Cribl Search suggests tags already used on other Notebooks and templates, which helps you reuse a consistent vocabulary instead of inventing near-duplicates.
- Select the check mark to save your changes, or the close icon to discard them. Pressing
Escalso discards them.
Without Maintainer access, or on a locked Notebook, you see the tags but no editing controls. When a Notebook you cannot edit has no tags, the tag area is hidden entirely.
You can tag Notebook templates the same way.
Filter and Sort the Notebooks List
Go to the Notebooks page in Cribl Search: On the top bar, select Products > Search > Notebooks. For each Notebook, the Notebooks tab lists Name, Status, Last Modified, Last Modified By, Created By, and Tags, along with an Actions column.
To narrow the list:
- Select the Status control at the top of the list, then choose one or more statuses. Each option shows how many Notebooks currently carry it. A Notebook matches if it has any of the statuses you chose.
- Select the Tags control at the top of the list, then choose one or more tags. A Notebook matches only if it carries every tag you chose, so adding tags narrows the results rather than widening them. This control appears only when at least one Notebook in the list has a tag.
- Select a status pill or a tag directly in a row to replace the current filter with just that value. This is the
quickest way to answer questions like “what else is tagged
pci-audit?”
Each control lists your current selections next to its name. To drop a filter, select the X beside that control.
Sort the list by Status using the column header. Tags is not sortable, because a Notebook can carry several tags at once.
Share Your Notebook
As a Maintainer, you can allow others to view or edit your Notebooks at any time. For example, you might want to:
- Invite colleagues to join the investigation and contribute their expertise.
- Let others retrace your steps and pick up where you left off.
- Tell the full story behind your analysis, so stakeholders can understand how you reached your conclusions and review any assumptions you made.
- Grant limited access rights on your Notebooks to service accounts that connect to Cribl Search via API.
To share a Search Notebook with a Member, Team, or API Credential whose Search Permission is Editor or User:
Open an existing Notebook for which you are a Maintainer or create a new one.
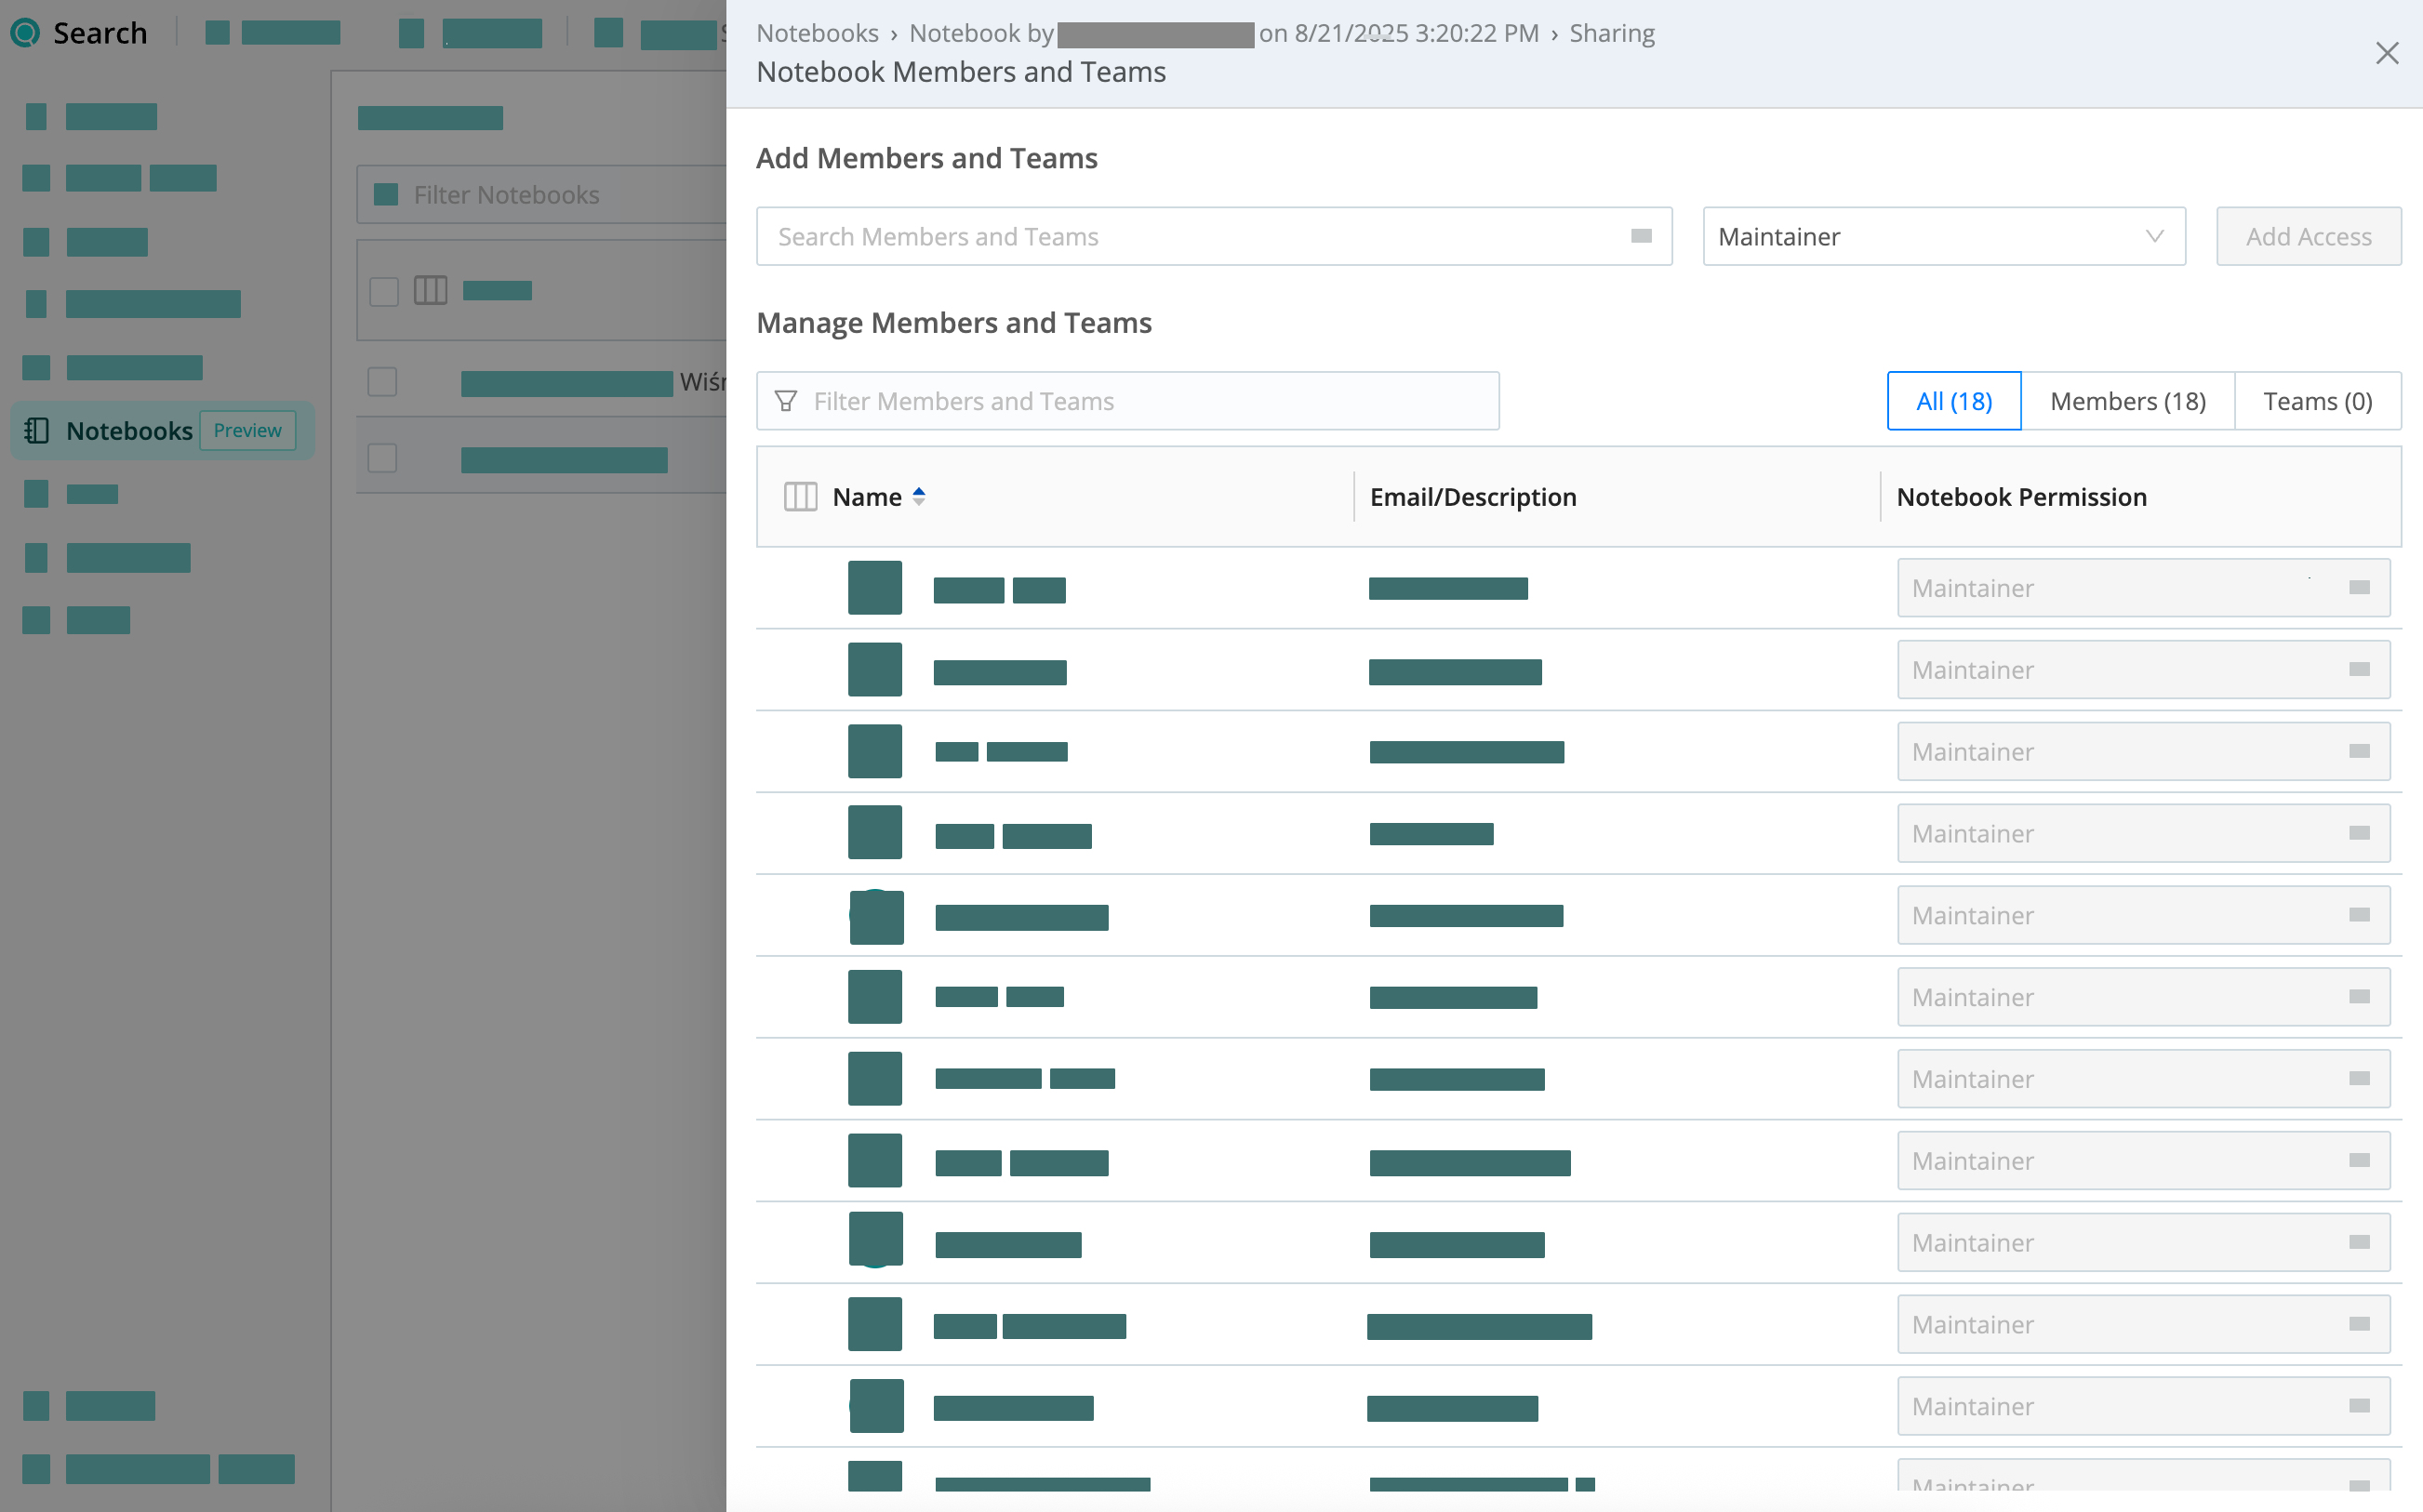
In the top-right corner, select the Share button. Now, you can see who has access to the Notebook and at what level.
Under Add Members, Teams, and API Credentials:
- From the left drop-down menu, select the Member, Team, or API Credential that you want to share the Notebook with.
- From the right drop-down menu, select the Notebook Permission you want to grant: Read Only or Maintainer. For details, see Cribl Search Notebooks Permissions.
Select Add Access.
Select Save.
Admin Members, Teams, and API Credentials have the Maintainer Permission on all Notebooks by default.
To modify or remove access on a Search Notebook, find the Member, Team, or API Credential in the list on the Sharing pane. Select the desired Permission from the drop-down menu in the Permission column and save. Selecting No Access removes all access rights on the Notebook.
To copy a link to a specific cell, select the link icon in the cell’s top-left corner.
Synchronize or Lock Edits
As a Notebook creator, or with a Maintainer or higher Permission: When you save changes to a Notebook, a pop-up will alert you to any changes that other collaborators have made since your last save. In this read-only state, you will be required to reload the Notebook before saving.
You also have the option to lock a shared Notebook into a read-only state for other collaborators (as well as yourself). This is useful if you need to freeze a completed investigation’s results, to preserve their integrity against further changes.
In the Actions drop-down at the top-right corner of the Notebook, select the Lock Notebook toggle to preserve the current Notebook state. Select Unlock Notebook to make the Notebook editable again.
Notebooks Retention
To support extended investigations, Cribl Search keeps each search job that runs in a Notebook for at least 30 days. During those 30 days, the Search history TTL doesn’t apply to these jobs, and they don’t count toward the Search history job limit. As a result, the total number of retained jobs might exceed the job limit. After 30 days, standard retention rules apply.
Investigation sessions are also retained for a minimum of 30 days. Sessions and Notebooks are separate artifacts: a session records the live investigation interaction, while a Notebook is a structured document created from a session’s findings. To convert an investigation session into a Notebook, select Save to Notebook in the investigation summary. To access saved sessions, see Resume a Prior Session.