

Configure Workspaces
Add, edit, or delete your Cribl.Cloud Workspaces.
Add New Workspace
To create a new Workspace:
On the top bar, select the name of the current Workspace and then Manage Workspaces. This opens a modal with a list of all Workspaces to which you have access.
Select Add Workspace. Only Organization Owners and Organization Admins can add a Workspace.
If the Organization has used its included three Workspaces, Cribl.Cloud opens Accept additional cost? Select Accept to continue, or Cancel. See Workspace Limitations.
The confirmation states that you have reached your current Workspace limit, that each Workspace you add costs an additional 250 credits per month, and that the charge will appear in your next billing cycle.
Enter the following information:
Workspace Name: Human-readable name for the Workspace.
Workspace ID: Internal ID for the Workspace. This ID will be part of the Cribl.Cloud URL. Cannot be changed once the Workspace is created.
Description: Brief description for the Workspace (optional).
Workspace region: AWS Region where you want to deploy the Workspace. Cannot be changed once the Workspace is created.
Tags: Up to three tags that you can use to filter Workspaces (optional).
If this Workspace is beyond the included allowance, the Details step shows that the Workspace will cost 250 credits per month, reflected in your next billing cycle.
Select Next.
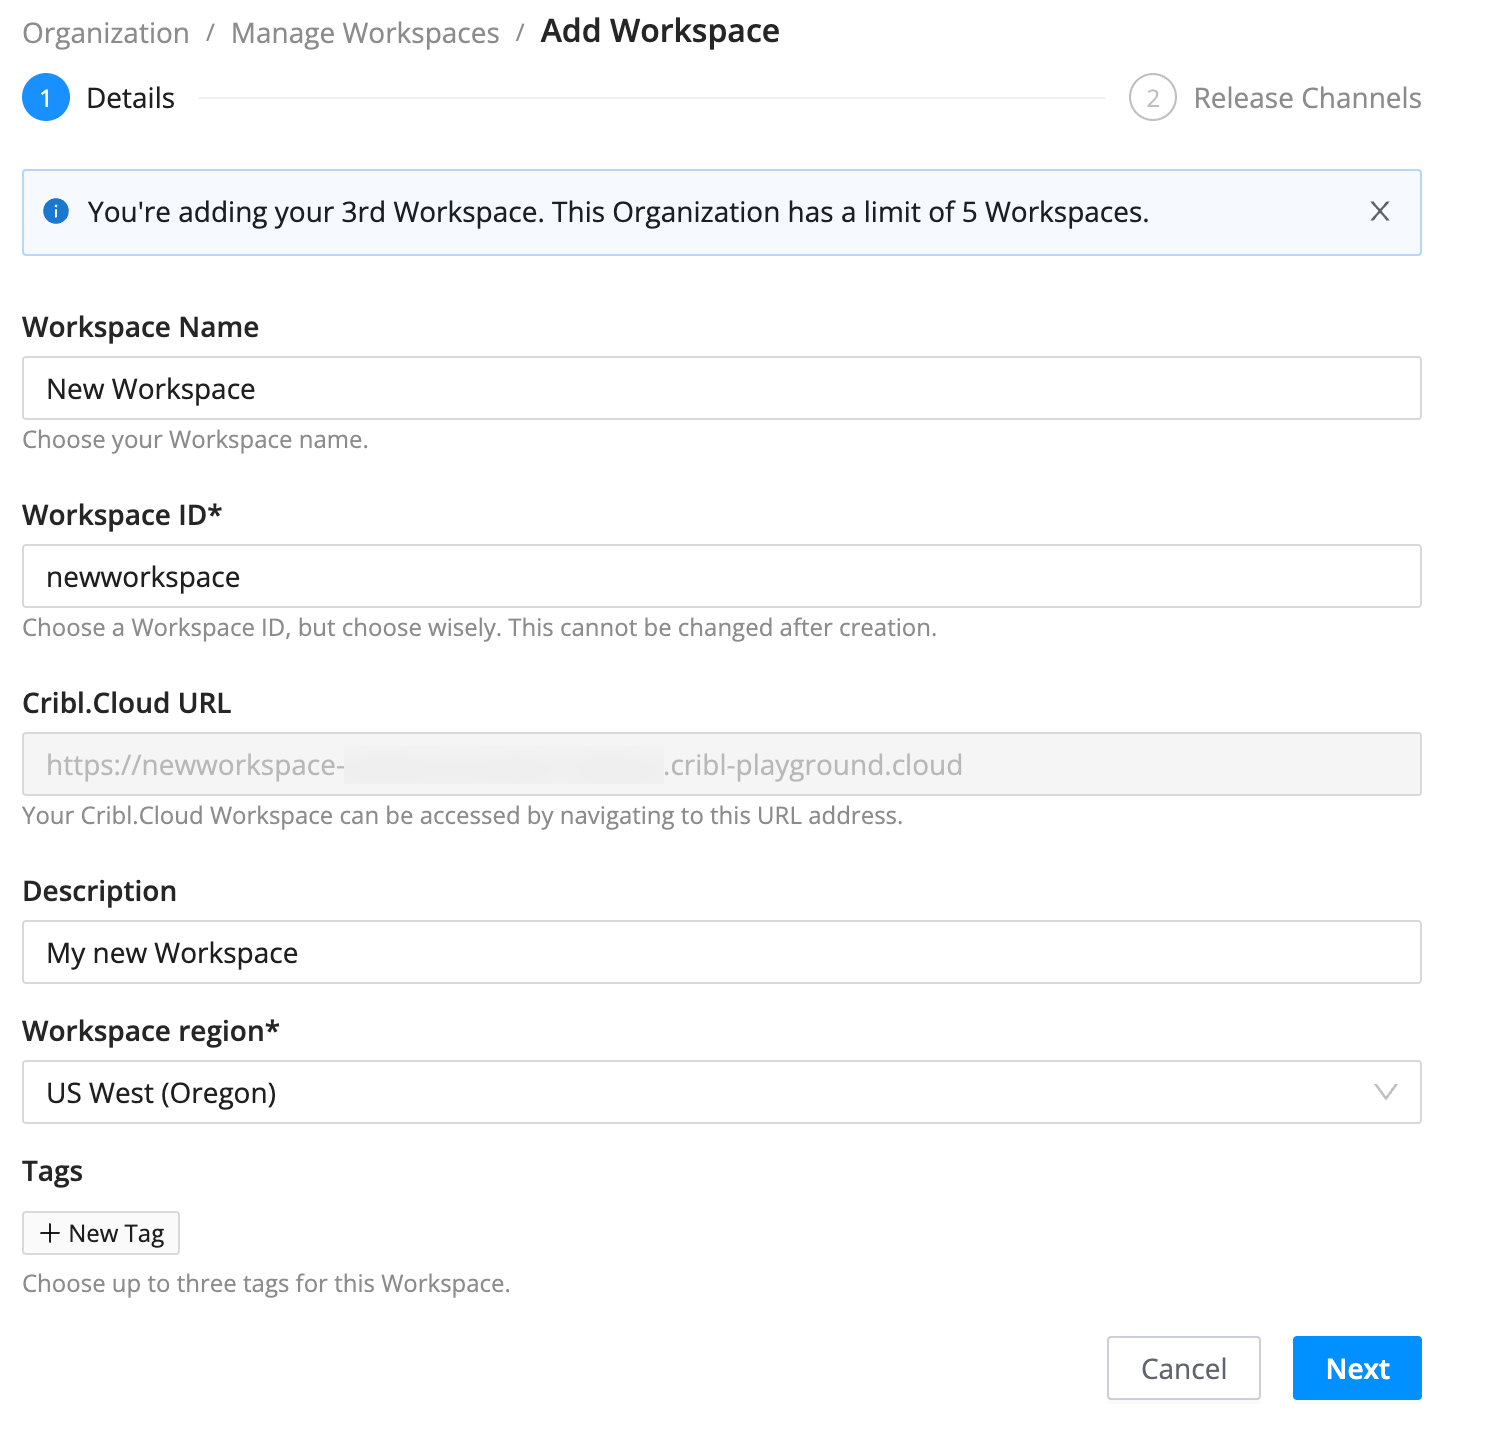
Creating a new Workspace Optionally enable Insights for the Workspace and choose a data retention tier, then select Next.
Select the release channel to use for the Workspace.
Fast: Get early access to new features and services, released approximately weekly. Allows you to preview upcoming functionality and provide feedback before features become available on the Regular release channel. Available only in commercial Cribl.Cloud, not in Cribl.Cloud Government.
Regular (default): Get new feature and maintenance releases every month.
Slow: Get new feature and maintenance releases 1 month after the Regular release channel goes into production. If the Regular release channel has a hotfix in the previous 2 weeks, the Slow release channel is delayed until the following month. No releases in November or December. If needed, critical security upgrades may also ship on the Slow release channel.
Select Save.
The Workspace can take up to several minutes to spin up. While the process continues, you can navigate away and keep working with your Cribl.Cloud instance as usual.
Workspace Regions
When you add a new Workspace, you can select the AWS Region where you want to deploy it. The default
Workspace main is always deployed in the same Region as the Organization, but you can deploy additional Workspaces in
any of the following AWS Regions:
| AWS Region Name | AWS Region Code |
|---|---|
| Asia Pacific (Singapore) | ap-southeast-1 |
| Asia Pacific (Sydney) | ap-southeast-2 |
| Asia Pacific (Tokyo) | ap-northeast-1 |
| Canada (Central) | ca-central-1 |
| Europe (Frankfurt) | eu-central-1 |
| Europe (Ireland) | eu-west-1 |
| Europe (London) | eu-west-2 |
| Europe (Paris) | eu-west-3 |
| Europe (Zurich) | eu-central-2 |
| South America (São Paulo) | sa-east-1 |
| US East (N. Virginia) | us-east-1 |
| US East (Ohio) | us-east-2 |
| US West (Oregon) | us-west-2 |
Edit or Delete a Workspace
To edit a Workspace:
- On the top bar, select your current Workspace name. This opens a modal with a list of all Workspaces you have access to.
- Next to the Workspace you want to edit, select Settings in the Actions column to open the Details page for the Workspace.
- On the Details page, you can change the name of the Workspace, description, and tags. However, you can’t change the Workspace ID after it has been created.
- Select Save.
For all Workspaces except main, you can select Delete Workspace on the Details page to delete it. You will
need to manually type the name of the Workspace as a security measure.
It is not possible to delete the
mainWorkspace.Only Organization Owners or Organization Admins can add and delete Workspaces.