


These docs are for Cribl Stream 4.0 and are no longer actively maintained.
See the latest version (4.17).
Azure Analytics/Webhook Integration
You can configure Cribl Stream to send logs through a Webhook Destination to the Azure Log Analytics Workspace.
Currently, Cribl Stream supports sending data only to custom tables and certain native tables. For details, see Azure’s Supported Tables topic.
To send data to custom tables using this integration, you must update a DCR Template with Stream definitions. We’ve provided an example DCR Template file.
Prepare the Azure Workspace
First, you must prepare the Azure Workspace to receive data from Cribl Stream, by registering Cribl Stream as an authorized application with the Microsoft Identity Platform].
Use Copy buttons, where available, to copy complete values for later use without truncation.
Create Credentials for a New Azure Application
- Log into the Azure portal as an
Administrator. - Navigate to the portal’s App registration section.
- Click New registration to register an application.
- Register a new application with the name
Cribl Stream.
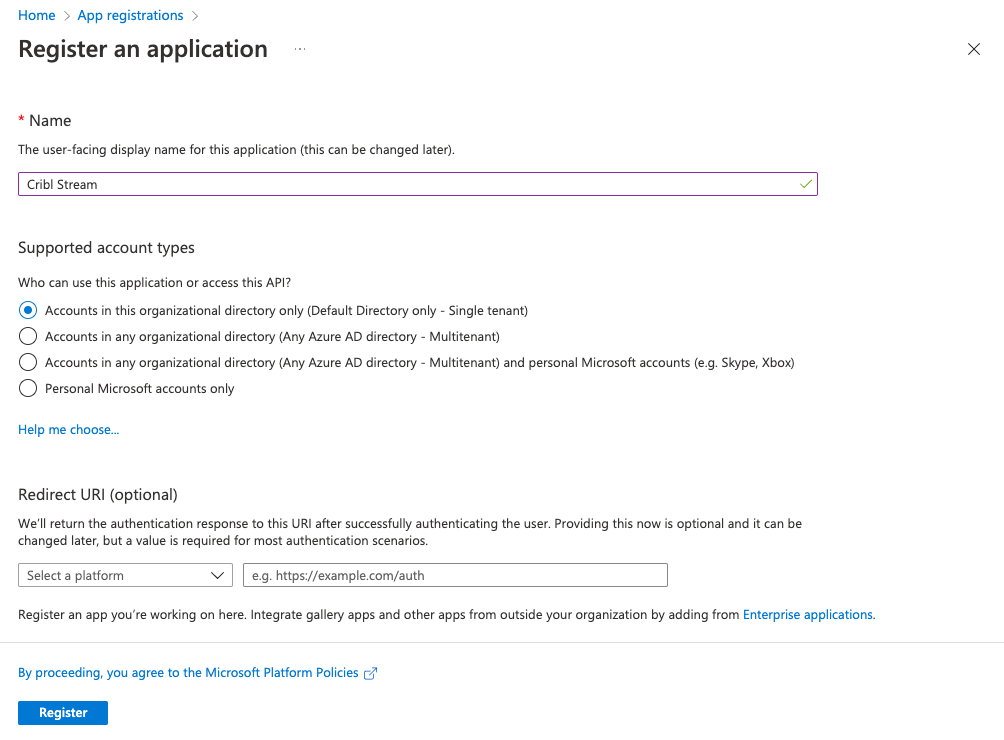
- Click Register.
- Store the Application (client) ID and Directory (tenant) ID for later steps.
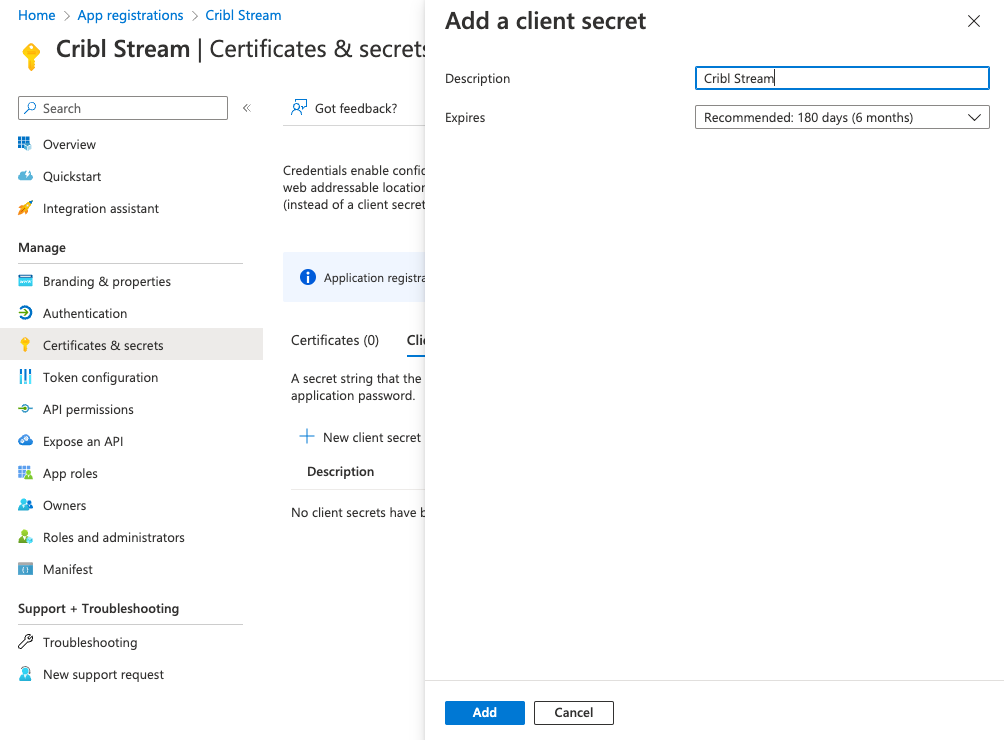
- In your newly registered application, select the Certificates & secrets tab.
- Create a New client secret.
- Store the secret Value for later steps.
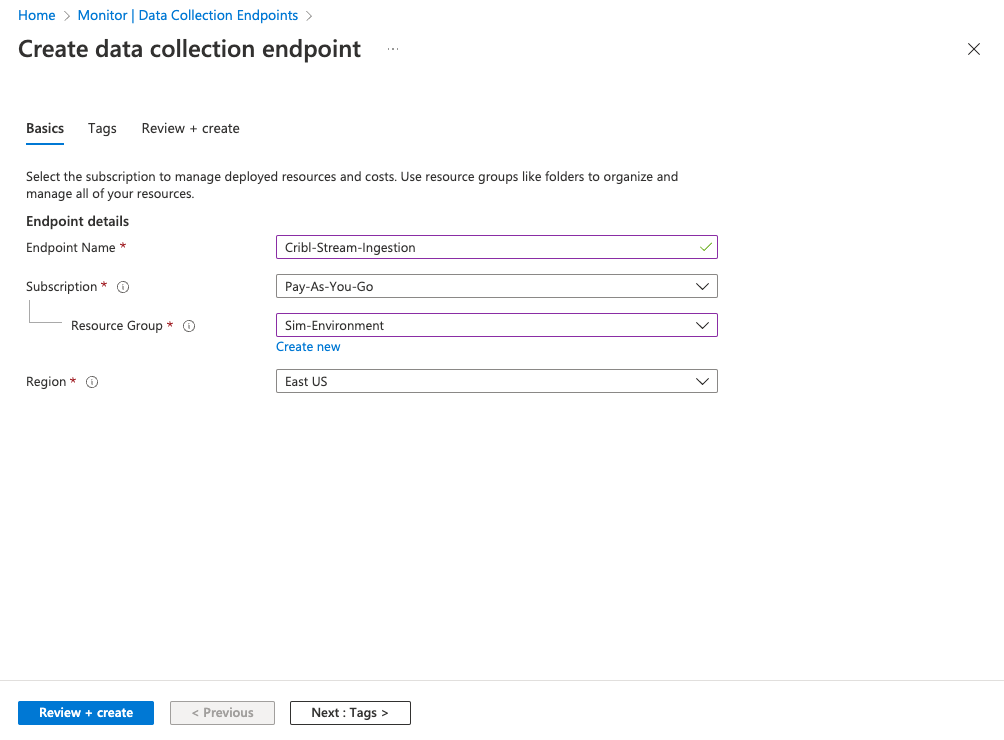
Create a Data Collection Endpoint
- Navigate to the Azure portal’s Monitor service.
- Under Settings, select Data Collection Endpoints.
- Select Create to add a new endpoint named
Cribl-Stream-Ingestion. - Select the appropriate Subscription and Resource Group used by your organization.
- Select Review + create, review your changes, then select Create.
- In the list of Data Collection Endpoints, open the newly created endpoint. (You might need to refresh the page to see it.)
- Navigate to the Overview page, and copy and store the Logs Ingestion URL.
- Select JSON view, and store the value of the Resource ID (gray box at the top) for later use.
Find the Log Analytics Workspace Resource ID
- Navigate to the Azure portal’s Log Analytics workspaces service.
- Select the workspace that will receive data.
- From the Overview page, select JSON view, and store the value of the Resource ID (gray box at the top) for later use.
Create Data Collection Rule
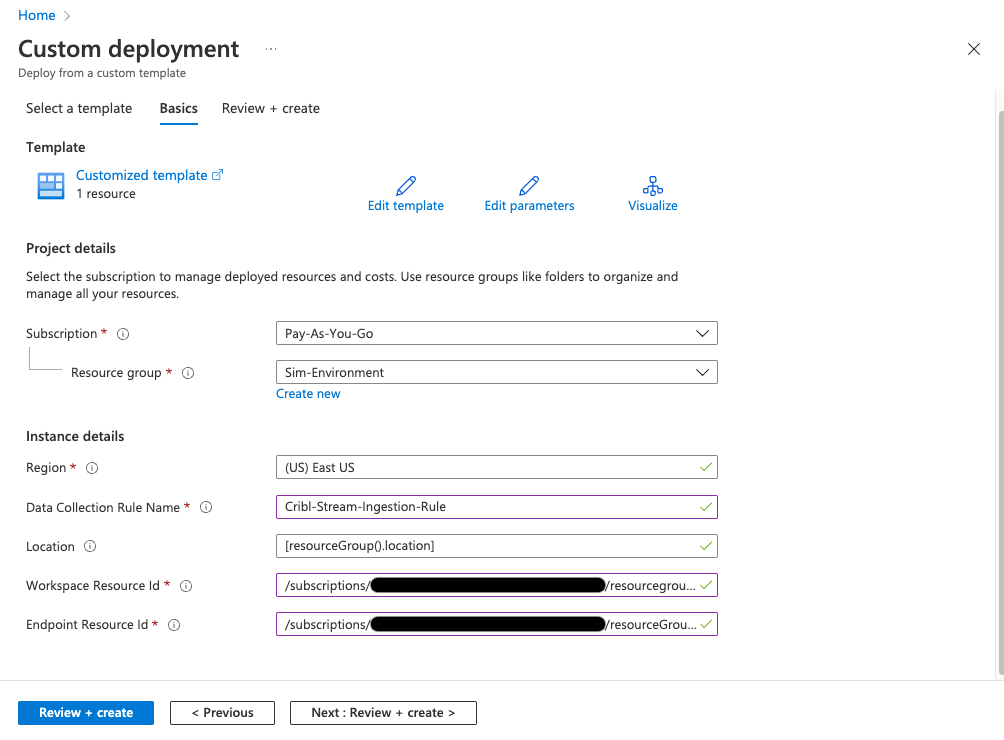
- Navigate to the Azure portal’s Deploy a custom template service.
- Select Build your own template in the editor.
- Select Load file and upload the DCR Template.
- Click Save.
- Select the appropriate Subscription and Resource Group used by your organization.
- Name the new Data Collection Rule
Cribl-Stream-Ingestion-Rule. - Enter the Log Analytics Workspace Resource ID, and the Data Collection Endpoint Resource ID, that you stored in the previous steps.
- To create the Data Collection Rule, click Review + create, followed by Create.
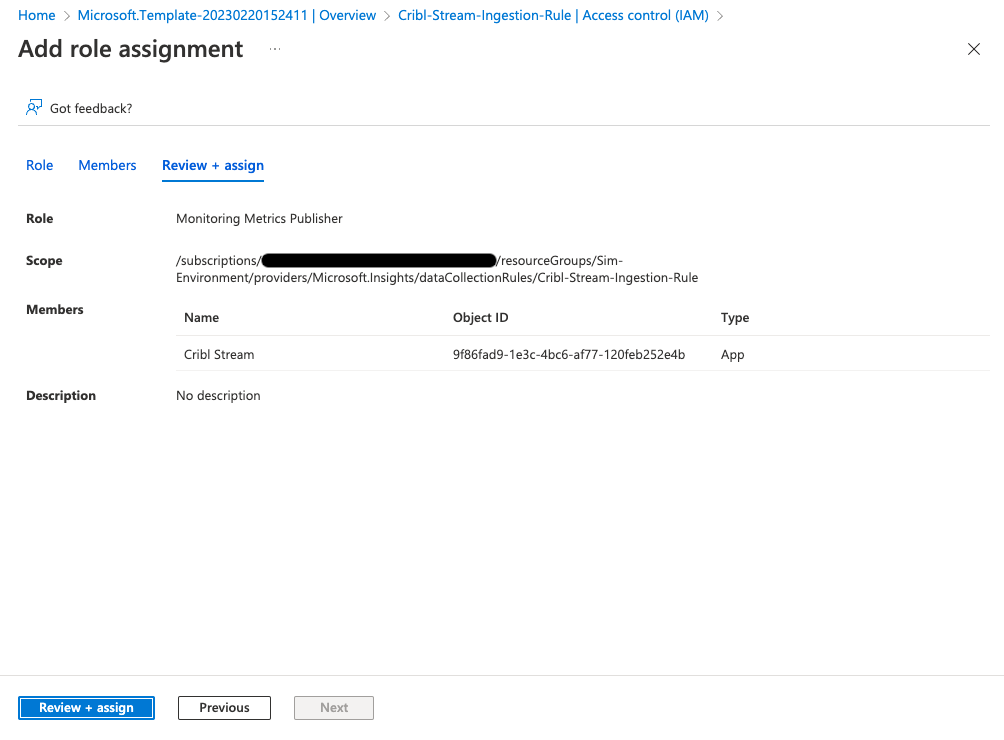
Add Role Assignment
- Once the template has been deployed, click Go to resource.
- From the Overview page, select the JSON view, and store the immutableId from the JSON body (without quotes) for later use.
- Click the Data Collection Rule’s Access control (IAM).
- Click Add role assignment.
- Select the Monitoring Metrics Publisher role, then click Next.
- Click + Select members.
- Search for and select
Cribl Stream(the app you created earlier), then click Select to confirm the selection. - Click Review + assign to review changes.
- Click Review + assign again to implement the permissions update.
Configure Cribl Stream’s Webhook Destination
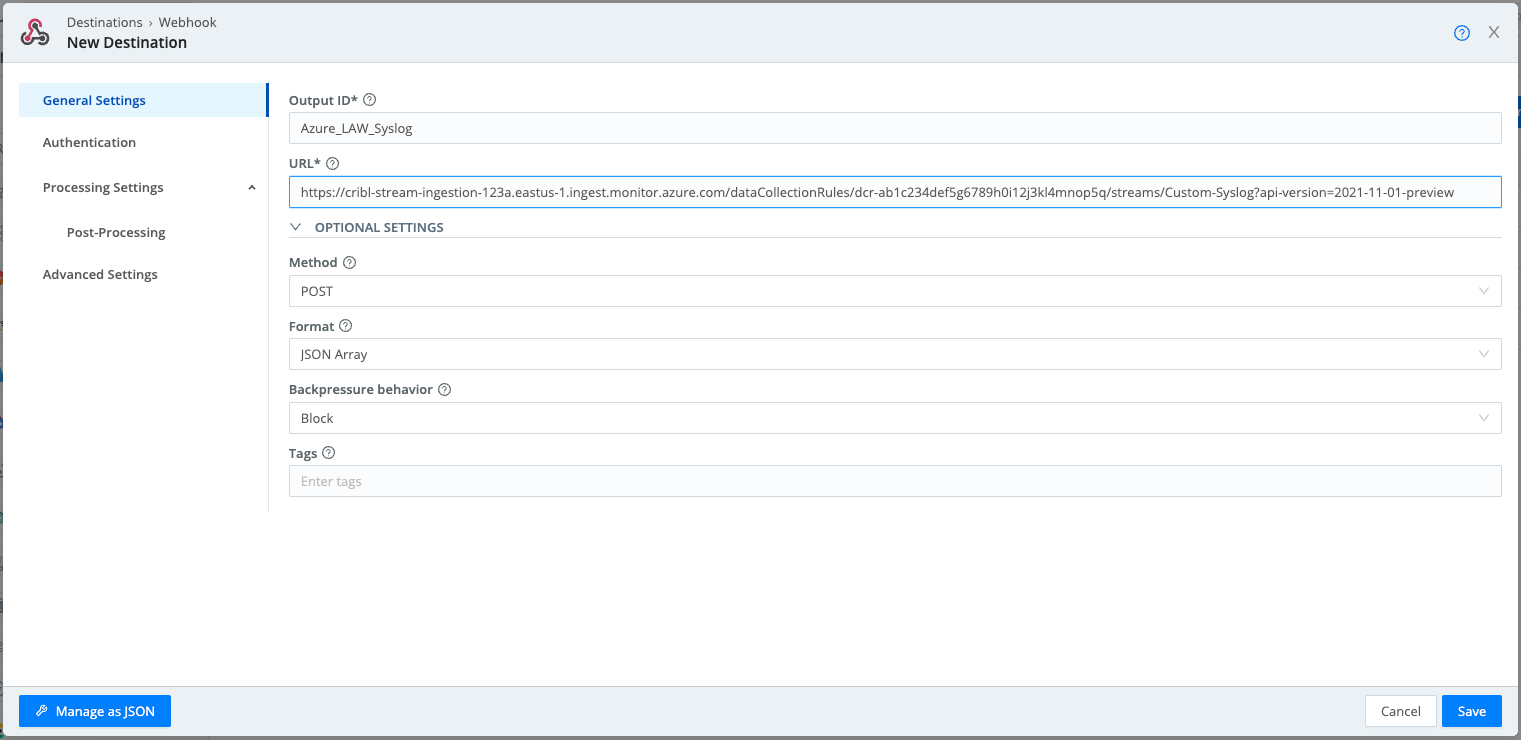
From a Cribl Stream instance’s or Group’s Manage submenu, select Data > Destinations, then select Webhook from the Manage Destinations page’s tiles or left nav. Click New Destination to open the Webhook > New Destination modal.
Currently, you must configure a separate Cribl Stream Destination for each stream defined in the Azure portal’s Data Collection Rule.
On the modal’s Configure > General Settings tab, enter or select the following values:
- URL: Enter the URL for the webhook, substituting the values you stored earlier into this template:
https://<< your logs ingestion url >>/dataCollectionRules/<< your data collection rule immutableId >>/streams/Custom-<< log analytics workspace native table name >>?api-version=2021-11-01-preview - Method:
POST - Format:
JSON Array
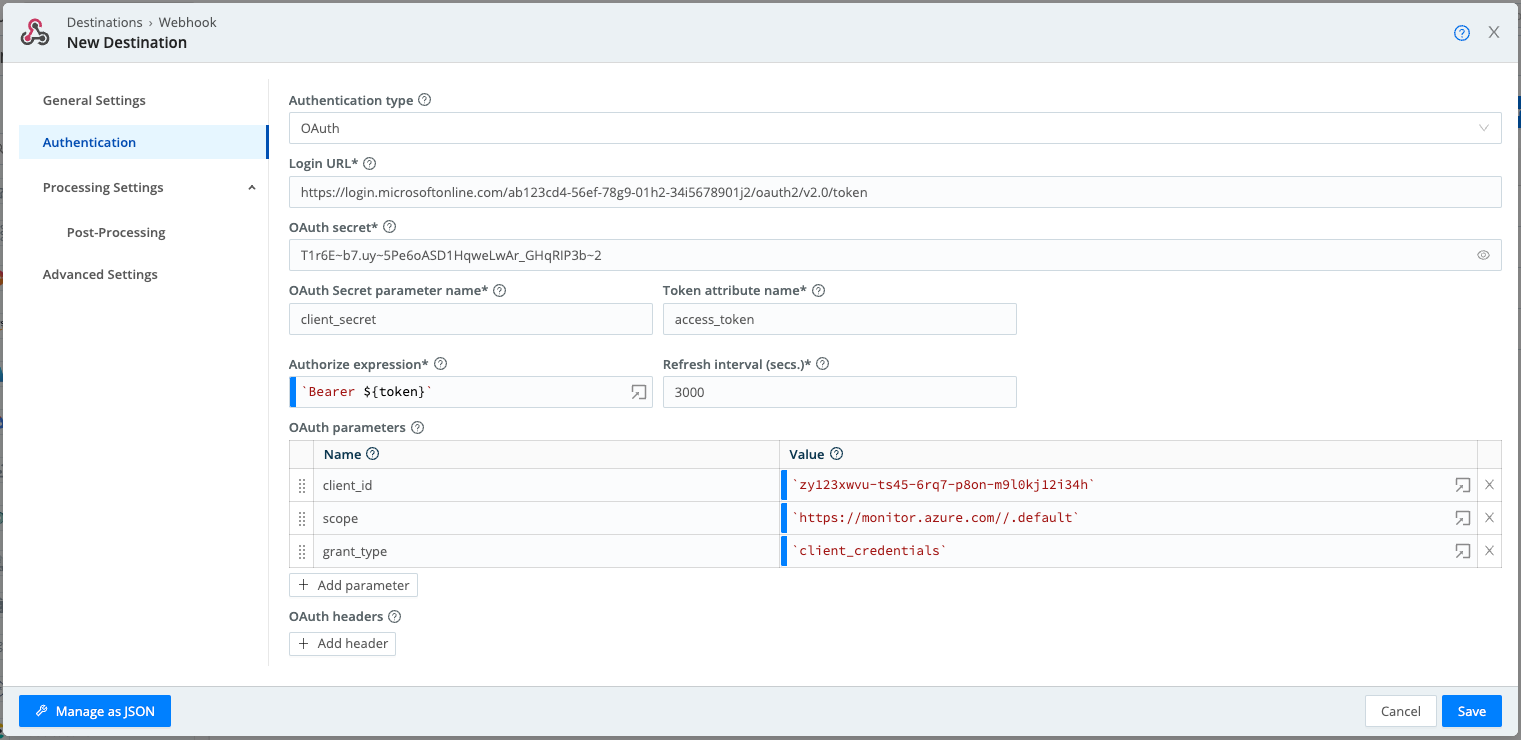
Next, in the Authentication tab, make sure that Authentication type is set to OAuth.
- Login URL:
https://login.microsoftonline.com/<< your tenant ID >>/oauth2/v2.0/token - OAuth secret:
<< your client secret >> - OAuth Secret Parameter Name:
client_secret - Token Attribute Name:
access_token - Authorize Expression:
`Bearer ${token}` - Refresh interval (secs.):
3000
As OAuth parameters, enter:
- client_id:
`<< your client/app ID >>` - scope:
`https://monitor.azure.com//.default` - grant_type:
`client_credentials`
Verify that Azure Log Analytics Workspace Is Receiving Data
In Cribl Stream:
Navigate to your Webhook Destination’s configuration modal.
Click the Test tab.
In the Test field, define one or more JSON payloads for the Cribl data you want to send. You can use the sample payload for a
syslogtable, below. Make sure you update the timestamps.[ { "Computer": "CriblStreamWorker", "EventTime": "2023-02-16T16:17:18.000Z", "Facility": "local4", "HostIP": "10.0.1.96", "HostName": "cribl-worker.lan", "ProcessID": "42000", "ProcessName": "cribl", "SeverityLevel": "warning", "SourceSystem": "destinationTest", "SyslogMessage": "CONNECTIVITY TEST", "TimeCollected": "2023-02-16T16:17:19.000Z", "TimeGenerated": "2023-02-16T16:17:20.000Z" } ]Click Test.
Open Azure Log Analytics Workspaces, and select the workspace with the endpoint you configured earlier.
Search the
syslogtable for the message in the sample.
When you run the test for the first time, the data might take up to 15 minutes to appear in the table.
When you write to syslog or
CommonEventLogtables,TimeGeneratedis a required field. If you omit it, your request will silently fail to write data into the tables.