


These docs are for Cribl Stream 4.0 and are no longer actively maintained.
See the latest version (4.17).
SSO/Okta Configuration
If you are a Cribl Stream admin and want to offer single sign-on (SSO) to your Cribl Stream users, you first choose OpenID Connect as the authentication type, then choose an SSO provider for OpenID Connect. Once configuration is complete (several steps later), the Cribl Stream login page will send users to the SSO provider login page.
The provider can be Okta or Google, among others. This page describes how to configure SSO with Okta as the provider. SSO with Okta is supported only in Cribl Stream (LogStream) versions 3.0.0 and newer.
In Okta, admins organize their users in groups. In Cribl Stream, there are no user groups, but there are Roles. Your task includes mapping Okta groups to Cribl Stream Roles.
Mapping groups to Roles is possible only for Cribl Stream deployments that are in Distributed mode, with an Enterprise license applied.
If you are running Cribl Stream in Single-instance mode, you cannot map Okta groups to Cribl Stream Roles, although you can still set up SSO with Okta.
As you think through how best to map your Okta groups to Cribl Stream Roles, keep these principles in mind:
A Cribl Stream Role can map to more than one Okta group.
An Okta group can map to more than one Cribl Stream Role.
The example mappings below illustrate these principles. Clearly, the groups in Mapping b and c each map to multiple Roles. And both the
reader_allandeditor_cloudRoles map to multiple groups.Mapping Okta Group Cribl Stream Role(s) a. Cribl Admins adminb. Cloud Admins reader_all,editor_cloudc. Security Team reader_all,editor_cloud,editor_firewall
If a user has multiple Roles, Cribl Stream applies the union of the most permissive levels of access.
Cribl Stream automatically assigns the
defaultRole to any user who has no mapped Roles.
Integrate Okta with Cribl Stream
Log in to your Okta tenant admin console.
In the left nav, select Applications > Applications.
Click Create App Integration.
For Sign-in method, select
OIDC - OpenID Connect.For Application type, select
Web Application.
Click Next to open the New Web App Integration page.
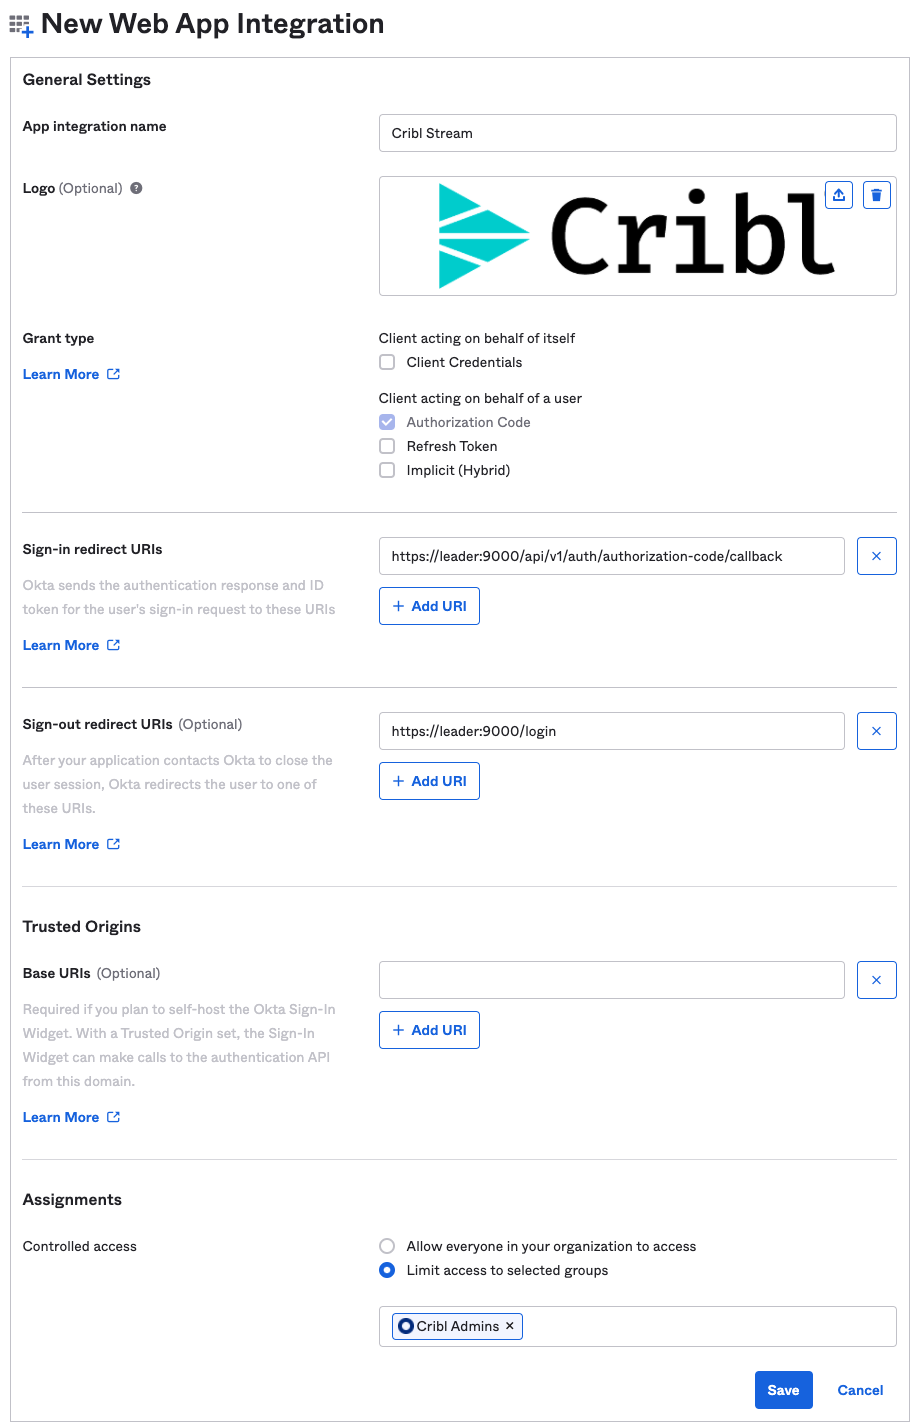
In the App integration name field, enter
Cribl Stream.(Optional:) In the Logo field, upload the Cribl logo. You can use a logo from the Cribl Media Kit.
In the Sign-in redirect URIs field, replace the default with your Leader base URL, and with
/api/v1/auth/authorization-code/callbackas the path. This is the Cribl Stream callback API endpoint.(Optional) In the Sign-out redirect URIs field, append
/loginto the pre-filled path.In the Assignments > Controlled access area:
- If all your Okta users need access to Cribl Stream, select Allow everyone in your organization to access.
- To permit specific Okta groups to access Cribl Stream, select Limit access to selected groups. Then, in the field below, add the groups you want to include. After you finish creating the app, if you need to add or remove groups, do that in the Applications > Assignments tab.
Click Save.
Okta should show an Application Created Successfully message.
Copy Your Okta App’s Client ID and Client Secret
In the Client Credentials panel, copy both the Client ID and Client Secret, and temporarily store them locally. You will need them in the next step, when you configure Cribl Stream.
Configure Cribl Stream
In Cribl Stream, select Settings > Access Management > Authentication.
Choose
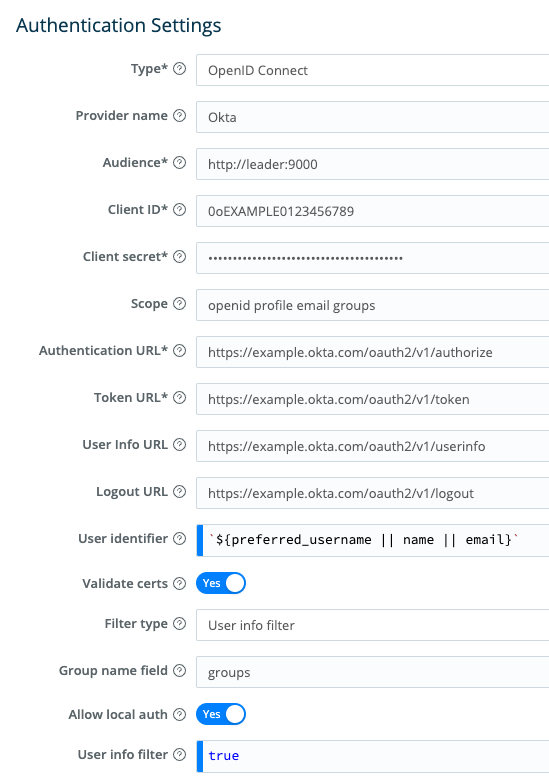
OpenID Connectfrom the Type dropdown.Choose
Oktafrom the Provider dropdown.In the Audience field, enter your Cribl Stream UI base URL. Do not append a trailing slash.
In the Client ID and Client secret fields, enter the respective values that you copied from the Okta UI in the previous step.
If your Cribl Stream is in Enterprise Distributed mode:
In the Scope field, add the scope
groupsto the default space-separated list of scopes, which is:openid profile email.Obtain the authentication, token, user info, and logout URLs for your Okta app, by sending a request to the OpenID Connect Discovery endpoint.
- This endpoint has the URL:
https://<tenant>.okta.com/.well-known/openid-configuration
…where
<tenant>is your Okta tenant name. For example:https://dev-12345678.okta.com/.well-known/openid-configuration- You can view the discovery document in your web browser, or use jq to extract the needed values, as in the following example:
curl -s https://<tenant>.okta.com/.well-known/openid-configuration | jq '. | {"auth": (.authorization_endpoint), "token":(.token_endpoint), "userinfo":(.userinfo_endpoint), "logout": (.end_session_endpoint)}'- Sample response:
{ "auth": "https://dev-416897.oktapreview.com/oauth2/v1/authorize", "token": "https://dev-416897.oktapreview.com/oauth2/v1/token", "userinfo": "https://dev-416897.oktapreview.com/oauth2/v1/userinfo", "logout": "https://dev-416897.oktapreview.com/oauth2/v1/logout" }- This endpoint has the URL:
Populate the Authentication URL Token URL fields with the respective
authandtokenURLs.If you configured Okta to use groups, populate the User info URL field with the
userinfoURL.This is necessary because Okta does not send group information in the
id_tokenpassed to Cribl Stream.If you want Account > Log out in Cribl Stream to log the user out globally, populate the Logout URL field with the
logoutURL. This means that when a user clicks the Accounts > Log out link in Cribl Stream, they are logged out of both Cribl Stream and Okta.
Configure Response to Okta /userinfo Endpoint
An Okta tenant’s user groups can be mastered either inside Okta, outside Okta, or both.
When the /userinfo endpoint is queried, Okta returns the appropriate groups membership of the user back to Cribl Stream:
For groups mastered inside Okta only, the app should pass a
Filtertype groups claim to Cribl Stream.For groups mastered outside Okta (e.g., Active Directory), or both inside and outside, the app should pass an
Expressiontype groups claim back to Cribl Stream.
See the Okta documentation on dynamic allow lists and using Okta together with Active Directory.
In Okta, you should still be in the panel for the app you created. If not, you can get there by opening Applications > Applications and selecting the app.
For groups mastered inside Okta only, complete this procedure.
For groups mastered outside Okta, or both inside and outside, complete this procedure.
Configure Groups Inside of Okta
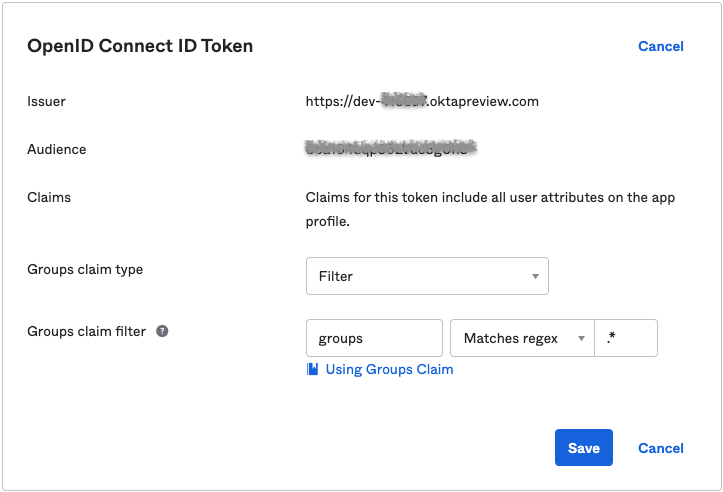
Open the Sign On tab. Then, in the OpenID Connect ID Token panel:
Click Edit to change the value of Groups claim filter to
groupsand show filter options.Leave Groups claim type set to
Filter.Choose Matches regex from the dropdown, and enter
.*as the regex.Click Save.
Configure Groups Outside of Okta
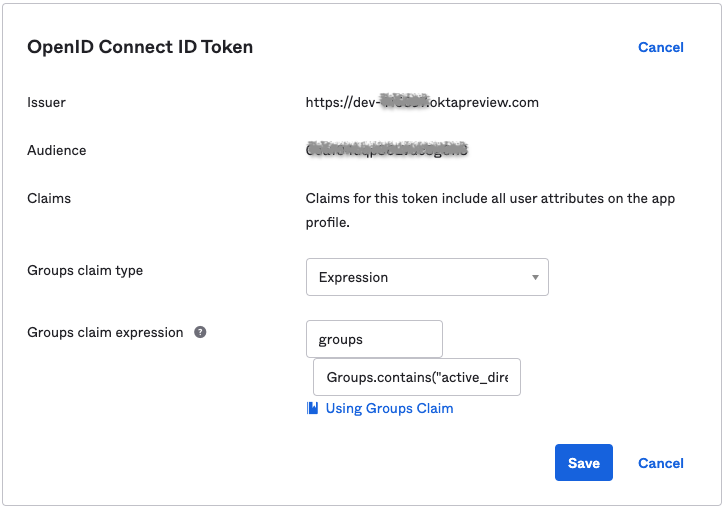
Open the Sign On tab, if necessary. Then, in the OpenID Connect ID Token panel:
Click Edit to change the value of Groups claim filter to
groupsand show filter options.Set Groups claim type set to
Expression.In the Groups claim expression, enter an expression field that matches the groups you want passed to Cribl Stream. See the Okta documentation for more details.
For example, to match on Active Directory groups that contain the string
okta, use the following expression:Groups.contains("active_directory", "cribl", 10)Click Save.
Configure ID Token to Include Groups Claim
Okta can recognize your groups only if your ID token includes your groups claim, as you’ll configure here.
In Okta, open the Security > API page.
In the Authorization Servers tab, click the edit (pencil) button for the desired Authorization Server.
In the resulting page, click the Claims tab.
If your groups claim already exists, click the edit (pencil) button. Otherwise, click Add Claim.
In the Include in token type drop-downs, choose
ID TokenandAlways, respectively.

Configure the remaining settings in the way that suits your groups claim.
Click Save (or Create if you’re adding the claim for the first time).
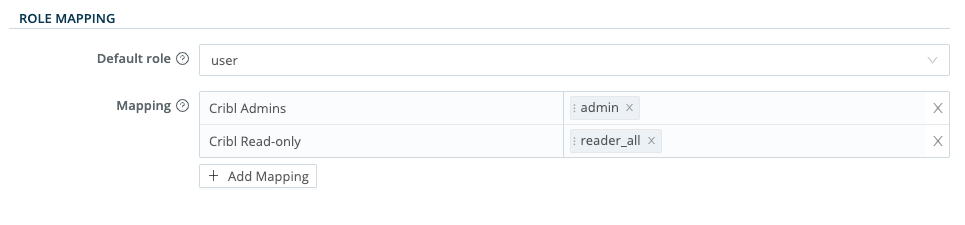
Map Okta Group Names to Cribl Stream Roles
You can assign a Cribl Stream Role to each Okta group name, and you can specify a default Role for users who are not in any groups.
In Cribl Stream, select Settings > Access Management > Authentication.
Scroll down to the ROLE MAPPING section.
Cribl recommends that you set the
defaultRole touser, meaning that this Role will be assigned to users who are not in any groups.Add mappings as needed.
The Okta group names in the left column are case-sensitive, and must match the values returned by Okta (those you saw earlier when configuring Okta).
Verify that SSO with Okta Is Working
- Log out of Cribl Stream, and verify that Okta is now an option on the login page.
Click Log in with Okta.
You should be redirected to Okta to authenticate yourself.
The OpenID connect flow should complete the authentication process.