


These docs are for Cribl Stream 4.1 and are no longer actively maintained.
See the latest version (4.18).
Notifications
In Cribl Stream (LogStream) 3.1 or later, and all Cribl Edge versions, you can configure Notifications about:
- Sources and Collectors that report abnormally high or low data flow rates.
- Sources and Collectors that report no data flow.
- Destinations that report errors.
- Destinations experiencing backpressure.
- Pending expiration of a Cribl Stream license.
Notifications are not designed to take the place of alerts on your overall infrastructure’s health - but they warn you about conditions that could impede expected data flow into and out of Cribl Stream.
Notifications require an Enterprise or Standard license, without which the configuration options described below will be hidden or disabled in Cribl Stream’s UI.
Notifications and Targets
Every Notification is sent to one or more targets. By default, any Notification that you configure will have a target of System Messages. This means that when a Notification is triggered, it will add an indicator on the top nav’s 🔔 Messages button. Click this button to view details in the Messages drawer.
All Notifications will also be sent as events to Cribl Stream’s internal logs - both application-wide, and with a filtered view available on affected Sources and Destinations. The application-wide logs are recorded as notifications.log on the Leader Node. The Leader Node is also responsible for sending all Notifications.
You can also send any Notification to additional targets, using Cribl Stream’s native PagerDuty integration and/or by specifying custom webhooks. For details, see Configuring Targets.
Notifications and RBAC
Notifications work with Cribl Stream’s role-based access control. For users with non-administrative permissions, their assigned Roles and Policies determine the Worker Groups on which they can view Notification messages, and can create and manage Notifications and targets
Configuring Notifications
Destination-state, Source-/Collector-state, and license-expiration Notifications are configured separately.
Destination-State Notifications
On individual Destinations, you can configure Notifications that will trigger under these conditions:
Read on for details about the above conditions, and about how to specify them in a Destination’s Condition drop-down.
Destination Backpressure Activated
This will generate a Notification reading Backpressure (<blocking|dropping>) is engaged for Destination <name> when one of the following events occur:
- The Destination’s Backpressure behavior is set to
BlockorDrop, and backpressure causes outgoing events to block or drop. - The Destination’s Backpressure behavior is set to Persistent Queue, but its Queue-full behavior is set to either
BlockorDrop new data; and a filled queue causes outgoing events to block or drop.
The threshold for the Notification to trigger is: Cribl Stream detected a blocked or dropped state during ≥ 5% of the trailing Time window that you configure in the Notification Settings below.

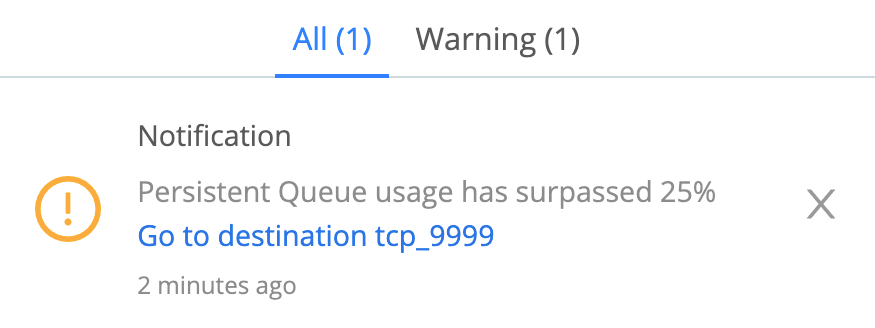
Persistent Queue Usage
This will generate a Persistent Queue usage has surpassed <threshold>% Notification when PQ files accumulate past the <threshold> percentage of capacity that you set in the Usage threshold field.
Unhealthy Destination
This will generate a Destination <name> is unhealthy Notification when the Destination’s health has been in “red” status (as indicated on the UI’s Monitoring page) over the trailing Time window that you configure in the Notification Settings below.
The algorithm has slight variations among Destination types, but red status generally means that ≥ 5% of health checks, aggregated over the Time window, reported either:
- An error inhibiting the Destination’s normal operation, such as a connection error; or
- For multiple-output Destinations like Splunk Load Balanced or Output Router, > 50% of the Destination senders in an error state.
Configuring Destination Notifications
To start configuring a Destination-state Notification:
- Configure and save the Destination.
- Access this Destination’s Notifications tab. Either:
- Click the Notifications button on the Manage…Destinations page’s appropriate row, or
- Reopen the Destination’s config modal, and click its Notifications tab.
- Click Add Notification to access the New Notification modal shown below.
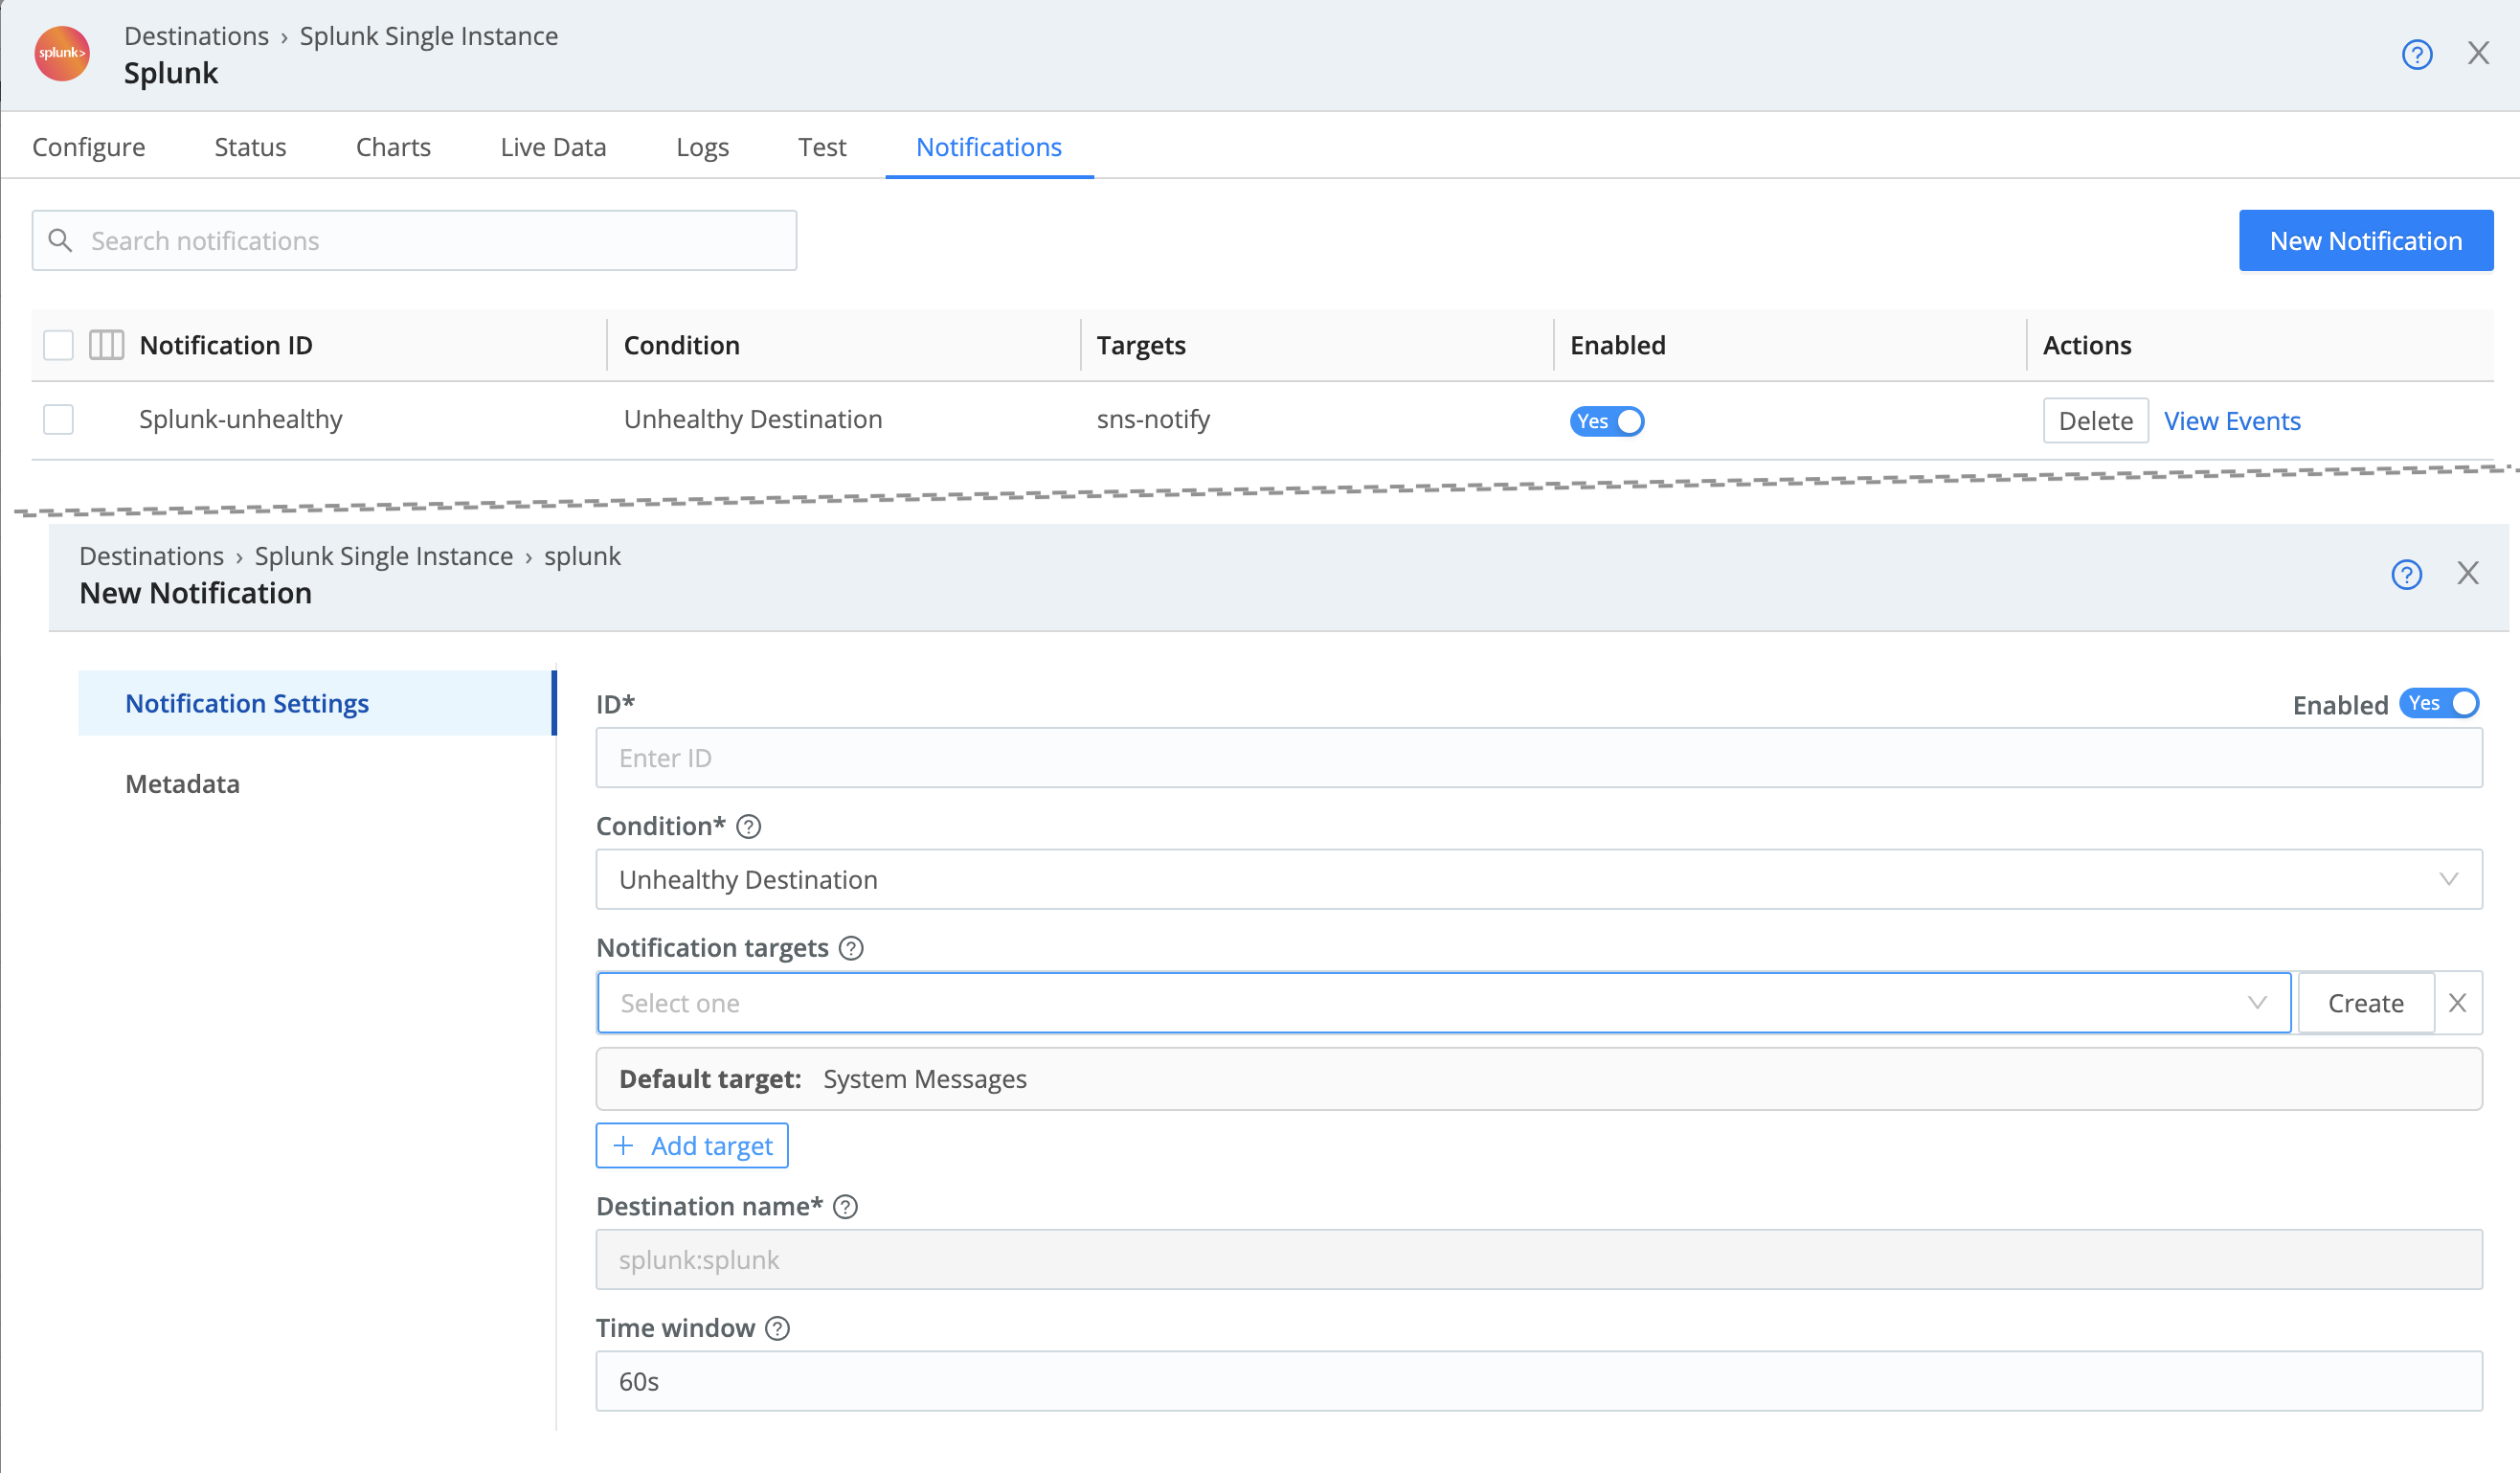
The New Notification modal provides Notification Settings and Metadata tabs, whose controls are listed in the respective sections below.
Notification Settings
ID: Enter a unique ID for this Notification. (Cribl recommends using a string that will make the Notification’s purpose clear.)
Condition: Select either Unhealthy Destination or Destination Backpressure Activated. (You can set triggers for both conditions on the same Destination, but you must configure them as separate Notifications.)
Notification targets: The Default target is always locked to System Messages. Click Add target to send this Notification to additional targets. You can add multiple targets.
- Use the resulting Notification targets drop-down to select any target you’ve already configured.
- Click Create to configure a new target. (See Configuring Targets for details.)
Destination name: This is locked to the Destination on which you’re setting this Notification.
Time window: Sets the threshold period before the Notification will trigger. E.g., the default 60s will generate a Notification when the Destination has reported the trigger condition over the past 60 seconds. (For % trigger conditions, see Destination Backpressure Activated and Unhealthy Destination.) To enter alternative numeric values, append units of s for seconds, m for minutes, h for hours, etc.
Usage threshold: This percentage setting is displayed only when you’ve set the Condition to Persistent Queue Usage.
Metadata
Click Add field here to add custom metadata fields to your Notifications, as key-value pairs:
Name: Enter a name for this custom field.
Value: Enter a JavaScript expression that defines this field’s value, enclosed in quotes or backticks. (Can evaluate to a constant.)
Once you’ve saved your Notification, you can see Notification events specific to this Destination on the Destination config modal’s Events tab. (When you set Source-state Notifcations, a corresponding Events tab is available on Sources’ and Collectors’ config modals.) For a comprehensive view of all Notification events, see the systemwide Events Tab.
Recurrence/Expiration
If a Destination-State Notification’s trigger condition persists beyond your configured Time window, expect a new notification to be sent once per Time window interval.
Notifications will cease when the triggering condition clears. There is no explicit “problem cleared” Notification.
Source-State Notifications
In Cribl Stream 3.5 and above, you can configure Notifications on Sources and Collectors to trigger under these conditions:
You configure these similarly to Destination Notifications: Select the Notification type from the Condition drop-down. Each type exposes additional fields, as outlined below.
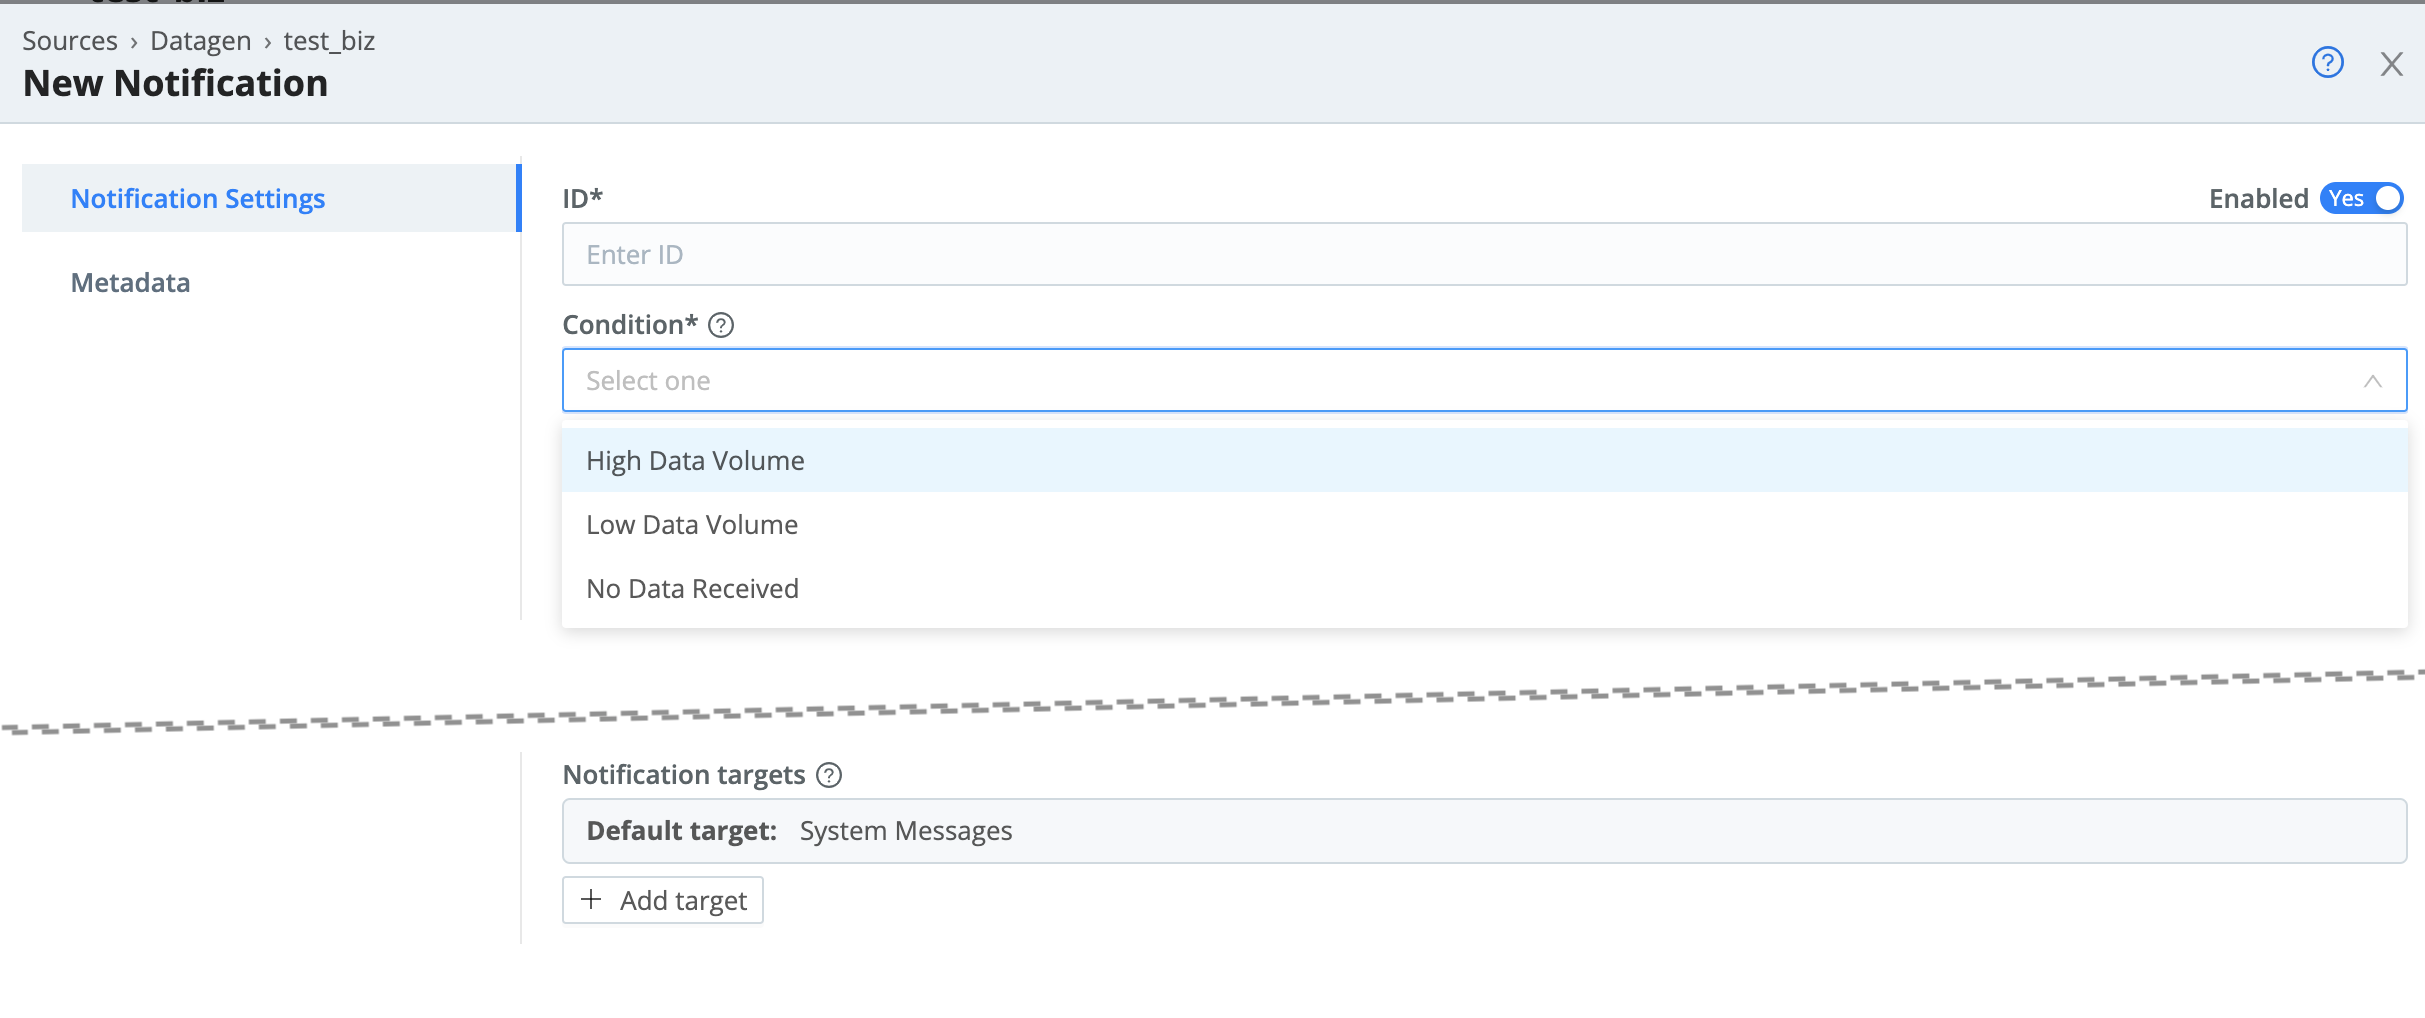
High Data Volume
Select the High Data Volume Condition to trigger Notifications when incoming data over your configured Time window exceeds your configured Data volume threshold. This selection exposes the following fields:
Notification targets: As with Destination-State Notifications, the Default target is always locked to System Messages. Click Add target to send this Notification to additional targets. You can add multiple targets.
- Use the resulting Notification targets drop-down to select any target you’ve already configured.
- Click Create to configure a new target. (See Configuring Targets for details.)
Source name: This is locked to the Source on which you’re setting this Notification.
Time window: As with the corresponding field on Destination-State Notifications, this field’s value sets the threshold period before the Notification will trigger. The default 60s will generate a Notification when the Source has reported the trigger condition over the past 60 seconds. To enter alternative numeric values, append units of s for seconds, m for minutes, h for hours, etc.
Data volume: Enter the threshold above which a Notification will trigger. Accepts numerals with units like KB, MB, and so forth. For example: 4GB. If you want the unit to be bytes, enter the numeral only, without a unit designator.
Low Data Volume
Select the Low Data Volume Condition to trigger Notifications when incoming data over your configured Time window is lower than your configured Data volume threshold.
This selection exposes the same additional fields as High Data Volume, except that here, the Data volume value defines a floor below which the Notification will trigger.
No Data
Select the No Data Received Condition to trigger Notifications when the Source or Collector ingests zero data over your configured Time window.
This selection exposes the same additional fields as High Data Volume, except (for obvious reasons) it omits the Data volume field - there is no threshold, because this is a binary condition.
License-Expiration Notifications
To prevent interruptions in data throughput, you can configure a Notification that will be triggered two weeks before your Cribl Stream paid license expires, and then again upon expiration. (If the two-week Notification is cleared from the 💬 Messages tab between those dates, but the license has not been extended, it will trigger again.)
Configuring License-Expiration Notifications
- From the top nav, select Settings > (Global Settings >) Licensing.
- Click Add expiration notification to access the New Notification modal shown below.
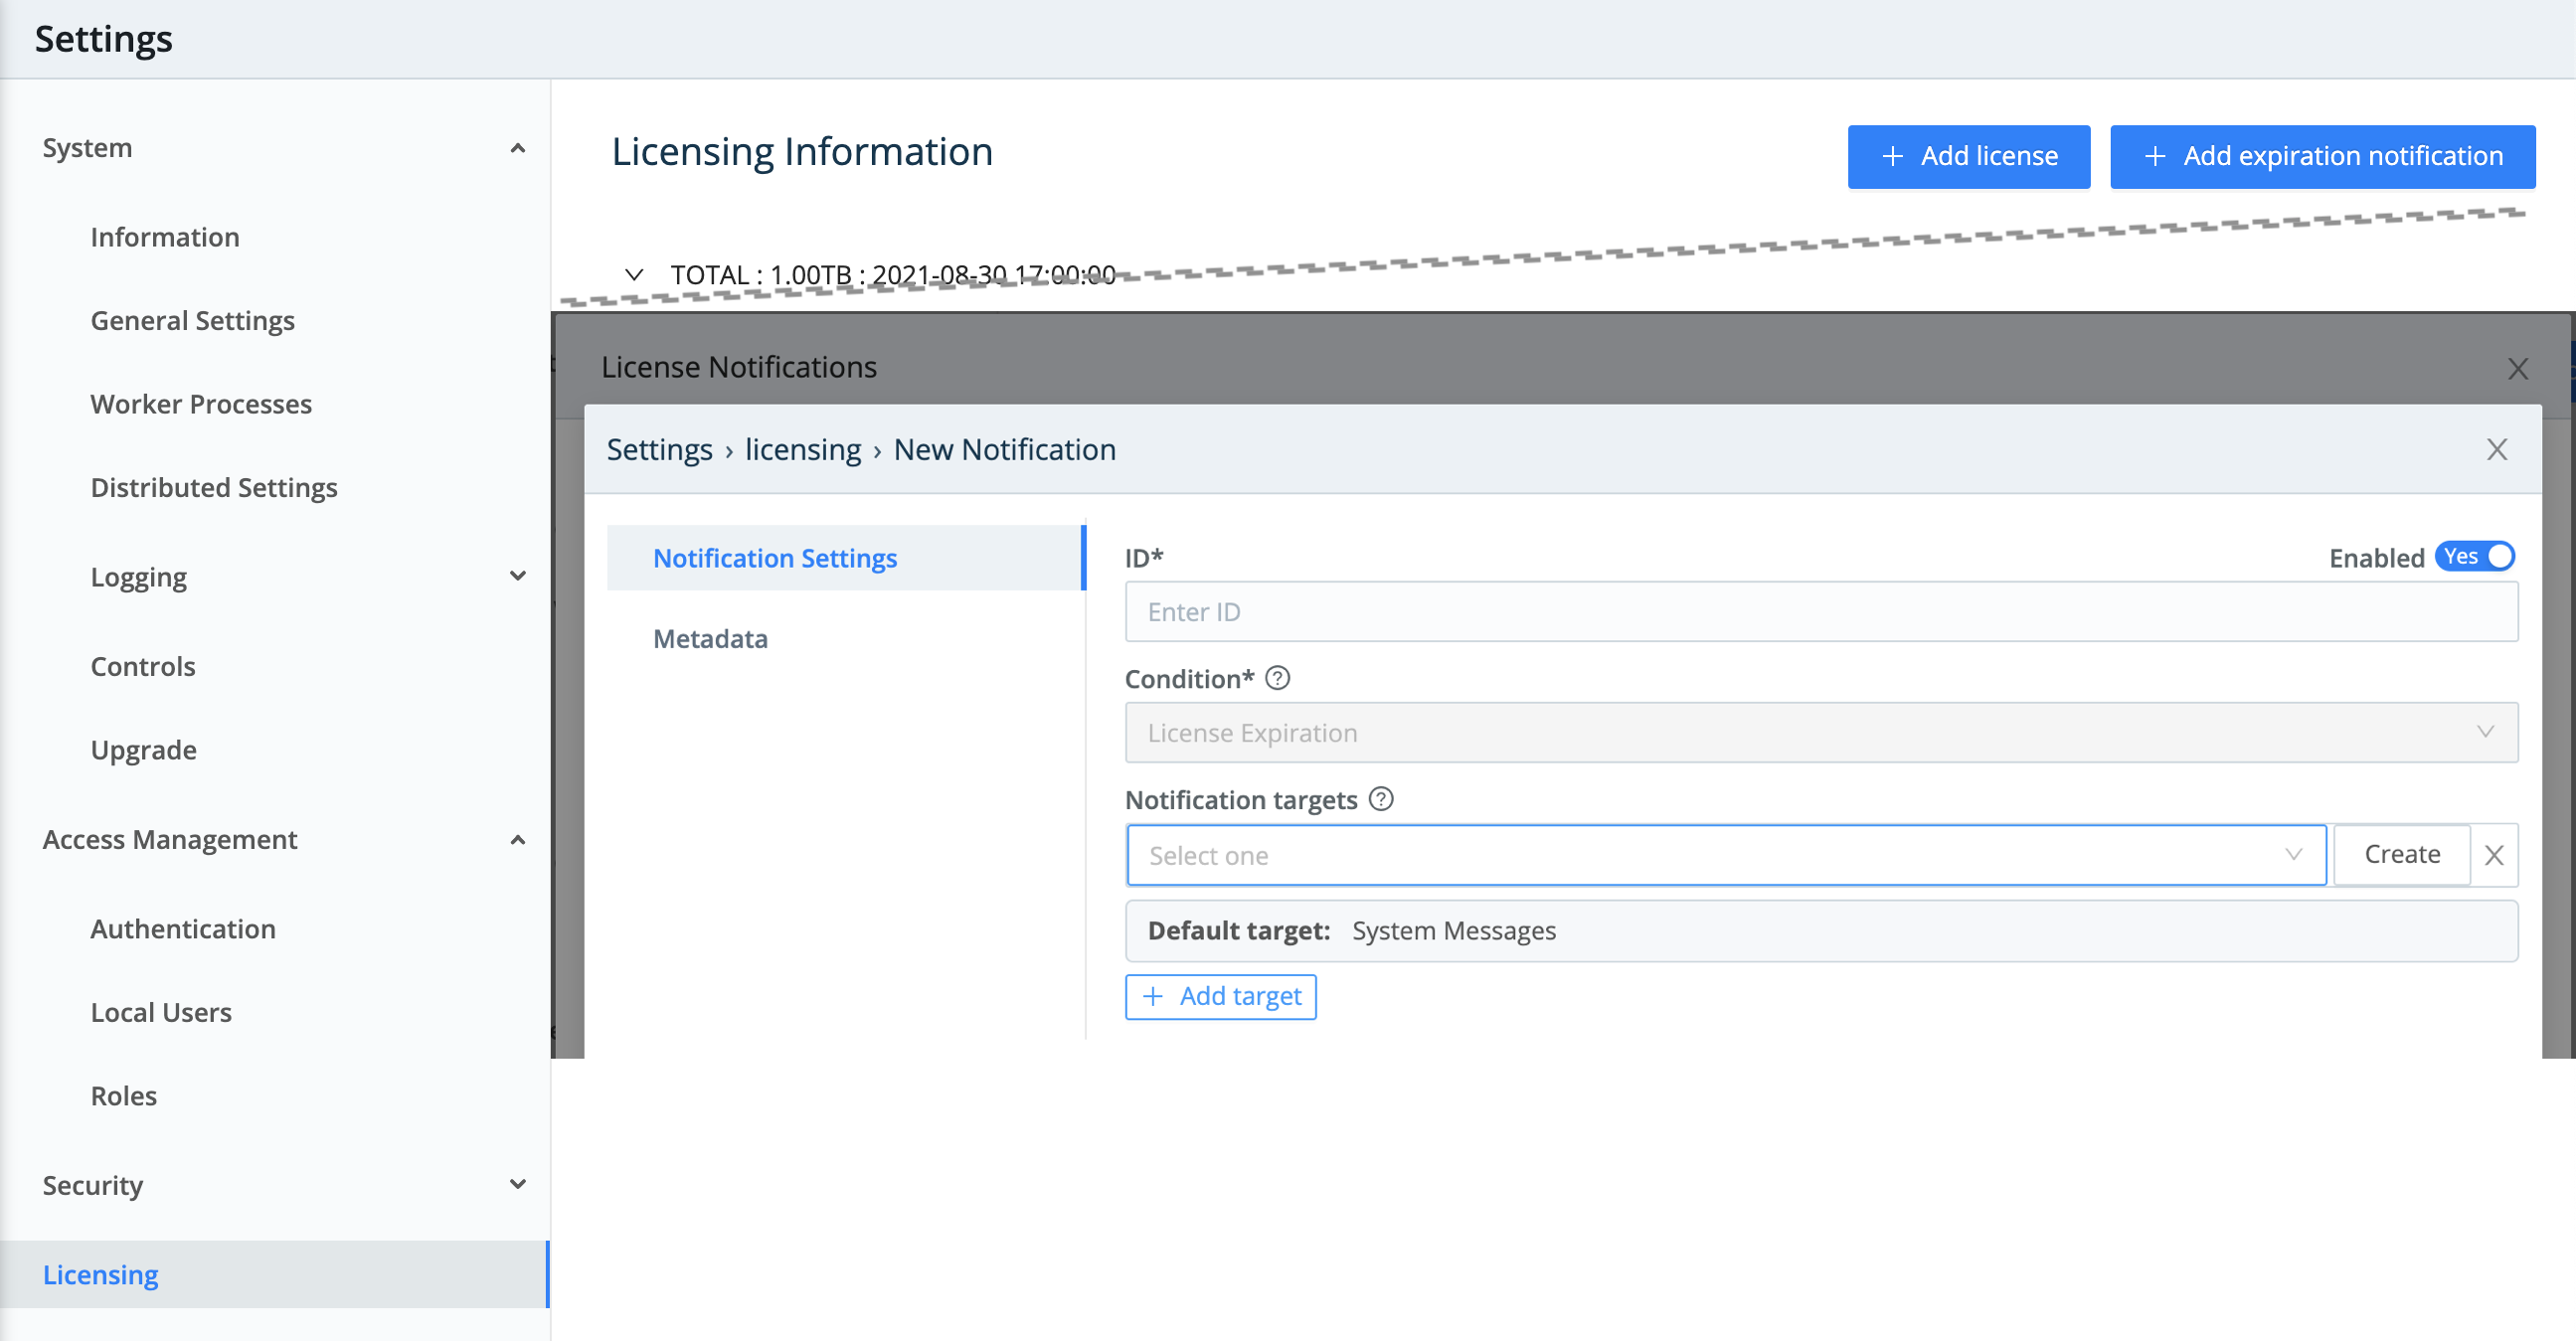
This New Notification modal provides Notification Settings and Metadata tabs, with a subset of the controls available in the Destination-unhealthy modal:
Notification Settings
ID: Enter a unique ID for this Notification.
Condition: This modal’s triggering condition is locked to License Expiration.
Notification targets: The Default target is always locked to System Messages. Click Add target for each additional target that you want to send this Notification to.
- Use the resulting Notification targets drop-down to select any target you’ve already configured.
- Click Create to configure a new target. See Configuring Targets for details.
Metadata
The options here are identical to those on the Destination-unhealthy modal’s Metadata tab.
Managing Notifications
The Notifications page provides global display and controls for all your configured Notifications, targets, and triggered Events - across all Sources, Collectors, Destinations, and all Worker Groups. To access this page: From the top nav, select Manage > Notifications.
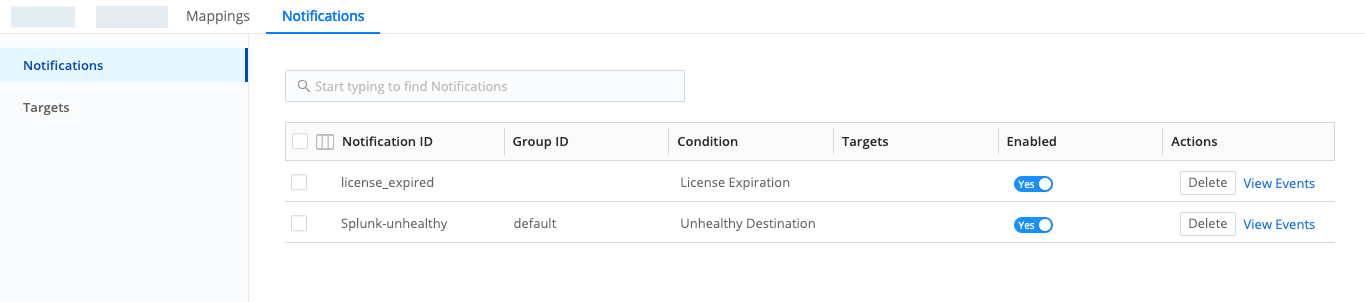
Notifications Tab
This tab lists all your configured Source-state and Destination-unhealthy Notifications, across all integrations, along with any configured license-expiration Notifications. You can’t create new Notifications here, but you can disable or delete existing Notifications; you can also click on any Notification’s row to open and modify its configuration.
Targets Tab
This tab is where you centrally configure and manage targets that are available across Cribl Stream - to all Source-, Destination-, and license-based Notifications. See Configuring Targets for details.
Events Tab
This tab displays logged events that have been fired by all your configured Notifications. You can filter by search string, and by lookback time.
What’s Next
In future Cribl Stream releases, Cribl plans to expand the Notifications feature with options to configure additional triggering conditions and time resolutions.