


These docs are for Cribl Stream 4.10 and are no longer actively maintained.
See the latest version (4.17).
Cribl Stream Tour
This is a quick visual overview of configuring primary Cribl Stream components. It covers both the QuickConnect graphical UI and the more flexible Data Routing alternative, where you can conditionally branch the same incoming data to specific processing logic and destinations.
This tour is an ideal way to quickly familiarize yourself with Cribl Stream’s UI and its general data-flow options. You can walk through the steps below in a free Cribl.Cloud environment, without installing any software.
While this tour is not a prerequisite to the adjacent Getting Started Guide and Distributed Quick Start tutorials, it will accelerate your later progress through them. The adjacent tutorials focus on on-prem deployments, processing Pipelines configuration, and more-complex routing options.
Accessing Cribl Stream
The quickest way to start your progress through this tour is by signing up for a free Cribl.Cloud account. Cribl will manage all infrastructure for you, and you can upgrade your deployment to a flexible paid plan whenever you want more capacity. Log in and you’ll be ready to go.
If you prefer to deploy Cribl Stream on your own infrastructure, see Installing on Linux. Then register your deployed software. Registration will unlock a free license with similar capabilities to a Cribl.Cloud free plan. Customize your password (if desired) and you’ll be ready to go.
Setting Up the Tour on Cribl.Cloud
These first steps apply only to a Cribl.Cloud Organization. If you’ve deployed Cribl Stream as a single instance on your own Linux infrastructure, skip ahead to Simple or Complex Routing?.
Examples throughout this tour prioritize a Cribl.Cloud environment, which defaults to one Worker Group with one or two Workers. If you’re running a single instance on your own Linux infrastructure, the examples will be equally valid, but you can ignore steps about deploying Groups.
Depending on how and when you take this tour - your environment, your plan or license tier (from free to Enterprise), and the date - some Cribl Stream pages might look slightly different from some screen captures in this tour. Again, the instructions will be equally valid.
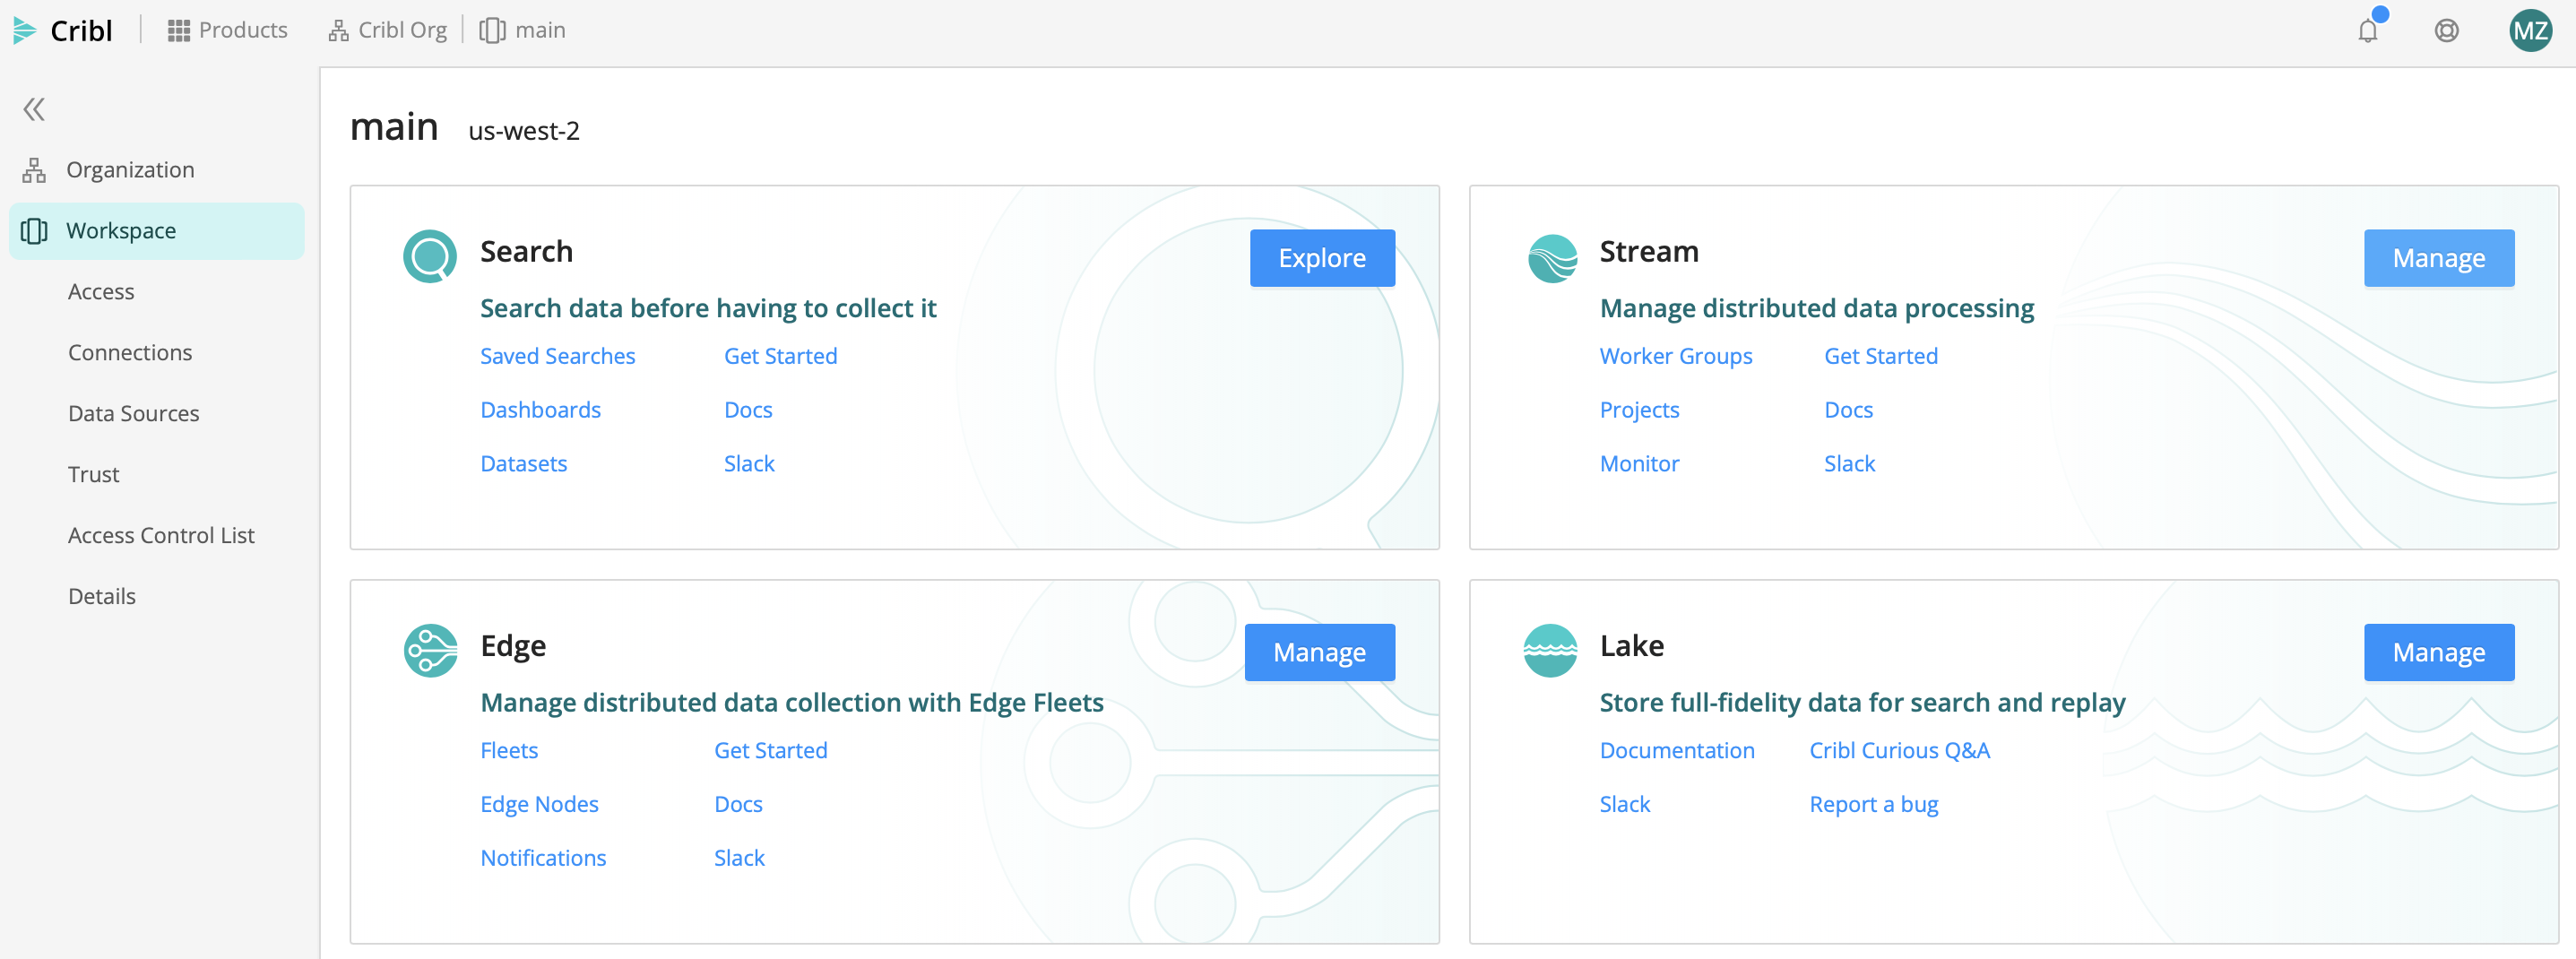
- From your Cribl.Cloud Organization’s home page, select the Stream tile’s Manage button.
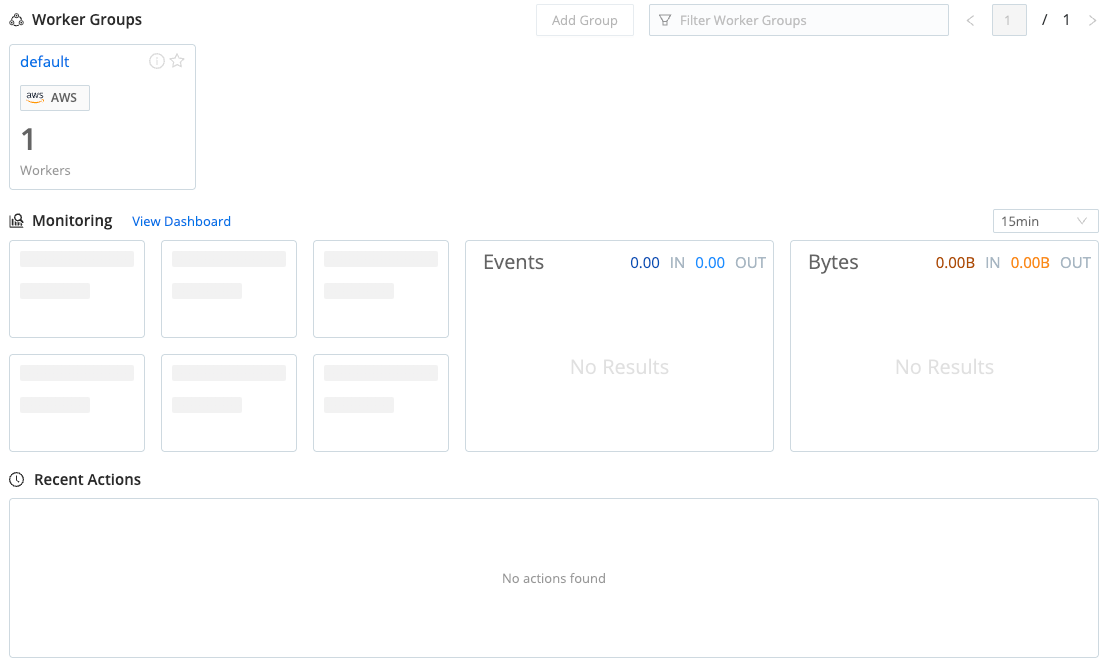
- On the resulting Worker Groups page, select the
defaultGroup.
(A Worker Group is a collection of processing instances that share the same configuration. For details, see the Distributed Deployment topic.)
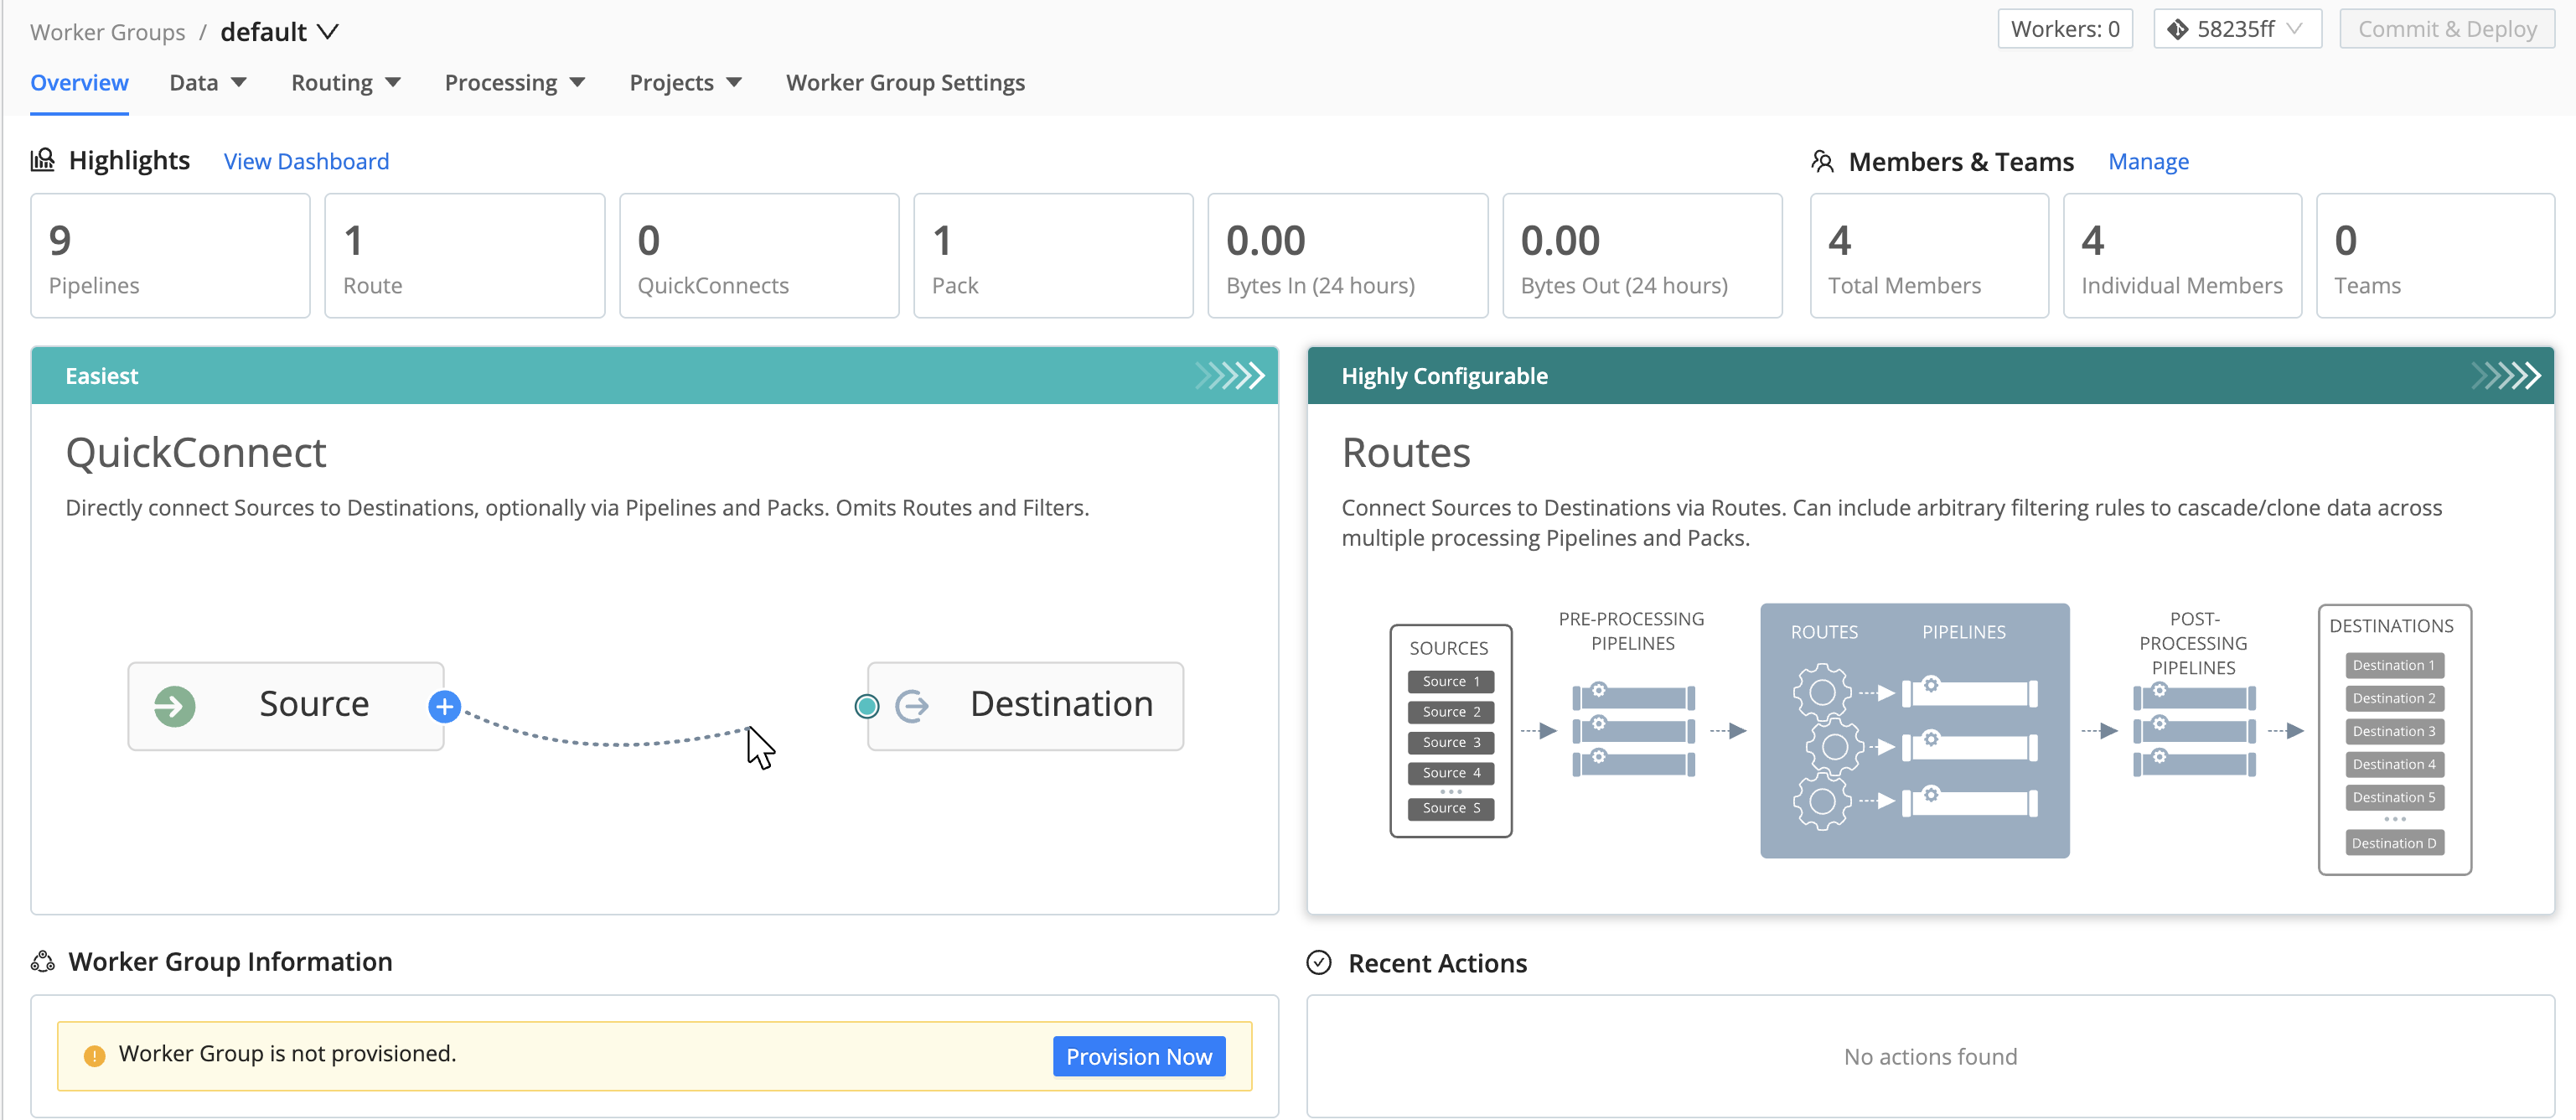
default Worker Group- If you see a Worker Group is not provisioned warning, select the Provision Now button to enable the data flow we’ll configure below.
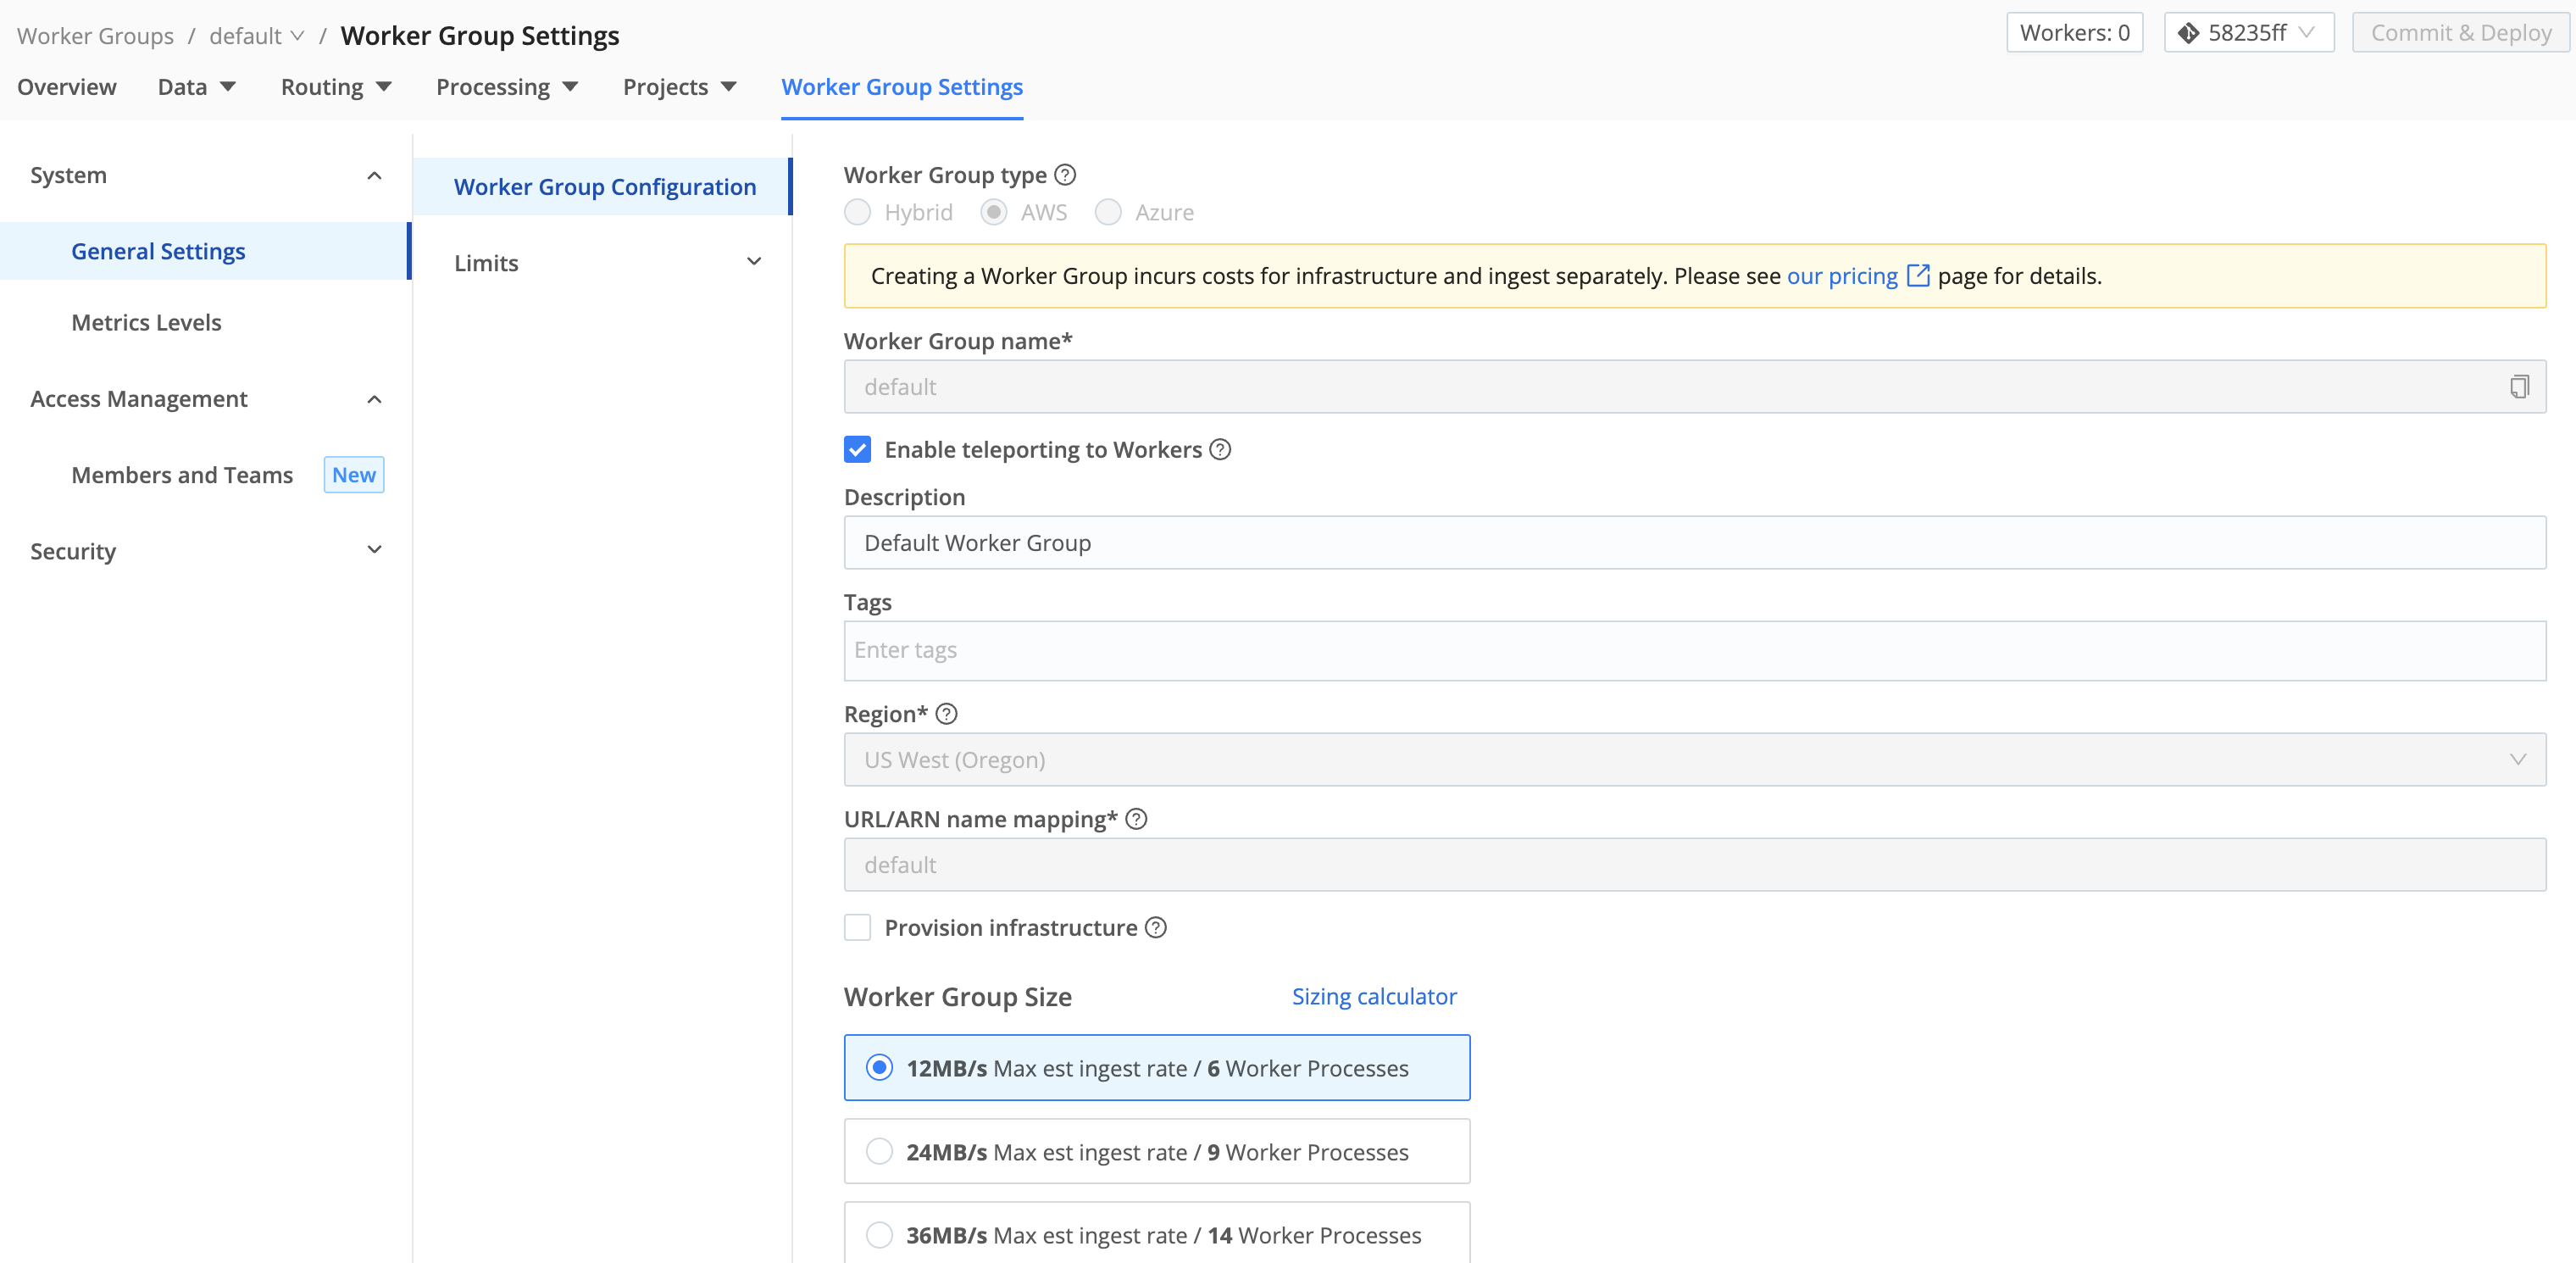
default Group’s initial state- As shown below, select both the Enable teleporting to Workers and the Provision infrastructure check boxes. Leave other defaults selected, and select Save.
default GroupWhen you see a Settings saved confirmation banner, you’re ready to commit and deploy your newly provisioned Worker Group.
Committing and Deploying Config Changes
After any significant configuration change, you’ll be prompted to use Cribl Stream’s built-in version control (Git) features to deploy (or redeploy) your Workers and commit your configuration changes. Your first prompt is to deploy your newly provisioned Worker Group:
- Select the blue Deploy button at the upper right (shown above with a red highlight indicator).
Leave the default commit message intact and click Deploy. This will make your newly provisioned Group ready to process data.
- Next select the red-highlighted Version Control button at the upper right.

- In the resulting drop-down, select the Commit button.
(We’ll explain all Version Control details later in this topic.)

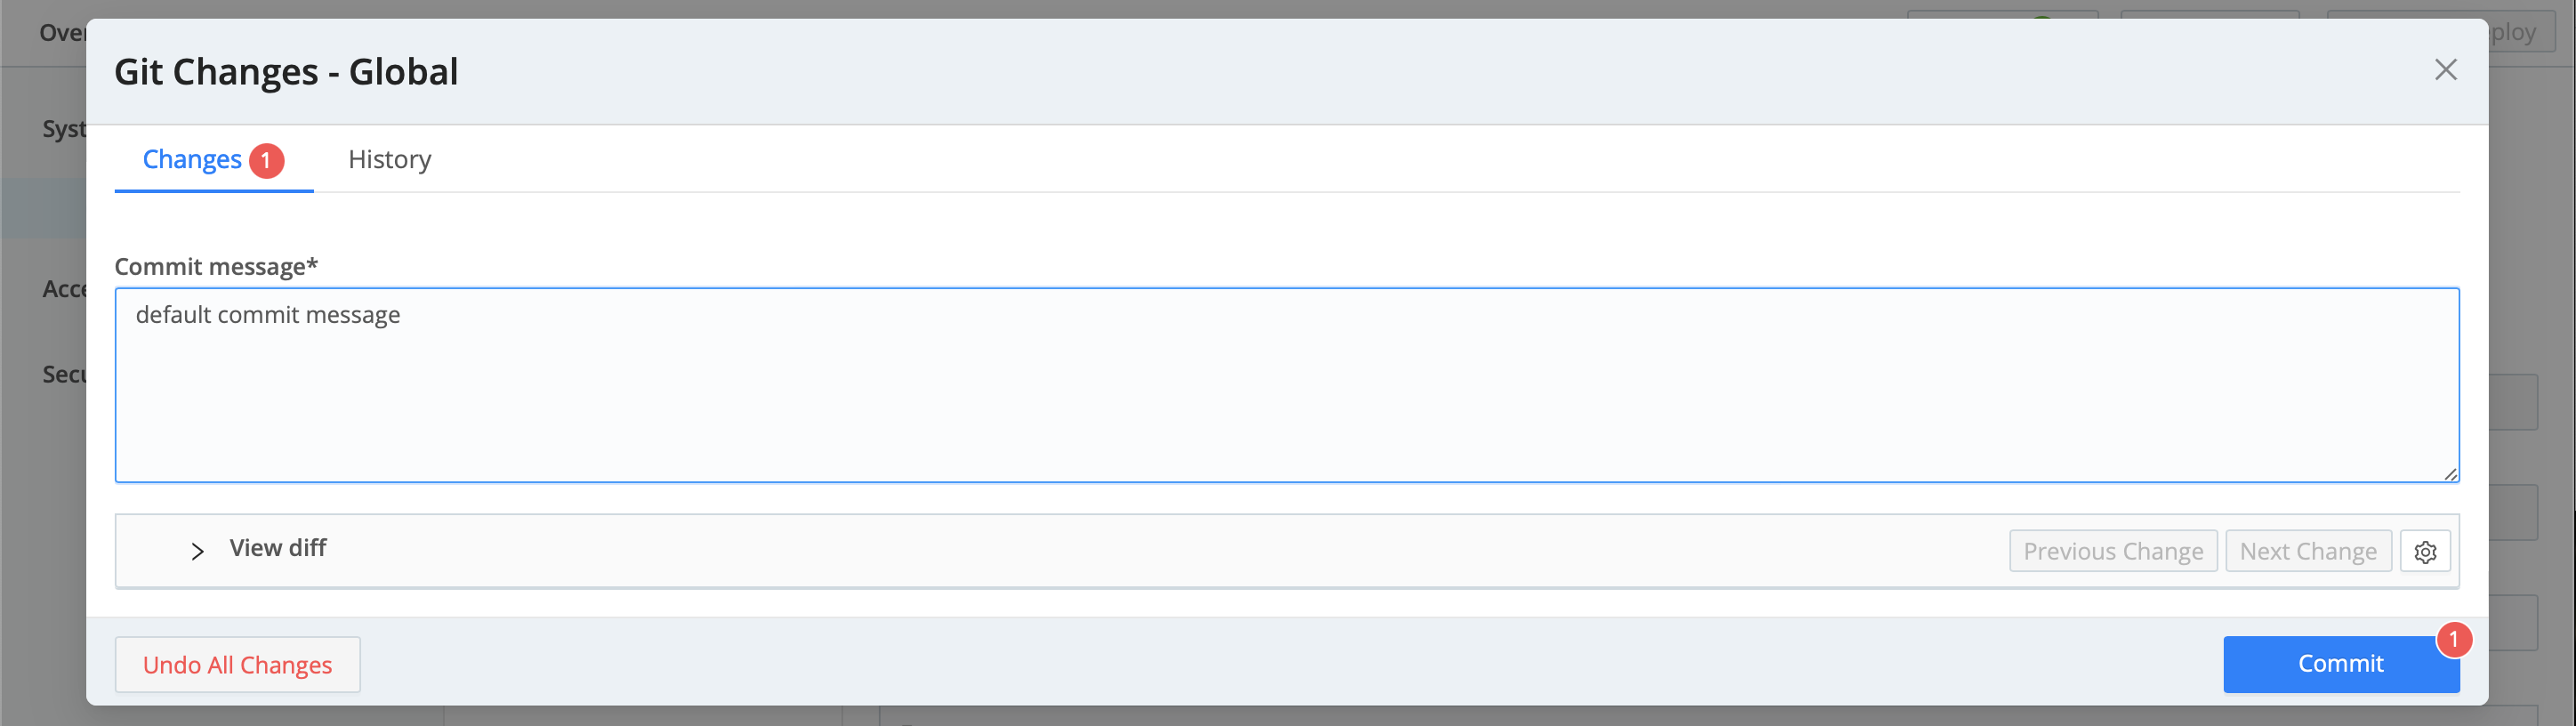
- In the resulting Git Changes - Global modal, accept all defaults, and again select Commit to close the modal.
- If you don’t already see a display like that shown below, select Stream Home to restore the Worker Groups page, then again select the
defaultGroup. You’re now set up for the rest of this tour.
To begin configuring this Group, you now have a two-up choice of QuickConnect or Routes tiles. How to choose? See the next section.
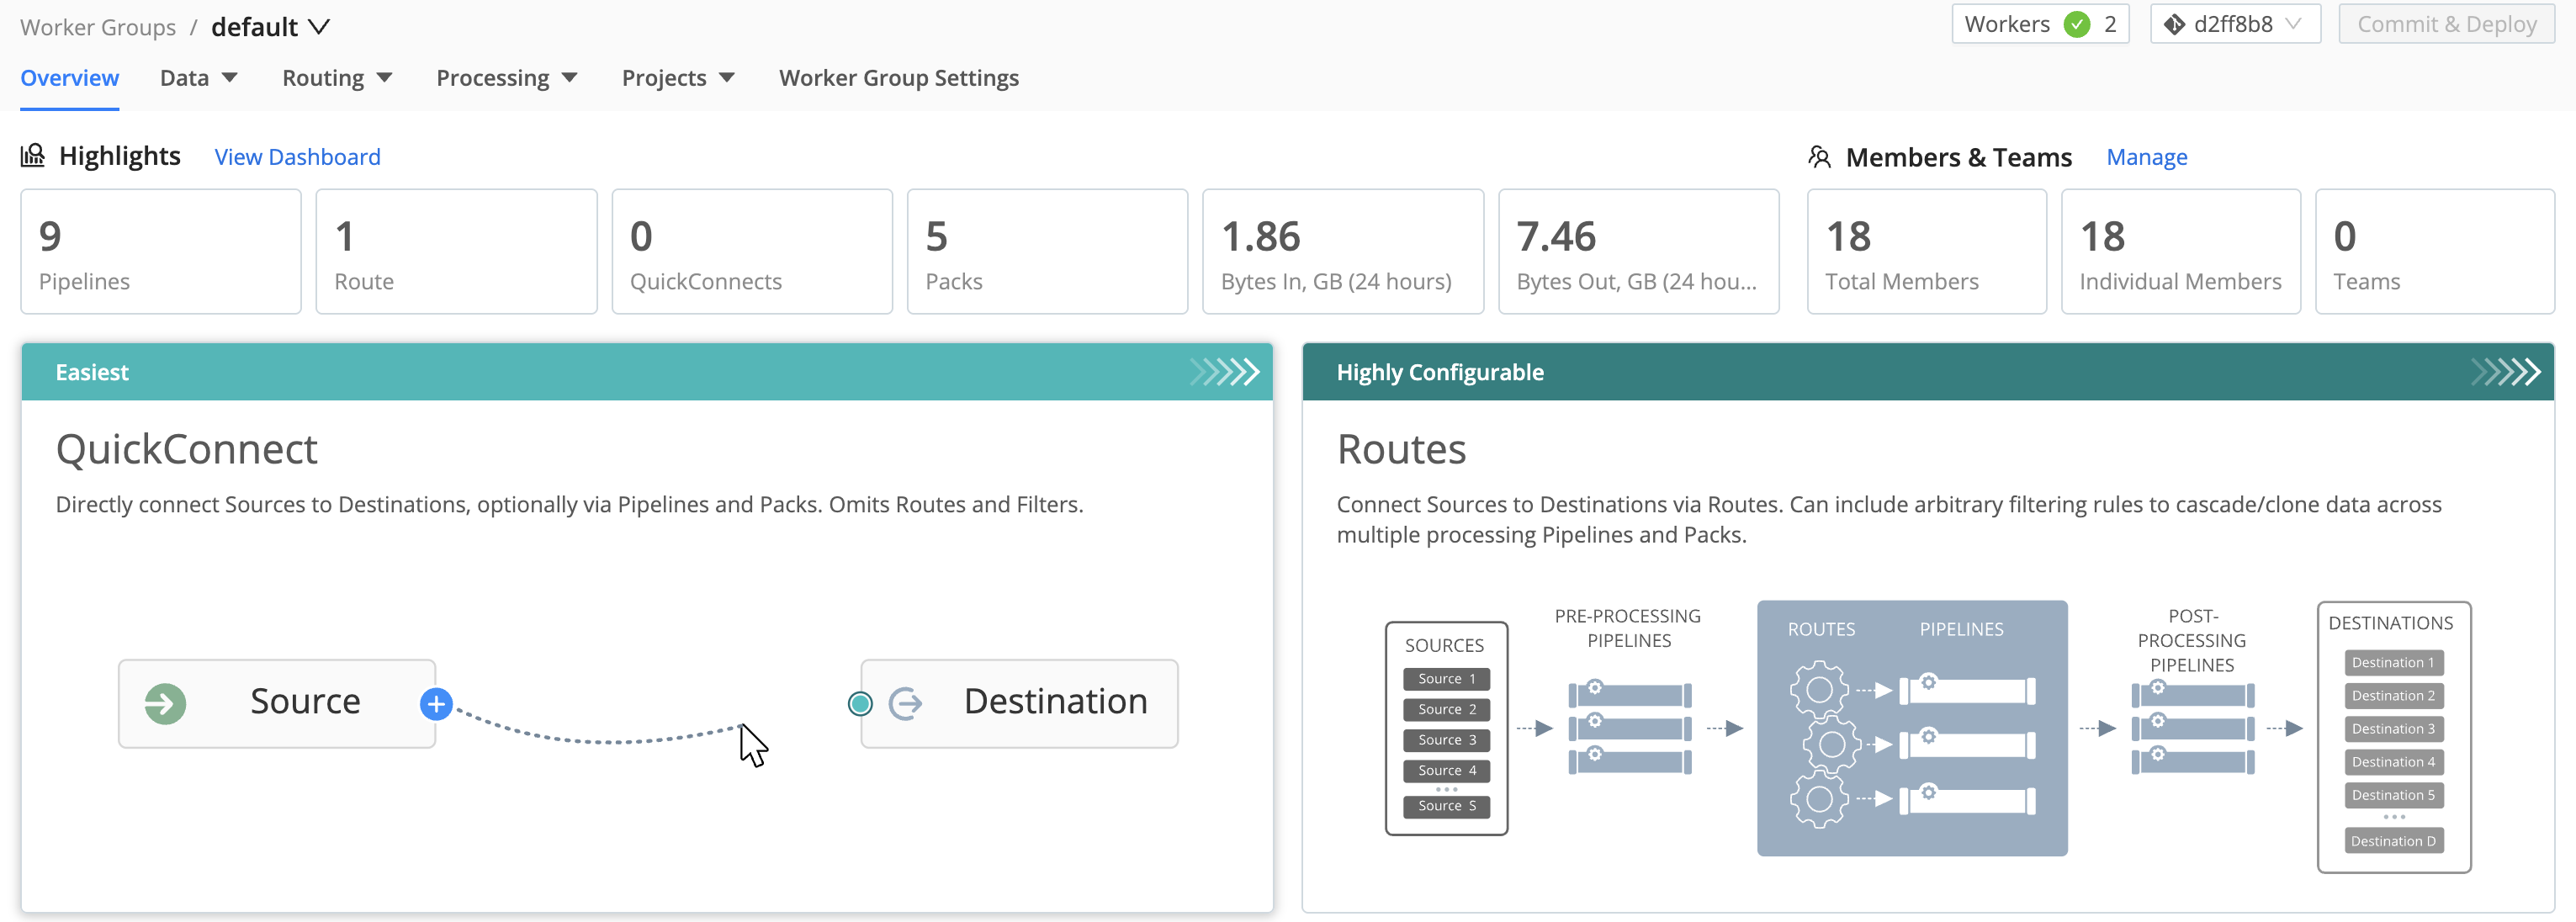
default Group enabled and ready to flow some dataFor More Information
Simple or Complex Routing?
Your first choice is how simply or intricately you want to configure data flow from the first data Source you set up. Cribl Stream offers two user interfaces:
QuickConnect (the left tile shown above) provides a simple visual UI. You drag and drop connections from Sources on the left to Destinations on the right. Each connection can include as much or as little intermediate processing as you like. To remove a connection, just drag it off the Destination (you’ll get a confirmation modal). The only practical limitation here is that data flow through every Source -> Destination connection must be parallel and independent.
Data Routing (the right tile shown above) provides fine-grained control, via a more traditional UI that you configure across separate modals and pages. You build a Routing table with conditional processing. This can cascade and clone data across multiple processing Routes, according to the arbitrary filtering rules and sequence that you define.
So the trade-off between these two options is ease of use versus flexibility. These two options are separate, but not mutually exclusive: You can set up simultaneous data flows through QuickConnect and Data Routes.
You can also move Sources, and their connections to Destinations, between the two UIs. So one obvious option is to configure your first data flow in QuickConnect, and then move to the Routing UI as your familiarity and needs expand.
Each configured Source instance can be assigned only to QuickConnect or Routing, not both. To switch it to the opposite environment, you’ll need to move it there, or duplicate its configuration there.
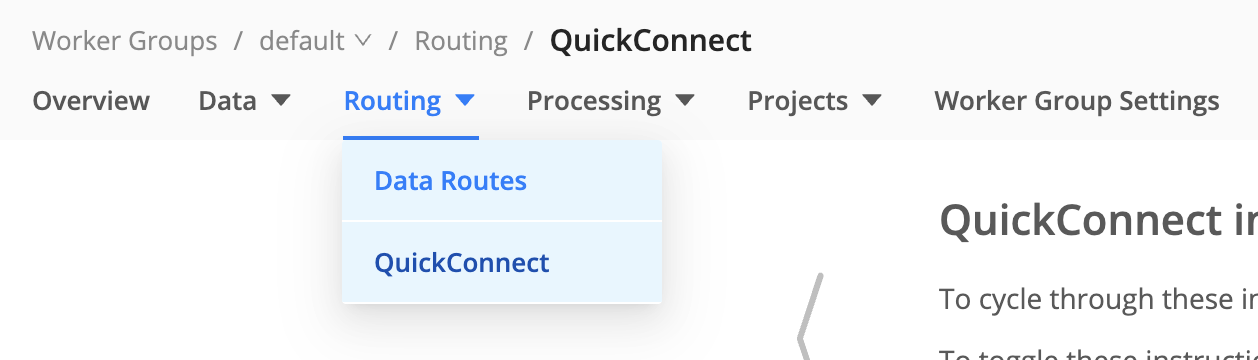
Navigate Between User Interfaces
To work in QuickConnect, select the left tile shown above, or select Routing > QuickConnect.
To work in the Routing UI, select the right tile shown above, or select Routing > Data Routes.
You can always switch between the two environments from a Worker Group, by using the Routing submenu.
Configure a Source
A Source is a model of an upstream service sending data into the system. In this model, you configure authentication and/or other needed parameters.
You can configure multiple instances of a given Source type, each with different parameters. You can also attach processing that’s specific to each instance. Cribl Stream provides the Datagen Source type to generate sample inbound events for development and testing.
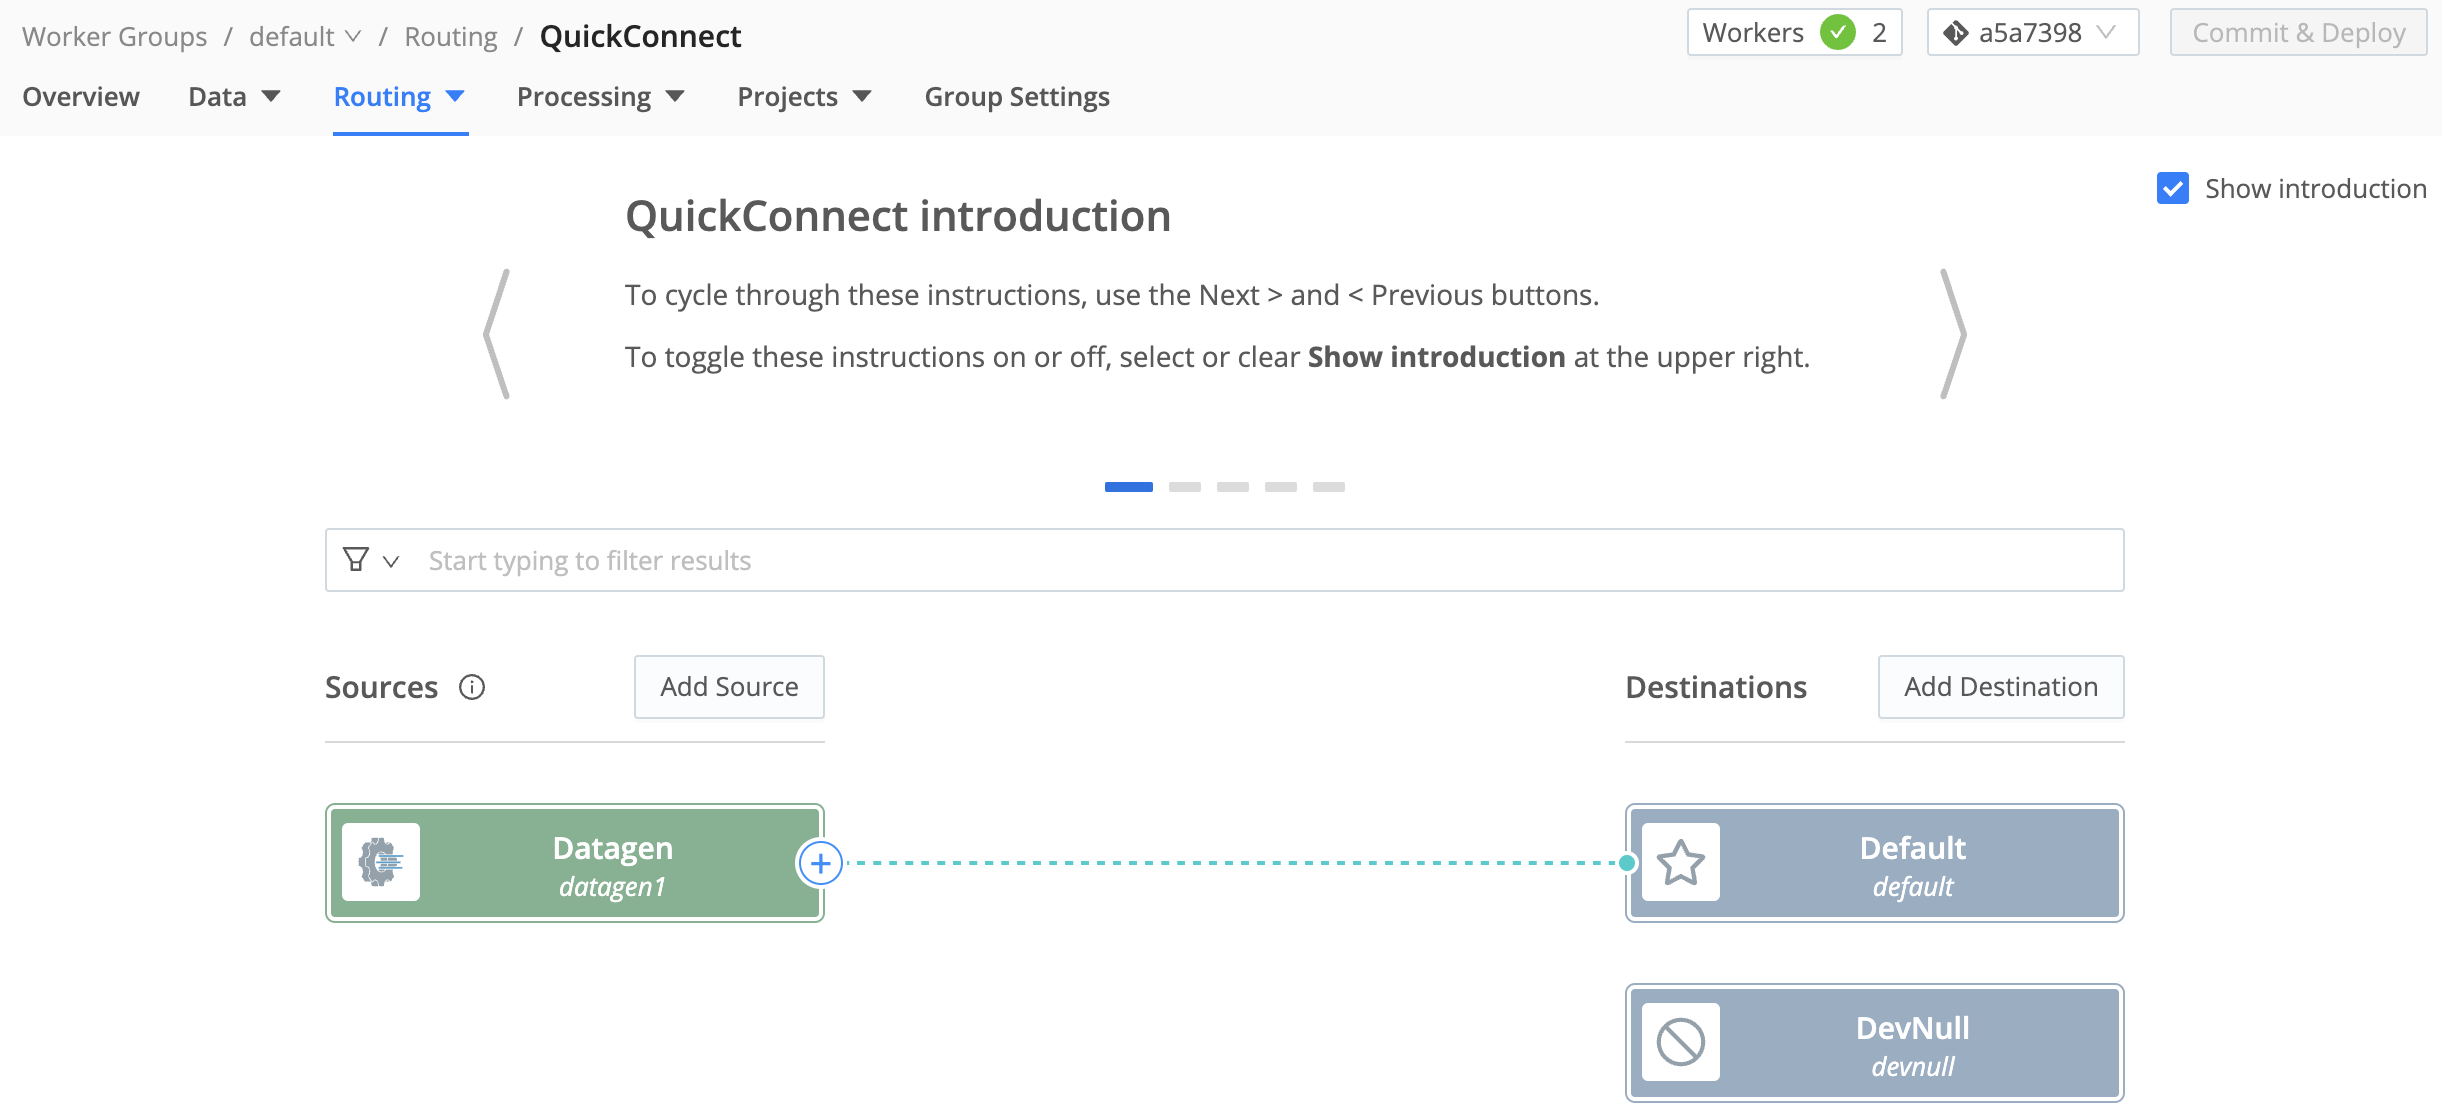
Using QuickConnect
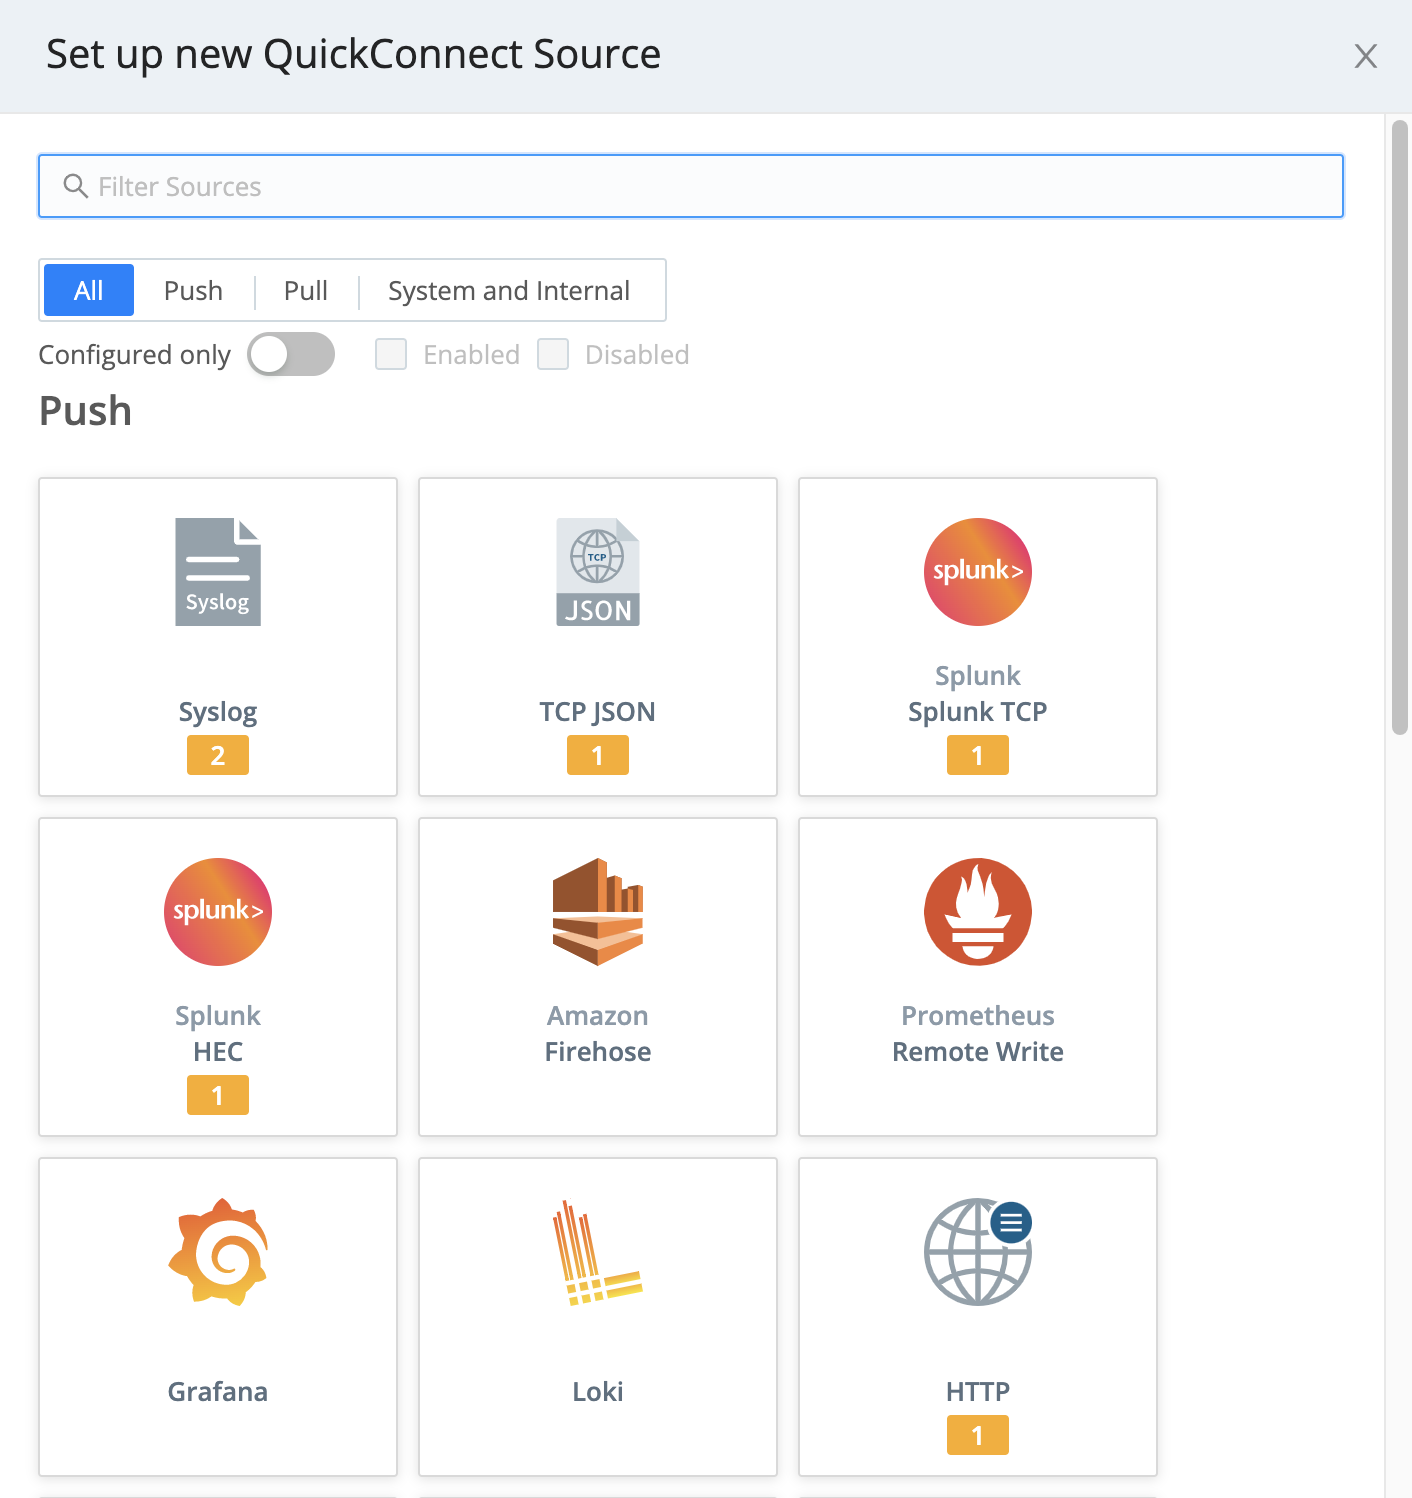
In QuickConnect, select the Add Source button on the left (Sources) side. In the resulting left drawer, search for and select your desired Source type to begin configuring a new instance of that Source.
To configure (or reconfigure) a Source that’s already present in QuickConnect, hover over its tile and select the ⚙️ Configure button.
For multiple Sources of the same type, tiles will be consolidated in a stack until you click the stack to display the hidden tiles.
Using Data Routes
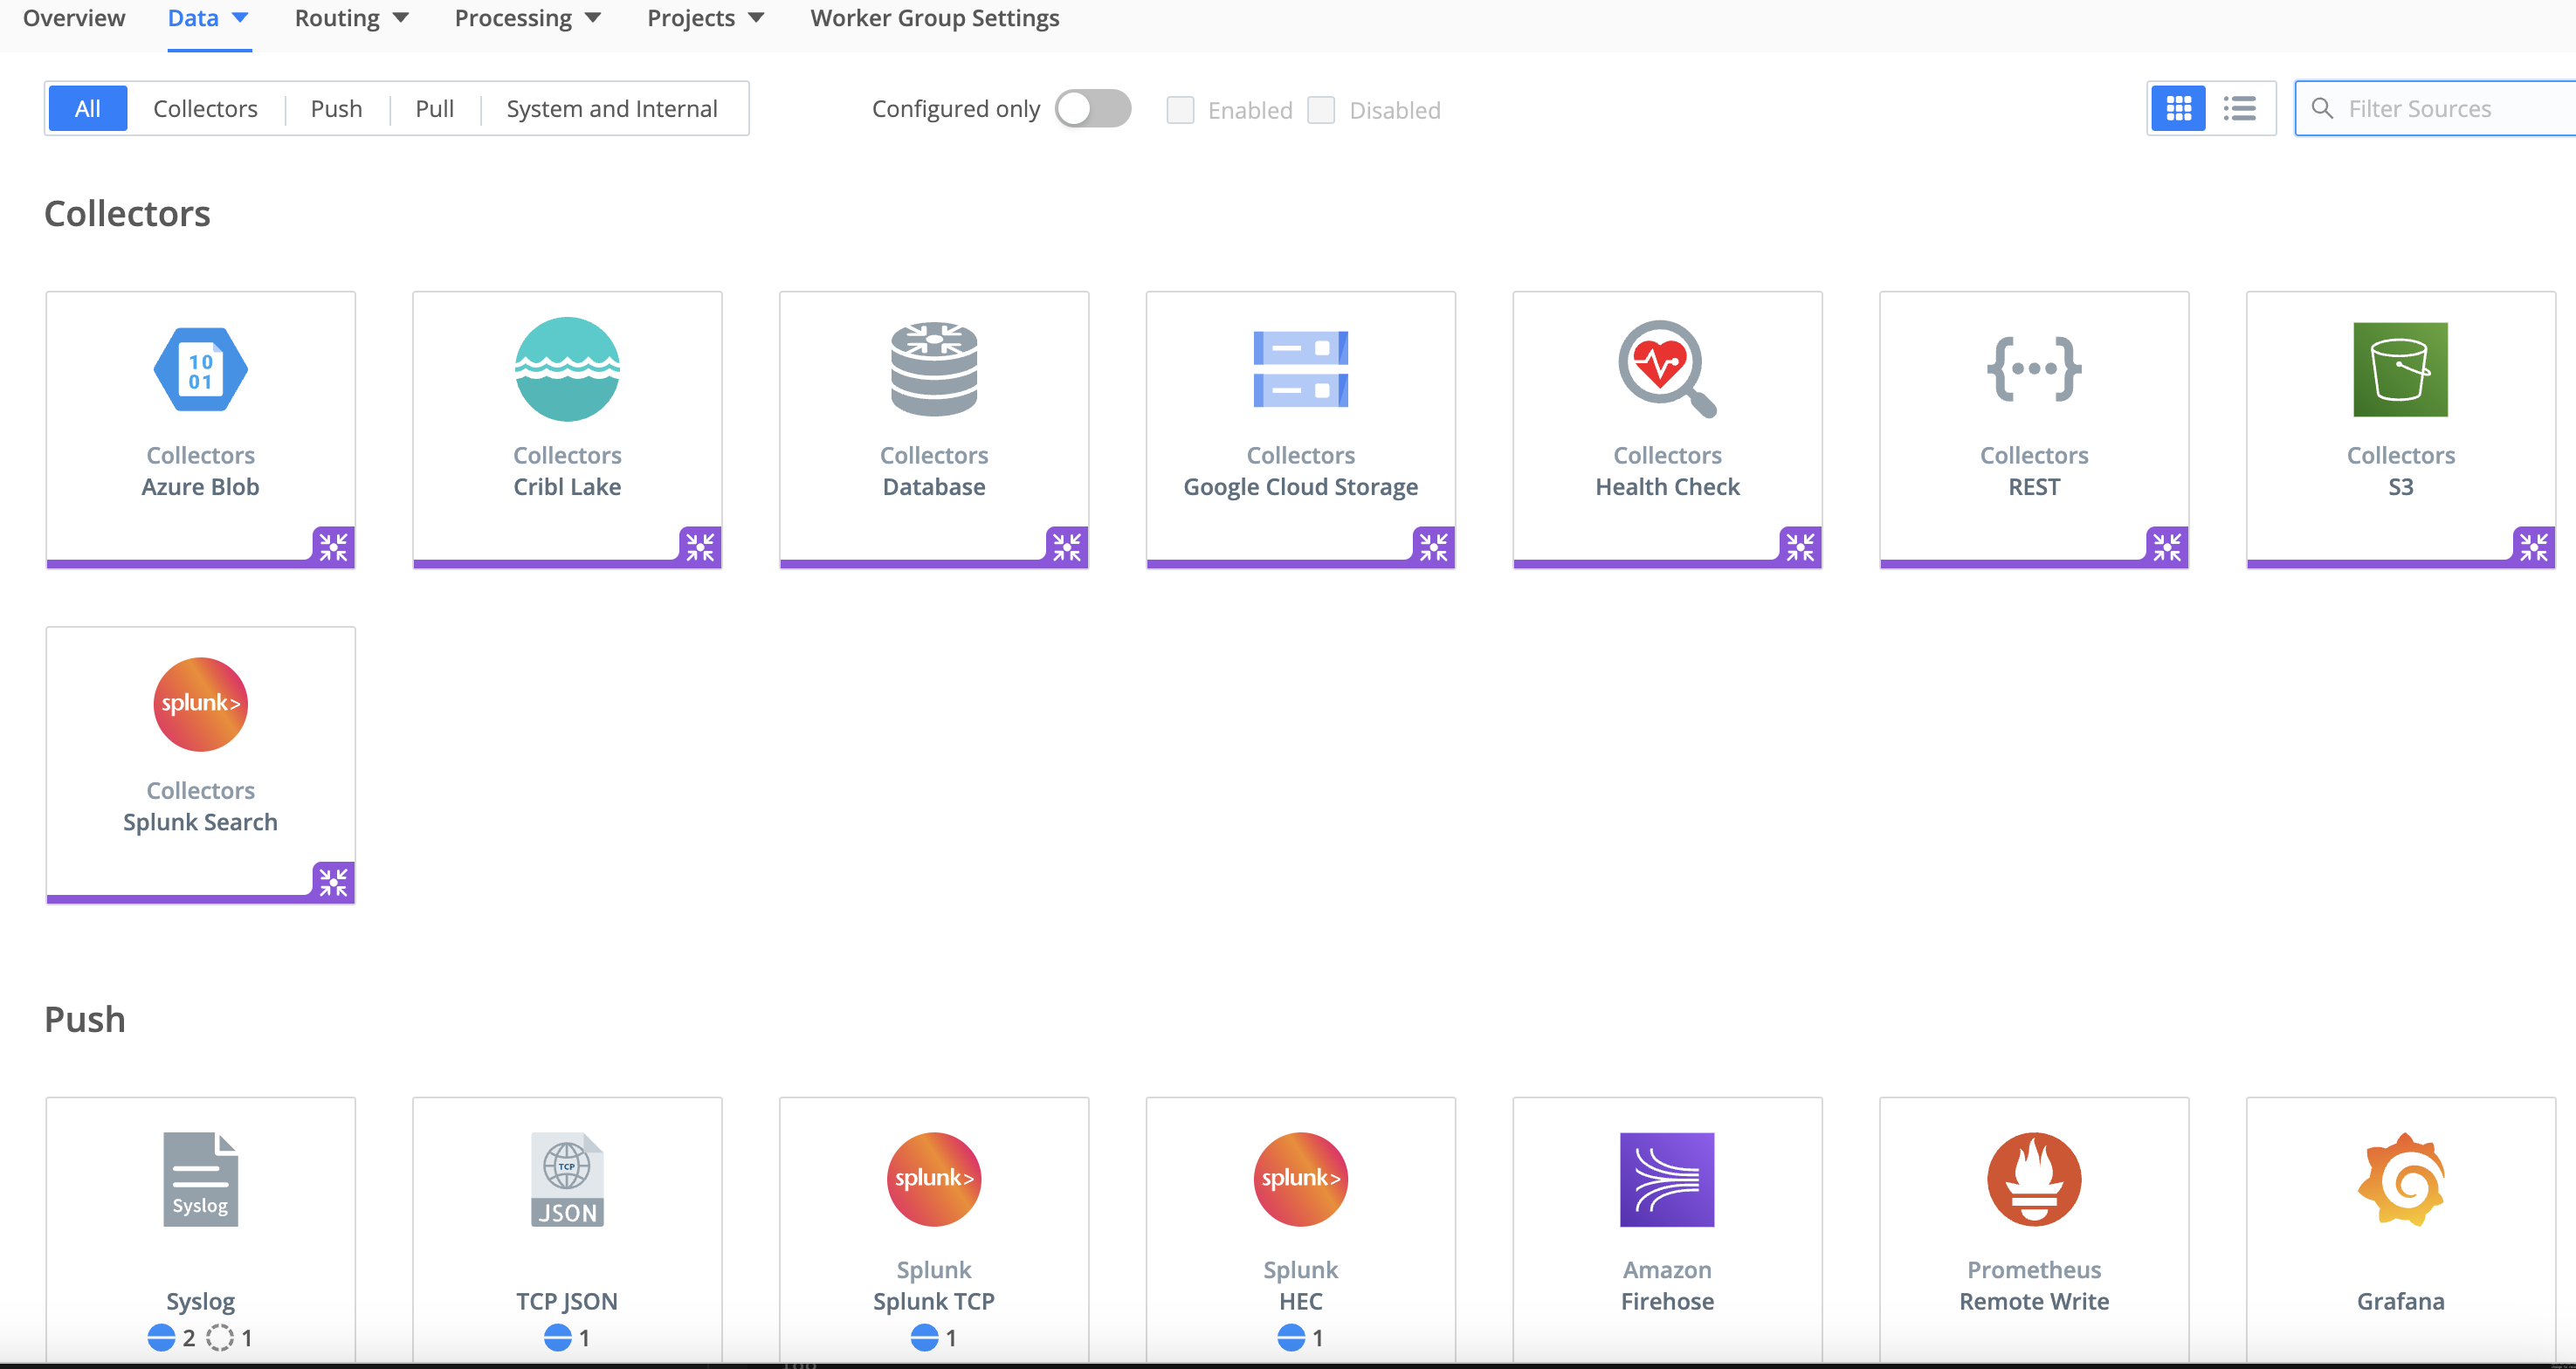
In the Routing UI, first select Data > Sources.
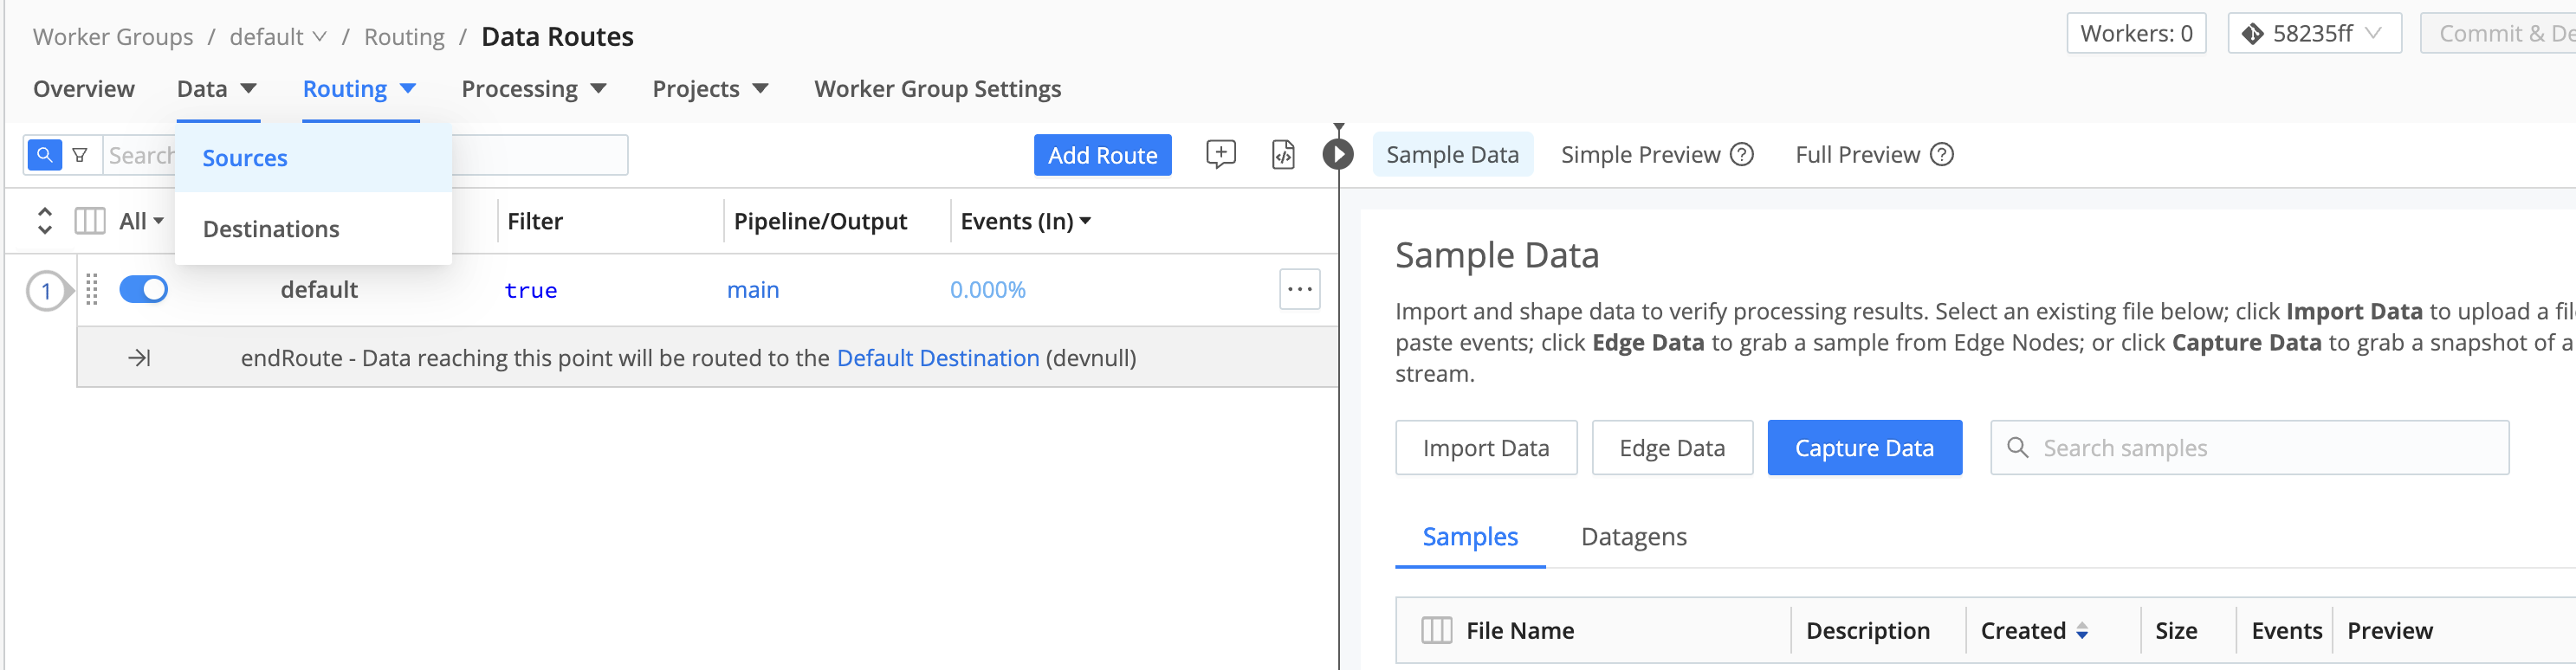
On the resulting Sources page, search for your desired Source type, then select its tile to begin configuring a new instance of that Source.
(After you click through to a Source, the same set of peer Sources will be available in the left nav.)
Select an existing Source’s row here to access its configuration, or select Add Source to configure a new instance of that Source.

You then configure (or reconfigure) the Source in a modal like this:

For More Information
Configure a Destination
A Cribl Stream Destination is a model of a downstream receiver of events, enabling you to configure authentication and/or other needed parameters.
As with Sources, you can configure multiple instances of a given Destination type, each with different parameters. You can attach processing that’s specific to each instance.
Using QuickConnect
To connect a configured Source to a Destination tile already present on the right, just drag from the Source and drop the connector onto the Destination. A pop-up will prompt you to configure the connection via a Passthru, Pipeline or Pack (explained below).

To configure (or reconfigure) the Destination, hover over its tile and select the ⚙️ Configure button.
For multiple Destinations of the same type, tiles will be consolidated in a stack until you click the stack to display the hidden tiles.
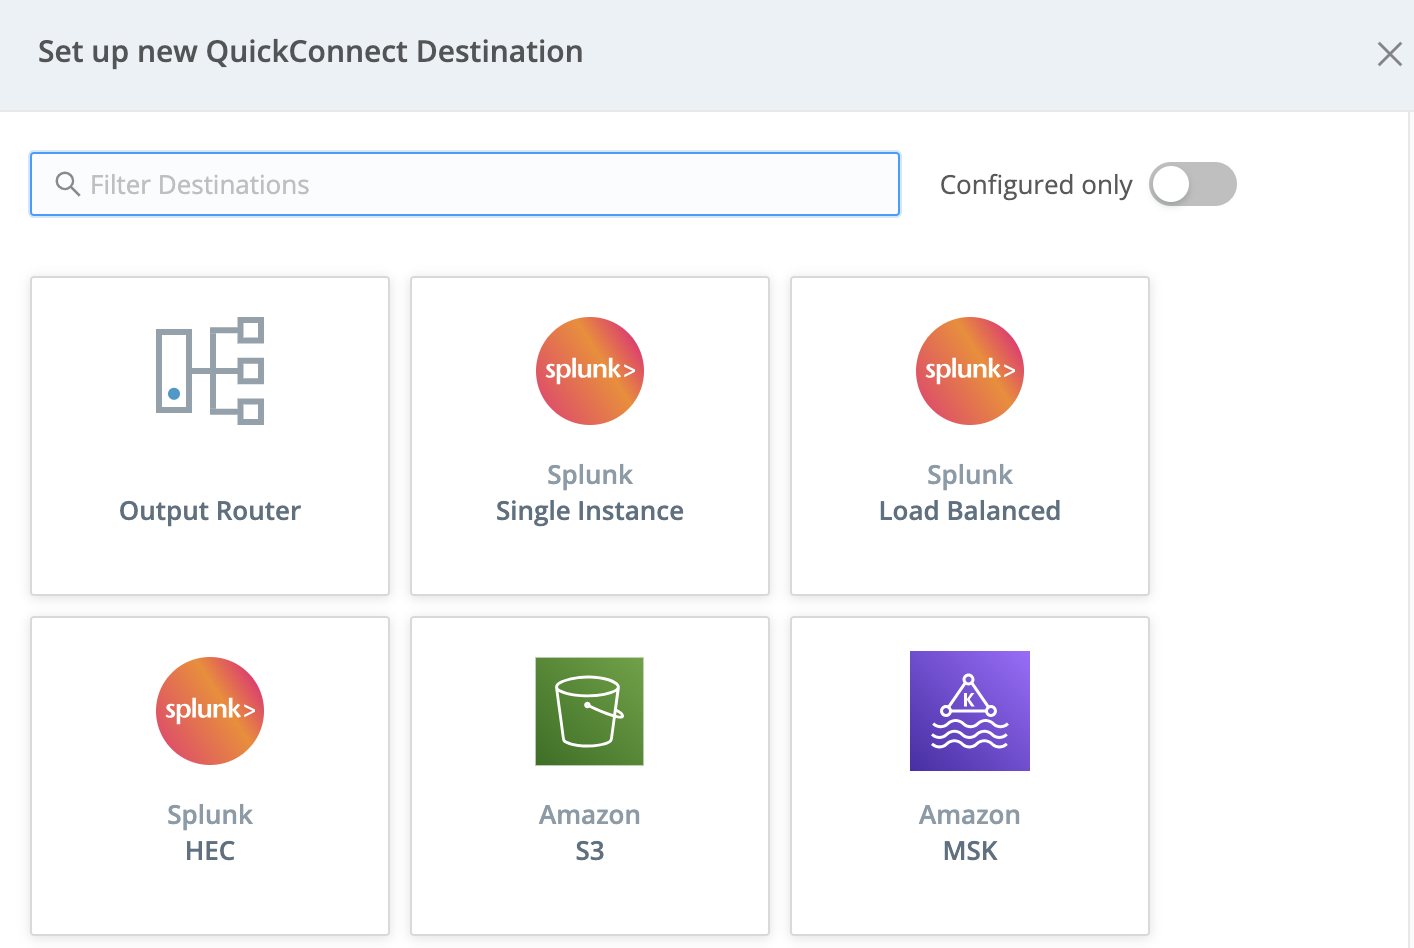
To add a new Destination, select the Add Destination button on the right (Destinations) side. In the resulting right drawer, search for and select your desired Destination type to begin configuring a new instance of that Destination.
Using Data Routes
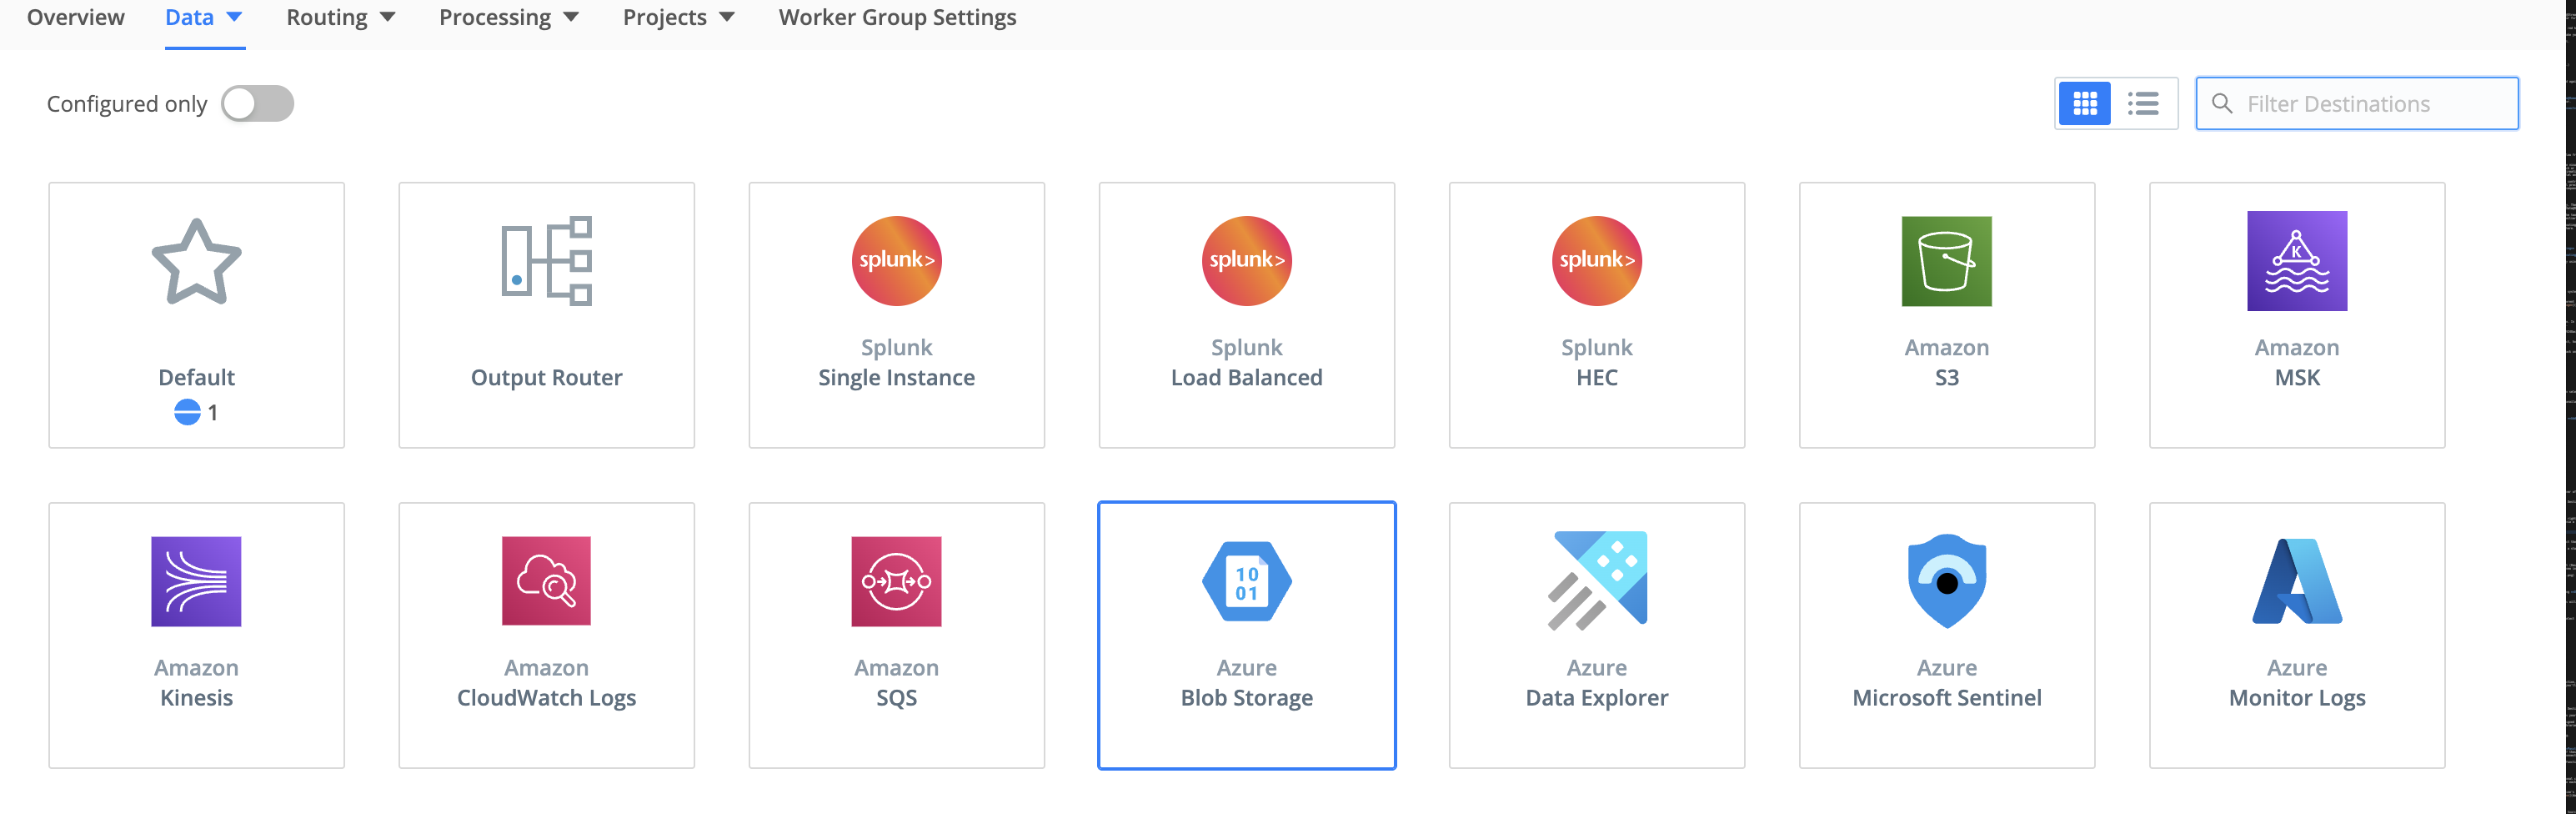
In the Routing UI, first select Data > Destinations. On the resulting Destinations page, search for your desired Destination type, then select its tile to begin configuring it.
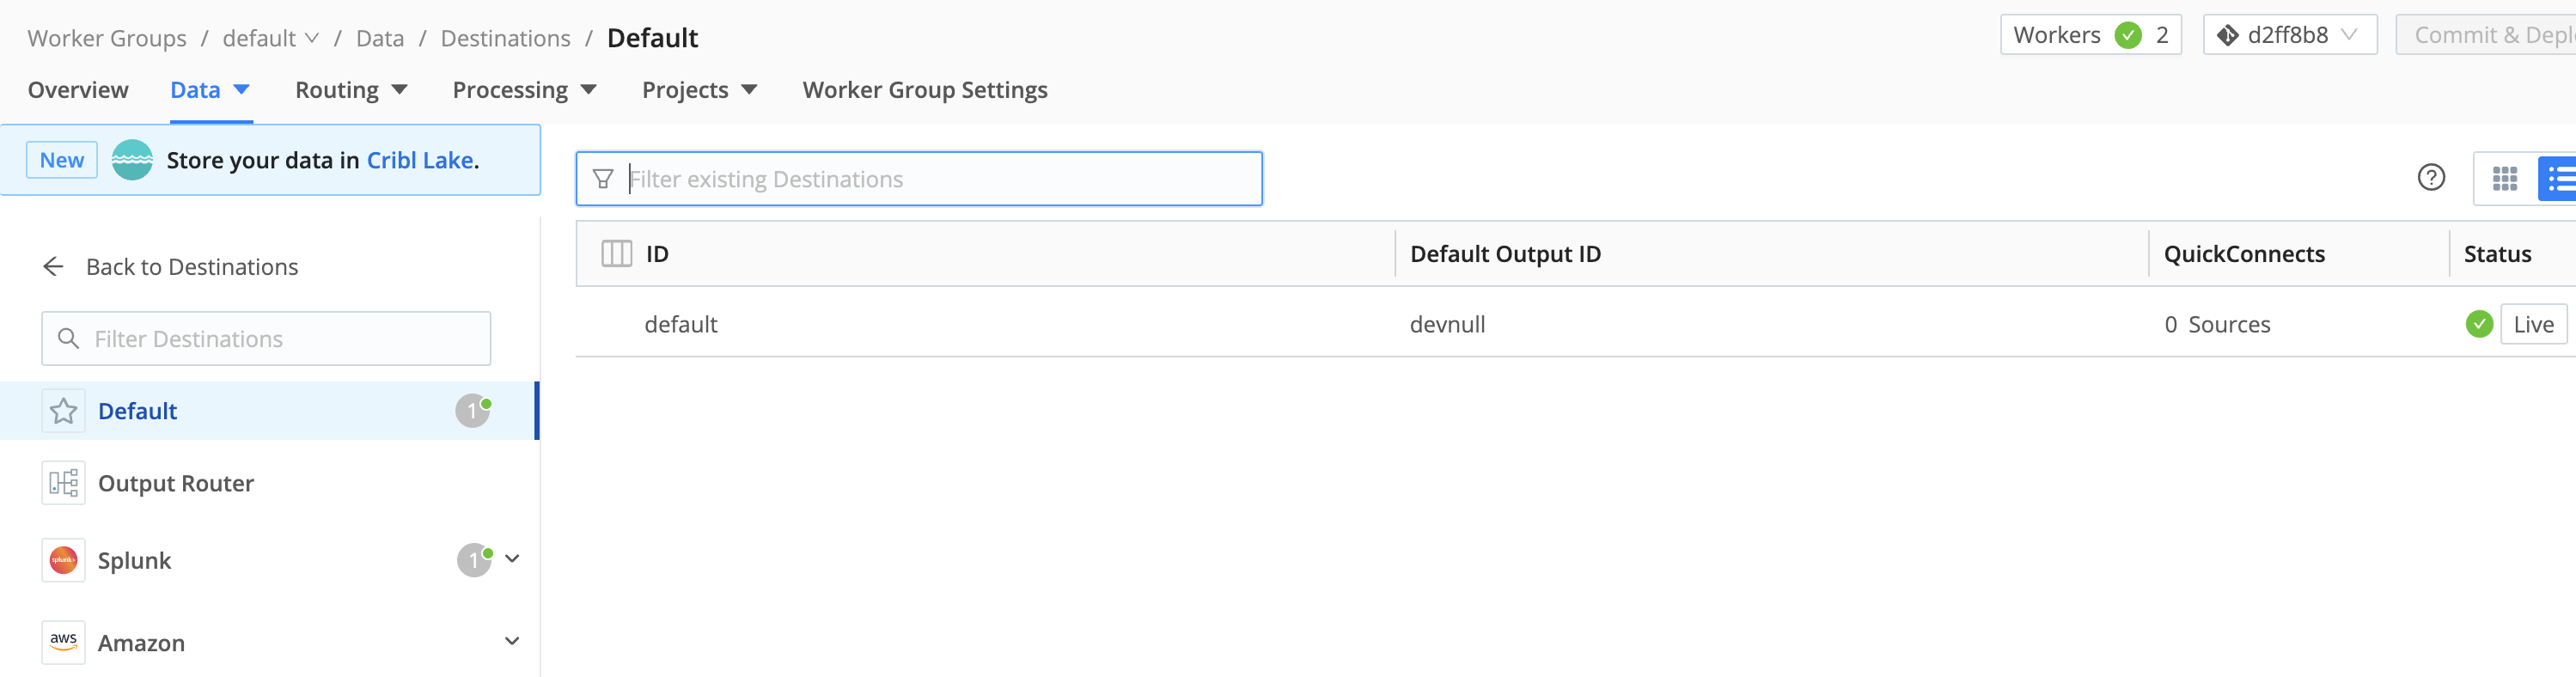
(After you click through to a Destination, the same set of peer Destinations will be available in the left nav.)
Select an existing Destination’s row here to access its configuration, or select Add Destination to configure a new instance of that Destination.
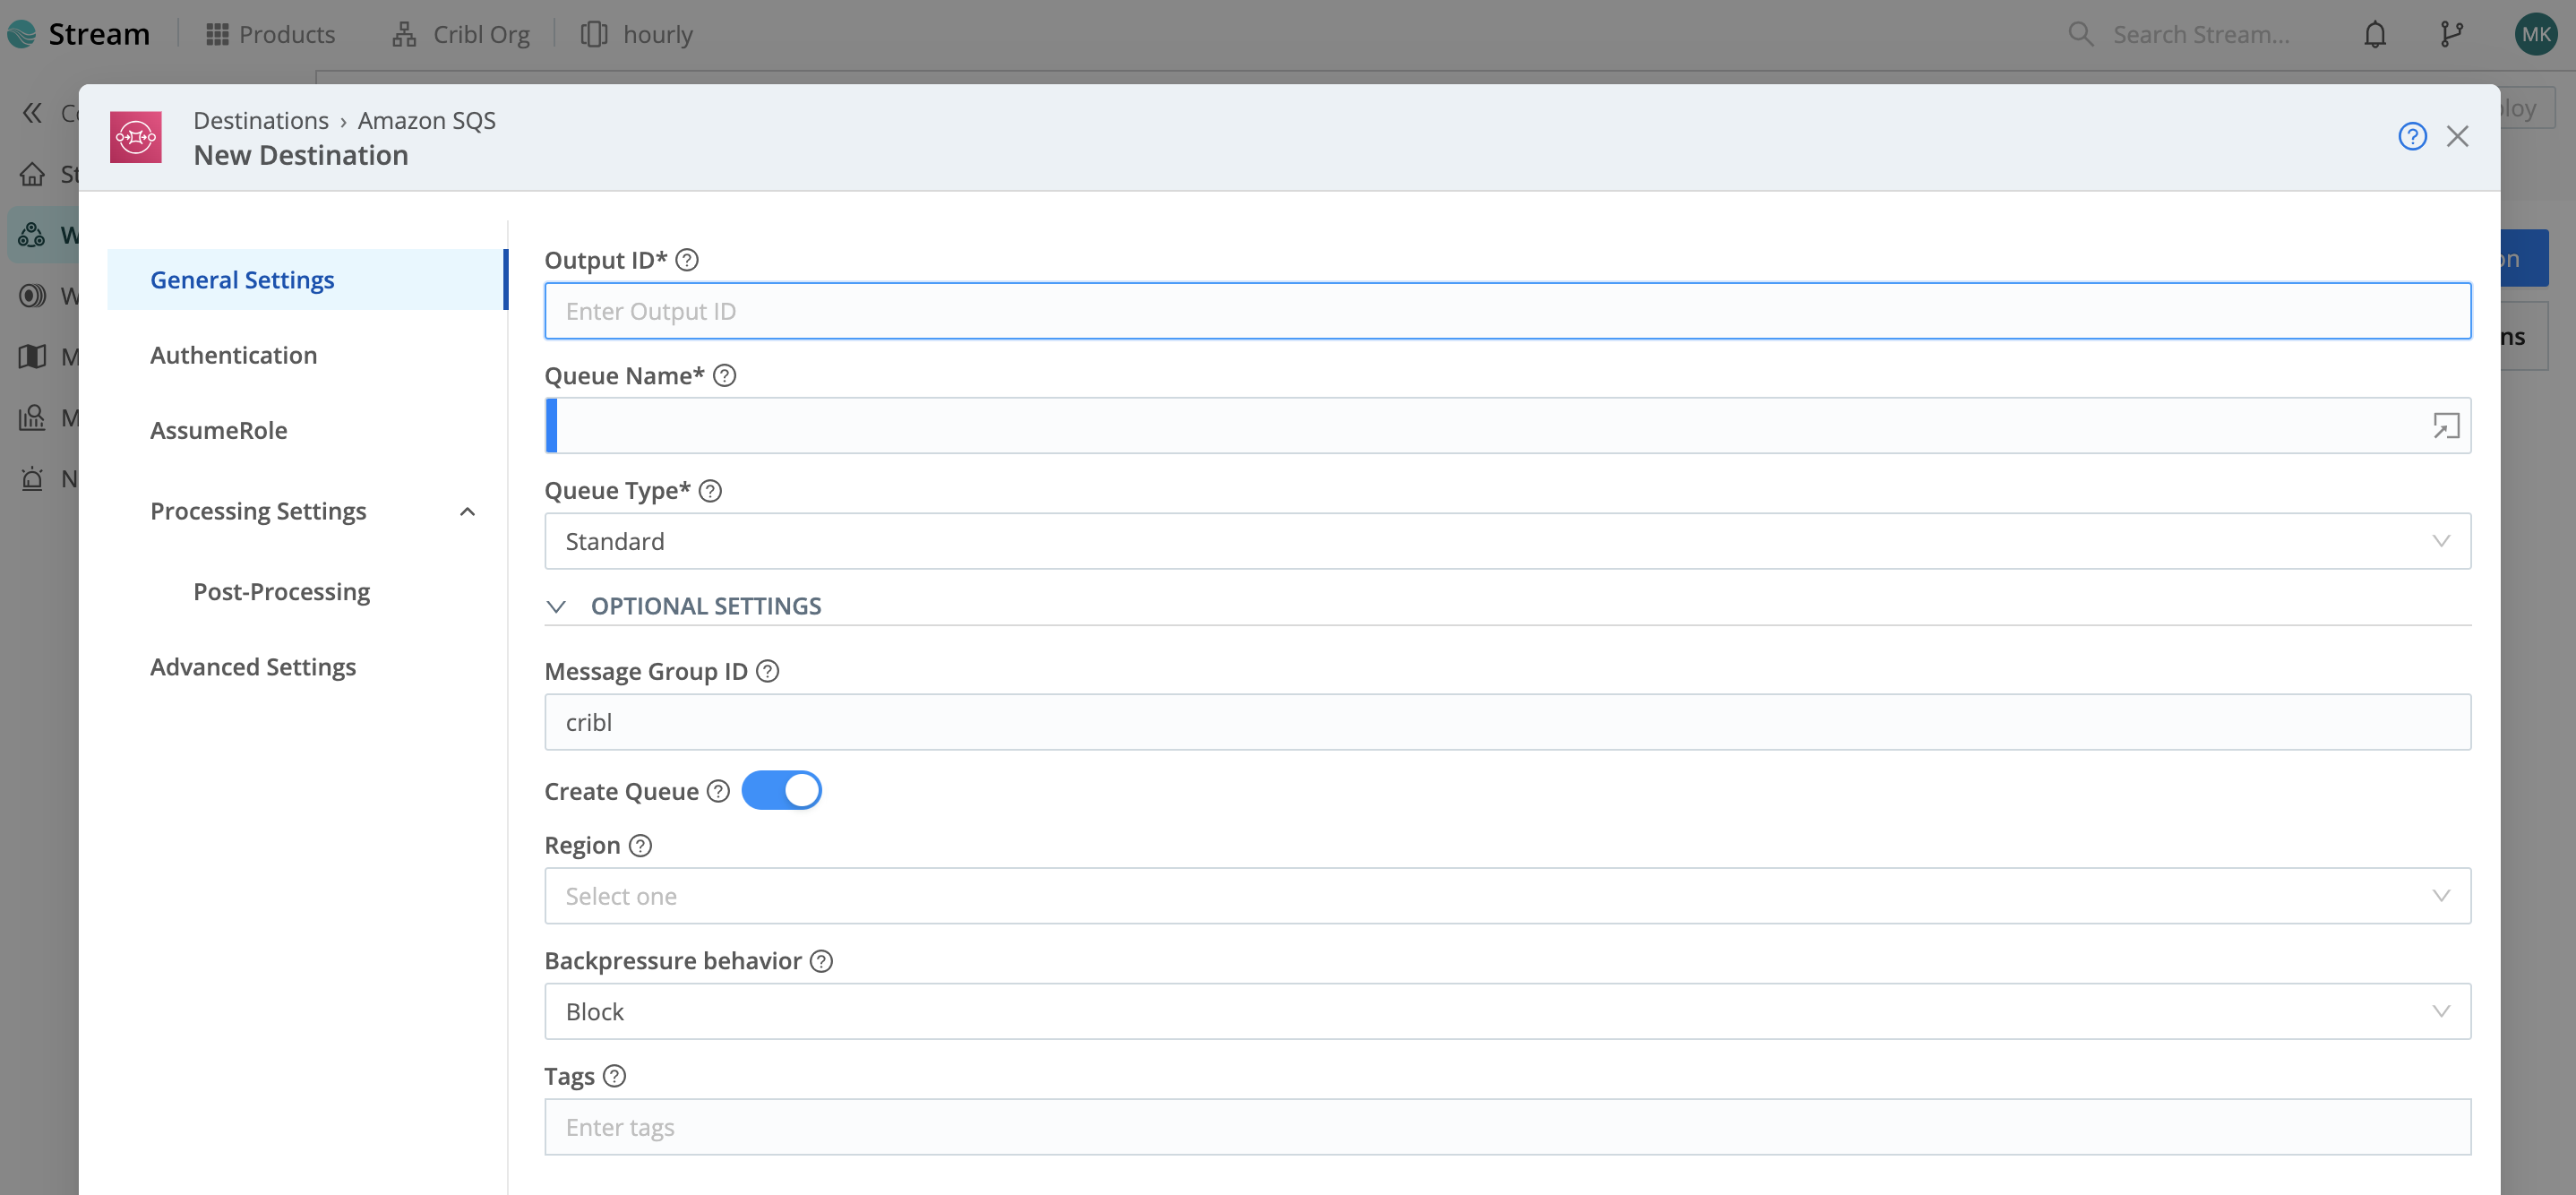
You then configure (or reconfigure) the Destination in a modal like this:
For More Information
Connect: Passthru, Pipeline, or Pack
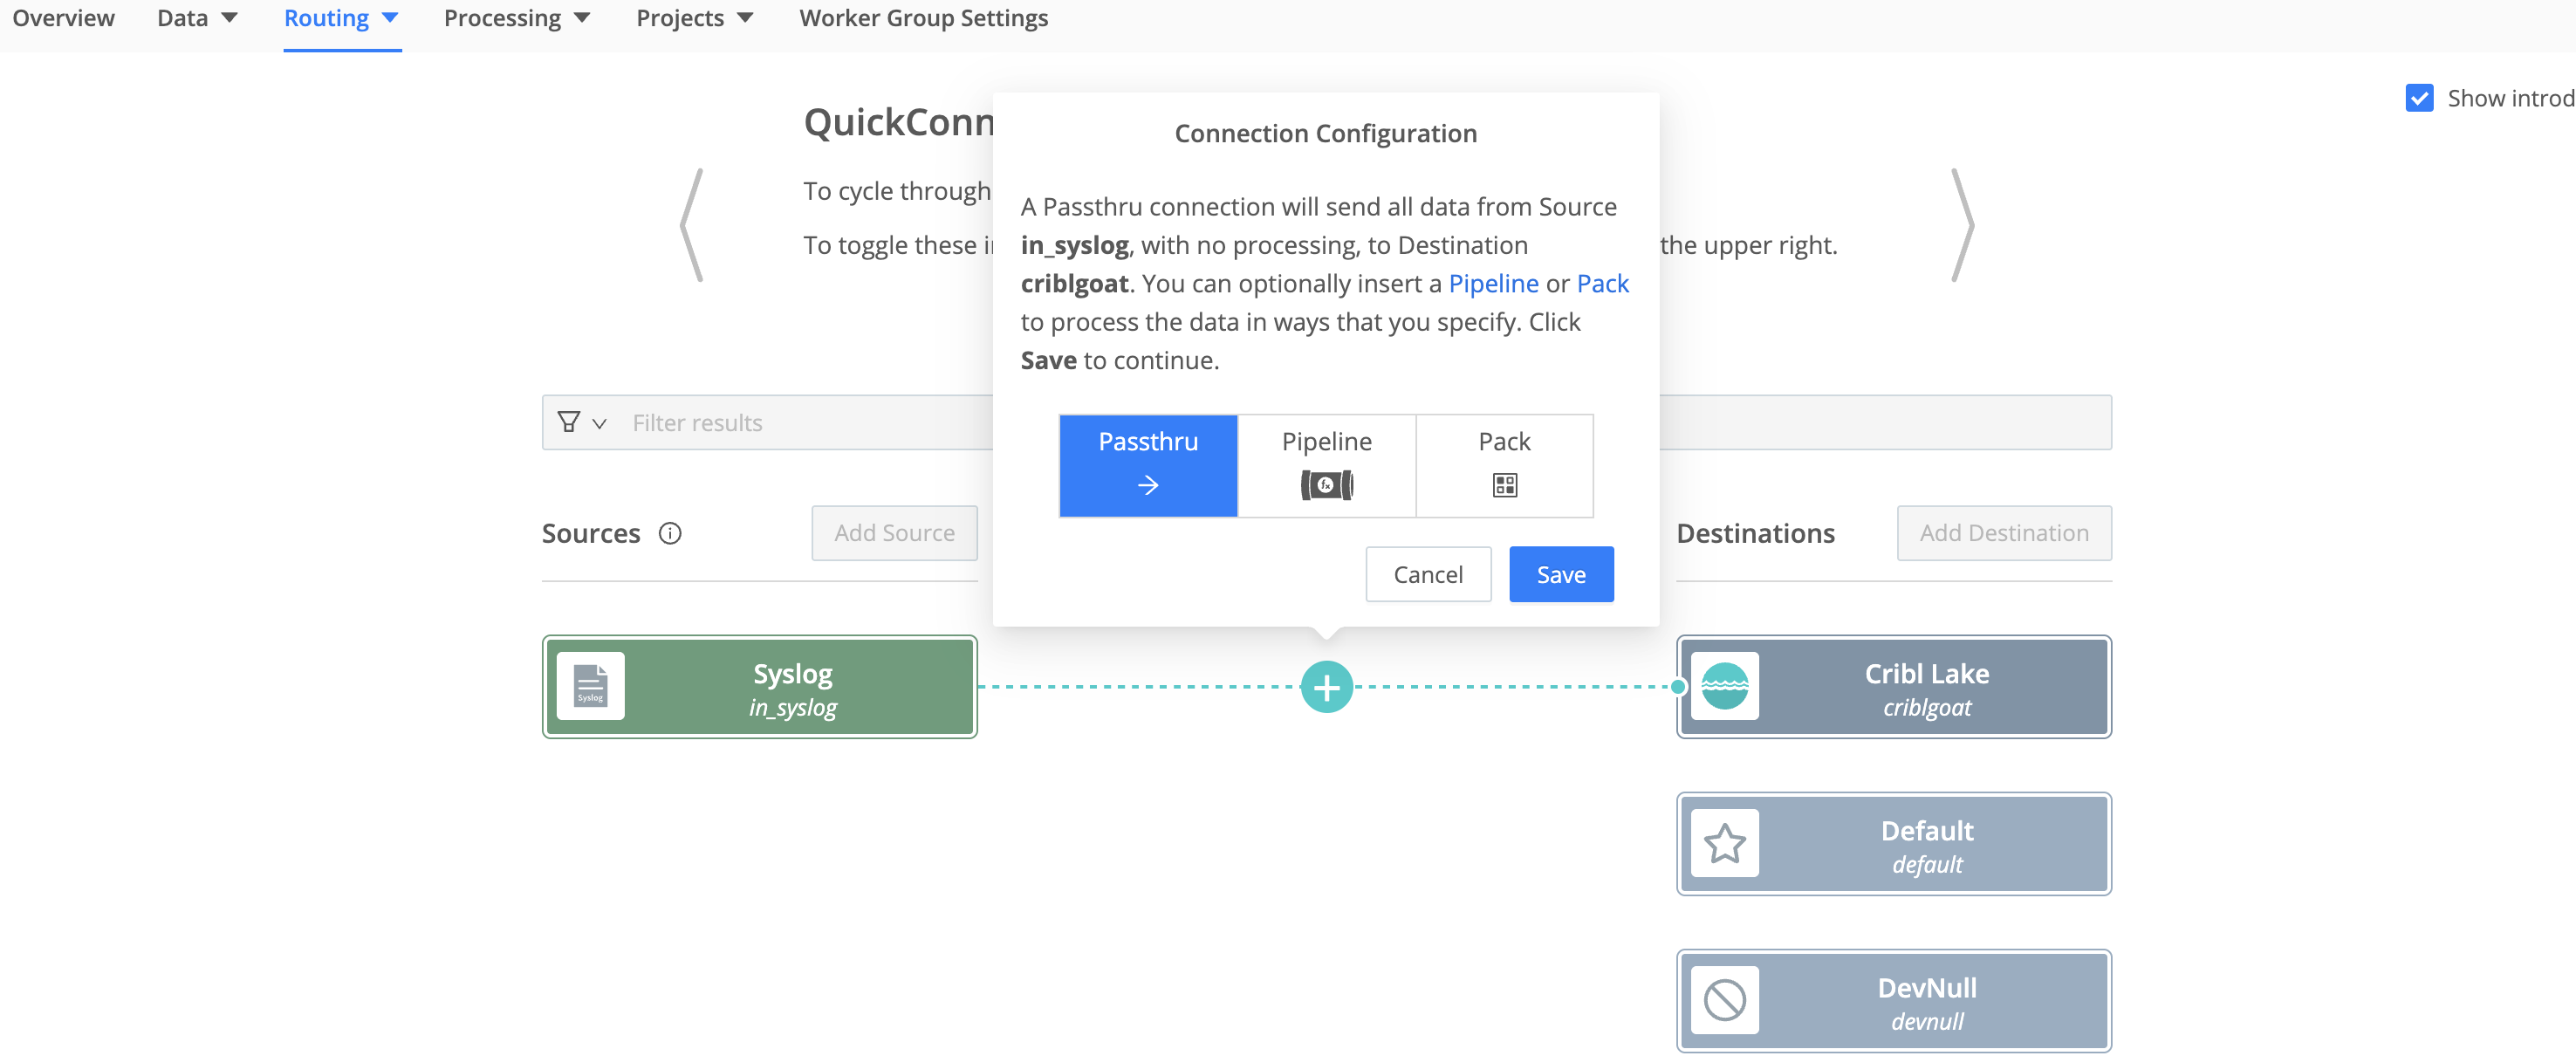
In QuickConnect, as soon as you drag and drop a Source -> Destination connection, a pop-up dialog will prompt you to select a connection type: Passthru, Pipeline, or Pack. (In Data Routes, you’ll make the same choices elsewhere.)
What are these options?
A Passthru establishes a simple direct connection between a Source -> Destination pair.
A Pipeline hosts a stack of Functions to process your data, in the order you arrange them.
A Pack is a microcosm of a whole Cribl Stream configuration, designed to share configs between Worker Groups or deployments. A Pack can encapsulate its own Pipelines, Routes, Knowledge libraries, and sample data (but not data Sources or Destinations). A Pack can snap in wherever you can use a Pipeline.
So let’s unpack Pipelines, where you’ll define most of your event processing.
Pipeline Options
When you first create a new Pipeline, it’s empty, making it equivalent to Passthru. Cribl Stream provides a set of out-of-the-box Pipelines for specific purposes. As you can see below, one of these is a passthru Pipeline. This similarly contains no Functions - making it the Data Routes UI’s equivalent of QuickConnect’s Passthru button.
For these reasons, it’s easy to start with an empty Pipeline, and then add Functions as you need them.

A Pipeline, as you populate it, is a stack of processing Functions and optional comments. Use the accordions on the left to expand or collapse each Function. Use the check boxes on the left to enable/disable each Function - preserving structure as you develop and debug the processing flow.
Use the right Sample Data pane to preview how the Pipeline’s current state transforms a set of events. (Controls here enable you to capture live data, save it to sample or Datagen files, and reload those files.)

Although you’ll configure most data shaping in processing Pipelines between Sources and Destinations, you can also attach a pre-processing Pipeline to any Source instance, and a post-processing Pipeline to any Destination instance. Use these options when you need to “condition” the specific data type handled by a particular inbound or outbound integration.
Connect via QuickConnect
To select a connection type in QuickConnect, select the appropriate button in the pop-up dialog shown above. To accept the default Passthru option, just select Save. Your Source and Destination will now be connected.
If you select Pipeline, you’ll see an Add Pipeline to Connection modal. Here, you can select an existing Pipeline, or select Add Pipeline to define a new one. Then select Save here to establish the connection.
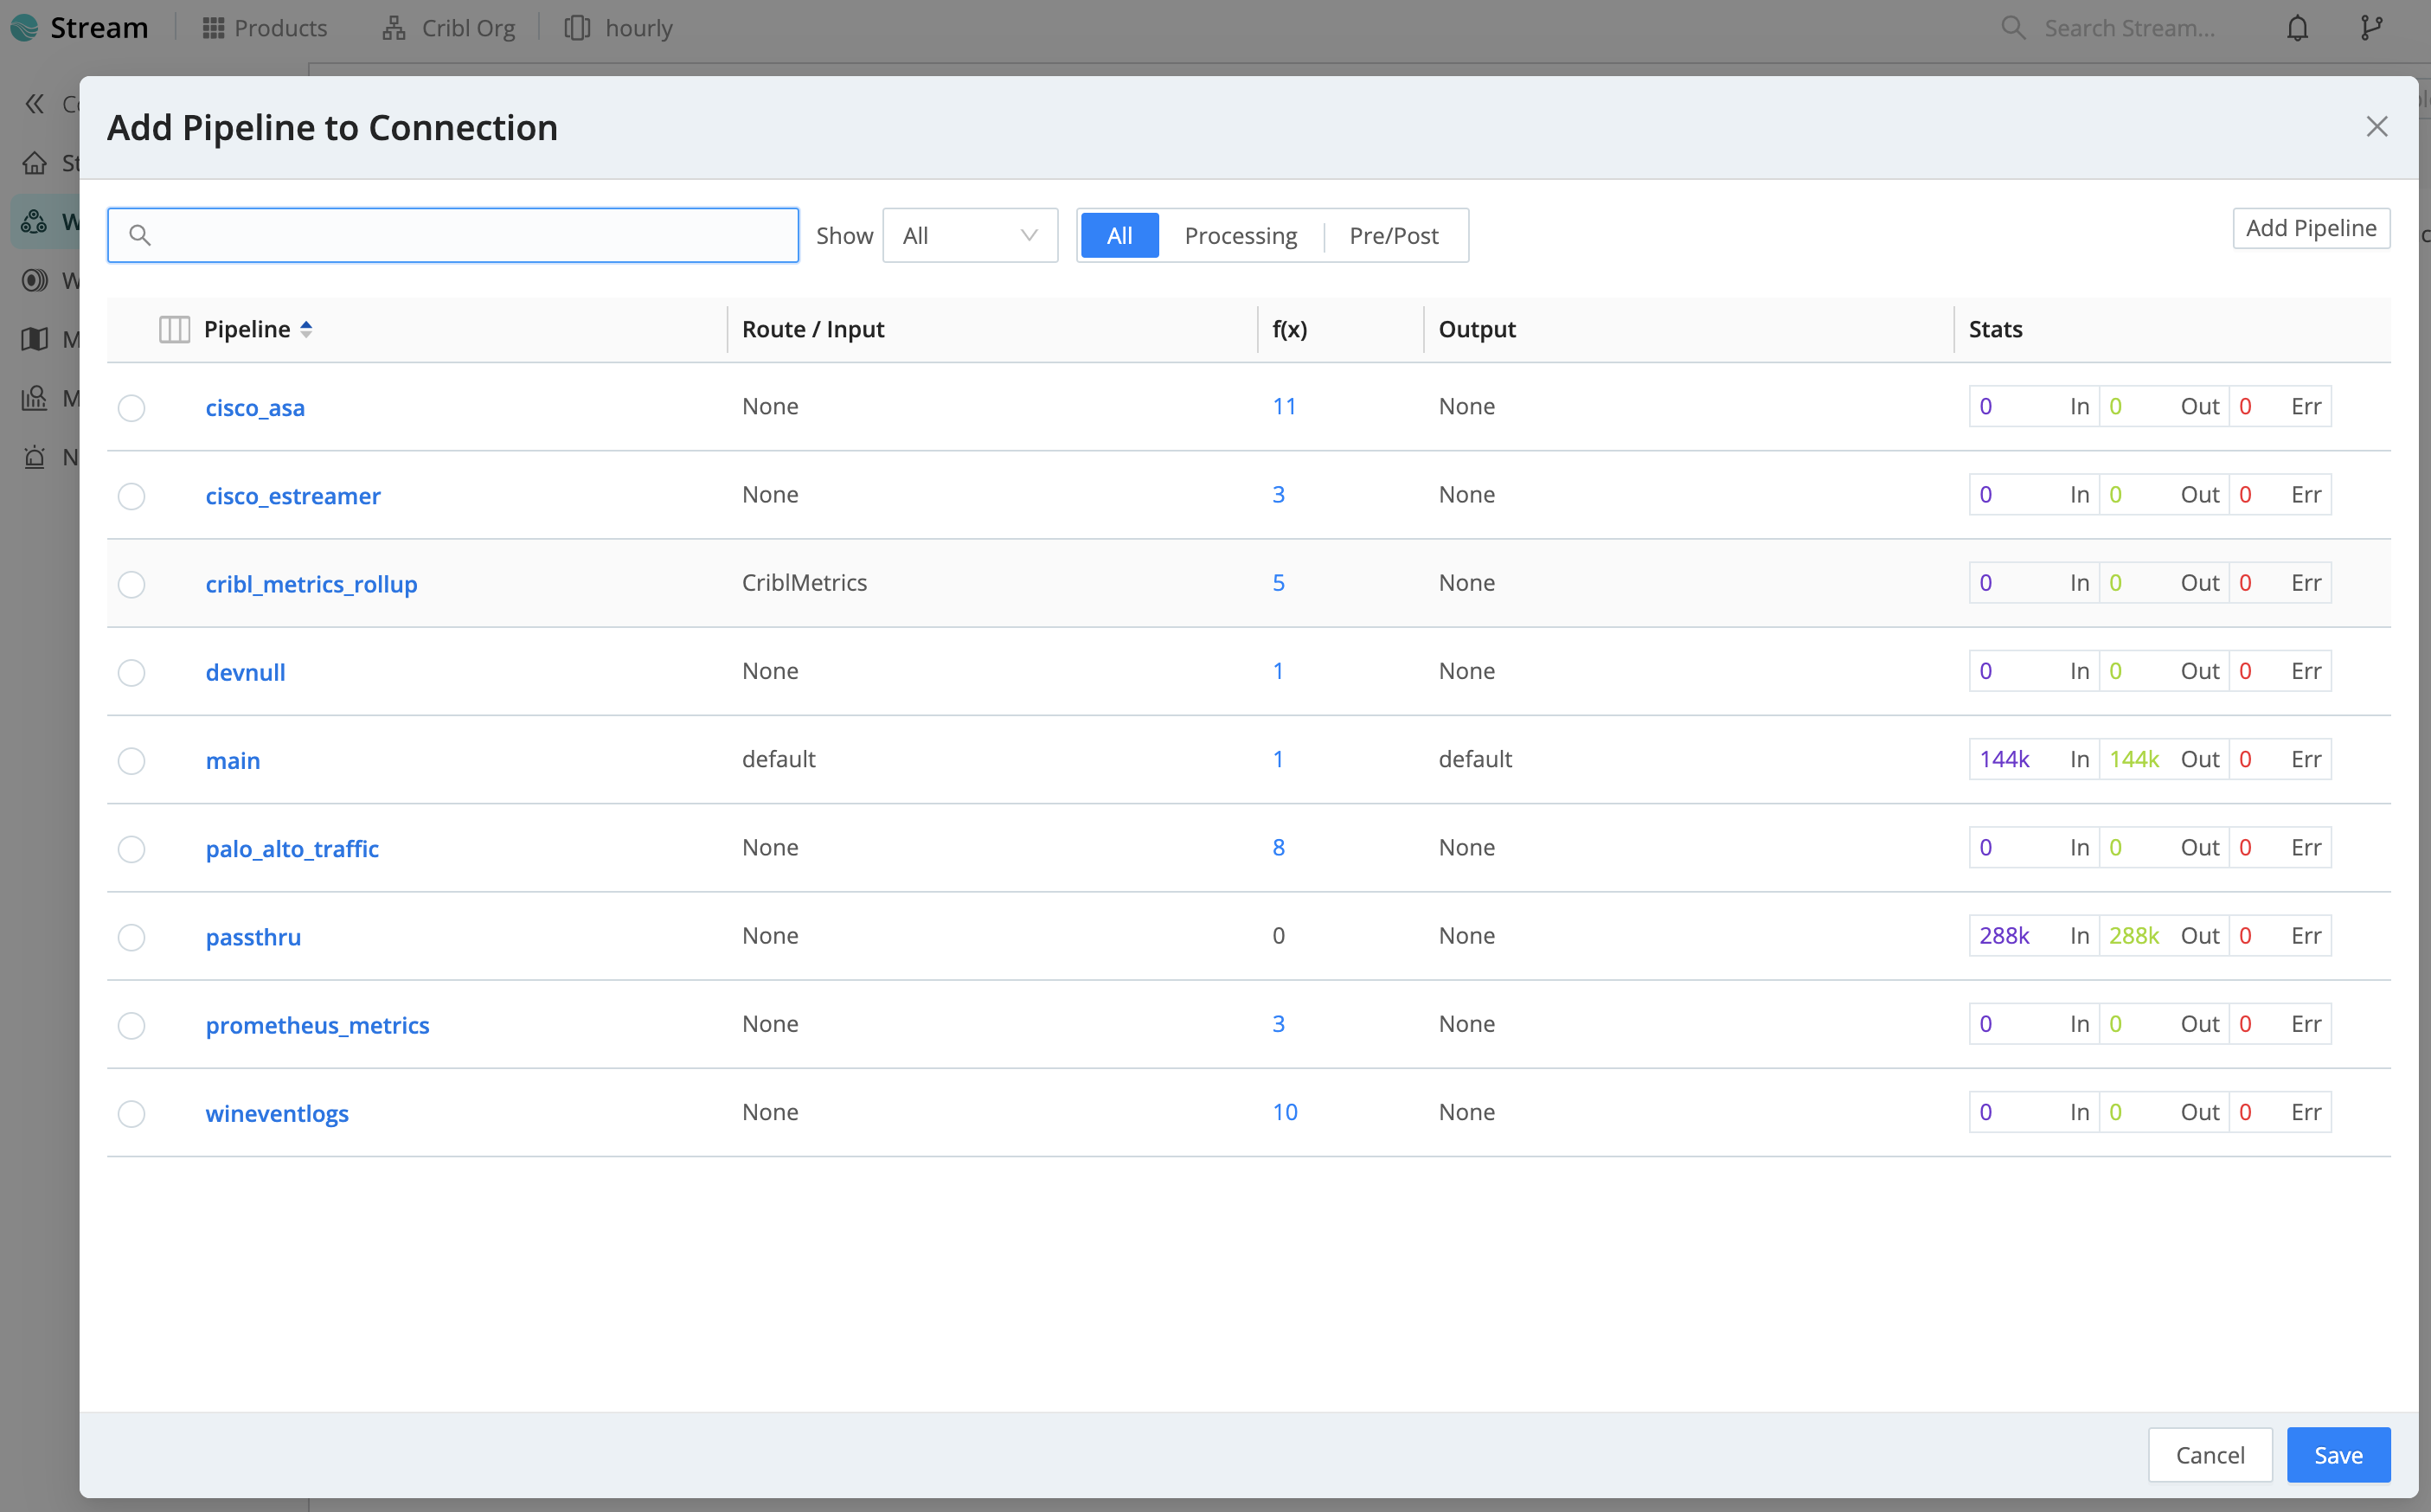
Selecting Pack opens an Add Pack to Connection modal that works exactly the same way.
Whichever option you choose here, your connection between this Source and Destination is now complete.
To get data flowing, jump ahead to commit and deploy your new configuration.
Connect via Data Routes
The Data Routes UI enables you to finely configure multiple, interdependent connections between Sources and Destinations. Events clone and cascade across a Routing table, based on the filtering rules and sequence you define.
In exchange for this flexibility, you sacrifice QuickConnect’s one-stop, snap-together UI metaphor. After configuring your Sources and Destinations - which you’ve already done above - you need to connect them by separately setting up at least one Pipeline and one Route.
Pipelines Access
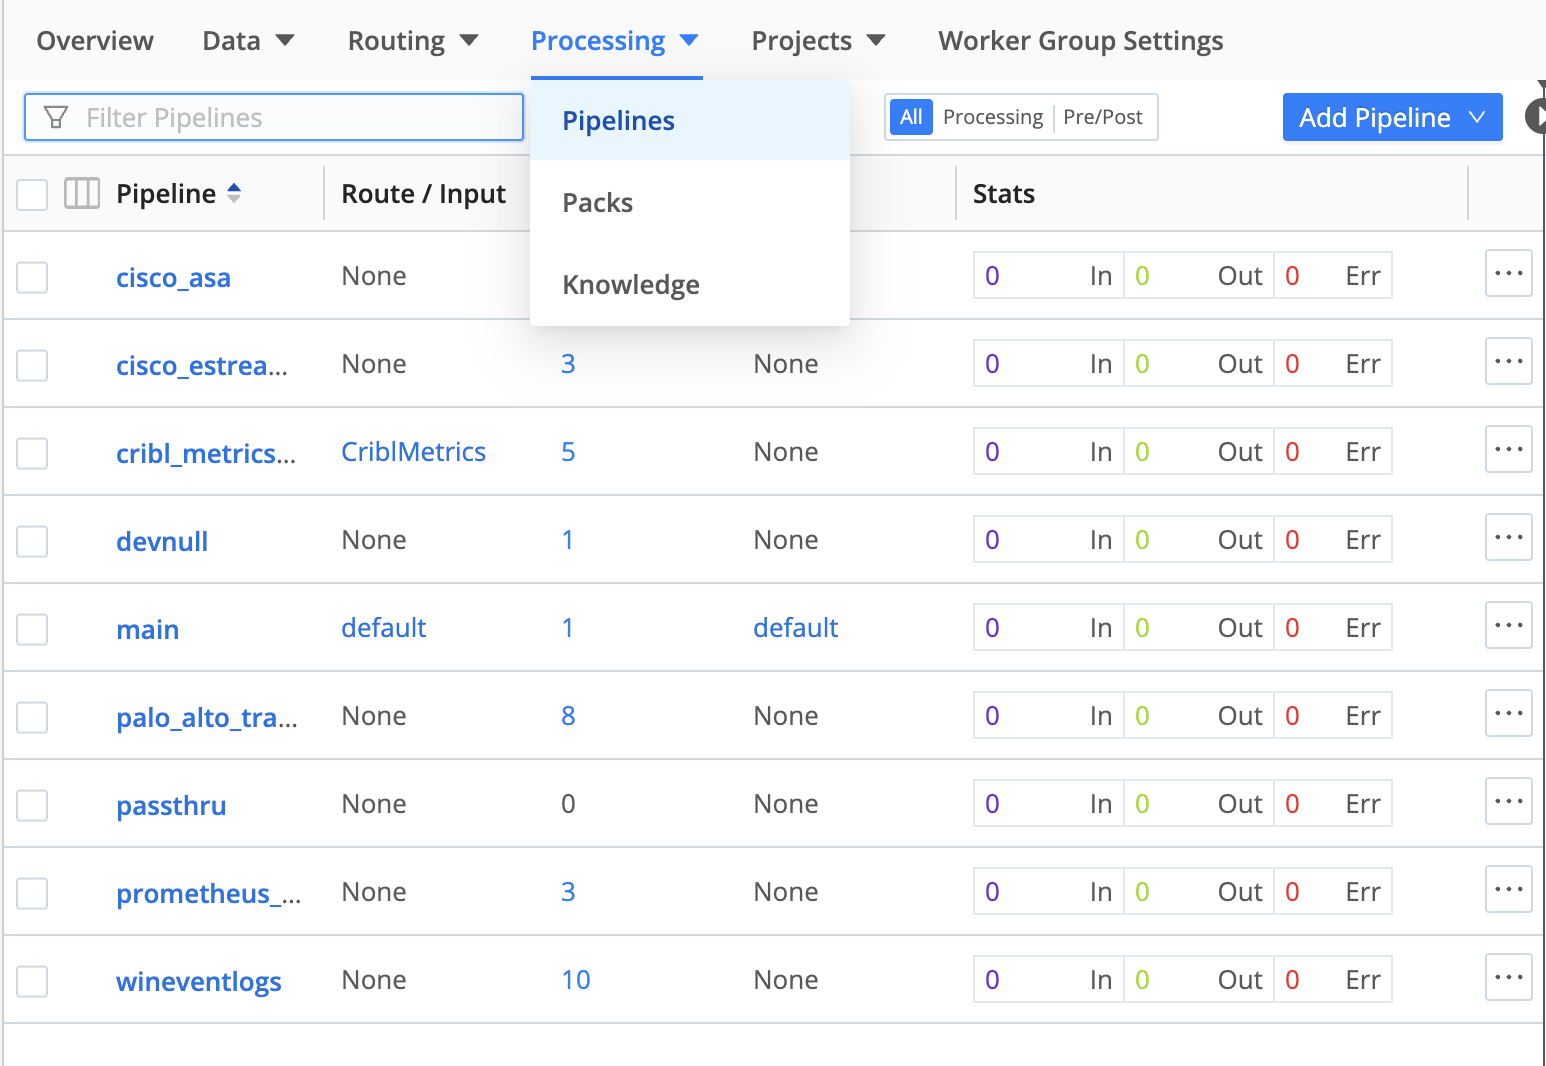
From a Worker Group, select Processing > Pipelines. In addition to the minimal passthru Pipeline identified above, other simple building blocks here include main (which initially contains only a simple Eval Function) and devnull (which contains a single Function that just drops events).
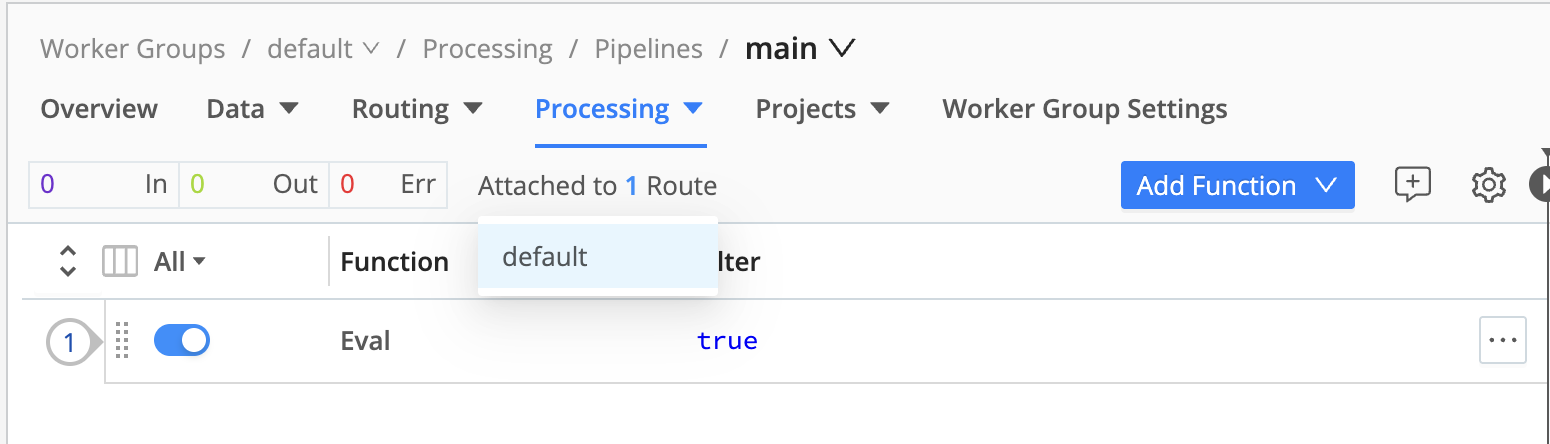
Out-of-the-box Pipelines are already connected to Routes. When you click into a Pipeline, you can hover to display the connected Route, as shown here. But as our final connection step, let’s next look at how to connect up everything (Source, Pipeline, Destination) in a Route.
For More Information
- Refine Data with Functions walks you through configuring Cribl’s built-in Pipeline Functions to perform common processing tasks like parsing, masking, adding, deleting, and renaming event fields.
Configure a Route
In the Data Routes UI, a Route is where you complete a data-flow connection. Each Route connects exactly one Pipeline with exactly one Destination.
This combination can consume data from one, multiple, or all the Sources you’ve configured on the Data Routes side. (QuickConnect Sources are separate, but you can open those Sources’ configs to move them to the Data Routes UI.) This is governed by the filtering we’ll see below.
To open the Routing table, from a Worker Group, select Routing > Data Routes.
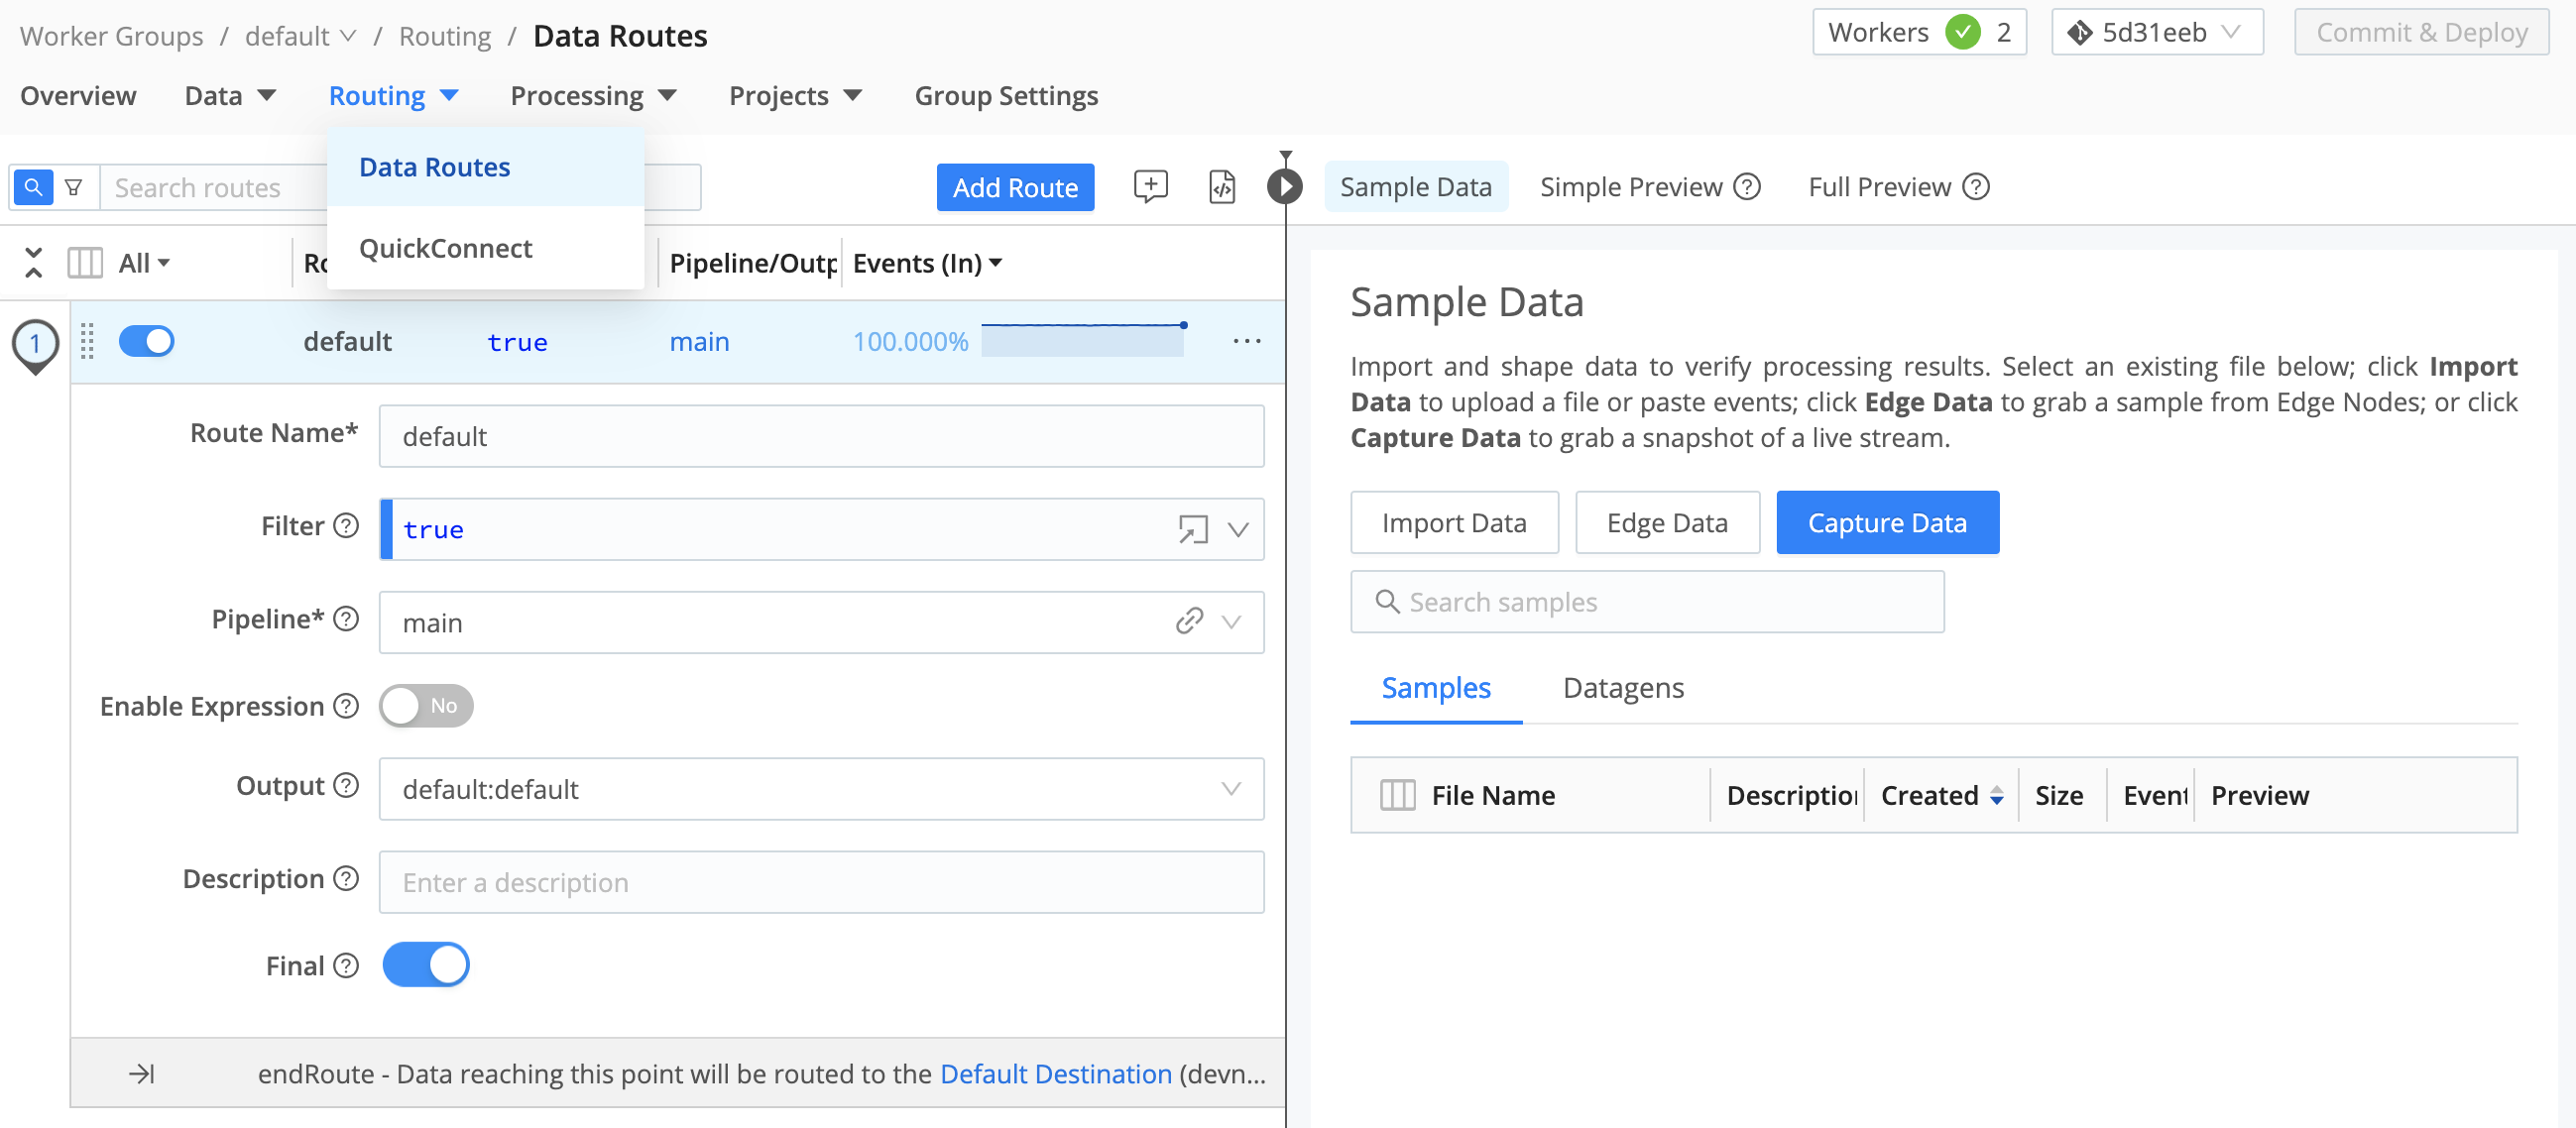
As you can see, Cribl Stream ships with one starter Route named default. It’s configured as follows:
The Filter expression is set to true. This simple, default expression makes data from all active Sources available to this Route. (See finer filtering options below.)
The Pipeline drop-down is where you set the 1:1 Pipeline:Route connection. This starter Route’s Pipeline defaults to main, but you can select any one other configured Pipeline.
The Output drop-down defines the single Destination for this Pipeline:Route connection. If this isn’t already set to your chosen Destination, you’ll most likely want to select that here. (Note that each option displayed on this list corresponds to the unique, arbitrary Output ID set on one instance of a Destination type. So some names might initially be unfamiliar.)

To get data flowing, jump ahead to commit and deploy your new configuration.
Filter a Route’s Input Data
When you want a Route to ingest data from only one Source, or a subset of Sources, you expand its Filter expression beyond the default true catch-all.
Filter is itself a drop-down. Open it to select among typeahead suggestions for several common inbound data types.
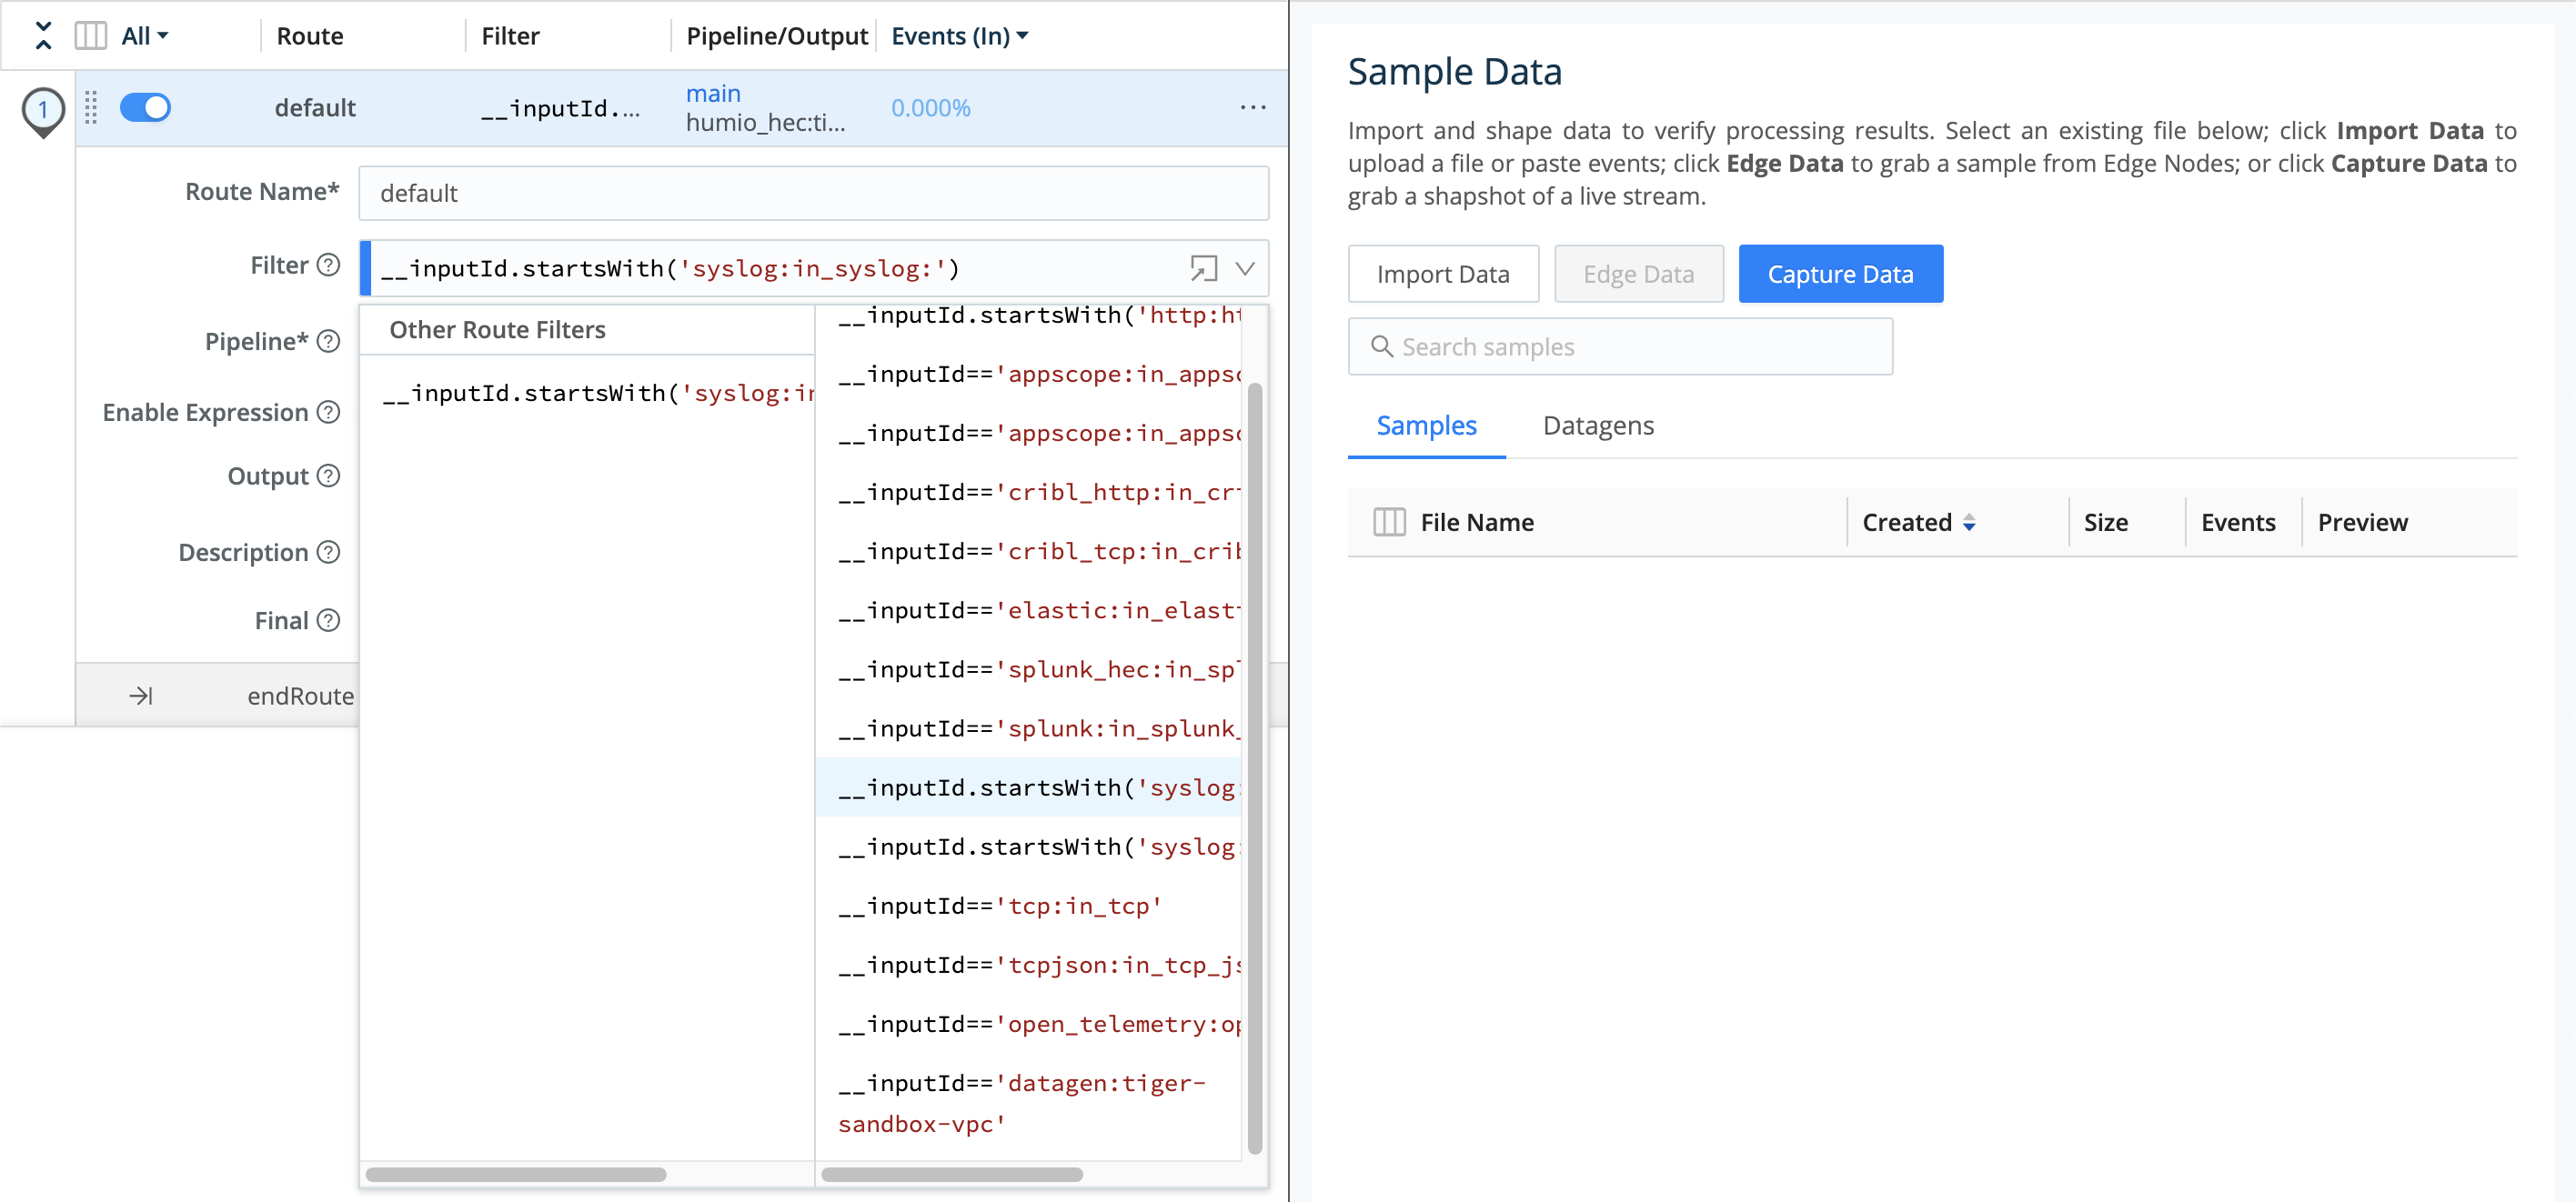
You can select one of these expressions and then modify it, using the same __inputId syntax. In the example expression below, note that the identifier after the : is - as with the Output options we saw above - the arbitrary name of one Syslog Source instance:
__inputId.startsWith('syslog:in_syslog:')
For More Information
Commit/Deploy and Monitor
To get data flowing as you expect, you’ll always need to use Cribl Stream’s built-in version-control (Git) integration to commit your configuration changes and deploy them to your event-processing Worker instances. If you started this tour on Cribl.Cloud, you first used this during initial setup in Committing and Deploying Config Changes above.
After any significant configuration change, you’ll be prompted with Group-level Commit/Deploy buttons like this at the upper right:

If you’re using an on-prem version of Cribl Stream, different version-control settings might display Commit and Deploy as separate buttons:.
Selecting either flavor of the Commit button will display the confirmation modal you saw above. Just be sure to select the appropriate buttons to both commit and deploy your changes.
Confirming Data Flow
Data should now start flowing through the Workers. (You can check this by selecting the Monitoring link. This takes you to read-only dashboards. If necessary, select Stream Home and your Group when you want to return to configuration options.)
Product-Wide (Leader) Commit
As you saw during initial setup: In return for clearing all the red-dot prompts, your reward will be one more red dot, on the top nav’s product-wide Version Control button. This is because Cribl Stream sees the preceding deploy to Workers as a change to record (commit) on the Leader’s configuration.
This top-level commit isn’t necessary to enable data flow, but it backs up and safeguards your overall configuration. Select the button to display one final confirmation prompt:
Select Commit here, confirm the commit and your configuration is complete!
For More Information
Moving Ahead with Cribl Stream
To quote a fundamental treatise on DevOps and SecOps: you know all the rules by now, and the fire from the ice. To delve deeper into Cribl Stream’s data shaping and routing options, follow these links to conceptual overview and reference topics.
For More Information
- Cribl Stream Basic Concepts
- Event Model
- Data Preview
- Functions
- Knowledge Objects
- Getting Started Guide - This tutorial’s middle sections cover downloading, deploying, and launching on-prem Cribl Stream; and then complement this tour by walking you through configuring multiple Pipeline Functions.
- Distributed Quick Start - This tutorial’s middle sections walk you through configuring Pipelines, Functions, and Routes, and scaling Workers, via the Routing UI.
- Setup Guides
- Expressions and other references