


These docs are for Cribl Stream 4.12 and are no longer actively maintained.
See the latest version (4.17).
Leader High Availability/Failover
To handle unexpected outages in on-prem Distributed deployments, Cribl Stream supports configuring standby Leaders for failover. In this High Availability (HA) scenario, if the primary Leader goes down, Collectors and Collector-based Sources can continue ingesting data without interruption.
For license tiers that support configuring backup Leaders, see Cribl Pricing.
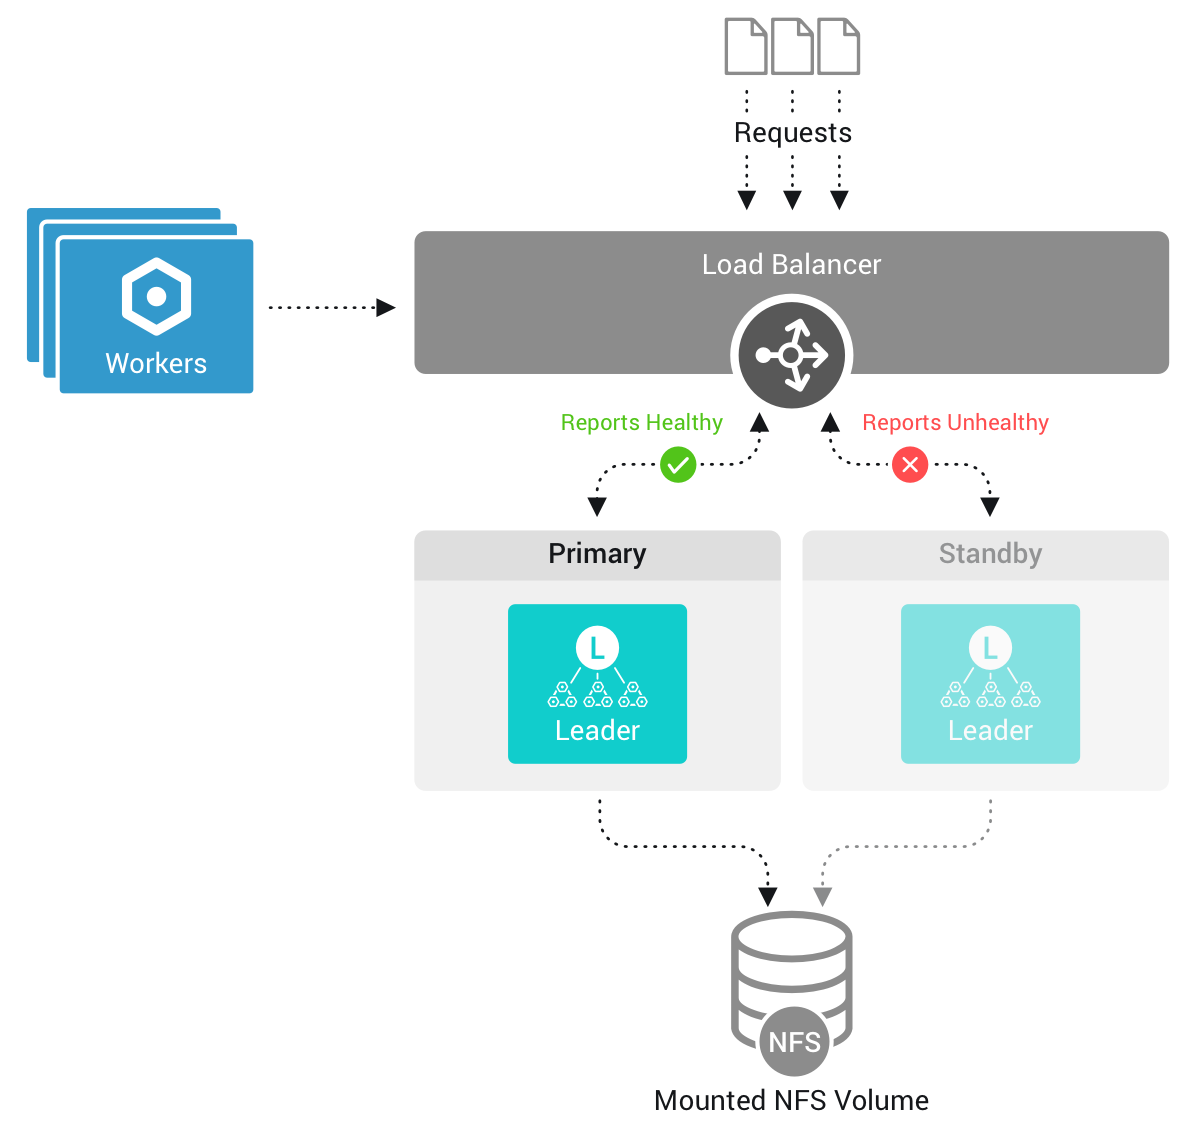
How It Works
There is only ever one active Leader Node at one time. A standby Leader will become active only in the event of failover. In the configuration for all Leaders, you must specify the same failover volume - a shared Network File System (NFS) volume.
During the transition to a High Availability Leader setup, Cribl Stream automates the data migration process. By configuring the failover: volume: /path/nfs setting in the YAML configuration (or UI), all necessary files are automatically copied to the specified failover directory.
If the primary Leader Node goes down:
- Cribl Stream will recover by switching to a standby Leader.
- The new Leader will have the same configs, state, and metrics as the previous Leader Node.
- The Worker Nodes connect to the new Leader.
In versions older than Cribl Stream 4.7, it was possible for the primary and standby Leaders to be configured differently, potentially causing issues, especially around authentication and authorization.
Required Configuration
Before adding a standby Leader, ensure that you have the configuration outlined in this section.
Auth Tokens
All Leaders must have matching auth tokens. If you configure a custom Auth token, make sure that all Leaders have that same token.
- In Cribl Stream, check and match these values at each Leader’s Settings > Global > Distributed Settings > Leader Settings > Auth token.
- Or, from the filesystem, check and match all Leaders’ instance.yml >
mastersection >authTokenvalues.
See How to Secure the Auth Token for the Leader Node for information on changing your auth token and allowed characters.
NFS
- On all Leader Nodes, use the latest version of the NFS client. NFSv4 is required.
- Ensure that the NFS volume has at least 100 GB available disk space.
- Ensure that the NFS volume’s IOPS (Input/Output Operations per Second) is ≥ 200. (Lower IOPS values can cause excessive latency.)
- Ensure that ping/latency between the Leader Nodes and NFS is < 50 ms.
You can validate the NFS latency using a tool like
ioping. Navigate to the NFS mount, and enter the following command:ioping .For details on this particular option, see the ioping docs.
NFS Mount Options
The Leader Node will access large numbers of files whenever you use the UI or deploy configurations to Cribl Stream Worker Nodes. When this happens, NFS’s default behavior is to synchronize access time updates for those files, often across multiple availability zones and/or regions. To avoid the problematic latency that this can introduce, Cribl recommends that you add one of the following NFS mount options:
relatime: Update the access time only if it is more than 24 hours ago, or if the file is being created or modified. This allows you to track general file usage without introducing significant latency in Cribl Stream. To do the same for folders, add thereldiratimeoption.noatime: Never update the access time. (Cribl Stream does not need access times to be updated to operate correctly.) This is the most performant option - but you will be unable to see which files are being accessed. To do the same for folders, add thenodiratimeoption.
Load Balancers
Configure all Leaders behind a load balancer.
- Port
4200must be exposed via a network load balancer. - Port
9000can be exposed via an application load balancer or network load balancer.
Health checks over HTTP/HTTPS via the /health endpoint are only supported on port 9000. Load balancers that support such health checks include:
- Amazon Web Services (AWS) Network Load Balancer (NLB). Suitable for TCP, UDP, and TLS traffic.
- AWS Application Load Balancer (ALB). Application-aware, suitable for HTTP/HTTPS traffic.
- HAProxy.
- NGINX Plus.
Load Balancer Health Checks
To ensure reliable load balancing for your Cribl Leader Nodes, configure health checks against the /health endpoint. For optimal performance and to avoid potential throttling, adhere to the following guidelines:
- Polling frequency: Set your load balancer to check the health endpoint every
60seconds. This interval aligns with Cribl.Cloud’s internal monitoring and prevents excessive API calls. - Avoid overly frequent checks: Polling more often than every
60seconds (for example, every5seconds) can overload the Leader’s API process. - Load balancer routing: Configure your load balancer to direct traffic exclusively to Leader Nodes that return a
200status code from the health check.
For detailed information on the /health endpoint’s query and response formats, refer to the Query the Health Endpoint documentation.
AWS Network Load Balancers
If you need to access the same target through a Network Load Balancer, use an IP-based target group and deactivate client IP preservation. For details, see:
Source-Level Health Checks
For many HTTP-based Sources, you can enable a Source-level health check endpoint in the Advanced Settings tab. Load balancers can send periodic test requests to these endpoints, and a 200 OK response indicates that the Source is healthy.
Frequent requests to Source-level health check endpoints can trigger throttling settings. In such cases, Cribl will return a 503 Service Unavailable response, which can be misinterpreted as a service failure. A 503 response may indicate that the health checks are running too frequently instead of an actual service failure.
Recommended Configuration
Use the latest NFS client across all Leaders. If you are on AWS, we recommend the following:
- Use Amazon’s Elastic File System (AWS EFS) for your NFS storage.
- Ensure that the user running Cribl Stream has read/write access to the mount point.
- Configure the EFS Throughput mode to
Enhanced>Elastic. - For details on NFS mount options, see Recommended NFS mount options.
For best performance, place your Leader Nodes in the same geographic region as the NFS storage. If the Leader and NFS are distant from each other, you might run into the following issues:
- Latency in UI and/or API access.
- Missing metrics between Leader restarts.
- Slower performance on data Collectors.
Set the primary Leader’s Resiliency drop-down to Failover.
Configure Additional Leader Nodes
You can configure additional Leader Nodes in the following ways. These configuration options are similar to configuring the primary Leader Node:
Remember, the
$CRIBL_VOLUME_DIRenvironment variable overrides$CRIBL_HOME.
How Cribl Stream Manages Leader Settings
When you first configure a Leader for failover, Cribl Stream will create a new leader.yml file in the local $CRIBL_HOME/local/cribl directory and will upload it to the failover volume. Configuration stored in the leader.yml file on the failover volume will take precedence over what is stored in the local instance.yml file.
The leader.yml file replicates most of the content of the local instance.yml, but leaves out the failover configuration.
While running in failover mode, when you change Settings > Distributed Settings via the UI, Cribl Stream applies those changes to leader.yml in the failover directory.
Use the UI
In Settings > Global > Distributed Settings > General Settings, select Mode:
Leader.Next, on the Leader Settings left tab, select Resiliency:
Failover. This exposes several additional fields.In the Failover volume field, enter the NFS directory to support Leader failover. This directory must be outside of
$CRIBL_HOME. One valid solution is to useCRIBL_DIST_MASTER_FAILOVER_VOLUME=<shared_dir>. See Using Environment Variables for more information.Optionally, adjust the Lease refresh period from its default
5s. This setting determines how often the primary Leader tries to refresh its hold on the Lease file.Optionally, adjust the Missed refresh limit from its default
3. This setting determines how many Lease refresh periods elapse before standby Nodes attempt to promote themselves to primary.Select Save to restart.
In Cribl Stream 4.0.3 and newer, when you save the Resiliency:
Failoversetting, further Distributed Settings changes via the UI will lock for both the primary and backup Leader. (This prevents errors in bootstrapping Workers due to incomplete token synchronization between the two leaders.) However, you can still update each Leader’s distributed settings by modifying its configuration files, as covered in the very next section.
Use the YAML Config File
In $CRIBL_HOME/local/_system/instance.yml, under the distributed section:
- Set
resiliencytofailover. - Specify a volume for the NFS disk to automatically add to the Leader Failover cluster and trigger automated data migration.
distributed:
  mode: master
  master:
    host: <IP or 0.0.0.0>
    port: 4200
    resiliency: failover
    failover:
volume: /path/to/nfsNote that
instance.ymlconfigs are local, not on the shared NFS volume.
Use the Command Line
You can configure another Leader Node using a CLI command of this form:
./cribl mode-master -r failover -v /tmp/shared
For all options, see the CLI Reference.
Use Environment Variables
You can configure additional Leader Nodes using the following environment variables listed in Environment Variables Reference: Adding Fallback Leaders.
You can also configure Leader Nodes using the distributed.master.resiliency and distributed.master.failover configuration options as shown in the example instance.yml file.
Monitor the Leader Nodes
To view the status of your Leader Nodes, select Monitoring > System > Leaders.

Upgrade
Upgrading through the UI is not supported for distributed environments with a second Leader configured for high availability/failover. Instead, use the command line (CLI) to upgrade.
Follow this upgrade order:
- Stop all Leaders.
- Upgrade the primary Leader for your Stream or Edge deployment.
- Upgrade standby Leaders.
- Start each Leader again, one by one.
- Upgrade each Worker Node, respectively.
Disable a Standby Leader
Cribl recommends that you maintain a standby Leader to ensure continuity in your on-prem distributed environment. Should you decide to disable it, contact support to assist you.
Addressing HA Migration Timeouts
When enabling High Availability (HA) mode on a production system with a lot of data, the process of moving that data can sometimes take longer than expected. If the system runs out of time during this move, it might only copy part of the data, which can cause problems when the system restarts.
To mitigate the risk of incomplete data transfers, temporarily increase the system’s transfer time prior to enabling HA. You can do this by adjusting a setting called TimeoutSec in the system’s configuration. Specifically, locate the Service section and add or modify the TimeoutSec directive. For example, set it to 600 seconds (10 minutes):
[Service]
TimeoutSec=600A successful data transfer will be confirmed by specific messages in the system’s log, such as:
{"time":"2025-02-17T22:01:46.295Z","cid":"api","channel":"ResiliencyConfigs","level":"info","message":"failover migration is complete"}
A failed migration due to timeout might show logs ending with a system shutdown, like this:
{"time":"2025-02-06T15:29:15.416Z","cid":"api","channel":"ShutdownMgr","level":"info","message":"Starting shutdown ...","reason":"Got SIGTERM","timeout":0}
After the HA setup is complete, revert the TimeoutSec setting to its original value. Leaving the timeout extended indefinitely can lead to prolonged leader downtime if a problem occurs during a future failover. Make sure to document the original setting before making changes to facilitate easy reversion.