


These docs are for Cribl Stream 4.3 and are no longer actively maintained.
See the latest version (4.17).
Creating a Custom Collector
Cribl’s flagship product introduced Collectors in Logstream 2.2, and they have since evolved to become a critical part of the platform. You can think of Collectors as jobs that retrieve data from an external service. You can also schedule them to run periodically, like a Linux cron job.
We built the Collection framework to be extensible like Cribl Stream Functions. This means that you can create new Collectors on the fly. This page covers the Collection process, schema files, and their implementation - to give you some context - before walking you though the steps of creating your own Collector.
Collection Process
At its simplest, collection is a two-step process: Discover, and Collect.
Discover
This step identifies the items to collect. The Discover call generates a list of items, and Collect tasks will be created for those items. Note that:
- The Discover call can return zero to many items. The Collection phase will run only if Discover returned at least one item.
- Your Collector’s purpose (and definition) determines the actual data that Discover will return.
- If the Collector pulls data from files on disk, the Discover call lists the files in the directory to determine how many items match the criteria (matching by filter and/or date range). Assuming that there are 100 files to collect from, the Discover call will return 100 items (each specifying a file path and size).
Collect
Each item, from the Discover phase’s returned list of items, will trigger one Collect task for Cribl Stream to create and run. More on Collect:
Generally, there is a single Collect task per item returned by Discover.
In distributed deployments, you configure Collectors at the Worker Group level, and Worker Nodes execute the tasks. However, the Leader Node oversees the task distribution, and tries to maintain a fair balance across jobs.
Collector Schema Files
The Collector schema files, conf.schema.json and conf.ui-schema.json, describe the structure of the UI for configuring a new or existing Collector. As an example, here’s a Script Collector’s Configuration modal:
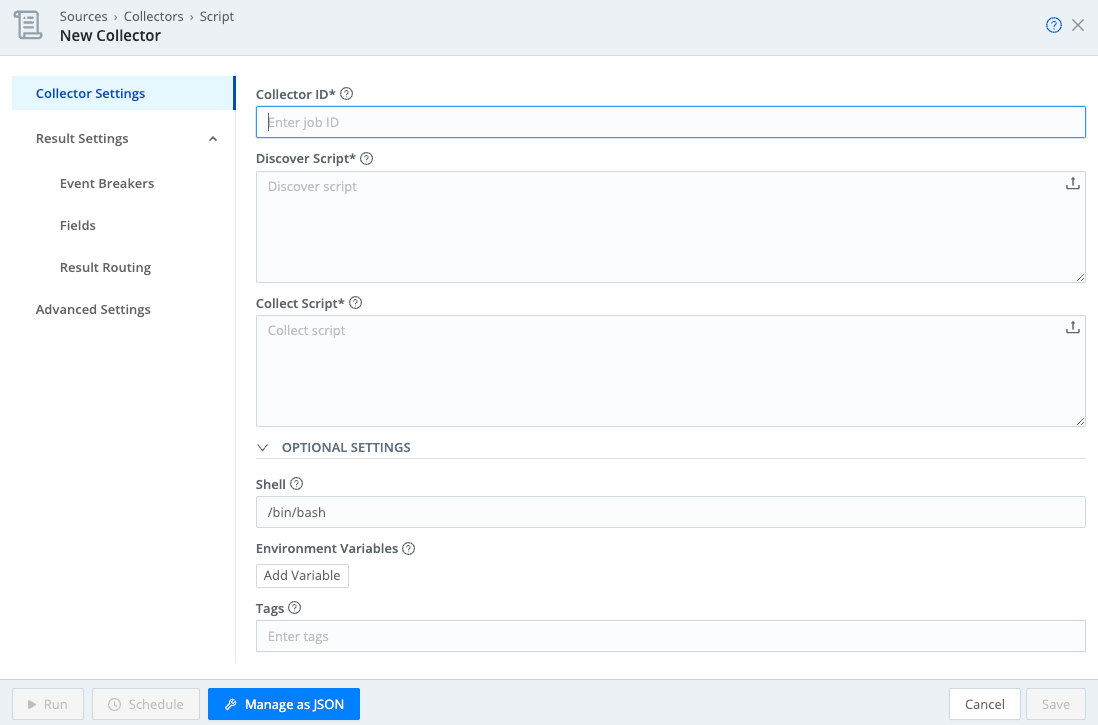
The conf.schema.json below defines all the fields displayed on that Collector Settings form:
{
  "type": "object",
  "title": "",
  "required": ["discoverScript", "collectScript"],
  "properties": {
    "discoverScript": {
      "type": "string",
      "title": "Discover Script",
      "minLength": 1,
      "description": "Script to discover what to collect. Should output one task per line in stdout."
    },
    "collectScript": {
      "type": "string",
      "title": "Collect Script",
      "minLength": 1,
      "description": "Script to run to perform data collections. Task passed in as $CRIBL_COLLECT_ARG. Should output results to stdout."
    },
    "shell": {
      "type":"string",
      "title": "Shell",
      "description": "Shell to use to execute scripts.",
      "default": "/bin/bash"
    }
  }
}The conf-ui-schema.json file further refines the field specifications in conf.schema.json. In the example below, it specifies that the discoverScript and collectScript fields should use the TextareaUpload widget with 5 rows. This file also gives each text field some placeholder (ghost) text, to display when no data is present in the field.
{
  "discoverScript": {
    "ui:widget": "TextareaUpload",
    "ui:options": {
      "rows": 5
    },
    "ui:placeholder": "Discover script"
  },
  "collectScript": {
    "ui:widget": "TextareaUpload",
    "ui:options": {
      "rows": 5
    },
    "ui:placeholder": "Collect script"
}Schemas can be simple, like the Script Collector, or complex like the REST Collector. This guide doesn’t cover all the possibilities of working with schemas, which do get complex. However, you can check out other existing Collectors as examples of how to apply schemas for your own use case.
Collector Implementation
The Collector’s implementation logic is part of index.js, and resides in the same directory as the Collector schema files. You must define the following attributes and methods for the Collector:
// Jobs can import anything from the C object, to see what's available use the
// Stream UI and an Eval Function to discover options.
const { Expression, PartialEvalRewrite } = C.expr;
const { httpSearch, isHttp200, RestVerb, HttpError, wrapExpr, DEFAULT_TIMEOUT_SECS } = C.internal.HttpUtils;

exports.name = 'Weather';
exports.version = '0.1';
exports.disabled = false; // true to disable the collector
exports.destroyable = false;
exports.hidden = false; // true to hide collector in the UI

// Define Collector instance variables here: i.e.:
// let myVar; // Initialize in init, discover, or collect.

// init is called before the collection job starts. Gives the Collector a chance
// to validate configs and initialize internal state.
exports.init = async (opts) => {
  // validate configs, throw Error if a problem is found.
  // Initialize internal attributes here
}

// The Discover task's main job is to determine 'what' to collect. Each item
// to collect (i.e. a file, an API call, etc) is reported via the job object
// and will execute a collection task.
// Note that different instances of the Collector will be used for the Discover
// and Collect operations. Do not set internal Collector state in Discover
// and expect it to be present in Collect. The _init method will be called
// prior to Discover orCcollect.
exports.discover = async (job) => {
  // Job is an object that the collector can interact with, for example
  // we can use the job to access a logger.
  job.logger().info('Discover called');

  // In this case, reporting 2 hard coded items to be collected. Normally,
  // collectors dynamically report items to collect based on input from
  // an API or library call.
  await job.addResults([{"city": "San Francisco"},{"city": "Denver"}]);
  // Can also add results one at a time using await job.addResult("city": "San Francisco"})
}

// One invocation of the Collect method is made for each item reported by the
// discover method. The collectible object contains the data reported by discover.
// In our example collect will be called twice, once for each item returned
// by discover's addResults call:
// Invocation 1: {"city": "San Francisco"}
// Invocation 2: {"city": "Denver"}
exports.collect = async (collectible, job) => {
   job.logger().info('In collect', { collectible });
   try {
     // Do actual data collection here. In this case we might make a REST API call
     // to retrieve current weather conditions for the city in collectible.
     const myReadableStream = doGetWeather(collectible.city);
   } catch (error) {
     // If the collector encounters a fatal error, pass the error to the job. This
     // will make the error visible in the Job inspector UI.
     job.reportError(error)
     return;
   }
   // Return result of the collect operation should be Promise<Readable>
   // which will be piped to routes or to the configured pipeline and destination.
   return Promise.resolve(myReadableStream)
}Set Up a New Collector
Now to the exciting part. Here’s an overview of how to add a Collector:
Create a directory where Collector files will reside. All files associated with the Collector should be in this directory.
Create the schema files and add them to the directory. The following schema files describe the structure of the UI for configuring a new or existing Collector:
schema.jsonui-schema.json
Create a JavaScript file named
index.js, with naming attributes and required methods.Test and validate the Collector.
Install the Collector in Cribl Stream.
Before You Start
A few things to note before we start the process of adding a custom Collector:
For a standalone install of a running Cribl Stream instance, add new directories and files to the
$CRIBL_HOME/local/cribl/collectorsdirectory (e.g.,/opt/cribl).The Collector will show up in the UI only if all schema files and the
index.jsfile successfully compile. If the Collector is not showing up in the UI, check whether there was a problem compiling one of the files. You can check the errors through the API Server Logs.Develop your Collector in a local test environment, as a best practice. After making changes to the Collector, you might need to restart/and or deploy your system.
Collectors can access all Node.js built-in modules, using the
requiredirective to import each module.You can include third-party Node.js modules into a custom Collector by installing them in the Collector’s home directory.
Cribl Stream ships with out-of-the-box Collectors which reside in the
$CRIBL_HOME/default/cribl/collectorsdirectory. Feel free to copy contents from one of the existing Collectors to your$CRIBL_HOME/local/cribl/collectors(local directory) as a starting point/example of how to build more-complex schemas.
Never modify a Collector in the default directory (
$CRIBL_HOME/default/cribl/collectors/*). Because:
- Doing so changes the behavior of a Collector in your installed system.
- Contents of the default directory will be overwritten during upgrades.
When creating your own Collector, always make a copy to a directory in the local
$CRIBL_HOME/local/cribl/collector/<yourCollector>
Sample Collector Requirements
For this example, our sample Collector’s goal is to generate events - containing a random quote obtained from an internal list - for a list of users. Here is a breakdown of this Collector’s requirements:
Provide a random quote to a predefined or random list of usernames.
Accept the names of users for whom to generate quotes.
Accept randomly generated usernames, by specifying the number of usernames to generate.
Generate a single event containing a random quote for each user.
Pick the random quotes from a hard-coded list, or optionally, use a REST API instead.
For this sample Collector, we’ll reference a third-party Node module to generate random usernames, and to give you a basic understanding of how to reference external code packages.
Set Up Your Environment
For this guide, we’ll build a custom Collector in a standalone Cribl Stream install running in Docker. To adapt the steps for a distributed environment:
Build the Collector on the Leader Node.
The Collector directory will reside in the filesystem at:
$CRIBL_HOME/groups/<workerGroup>/local/cribl/collectors/quote_generator. For example, to build in the default Worker Group, work in the directory:$CRIBL_HOME/groups/default/local/cribl/collectors/quote_generator.Before running the Collector, commit and deploy changes for the parent Worker Group.
Deploy a Single Instance of Cribl Stream in Docker
Start the Docker instance by running the following command:
docker run -d -p 19000:9000 cribl/cribl:latestList Docker containers by running
docker ps, as shown here:$ docker ps CONTAINER ID IMAGE COMMAND CREATED STATUS PORTS NAMES 544370698fb5 cribl/cribl:3.4.1-RC1 "/sbin/entrypoint.sh..." 4 minutes ago Up 4 minutes 0.0.0.0:19000->9000/tcp nervous_wozniakAccess the Cribl Stream UI at port:
http://localhost:19000Connect to the container:
docker exec -it <Container ID> bash(e.g.,
docker exec -it 544370698fb5 bash)Update the apt installer:
apt updateInstall Vim (or an editor of your choice):
- vim:
apt install vim - nano:
apt install nano
- vim:
After this, remain connected to the Docker container, and follow the steps below to create the Collector.
Remember to leave the Docker container running while you work on the Collector. Also, remember to explicitly back up your files before stopping the Docker container.
Build a Collector (Single-Instance Environment)
In your terminal, type the following commands:
cd /opt/cribl/local/criblmkdir collectorscd collectorsmkdir quote_generatorcd quote_generatorcp ../../../../default/cribl/collectors/script/* .chmod +w index.js *.jsonEdit
index.jsto change the following, to assign a unique name to the Collector:exports.name = 'Quote Generator';Next, restart Cribl Stream with the following command:
$ /opt/cribl/bin/cribl restartAfter Cribl Stream restarts, you must log out and log back in for the new Collector tile to display under Sources.
Configure the Collector in Cribl Stream
From your Cribl Stream UI’s top nav, select Data > Sources, then select Collectors > Quote Generator from the Data Sources page’s tiles or the Sources left nav.

Quote Generator Collector (Missing an Icon) Click Add Collector to open the Quote Generator > New Collector modal.
Enter the following in the Collector Settings tab, then click Save:
- Collector ID:
Hello_World - Discover Script:
echo "hello world" - Collect Script:
echo "{ message: \"$CRIBL_COLLECT_ARG\" }"

Collector Settings Tab - Collector ID:
On the Manage Quote Generator Collectors page, click Run next to the Collector.

Run the Collector In the Run configuration modal, click Run again. Note that you can set the Collector’s debug level in the modal’s Advanced Options section. For details, see Run Configurations and Shared Settings.

Run the Collector After the Collector runs, the following event will be generated:

Run the Collector Now that we have a basic shell for our Collector, let’s change the UI and
index.jsto add our custom Collector logic. Before making any additional changes, delete the Collector we just created.On the Manage Quote Generator Collectors page, click the check box next to your Collector, then click Delete selected Collectors.

Delete the Collector
Edit the Schema Files
Replace the contents of
conf.schema.jsonwith the following:{ "type": "object", "title": "", "required": ["autoGenerateNames"], "properties": { "autoGenerateNames": { "type": "boolean", "title": "Auto generate names", "description": "Turn on to autogenerate names, use num names to specify how many names to generate. Turn off to specify a static list of names", "default": false } }, "dependencies": { "autoGenerateNames": { "oneOf": [ { "required": ["numNames"], "properties": { "autoGenerateNames": { "enum": [true] }, "numNames": { "type": "number", "title": "Num names", "minimum": 1, "maximum": 1000, "description": "The number of names to auto generate, each name will turn into a collection task." } } }, { "required": ["names"], "properties": { "autoGenerateNames": { "enum": [false] }, "names": { "type": "array", "title": "Names", "minLength": 1, "description": "List of user names to retrieve quotes for.", "items": {"type": "string"} } } } ] } } }Two interesting things to note in the
conf.schema.jsonfile:- When you disable - set to
false- the boolean toggleautoGenerateNames, the UI displays a Names field requesting a list of user names for which to retrieve quotes. - When you enable - set to
true- the boolean toggleautoGenerateNames, the UI displays a Number of names to enter field requesting the number of names to auto-generate.
The dependency allows dynamic onscreen behavior based on the field’s value.
- When you disable - set to
Replace the contents of
conf.ui-schema.jsonwith the following:{ "names": { "ui:field": "Tags", "ui:placeholder": "Enter names", "ui:options": { "separator": "," } } }The UI schema, in this case, further refines the widget (“Tags”) used for the Names field. We will see this in action a bit later.
Finally, replace the contents of
index.jswith the following:exports.name = 'Quote Generator'; exports.version = '0.1'; exports.disabled = false; exports.destroyable = false; const Readable = require('stream').Readable; const os = require('os'); const host = os.hostname(); const logger = C.util.getLogger('myCollector'); // For use in debugging init, search worker logs for channel 'myCollector' let conf; let batchSize; let filter; let autoGenerate = false; let numNames = 0; let names; exports.init = async (opts) => { conf = opts.conf; //logger.info('INIT conf', { conf }); batchSize = conf.maxBatchSize || 10; filter = conf.filter || 'true'; autoGenerate = conf.autoGenerateNames names = conf.names || []; numNames = conf.numNames ?? 3; //logger.info('INIT VALUES', { autoGenerate, names, numNames }); return Promise.resolve(); }; exports.discover = async (job) => { for (let i = 0; i < names.length; i++) { job.addResult({"name": names[i]}); } } exports.collect = async (collectible, job) => { job.logger().debug('Enter collect', { collectible }); const quote = "Carpe Diem!"; // Hard coded quote for now. // Must return a readable stream from the collect method. Here we are returning // the result string wrapped in a Readable. const s = new Readable(); s.push(JSON.stringify({ host, name: collectible.name, quote })); s.push(null); // Return readable to stream collected data return Promise.resolve(s) };Next, restart Cribl Stream with the following command:
$ /opt/cribl/bin/cribl restartAfter Cribl Stream restarts, you must log out and log back in for the new Collector tile to display under Sources.
Configure a New Collector Instance
In the Cribl Stream UI, navigate to the Quote Generator Collector and click Add New to open the Quote Generator > New Collector modal.
Type the following into the Collector Settings tab, then click Save:
- Collector ID:
firstCollector - Auto generate names:
No - Names:
Jane, John, Rover

New Collector Settings - Collector ID:
On the Manage Quote Generator Collectors page click Run next to the Collector.

Run the Collector In the Run configuration modal:
- For Mode, click Preview.
- For Log Level, select debug.
- Click Run again.

Run Collector Settings If the Collector works, a successful run displays a results dialog, including an event for each name that was added.

Collector Events Close the Preview dialog.
On the Manage Quote Generator Collectors page, click Latest ad hoc run.
This will open a dialog from the Job Inspector with information about the run, including job status, items returned by the Discover call, and logs. Click the Discover Results tab to see data returned from the Collector’s Discover call:

Discover Results
The Collector method separately. invokes each item returned The Collector argument is the content from each row in the table.
Click the Logs tab to view logs from the run. This is where you can locate anything logged by
job.logger.
View Logs
The exceptions are anything logged by our Collector in init. Notice that index.js defined another logger to use when debugging init:
const logger = C.util.getLogger('myCollector');
You can view the relevant Worker Process’ logs on the Monitoring page.
Integrate a Third-Party Package
Next, we’ll integrate a third-party package to randomly generate names in the Discover method.
In your terminal, follow these steps to install npm (Node Package Manager) into the virtual machine running Cribl Stream:
apt updateapt install npm- When prompted, select a
Region. - When prompted, select a
Timezone.
Run the following commands in your Collector directory:
- cd
/opt/cribl/local/cribl/collectors/quote_generator npm init: Answer all questions with default answers. The values are not important for our purposes.npm install username-generator --save
This will install the third-party username-generator package in
/opt/cribl/local/cribl/collectors/quote_generator/node_modules.- cd
Next, update the Collector’s
index.jswith the following content, to use this new package to auto-generate names:exports.name = 'Quote Generator'; exports.version = '0.1'; exports.disabled = false; exports.destroyable = false; const UsernameGenerator = require('username-generator'); const Readable = require('stream').Readable; const os = require('os'); const host = os.hostname(); const logger = C.util.getLogger('myCollector'); // For use in debugging init, search worker logs for channel 'myCollector' let conf; let batchSize; let filter; let autoGenerate = false; let numNames = 0; let names; exports.init = async (opts) => { conf = opts.conf; //logger.info('INIT conf', { conf }); batchSize = conf.maxBatchSize || 10; filter = conf.filter || 'true'; autoGenerate = conf.autoGenerateNames names = conf.names || []; numNames = conf.numNames ?? 3; //logger.info('INIT VALUES', { autoGenerate, names, numNames }); return Promise.resolve(); }; exports.discover = async (job) => { if (autoGenerate) { // Auto generate usernames using 3rd party package. names = []; for (let i = 0; i < numNames; i++) { names.push(UsernameGenerator.generateUsername('_')); } job.logger().info('Successfully generated usernames', { numGenerated: names.length }); } for (let i = 0; i < names.length; i++) { job.addResult({"name": names[i]}); } } exports.collect = async (collectible, job) => { job.logger().info('Enter collect', { collectible }); const quote = "Carpe Diem!"; // Hard coded quote for now. // Must return a readable stream from the collect method. Here we are returning // the result string wrapped in a Readable. const s = new Readable(); s.push(JSON.stringify({ host, name: collectible.name, quote })); s.push(null); // Return readable to stream collected data return Promise.resolve(s) };Now, in Cribl Stream’s UI, update the existing Collector to use the auto-generate feature. Add these settings, then click Save:
- Auto generate names:
Yes - Num names:
10

Update Existing Collector - Auto generate names:
Run the Collector, notice that 10 Events are now displayed and each username is randomized:

Update Existing Collector Next, update the Collector’s
index.jswith the following content to create a static list of random quotes in the Collect method. You can optionally retrieve a random quote from a REST API instead.exports.name = 'Quote Generator'; exports.version = '0.1'; exports.disabled = false; exports.destroyable = false; const UsernameGenerator = require('username-generator'); const Readable = require('stream').Readable; const os = require('os'); const host = os.hostname(); const { httpSearch, isHttp200, RestVerb } = C.internal.HttpUtils; const logger = C.util.getLogger('myCollector'); // For use in debugging init, search worker logs for channel 'myCollector' // Quotes to randomize const quotes = [ "Spread love everywhere you go. Let no one ever come to you without leaving happier. -Mother Teresa", "When you reach the end of your rope, tie a knot in it and hang on. -Franklin D. Roosevelt", "Always remember that you are absolutely unique. Just like everyone else. -Margaret Mead", "Don't judge each day by the harvest you reap but by the seeds that you plant. -Robert Louis Stevenson", "The future belongs to those who believe in the beauty of their dreams. -Eleanor Roosevelt", "Tell me and I forget. Teach me and I remember. Involve me and I learn. -Benjamin Franklin", "The best and most beautiful things in the world cannot be seen or even touched - they must be felt with the heart. -Helen Keller", "It is during our darkest moments that we must focus to see the light. -Aristotle", "Whoever is happy will make others happy too. -Anne Frank", "Do not go where the path may lead, go instead where there is no path and leave a trail. -Ralph Waldo Emerson", "You will face many defeats in life, but never let yourself be defeated. -Maya Angelou", "The greatest glory in living lies not in never falling, but in rising every time we fall. -Nelson Mandela", "In the end, it's not the years in your life that count. It's the life in your years. -Abraham Lincoln", "Never let the fear of striking out keep you from playing the game. -Babe Ruth", "Life is either a daring adventure or nothing at all. -Helen Keller", "Many of life's failures are people who did not realize how close they were to success when they gave up. -Thomas A. Edison", "You have brains in your head. You have feet in your shoes. You can steer yourself any direction you choose. -Dr. Seuss", "If life were predictable it would cease to be life and be without flavor. -Eleanor Roosevelt", "In the end, it's not the years in your life that count. It's the life in your years. -Abraham Lincoln", "Life is a succession of lessons which must be lived to be understood. -Ralph Waldo Emerson", "You will face many defeats in life, but never let yourself be defeated. -Maya Angelou", ] let conf; let batchSize; let filter; let autoGenerate = false; let numNames = 0; let names; exports.init = async (opts) => { conf = opts.conf; //logger.info('INIT conf', { conf }); batchSize = conf.maxBatchSize || 10; filter = conf.filter || 'true'; autoGenerate = conf.autoGenerateNames names = conf.names || []; numNames = conf.numNames ?? 3; //logger.info('INIT VALUES', { autoGenerate, names, numNames }); return Promise.resolve(); }; exports.discover = async (job) => { if (autoGenerate) { // Auto generate usernames using 3rd party package. names = []; for (let i = 0; i < numNames; i++) { names.push(UsernameGenerator.generateUsername('_')); } job.logger().info('Successfully generated usernames', { numGenerated: names.length }); } for (let i = 0; i < names.length; i++) { await job.addResult({"name": names[i]}); } } exports.collect = async (collectible, job) => { const quote = quotes[Math.trunc(Math.random()*100)%quotes.length]; // Must return a readable stream from the collect method. Here we are returning // the result string wrapped in a Readable. const result = { host, name: collectible.name, quote }; job.logger().info('collect returning quote', { collectible, quote }); const s = new Readable(); s.push(JSON.stringify(result)); s.push(null); // Return readable to stream collected data return Promise.resolve(s) };Run the Collector to randomly retrieve the quotes from the list:

Run the Collector In the next few steps, you’ll back up the files, by opening a shell window on your local machine and running the indicated commands.
List Docker containers by running
docker ps, as shown here:$ docker ps CONTAINER ID IMAGE COMMAND CREATED STATUS PORTS NAMES 208db8d1d8f7 cribl/cribl:latest "/sbin/entrypoint.sh..." 6 hours ago Up 6 hours 0.0.0.0:19000->9000/tcp serene_galileoIn this example, the Container ID is 208db8d1d8f7. You’d paste this into the next commands.
Run:
docker exec -it 208db8d1d8f7 tar cvzf /tmp/container_source.tgz /opt/cribl/local/cribl/collectors/quote_generatorRun:
docker cp 208db8d1d8f7:/tmp/container_source.tgz
You can locate the archive file containing the source code in the current directory. After you back up the source code, it is safe to shut down the Docker container.
Building a Collector (Distributed Environment)
When you create a Collector in a distributed environment, the directory path is slightly different from the single-instance example above. E.g., for the default group, you should create Collectors on the Leader Node in the directory: opt/cribl/groups/default/local/cribl/collectors.
The format of the path is: /opt/cribl/groups/<workerGroup>/local/cribl/collectors
For example, assuming you want to create a new Collector in group is myGroup, the path would be:/opt/cribl/groups/myGroup/local/cribl/collectors.
You’d proceed as follows:
Connect to the Leader Node.
cd $CRIBL_INSTALL/groups/default/local/cribl$CRIBL_INSTALLrefers to the directory where Stream is running, e.g.:/opt/criblmkdir collectorscd collectorsmkdir quote_generatorcd quote_generatorcp ../../../../default/cribl/collectors/script/* .
Building the Collector in a distributed environment works the same as in single-instance environment with exception of a few differences:
You must add the files to a Worker-Group directory, as described above.
You must commit and deploy changes to the Workers.
Given the extra steps, we recommend that you first build the Collector in a standalone environment, before deploying it to a distributed environment.