


These docs are for Cribl Stream 4.3 and are no longer actively maintained.
See the latest version (4.17).
Splunk Cloud and BYOL Integrations
Cribl Stream can send data to these flavors of Splunk Cloud:
- The free, single-instance trial version.
- A distributed Splunk Cloud instance with clustered indexers.
- A Bring Your Own License (BYOL) deployment, either in a non-Splunk cloud or on-prem.
You have a choice of two methods for sending the data:
- Splunk HEC (HTTP Event Collector).
- The S2S (Splunk-to-Splunk) protocol.
Of all the possible combinations, three have proven most useful in the field:
- Using Splunk HEC with the trial version of Splunk.
- Using S2S with a distributed instance of Splunk.
- Using S2S with a BYOL deployment of Splunk.
When to Use Splunk HEC
Splunk HEC is fast and easy to set up. Under the hood, it uses the HTTP/S protocol. The HTTP/S protocol offers better compression than S2S, which is a binary protocol.
The Splunk HEC endpoints are virtual endpoints, front-ended with load balancers
- ELB for AWS, or GLB for GCP.
Cribl generally recommends using Splunk HEC for integrating with Splunk Cloud, because (1) it requires fewer connections than S2S, and therefore consumes less memory; and (2) because its superior compression yields lower egress costs.
When to Use S2S
S2S allows each Cribl Stream Worker Process to connect to multiple indexers concurrently, which distributes data very effectively. Using concurrent connections minimizes the burden on any individual indexer, placing a smaller burden on a larger number of indexers. This support for concurrent connections is the main advantage of S2S. Consider S2S if you plan to route all your data through Cribl Stream first, and you prioritize search performance.
Using Splunk HEC
Identify Your Splunk HEC Endpoint
In Splunk Cloud, identify your HEC endpoint, as described in the Splunk documentation. Here are some example URL patterns for HEC endpoints:
Free version:
https://inputs.<cloud_stack_name>:8088/<endpoint>Paid Version in AWS:
https://http-inputs-<cloud_stack_name>:443/<endpoint>Paid version in GCP:
https://http-inputs.<cloud_stack_name>:443/<endpoint>
A HEC endpoint for a paid version of Splunk Cloud on AWS with an endpoint for JSON-formatted events, for a company called “Acme Group,” might look like this:
https://http-inputs-acmegroup.splunkcloud.com:443/services/collector/event
Copy the endpoint URL for use when configuring Cribl Stream in the next section.
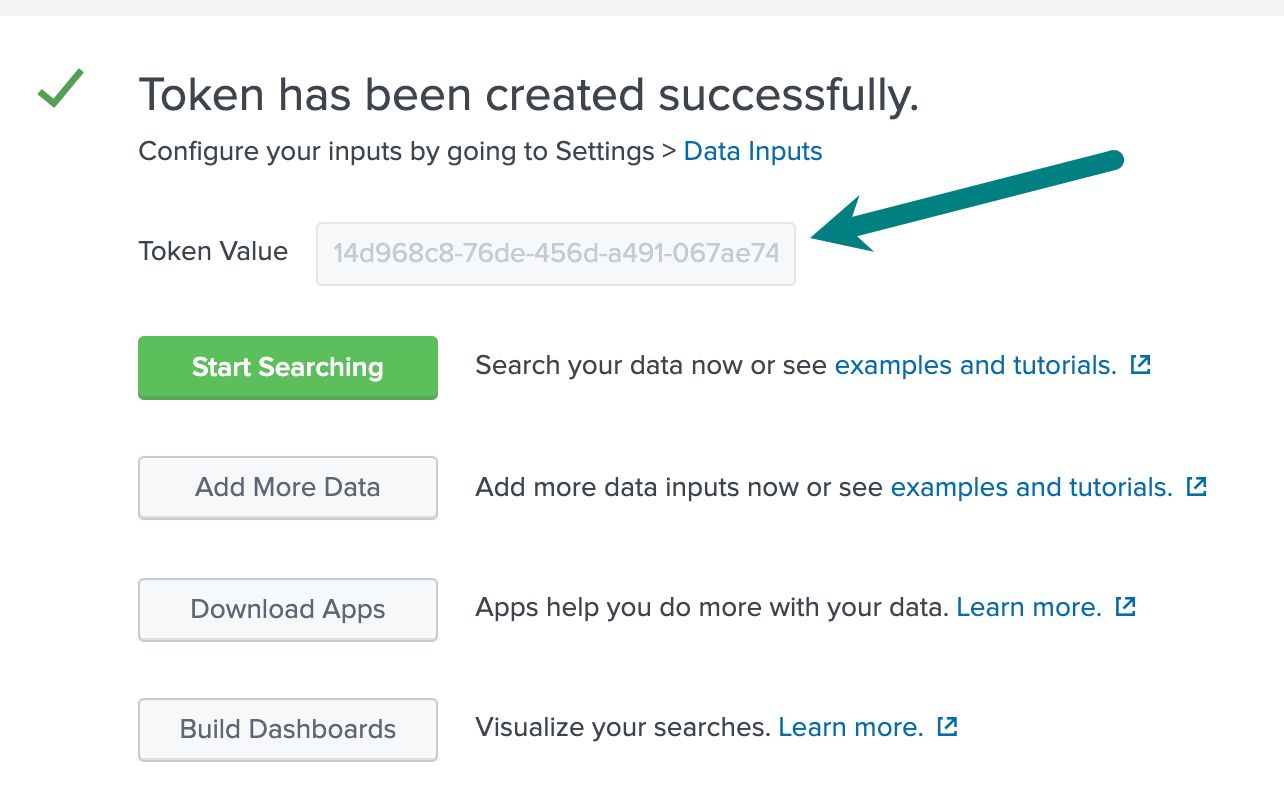
Create HEC Tokens
You need to create at least one HEC token. For deployments where you set up routing to individual indexes, or you use HEC tokens for RBAC on Splunk, you will create multiple HEC tokens.
- In the Splunk UI, open the Settings menu and click Data Inputs.
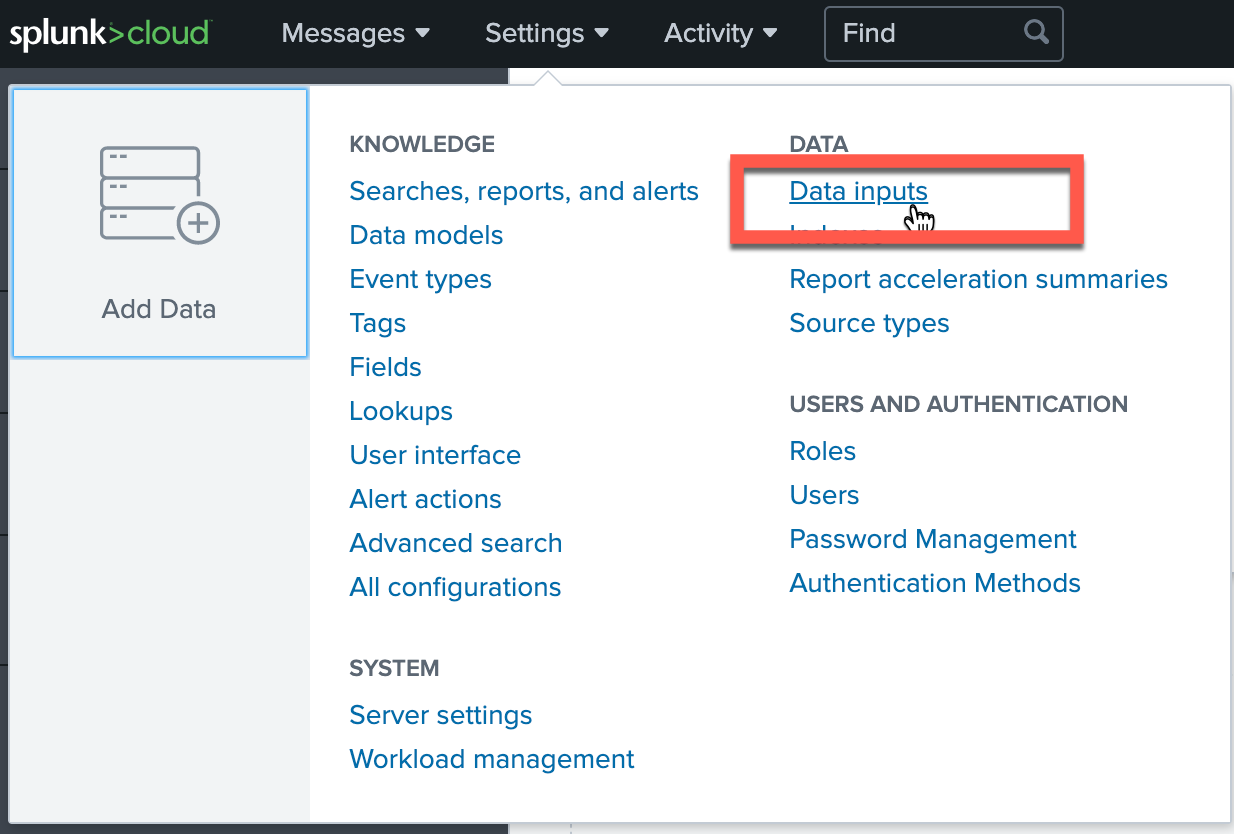
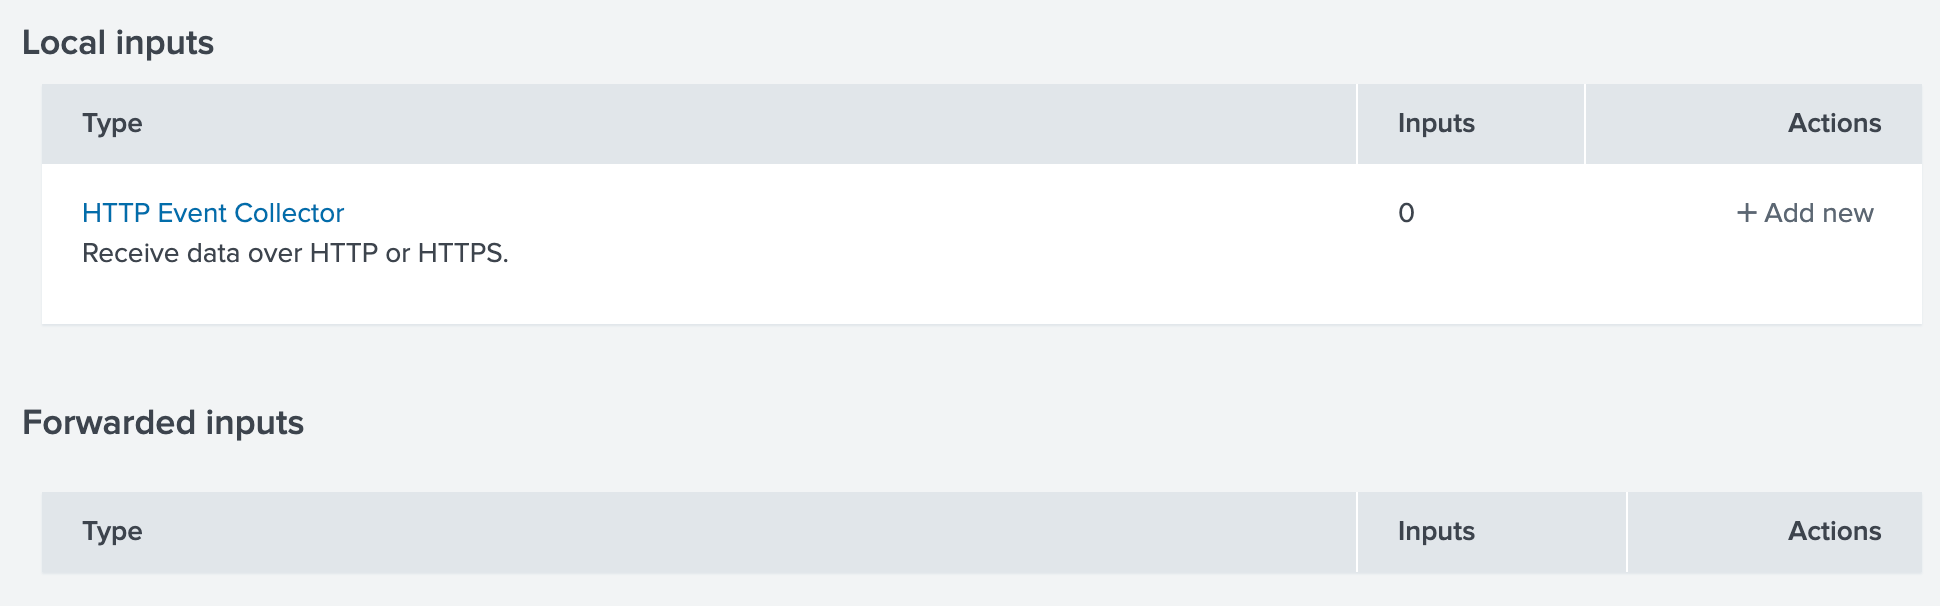
- In the resulting modal’s HTTP Event Collector section, click + Add new.
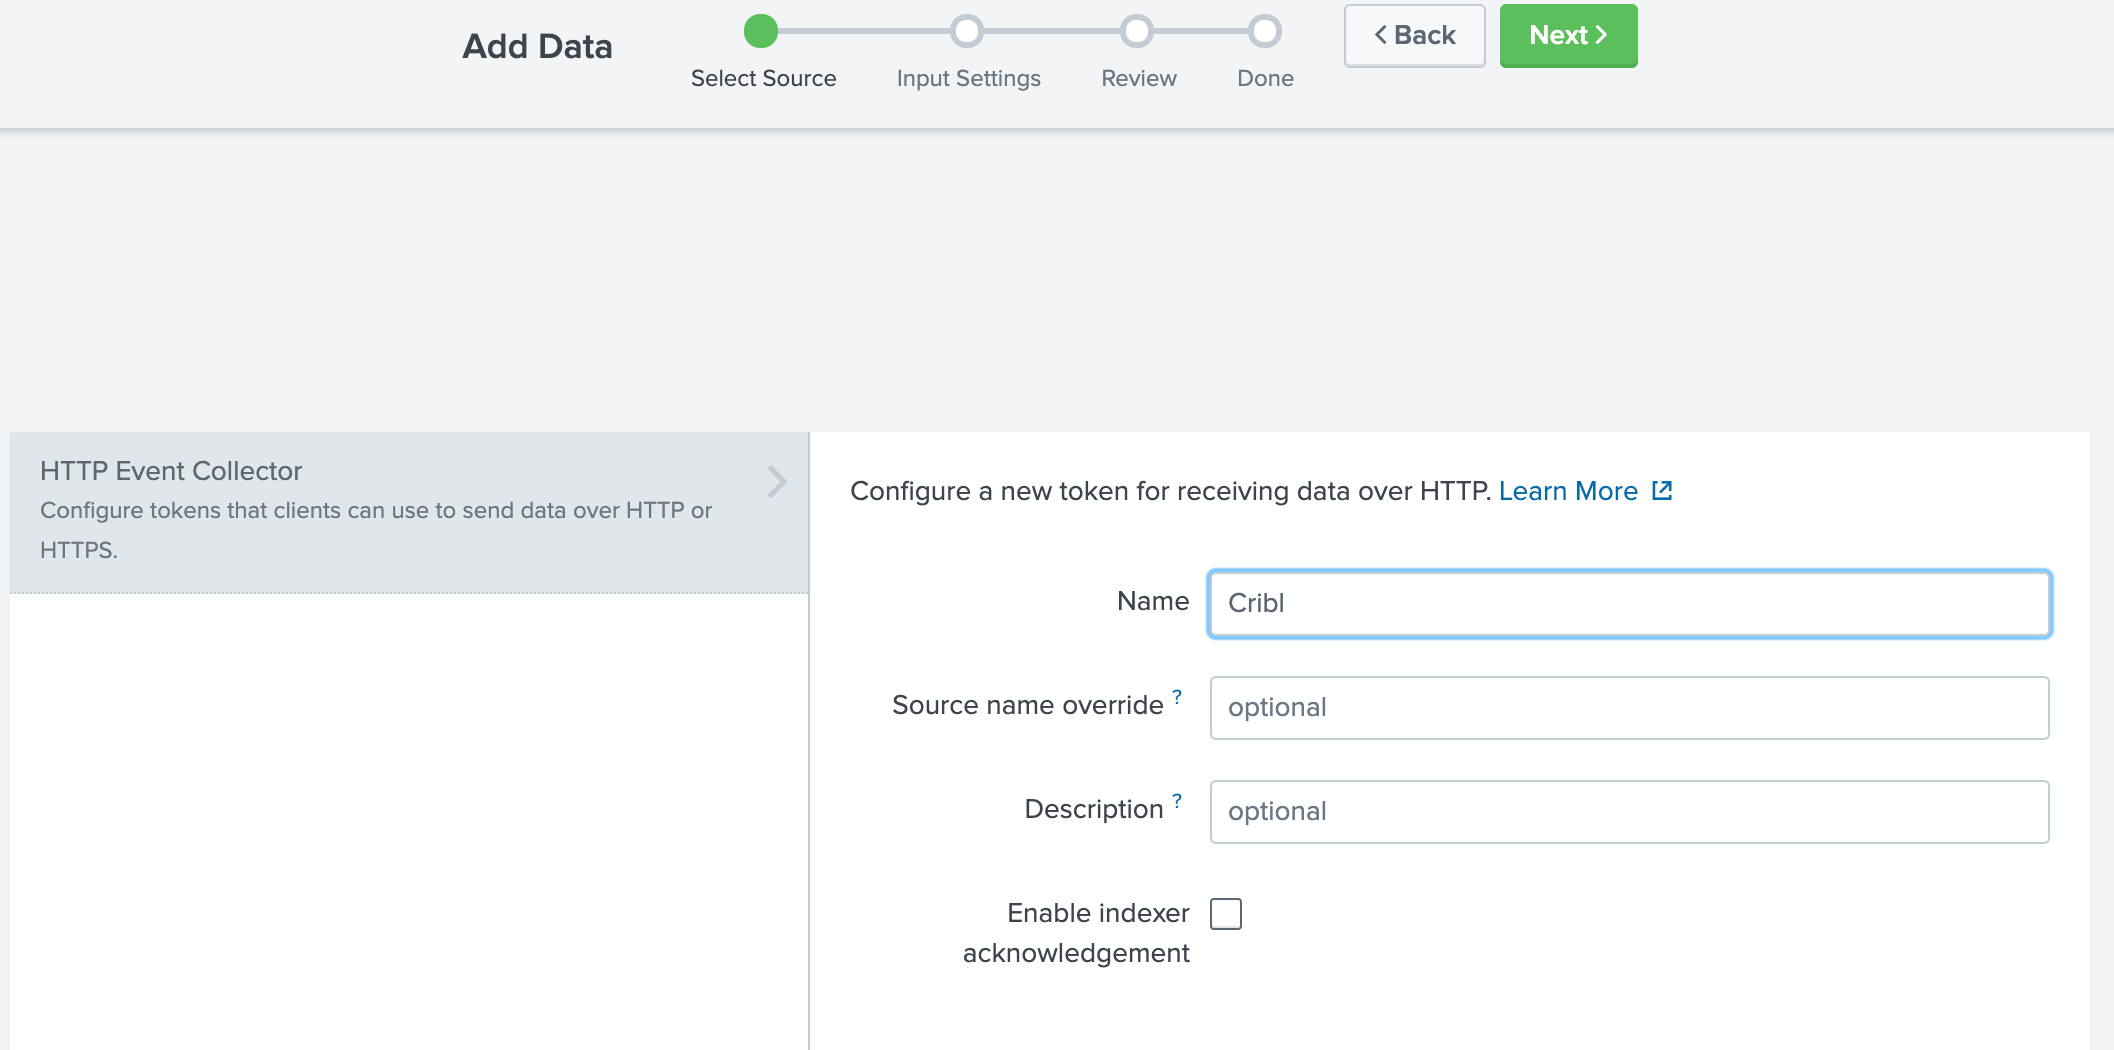
- Name the new token and click Next.
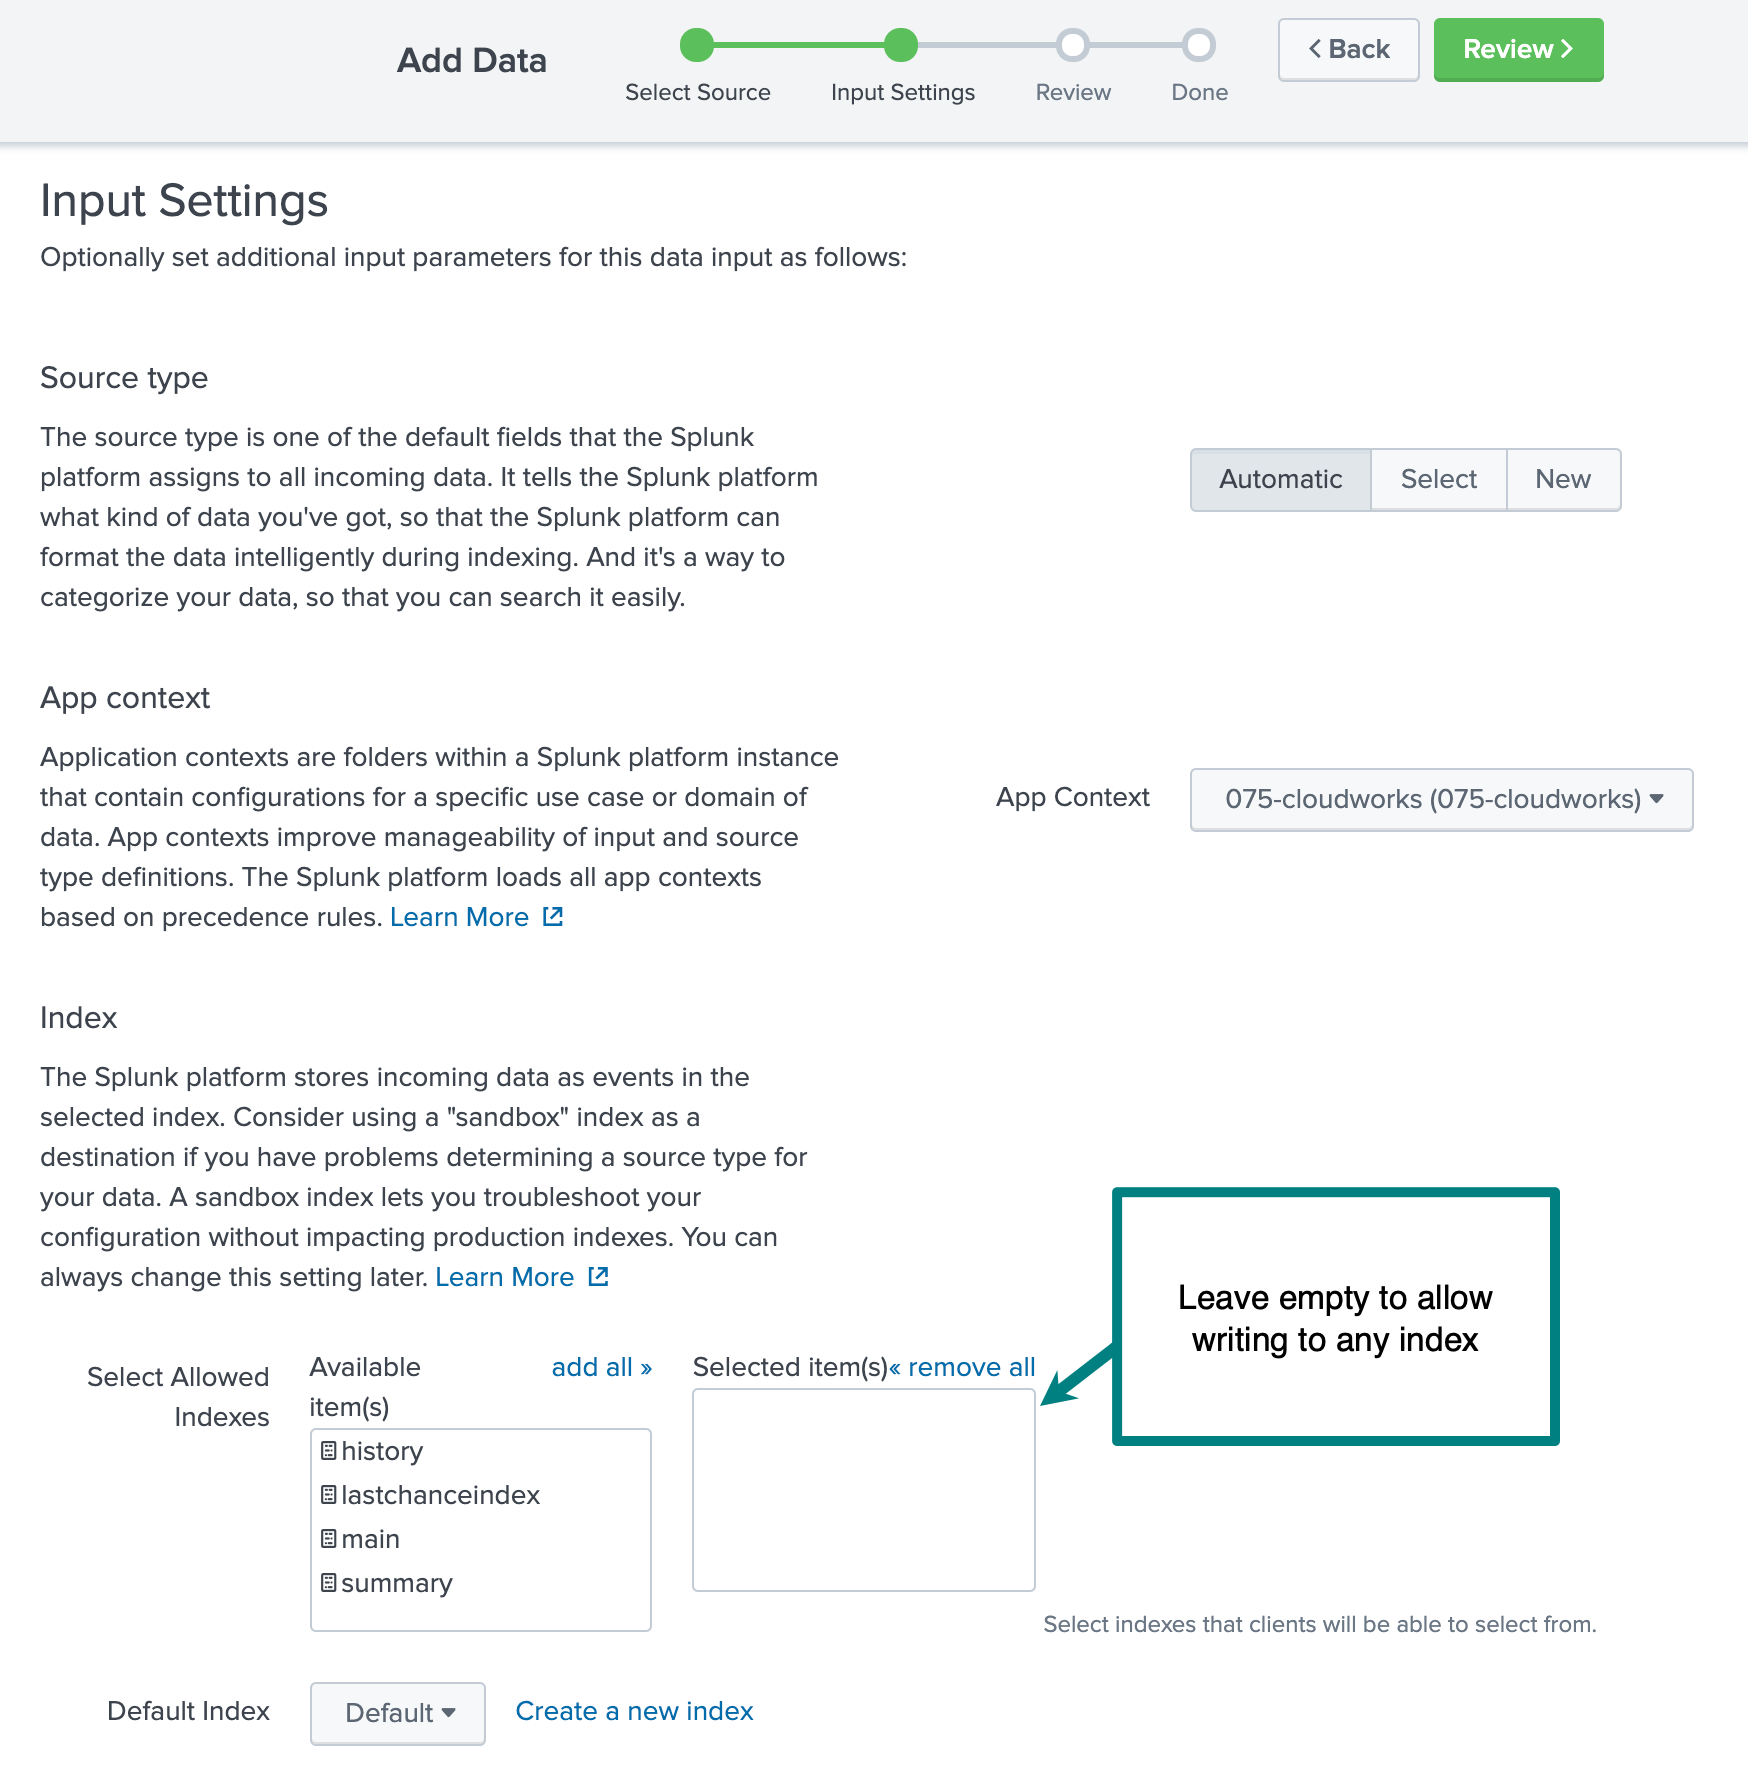
- Do not add any indexes. This way HEC can write to any index. If you prefer a
default index other than
main, choose it from the Default index drop-down.
- Copy the created token to use it when you configure Cribl Stream in the next section.
Add a Splunk HEC Destination in Cribl Stream
In Cribl Stream, click into a Group and open the Manage submenu.
Select Data > Destinations, then select Splunk > HEC.
Click Add New to open the HEC > New Destination modal.
In the General Settings tab, paste the values you copied in the previous section into the Splunk HEC Endpoint and HEC Auth Token fields, respectively.
- Be sure to specify HTTPS, because the endpoint will default to HTTP.
- When the protocol is set to HTTPS, Cribl Stream automatically uses port
443. If you’ve designated a different port in Splunk, be sure to add it to this URL in Stream. - The port in the URL can differ depending on your endpoint type. If you’re not sure which port is the default, see Identify Your Splunk HEC Endpoint.
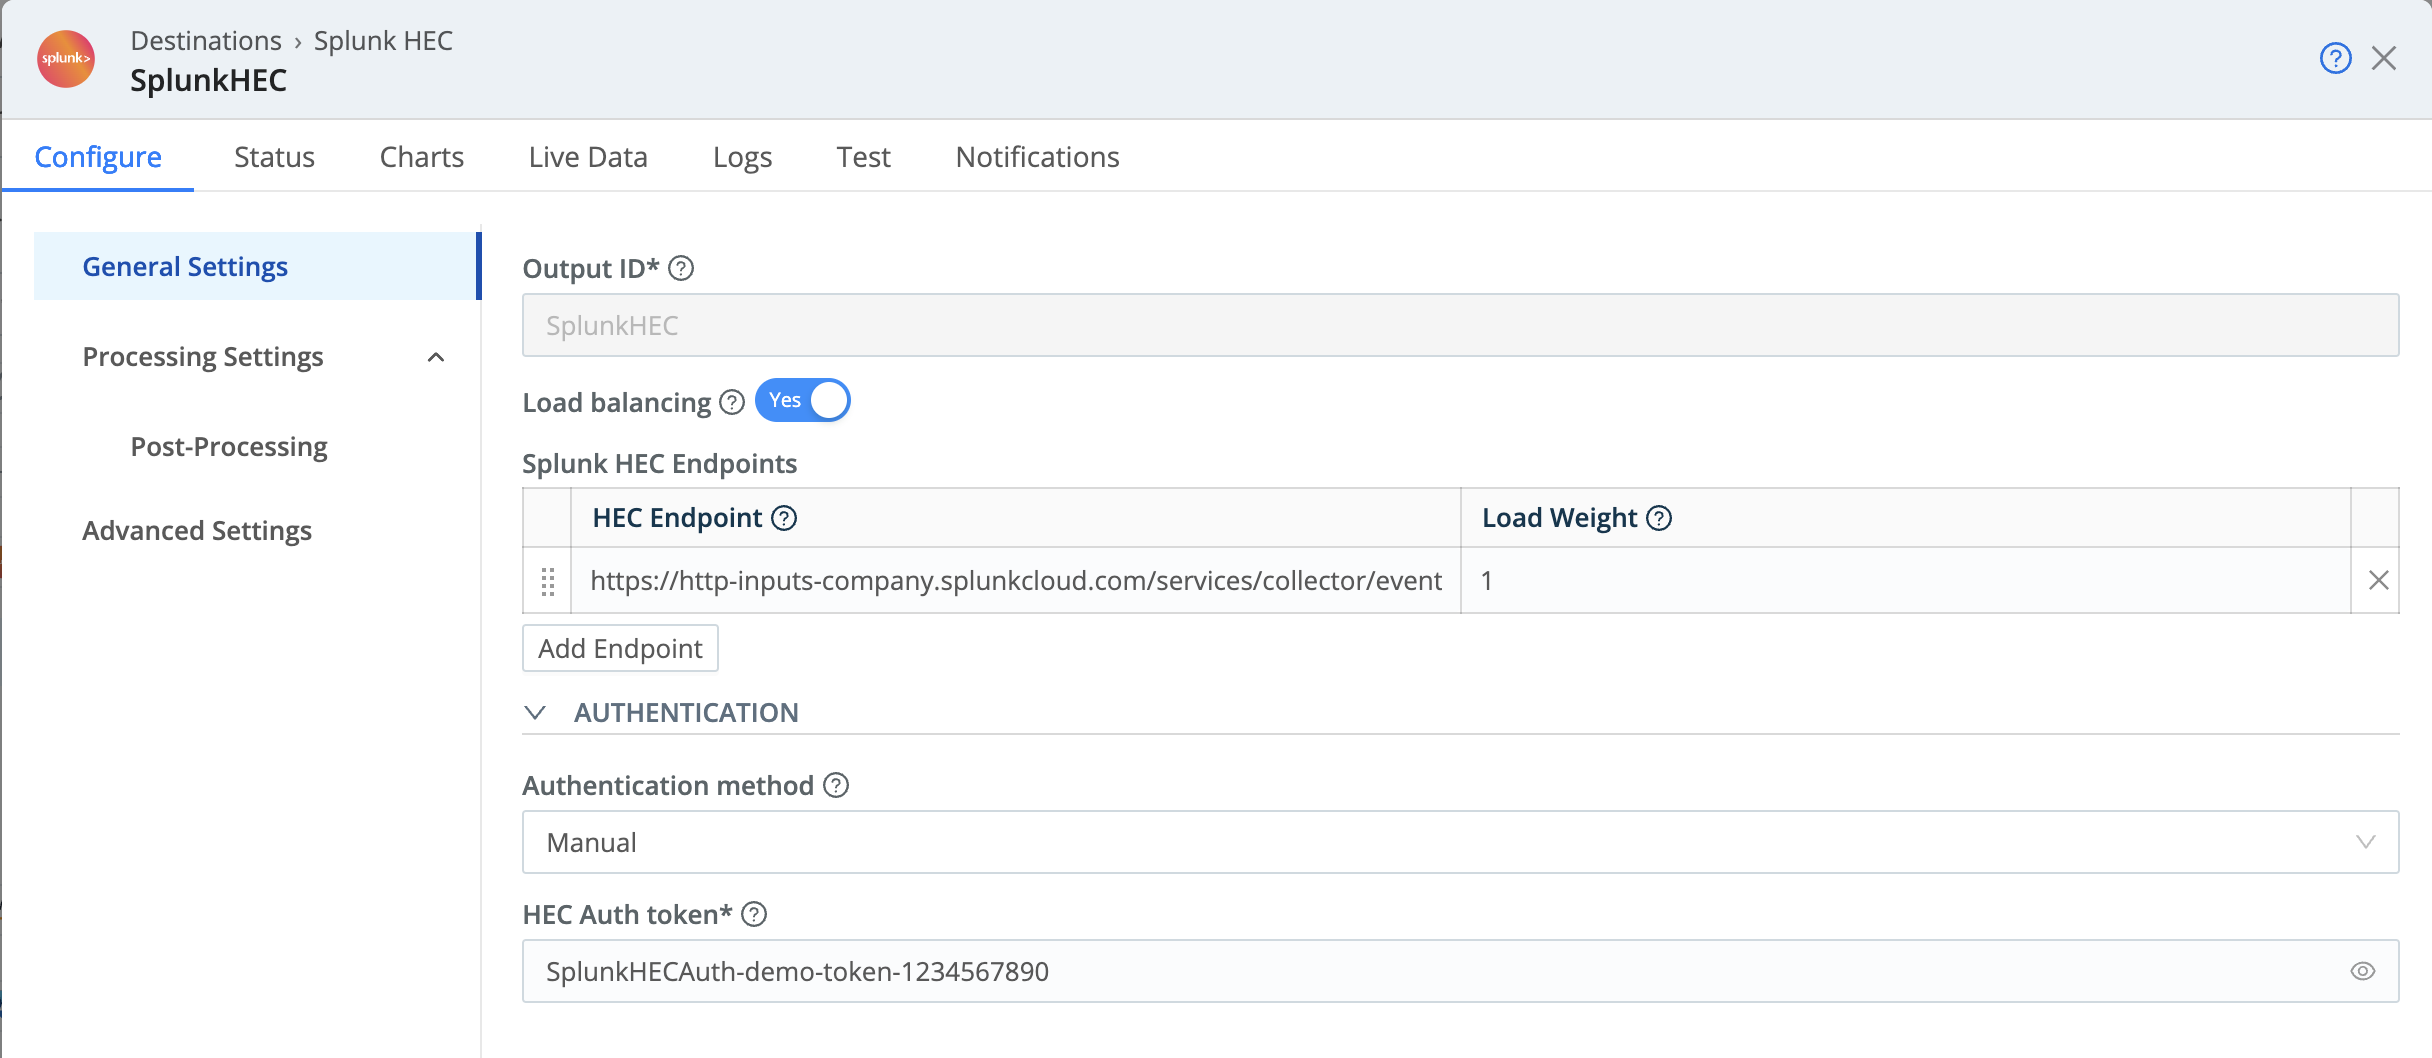
Populating General Settings with values from Splunk Click Save.
Click Commit & Deploy.
Verify that Data is Flowing from Cribl Stream to Splunk Cloud
Make sure you commit and deploy the newly created configuration. Otherwise, data will not flow to Splunk Cloud, and verification will fail.
In Cribl Stream, open the Splunk HEC Destination that you created in the previous section.
- In the configuration modal’s Test tab, click Run Test.
- You should see a Success message.
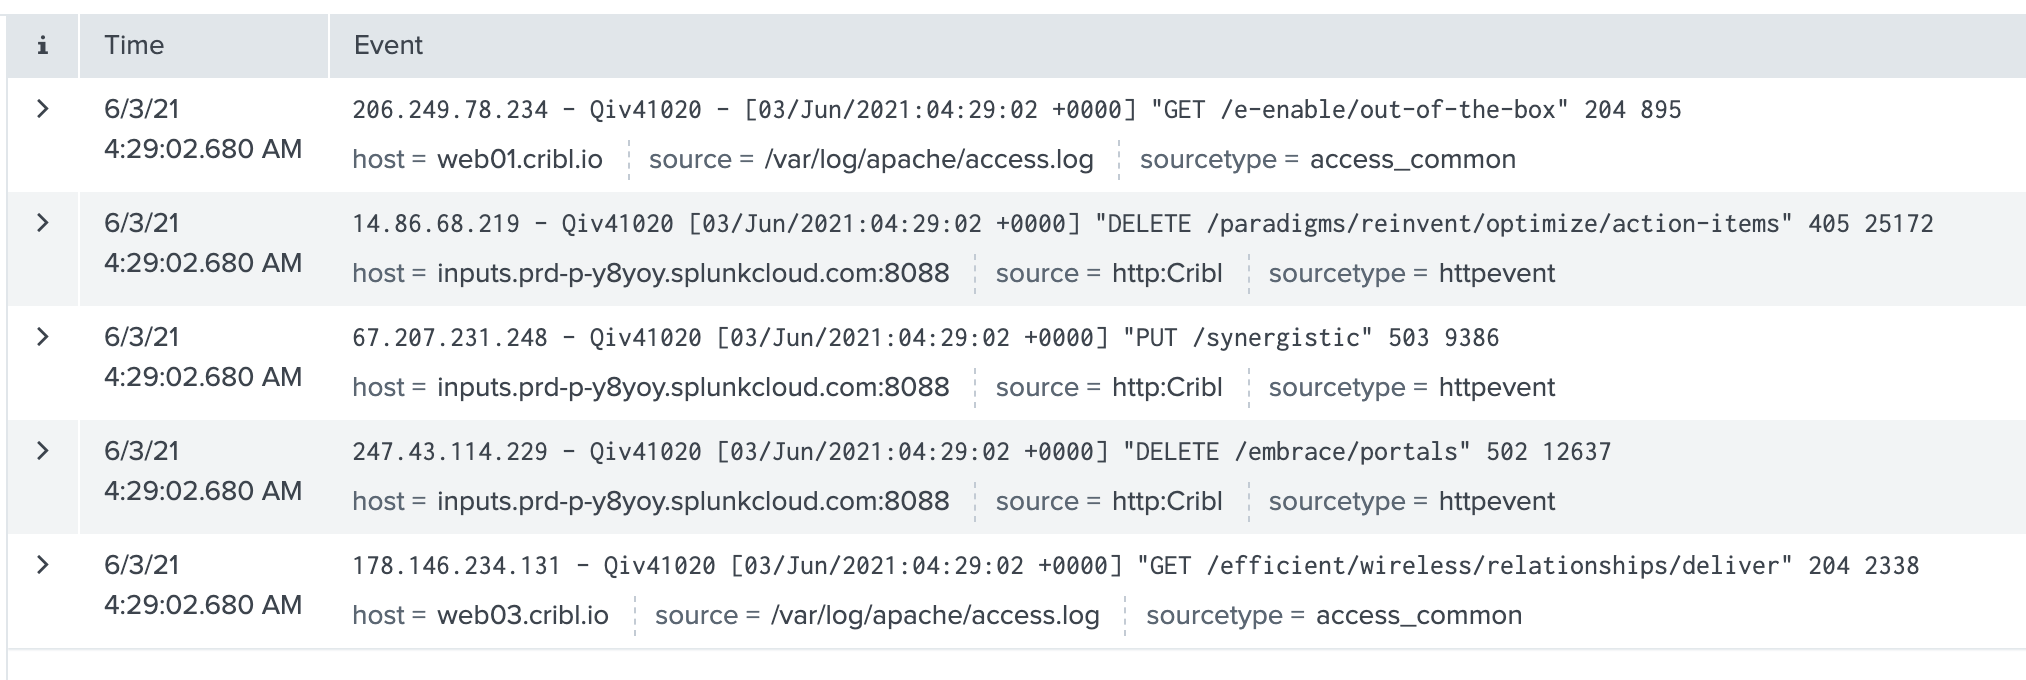
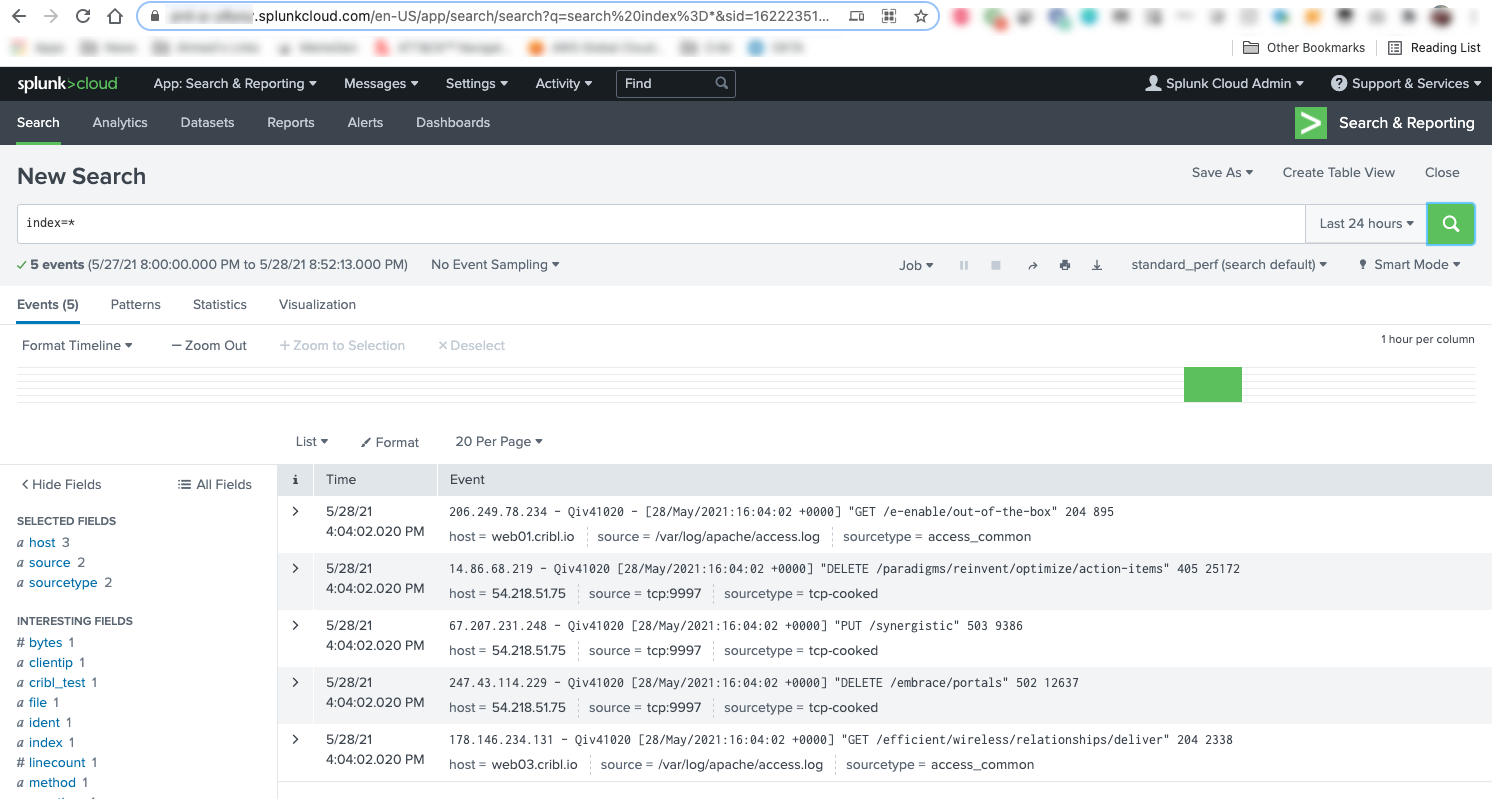
In Splunk, search on
index=main cribl_pipe=*. Events that you sent from the Cribl Stream Test tab should appear in the search results.
Using S2S
Prepare Splunk Cloud for Cribl Stream Integration
In Splunk Cloud, download the Splunk Cloud Universal Forwarder credentials app to your desktop.
Change the file suffix from
.splto.tar.gz.
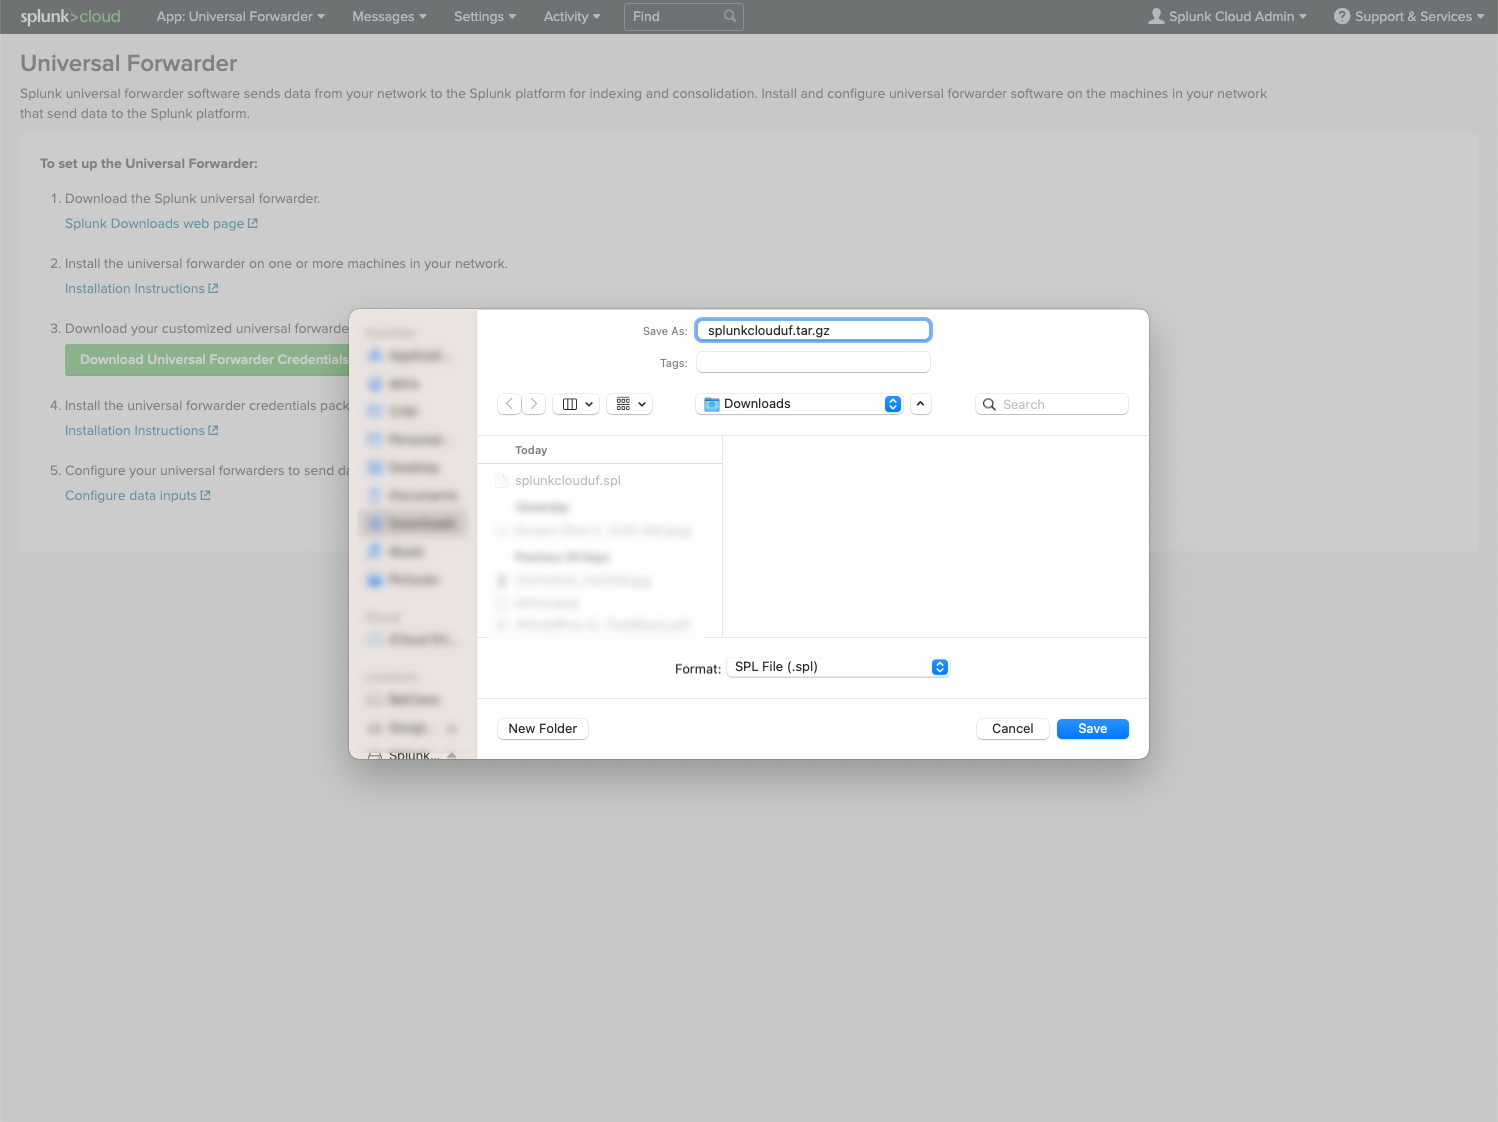
- Untar/unzip the directory to expose the files.
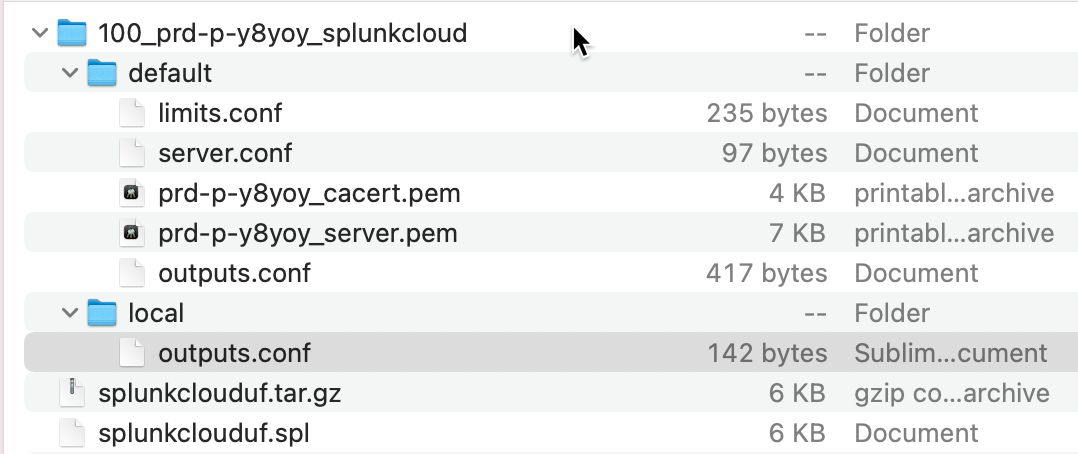
Locate the following files. You will need them when you configure Cribl Stream in the next section.
./default/<SplunkCloudInstanceName>_cacert.pem./default/<SplunkCloudInstanceName>_server.pem./default/outputs.conf./local/outputs.conf
Configure Certificate Settings in Cribl Stream
In the top menu, go to Setting > Global Settings.
Next, in the left nav, select Security > Certificates.
Populate each field below with the specified content:
- Certificate: Drag and drop the
server.pemfile. - Private Key: Copy and paste just the
private keysection of theserver.pemfile. - Passphrase: Copy and paste just the SSL password from the
../local/outputs.conffile. - CA certificate: Drag and drop the
cacert.pemfile.
- Certificate: Drag and drop the
Add a Splunk Destination in Cribl Stream
The type of Destination to add depends on what form of Splunk you’re using:
- For a trial version of Splunk Cloud, select Splunk Single Instance.
- For a paid version of Splunk Cloud, select Splunk Load Balanced. This is
required, because any paid version of Splunk Cloud will have multiple indexer
entries in the
../default/outputs.conffile.
In Cribl Stream, click into a Group and open the Manage submenu.
Select Data > Destinations, then select the correct Destination for your Splunk instance:
- Splunk Load Balanced
- Splunk Single Instance
Click New Destination to open the corresponding New Destination modal.
In the General Settings tab, populate the Address and Port fields.
- From the
./default/outputs.conffile you copied in the previous section, divide the value of theserverline between the Address and Port fields.
- From the
In the TLS Settings (Client Side) tab:
- From the Certificate name drop-down, select the certificate that you created.
- From the
./local/outputs.conffile, paste thesslPasswordvalue into the Passphrase field. - Click Save.
- Click Commit and Deploy.
Verify that Data is Flowing from Cribl Stream to Splunk Cloud
Be sure you have committed and deployed the newly created configuration. Otherwise, data will not flow to Splunk Cloud, and verification will fail.
In Cribl Stream, open the Destination that you created in the previous section.
- In the configuration modal’s Test tab, click Run Test.
- You should see a Success message.
In Splunk, search on
index=main cribl_pipe=*. Events that you sent from the Cribl Stream Test tab should appear in the search results.
Using S2S with Splunk BYOL
Before you begin configuring this option, you should already have Splunk Universal Forwarders configured to send data securely to your Splunk environment. This enables you to:
Re-use content from the
.pemandoutputs.conffiles already in use on those Forwarders.Follow the procedures in the in the previous section to add the certificate to Cribl.Cloud.
Then, reference the certificate in the Splunk Destination configuration.
If you need to secure your Splunk indexers, see the Splunk documentation.
When Your Data Source is a Splunk Forwarder
If a Splunk Universal or Heavy Forwarder is the source of the data you want to send to Splunk Cloud:
In Cribl Stream, create a Splunk TCP Source to receive data from the Splunk Forwarder.
This process includes configuring the Splunk Forwarder to point to the new Source in Cribl Stream, and (optionally) securing the communication with TLS.