


These docs are for Cribl Stream 4.5 and are no longer actively maintained.
See the latest version (4.17).
Using REST/API Collectors
The REST/API Endpoint Collector is powerful, but complex. This use case demonstrates several examples of building and running REST Collectors to pull data from public and simulated REST endpoints.
Check out the example REST Collector configurations in Cribl’s Collector Templates repository. For many popular Collectors, the repo provides configurations (with companion Event Breakers, and event samples in some cases) that you can import into your Cribl Stream instance, saving the time you’d have spent building them yourself.
To configure a Collector for Netskope Events and Alerts, see this Netskope Community topic.
1. Basic HTTP GET
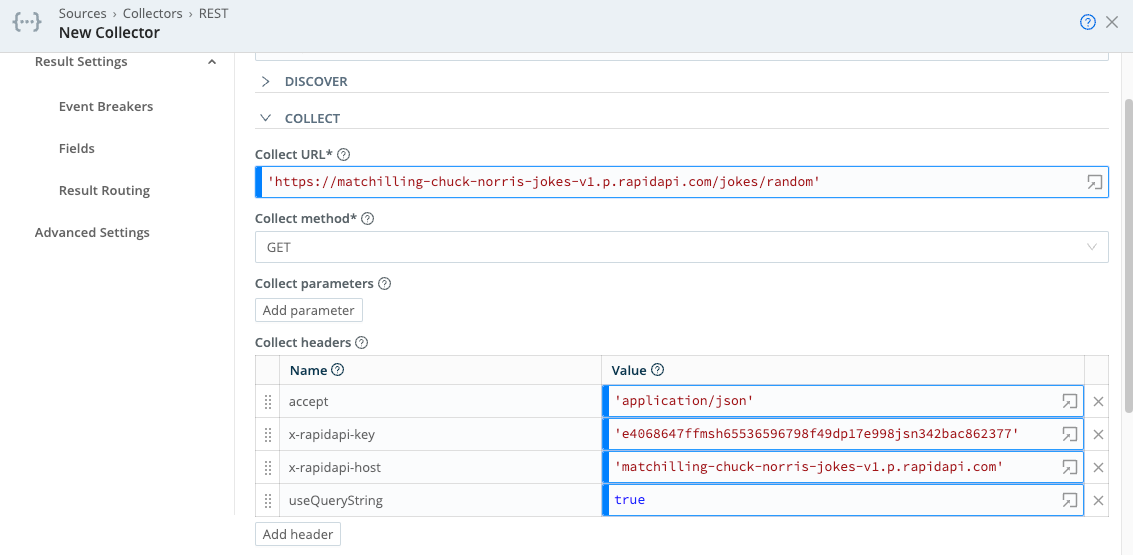
This example performs an HTTP GET operation against an external Joke API. This API uses a license key header to authenticate the user.
Discover type: None
Collect URL: ‘https://matchilling-chuck-norris-jokes-v1.p.rapidapi.com/jokes/random'
Collect parameters: None
Collect headers:
accept: 'application/json'
x-rapidapi-key: 'e4068647ffmsh65536596798f49dp17e998jsn342bac862377'
x-rapidapi-host: 'matchilling-chuck-norris-jokes-v1.p.rapidapi.com'
useQueryString: true
Pagination: None
Authentication: None
Event Breaker: JSON Newline Delimited - use Cribl Stream’s built-in Cribl > ndjson rule, and associate it with the Collector to parse the JSON document.
Results
When run (in preview mode), the Collector should return a single JSON record. If the Collector is set up with an NDJSON event breaker, it will look like this:

2. HTTP GET with Pagination via URL Attribute
The REST Collector’s Pagination feature (available in Cribl Stream 2.4.3 and above) allows collection to retrieve 1-N pages of data, using attributes returned in either the response body or response header. The returned attribute can either be a URL (referencing the next page), or a token that can be added to subsequent request headers or parameters.
In this example, a returned response-body attribute contains a URL that references the next page. Pagination will continue until either the Collector’s Max Pages setting is reached, or no more pages are present (i.e., the returned attribute is not present in the response body).
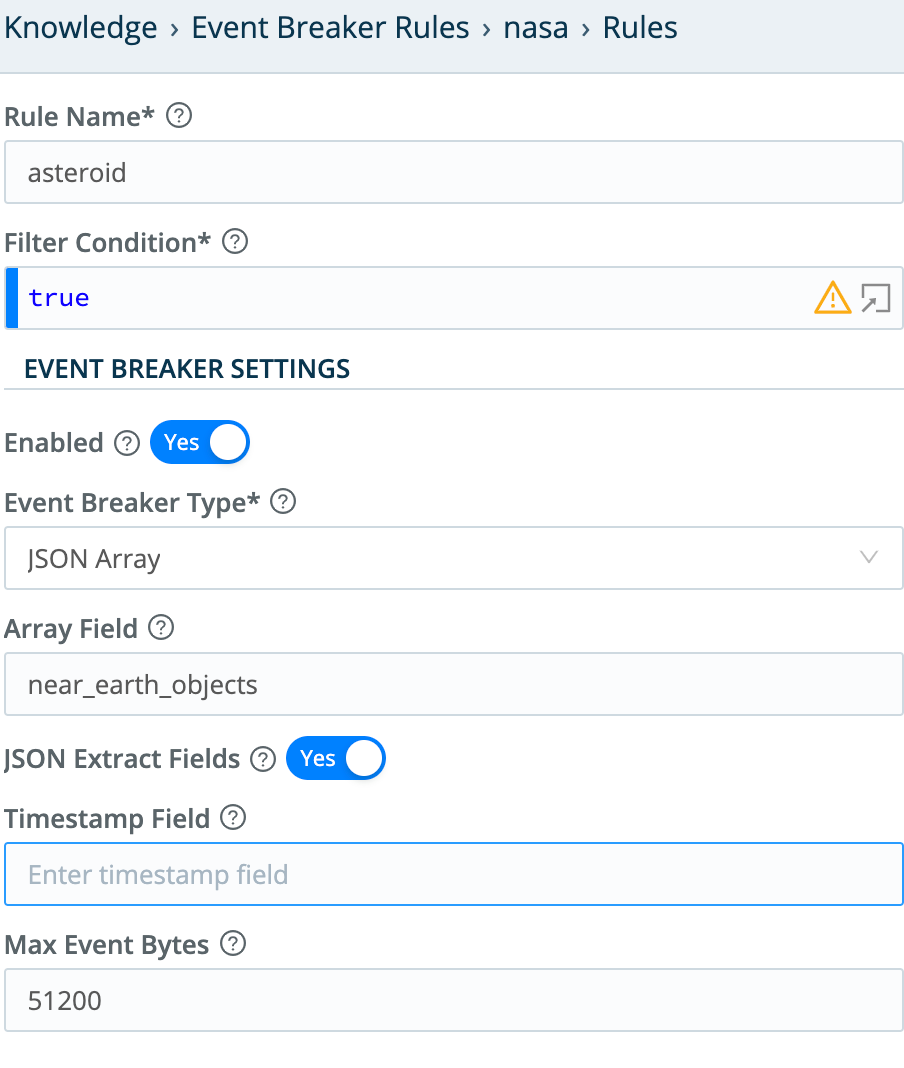
This example’s API retrieves near-Earth asteroid data from NASA. The example uses a JSON Array Event Breaker to extract individual records from an array attribute in the response.
Discover type: None
Collect URL: ‘http://www.neowsapp.com/rest/v1/neo/browse?api_key=oDa6w0fjsKEb1N3bMA5dMLhatMJ4WC5XtOBTrLrk'
Collect parameters: None - Parameters in this example are added to the header. Static parameters (i.e., parameters that don’t reference variables) can safely be added to the URL. Any parameters that do reference variables should always be added in the Collect parameters section, to allow filtering of values that evaluate as undefined.
Collect headers: None
Pagination: Response Body Attribute
Response attribute: next
Authentication: None
Event Breaker: JSON Array
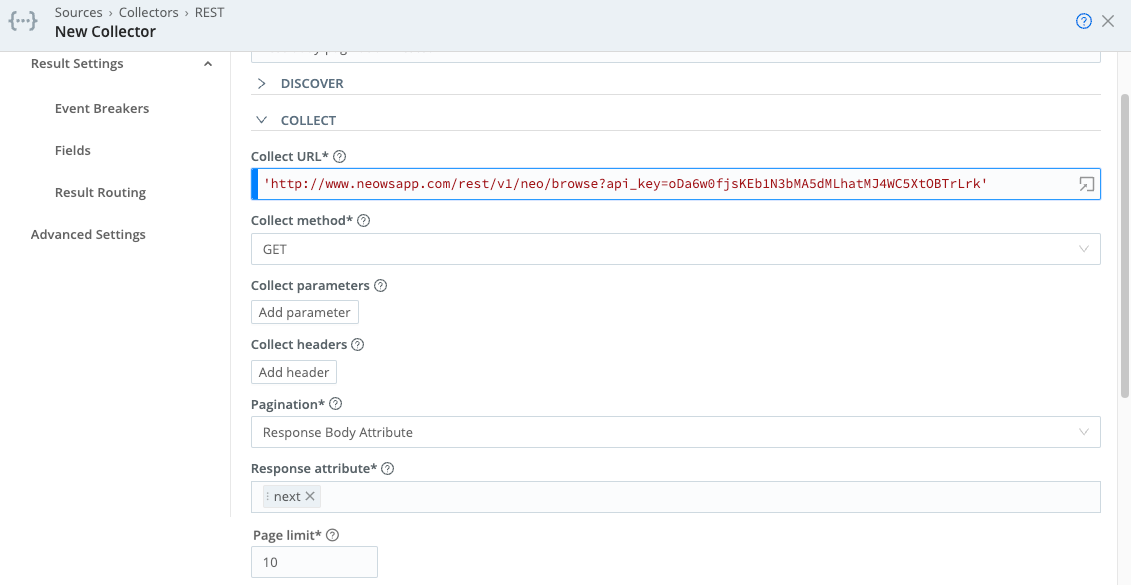
When run (in Preview mode), the collector should return multiple records extracted from the Event Breaker. In this example, we limited output to 10 pages of data. This particular dataset has over 1,000 total pages, so it’s a good idea to limit output to avoid a job that runs too long.

This API allows a certain number of calls/month. Cribl recommends that you not schedule this Collector - run it ad-hoc, for testing only.
3. HTTP GET with Pagination via Response Body Attribute
This example uses Response Body Attribute pagination, which returns a token that is passed as a request parameter to retrieve subsequent pages of data. The only difference between this example and Example 2 is how the Response Body Attribute is used.
To authenticate against the GreyNoise endpoint used in this example, set up a trial account according to GreyNoise’s Setting Up a Trial Account documentation.
Discover type: None
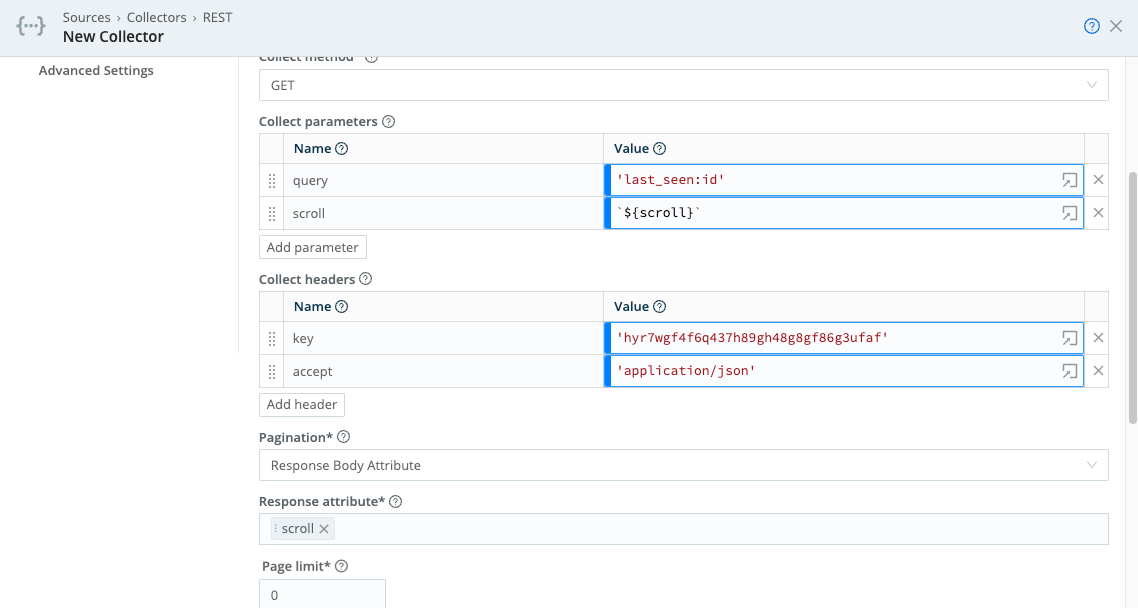
Collect URL: 'https://api.greynoise.io/v2/experimental/gnql'
Collect method: GET
Collect parameters:
query: 'last_seen:1d'
scroll: `${scroll}`
Collect headers:
accept: 'application/json'
key: '<your-GreyNoise-API-key-here>'
Pagination: Response Body Attribute
Response attribute: scroll
Max pages: 10 (or 0 to pull all data)
Authentication: None
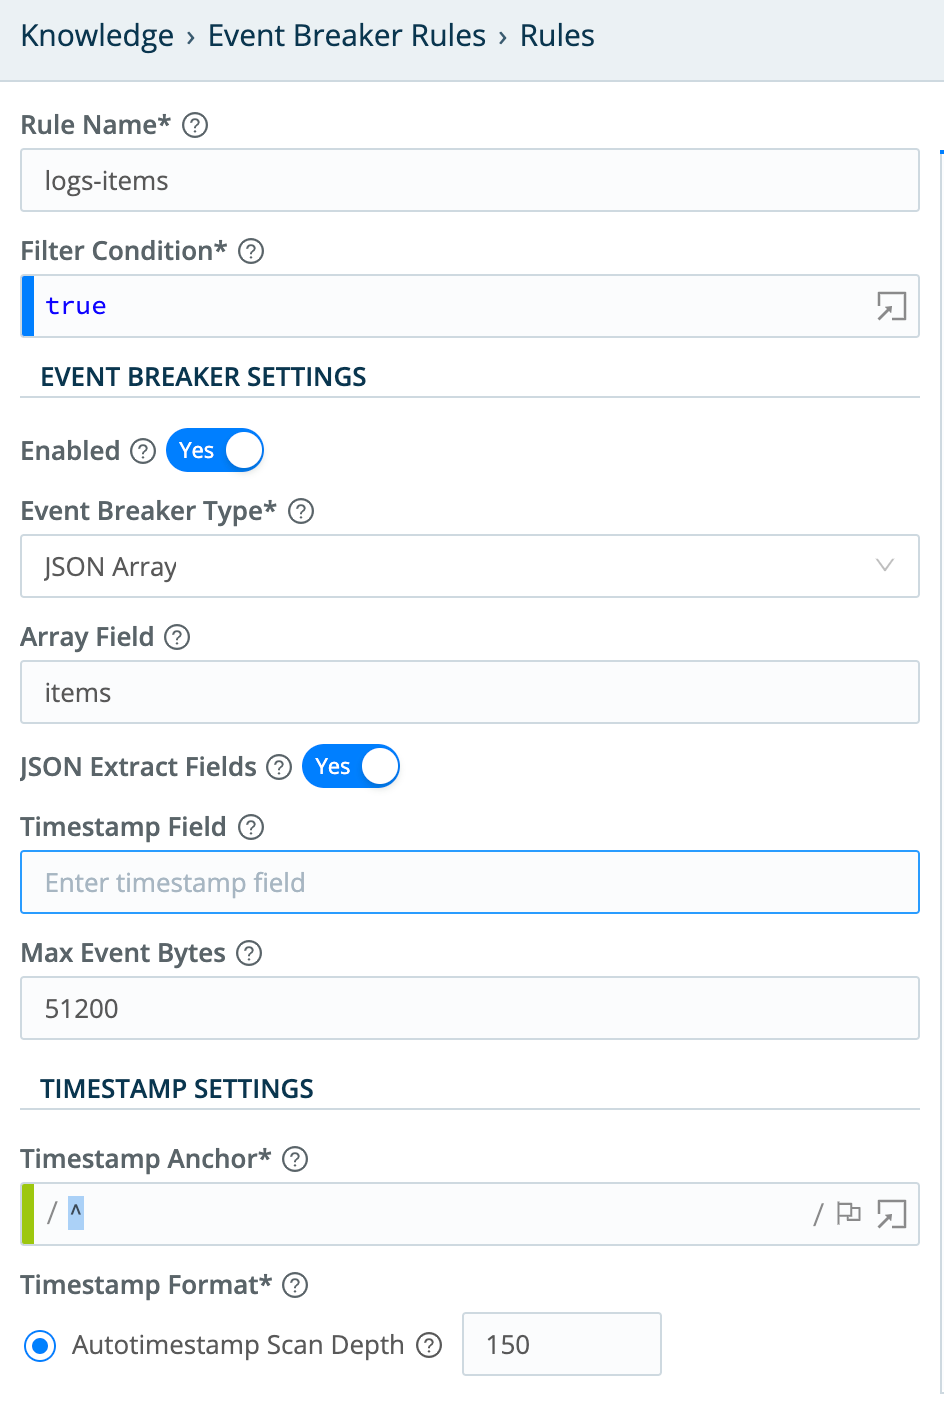
Event Breaker: JSON Array - use the configuration shown here:
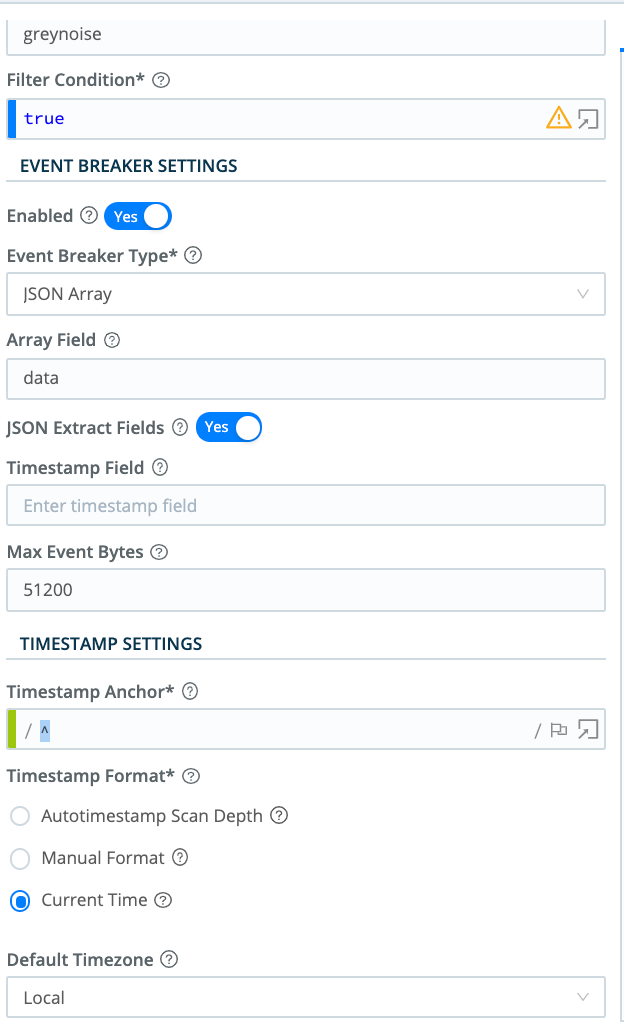
In this example, the response body returns an attribute named scroll, which is a token that references the next page of data to fetch. We reference the attribute in Collect parameters using the JavaScript expression: `${scroll}`. If present, this will be passed to retrieve subsequent pages of data, until either the Collector’s Max Pages setting is reached, or no more pages are present.
Collector Output

This API allows a certain number of calls/month. Cribl recommends that you not schedule this Collector - run it ad-hoc, for testing only.
For a more detailed use case around this particular API, see Cribl’s Enrichment at Scale! blog post.
4. HTTP GET with Pagination via Response Header URL
This example leverages pagination using a Response Header Attribute value. The value returned can be either a URL (of the next page) or a token value (a request attribute that is passed to retrieve the next page of data).
This example is based around a local Web server on port 3001. The server returns a response header when another page of data is available, and the header contains the URL of the next page. Here’s how the header looks in developer tools:

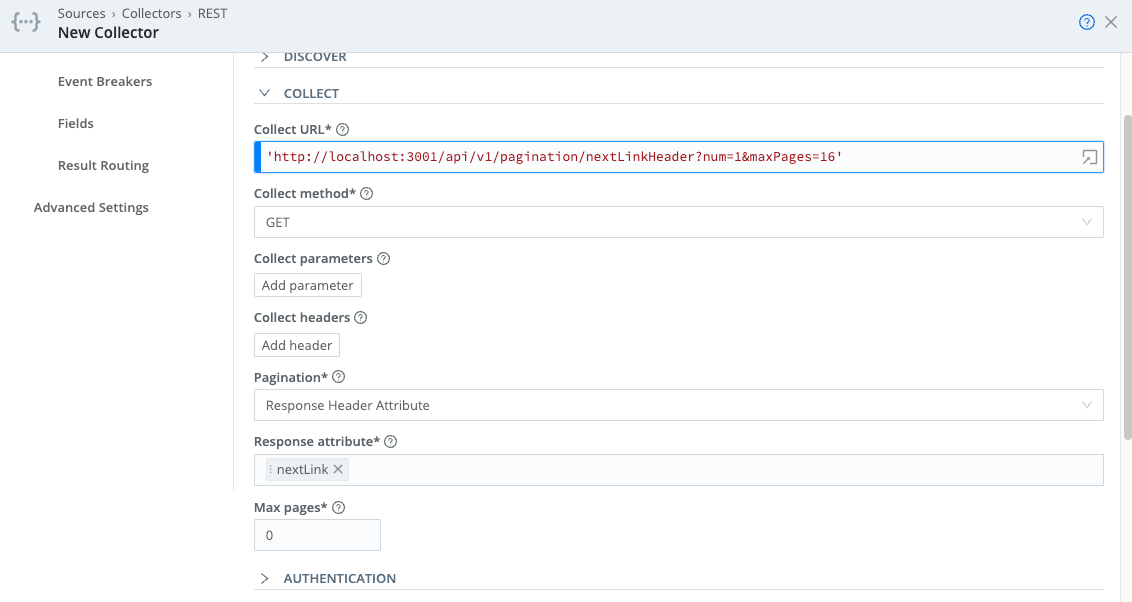
Collector Configuration
Discover type: None
Collect URL: ‘http://localhost:3001/api/v1/pagination/nextLinkHeader?num=1&maxPages=16’
Collect parameters: None
Collect headers: None
Pagination: Response Header Attribute
Response attribute: nextLink
Authentication: None
Event Breaker: None
You can modify the
maxPagesURL parameter to control how many pages this call returns.
Collector Output

5. HTTP Discover and Collect with Login Authentication
In some cases, you must run an HTTP Request discovery to identify the items to collect. This example will do the following:
- Perform a Login (POST with body containing the login credentials), to obtain an auth token that will passed in the Authorization header in all subsequent REST calls.
- Run a REST call to discover items to be collected - in this case, log files.
- For each log file discovered, collect the contents of that file.
- We’ll also demonstrate URL-encoding of a path element. You’d need to manually encode part of the URL in cases where unsafe ASCII characters might be present in the path element (e.g., space,
$,/, or=).
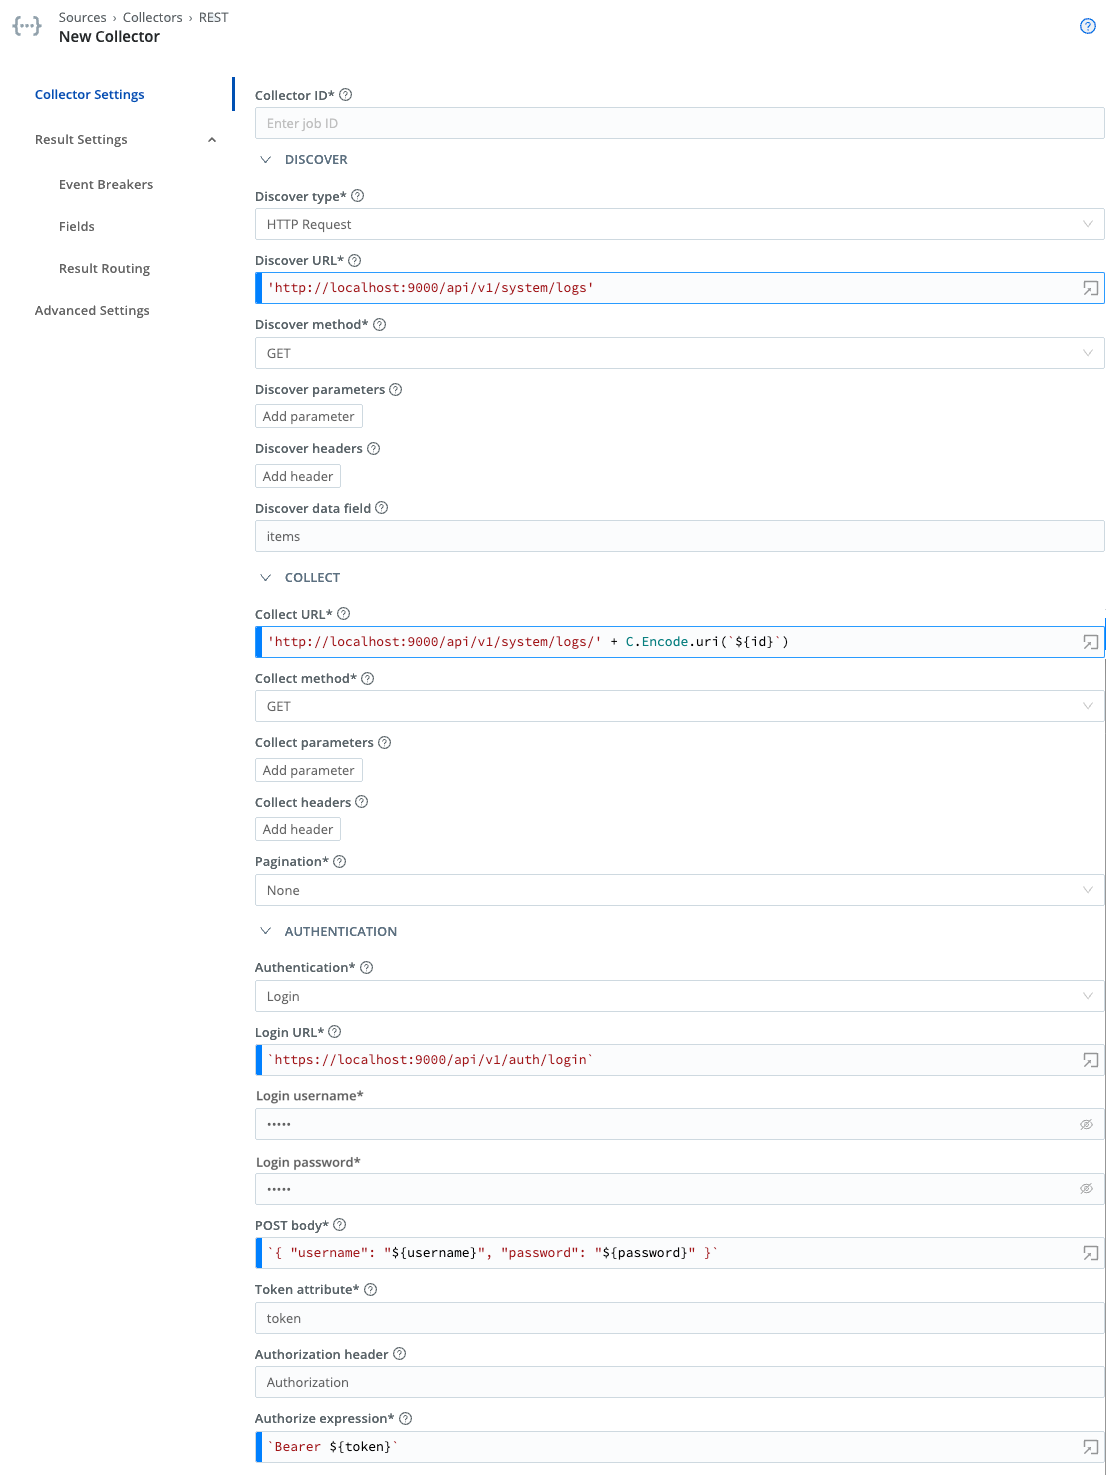
Discover type: HTTP Request
Discover URL: ‘http://localhost:9000/api/v1/system/logs’
Discover method: GET
Discover parameters: None
Discover headers: None
Discover data field: items
Collect URL: 'http://localhost:9000/api/v1/system/logs/' + C.Encode.uri(`${id}`)
Collect method: GET
Collect parameters: None
Collect headers: None
Pagination: None
Authentication: Login
Login URL: 'http://localhost:9000/api/v1/auth/login'
Username: admin (or other user)
Password: admin (or other user’s corresponding password)
[Authentication] POST Body: `{ "username": "${username}", "password": "${password}" }`
Token Attribute: token
Authorize Expression: `Bearer ${token}`
Event Breaker: JSON Array
- Array Field:
items.events
Login
The login call sends a POST to the login URL, passing the string derived from the POST Body JavaScript expression. Note that the variables ${username} and ${password} are available to this call, and are taken from the username and password text fields.
Upon successful login (200 response code), the login token will be extracted from the response body’s token attributes, as specified by the Token Attribute field.
Finally, the value derived from the Authorize Expression field will be added to the Authorization header for all subsequent calls (here, both Discover and Collect). Set this to ${token} to reference the token obtained from the login POST request.
Discover
The Discover call here is used to discover the list of log files that can be collected. The data returned by this call has this format:
{
  "count": 0,
  "items": [
	{
  	"id": "logFileName",
  	"path": "pathToFile"
	}
  ]
}The Discover Data Field is used to define the array in Discover results that contains the list of items to discover. Here, each item is an object, with an attribute ID that is referenced in the Collect calls. So the Discover call generates a list of items for which Collect tasks will be created.
Collect
From the Discover task’s returned list of items, each item will cause one Collect task to be created and run. An object containing the Discover item (along with some internal variables) will be passed to the Collect task.
You can reference this object’s attributes as variables in the Collect task’s URL, request parameters, and request headers. When running a preview, you can see the object’s contents in the __collectible internal variable. (Enable Show Internal Fields, and expand __collectible to view the variables available).
For example, here’s one of the events returned by this example’s Collect operation. The __collectible attribute contains details identifying the page number and the URL used to obtain the data:

As you can see, __collectible contains a __pageNum variable, which shows which page of data the event was received in. Also, __collectible contains an id variable, available for use in the Collect operation. Here’s how this variable is referenced in the Collect operation’s URL:
'http://localhost:9000/api/v1/system/logs/' + C.Encode.uri(`${id}`)
Because the variable is used in the path, and it might contain unsafe ASCII characters (specifically, space), we need to URL-encode the variable. This is the only case where the REST Collector requires URI encoding - variables that are defined directly as part of the URL. (Request parameters, not contained directly in the URL, are automatically encoded.)
The data returned by the Collect call has the following format:
{
  "items": [
	{
  	"file": "access.log",
  	"nextOffset": "",
  	"previousOffset": "0:2236637",
  	"events": [
    	{
      	"time": "2021-02-15T23:39:23.043Z",
      	"src": "127.0.0.1",
      	"user": "admin",
      	"method": "GET",
      	"url": "/api/v1/jobs/1613432361.24",
      	"status": 200,
      	"message": "GET /api/v1/jobs/1613432361.24",
      	"response_time": 2
    	},
    	{
      	"time": "2021-02-15T23:39:22.366Z",
      	"src": "127.0.0.1",
      	"user": "admin",
      	"method": "GET",
      	"url": "/api/v1/system/logs/worker%2F7%2Fcribl.log",
      	"status": 200,
      	"message": "GET /api/v1/system/logs/worker%2F7%2Fcribl.log",
      	"response
...The real data that we want to access is located at items.events. We can use a JSON Array event breaker to convert data from events.items into individual events that will be sent to Routes and processed by Cribl Stream. The output looks like this in Preview:

If this example fails with errors of the form
statusCode: 429...Too many requests- see Common Errors and Warnings to resolve this by relaxing the login rate limit.
6. Item List Discovery
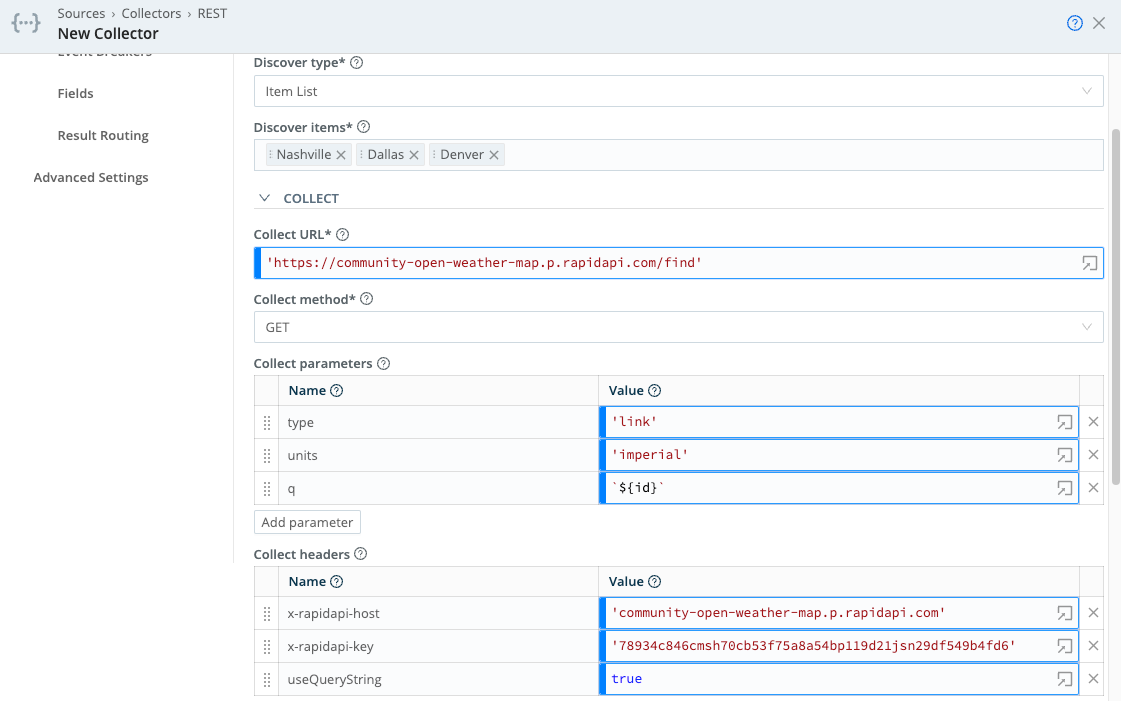
This example demonstrates situations where the Item List discovery mechanism is useful: enabling collection based on a predefined list of items. Here, we want to collect weather information for a static list of states - each returned from Discover results as a single collection task.
Let’s assume we are interested in weather for the following U.S. locations: Nashville, Dallas, and Denver. When the Discover operation runs, it will return a __collectible object for each location (each representing its own collection task): { id: ''}, {id: 'TX'}, {id: 'TN'}.
Discover type: Item List
Discover items: Nashville, Dallas, Denver
Collect URL: ‘https://community-open-weather-map.p.rapidapi.com/find'
Collect parameters:
type: 'link'
units: 'imperial'
q: `${id}`
Collect headers:
x-rapidapi-host: 'community-open-weather-map.p.rapidapi.com'
x-rapidapi-key: '78934c846cmsh70cb53f75a8a54bp119d21jsn29df549b4fd6'
useQueryString: true
Pagination: None
Authentication: None
Event Breaker: JSON Newline Delimited - Use a rule like Cribl > ndjson to parse each event and extract fields.
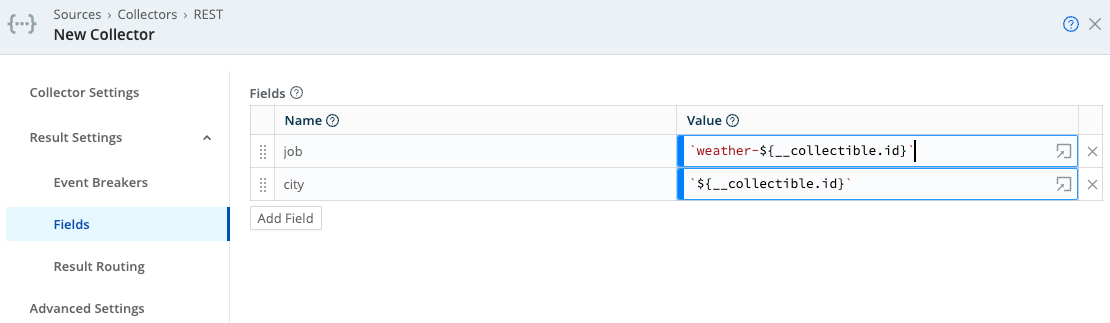
Fields:
job: weather-${__collectible.id}
city: ${__collectible.id}
Collector Output
One interesting thing about this example is the addition of Fields to each event, using content from the internal __collectible attribute. This __collectible attribute contains results from the Discover operation, and is available in each event collected.
This demonstrates how information from the Discover operation can be transferred to events generated during the Collect operation. Note the attributes __collectible, city, and job in the Collector output below:

This API allows a certain number of calls/month. Cribl recommends that you not schedule this Collector - run it ad-hoc, for testing only.
7. JSON Response Discovery
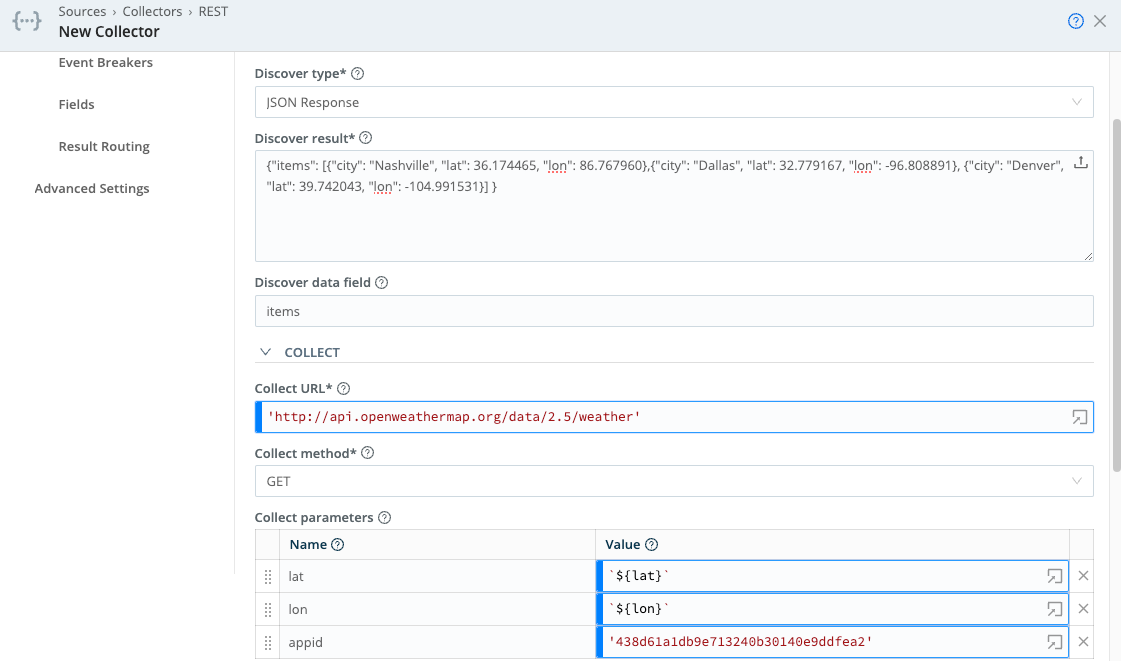
Like Item List discovery, Discover type: JSON Response allows you to discover a predefined, static list of items. JSON Response’s advantage is its ability to return an object containing more than one attribute that the Collect operation can use.
Sticking with our weather example above, imagine that we needed to use both longitude and latitude (instead of just city or state) when performing collection. This is the perfect use case for JSON Response discovery.
Discover type: JSON Response
Discover result: {"items": [{"city": "Nashville", "lat": 36.174465, "lon": 86.767960},{"city": "Dallas", "lat": 32.779167, "lon": -96.808891}, {"city": "Denver", "lat": 39.742043, "lon": -104.991531}] }
Discover data field: items
Collect URL: ‘‘http://api.openweathermap.org/data/2.5/weather''
**Collect headers: **None
Collect parameters:
lat: `${lat}`
lon: `${lon}`
appid: '438d61a1db9e713240b30140e9ddfea2'
Pagination: None
Authentication: None
Event Breaker: JSON Newline Delimited - Use a rule like Cribl > ndjson to parse each event and extract fields.
Fields:
job: `weather-${__collectible.city}`
city: `${__collectible.city}`
Notice how attributes present in the Discover Result JSON object’s items array (`${lat}`, `${lon}`, `city`) are used in Collect Request Parameters, and in metadata Fields. Any other attribute present in the items array can similarly be referenced in the URL, request parameters, or request headers.
Collector Output

This API allows a certain number of calls/month. Cribl recommends that you not schedule this Collector - run it ad-hoc, for testing only.