


These docs are for Cribl Stream 4.6 and are no longer actively maintained.
See the latest version (4.17).
Kubernetes Worker Deployment
Boot a fully provisioned Worker Group via Helm.
This page outlines how to deploy a Cribl Stream Worker Group to AWS via Kubernetes, using a Cribl-provided Helm chart.
This chart will deploy only a Cribl Stream Worker Group, whose functioning depends on the presence of a Cribl Stream Leader Node. To deploy the Leader, see Kubernetes Leader Deployment.
New Capabilities
- Supports Cribl Stream v.4.3.1.
Deployment
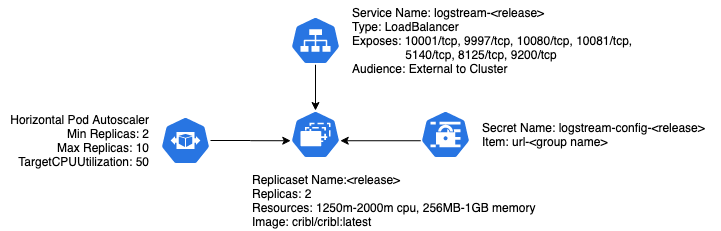
As built, Cribl’s chart will deploy a simple Worker Group for Cribl Stream, consisting of a deployment, a service, a horizontal pod autoscaler configuration, and a secret used for configuration.
AWS and Kubernetes Prerequisites
This section covers both general and specific prerequisites, with a bias toward the EKS-oriented approach that Cribl uses for its own deployments.
Set Up AWS CLI
Install the AWS CLI, version 2, following AWS’ instructions.
Next, create or modify your ~/.aws/config file to include (at least) a [profile] section with the following SSO (single-sign-on) details:
[profile <your-profile-name>]
sso_start_url = https://<your-domain>/start#/
sso_region = <your-AWS-SSO-region>
sso_account_id = <your-AWS-SSO-account-ID>
sso_role_name = <your-AWS-role-name>
region = <your-AWS-deployment-region>Set Up kubectl
You will, of course, need kubectl set up on your local machine or VM. Follow Kubernetes’ installation instructions.
Add a Cluster to Your kubeconfig File
You must modify your ~/.kube/config file to instruct kubectl what cluster (context) to work with.
Run a command using this format:
aws --profile <profile-name> eks update-kubeconfig --name <cluster-name>
This should return a response like this:Added new context arn:aws:eks:us-west-2:424242424242:cluster/<cluster-name> to /Users/<username>/.kube/configIn the resulting
~/.kube/configfile’sargssection, as the new first child, insert the profile argument that you provided to theawscommand. For example:
args:
- --profile=<profile-name>
- --region
[...]- Also change the
command: awspair to include the full path to theawsexecutable. This is usually in/usr/local/bin, in which case you’d insert:command: /usr/local/bin/aws.
This section of ~/.kube/config should now look something like this:
      args:
      - --profile=<profile-name>
      - --region
      - us-west-2
      - eks
      - get-token
      - --cluster-name
      - lab
      command: /usr/local/bin/aws
      env:
      - name: AWS_PROFILE
value: <profile-name>With these AWS and Kubernetes prerequisites completed, you’re now set up to run kubectl commands against your cluster, as long as you have an active aws SSO login session.
Next, install Helm and the Cribl repository.
Install Helm and Cribl Repo
You’ll need Helm (preferably v.3.x) installed. Follow the instructions here.
Add Cribl’s repo to Helm, using this command:
helm repo add cribl https://criblio.github.io/helm-charts/Display the default values available to configure Cribl’s
logstream-workergroupchart:helm show values cribl/logstream-workergroup
Configure the Chart’s Values
You’ll want to override some of the values you’ve just displayed. The easiest way is to copy this chart’s default values.yaml file from our repo. save it locally, modify it, and install it in Helm:
Copy the raw contents of: https://github.com/criblio/helm-charts/blob/master/helm-chart-sources/logstream-workergroup/values.yaml
Save this as a local file, e.g.:
/foo/values.yamlModify values as necessary (see Values to Override in the Cribl Helm Charts docs). To see the full scope of values available, run:
helm show values cribl/logstream-workergroup.Install your updated values to Helm, using this command:
helm install -f /foo/values.yaml
Match Versions
Cribl recommends that you use the same Cribl Stream version on Leader Nodes versus Worker Group/Fleet Nodes. So, if you’re not yet upgrading your Leader to the version in the current values.yaml > criblImage.tag, be sure to override that criblImage.tag value to match the version you’re running on the Leader.
Set Worker Processes Statically
For all container-based Worker Groups, Cribl recommends that you directly specify the Worker Process count using a positive integer (like +3). This convention prevents the overprovisioning of Worker Processes that can occur with dynamic values (like the default -2 setting).
To access Process count in Stream’s UI, select Group Settings > System > Worker Processes (distributed deployments) or Settings > System > Service Processes (single-instance deployments).
Set a Maximum Number of Workers
To provision a Kubernetes container with a specific number of Workers, use the
CRIBL_MAX_WORKERS environment variable. Setting a maximum amount of Workers
on a Kubernetes node helps to prevent overloading the node with more CPUs than
it can handle.
See Sizing and Scaling for more information on this environment variable and example configurations.
Install the Chart
With the above prerequisites and configuration completed, you’re ready to install our chart to deploy a Cribl Stream Worker Group/Fleet. Here are some example commands:
To install the chart with the release name
logstream-wg:helm install logstream-wg cribl/logstream-workergroupTo install the chart using the Cribl Stream Leader
logstream.lab.cribl.io:helm install logstream-wg cribl/logstream-workergroup --set config.host='logstream.lab.cribl.ioTo install the chart using the Cribl Stream Leader
logstream.lab.cribl.ioin the namespacecribl-helm:helm install logstream-wg cribl/logstream-workergroup --set config.host='logstream.lab.cribl.io' -n cribl-helm
Upgrading
You upgrade using the helm upgrade command. But it’s important to ensure that your Helm repository cache is up to date, so first issue this command:
helm repo updateAfter this step, invoke:
helm upgrade <release> -n <namespace> cribl/logstream-workergroupFor the example above, where the release is logstream-wg and is installed in the cribl-helm namespace, the command would be:
helm upgrade logstream-wg -n cribl-helm cribl/logstream-workergroupThis Helm chart’s upgrade is idempotent, so you can use the upgrade mechanism to upgrade the chart, but you can also use it to change its configuration (as outlined in Change the Configuration).
Optional: Kubernetes API Access
Versions 2.4.0+ include access mechanisms for Worker Groups to access the Kubernetes API. The values.yaml file provides three relevant options:
rbac.create- Enables the creation of a Service Account, Cluster Role, and Role Binding (which binds the first two together) for the release.rbac.resources- Specifies the Kubernetes API resources that will be available to the release.rbac.verbs- Specifies the API verbs that will be available to the release.rbac.extraRules- Additional rulesets for the cluster role.
For more information on the verbs and resources available, see Kubernetes’ Using RBAC Authorization documentation.
Change the Configuration
Once you’ve installed a release, you can get its values.yaml file by using the helm get values command. For example, assuming a release name of logstream-wg, you could use this command:
helm get values logstream-wg -o yaml > values.yaml
This will retrieve a local values.yaml file containing the values in the running release, including any values that you overrode when you installed the release.
You can now make changes to this local values.yaml file, and then use the helm upgrade operation to “upgrade” the release with the new configuration.
For example, assume you wanted to add an additional TCP-based syslog port, listening on port 5141, to the existing logstream-wg release. In the values.yaml file’s service > ports section, you’d add the three key-value pairs shown below:
service:
  [...]

  ports:
  [...]
  - name: syslog
    port: 5141
protocol: TCPThen you’d run:
helm upgrade logstream-wg cribl/logstream-workergroup -f values.yaml
Remember, if you installed in a namespace, you need to include the -n <namespace> option to any helm command. You’ll still have to create the source in your Cribl Stream Leader, and commit and deploy it to your Worker Group/Fleet.
Using Persistent Storage for Persistent Queueing
The extraVolumeMounts option makes it feasible to use persistent volumes for Cribl Stream persistent queueing. However, Cribl does not recommend this combination - there is variability in persistent-storage implementations, and this variability can lead to problems in scaling Worker Groups/Fleets. However, if you choose to implement persistent volumes for queueing, please consider these suggestions:
Use Elastic Block Store (EBS block) storage for the
CRIBL\_VOLUME\_DIR. EBS storage is resilient and has minimal risk of data loss or corruption. While shared storage solutions like Elastic File System (EFS) can be flexible, they may not provide the necessary performance for persistent queuing. EBS volumes, while less flexible, offer better performance and reliability.Understand your Kubernetes networking topology, and how that topology interacts with your persistent-storage driver. (For example, if you’re on AWS, ensure that your volumes are available in all Availability Zones that your nodes might run in.)
Monitor the Worker Group/Fleet pods for volume issues. The faster you can see such issues and react, the more likely that you’ll be able to resolve thema.
Uninstall the Infrastructure
To spin down deployed pods, use the helm uninstall command - where <release-name> is the namespace you assigned when you installed the chart:helm uninstall <release-name>
You can append the --dry-run flag to verify which releases will be uninstalled before actually uninstalling them:helm uninstall <release-name> --dry-run
Notes on This Example
If you installed in a namespace, you’ll need to include the
-n <namespace>option in anyhelmcommand.In the above syslog example, you’d still need to configure a corresponding syslog Source in your Cribl Stream Leader, and then commit and deploy it to your Worker Group(s)/Fleet(s).
Known Issues
The chart currently supports only TCP ports in
service>portsfor Worker Groups/Fleets. This limitation might be removed in future versions.See EKS-specific issues on our GitHub repo.