


These docs are for Cribl Stream 4.6 and are no longer actively maintained.
See the latest version (4.17).
Configuring WEF for Cribl Stream
You can configure Cribl Stream to receive Windows events from the Windows Event Forwarding (WEF) mechanism. To do this, you configure a Windows endpoint/sender to forward events to Cribl Stream’s Windows Event Forwarder Source with mutual TLS authentication.
This page picks up where the Windows Event Forwarder Source doc’s upstream sender configuration section leaves off. Before you begin, make sure that you are running PowerShell as an administrator.
Configuring Certificate Auto-Enrollment
In a production environment, you can use certificate auto-enrollment through Group Policy to automatically configure unique device certificates.
For specific configuration options, please consult with your Windows administrators.
Generating a CA and Client Certificates for Testing
This section is intended for testing and setup purposes only.
Cribl-Managed Cribl.Cloud Workers
To begin, generate a public/private key pair that constitute a new Cribl WEF Certificate Authority (CA) - i.e., the root CA. Then, import it into the local computer’s Trusted Root CA store. The following PowerShell commands do all of this (run as Administrator):
$rootca = New-SelfSignedCertificate -CertStoreLocation cert:\LocalMachine\My -DnsName "Cribl Windows Event Forwarding CA" -subject "CN=CRIBL-CA, DC=cribl, DC=local" -KeyUsage CertSign
Export-Certificate -Cert $rootca -FilePath C:\temp\cribl-wef-ca.cer
Import-Certificate -FilePath C:\temp\cribl-wef-ca.cer -CertStoreLocation cert:\LocalMachine\RootNow, generate the client certificate.
New-SelfSignedCertificate -CertStoreLocation cert:\LocalMachine\My -DnsName cribl-wef-client -Signer $rootcaHybrid/On-Prem Workers
For deployments with Hybrid or on-prem Workers, the following steps are required:
You need to generate a server certificate with a Common Name (CN) that matches the fully qualified domain name (FQDN) of your Cribl Stream Leader.
The provided PowerShell commands offer a sample method for generating a Root CA and client certificate. These certificates should be signed by the same CA to ensure trust within your deployment.
Setting Client Certificate Permissions
You can perform this step through the Windows UI, or on the command line.
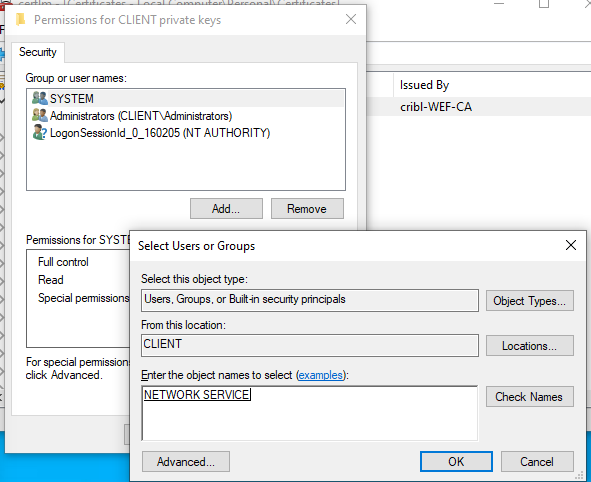
Cert Permissions via UI
Open the Certificate Manager tool (certlm.msc).
Right-click the
cribl-wef-clientcertificate and select All Tasks > Manage Private Keys….Add the
NETWORK SERVICEuser.
Cert Permissions via Command Line
As an alternative, you can run the following PowerShell script (as administrator):
$issuer = "CN=CRIBL-CA, DC=cribl, DC=local"
$certs = Get-ChildItem -Path cert:\LocalMachine\My | Where {$_.Issuer -eq $issuer}

Foreach ($cert in $certs)
{
  # Specify the user, the permissions, and the permission type
  $permission = "Network Service","FullControl","Allow"
  $accessRule = New-Object -TypeName System.Security.AccessControl.FileSystemAccessRule -ArgumentList $permission

  # Location of the machine-related keys
  $keyPath = Join-Path -Path $env:ProgramData -ChildPath "\Microsoft\Crypto\RSA\MachineKeys"
  $keyName = $cert.PrivateKey.CspKeyContainerInfo.UniqueKeyContainerName
  $keyFullPath = Join-Path -Path $keyPath -ChildPath $keyName

  # Get the current ACL (Access Control List) of the private key
  $acl = (Get-Item $keyFullPath).GetAccessControl('Access')

  # Add the new ACE to the ACL of the private key
  # An ACE (Access Control Entry) is an individual rule in an ACL
  $acl.SetAccessRule($accessRule)

  # Write back the new ACL
  Set-Acl -Path $keyFullPath -AclObject $acl -ErrorAction Stop

  # Observe the access rights currently assigned to this certificate.
  get-acl $keyFullPath| fl
}(Source: Stack Overflow - NETWORK SERVICE user cannot read certificate Windows Server 2012.)
Configuring Log Forwarding Group Policies
Your goal here is to enable the Network Service to read the security logs. To do this, you’ll configure access for the Event Log Service.
Open the Local Group Policy Editor tool (gpedit.msc).
Navigate to Computer Configuration > Policies > Administrative Templates > Windows Components > Event Log Service. Double-click Security, then in the Settings pane, select Configure log access.

In the resulting modal, under Options > Log Access, enter the following Log Access configuration:
O:BAG:SYD:(A;;0xf0007;;;SY)(A;;0x7;;;BA)(A;;0x1;;;BO)(A;;0x1;;;SO)(A;;0x1;;;S-1-5-32-573)(A;;0x1;;;S-1-5-20)Then, reboot your Windows machine to apply this setting.
(Source: Microsoft’s Security event log forwarding fails… topic.)
Configuring the Subscription Manager
Navigate to Computer Configuration > Policies > Administrative Templates > Windows Components. Select Event Forwarding to open the Local Group Policy Editor.
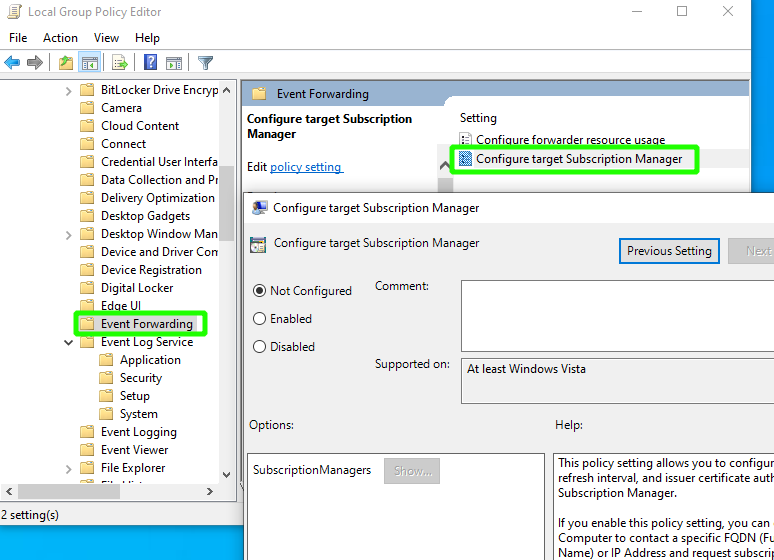
Select Configure target Subscription Manager and enter the following template string, substituting the appropriate values for the placeholders:
Server=https://in.main-default-<organization>.cribl.cloud:<port>/wsman/SubscriptionManager/WEC,Refresh=60,IssuerCA=<CA_thumbprint>If you forget your Client CA hash, run the following command to find it:
Get-ChildItem cert:\LocalMachine\root | Where-Object {$_.Subject -Like "CN=Cribl*"}
Configuring the CA Certificate in Cribl.Cloud
Complete this section only if your deployment is in Cribl.Cloud. If your Cribl Stream deployment is on-prem or hybrid, import the correct certificate for the appliance, then skip ahead to Configuring a New WEF Source.
First, dump the CA certificate in PEM format:
$oMachineCert=get-item cert:\LocalMachine\Root\$($(Get-ChildItem cert:\LocalMachine\root | Where-Object {$_.Subject -Like "CN=Cribl*"}).Thumbprint)
$oPem=new-object System.Text.StringBuilder
$oPem.AppendLine("-----BEGIN CERTIFICATE-----")
$oPem.AppendLine([System.Convert]::ToBase64String($oMachineCert.RawData,1))
$oPem.AppendLine("-----END CERTIFICATE-----")
$oPem.ToString() | out-file C:\cribl-wef-ca.pemThe cribl-wef-ca certificate should now be available at C:\cribl-wef-ca.pem.
Cribl Stream requires every CA certificate to be accompanied by a cert/key pair. Although Cribl Stream won’t ever use the cert/key pair for the cribl-wef-ca certificate, you need to generate this pair to pass validation.
Run the following openssl command to generate a placeholder cert/key pair:
openssl req -x509 -newkey rsa:2048 -nodes -keyout key.pem -out cert.pem -sha256 -days 365 -subj '/CN=placeholder'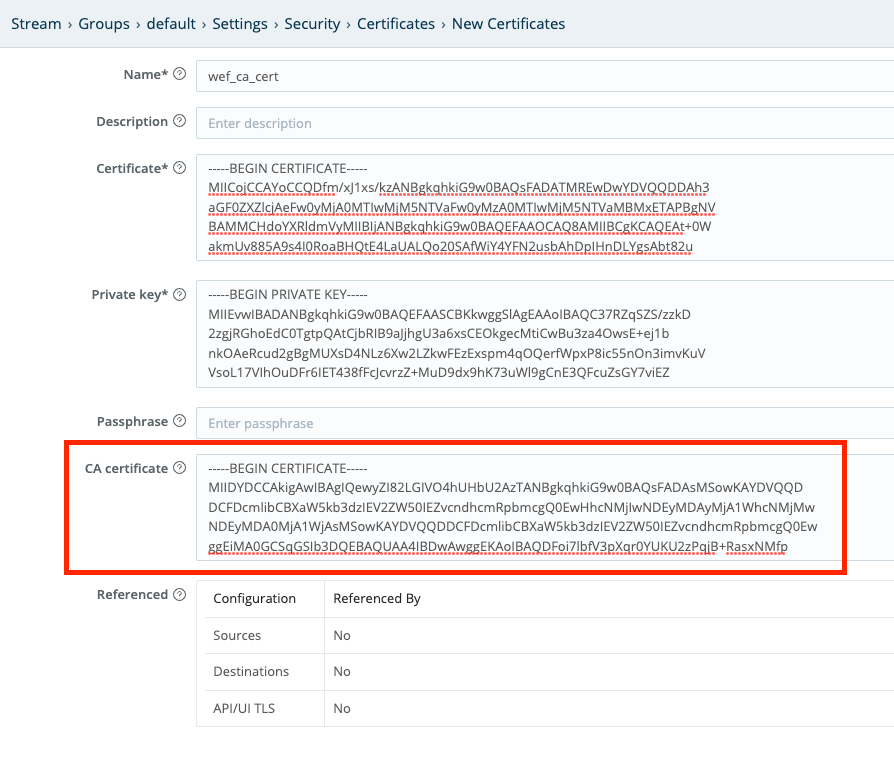
cat cert.pem key.pemIn the Cribl Stream Worker Group UI, navigate to Settings > Security > Certificates > New Certificates.
Paste the placeholder certificate and key into the Certificate and Private key fields, respectively. Cribl Stream automatically pastes the cribl-wef-ca PEM contents into the CA certificate field.
If the client certificates contain a CA chain (root and intermediate signers), you must import the entire CA chain. Concatenate the PEM files together in the CA certificate field.
Each certificate here must directly certify the one preceding it. This matches the order of traversing the chain from the host to the root CA cert.
When the WEF machine connects to Cribl Stream, the machine presents its certificate to Cribl Stream. To authenticate clients that try to send logs from WEF, Cribl Stream compares the signer of the WEF machine’s certificate against the CA list (which you imported in the previous step).
Configuring a New WEF Source
To create a new Windows Event Forwarder Source:
In the QuickConnect UI: Click Add Source. From the resulting drawer’s tiles, select [Push >] Windows Event Forwarder. Next, click either Add Destination or (if displayed) Select Existing to open a Windows Event Forwarder Source drawer.
Or, in the Data Routes UI: From the top nav of a Cribl Stream instance or Group, select Data > Sources. From the resulting page’s tiles or the Sources left nav, select [Push >] Windows Event Forwarder. Next, click New Source to open a New Source modal.
The drawer or modal will now provide the options and fields described in the Windows Event Forwarder Source topic. That topic describes the general case; this one covers only settings that are specific to the use case we’re describing.
General Settings
In the Port field, do not change the default of 5986 - that is the port WEF uses for mutual TLS authentication.
From the Certificate name drop-down, choose the certificate you just created:
If you are using a hybrid Worker Group, provide the path to your own key and certificate in Private key path and Certificate path.
If you are using a Cribl-managed Cribl.Cloud Worker Group, replace the contents of Private key path with
/opt/criblcerts/criblcloud.key, and the contents of Certificate path with/opt/criblcerts/criblcloud.crt. (These are the default certificates that ship with Cribl.Cloud.)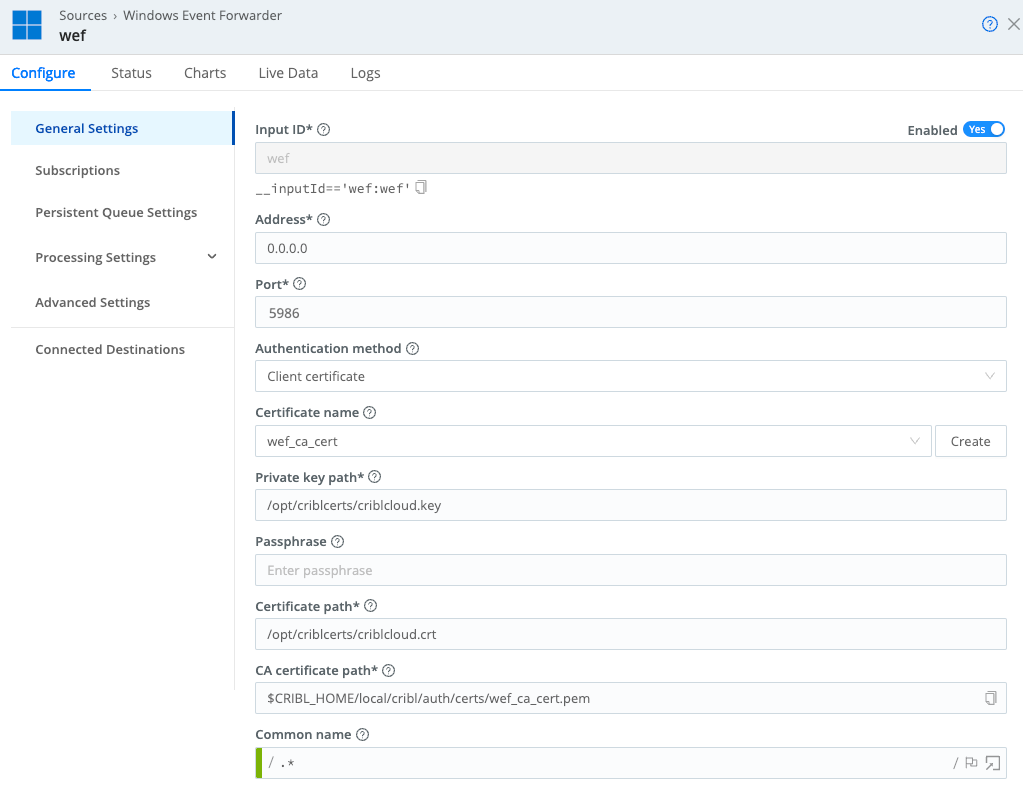
Configuring General Settings
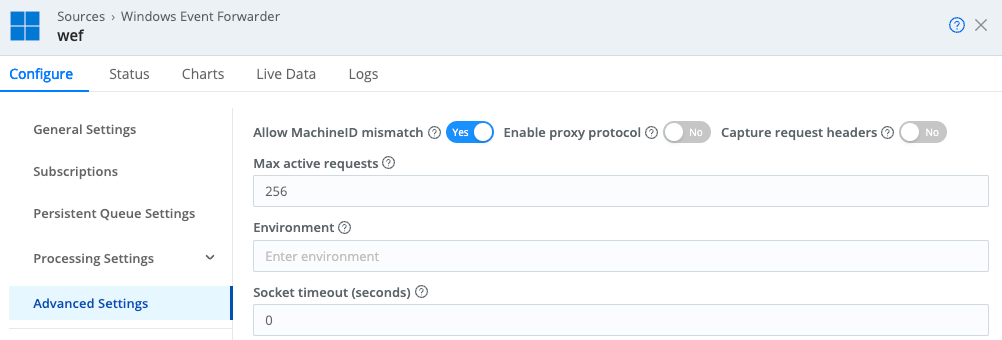
Advanced Settings
If you’re using a shared certificate across multiple machines (meaning that your devices cannot be configured for certificate auto-enrollment), toggle Allow MachineID mismatch to Yes. This tells Cribl Stream to allow machine names that do not match the common name (CN) specified in the certificate. However, certificates will still need to be signed by the Certificate Authority that you uploaded.
If your devices are configured for certificate auto-enrollment, toggle Allow MachineID mismatch to No, because MachineIDs will match the Subject Name specified the certificate. The No setting provides better security than Yes.
Subscriptions
Configure a subscription to forward the type of logs you’re interested in. For example, to forward all Security logs:
- In Query > Path, enter
Security. - In Query > Query expression, enter
*[System].

Remember to save, commit, and deploy your new configuration as soon as you have configured Subscriptions. This is required for the previous steps, beginning with Configuring the CA Certificate in Cribl.Cloud, to take effect.
When you first create a subscription, Windows Event Forwarder generates its subscription ID. Every Refresh=XX seconds - as defined in the Group Policy Objects (GPO) - the WEF clients contact Cribl Stream (or Cribl Edge) to ask for a subscription. Upon receiving the subscription, the clients start sending events, referencing the subscription ID. The clients send events at the interval specified in the WEF Source Batch timeout setting.
Changing Subscriptions
If you change a subscription that is in use, Windows Event Forwarder will discover the new subscription ID. Once the Refresh=XX interval has elapsed, if any events were sent to the now-invalid previous subscription ID, Windows will resend them to the new one (assuming that these events remain valid under the updated subscription parameters). The Receiver Refuses to Accept Delivery of Events warnings you’ll see in this scenario are normal.
Troubleshooting
A full account of how to troubleshoot WEF certificate administration is beyond the scope of this guide, but knowing about the following common errors is a good start.
Cannot find the Certificate
Error:The forwarder is having a problem communicating with subscription manager at address... The WS-Management service cannot find the certificate that was requested.
For example:
The forwarder is having a problem communicating with subscription manager at address https://<stream_worker>:5986/wsman/SubscriptionManager/WEC.

Error code is 2150858882 and Error Message is <f:WSManFault xmlns:f=http://schemas.microsoft.com/wbem/wsman/1/wsmanfault Code="2150858882" Machine="DELMD2273309.na.blkint.com"><f:Message>The WS-Management service cannot find the certificate that was requested. </f:Message></f:WSManFault>.Resolution:
- The
NETWORK SERVICEuser does not have permissions to use the private key of the certificate for authentication. - Add the
NETWORK SERVICEuser to the list of users allowed to use the private key.
Receiver Refuses to Accept Delivery of Events
Warning:The receiver refuses to accept delivery of events and requests that the subscription be canceled.
If you make a change to a subscription that is in use, and if the Windows client tries to send events before the Refresh=XX interval has elapsed, the result is that these events are sent to the old subscription, which is now invalid because its query is outdated or because other subscription parameters have changed.
The warning message tells the WEF client to stop sending events to the now-invalid old subscription.
Resolution:
Windows Event Forwarder handles this scenario gracefully, and you do not need to take any action to resolve it:
Once the
Refresh=XXinterval has elapsed, the WEF client will ask for and receive the updated subscription, and from then on should be able to successfully deliver events against that new subscription.Any events that were refused under the old/invalid subscription ID will be resent under the new one, assuming that they remain valid according to the new subscription parameters.
Subscription Cannot be Created
Error:The subscription <subscription> can not be created. The error code is 5004.
The error appears in the Microsoft-Windows-Eventlog-ForwardingPlugin/Operational log.
Resolution:
- Apply the
O:BAG:SYD:...permissions to make the log file readable. - Reboot the machine.
Verify that Client and Destination are Joined to a Domain
Error:If Kerberos mechanism is used, verify that the client computer and the destination computer are joined to a domain.
When you are using auto-enroll, the Eventlog-ForwardingPlugin Operational logs might display an error of this form.
Resolution:
In your auto-enroll template’s Client-Server Authentication Properties, make sure the Subject Name format is set to Common name.
Further Reading
For more context and greater detail, see:
- System Center Dudes’ blog post about using PowerShell to generate certs.
- ATA Learning’s WEF tutorial.
For more about WEF subscriptions, including sample subscription queries, see:
Microsoft’s Use Windows Event Forwarding to Help with Intrusion Detection topic.
The NSA Cybersecurity Directorate’s WEF Guidance.
Palantir’s WEF Guidance.