


These docs are for Cribl Stream 4.9 and are no longer actively maintained.
See the latest version (4.17).
Packs
Packs enable Cribl Stream administrators and developers to pack up and share complex configurations and workflows across multiple Worker Groups, or across organizations.
Packs = Portability
With a Cribl Stream deployment of any size, using Packs can simplify and accelerate your work. Packs can also accelerate internal troubleshooting, and can accelerate working with Cribl Support, because they facilitate quickly replicating your Cribl Stream environment.
For example, where a Pipeline configuration references Lookup file(s), Cribl Stream will import the Pipeline only if the Lookups are available in their configured locations. A Pack can consolidate this dependency, making the Pipeline portable across Cribl Stream instances. If you import the Lookups into the Pack, you can develop and test a configuration, and then port it from development to production instances, or readily deploy it to multiple Worker Groups.
What Is a Pack?
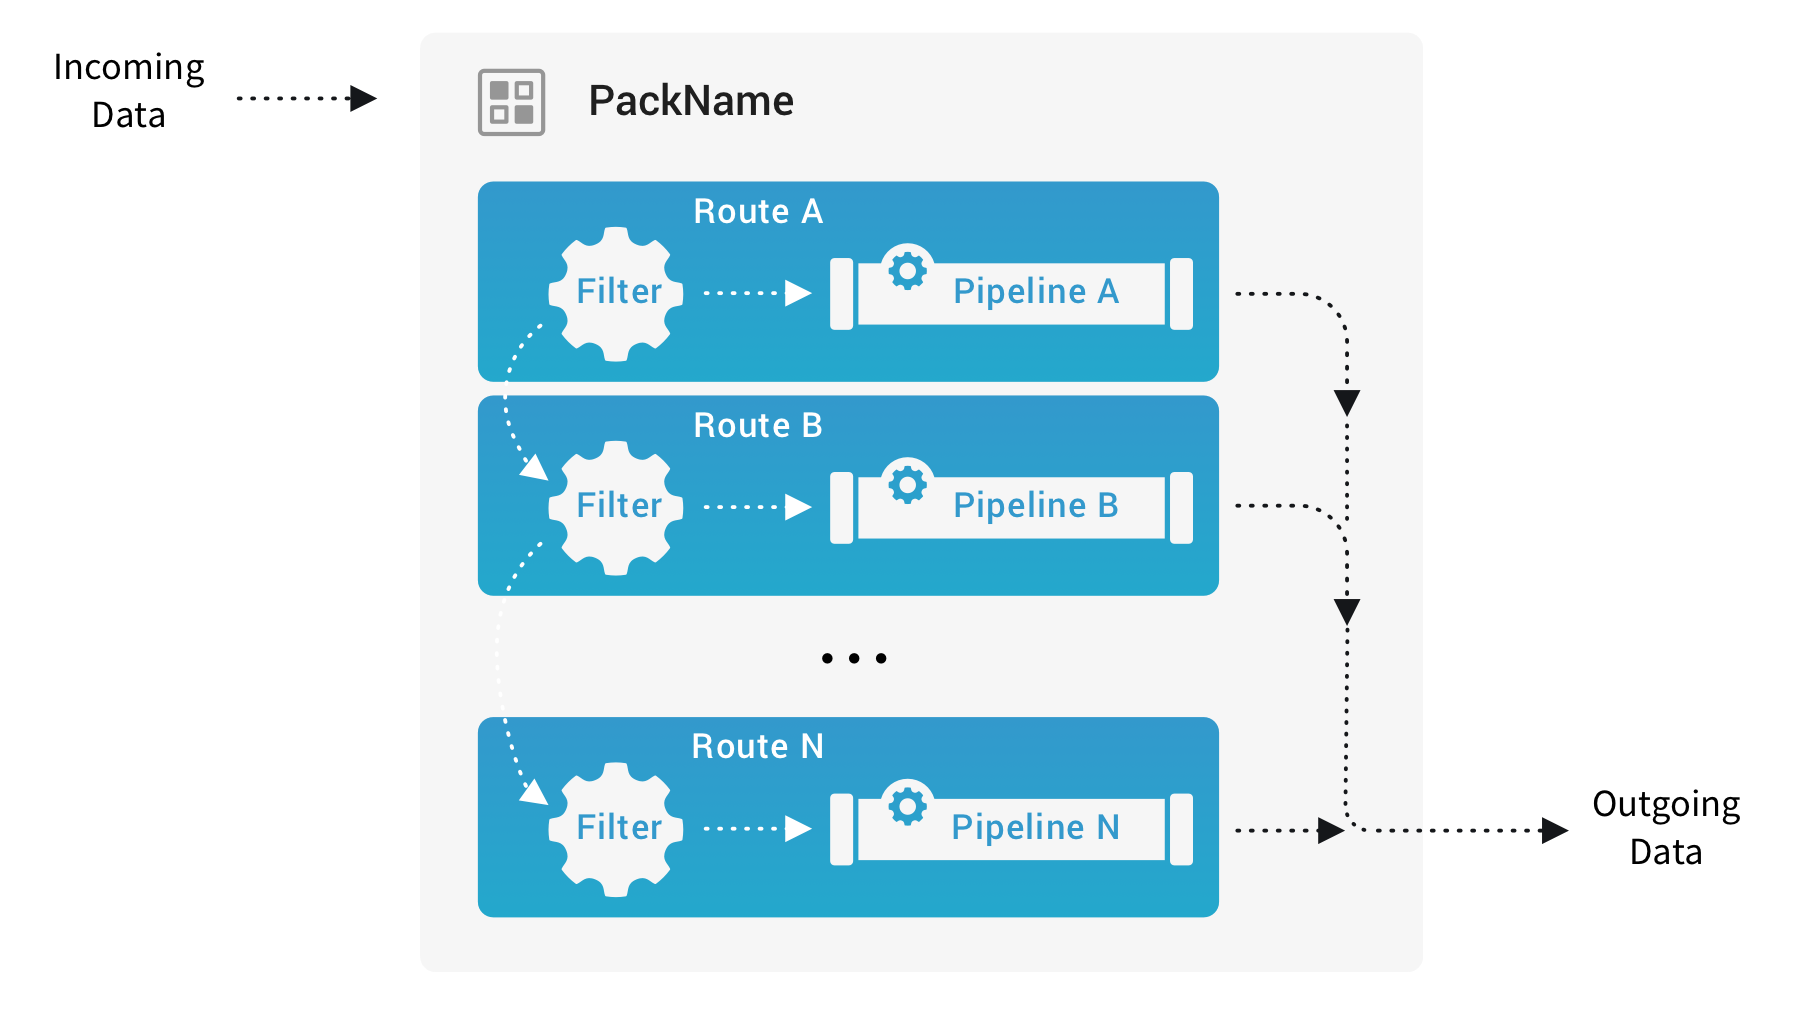
Each Pack provides you with a microcosm of a Cribl Stream deployment. (See the next section for what’s included and excluded). A Pack also includes a restricted version of Cribl Stream’s user interface (outlined in the first half of the Use Packs section below). You can import and export each Pack as a file, in .crbl format.
What’s in a Pack?
Currently, a Pack can pack up everything between a Source and a Destination:
- Routes (Pack-level).
- Pipelines (Pack-level).
- Functions (built-in and custom).
- Sample data files.
- Knowledge objects (Lookups, Parsers, Global Variables, Grok Patterns, Schemas, and more).
As the above list suggests, a Pack can encapsulate a whole set of infrastructure for a given use case.
Packs have access only to Knowledge objects (Lookups, Global Variables, and so forth) that are defined within the Pack itself. That means they can’t access global Knowledge objects or those included in other Packs. If your Pack needs a Knowledge object that is defined elsewhere, you need to re-create it in the Pack.
What’s Not in a Pack?
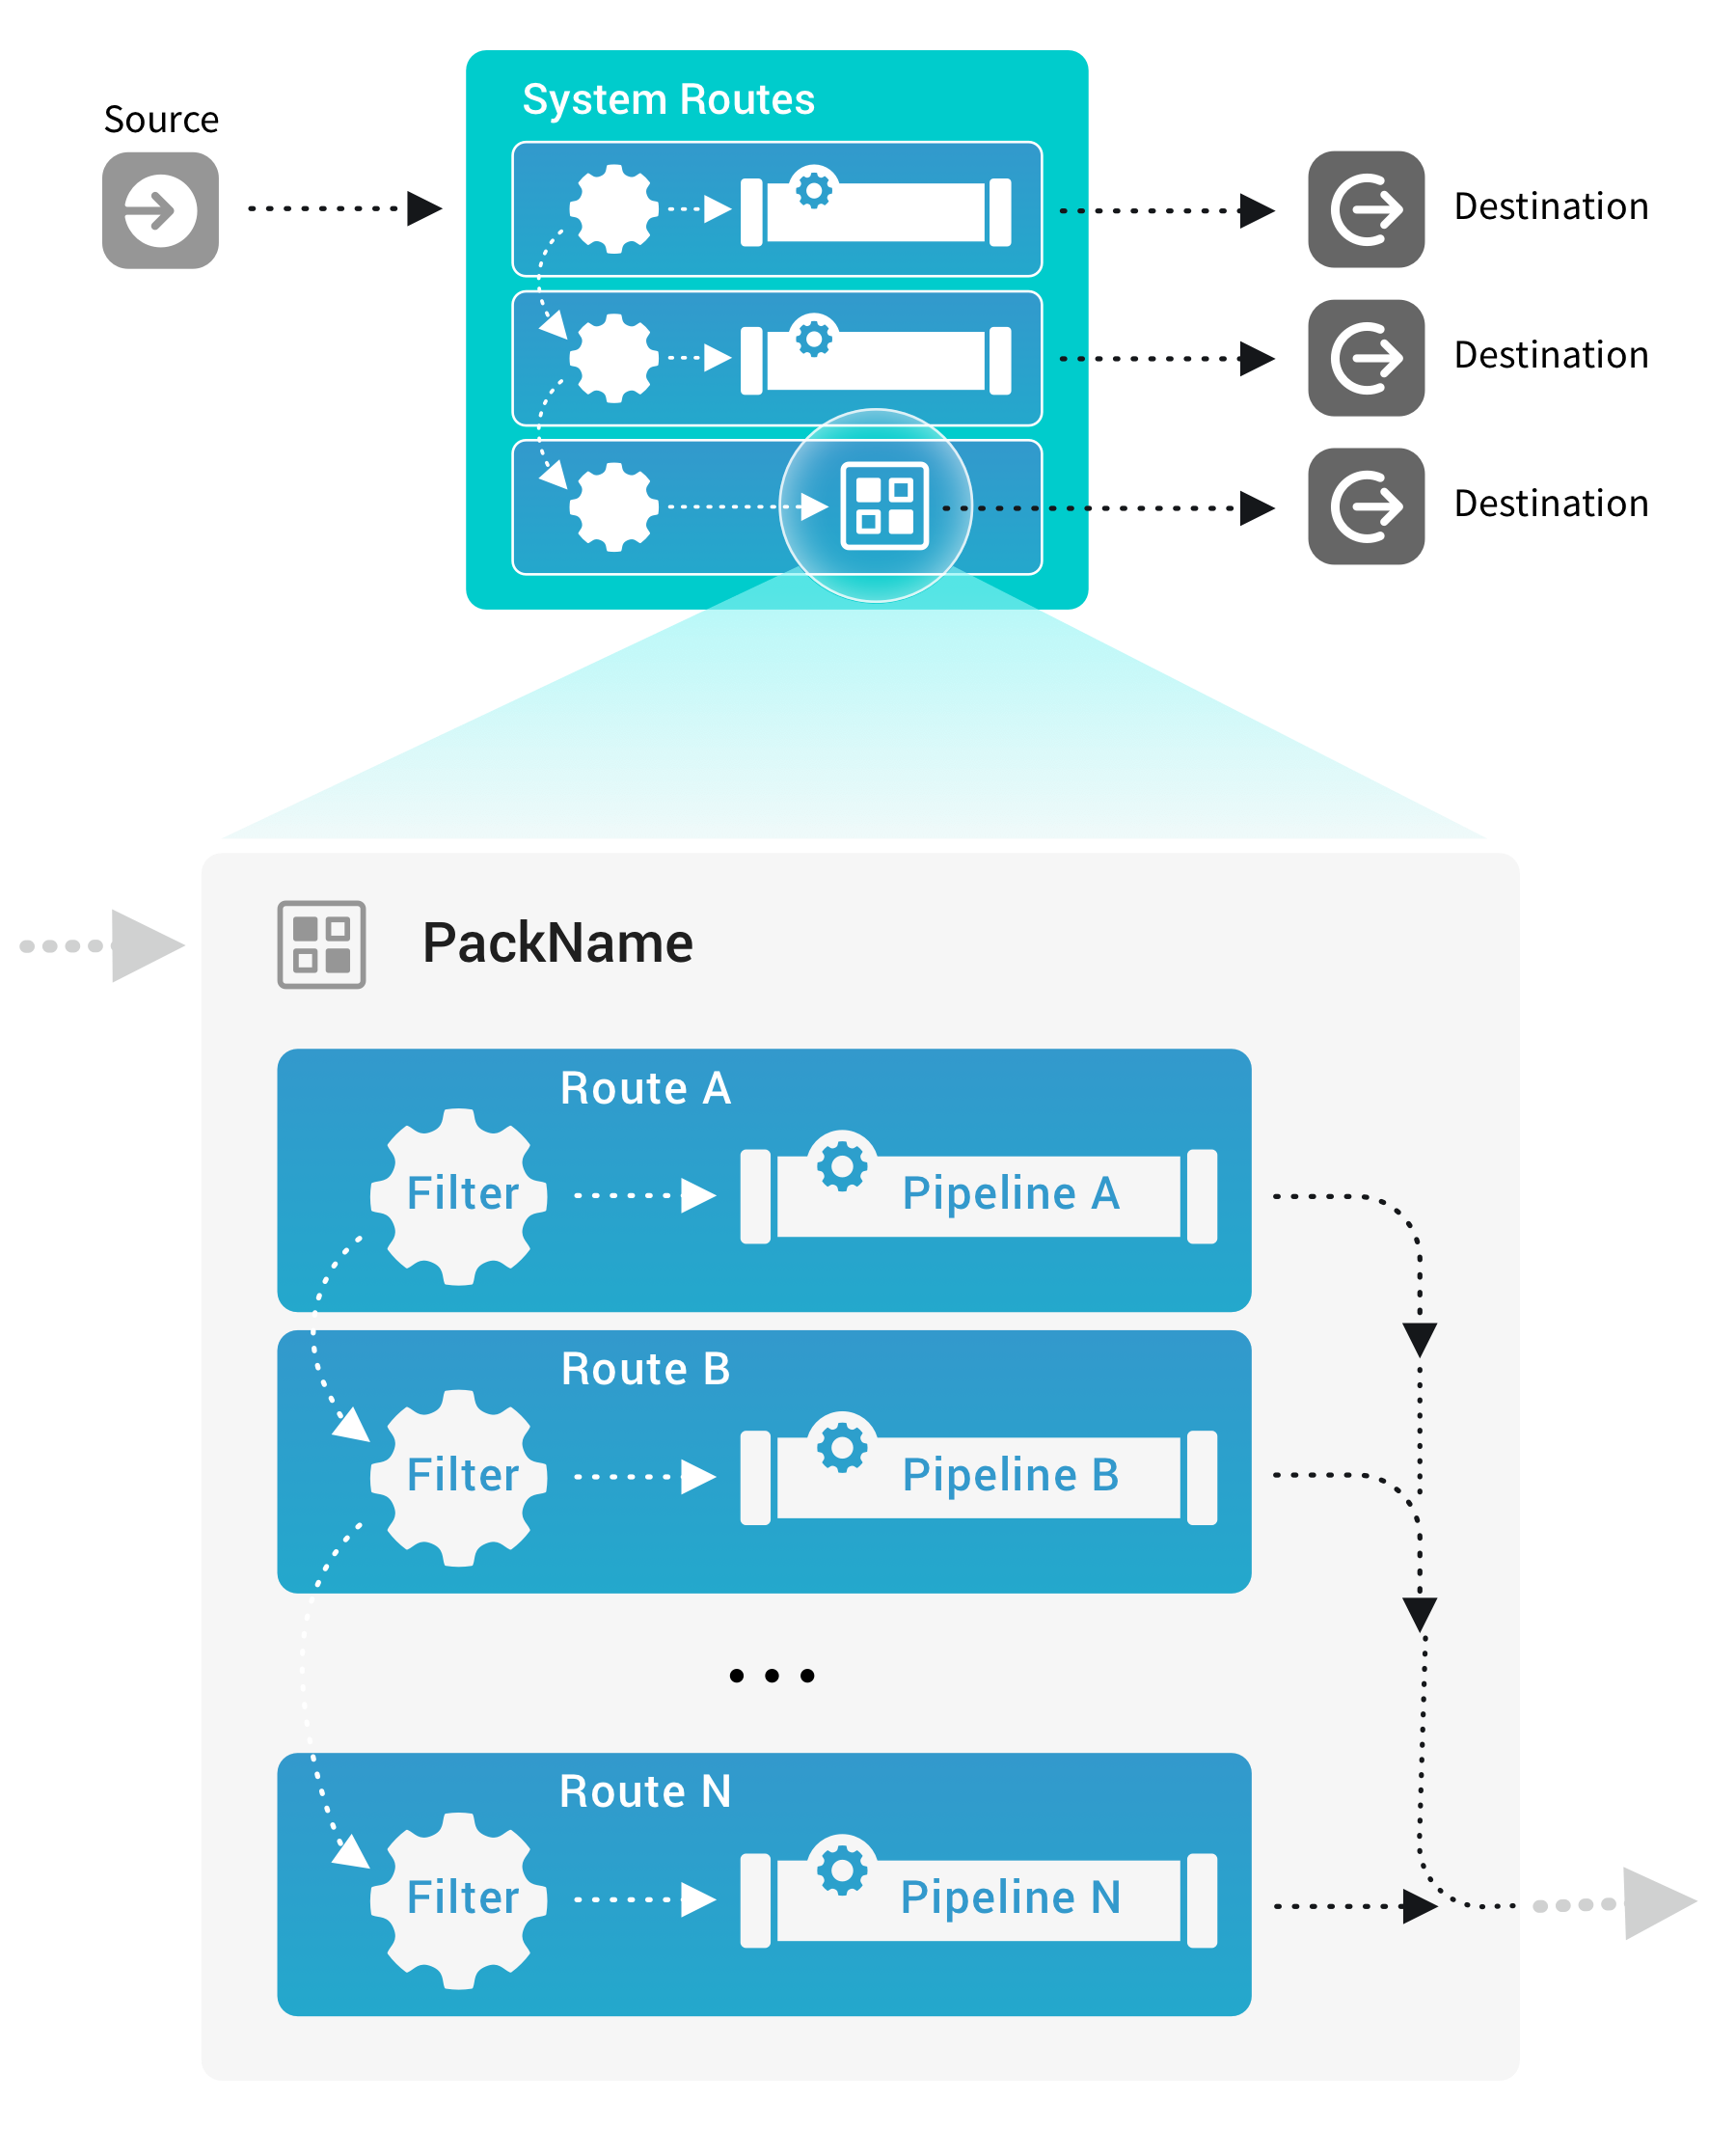
Sources, Collectors, and Destinations are external to Packs, so you can’t specify them within a Pack. This excludes a few other things:
- Routes configured within a Pack can’t specify a Destination.
- Packs can’t include Event Breakers, which are associated with Sources. (However, you can instead use the Event Breaker Function in Pipelines that you include in your Pack.)
You connect a Pack with a Source and Destination by attaching it to a Route, just as you’d attach a Pipeline. For details, ssee Where Can I Use Packs? below.
Where Can I Get Some Packs?
See The Cribl Packs Dispensary below.
Use Packs
These instructions cover using predefined Packs, as well as creating and modifying Pack configurations.
Version Compatibility
Packs created or modified in Cribl Stream 4.0.x cannot be used in any pre-4.0 version of Cribl Stream. (If you try, you’ll see a
should NOT have additional propertieserror.) To avoid this problem, Cribl recommends that you upgrade to Cribl Stream 4.0.x or later.For compatibility questions about any individual Packs, please contact us in the Cribl Community Slack
#packschannel.
Where Can I Use Packs?
Wherever you can reference a Pipeline, you can specify a Pack:
- In Sources, where you attach pre-processing Pipelines.
- In Destinations, where you attach post-processing Pipelines.
- In Routes, in the Routing table’s Pipeline/Output column.
This expanded view shows how a Pack can replace a Pipeline in a Route:
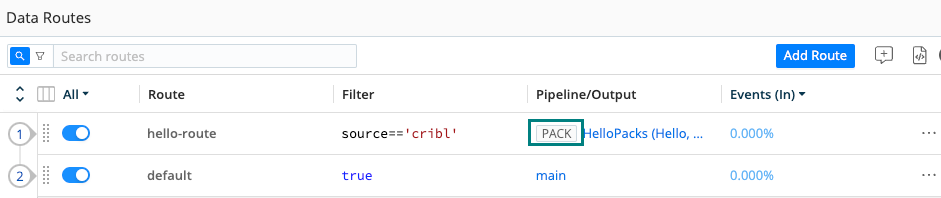
Packs are distinguished in the display with a PACK badge, as you can see here in the Routing table:
The PACK badge is also displayed when you click into a resource - shown here on one of the Routes from the above table:

Cribl Stream’s Monitoring page includes a Packs link where you can monitor the throughput of a Pack.
Access Packs
You access Packs differently, depending on your deployment type.
Single-Instance Deployment
In a single-instance deployment, Packs are global. On the top bar, select Processing > Packs. On the filesystem, Packs (including those that you add) are stored at $CRIBL_HOME/default/.
Distributed Deployment
In a Distributed deployment, Packs are associated with (and installed within) Worker Groups. In the sidebar, select Worker Groups, and then select the Worker Group you want to manage. Next, from that Worker Group’ submenu, select Processing > Packs (Stream) or More > Packs (Edge).
Each Group’s Packs are stored at $CRIBL_HOME/groups/<group-name>/default/. (In a typical installation, you’ll find the starter HelloPacks Pack at /opt/cribl/groups/default/default/.)
By design, you can readily share Packs across Worker Groups by copying them between Groups.
Get Started with Packs
To unpack Packs, use the above instructions (per deployment type) to navigate to the Packs page. Select HelloPacks to see its configuration.
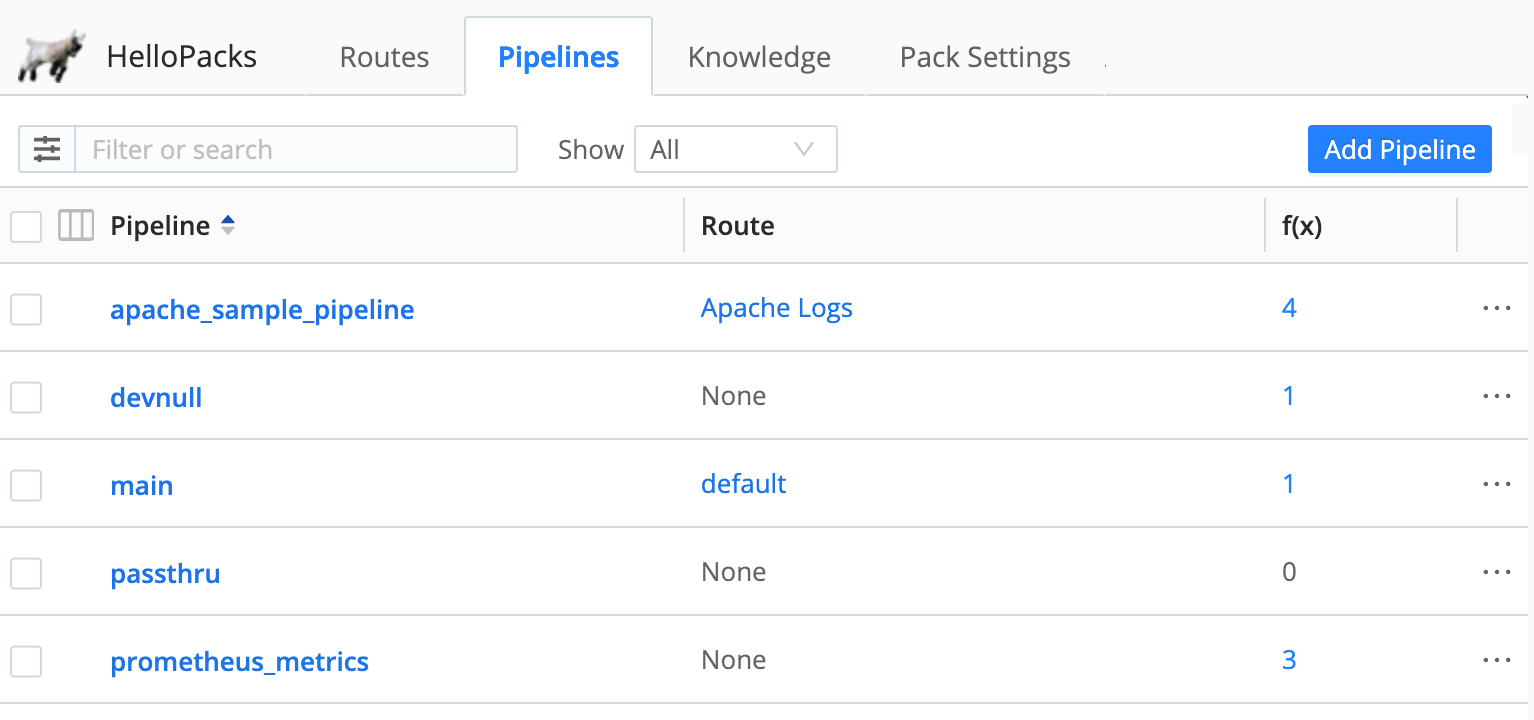
Select Pipelines, and you’ll see that the Pack includes devnull, main, and passthru Pipelines, corresponding to the default Pipelines provided at Cribl Stream’s global level. This Pack also includes an Apache-specific sample Pipeline - select it to unpack that, too.
Select Routes, and you’ll see that this Pack also provides both a default and an Apache-specific Route.
Configure a Pack
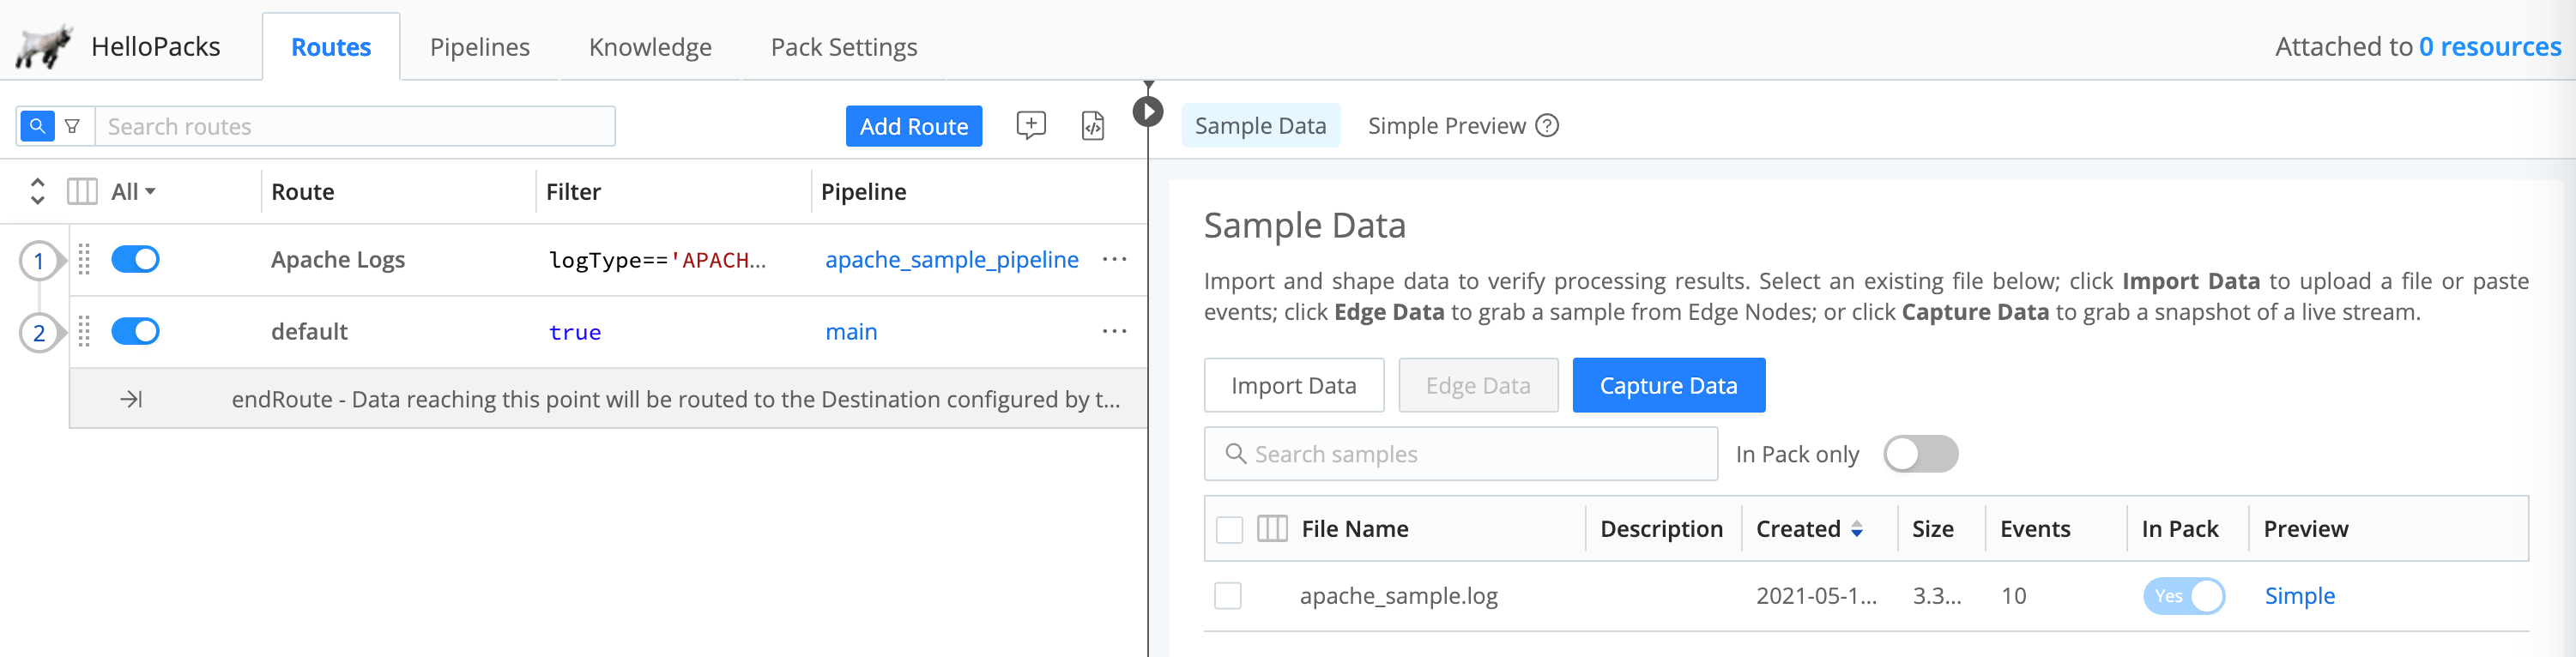
Once loaded, each Pack displays tabs labeled with familiar links: Routes, Pipelines, Knowledge, and Pack Settings in the left pane, along with Sample Data, and Simple Preview on the right.
The left pane tabs give you access to configuration objects specific to this Pack.
Cribl imposes a limit of 200 maximum Pipelines per Pack. This limit helps ensure optimal performance, and prevents potential errors. It helps maintain stability and avoids issues that can arise from managing very large Packs.
Sample Data
Within a Pack, the right pane defaults to displaying all sample data files available on your Cribl Stream instance. If you prefer to filter only sample files internal to the Pack, select the In Pack only option.
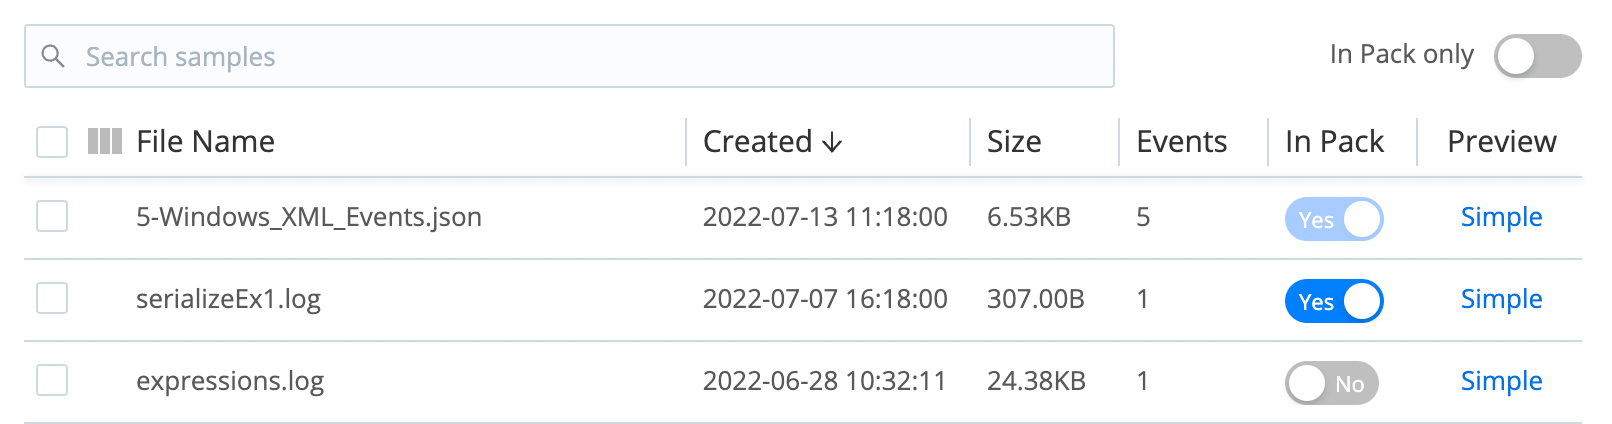
If you add sample data files via a Pack UI, they will be internal to that Pack. Each sample file here displays its own In Pack toggle on its row, which works as follows:
A light-blue toggle is locked, meaning that this sample file is internal to the Pack. It will export with the Pack. If you want to make this sample available across Cribl Stream, you’ll need to also add it via the global right preview pane (accessed from Routing > Data Routes or Processing > Pipelines).
A grayed-out or dark-blue toggle means that this sample file is global to Cribl Stream. It is available to this Pack. Toggle this to Yes (dark blue) if you want the sample file to export along with the Pack.
Basically, you can manipulate all the options here as you would work with the equivalent options in the global navigation.
Import or Upgrade a Pack
To import a new Pack, or an updated version of an existing Pack, from your filesystem:
- Navigate to the Packs page.
- Select Add Pack at the upper right.
- Select your desired Add/Import source: Dispensary, File, URL, or Git repo. When you import Packs that were exported in
mergemode, make sure to re-enter any required secrets to restore full functionality. This is necessary because Cribl Stream deletes all encrypted fields during the export process to ensure security and prevent the accidental sharing of sensitive information. - Follow the above links to details on each of these options.

The Cribl Packs Dispensary
The Cribl Packs Dispensary is a Cribl-hosted resource for you to find and share Packs. Cribl, our partners, and community users develop Packs and submit them to the Dispensary for easy sharing. Cribl tests submissions before publication, to ensure each Pack’s quality, security guardrails, and stability.
You can install Dispensary Packs directly through Cribl Stream’s user interface, as outlined in Add from Packs Dispensary below.
Interested in publishing your own Packs on the Cribl Packs Dispensary? See Publishing a Pack.
Add from the Packs Dispensary
To add a Pack from the Cribl Packs Dispensary sharing site:
- Navigate to the Packs page.
- Select Add Pack at the upper right and select Add from Dispensary.
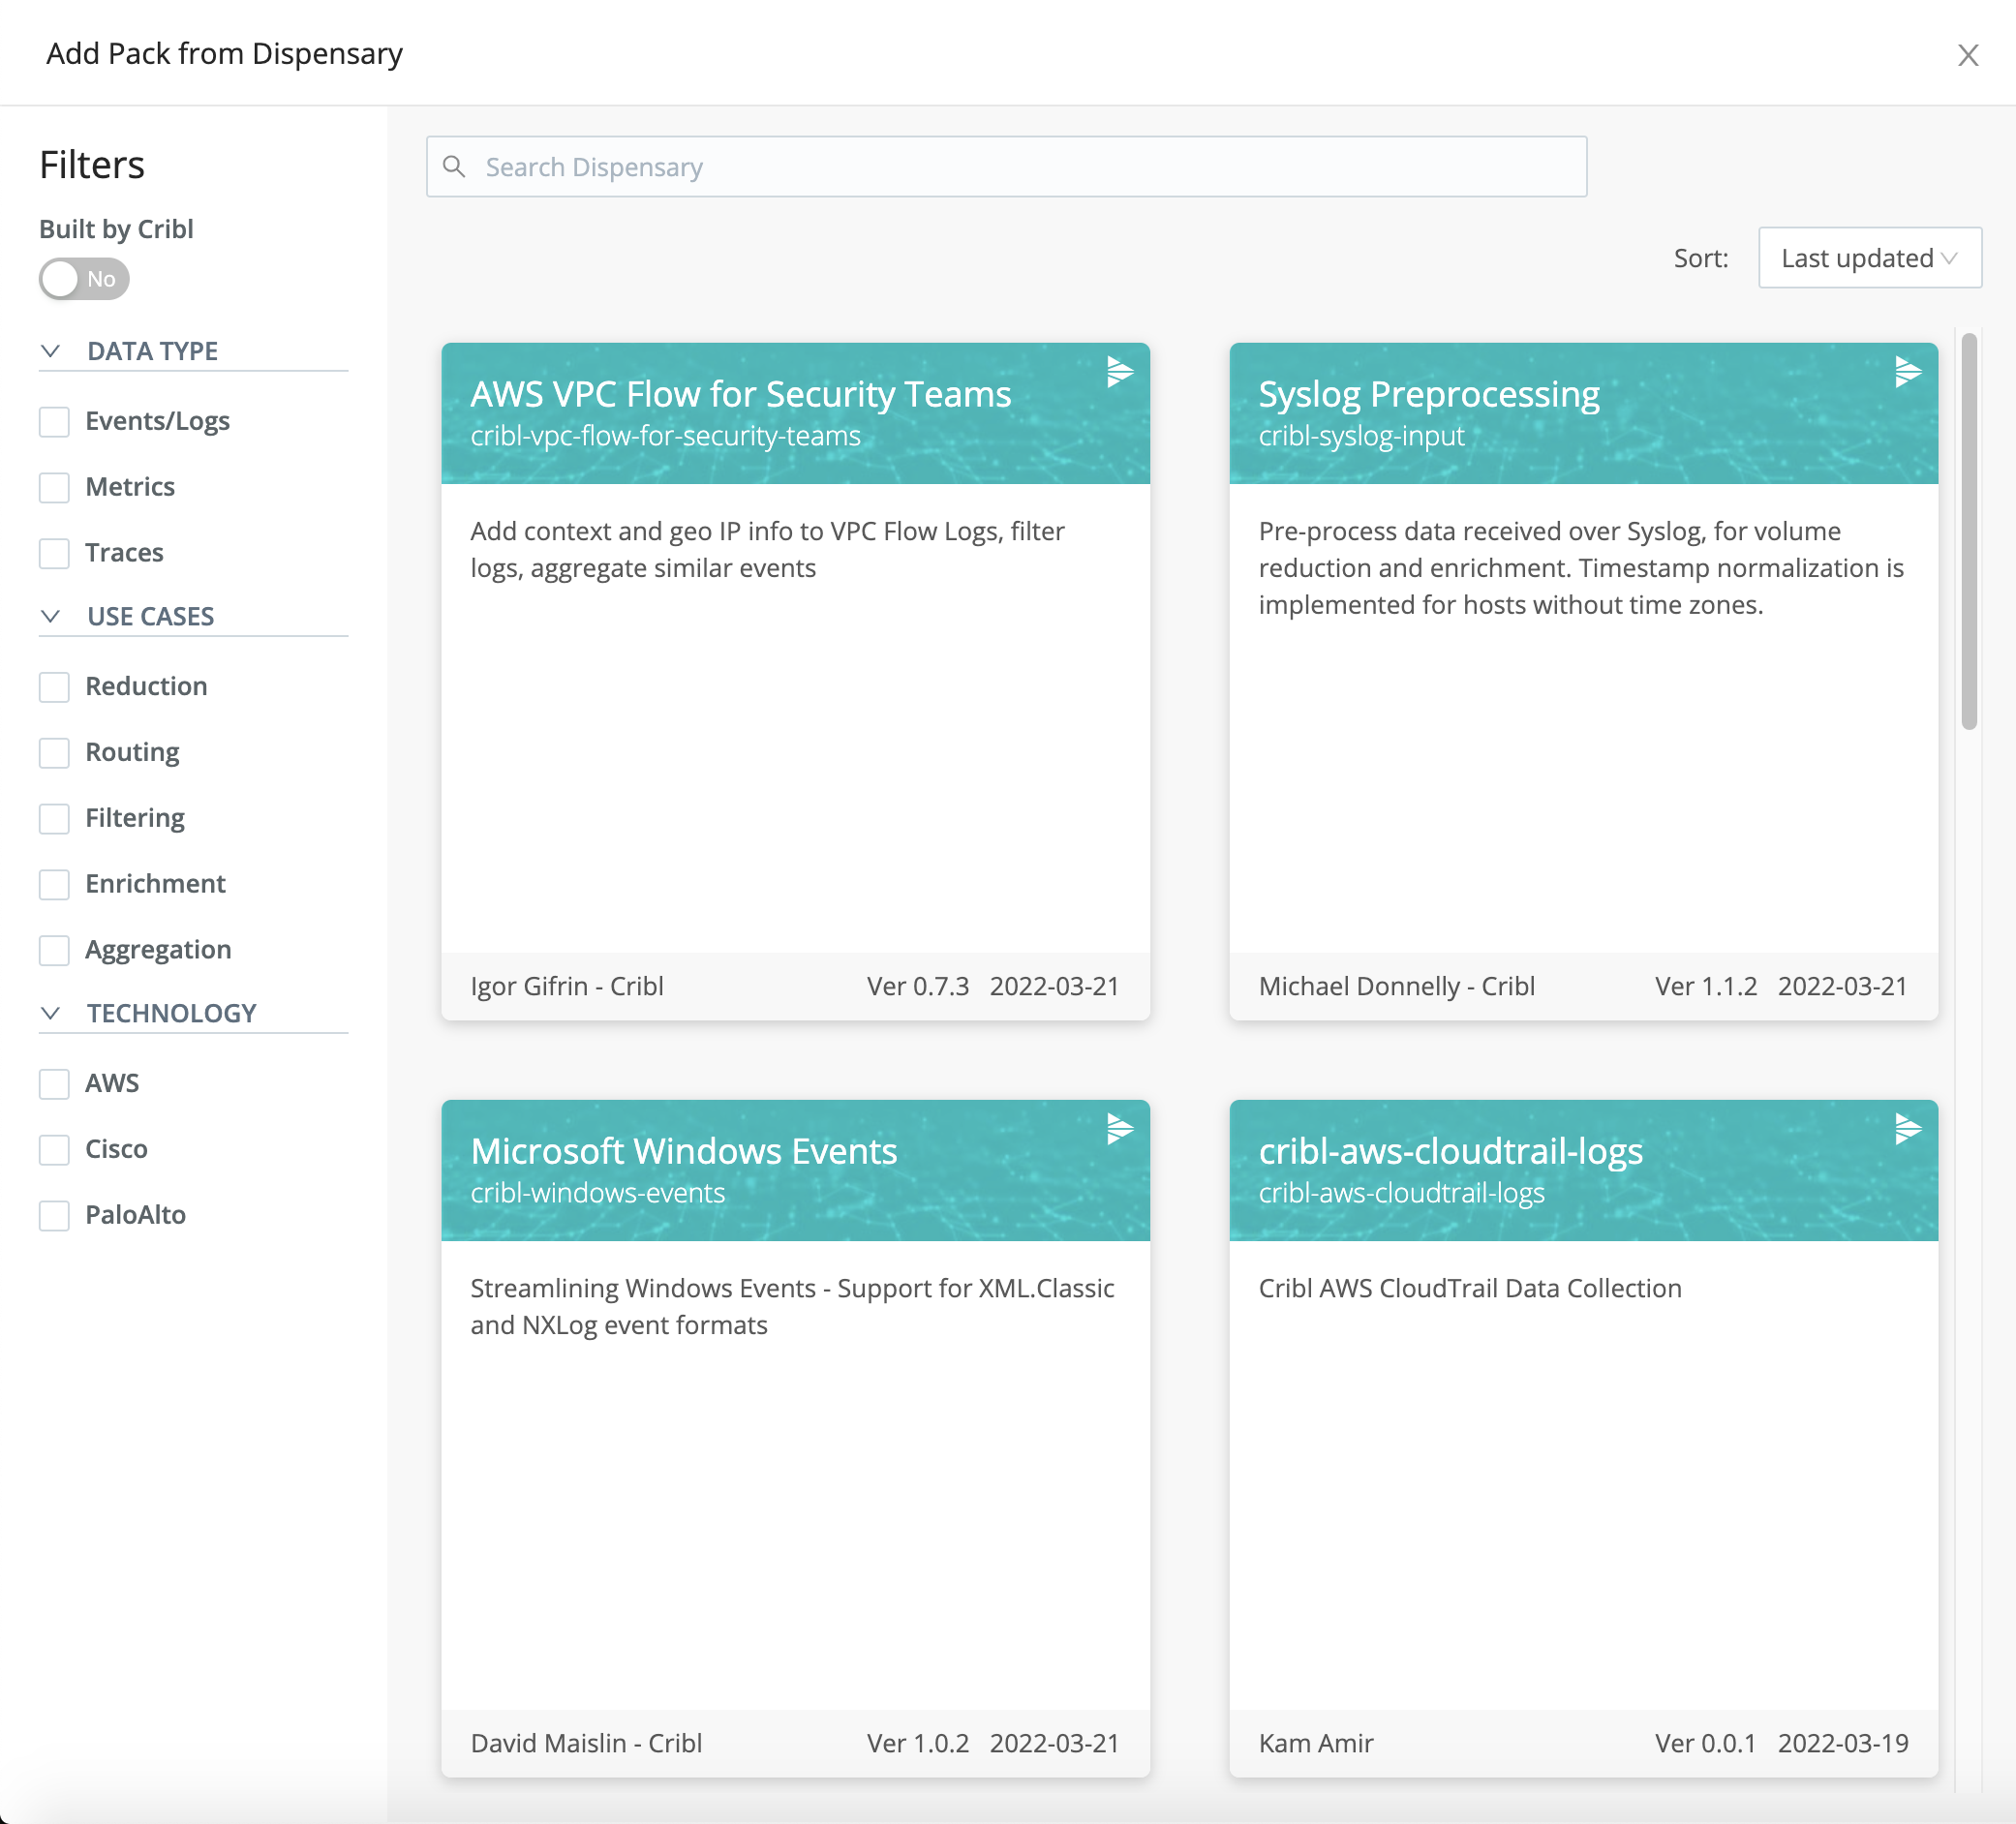
- The Packs Dispensary will open in a drawer, as shown in the screenshot above.
- Using the drawer controls, browse or search for the Pack(s) you want. (You can use the check boxes at the left to filter by data type, use case, and technology.)
- Select any Pack tile to display its details page with its README. This will typically outline the Pack’s purpose, compatibility, requirements, and installation.
- To proceed, select Add Pack on this page.
- That’s it! You’ll see a banner confirming that the Pack is now installed.
Import from a File
To import a Pack (.crbl file) from your local filesystem:
- Navigate to the Packs page.
- Select Add Pack at the upper right and select Import from File.
- Select the file to import.
- Optionally, give the Pack an explicit, unique New Pack ID. (For details about this option, see Upgrade an Existing Pack below.)
- Select Import to confirm the import.
Import from a URL
To import a Pack from a known, public or internal, URL:
- Navigate to the Packs page.
- Select Add Pack at the upper right and select Import from URL.
- Enter a valid URL for the Pack’s source. (This field’s input is validated for URL format, but not for accuracy, before you submit the modal.)
- Optionally, give the Pack an explicit, unique New Pack ID. (See Upgrade an Existing Pack.)
- Select Import to confirm the import.
To import a Pack from a public URL, the Leader Node (or single instance) requires Internet access. A Distributed deployment Leader can then deploy the Pack to Workers even if the Workers lack Internet access.
Import from Git Repos
To import a Pack from a known public or private Git repo:
Navigate to the Packs page.
Select Add Pack at the upper right and select Import from Git.
Enter the source repo’s valid URL.
This field’s input is validated for URL format, but not for completeness or accuracy, before you submit the modal. When targeting a private repo, use the format:https://<username>:<token/password>@<repo-address>. Public repos need onlyhttps://<repo-address>, as shown in the example below.Optionally, give the Pack an explicit, unique New Pack ID. (See Upgrade an Existing Pack.)
Optionally, enter a Branch or tag to filter the import source using the repo’s metadata. You can specify a branch (such as
master) or a tag (such as a release number:0.5.1, and so forth).Select Import to confirm the import.
To import a Pack from a public repo, the Leader Node (or single instance) requires Internet access. A Leader in a Distributed deployment can then deploy the Pack to Workers even if the Workers lack Internet access.
Dispensary GitHub Repo
A particularly useful public repo is the Cribl Pack Dispensary on GitHub. This repo was established prior to the Cribl-hosted Cribl Packs Dispensary site described above, and it is a place to collaborate on developing Packs prior to submitting them to the newer site.
You can install this repo’s Packs directly through Cribl Stream’s user interface, as outlined in Import from Git Repos above. However, if you prefer, you can click through to any Dispensary repo release page, download the corresponding .crbl file, and then upload the file into Cribl Stream.
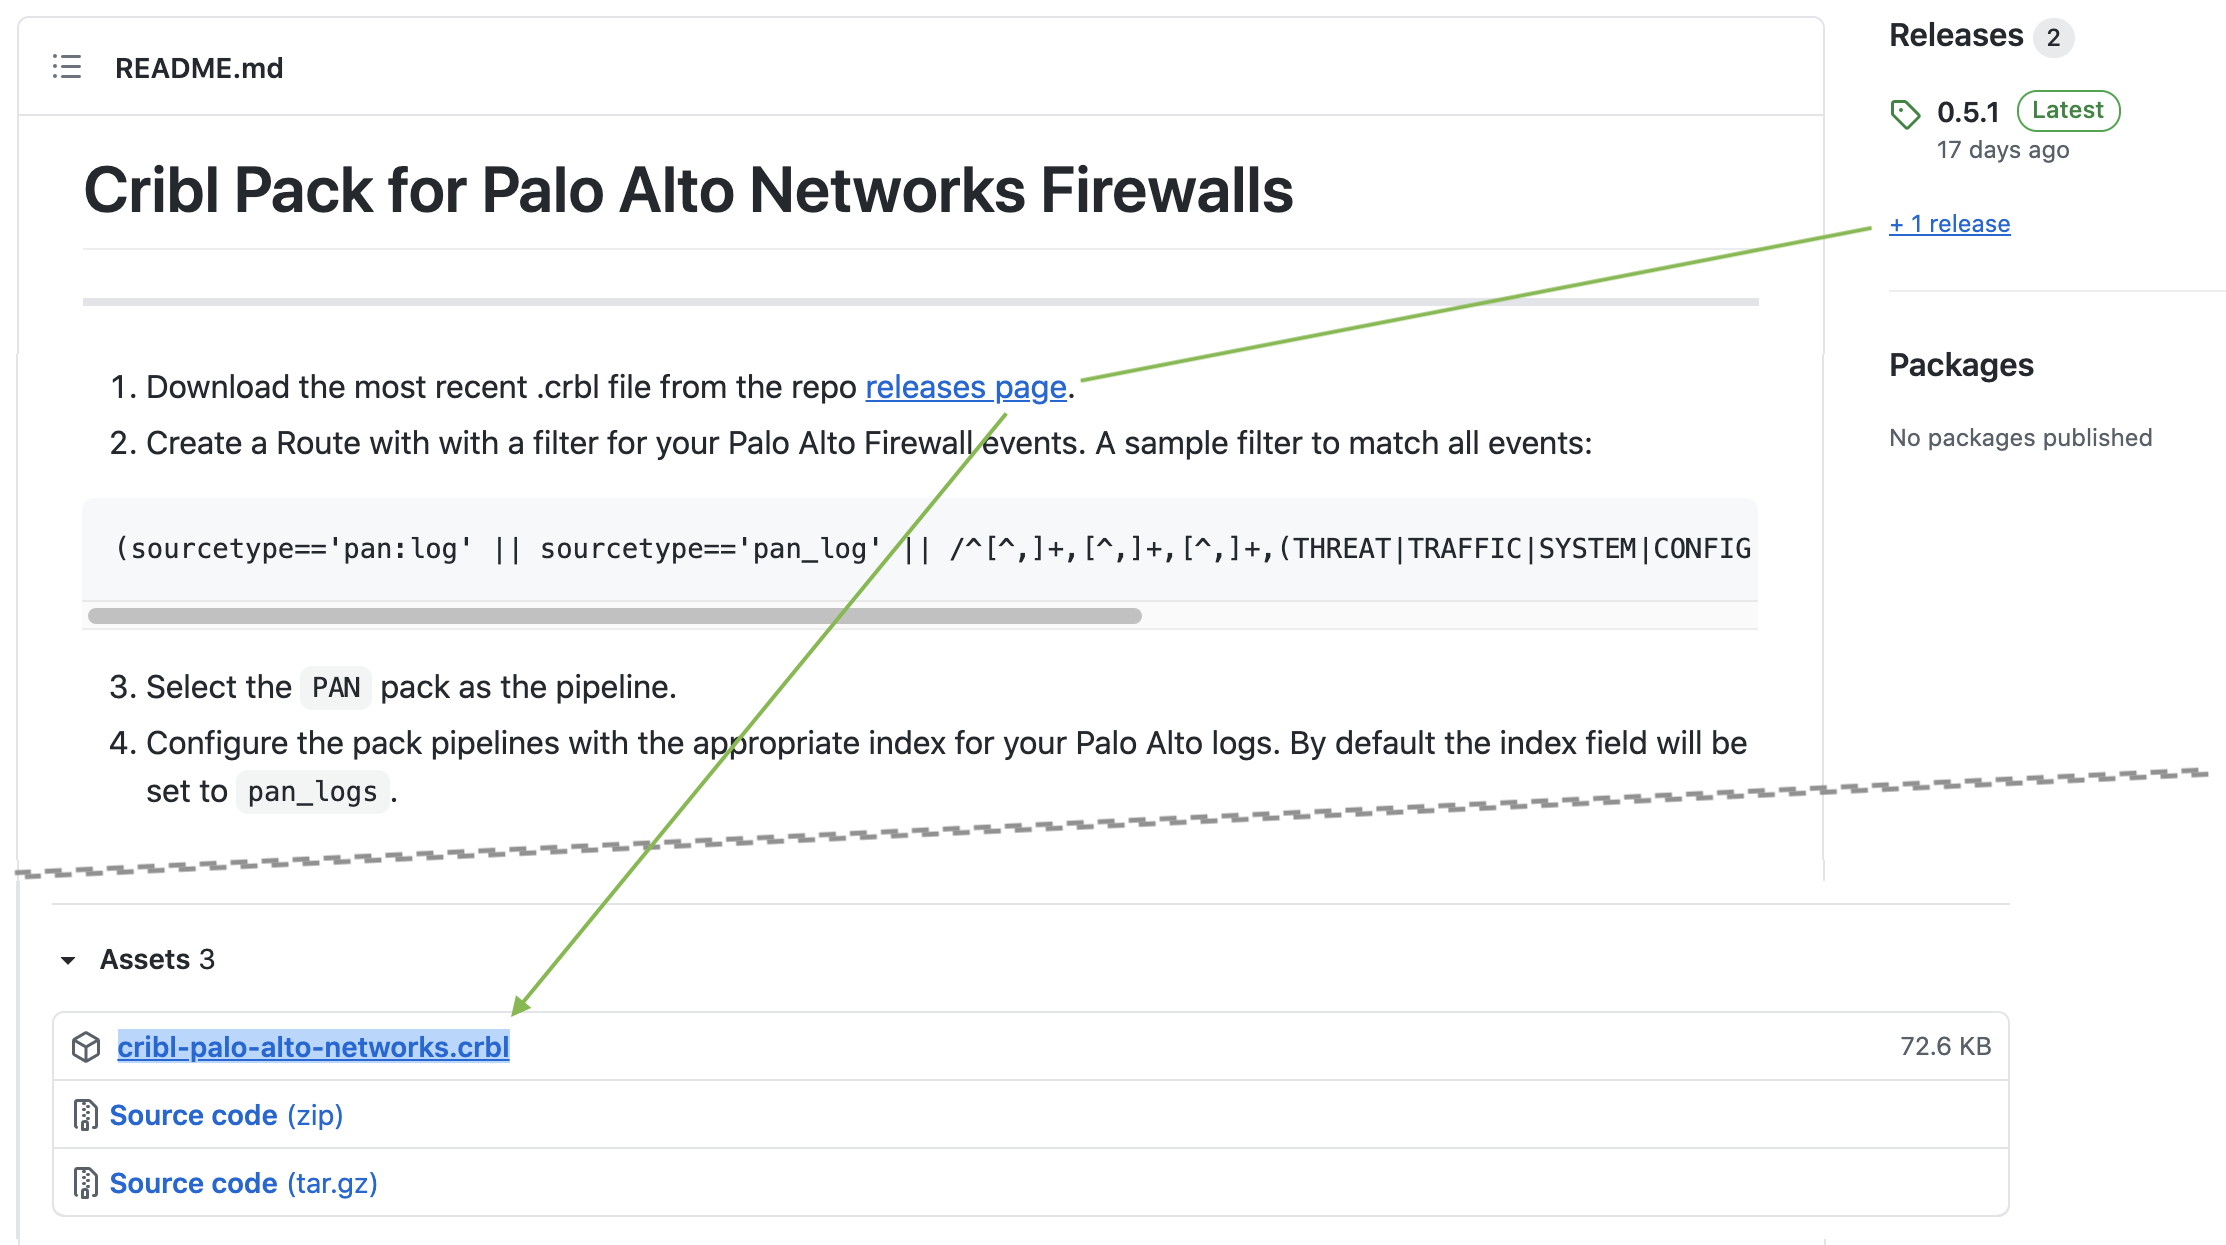
.crbl file from the Cribl Pack Dispensary’s Web UIIf you’ve posted completed Packs to our GitHub repo, we encourage you to also submit them to the Cribl Packs Dispensary site. See Publishing a Pack.
Upgrade an Existing Pack
Each Pack that you install within a given Worker Group (or single-instance deployment) must have a unique ID. The ID is based on the internal configuration of the Pack - not its container file name, nor on its Display name.
If you import a Pack whose internal ID matches an installed Pack - whether an update, or just a duplicate - you’ll be prompted to assign a unique New Pack ID to import it as a separate Pack.
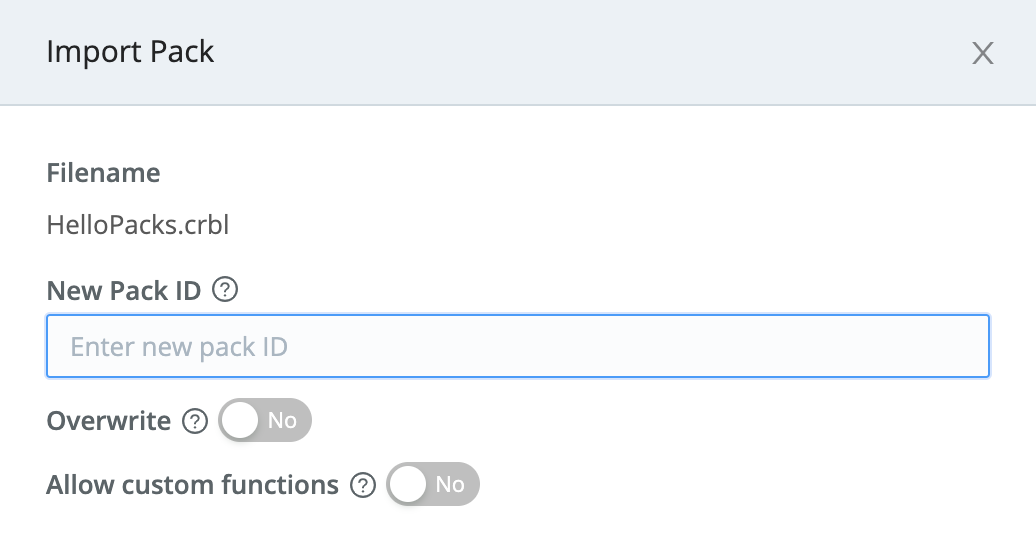
You’ll also have the option to Overwrite the installed Pack, reusing the same ID.
Be careful about enabling the Overwrite option. Doing so will cause the imported Pack to completely overwrite your existing Pack configuration.
Each Pack within a Cribl Stream instance must have a unique Pack ID, so you cannot share an ID between two (or more) installed Packs.
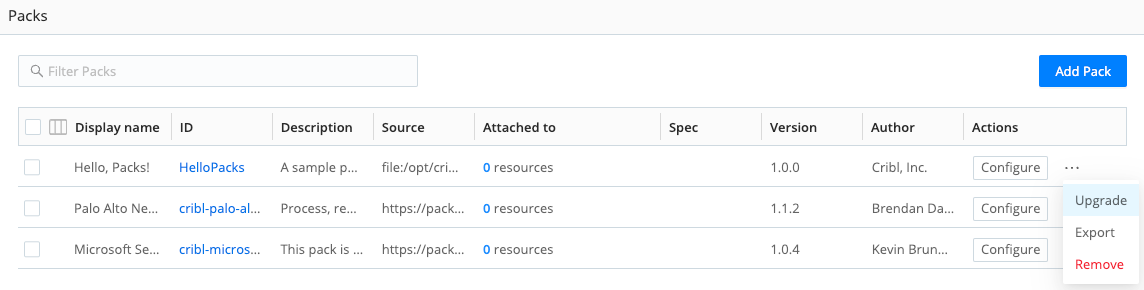
To explicitly upgrade an existing Pack, you can instead open the Options ••• menu on its row, and then select Upgrade.
If you’ve modified an installed Pack, Cribl Stream will block the overwrite of the Pack, to prevent deletion of your locally created resources.
When upgrading a Pack, Cribl recommends that you:
- Import the updated Pack under a new name that includes the version number (for example,
cribl-syslog-input-120). This allows you to review and adjust new functionality against currently-deployed configurations. - Do a side-by-side comparison of the previous and new versions of the Pack - remember to review all comments in the new Pack. Doing this side-by-side comparison allows you to copy Function expressions and other settings from the current version into the same fields in the new version.
- Enable or disable any Functions in the new Pack as necessary.
- Update any Routes, Pipelines, Sources, or Destinations that use the previous Pack version to reference the new Pack.
- If the Pack includes any user-modified versions of default Cribl Stream Knowledge objects (for example, Lookup files): Be sure to copy the modified files locally for safekeeping, before upgrading the Pack. After you install the upgrade, copy those files back to the upgraded Pack, overwriting the default versions in the Pack.
- Test, test, and test!
- Commit and Deploy.
Create a Pack
You can create a new Pack from scratch, to consolidate and export multiple Cribl Stream configuration objects:
Navigate to the Packs page and select Add Pack.
From the submenu, select Create Pack.
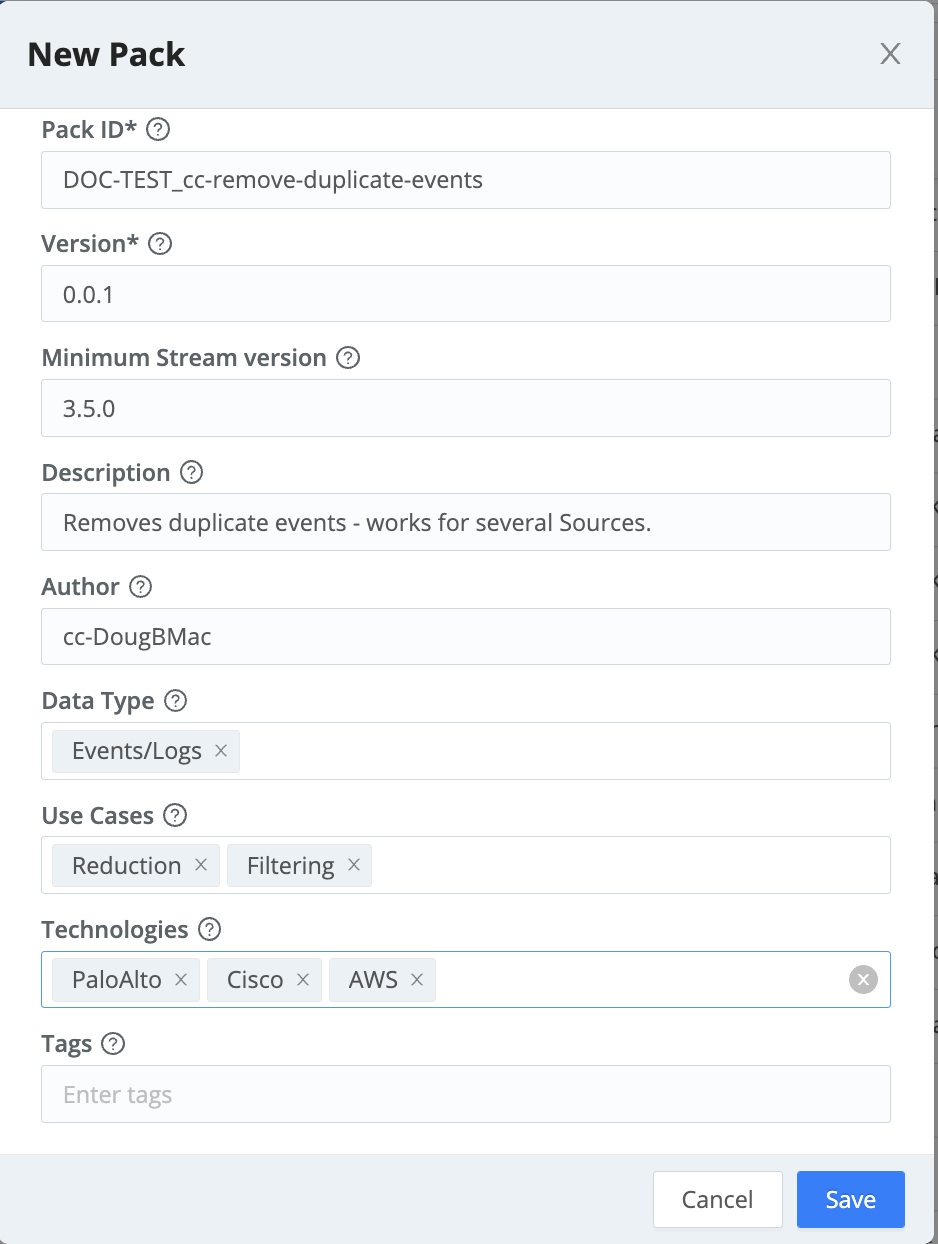
Enter a unique Pack ID and other details:
- Each Pack within a Cribl Stream instance must have a separate Pack ID, but you can assign arbitrary Display names.
- Version is a required field identifying the Pack’s own versioning.
- Minimum Stream version is an optional field specifying the lowest compatible version of Cribl Stream software.
- Description and Author are optional identifiers.
- Data type, Use cases, and Technologies are optional combo boxes. You can insert one or multiple keywords to help users filter Packs that you post publicly on the Cribl Packs Dispensary.
- Tags are optional, arbitrary labels that you can use to filter/search and organize Packs.
Select Save.
- On the Packs page, select the new Pack’s row to open the Pack.

- Use the standard Cribl Stream controls to configure and save the infrastructure you want to pack up. As you save changes in the UI, they’re saved to the Pack.
Publish a Pack
If you’d like to share your Pack with the community of Cribl users, you can publish it on the Cribl Packs Dispensary.
The Cribl Packs Dispensary site is designed for sharing completed Packs. If you want to collaborate with others on iteratively developing a Pack, Cribl recommends relying on our Dispensary GitHub Repo for the development phase.
If you have a Cribl.Cloud account, you can also collaborate there by inviting team members to your Cribl.Cloud Organization. See Inviting and Managing Other Users.
Once your Pack is ready to share, we encourage you to submit it to the Cribl Packs Dispensary site. If you already have completed Packs on our GitHub repo, bring them over here!
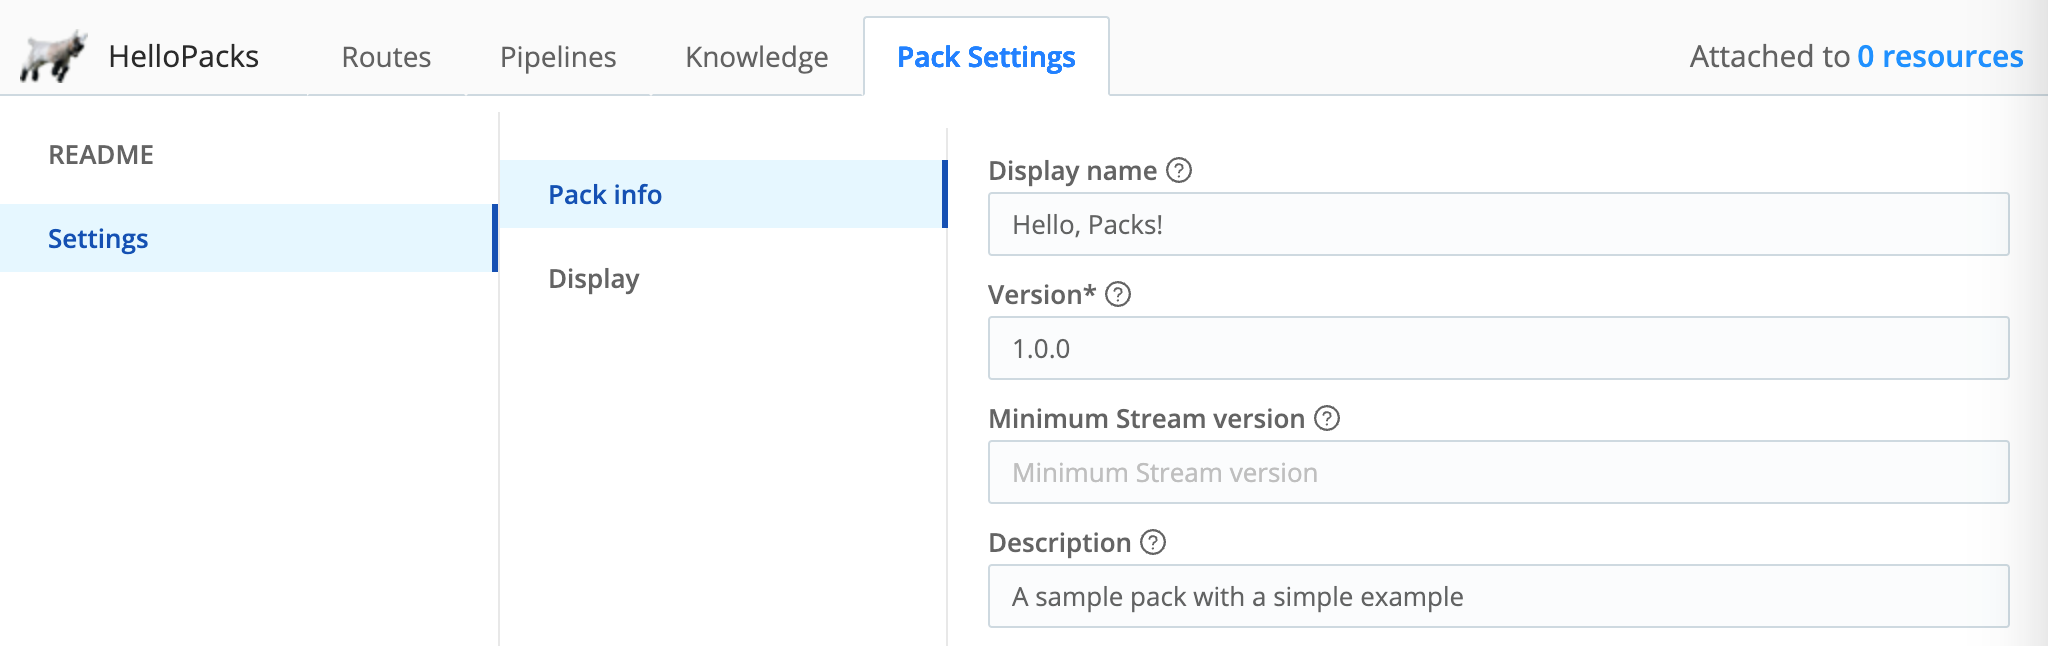
Modify Pack Settings
You can update Pack metadata (such as Version, Description and Author) and the Pack’s display settings. If you’re developing a new Pack to share, you’ll want to use this interface to populate the README and display logo within the Pack:
- Open a Pack and select Pack Settings. The left README tab will gain focus.
- To populate the Pack README file, toggle View to Edit, replace the placeholder markdown content with your actual Pack description, and Save.
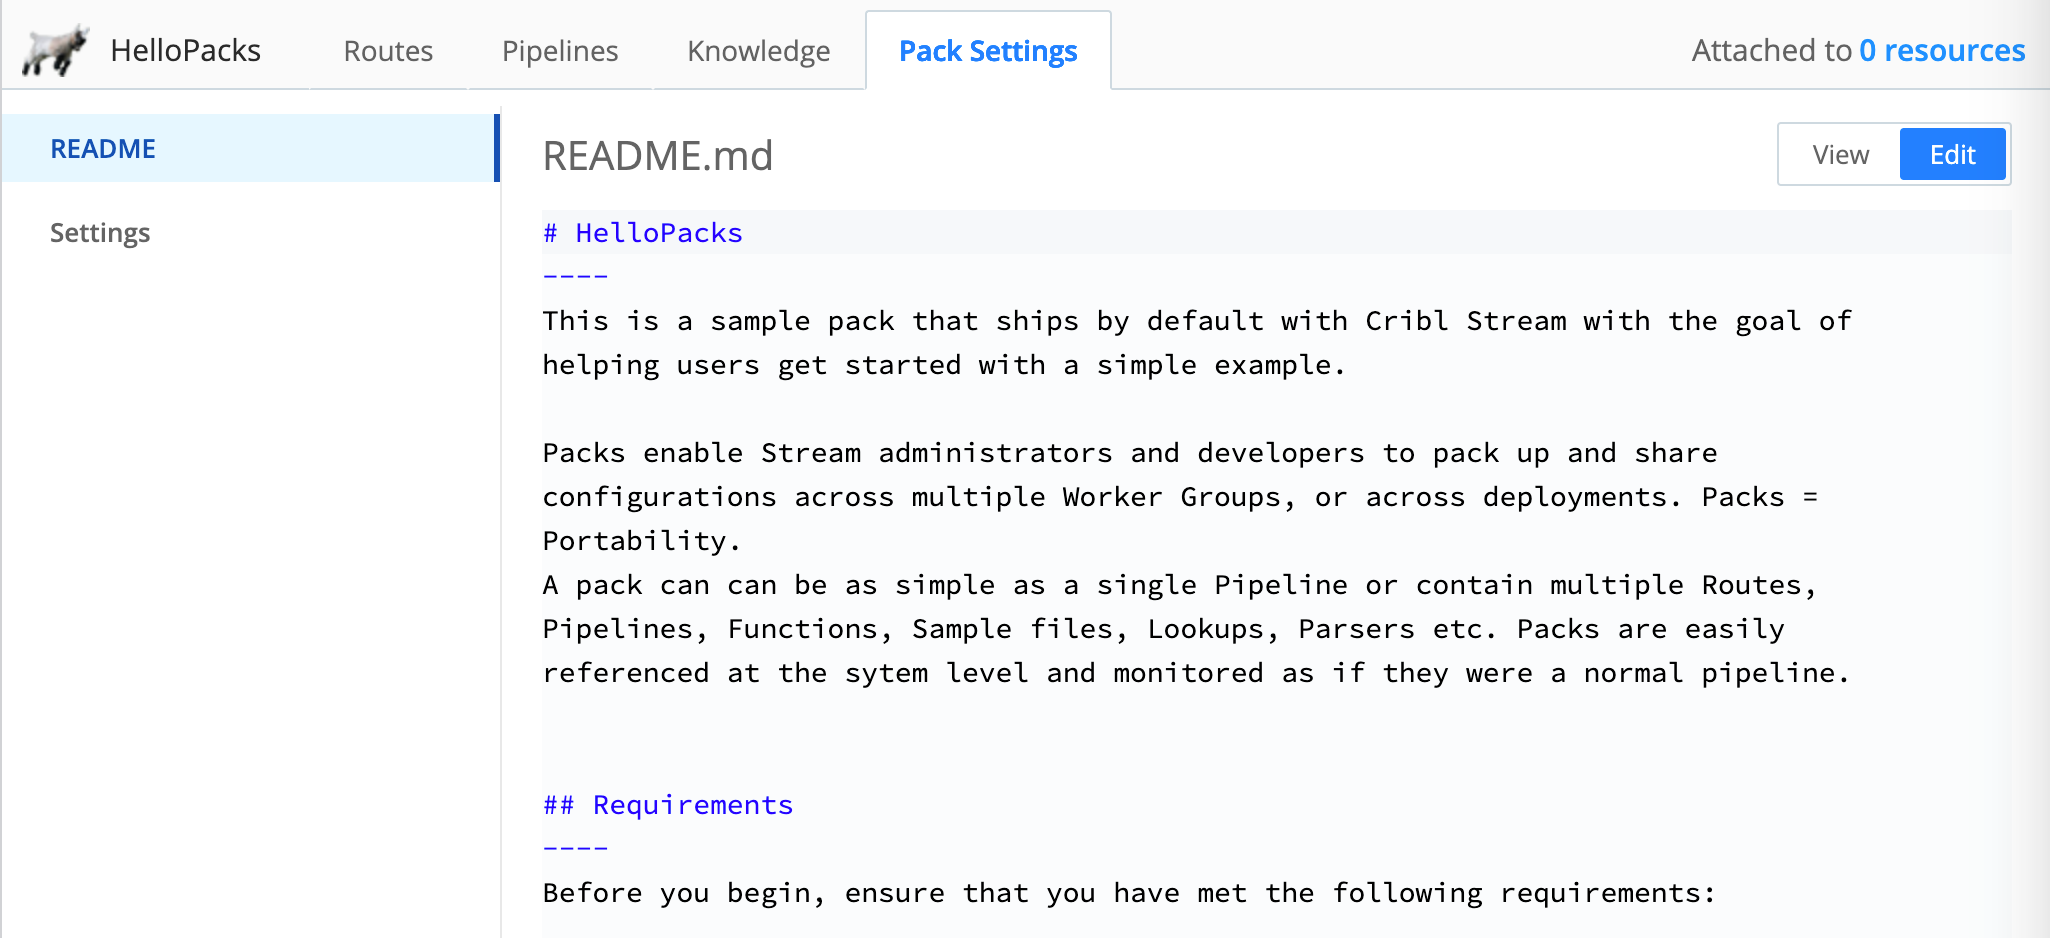
- To update other metadata, select the left Settings tab.
You can add a Pack logo on the Settings tab.
Cribl recommends adding a logo to each custom Pack, to visually distinguish the Pack UI from the surrounding Cribl Stream UI (as well as from other Packs). You can upload a
.pngor.jpg/.jpegfile, up to a maximum size of 2 MB and 350x350 px. Cribl recommends a transparent image, sized approximately 280x50 px.
Copy a Pack
You can share Packs in a Distributed deployment by copying the Packs between Worker Groups. You can copy one or more Packs from the Packs page as described here or using the Cribl API.
To copy a single Pack, your first step is to open its Options ••• menu, then select Copy to another Worker Group.
To copy multiple Packs in one operation, your first step is to select their check boxes on the Packs page. Then, Options ••• menu, select Copy selected Packs to another Worker Group.
Next;
- Select the Worker Groups to which you want to copy the Pack.
- Optionally, select the Overwrite option to replace existing Packs that have the same Pack ID. (Use this option with caution, because it is destructive.)
- Select Copy.
A status modal will either display a success message, or list any Packs that failed to copy.
Export a Pack
You can also use the Cribl API to export a Pack.
To export a newly created or modified Pack from the Packs page, open its Options ••• menu and select Export.
The Export Pack modal provides the following options.
Export Mode
Select one of these three buttons to determine the export mode:
Merge safe: Attempt to safely merge local modifications into the Pack’s default layer (original configuration), then export.
Merge: Force-merge local modifications into the Pack’s original configuration, then export. When you export Packs in
mergemode, Cribl Stream deletes all encrypted fields from Pipelines. Upon importing these packs, you will need to re-enter the secrets to make them functional again.Default only: Export only the Pack’s original configuration, without local modifications.
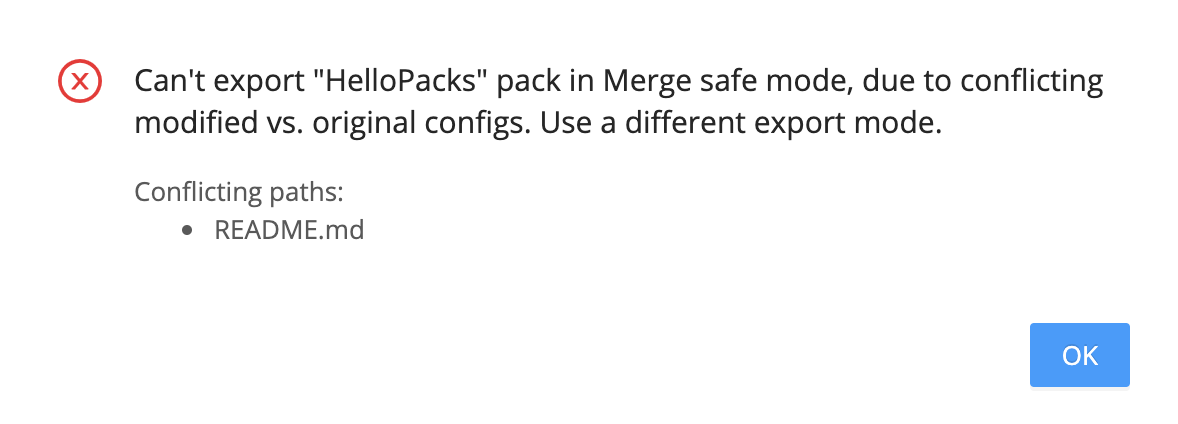
The Merge safe option is conservative, and will block the export where Cribl Stream can’t readily merge modified contents with the Pack’s original contents, due to conflicts. If you encounter an error like the example shown below, use the Merge or Default only export mode instead.
Exported Pack ID
Defaults to the Pack’s current ID, with the version number appended. This field provides an opportunity to change the Pack’s ID, if you’re exporting a new version of the Pack.