


These docs are for Cribl Stream 4.9 and are no longer actively maintained.
See the latest version (4.17).
Azure Blob Storage Source
Cribl Stream supports receiving data from Azure Blob Storage buckets. Cribl Stream uses Azure Event Grid to receive notifications, via a queue, when new blobs are added to a storage account.
Type: Pull | TLS Support: YES (secure API) | Event Breaker Support: YES Available in: Cribl Stream (LogStream) 2.4.4 and above.
Cribl Stream running on Linux (only) can use this Source to read Parquet files, identified by a
.parquet,.parq, or.pqtfilename extension.For configuration examples, see Resources below.
Restrictions
Cribl Stream supports data ingestion from Azure’s hot and cool access tiers, but not from the archive tier - whose stated retrieval lag, up to several hours, cannot guarantee data availability.
This Source supports block blobs, but not append blobs, which can change after they are initially created and the create message is sent. Consider using a Cribl Stream Azure Event Hubs Source if you need to ingest changeable Azure data.
Configure Cribl Stream to Receive Data from Azure Blob Storage
- On the top bar, select Products, and then select Cribl Stream. Under Worker Groups, select a Worker Group. Next, you have two options:
- To configure via QuickConnect, navigate to Routing > QuickConnect. Select Add Source and select the Source you want from the list, choosing either Select Existing or Add New.
- To configure via the Routes, select Data > Sources. Select the Source you want. Next, select Add Source.
- In the New Source modal, configure the following under General Settings:
- Input ID: Enter a unique name to identify this Azure Blob Storage Source definition. If you clone this Source, Cribl Stream will add
-CLONEto the original Input ID. - Description: Optionally, enter a description.
- Queue: The queue name from which to read Blob notifications. Value must be a JavaScript expression (which can evaluate to a constant value), enclosed in quotes or backticks. Can be evaluated only at init time. For example, referencing a Global Variable:
myQueue-${C.vars.myVar}.
- Input ID: Enter a unique name to identify this Azure Blob Storage Source definition. If you clone this Source, Cribl Stream will add
- Under Authentication, select an Authentication method from the dropdown:
- Manual: Use this default option to enter your Azure Storage connection string directly. Exposes a Connection string field for this purpose. (If left blank, Cribl Stream will fall back to
env.AZURE_STORAGE_CONNECTION_STRING.) - Secret: This option exposes a Connection string (text secret) drop-down, in which you can select a stored secret that references an Azure Storage connection string. The secret can reside in Cribl Stream’s internal secrets manager or (if enabled) in an external KMS. A Create link is available if you need a new secret. For details, see Connection String Format.
- Client secret: This option allows you to use the Azure service principal’s client secret to authenticate, and exposes Azure service principal settings.
- Certificate: This option allows you to use a certificate registered with the Azure service principal to authenticate, and exposes Azure service principal settings.
- Manual: Use this default option to enter your Azure Storage connection string directly. Exposes a Connection string field for this purpose. (If left blank, Cribl Stream will fall back to
- Next, you can configure the following Optional Settings:
- Filename filter: Regex matching file names to download and process. Defaults to
.*, to match all characters. - Tags: Optionally, add tags that you can use to filter and group Sources in Cribl Stream’s UI. These tags aren’t added to processed events. Use a tab or hard return between (arbitrary) tag names.
- Filename filter: Regex matching file names to download and process. Defaults to
- Optionally, you can adjust the Processing and Advanced settings, or Connected Destinations outlined in the sections below.
- Select Save, then Commit & Deploy.
Connection String Format
Manual and Secret authentication methods use an Azure Storage connection string in this format:
DefaultEndpointsProtocol=[http|https];AccountName=<your-account-name>;AccountKey=<your-account-key>;EndpointSuffix=<your-endpoint-suffix>A fictitious example, using Microsoft’s recommended HTTPS option, is:
DefaultEndpointsProtocol=https;AccountName=storagesample;AccountKey=12345678...32;EndpointSuffix=core.windows.netService Principal Settings
Client secret and Certificate authentication methods expose the following additional settings:
- Storage account name: Enter the name of your Azure Storage Account.
- Tenant ID: Enter the service principal’s tenant ID.
- Client ID: Enter the service principal’s client ID.
- Client secret (text secret) (with Client secret method selected): Select a text secret containing the client secret, or create a new one.
- Certificate (with Certificate method selected): Select the certificate you registered as credentials for your app in the Azure portal, or create a new one.
Processing Settings
Custom Command
In this section, you can pass the data from this input to an external command for processing, before the data continues downstream.
Enabled: Defaults to No. Toggle to Yes to enable the custom command.
Command: Enter the command that will consume the data (via stdin) and will process its output (via stdout).
Arguments: Click Add Argument to add each argument to the command. You can drag arguments vertically to resequence them.
Event Breakers
This section defines event breaking rulesets that will be applied, in order.
Event Breaker rulesets: A list of event breaking rulesets that will be applied to the input data stream before the data is sent through the Routes. Defaults to System Default Rule.
Event Breaker buffer timeout: How long (in milliseconds) the Event Breaker will wait for new data to be sent to a specific channel, before flushing out the data stream, as-is, to the Pipelines. Minimum 10 ms, default 10000 (10 sec), maximum 43200000 (12 hours).
Fields
In this section, you can add Fields to each event, using Eval-like functionality.
Name: Field name.
Value: JavaScript expression to compute field’s value, enclosed in quotes or backticks. (Can evaluate to a constant.)
Pre-Processing
In this section’s Pipeline drop-down list, you can select a single existing Pipeline to process data from this input before the data is sent through the Routes.
Advanced Settings
Max messages: The maximum number of messages to return in a poll request. Azure queues never return more messages than this value (although they might return fewer messages). Acceptable values: 1 to 32.
Visibility timeout (secs): The duration (in seconds) that the received messages are hidden from subsequent retrieve requests, after being retrieved by a ReceiveMessage request. Defaults to 600 seconds. Maximum allowed value is 604800 seconds (7 days).
Cribl Stream will automatically extend this timeout until the initial request’s files have been processed - notably, in the case of large files that require additional processing time.
Num receivers: The number of receiver processes to run. The higher the number, the better the throughput, at the expense of CPU overhead. Defaults to 1.
Service period (secs): The interval (in seconds) at which pollers should be validated, and restarted if exited. Defaults to 5 seconds.
Skip file on error: Toggle to Yes to skip files that trigger a processing error (for example, corrupted files). Defaults to No, which enables retries after a processing error.
Max Parquet chunk size (MB): Maximum size for each Parquet chunk. Defaults to 5 MB. Valid range is 1 to 100 MB. Cribl Stream stores chunks in the location specified by the CRIBL_TMP_DIR environment variable. It removes the chunks immediately after reading them.
Parquet chunk download timeout (seconds): The maximum time to wait for a Parquet file’s chunk to be downloaded. If a required chunk cannot not be downloaded within this time limit, processing will end. Defaults to 600 seconds. Valid range is 1 second to 3600 seconds (1 hour).
Environment: If you’re using GitOps, optionally use this field to specify a single Git branch on which to enable this configuration. If empty, the config will be enabled everywhere.
Connected Destinations
Select Send to Routes to enable conditional routing, filtering, and cloning of this Source’s data via the Routing table.
Select QuickConnect to send this Source’s data to one or more Destinations via independent, direct connections.
Internal Fields
Cribl Stream uses a set of internal fields to assist in handling of data. These “meta” fields are not part of an event, but they are accessible, and Functions can use them to make processing decisions.
Fields for this Source:
__accountName__final__inputId__source__topic_time
The remainder of this topic covers required Azure-side configuration.
Configuring Azure Blob Notifications
This Source needs to receive Azure Event Grid notifications, via a queue, when new blobs are added to a storage account. This queue approach enables Cribl Stream to manage backpressure conditions and retries upon errors.
You will therefore need to enable notifications in the Azure portal. The basic flow is:
File upload → Blob container → Blob Created notification → Azure Queue Storage queue
To configure notifications from the Blob storage account in the Azure backend, there are three major steps, outlined below:
Create an Event Grid system topic.
Create a queue.
Configure the generation of storage account notifications when new blobs are uploaded to the queue.
Azure’s UI will change over time. Please fall back to Microsoft’s Azure Event Grid documentation for up-to-date instructions and screenshots.
1. Create System Topic
First, you must create a system topic, to which Azure will publish notifications. In the Azure portal, start at Event Grid System Topics:
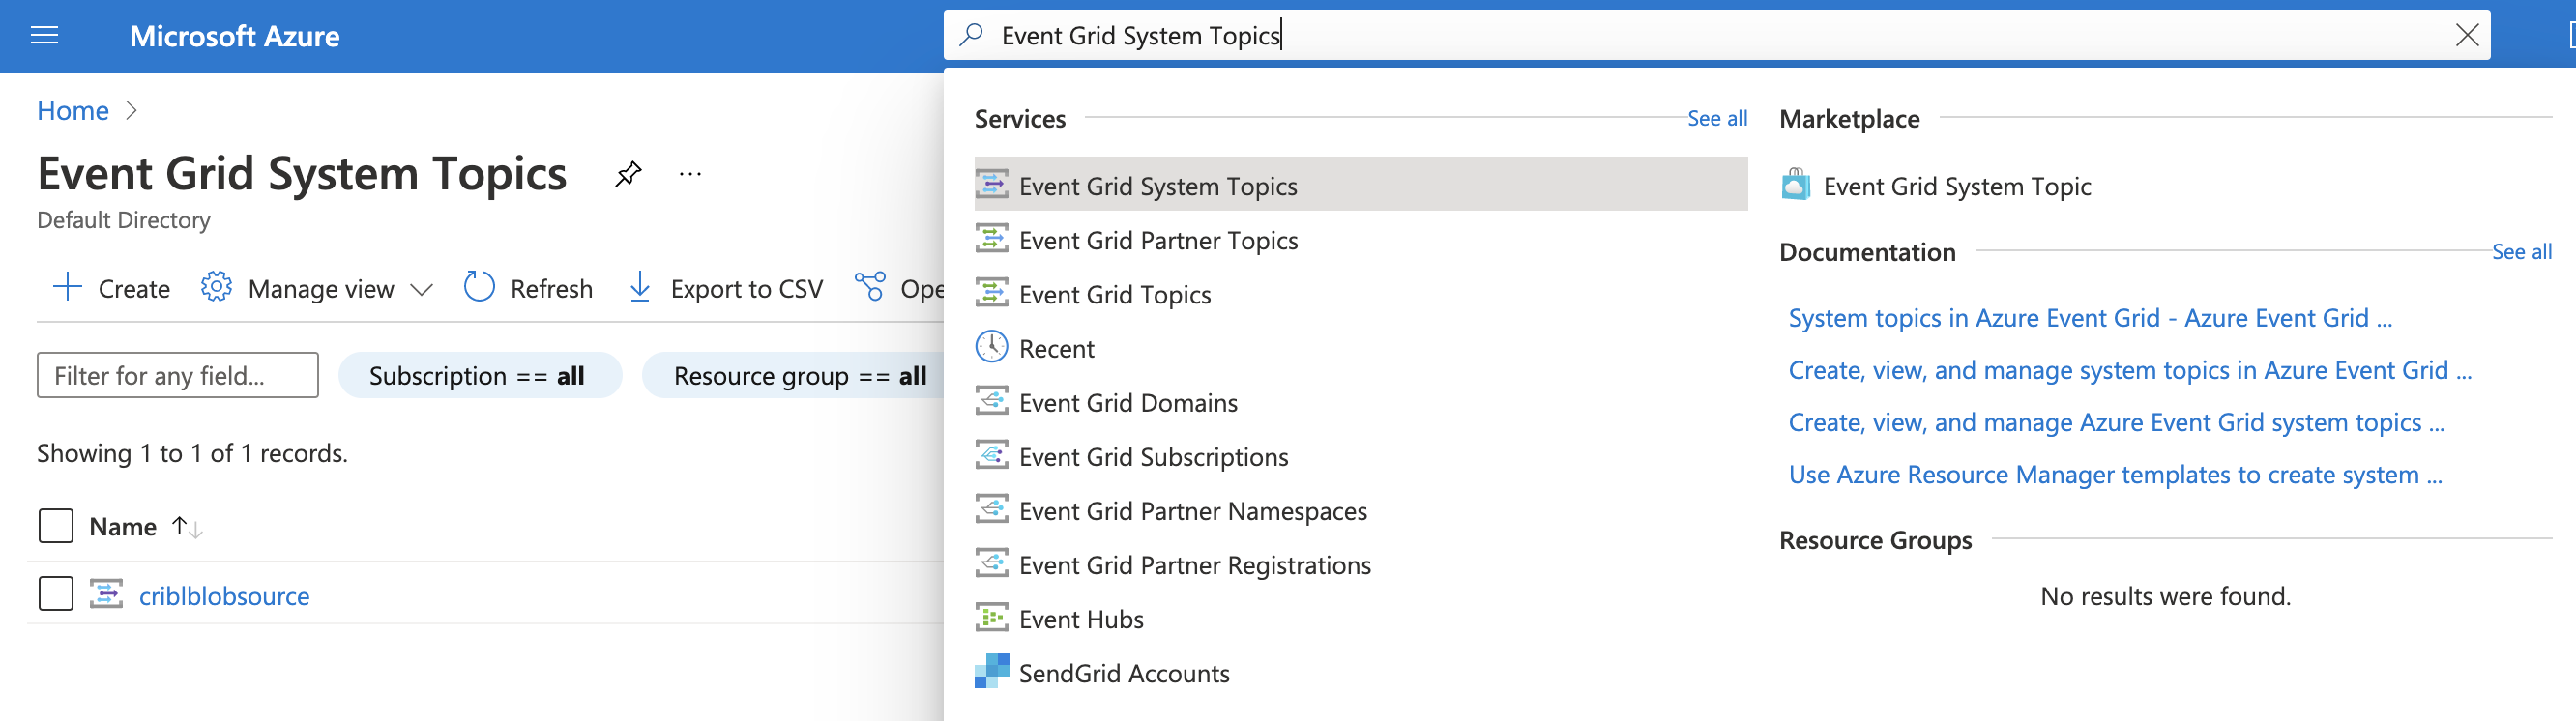
Select +Create to create a new system topic, then set the Topic Type to Storage Account (Blob):
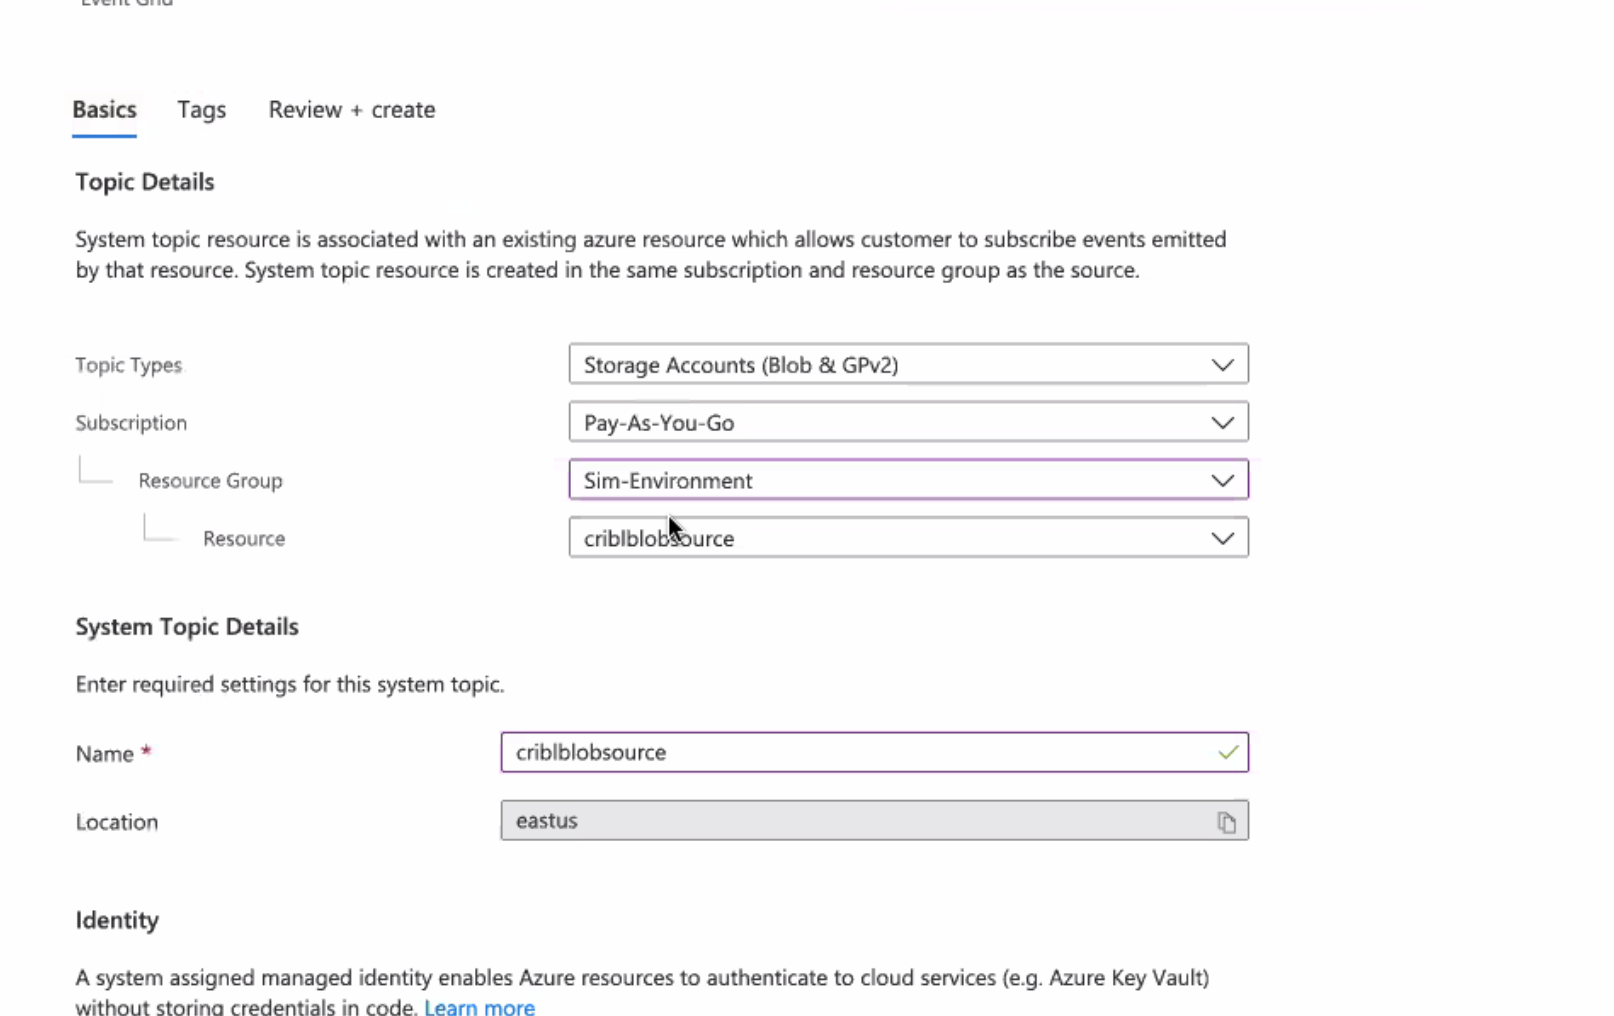
In Subscription > Resource Group > Resource, reference the storage account where you want to generate notifications.
Give the topic an arbitrary name that is meaningful to you. (In this example, the name is the same as the storage account.)
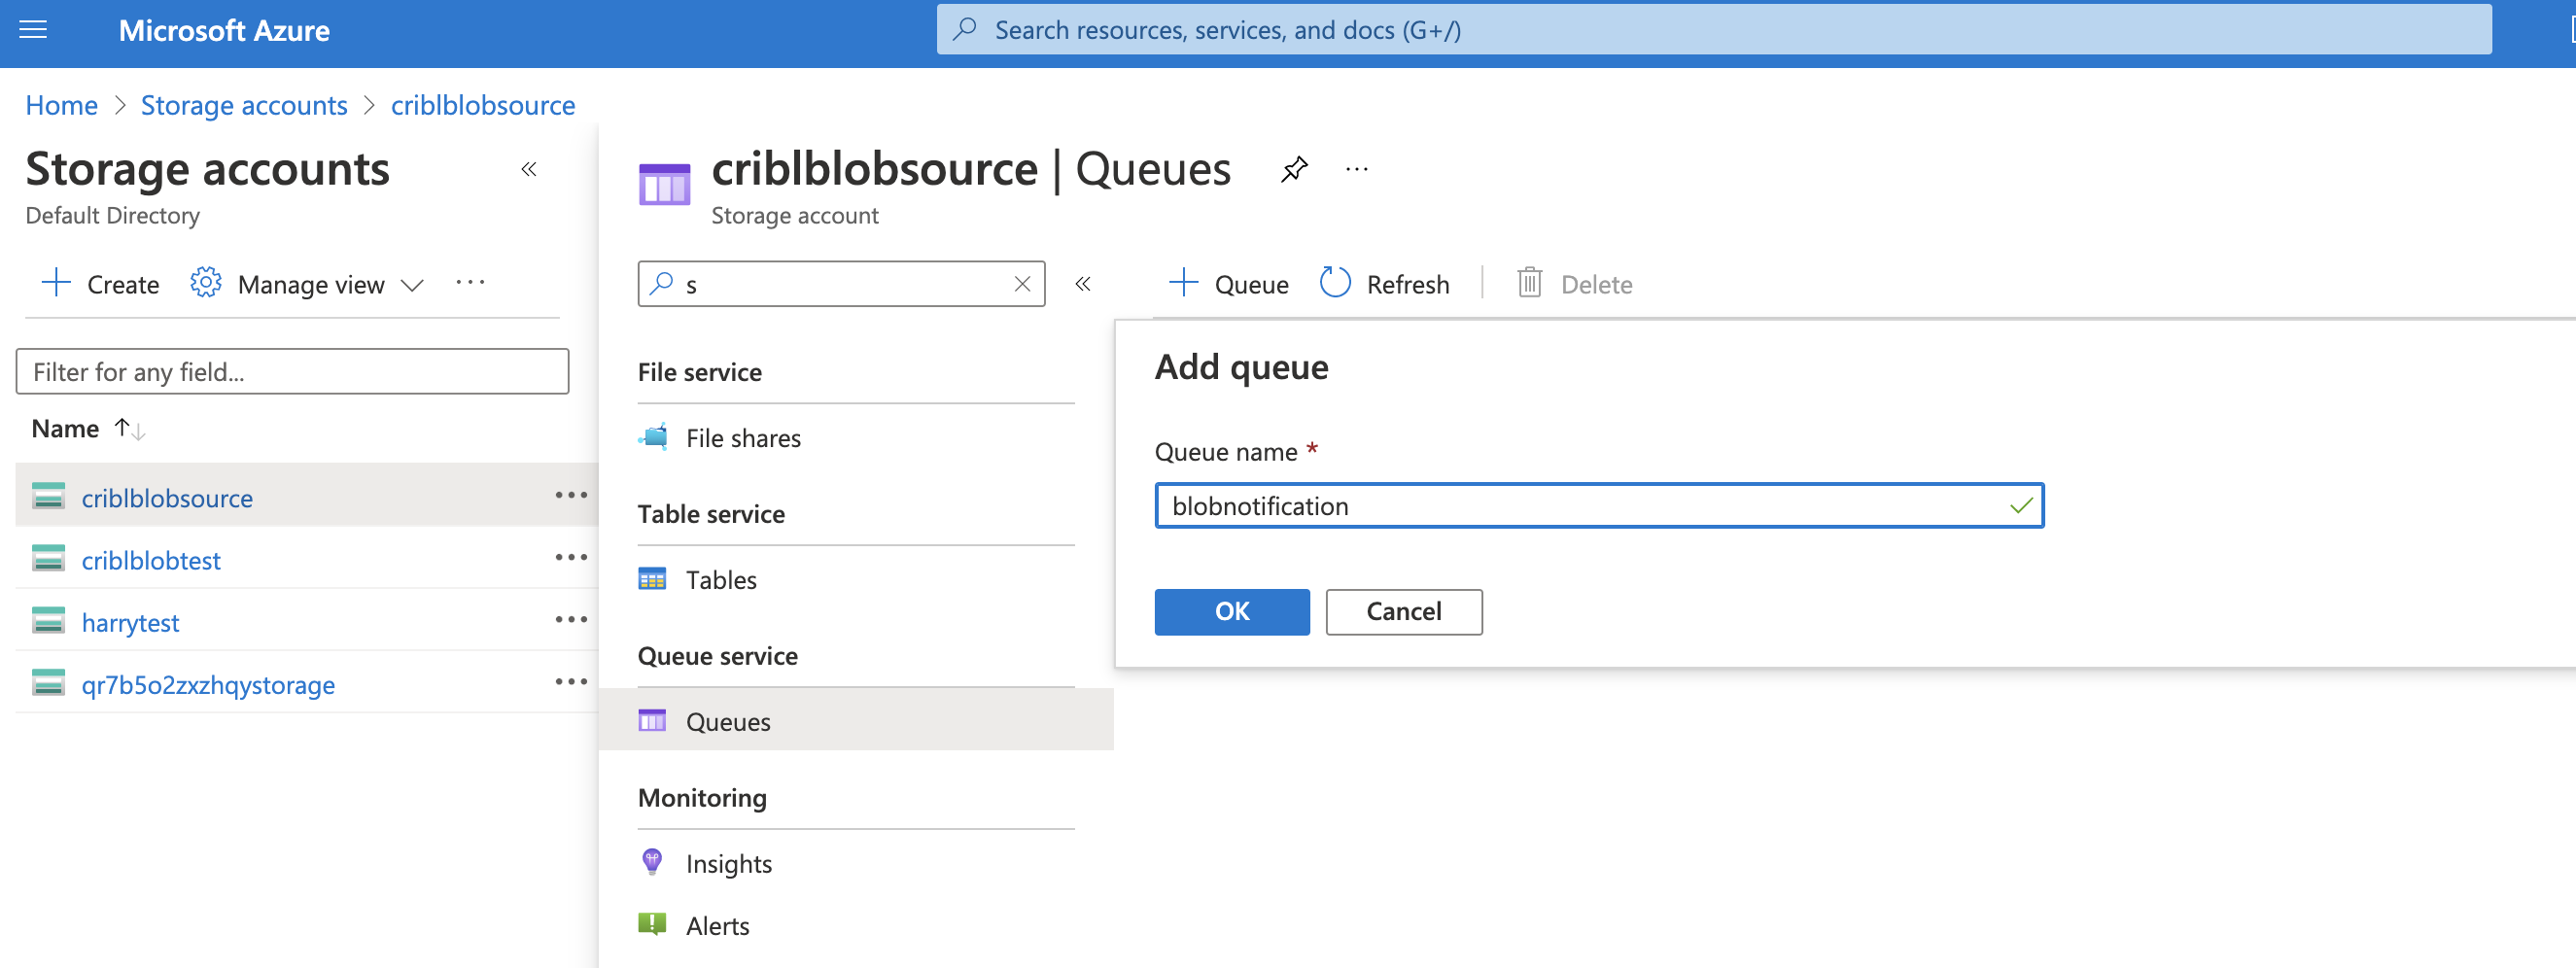
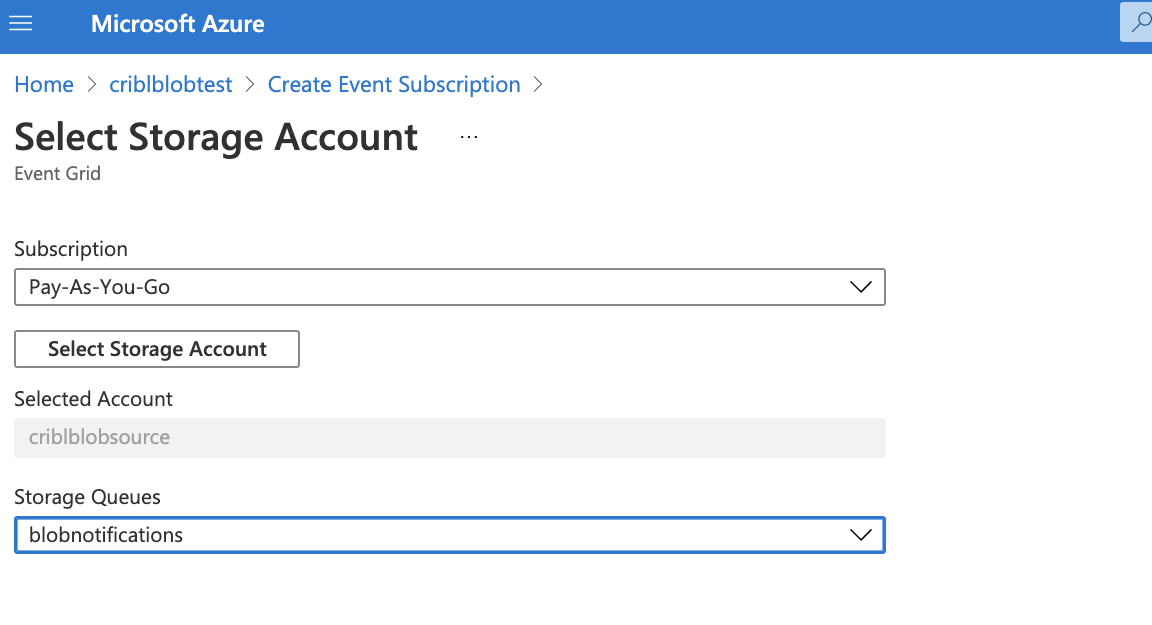
2. Create Storage Queue
Next, navigate to your storage account to create a queue.
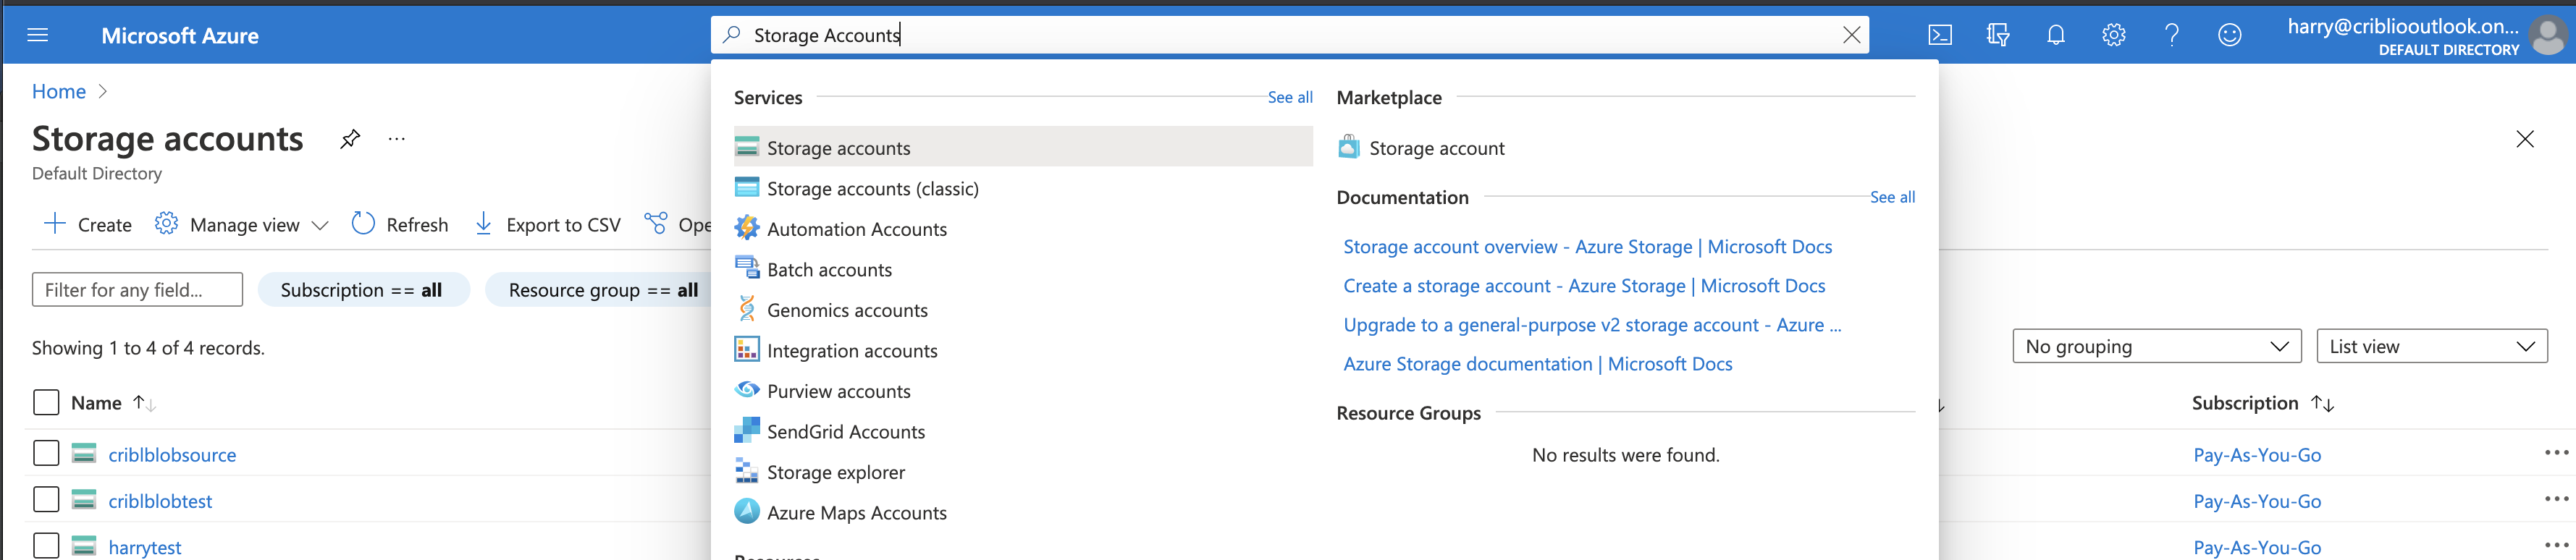
Select the storage account for which you would like to set up notifications. Then, in the submenu, select Queue service > Queues:
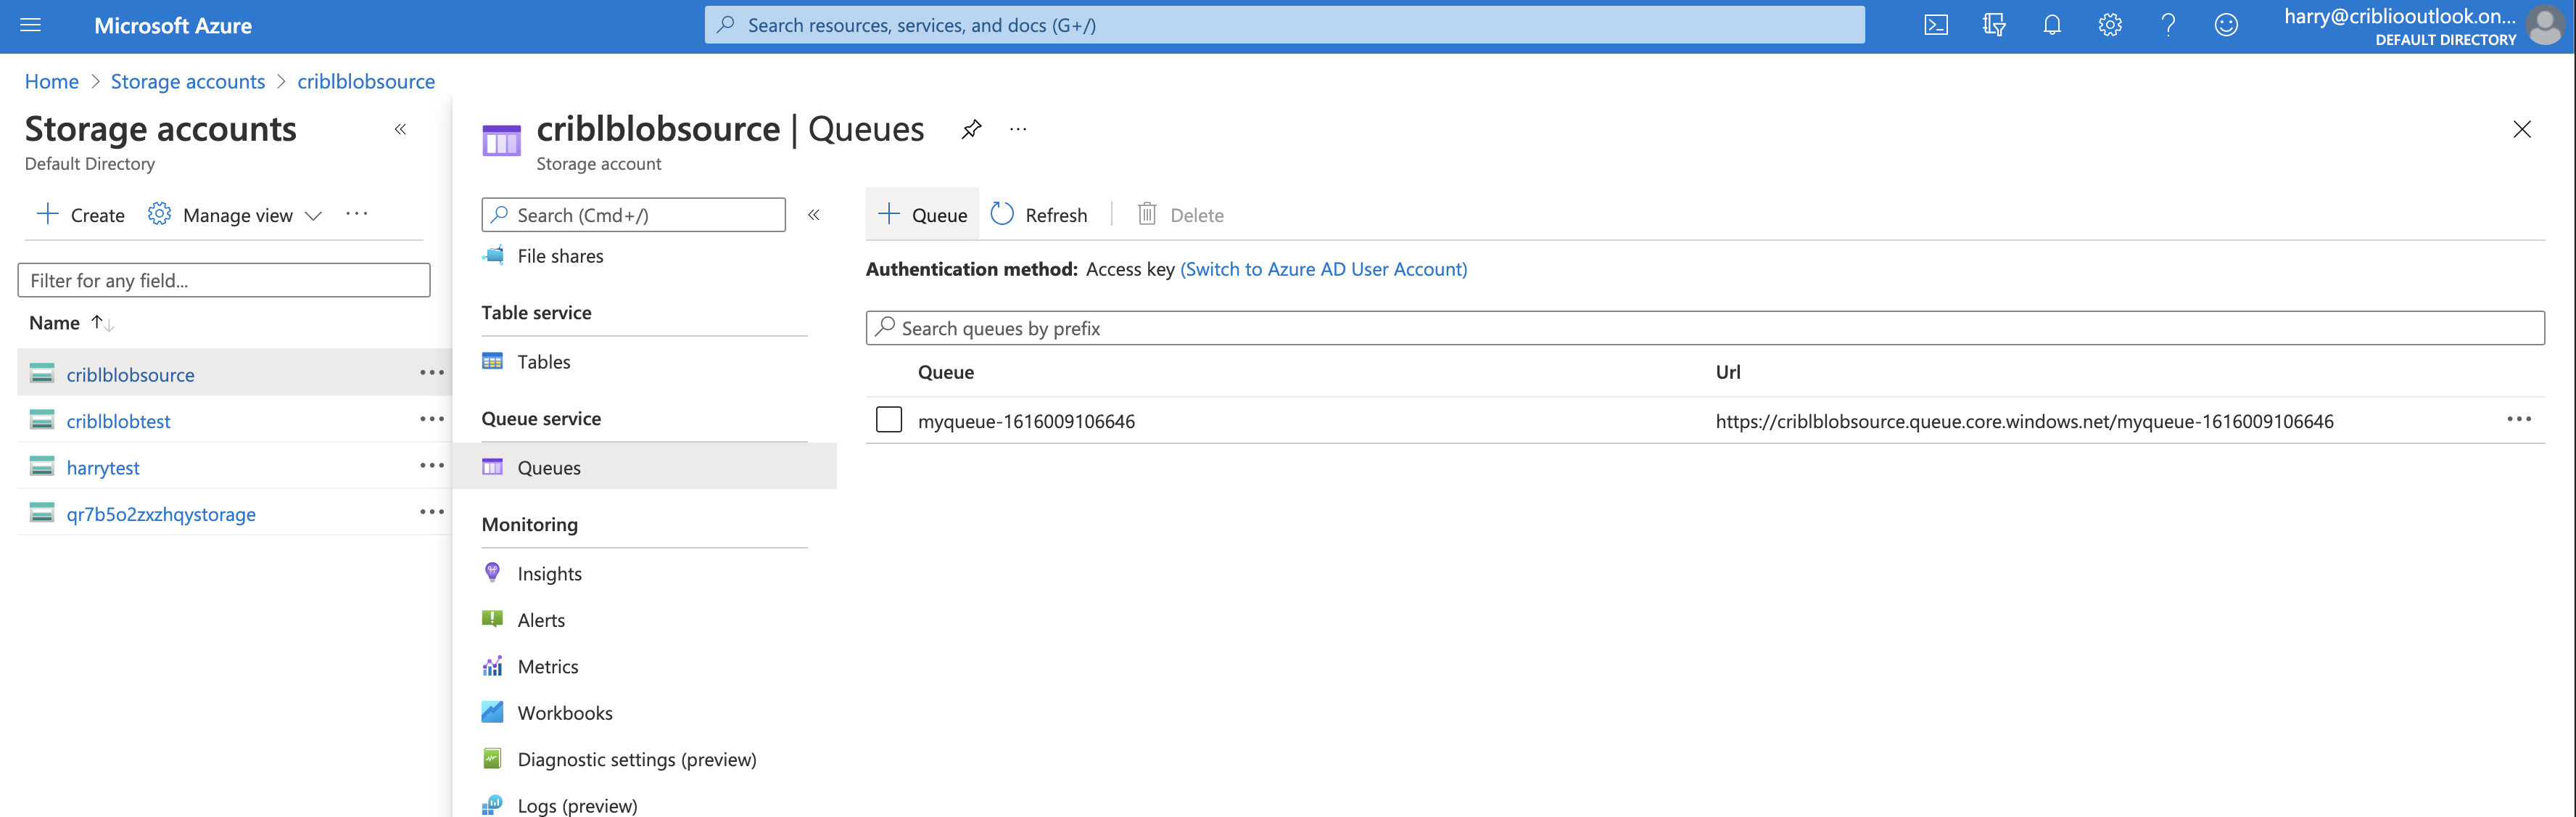
Select Create queue, and give the queue a name that is meaningful to you.
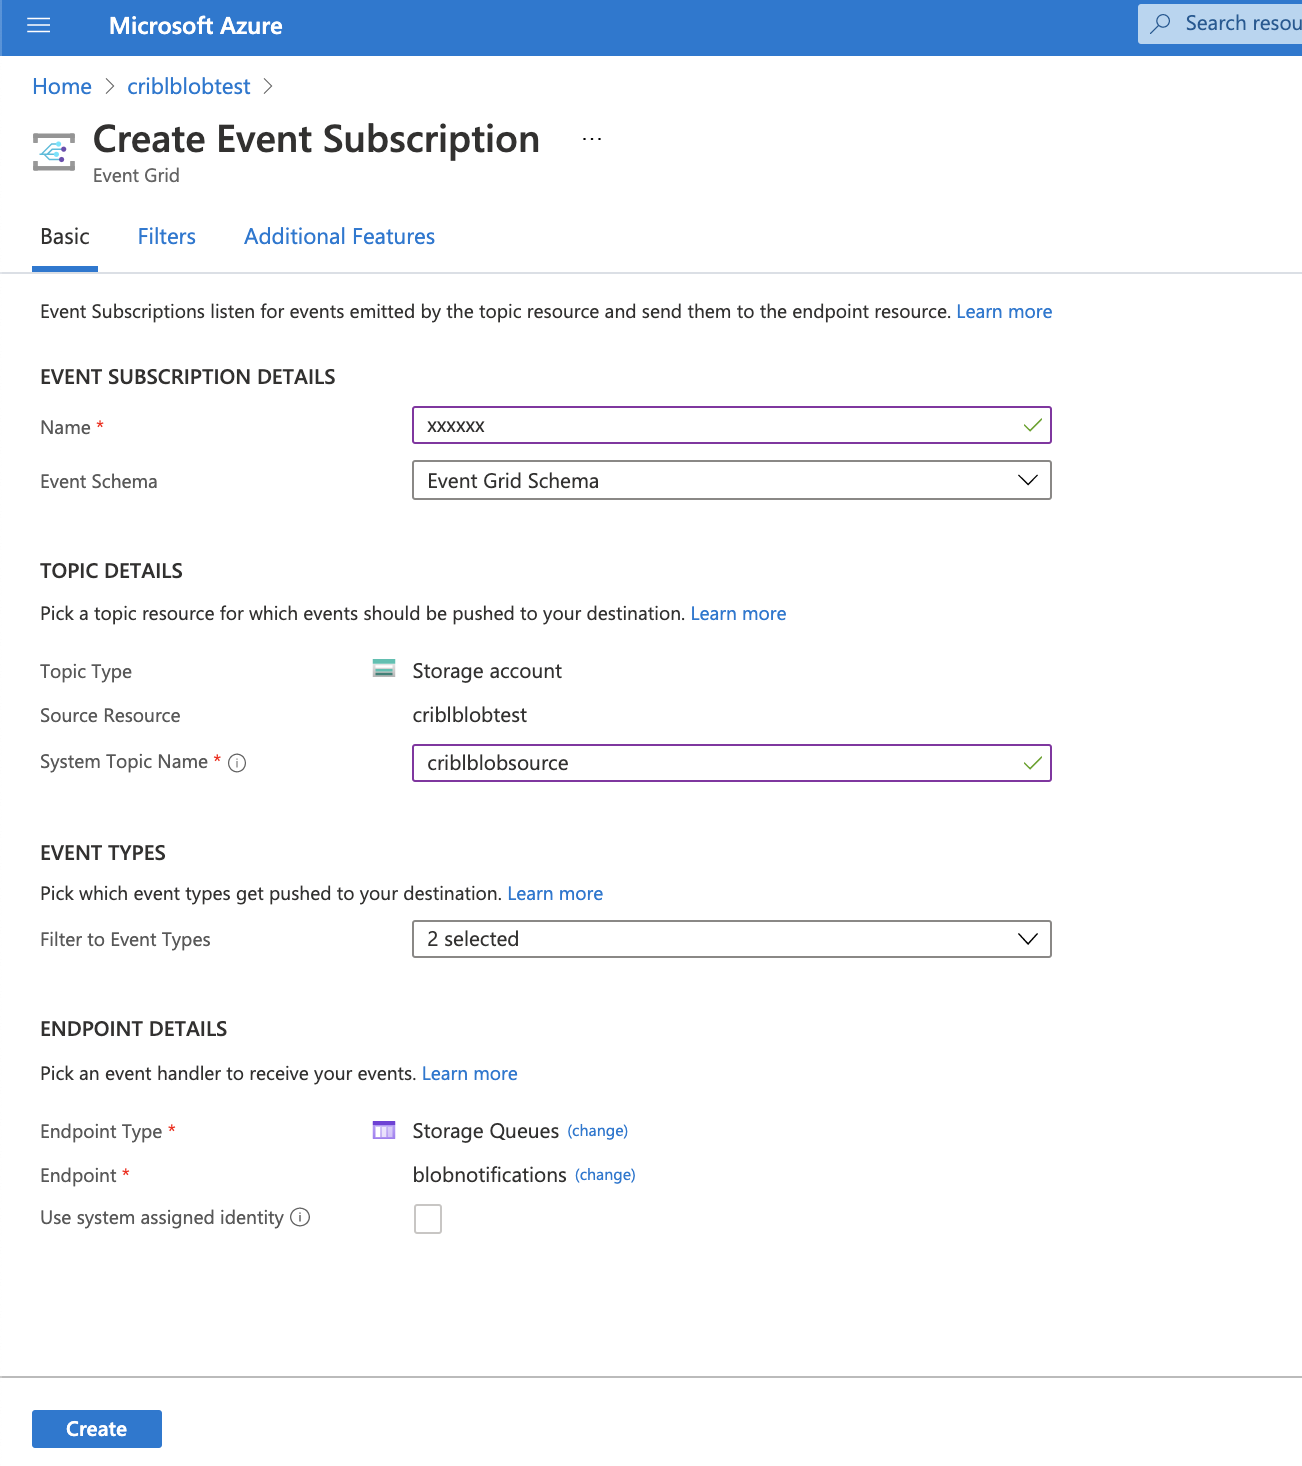
3. Configure Storage Account Notifications
Next, set up the storage account that will publish Blob Create notifications to the queue, using the system topic. From the Storage Accounts menu, select Events:
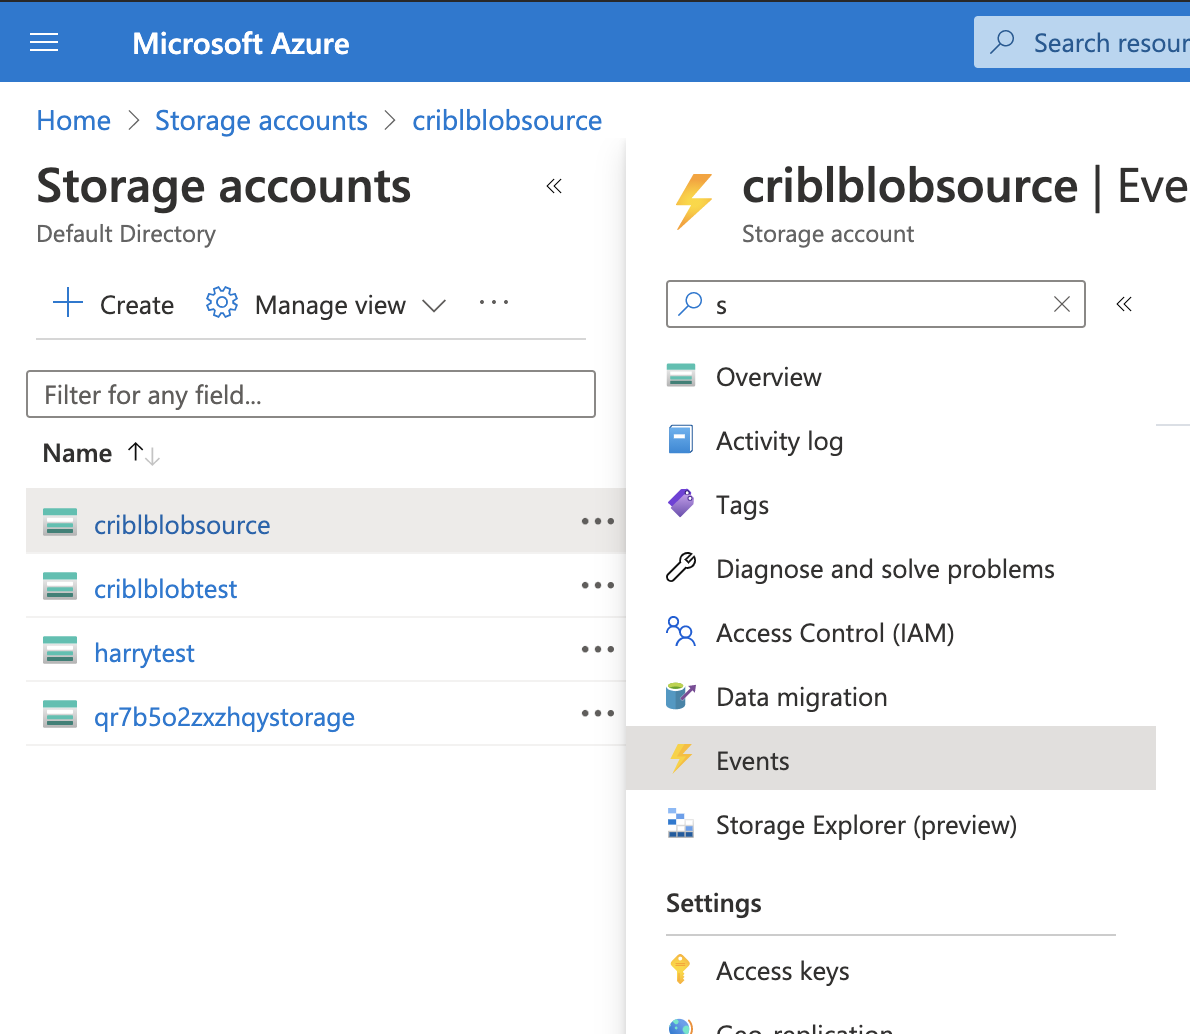
Then click + Event Subscription to proceed:
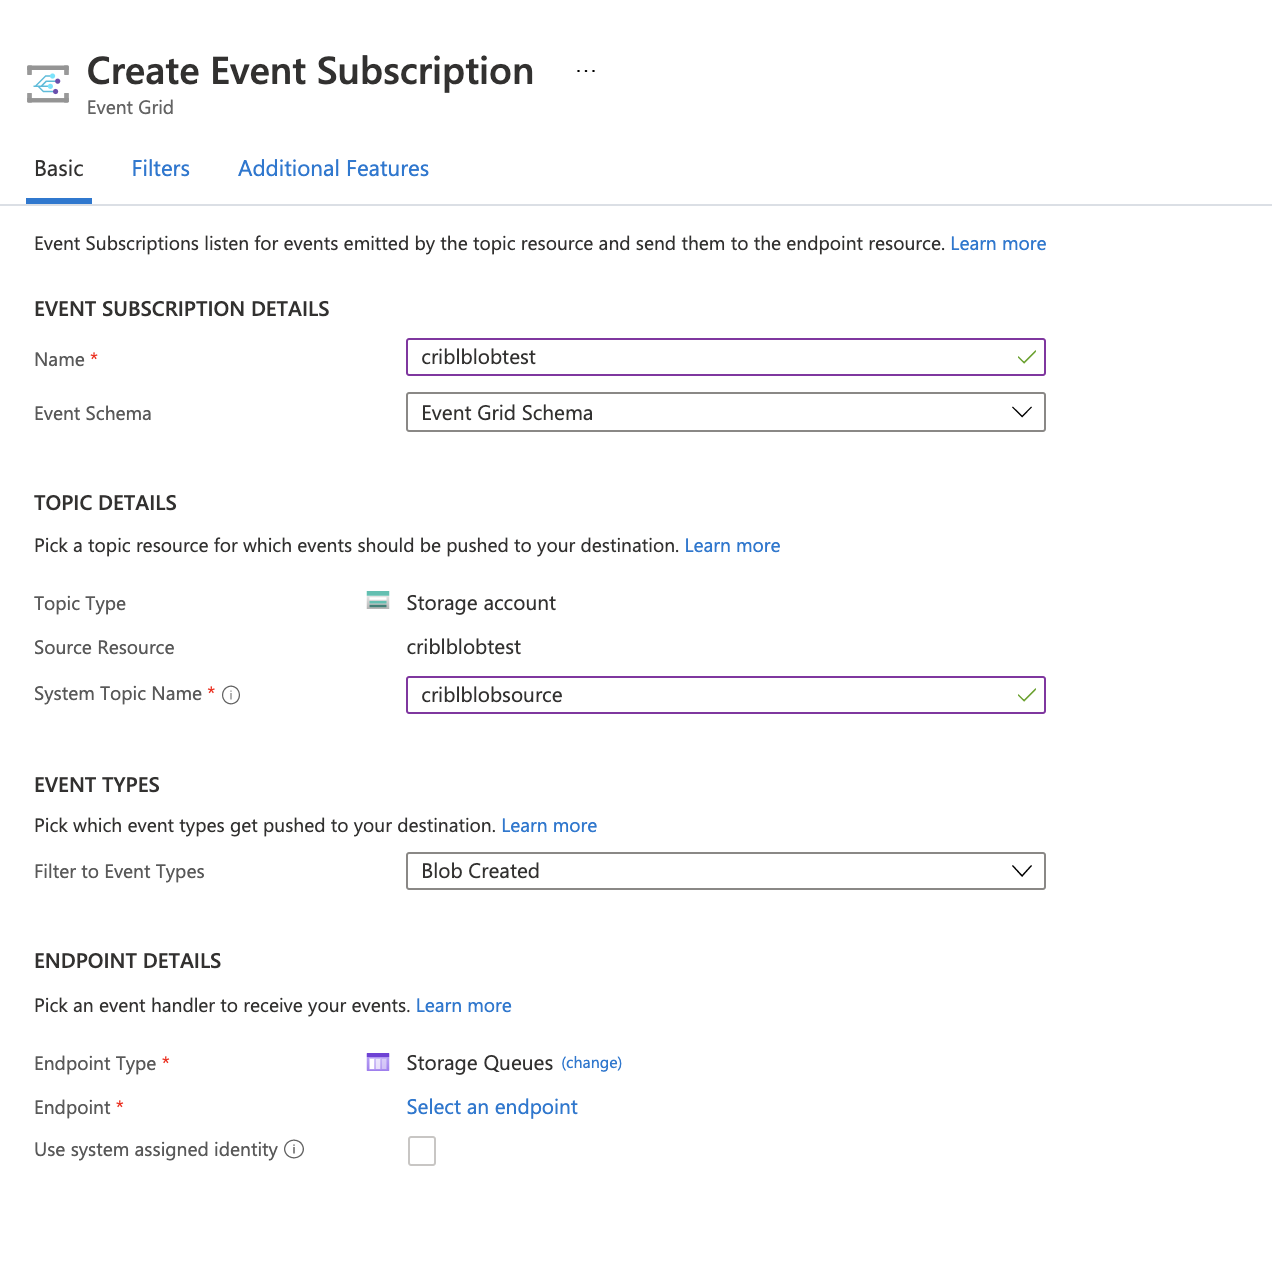
There are a few things to configure here:
- Enter a Name for the subscription.
- In System Topic Name, enter the name of the system topic you created in 1. Create System Topic above.
- In Event Types, select Blob Created, and deselect Blob Deleted.
- As the Endpoint Type, select Storage Queues.
- Click Select an endpoint, and click the subscription to use (Pay-As-You-Go).
Next, select the storage account on which to add the subscription:
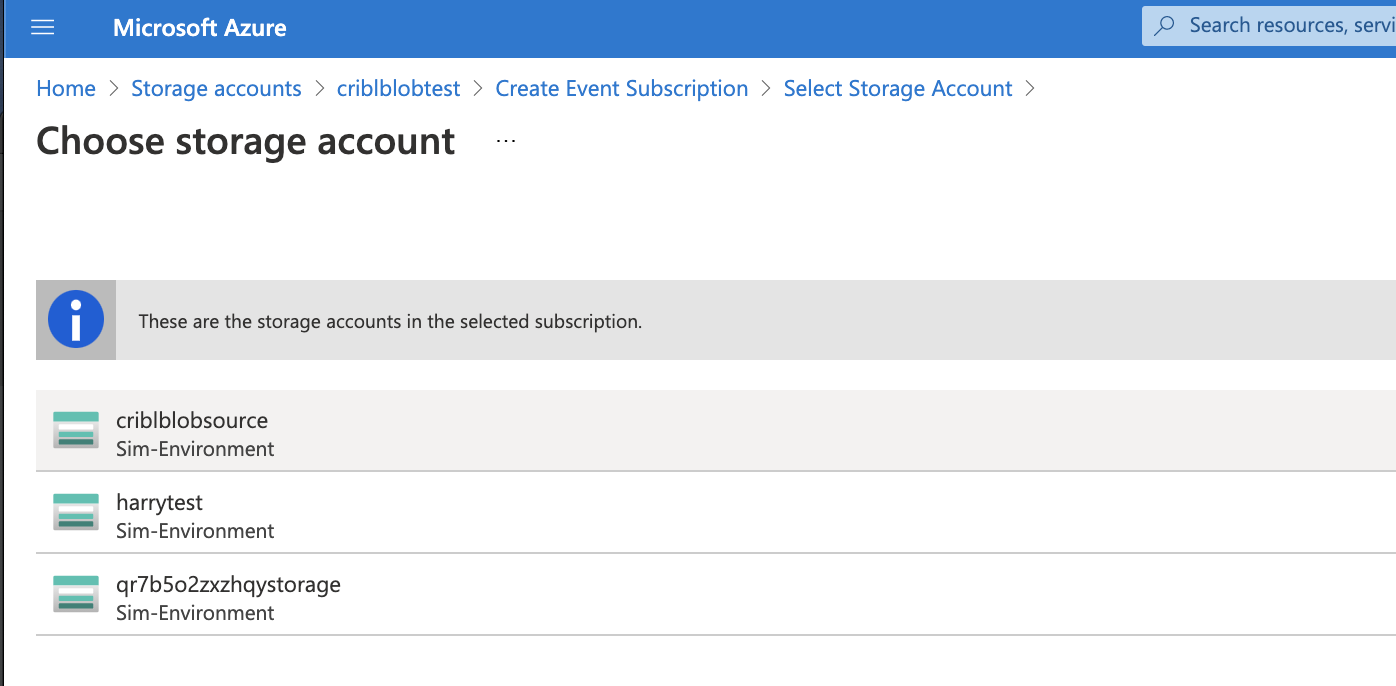
Select the queue you created in Create Storage Queue above, and click Confirm Selection to save the settings.
To complete the process, click Create.
How Cribl Stream Pulls Data
Workers poll messages from Azure Blob Storage using the Azure Event Grid Queue. The call will return a message if one is available, or will time out after 5 seconds if no messages are available.
Each Worker gets its share of the load from Azure Event Grid, and receives a notification of a new file added to an Azure Blob Storage bucket.
By default, the maximum number of messages Azure Event Grid returns in a single poll request is 1 per Worker Process.
Proxying Requests
If you need to proxy HTTP/S requests, see System Proxy Configuration.
Resources
For examples of configuring Cribl Stream to interoperate with Azure services, see these guides:
Also see these Packs on the Cribl Packs Dispensary, which provide processing Pipelines to transform and optimize incoming Azure data. You can directly import these Pipelines and adapt them to your needs:
Microsoft Azure NSG Source to Common Schema.
Troubleshooting
The Source’s configuration modal has helpful tabs for troubleshooting:
Live Data: Try capturing live data to see real-time events as they are ingested. On the Live Data tab, click Start Capture to begin viewing real-time data.
Logs: Review and search the logs that provide detailed information about the ingestion process, including any errors or warnings that may have occurred.
You can also view the Monitoring page that provides a comprehensive overview of data volume and rate, helping you identify ingestion issues. Analyze the graphs showing events and bytes in/out over time.