


REST / API Endpoint Collector
Cribl Stream supports collecting or pulling data from a REST API endpoint. The REST Collector is versatile and can collect data from a wide variety of upstream services. It provides multiple Discover types and Collect options.
Use REST Collectors when you need to ingest data from:
- Internal APIs built and used inside your Organization.
- External APIs from which your Organization uses data.
- Vendors or upstream API services that you use but which Cribl doesn’t yet support natively.
For more usage examples, see Using REST / API Collectors and our adjacent guides.
Once you’ve configured a REST Collector, you can either run it immediately (ad hoc) to collect data, or schedule it to run on a recurring interval. See Schedule and Run Collector Jobs for more information.
How REST Collectors Handle Data
When the REST Collector runs, Cribl Stream executes a collection job. A collection job consists of tasks, which are the units of work to authenticate, discover, or collect the data. For example, a job that first authenticates and then collects data creates two tasks.
Cribl Stream processes collection jobs that run in these phases:
Discovery (optional)
Collection
Event Breaking
Filtering (optional)
Authentication takes place during the Collection phase if needed and can also happen during Discovery for HTTP calls.
You can also filter data based on specific criteria, such as time and/or field values, which you specify during the Collector’s ad hoc or scheduled run.
Prerequisites
At a minimum, you need the URL of the API that you intend to collect data from. If the API requires authentication, you will also need authentication credentials.
Configure a REST Collector
Currently, you cannot configure Collector Sources in QuickConnect.
In Cribl Stream, set up a REST Collector:
From inside Cribl Stream, select a Worker Group to configure. Then, select Data > Sources. Select REST from the list of tiles or the Collectors tab. Next, select Add Collector to open the Add Collector modal.
In a simple setup, you only need to fill in the General and Collect settings in the Collector modal. You will also need the Authentication settings if the API requires authentication. Configure the following options under the General settings:
Collector ID: Unique ID for this Collector. This ID must be unique from other Collector IDs in your Cribl Stream instance. If you clone this Collector, Cribl Stream will add
-CLONEto the original Collector ID.Description Optionally, add an explanation of the function or purpose of the Collector.
Configure the following options under the Collect settings:
- Collect URL: URL (constant or JavaScript expression) to use for the Collect operation. This URL can use an
authTokenvariable to access an auth token. For example, if you define1234567890as an auth token and you usehttp://myurl.com?authToken=${authToken}as the Collect URL, the Collect operation will usehttp://myurl.com?authToken=1234567890. See Use JavaScript Expressions to Shape Incoming API Data for more information about using JavaScript with this field.
If a URL (a path or parameters) includes variables that might contain unsafe ASCII characters, encode these variables using
C.Encode.uri(paramName). Considerations:- Examples of unsafe characters are: space,
$,/,=. - Example URL with encoding:
'http://localhost:9000/api/v1/system/logs/' + C.Encode.uri(`${id}`). See Cribl Expressions - C.Encode.uri() for more information. - Request parameters that are not contained directly in the URL are automatically encoded.
- Cribl Stream URLs/expressions specified in the Collect URL field can follow redirects.
Collect method: Select the HTTP verb to use for the Collect operation -
GET,POST,POST with body, orOther.Collect POST body (displays when you set the Collect method to
POST with body): Template for POST body to send with the Collect request. See Use JavaScript Expressions to Shape Incoming API Data for more information about using JavaScript with this field.Collect verb (displays when you set the Collect method to
Other): Custom HTTP method to use for the Collect operation.
Collect parameters: Optional HTTP request parameters to append to the request URL. These refine or narrow the request. Select Add Parameter to add parameters as key-value pairs:
- Name is the parameter name.
- Value is a JavaScript expression to compute the parameter’s value, normally enclosed in backticks (for example,
`${earliest}`). The value can also be a constant, enclosed in single quotes ('earliest'). Cribl Stream evaluates values without delimiters (such asearliest) as strings. - This field can also accept the
${earliest}and${latest}time range variable. See Time Range Variables for more information.
If both the Collect URL and Collect parameters use the same Name (key), the value from the Collect URL takes precedence.
Collect headers: Optional collection request headers to add to the API call. Select Add Header to add collection request headers as key-value pairs:
- Name is the header name.
- Value is a JavaScript expression to compute the header’s value, normally enclosed in single quotes (
'someConstantValue'). The value can also be a template literal, enclosed in backticks. For example,`${new Date().getFullYear()}`. Cribl Stream evaluates values without delimiters (such assomeConstantValue) as strings. - This field can also accept the
${earliest}and${latest}time range variable. See Time Range Variables for more information.
You can also use Collect headers as an alternative to the Basic, Login, or OAuth authentication options. This method authenticates requests based on API keys using secrets. See How to Use Collect Headers for Authentication for more information.
Pagination: Use this menu to select the pagination scheme for collection results. The available options are:
Option Description None The default selection. Use this option if you do not need a pagination scheme. Response Body Attribute / Response Header Attribute Select Response Body Attributeto extract a value from the response body that identifies the next page of data to retrieve.
SelectResponse Header Attributeto extract this next-page value from the response header. These selections expose additional fields. See Response Body Attribute / Response Header Attribute for information about these fields.RFC 5988 - Web Linking Select this option for APIs that follow RFC 5988 conventions to provide the next-page link in a header. This selection exposes three additional fields. See RFC 5988 - Web Linking for information about these fields. Offset/Limit Select this option to receive data from APIs that use offset/limit pagination. This selection exposes several additional fields. See Offset/Limit for information about these fields. Page/Size Select this option to receive data from APIs that use page/size pagination. This selection exposes several additional fields. See Page/Size for information about these fields.
- Collect URL: URL (constant or JavaScript expression) to use for the Collect operation. This URL can use an
In the Authentication settings, select one of the following options from the menu:
Option Description None The default selection. Use this option if you do not need to use authentication.
You can also select this option if you decide to embed the authentication secret directly in the request URL, such as with compatible REST servers like AWS. See How to Use Collect Headers for Authentication for more information.Basic Displays Username and Password fields for you to enter HTTP Basic authentication credentials. Basic (credentials secret) Provide username and password credentials referenced by a secret. Select a stored text secret in the resulting Credentials secret drop-down, or select Create to configure a new secret. Login Enables you to specify several credentials, then perform a POST to an endpoint during the Discover operation. The POST response returns a token, which Cribl Stream uses for later Collect operations. Exposes multiple extra fields. See Login Authentication for more information. Login (credentials secret) Like Login, except that you specify a secret referencing the credentials, rather than the credentials themselves. Exposes multiple extra fields. See Login Secret Authentication for more information. OAuth Enables you to directly enter credentials for authentication via the OAuth protocol. Exposes multiple extra fields. See OAuth Authentication for more information. OAuth (text secret) Like the OAuth option, except that you specify a stored secret referencing the credentials. Exposes multiple extra fields. See OAuth Secret Authentication for more information. Google service account OAuth Uses Google Cloud Platform (GCP) service account credentials to authenticate. Exposes multiple extra fields. See Google Service Account OAuth Authentication for more information. Google service account OAuth (text secret) Similar to Google service account OAuth, but uses the service account credentials directly as text within the configuration, instead of a separate file. Exposes multiple extra fields. See Google Service Account OAuth Secret Authentication for more information. HMAC HMAC (Hash-based Message Authentication Code) authentication allows you to securely authenticate your data collection requests by generating a unique signature for each request. This signature ensures the integrity and authenticity of the request, making it tamper-proof and verifiable by the server. Select an existing HMAC authentication signature or select Create HMAC Function to continue. See Generate HMAC Functions for REST Collector Requests for more information about generating an HMAC signature. For the remaining options, refer to the settings listed for each section:
Select Save, then Commit & Deploy.
Verify that data is making it to Cribl Stream by viewing the Live Data feed from the Collector.
Configure as JSON
As an alternative to configuring a REST Collector with the user interface, you can configure REST Collectors in JSON mode instead. To use the JSON configuration mode, select the Configure as JSON tab at the top of the REST Collector configuration modal. Select the Configure Collector tab to return to the user interface configuration mode.
Some important considerations when working in the JSON configuration mode:
- Use this feature with caution. Only experienced and advanced Cribl administrators should configure as JSON.
- The advantage of using the JSON configuration mode is that you can cut and paste or import/export JSON configuration objects, such as from the Cribl Collector Templates repository or your own Git repository where you store version-controlled configurations that you have already validated and which you deploy regularly.
- The JSON configuration editor does not validate your REST Collector configuration. The editor only validates whether your JSON is well-formed, not whether the configuration is valid. Validate your REST Collector configuration with the user interface, not the JSON configuration editor.
- When you make a configuration change in the user interface mode and save it, that change appears in in the JSON configuration mode as well. Similarly, changes made and saved (and vice versa).
Discover Settings
Use the Discover step to better understand what data is available and how it is configured when interacting with a third party API. The results of a Discover call can range in variety and size, depending on the API.
The Discover type field provides four options, corresponding to different use cases. Each Discover type selection will expose a different set of Collector Settings fields:
| Discover type | Description | Example use case |
|---|---|---|
| HTTP Request | Makes a REST call to dynamically get Discover results. This Discover type matches cases where you need to dynamically discover what you can collect from a REST endpoint. It most fully exploits Cribl Stream’s Discover-and-then-Collect architecture. Each item returned will generate a Collect task, and Cribl Stream will spread each of those Collect tasks across all available Workers. As of Cribl Stream 3.0.2, this Discover type supports XML responses. | Make a REST call to get a list of available log files, then run Collect against each of those files. |
| JSON Response | Use when you need to manually define the Discovery results as a JSON object. This Discover type provides a Discover result field where you can (optionally) define Discover tasks as a JSON array of objects. Each entry returned by Discover will generate a Collect task, and Cribl Stream will spread each of those Collect tasks across all available Workers. | You can collect data for specific geo-locations in the National Weather Service API stream of worldwide weather data. This particular API requires multiple parameters in the request URL (latitude, longitude, and so forth), so Item List discovery would not work. |
| Item List | Use when you need to enumerate Discover results as a list of strings. This Discover type matches cases where you want to enumerate a known list of Discover items to retrieve. Discovery will return one Collect task per item in the list, and Cribl Stream will spread each of those Collect tasks across all available Workers. |
|
| None | Use when you want to skip the Discover step. This default option suppresses the Discover stage. Alternatively, you select this option and use the modal’s Collect section to specify the endpoint and other details. Cribl Stream will assign the Collect task to a single Worker. |
|
Discover Type: HTTP Request
Setting the Discover type to HTTP Request exposes these additional fields:
Discover URL: Enter the URL to use for the Discover operation. This can be a constant URL, or a JavaScript expression to derive the URL. This field can also accept the
${earliest}and${latest}time range variable. See Time Range Variables for more information.If a URL (a path or parameters) includes variables that might contain unsafe ASCII characters, encode these variables using
C.Encode.uri(paramName). Considerations:- Examples of unsafe characters are: space,
$,/,=. - Example URL with encoding:
'http://localhost:9000/api/v1/system/logs/' + C.Encode.uri(`${id}`). - Request parameters that are not contained directly in the URL are automatically encoded.
- Cribl Stream URLs/expressions specified in the Collect URL field follow redirects.
- Examples of unsafe characters are: space,
Discover method: Select the HTTP verb to use for the Discover operation -
GET,POST,POST with body, orOther.Discover POST body: Template for POST body to send with the Discover request. (This field is displayed only when you set the Discover method to
POST with body.)Discover verb: Custom HTTP method to use for the Discover operation. (This field is displayed only when you set the Discover method to
Other.)Discover parameters: Optional HTTP request parameters to append to the Discover request URL. These refine or narrow the request. Select Add Parameter to add parameters as key-value pairs:
- Name: Parameter name.
- Value: JavaScript expression to compute the parameter’s value, normally enclosed in backticks (for example,
`${earliest}`). Can also be a constant, enclosed in single quotes ('earliest'). Values without delimiters (for example,earliest) are evaluated as strings. - This field can also accept the
${earliest}and${latest}time range variable. See Time Range Variables for more information.
Discover headers: Optional Discover request headers. Select Add Header to add headers as key-value pairs:
- Name: Header name.
- Value: JavaScript expression to compute the header’s value, normally enclosed in backticks (for example,
`${earliest}`). Can also be a constant, enclosed in single quotes ('earliest'). Values without delimiters (for example,earliest) are evaluated as strings. - This field can also accept the
${earliest}and${latest}time range variable. See Time Range Variables for more information.
Pagination: Use this menu to select the pagination scheme for Discover results. Defaults to
None. The available options are:Option Description None The default selection. Use this option if you do not need a pagination scheme. Response Body Attribute / Response Header Attribute Select Response Body Attributeto extract a value from the response body that identifies the next page of data to retrieve.
SelectResponse Header Attributeto extract this next-page value from the response header. These selections expose additional fields. See Response Body Attribute / Response Header Attribute for information about these fields.RFC 5988 - Web Linking Select this option for APIs that follow RFC 5988 conventions to provide the next-page link in a header. This selection exposes three additional fields. See RFC 5988 - Web Linking for information about these fields. Offset/Limit Select this option to receive data from APIs that use offset/limit pagination. This selection exposes several additional fields. See Offset/Limit for information about these fields. Page/Size Select this option to receive data from APIs that use page/size pagination. This selection exposes several additional fields. See Page/Size for information about these fields. Discover data field: Within the response, this is the name of the field that contains discovery results.
- If the response is a JSON object that contains an array, and you want to generate a separate Collect task for each item in the array, set the Discover data field to the key of the array in the JSON object. For example, if the response is
{ "logFiles": ["cribl.log", "cribl.log.1", "cribl.log.2", "audit.log"] }, setting Discover data field tologFileswould result in four Collect tasks, one for each log file. - If the response itself is a JSON array, like
["cribl.log", "cribl.log.1", "cribl.log.2", "audit.log"], leave the Discover data field blank for each item in the array to become a collection task.
See Parse Discover Returns With Arrays as JSON Object for an example of how to parse arrays inside JSON objects as separate collection tasks.
- If the response is a JSON object that contains an array, and you want to generate a separate Collect task for each item in the array, set the Discover data field to the key of the array in the JSON object. For example, if the response is
Strict discover response parsing: Toggle on to explicitly set the Discover response format to handle
JSON,XML,NDJSONorPlain textdata. This functionality provides a more direct and configurable way to handle data from a wider variety of APIs. This functionality is particularly useful when an API’sContent-Type headeris missing or inaccurate, as it allows you to bypass the Collector’s default best-effort parsing and instead enforce a specific format. When the configured strict format is enabled, the Collector will fail if the response does not match the expected format, which helps ensure data integrity and predictable behavior.Format discover result with custom code: Toggle on to provide custom JavaScript code, in the Format discover result field, that manipulates the data returned by a Discover request before it’s used for collection. This functionality allows you to influence the collection process by transforming Discover results into a specific set of collection tasks.
The custom code operates on the __e variable, which is a JSON object or array containing the original Discover results. You can modify the contents of __e to define tasks for parallel collection. Here are some key points to remember when working with __e:
- Mutable object/array:
__eis mutable, meaning you can directly modify its contents. - Response structure: The structure of
__edepends on the specific response from your Discover request.
For example, to split data by user IDs, assume the Discover result contains user IDs:
`[{ "name": "root", "id": 1}, { "name": "joe", "id": 2 }, { "name": "jane", "id": 3 },{ "name": "jose", "id": 4 }]`
To achieve a collection task that runs for all users except root, you’d use:
`__e['tasks'] = __e.filter(item => item.name != 'root');`
As another example, imagine an API with two endpoints:
- Endpoint that returns the count of objects that match search criteria.
- Endpoint for collection that returns items using search criteria that also supports pagination.
You can leverage the Format discover results option to do the following:
- Run a Discover REST API call to return the number of items that match search criteria, like an SQL count query.
- Use the count matching items to generate collect tasks, one for each page of data to retrieve.
For example, assume the discover REST API call returns the following:
`{ "numMatchingItems": 100000 }`
Assume the max page size is 10,000 for the collect API.
The Format discover result with custom code option allows you to implement logic that generates an array of collection tasks, one for each page. You can then leverage this array in conjunction with the collection request parameters to retrieve a unique page of data for each collection task.
For example: http://0.0.0.0:8004/query?sysparm_offset=${offset}&sysparm_limit=${limit}
Now you’ll transform a Discover result of { "numMatchingItems": 100000 } into 10 distinct collect tasks, each retrieving 10,000 results per page. Some of the tasks can be run in parallel depending on job settings and system load.
// Expecting: { \"numMatchingItems\" : xxxxx };
if (Array.isArray(__e)) {
  const count = __e['numMatchingItems'];
  let pageSize=10000;
  let numPages=count/pageSize;
  if (count % pageSize) {
     numPages++; // count not evenly divisible by page size, add one more collect task for remaining items
  }
  // Add a collect task for each page of data to be retrieved.
  for (let i = 0; i < numPages; i++) {
    __e.push({ offset: i*pageSize, limit: pageSize, count });
  }
}
else {
  __e['__resultOut'] = {"error": "Unexpected - discover result is NOT an array"}
}See another use case example in Using REST/API Collectors.
Discover Type: Item List
Setting the Discover type to Item List exposes this additional field:
- Discover items: List of items to return from the Discover task. Each returned item will generate a Collect task, and can be referenced using
${id}in the Collect URL, the Collect parameters, or the Collect headers.
Discover Type: JSON Response
Setting the Discover type to JSON Response exposes these additional fields above the Common Collector Settings:
Discover result: Allows hard-coding the Discover result. Must be a JSON object. Works with the Discover data field.
Discover data field: Within the response, this is the name of the field that contains discovery results.
- If the response is a JSON object that contains an array, and you want to generate a separate Collect task for each item in the array, set the Discover data field to the key of the array in the JSON object. For example, if the response is
{ "logFiles": ["cribl.log", "cribl.log.1", "cribl.log.2", "audit.log"] }, setting Discover data field tologFileswould result in four Collect tasks, one for each log file. - If the response itself is a JSON array, like
["cribl.log", "cribl.log.1", "cribl.log.2", "audit.log"], leave the Discover data field blank for each item in the array to become a collection task.
Sample JSON entry:
items, json: { items: [{id: 'first'},{id: 'second'}] }In an XML response, this is the name of the element that contains discovery results. Sample XML entry:
result.items
<response>
 <items>
  <element>
   <id>first</id>
  </element>
  <element>
   <id>second</id>
  </element>
 </items>
</response>Collect Settings
See Configure a REST Collector for information about most of the settings in the Collect section of the REST Collector configuration. The following sections provide additional information about these settings.
How to Use Collect Headers for Authentication
You can use collect headers as an alternative to the Basic, Login, or OAuth authentication options. This method authenticates requests based on API keys using secrets.
To use this authentication method:
In the REST Collector configuration Collect section, select Add Header to add a new header key-value pair.
In the Name field, assign the header a name.
In the Value field, use the
C.SecretJavascript expression method in this field to provide the key-value for the Authentication header. For example, depending on the requirements of your application, you could use this key-value pair:`Bearer: ${C.Secret('<secretId>', 'text').value}`or:
`Token: ${C.Secret('<secretId>', 'text').value}`In the Authentication section, select
Nonein the Authentication menu.
Pagination Settings
Use the Pagination menu in the Collect section to select the pagination scheme for collection results. Defaults to None.
Response Body Attribute / Response Header Attribute
Select Response Body Attribute to extract a value from the response body that identifies the next page of data to retrieve.
Select Response Header Attribute to extract this next-page value from the response header. Either of these selections exposes these additional fields:
Response attribute: Name(s) of attribute(s) in the response payload or header that contain next-page information. If you have multiple attributes with the same name within the response body, you can provide the path to the one you need, for example:
foo.0.bar. If Cribl Stream cannot find an exact match for a specified attribute name, it will fallback to the last-found partial match.Page limit: The maximum number of pages to retrieve per Collect task. Defaults to
50pages. Set to0to retrieve all pages.
Selecting Response Body Attribute exposes one more field:
- Last-page expression: Optionally, enter a JavaScript expression that Cribl Stream will use to determine when the last page has been reached. The values tested by this expression must be present in the Response attributes section above. Example expression:
morePages === false.
Use this expression with APIs like Smartsheet Event Reporting, which return an attribute that signals whether more pages are present, rather than simply returning an empty result set beyond the last page.
RFC 5988 - Web Linking
Select this option with APIs that follow RFC 5988 conventions to provide the next-page link in a header. This selection exposes three additional fields:
Next page relation name: Header substring that refers to the next page in the result set. Defaults to
next, corresponding to the following example link header:<https://myHost/curPage>; rel="self" <https://myHost/nextPage>; rel="next"Current page relation name: Optionally, specify the relation name within the link header that refers to the current result set. In this same example,
rel="self"refers to the current page of results:<https://myHost/curPage>; rel="self" <https://myHost/nextPage>; rel="next"Page limit: The maximum number of pages to retrieve. Defaults to
50pages. Set to0to retrieve all pages.
Offset/Limit
Select this option to receive data from APIs that use offset/limit pagination. This selection exposes several additional fields:
Offset field name: Query string parameter that sets the index from which to begin returning records. For example:
/api/v1/query?term=cribl&limit=100&offset=0. Defaults tooffset.Starting offset: (Optional) offset index from which to start request. Defaults to undefined, which will start collection from the first record.
Limit field name: Query string parameter to set the number of records retrieved per request. For example:
/api/v1/query?term=cribl&limit=100&offset=0. Defaults tolimit.Record limit: Maximum number of records to collect per request. Defaults to
50.Total record count field name: Identifies the attribute, within the response, that contains the total number of records for the query.
Page limit: The maximum number of pages to retrieve. Defaults to
50. Set to0to retrieve all pages.Zero-based index: Toggle on to indicate that the requested data’s first record is at index
0. The default (No) indicates that the first record is at index1.
Page/Size
Select this option to receive data from APIs that use page/size pagination. This selection exposes several additional fields:
Page number field name: Query string parameter that sets the page index to be returned. For example:
/api/v1/query?term=cribl&page_size=100&page_number=0. Defaults topage.Starting page number: (Optional) page number from which to start request. Defaults to undefined, which will start collection from the first page.
Page size field name: Query string parameter to set the number of records retrieved per request. For example:
/api/v1/query?term=cribl&page_size=100&page_number=0. Defaults tosize.Record limit: Maximum number of records to collect per page. Defaults to
50.Total page count field name: Identifies the attribute, within the response, that contains the total number of pages for the query.
Total record count field name: Identifies the attribute, within the response, that contains the total number of records for the query.
Page limit: The maximum number of pages to retrieve. Defaults to
50. Set to0to retrieve all pages.Zero-based index: Toggle on to indicate that the requested data’s first record is at index
0. The default (No) indicates that the first record is at index1.
Authentication Settings
See Configure a REST Collector for information about most of the options in the Authentication section of the REST Collector configuration. The following sections provide additional information about these authentication options.
You can also use Collect headers as an alternative to the Basic, Login, or OAuth authentication options. This method authenticates requests based on API keys using secrets. See How to Use Collect Headers for Authentication for more information.
Login Authentication
Login is the best authentication type to use for all services that return a JSON web token (JWT) or other authentication token whose content type is application/json or content/plain.
Selecting Login exposes the following additional fields:
Login URL: URL for the login API call, which is expected to be a POST call.
Login username: Login username.
Login password: Login password.
POST body: Template for POST body to send with the login request. The
${username}and${password}variables specify the corresponding credentials’ locations in the message. You can also use theC.Secret()method within the POST body for dynamic values.Get auth token from header: Toggle on to parse the authentication token from the HTTP Authorization response header of the login call, instead of the standard JSON response body. This is useful for APIs that return the token in the header rather than in the response payload, which is a non-standard pattern. Format the header value as
Bearer <authToken>. When on, Token attribute is hidden and not used.Token attribute: Path to the token attribute in the login response body. Supports nested attributes. If the response from the auth request provides the JWT as
plain/text, leave this field blank.Authorization header: Authorization header key to pass in Discover and Collect calls. Defaults to the literal name
Authorization. (Cribl Stream 4.0 and newer.)Authorize expression: JavaScript expression used to compute an Authorization header to pass in Discover and Collect calls. Uses
${token}to reference the token obtained from a Login or OAuth authorization request. If you need to pass the token in a Collector or Discover request parameter, URL, or request body, you can access it with${authToken}.Authentication headers: Optionally, select Add Header for each custom auth header you want to define. In the resulting table, enter each header row’s Name.
The corresponding Value is a JavaScript expression to compute the header’s value. This can also evaluate to a constant. Values not formatted as expressions - for example,
earliestinstead of`${earliest}`- will be evaluated as strings.
Login Secret Authentication
Login is the best authentication type to use for all services that return a JSON web token (JWT) or other authentication token whose content type is application/json or content/plain.
Selecting Login (credentials secret) exposes the following additional fields:
Login URL: URL for the login API call, which is expected to be a POST call.
Credentials secret: Select a stored text secret in this drop-down, or select Create to configure a new secret.
POST body: Template for POST body to send with the login request. The
${username}and${password}variables specify the corresponding credentials’ locations in the message. You can also use theC.Secret()method within the POST body for dynamic values.Get auth token from header: Toggle on to parse the authentication token from the HTTP Authorization response header of the login call, instead of the standard JSON response body. This is useful for APIs that return the token in the header rather than in the response payload, which is a non-standard pattern. Format the header value as
Bearer <authToken>. When on, Token attribute is hidden and not used.Token attribute: Path to the token attribute in the login response body. Supports nested attributes. If the response from the auth request provides the JWT as
plain/text, leave this field blank.Authorization header: Authorization header key to pass in Discover and Collect calls. Defaults to the literal name
Authorization. (Cribl Stream 4.0 and newer.)Authorize expression: JavaScript expression used to compute an Authorization header to pass in Discover and Collect calls. Uses
${token}to reference the token obtained from a Login or OAuth authorization request. If you need to pass the token in a Collector or Discover request parameter, URL, or request body, you can access it with${authToken}.Authentication headers: Optionally, select Add Header for each custom auth header you want to define. In the resulting table, enter each header row’s Name.
The corresponding Value is a JavaScript expression to compute the header’s value. This can also evaluate to a constant. Values not formatted as expressions - for example,
earliestinstead of`${earliest}`- will be evaluated as strings.
OAuth Authentication
Selecting OAuth exposes the following additional fields:
Login URL: Endpoint for the OAuth API call, which is expected to be a POST call.
Client secret parameter: The name of the parameter to send with the Client secret value.
Client secret value: The OAuth access token to authorize requests.
Extra authentication parameters: Optionally, select Add parameter for each additional OAuth request parameter you want to send in the body of POST requests. Automatically sets the
Content-Typeheader toapplication/x-www-form-urlencoded.In the resulting table, enter each parameter row’s Name. The corresponding Value is a JavaScript expression to compute the parameter’s value. This can also evaluate to a constant. Values not formatted as expressions - for example,
earliestinstead of`${earliest}`- will be evaluated as strings.Token attribute: Path to the token attribute in the login response body. Supports nested attributes.
Authorization header: Authorization header key to pass in Discover and Collect calls. Defaults to the literal name
Authorization. (Cribl Stream 4.0 and newer.)Authorize expression: JavaScript expression used to compute an Authorization header to pass in Discover and Collect calls. Uses
${token}to reference the token obtained from a Login or OAuth authorization request. If you need to pass the token in a Collector or Discover request parameter, URL, or request body, you can access it with${authToken}.Authentication headers: Optionally, select Add Header for each custom auth header you want to define. In the resulting table, enter each header row’s Name.
The corresponding Value is a JavaScript expression to compute the header’s value. This can also evaluate to a constant. Values not formatted as expressions - for example,
earliestinstead of`${earliest}`- will be evaluated as strings.
OAuth Secret Authentication
Selecting OAuth (text secret) exposes the following additional fields:
Login URL: Endpoint for the OAuth API call, which is expected to be a POST call.
Client secret parameter: The name of the parameter to send with the Client secret value.
Client secret value (text secret): Select a stored text secret in this drop-down, or select Create to configure a new secret.
Extra authentication parameters: Optionally, select Add parameter for each additional OAuth request parameter you want to send in the body of POST requests. Automatically sets the
Content-Typeheader toapplication/x-www-form-urlencoded.In the resulting table, enter each parameter row’s Name. The corresponding Value is a JavaScript expression to compute the parameter’s value. This can also evaluate to a constant. Values not formatted as expressions - for example,
earliestinstead of`${earliest}`- will be evaluated as strings.Token attribute: Path to the token attribute in the login response body. Supports nested attributes.
Authorization header: Authorization header key to pass in Discover and Collect calls. Defaults to the literal name
Authorization. (Cribl Stream 4.0 and newer.)Authorize expression: JavaScript expression used to compute an Authorization header to pass in Discover and Collect calls. Uses
${token}to reference the token obtained from a Login or OAuth authorization request. If you need to pass the token in a Collector or Discover request parameter, URL, or request body, you can access it with${authToken}.Authentication headers: Optionally, select Add Header for each custom auth header you want to define. In the resulting table, enter each header row’s Name.
The corresponding Value is a JavaScript expression to compute the header’s value. This can also evaluate to a constant. Values not formatted as expressions - for example,
earliestinstead of`${earliest}`- will be evaluated as strings.
Google Service Account OAuth Authentication
Selecting Google service account OAuth exposes the following additional fields:
Scopes: OAuth 2.0 scopes used to request access to Google APIs during authentication. See the Google page OAuth 2.0 Scopes for more information. Select Add Scope to add a scope.
Service account credentials: Contents of the Google Cloud service account credentials (JSON keys) file. To upload a file, select the upload icon in this field’s upper right corner.
Impersonated account’s email address: Email address of a user account with super admin permissions to the resources the Collector will retrieve.
Google Service Account OAuth Secret Authentication
Selecting Google service account OAuth (text secret) exposes the following additional fields:
Scopes: OAuth 2.0 scopes used to request access to Google APIs during authentication. See the Google page OAuth 2.0 Scopes for more information. Select Add Scope to add a scope.
Service account credentials (text secret): Text secret containing the value of the Google service account credentials. Select an existing text secret or select Create to create a new secret.
Impersonated account’s email address: Email address of a user account with super admin permissions to the resources the Collector will retrieve.
Retries
The Retries Settings determine how to handle API calls that fail or timeout. It has the following fields:
Retry type: The algorithm to use when performing HTTP retries. Options include
Backoff(the default),Static, andDisabled.Initial retry interval (ms): Time interval between failed request and first retry (kickoff). Maximum allowed value is 20,000 ms (1/3 minute). A value of
0means retry immediately until reaching the limit specified in Retry limit.Retry limit: Maximum number of times to retry a failed HTTP request. Defaults to
5. Maximum:20. A value of0means don’t retry at all.Backoff multiplier: Base for exponential backoff. A value of
2(default) means that Cribl Stream will retry after 2 seconds, then 4 seconds, then 8 seconds, and so forth.Longest interval between retries (ms): Maximum time to wait between retry attempts. This is useful for APIs with high backoff timeouts, enabling you to configure longer wait times to avoid excessive retry attempts. Defaults to
20000ms (20 seconds). Supports values up to900000ms (15 minutes) to handle longer backoff requirements. Setting a long retry interval can lead to significantly extended job execution times, which could prevent other jobs from running on the Worker because of concurrent task limits.Retry HTTP codes: List of HTTP codes that trigger a retry. Leave empty to use the defaults (
429and503). Cribl Stream does not retry codes in the200series.Honor Retry-After header: When toggled on (the default) and the
retry-afterheader is present, Cribl Stream honors anyretry-afterheader that specifies a delay, up to a maximum of 20 seconds. Cribl Stream always ignoresretry-afterheaders that specify a delay longer than 20 seconds. Cribl Stream will log a warning message with the delay value retrieved from theretry-afterheader (converted to ms). When toggled off, Cribl Stream ignores allretry-afterheaders.- Cribl Stream will log a warning message with the delay value retrieved from the
retry-afterheader (converted to ms). - When toggled off, Cribl Stream ignores all
retry-afterheaders.
- Cribl Stream will log a warning message with the delay value retrieved from the
Retry Connection Timeout: Toggle on to automatically retry a single connection attempt after a timeout (
ETIMEDOUT) to ensure data continuity.Retry Connection Reset: Toggle on to automatically retry a connection after a peer reset (
ECONNRESET) to maintain data flow.Retry-After header name: Optionally, if the service uses a different header name for conveying retry information, specify that custom name here. For example, a service might use
x-ratelimit-retry-afterinstead.
Results
The Result Settings determine how Cribl Stream transforms and routes the collected data.
Custom Commands
Custom Command: When enabled, you can pass the data from this input to an external command for processing, before the data continues downstream. Enabling this field exposes these additional fields:
Command: Enter the command that will consume the data (via
stdin) and will process its output (viastdout).Arguments: Select Add Argument to add each argument to the command. You can drag arguments vertically to resequence them.
Event Breaking
Event Breaker rulesets: A list of event breaking rulesets that will be applied, in order, to the input data stream. Defaults to System Default Rule. Select Add Ruleset to add a new row to the ruleset table. Select the ruleset to see a list of available recommended rulesets for your API. Change the order of the rules to determine which rule is applied in order.
Event Breaker buffer timeout: How long (in milliseconds) the Event Breaker will wait for new data to be sent to a specific channel, before flushing out the data stream, as-is, to the Routes. Minimum 10 ms, default 10000 (10 sec), maximum 43200000 (12 hours).
Event Fields
In this section, you can define new fields or modify existing ones using JavaScript expressions, similar to the Eval function.
- The Field Name can either be a new field (unique within the event) or an existing field name to modify its value.
- The Value is a JavaScript expression (enclosed in quotes or backticks) to compute the field’s value (can be a constant). Select this field’s advanced mode icon (far right) if you’d like to open a modal where you can work with sample data and iterate on results.
This flexibility means you can:
- Add new fields to enrich the event.
- Modify existing fields by overwriting their values.
- Compute logic or transformations using JavaScript expressions.
Results Routing
Send to Routes: Toggle on (default) if you want Cribl Stream to send events to normal routing and event processing. Toggle off to select a specific Pipeline/Destination combination. Toggling off exposes these two additional fields:
- Pipeline: Select a Pipeline to process results.
- Destination: Select a Destination to receive results.
Toggling on (default) exposes this field:
- Pre-processing Pipeline: Pipeline to process results before sending to Routes. Optional.
This field is always exposed:
- Throttling: Rate (in bytes per second) to throttle while writing to an output. Also takes values with multiple-byte units, such as
KB,MB,GB, and so forth. (Example:42 MB.) Default value of0indicates no throttling.
You might toggle Send to Routes off when configuring a Collector that will connect data from a specific Source to a specific Pipeline and Destination. One use case might be a REST Collector that gathers a known, simple type of data from a single endpoint. This approach keeps the Collector’s configuration self-contained and separate from Cribl Stream’s routing table for live data - potentially simplifying the Routes structure.
Pre-processing Pipeline: Pipeline to process results before sending to Routes. Optional, and available only when Send to Routes is toggled on.
Throttling: Rate (in bytes per second) to throttle while writing to an output. Also takes values with multiple-byte units, such as KB, MB, GB, and so forth. (Example: 42 MB.) Default value of 0 indicates no throttling.
Advanced Settings
The Advanced Settings section of the REST Collector configuration has the following options:
Request timeout (secs): Here, you can set a maximum time period (in seconds) for an HTTP request to complete before Cribl Stream treats it as timed out. Defaults to
0, which disables timeout metering.Round-robin DNS: Toggle on to enable round-robin DNS lookup across multiple IP addresses, IPv4 and IPv6. When a DNS server resolves a Fully Qualified Domain Name (FQDN) to multiple IP addresses, Cribl Stream will sequentially use each address in the order they are returned by the DNS server for subsequent connection attempts.
Disable time filter: Toggle on to bypass the collection job event timestamp filtering. By default, Collectors apply time filtering based on the configured time range. Events with timestamps outside this range are discarded. Enabling this setting disables timestamp-based filtering, allowing all returned events to be processed regardless of their timestamps. This is useful when the data source’s timestamps do not align with the configured time range, causing unexpected filtering, or when you need to process all data regardless of their timestamps. If you encounter zero results despite the data source returning events, disabling the time filter can help isolate whether timestamp filtering is the issue. For details, see No Discover or Collector Event Results.
Decode URL: When toggled off, Cribl Stream will not decode URLs before sending the HTTP request. This setting applies to collect, authentication, and pagination requests. Defaults to toggled on.
Reject unauthorized certificates: Whether to accept certificates that cannot be verified against a valid Certificate Authority (for example, self-signed certificates). Defaults to toggled on.
Capture response headers: Toggle on to include the headers from the API response of a collect call under a
resHeaderskey in the__collectibleobject that is added to collected events.Stop on empty results: Toggle on to use your Event Breaker Ruleset to optimize paginated data collection. When toggled on, the REST Collector immediately stops requesting subsequent pages if a current page returns no new data events. The Collector determines a page has no data by checking the output of the Event Breaker rules. If the Event Breaker returns zero events from the received payload, the pagination loop will terminate. This setting prevents the Collector from making unnecessary API calls when the data source reaches its current tail, improving Pipeline efficiency and reducing the consumption of external API rate limits.
To ensure the Stop on empty results setting works as expected, validate that you have properly configured the Event Breaker rules to successfully identify and parse all valid events from the payload. If you accidentally misconfigure the Event Breaker and it returns zero events incorrectly, the collection process will stop early.
Safe headers: Optionally, list headers that you consider safe to log in plain text. Separate the header names with tabs or hard returns. These headers will not be redacted when exporting the Collector configuration as JSON.
Environment: If you’re using GitOps, optionally use this field to specify a single Git branch on which to enable this configuration. If empty, the config will be enabled everywhere.
Time to live: How long to keep the job’s artifacts on disk after job completion. This also affects how long a job is listed in Job Inspector. Defaults to
4h.Remove Discover fields : List of fields to remove from the Discover results. This is useful when discovery returns sensitive fields that should not be exposed in the Jobs user interface. You can specify wildcards (such as
aws*).Resume job on boot: Toggle on to resume ad hoc collection jobs if Cribl Stream restarts during the jobs’ execution.
Tags: Optionally, add tags that you can use to filter and group Sources in Cribl Stream’s Manage Sources page. These tags aren’t added to processed events. Use a tab or hard return between (arbitrary) tag names.
Internal Fields
Cribl Stream uses a set of internal fields to assist in data handling. These “meta” fields are not part of an event, but they are accessible, and you can use them in Functions to make processing decisions.
Relevant fields for this Collector:
__collectible- This object’s nested fields contain metadata about each collection job.collectorType: Indicates the type of Collector used for the job.collectorId: Represents the Collector ID of the Collector, as configured during setup.resHeaders: Added only when Advanced Settings > Capture response headers is toggled on.
__collectStats- This object’s nested fields are:method: The value you set for Collect > Collect method.url: The value you set for Collect Settings (Common) > Collect URL.elapsedMS: The time elapsed from the moment the Collector’s request was sent until the response was received.
__inputId- Uniquely identifies the origin of data for a collection job. Its format varies depending on whether the job is ad hoc or scheduled:- Ad hoc jobs are formatted as
collection:<timestamp>.<randomId>.adhoc.<Collector ID>.<timestamp>: Timestamp when the job was initiated (in Unix time).<randomId>: A random identifier to ensure uniqueness.adhoc: Indicates the job was manually triggered.<Collector ID>: The ID of the Collector.
- Scheduled jobs are formatted as
collection:<Collector ID>.<Collector ID>: The ID of the Collector.
- Ad hoc jobs are formatted as
Use JavaScript Expressions to Shape Incoming API Data
While you configure a REST Collector, you may need to translate the incoming data structure from an upstream API into the data structure that Cribl Stream expects and can work with. To effectively translate data, you need to know:
- The data structure of returns sent by the upstream API.
- How that upstream data structure differs from the data structure that Cribl Stream expects to receive.
- How to shape (transform) the data structure from the upstream API into the data structure expected by Cribl Stream.
You can shape incoming API data using JavaScript expressions when you configure a REST Collector. Various fields in the Collector accept JavaScript expressions. Fields that accept JavaScript are set apart by a blue JS bar, such as this example of the Collect URL field:

JavaScript expression fields in the REST Collector behave differently from other similar JavaScript fields in Cribl Stream. In the REST Collector,you must enter expressions as template literals. Template literals (also known as template strings) allow you to use placeholders to reference dynamic variables and JavaScript functions. Cribl Stream uses some built-in variables or you can build your own custom placeholder variables to transform incoming data as needed.
For example:
- To reference the earliest time variable in a URL, header, or parameter, you would write the variable as
`${earliest}`. - To reference a function call:
`${Date.now()}`. - To call a function that references a variable:
`${Math.floor(earliest)}`.
Time and Date Strings
Refer to the API documentation that you want to pull data from to gather information about how the API formats timestamps. The API could return the date in a variety of different formats, such as:
yyyy/MM/ddyyyy-MM-dddd-MM-yyyy
To effectively parse different patterns of dates in Cribl Stream, you may need to use a combination of different settings and JavaScript expressions.
Time Range Variables: `${earliest}` and `${latest}`
The following fields accept `${earliest}` and `${latest}` variables, which reference any Time Range values that have been set in manual or scheduled collection jobs:
Collect settings:
- Collect URL
- Collect parameters
- Collect headers
Discover settings:
- Discover URL
- Discover parameters
- Discover headers
As an example, here is a Collect URL entry using these variables: http://localhost/path?from=${earliest}&to=${latest}
APIs vary in their requirements for time formatting required. Consult the API documentation for the API to format it correctly.
For additional help with time filtering, see How Time Filtering Works for Scheduled Jobs.
Parse Discover Returns With Arrays as JSON Objects
When events are returned as an array, you need a JSON array event breaker is needed to separate out the individual fields so that the filter can be applied.
Some APIs return data as an array, such as { "logFiles": ["file-name-1.log", "file-name-2.log", "file-name-3.log.2", "audit.log"] }. In this case, Cribl Stream treats each item in the array as a collection task.
However, some APIs return a JSON object that contains an array and you need to tell Cribl Stream to generate a separate Collect task for each item in the array, as in this example:
[
  {
    "LogFile": "/collect?filename=1",
    "attributes": {
      "field": 1
    }
  },
  {
    "LogFile": "/collect?filename=2",
    "attributes": {
      "field": 1
    }
  }
]To properly parse the array inside the JSON object:
In the Discover Settings, select HTTP Request as the Discover type.
Set the options for your API in the standard required fields (such as Discover URL) as needed.
In the Discover data field, type
fileto create a custom property to store theLogFilearray values.Toggle Format discover result with custom code on.
In the Format discover result field, type:
__e.file = __e.map(item => item.LogFile)
This expression processes an array __e, extracts the LogFile property from each element in that array, and assigns the resulting array of LogFile values to __e.file. Essentially, it creates a new array of log file paths (or similar information) from the original array and stores it in the file property of __e. Each property becomes a separate collection task.
This JavaScript expression is performing the following actions:
__e.map(...): This is using themap()method on the JSON object. Themap()method creates a new array by applying the provided function to each element in the original array.item => item.LogFile: This is an arrow function that takes each item in the__earray and returns theLogFileproperty of thatitem.__e.file =:The result of themap()function, which is a new array containing only theLogFilevalues of each item in the original__earray, is assigned to thefileproperty of__e.
Mutually Exclusive HTTP Request Parameters
Some APIs have mutually exclusive request, query, or URL parameters. In this situation, you may have parameters that cannot be used together in an API call. You must use either one or the other. For example, you may need to send one parameter in the first query and a different parameter for all subsequent queries.
To solve this problem, try using some of the formulas discussed in this Cribl User Group Community video at approximately the 30 minute mark: ServiceNow and Smartsheet.
For example, one user working with the Smartsheet API needed to send since in the first pagination query and streamPosition in all subsequent pagination queries. This user used these two Collect Parameters:
| Name | Value |
|---|---|
since | ${(!nextStreamPosition ? C.Time.strftime(Date.now()/1000-300, '%Y-%m-%d%T%H:%M:%S.000Z') : '')} |
streamPosition | ${((moreAvailable==false && nextStreamPosition!=null) ? '' : nextStreamPosition.toString())} |
Then, the user:
- Set Pagination to
Response Body Attribute. - Defined the Response attribute as
nextStreamPosition. - Set the Last-page expression to
moreAvailable=='false'.
Work with State Tracking
You can configure the Collector to track state, either by time or another arbitrary value. This can help prevent overlaps between jobs, where subsequent Collector runs may return some of the same results as previous runs. Similarly, it can help prevent gaps in data by allowing a Collector run to pick up from where the last run ended.
The Collector updates its saved state even if a collection job does not fully succeed. As long as new data is collected during the run, regardless of whether the job completes successfully or encounters errors, the state is updated to reflect the latest collected point.
State tracking can be particularly useful for tracking the greatest _time value for events returned from a collection run, but you can also use it to derive arbitrary state for custom use cases. You can access saved state values in any Collector field that supports JavaScript expressions.
For a hands-on example of setting up a Collector with state tracking enabled, see Using REST/API Collectors.
Track State for Collector Runs
You can enable state tracking under the State Tracking section when scheduling or performing a full run of the Collector (Preview and Discover runs do not support state tracking). Once enabled, two more fields will appear for state tracking configuration.
State update expression: JavaScript expression that defines how to update the state from an event. Use the event’s data and the current state to compute the new state.
State merge expression: JavaScript expression that defines which state to keep when merging a task’s newly reported state with the previously saved state. Evaluates prevState and newState variables, resolving to the state to keep.
The default values for these fields are configured to track state by the latest _time field found in events gathered in a collection run.
Understand State Expression Fields
The State update and State merge expressions control how state is derived from a collection run and how it is merged with existing state, respectively. They’re preconfigured to work with the common use case of tracking state by latest _time, but you may need to update them for other use cases. To understand what these fields do, let’s break down the default values.
State update expression
This expression has a default value of:
__timestampExtracted !== false && {latestTime: (state.latestTime || 0) > _time ? state.latestTime : _time}__timestampExtracted !== false - the __timestampExtracted field is set to false if the Event Breaker was unable to parse time for the event. If this is the case, we don’t want to update state (the event’s _time value defaults to Date.now() if the Event Breaker was unable to parse out the correct time). If __timestampExtracted is false, we take advantage of short-circuit evaluation to not update state.
State values must resolve to an object, such as:
{ "latestTime": 17122806161 }If the expression does not resolve to an object, Cribl Stream will ignore the result.
{latestTime: (state.latestTime || 0) > _time ? state.latestTime : _time} - compare state.latestTime to the event’s _time value, keeping whichever value is greater.
State merge expression
This expression has a default value of:
prevState.latestTime > newState.latestTime ? prevState : newStateIt compares prevState (the state that was previously saved) to newState (the state reported from the most recent collection task), keeping the state with the greatest latestTime value.
Manage Collector State
Select Manage State to view, modify, or delete Collector state. For more information, see Manage Collector State.
Proxy Requests
If you need to proxy HTTP/S requests, see System Proxy Configuration.
Troubleshoot
Response Errors
The Collector treats all non-200 responses from configured URL endpoints as errors. This includes 1xx, 3xx, 4xx, and 5xx responses.
On Discovery, Preview, and most Collect jobs, it interprets these as fatal errors. On Collect jobs, the Collector treats these exceptions as non-fatal:
Where a Collect job launches multiple tasks, and only a subset of those tasks fail, Cribl Stream places the job in failed status, but treats the error as non-fatal. (Note that Cribl Stream does not retry the failed tasks.)
Where a Collect job receives a
3xxredirection error code, it follows the error’s treatment by the underlying library, and does not necessarily treat the error as fatal.
Mitigate Stuck-Job Problems
Occasionally, a scheduled job fails, but continues running for hours or even days, until someone intervenes and cancels it. If left alone, such a “stuck”, “orphaned,” or “zombie” job will never complete. This can cause missing events in downstream receivers, along with HTTP timeout or similar errors in Cribl Stream’s logs.
To keep stuck jobs from running excessively long:
- First, try setting Optional Settings > Request timeout (secs) - whose default of
0means “wait forever” - to a desired maximum duration. - If adjusting Timeout (secs) does not fix the problem, try the global setting Job Timeout - whose default of
0allows a job to run indefinitely - to a desired maximum duration. You’ll find Job Timeout among the task manifest and buffering limits.
Using these settings in tandem works like this:
- Timeout (secs) limits the time that Cribl Stream will wait for an HTTP request to complete.
- Then, if a job gets stuck and keeps running beyond that limit, Job Timeout can catch and terminate the job, because it monitors the overall time the job has been running.
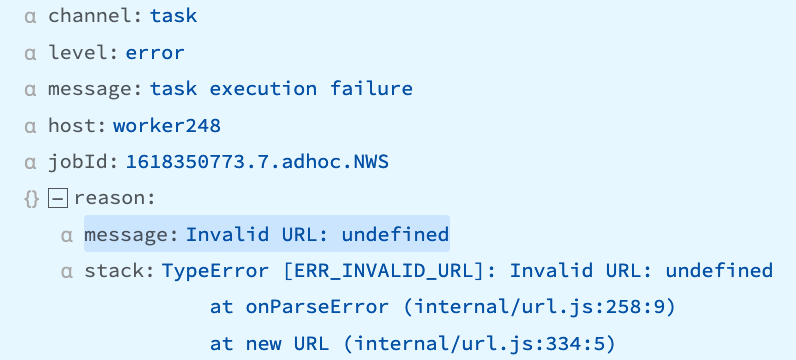
Error Message: TypeError [ERR_INVALID_URL]
The full text of this error message:
"reason.stack == `TypeError [ERR_INVALID_URL]: Invalid URL: https%3A%2F%2Ftype.fit%2Fapi%2Fquotes" at onParseError (internal/url.js:258:9)"Cause: This error message is caused by unnecessarily encoding the Discover/Collect URL.
Recommendation: To fix this error message, remove the encoding function for the URL. You will rarely need to encode URLs. When they do, you should only encode the parts that need it. Otherwise, you will see this error because the entire URL is encoded unnecessarily.
Error Message: statusCode: 429...Too many requests
When running a REST Collector, you may encounter rate-limiting errors if the volume of outgoing requests exceeds the allowed threshold of the target API or Destination.
Cause
A 429 Too Many Requests response indicates that a rate limit has been exceeded.
With REST Collectors, this most commonly comes from the upstream REST API you are calling, which returns a429 error when it detects too many requests in a given window (for example, because the Collector’s Discover/Collect tasks are running frequently or in parallel across multiple Workers). In some deployments, that upstream endpoint might itself be a Cribl-managed API, but it is still acting as the rate-limiting service in this context.
Before you apply any remediation, verify which system is returning the 429 error by checking the host, path, and response headers in job logs or HTTP traces.
Recommendations
Use the following remediation steps when the upstream REST API is rate limiting your Collector:
- Review the upstream Destination rate-limit documentation and ensure the Collector configuration respects those limits.
- Reduce concurrency and request volume, for example by:
- Lowering the number of parallel Discover/Collect tasks.
- Increasing job frequency intervals so the API has more time between runs.
- Adjusting pagination settings to request fewer records per page when appropriate.
If your REST Collector is intentionally calling a Cribl-hosted API endpoint as its upstream service (for example, a Cribl.Cloud REST API), then that endpoint’s own rate-limit configuration and behavior govern 429 responses.
- Gradually increase the Login rate limit threshold until you no longer receive this error response. On the Leader or a Single-instance deployment, access this option at Global Settings > General Settings > API Server Settings > Advanced. In a Distributed deployment, select Manage, select the Worker Group, and then navigate to Group Settings > General Settings > API Server Settings > Advanced.
Only adjust Cribl API Server Settings if you are specifically targeting the Cribl Leader’s own API. For all other external endpoints, adjusting Cribl’s internal rate limits will have no effect.