


Create and Share Data Samples
A data sample (also called a data capture) is a small, representative subset of live or stored data from a given data stream. Sample files are essential tools for:
- Ensuring that proper data is flowing between the right Sources and Destinations.
- Confirming that data is routed correctly.
- Testing and validating Routes, Pipelines, and Functions to ensure they process data as expected.
Access and Manage Data Samples
Whether you are capturing live data samples for immediate testing or managing a shared library for collaboration, you can work with data samples through a few main workflows:
| Workflow | Description |
|---|---|
| Data Preview | Capture sample data, then test and validate Pipeline logic in real-time using the Data Preview tool as you build Routes and Pipelines to see your data processing logic in action. |
| Knowledge Objects | Save samples as Knowledge objects in a central location to manage and reuse them across Routes, Pipelines, Event Breakers, and datagens. Samples you create here can also be used in the Data Preview tool. |
| Datagens | Generate a stream of realistic sample log data to help you simulate live data. Build custom datagens (data generators) from your own sample files. |
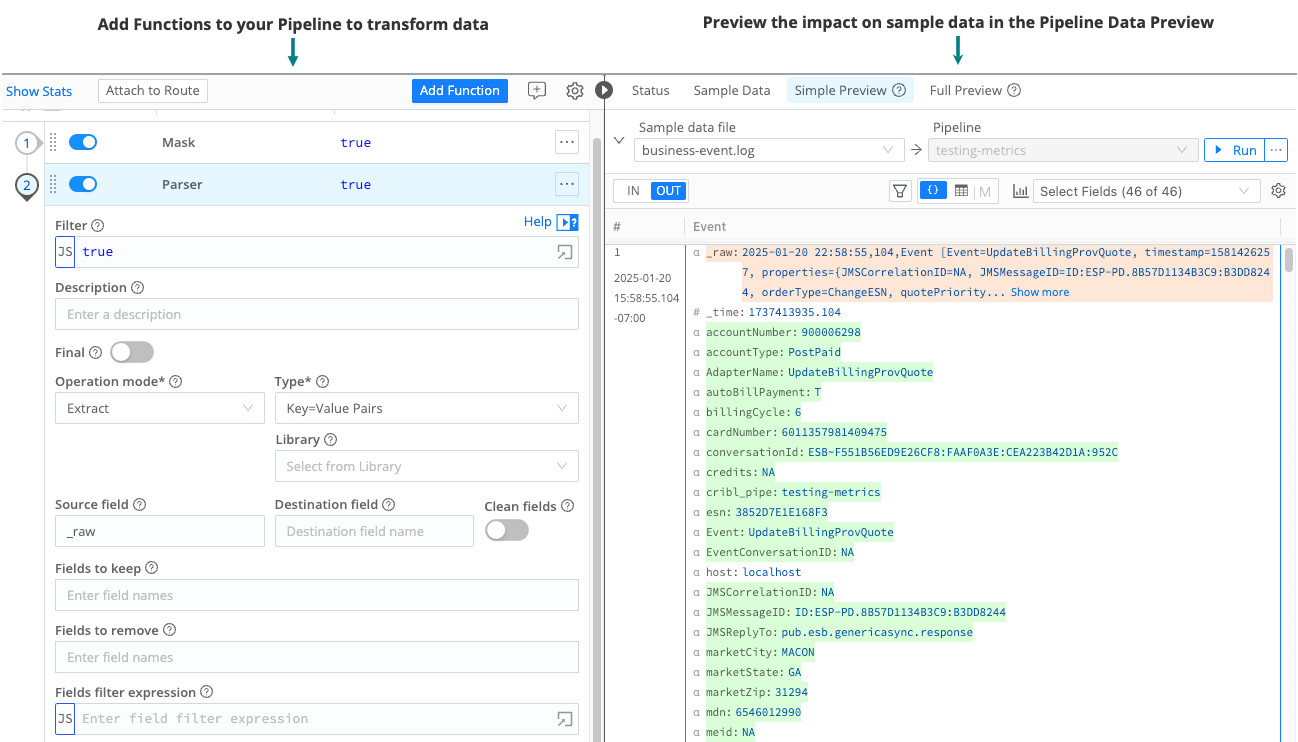
Data Preview
The primary way that you will use sample files is with the Data Preview tool for Pipelines and Routes. The Data Preview tool works by processing a set of sample events and passing them through the Pipeline or Route. Then, it displays the inbound and outbound results in a dedicated pane. Whenever you modify, add, or remove a Function, the output updates instantly to reflect your changes. This is helpful for validating your data processing logic in real-time to assess whether the logic works as you expected.
See Validate Pipeline Logic Using Data Preview for information about accessing and using the Data Preview tool.
Knowledge Objects
You can create and save sample data files as Knowledge objects at either the Worker Group level or the Pack level. The advantage of creating samples as Knowledge objects is that these objects can be accessed across your Worker Group by Routes, Pipelines, Event Breakers, and datagens as needed.
When working with sample files as Knowledge objects, be aware that sample file visibility is context-dependent:
- Worker Group samples are only visible within that specific Worker Group.
- Pack samples are only visible within that specific Pack.
To use a sample in a different context, you must manually copy it from the Worker Group to the Pack (or the Pack to the Worker Group). See Copy and Share Sample Files for specific instructions.
To access sample files in the Knowledge library at the Worker Group level:
Select Worker Groups from the sidebar, and choose a Worker Group.
On the Worker Groups submenu, select Processing, then Knowledge, then Sample Files.
To access sample files in the Knowledge library from inside a Pack:
Ensure you are in the correct Pack.
Select Knowledge from the top bar, then Sample Files.
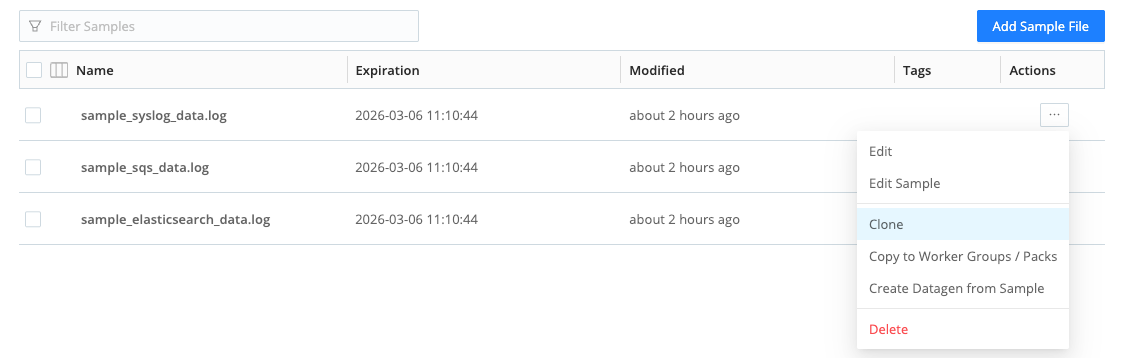
The Knowledge library lists any sample files you have captured. From the list view, you add new files, edit samples, clone, or copy sample files to other Worker Groups or Packs. See Copy and Share Sample Files for specific instructions.
Cross-copying samples between Worker Groups and Fleets is not supported.
You can also build a custom datagen (data generator) from these sample files to simulate live data. See the next section about datagens for more information.
Datagens
Datagens (data generators) allow you to simulate live data by replaying sample log data. You can then use this live data to test and validate your Routes, Pipelines, and Functions in a sandbox environment before applying changes to production data.
Cribl provides several datagens that you can use out-of-the-box to simulate live data. You can also transform your own custom sample files into active generators. See Use Datagens to Simulate Live Data for more information.
If you create a sample file in the Knowledge object library, you can use this file to build a custom datagen. To create the datagen from a sample file:
Ensure you are in the correct context (either in a Worker Group or a Pack). Then access the Knowledge objects library in that context.
Next to the sample file you want to copy or share, select Create Datagen from Samples from the Actions (
 ) menu.
In the modal, update the datagen settings as needed. See Use Datagens to Simulate Live Data for more information.
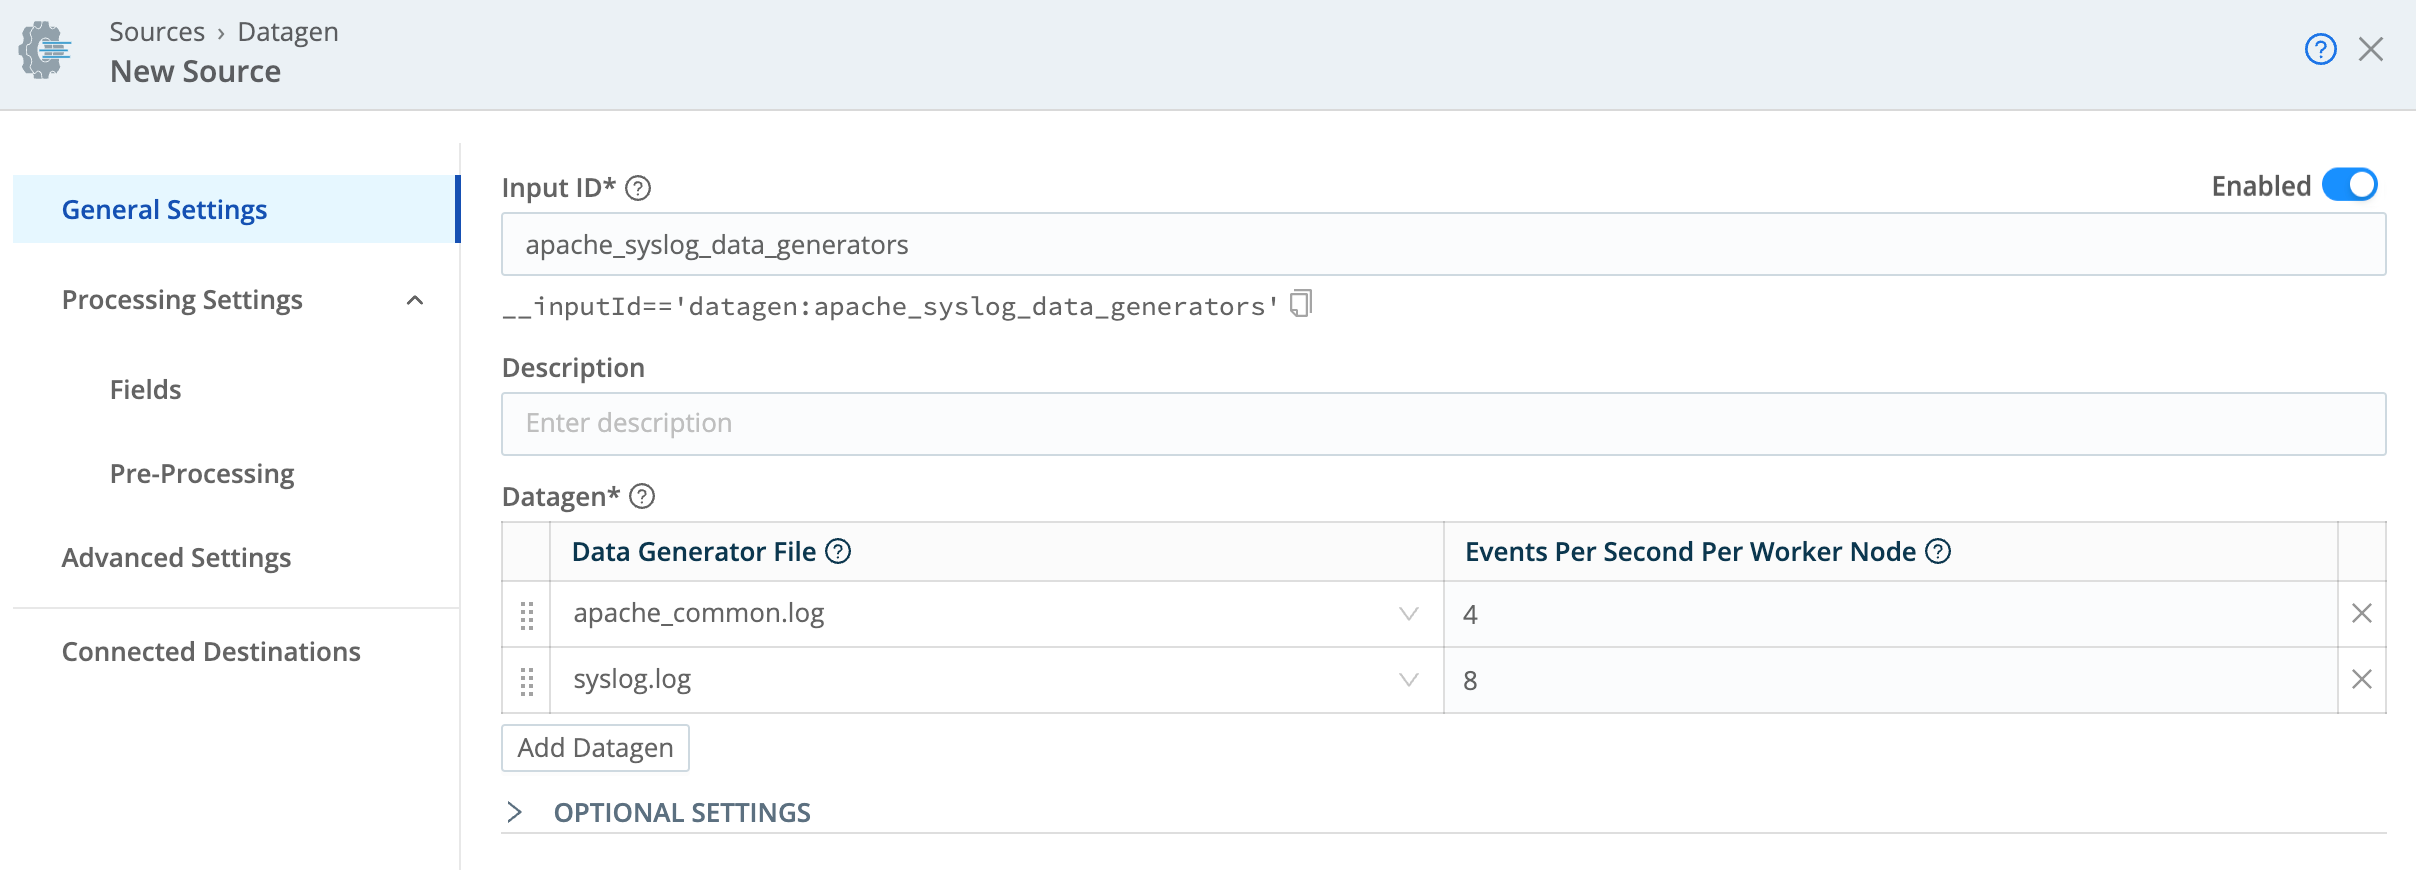
Simulate live data with a data generator Select Save as Datagen File.
The new datagen is automatically added to your list of Sources for that Worker Group or Pack. It will share the same name as the original sample file.
Add Sample Data
To validate your data, you first need sample data to work with. Some methods of getting sample data can only work with the Data Preview tool. If you are creating a data sample using the Knowledge object library, you can only capture sample data live from a Source or from a datagen.
You can get sample data using a few methods:
| Method | Description | Requirements and Limitations |
|---|---|---|
| Capture new sample data | Capture live data from multiple incoming data streams to use for validating data routing and processing logic. |
|
| Capture live data from a single Source or Destination | Use this method if you only need to capture data from one Source or Destination to build your data sample. |
|
| Upload a sample data file | Use this method to upload sample data file from another Cribl deployment or an external data source. |
|
| Copy data from a clipboard | Use this method to copy and paste sample data from your computer’s internal clipboard. |
|
| Import data from Cribl Edge Nodes | Use this method to import data from Cribl Edge. |
|
Capture New Sample Data
The Capture Data mode does not require event breaking. To capture live data, you must have Worker Nodes registered to the Worker Group for which you’re viewing events. You can view registered Worker Nodes from the Status tab in the Source.
To capture new sample data:
Ensure you are in the correct context (such as the Worker Group or inside a Pack). To navigate to the Knowledge library:
- From a Worker Group: Select Worker Groups from the sidebar, and choose a Worker Group. On the Worker Groups submenu, select Processing, then Knowledge, then Sample Files.
- From a Pack: Select Knowledge from the top bar, then Sample Files.
Select Add Sample File.
Select Capture and modify the settings as needed:
Capture time (sec): The length of the time you want to sample in seconds. Defaults to 10 seconds.
Capture up to N events: The maximum number of events to capture. Defaults to 10.
Where to capture: Select the stage in the data flow where you want to capture events. Options include:
- Before pre-processing Pipeline (labeled as
1in the following diagram) - Before the Routes (
2) - Before post-processing Pipeline (
3) - Before the Destination (
4)
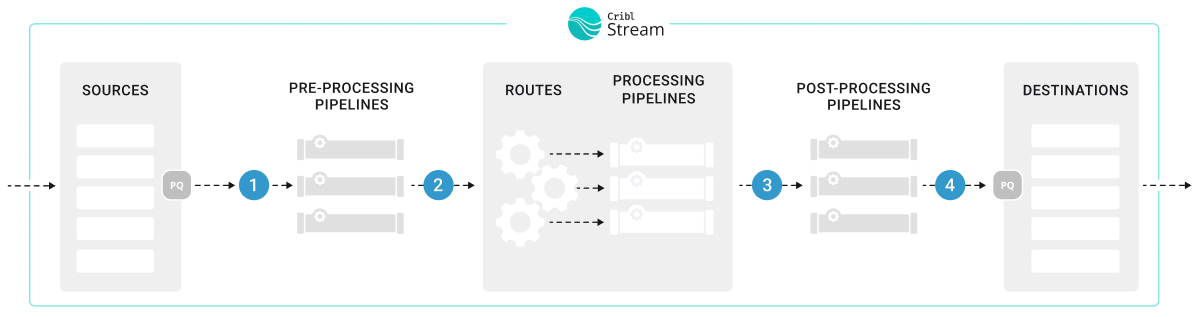
Options for where to capture the data - Before pre-processing Pipeline (labeled as
Initial Worker sample size: Set a limit to the number of Worker Nodes that are included in the capture. Defaults to 50 Nodes. Set it to
0to make it unlimited.Interval (sec): Specify how long the system should wait for data before increasing the capture sample size. Must be at least 1 second. Defaults to 2 seconds.
Select Start and the system will start capturing data.
If the capture fails, check that you have committed and deployed all changes. Also check the Filter setting for the data capture to ensure it is not filtering out all events.
Select Save as Sample File.
Verify that the new sample file appears in the Data Preview pane or in the Knowledge objects library.
Capture Live Data from a Single Source or Destination
To capture data from a single enabled Source or Destination, it’s fastest to use the Sources or Destinations pages instead of the Preview pane:
In the sidebar, select Worker Groups, then select a Worker Group. On the Worker Groups submenu, select Data, then Sources or Destinations.
Select Live on the Source or Destination configuration row to initiate a live capture.

Live button on a Source Select Capture. Accept or modify the default settings as needed and select Start.
When the modal finishes populating with events, select Save as Sample File. In the sample file settings, configure the sample’s metadata. See Sample Data Settings for detailed information about these settings.
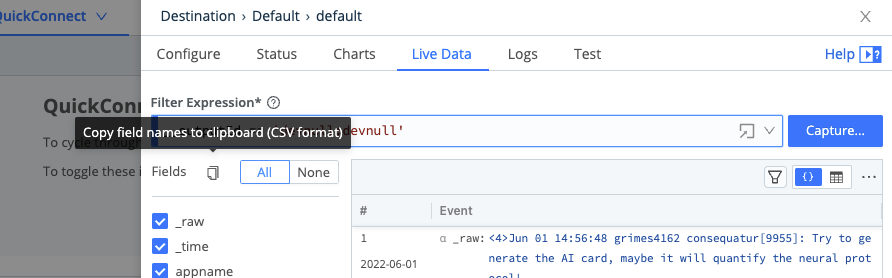
Alternatively, you can start an immediate capture from within an enabled Source’s or Destination’s configuration modal, by selecting the modal’s Live Data tab.
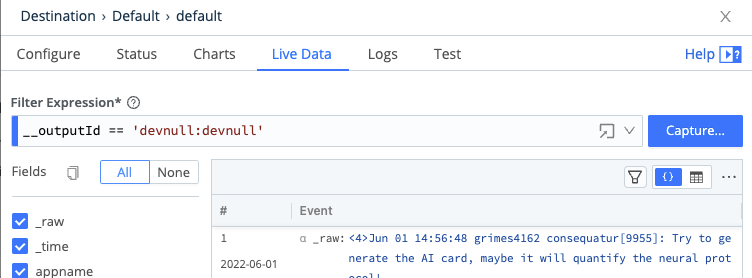
You can also use the Fields selector in the Live Data is a Copy button, which enables you to copy the field names to the clipboard in CSV format. The Logs tab also provides this copy button.
Upload a Sample Data File
To upload a sample data file:
In the sidebar, select Worker Groups, then select a Worker Group. On the Worker Groups submenu, select Processing, then Pipelines.
Select the Sample Data tab in the Data Preview pane. Select Import Data.
In the Import Sample Data modal, drag and drop your sample file or select Upload to navigate to the file on your computer.
Select an appropriate option from the Event Breaker Settings menu.
Configure the sample’s metadata. See Sample Data Settings for detailed information about these settings.
Add or drop fields as needed.

If you notice imported events are fragmented, it could be because Cribl Stream has added a
__timeoutFlushinternal field to them. See the troubleshooting section about Imported Data Events Are Fragmented for more information.
Copy Data From a Clipboard
To copy sample data from a clipboard:
In the sidebar, select Worker Groups, then select a Worker Group. On the Worker Groups submenu, select Processing, then Pipelines.
Select the Sample Data tab in the Data Preview pane. Select Import Data.
In the Import Sample Data modal, paste data from your computer clipboard into the provided field.

Import Sample Data modal Select an appropriate option from the Event Breaker Settings menu.
Configure the sample’s metadata. See Sample Data Settings for detailed information about these settings.
Add or drop fields as needed.
If you notice imported events are fragmented, it could be because Cribl Stream has added a
__timeoutFlushinternal field to them. See the troubleshooting section about Imported Data Events Are Fragmented for more information.
Import Data from Cribl Edge Nodes
To import data from Cribl Edge Nodes, you must have at least one working Edge Node. To upload data from a file on an Edge Node:
In the sidebar, select Worker Groups, then select a Worker Group. On the Worker Groups submenu, select Processing, then Pipelines.
Select the Sample Data tab in the Data Preview pane. Select Import Data.
In the Import Sample Data modal, select Edge Data and navigate to the Edge Node that has the stored file.
In Manual mode, use the available filters to narrow the results:
- Path: The location from which to discover files.
- Allowlist: Supports wildcard syntax and supports the exclamation mark (
!) for negation. - Max depth: Sets which layers of files to return highlighted in bold typeface. By default, this field is empty, which implicitly specifies
0. This default boldfaces only the top-level files within the Path.
Once you find the file you want, select its name to add its contents to the Add Sample Data modal.
Select an appropriate option from the Event Breaker Settings menu.
Configure the sample’s metadata. See Sample Data Settings for detailed information about these settings.
Add or drop fields as needed.
Modify Sample Files
To modify sample files that were captured and stored as Knowledge objects, you can edit samples by accessing the list of sample files in the Knowledge objects library. From there, select the Edit Sample option from the Actions (…) menu.
To modify existing sample files in the Data Preview tool in Routes or Pipelines:
In the right Preview pane, select the Samples tab.
Hover over the file name you want to modify to show an edit (pencil) button next to the file name.
Select that button to open the modal shown below. It provides options to edit, clone, or delete the sample, save it as a datagen Source, or modify its metadata. See Sample Data Settings for detailed information about these settings.
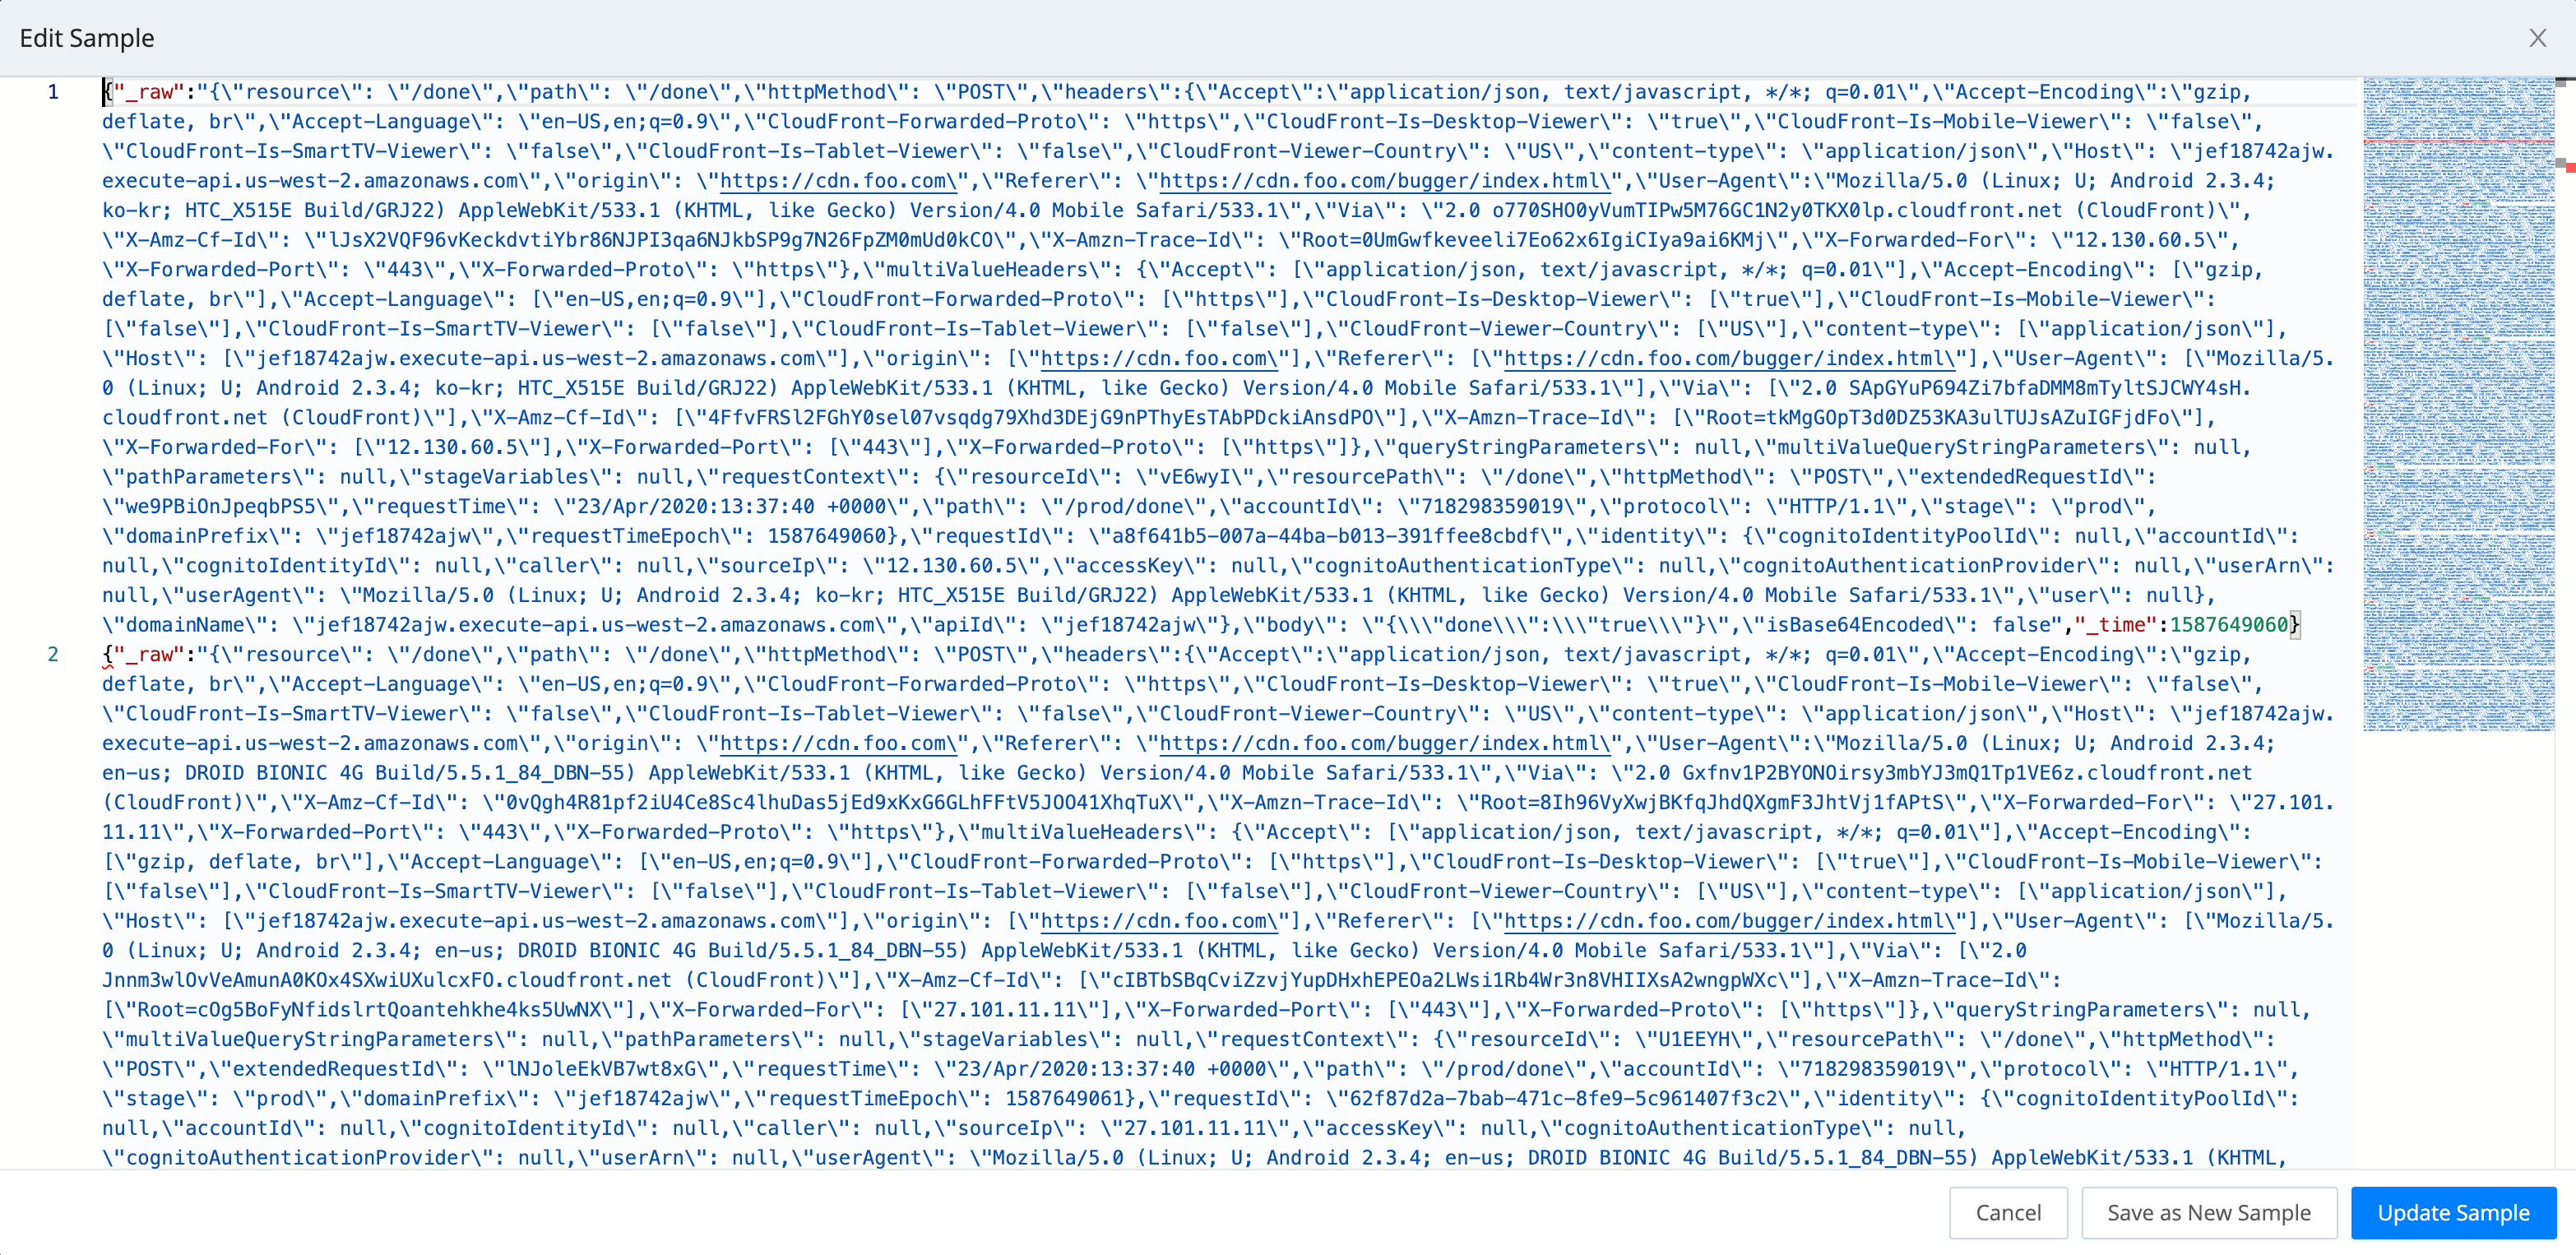
To make changes to the sample, select the modal’s Edit Sample button. This opens the Edit Sample modal shown below, exposing the sample’s raw data.
Edit the raw data as desired.
Select Update Sample to resave the modified sample, or select Save as New Sample to give the modified version a new name.
Copy and Share Sample Files
To clone a sample file in the Data Preview tool, follow the same steps to Modify Sample Files.
Sample files cannot be copied from a Worker Group to a Fleet.
To copy sample files that were captured and stored as Knowledge objects:
Select Worker Groups from the sidebar, and choose a Worker Group. On the Worker Groups submenu, select Processing, then Knowledge, then Sample Files.
Next to the sample file you want to copy or share, select Copy to Worker Groups / Packs option from the Actions (…) menu.
In the Copy Sample modal, define your target:
- Worker Group: Type or select the target Worker Group. Leave blank if you only want to copy the file to a Pack.
- Packs: Type or select the target Pack. Leave blank if you only want to copy the file to a Worker Group.
Select Copy Sample.
A confirmation message will appear upon a successful copy.
If you want to share sample files across your Cribl deployment, add them to a Pack and then copy the Pack to other Worker Groups. From there, you can copy it to the target Worker Group. See Copy a Pack for specific instructions.
Sample Data Settings
These metadata settings are available for all data samples:
File name: The display name for the sample file. Choose a name that makes the sample easy to recognize in the Sample Data and Samples tabs.
Description: An optional, free-form description that explains what the sample represents (source system, time range, scenario, and so on).
Expiration time: A time-to-live (TTL), in hours, for the sample file. Each time you use the sample, for example in Data Preview, Pipeline testing, or when creating a datagen, the TTL resets. When a sample reaches its expiration without being used, Cribl Stream silently removes the sample and its backing file. Leave this field blank if you do not want the sample to expire automatically.
In deployments that use Git-backed configuration bundles, expiration only affects the live configuration on disk. If you commit while the sample exists, that commit continues to contain the sample. When the sample later expires, its removal is just another change that you can commit in a later revision. If the sample expires before you commit, it is cleaned up without ever being recorded in Git.
- Tags: Optional labels that you can use to organize and search for samples (for example, by source, environment, or use case).

Troubleshoot Sample Data
This section describes some strategies for managing potential issues with sample data.
Integer Values Are Too Large
The JavaScript implementation in Cribl Stream can safely represent integers only up to the Number.MAX_SAFE_INTEGER constant of about 9 quadrillion (precisely, {2^53}-1). Data Preview will round down any integer larger than this, and trailing zeroes might indicate such rounding.
Imported Data Events Are Fragmented
The Import Data options work with content that needs to be broken into events, meaning it needs Event Breakers.
Cribl Event Breakers are regular expressions that tell Cribl Stream how to break the file or pasted content into events. Breaking occurs at the start of the match. Cribl Stream ships with several common breaker patterns out of the box, but you can also configure custom breakers. The UI here is interactive, and you can iterate until you find the exact pattern.
If you notice fragmented events, check whether Cribl Stream has added a __timeoutFlush internal field to them. The presence of this diagnostic field indicates that Cribl Stream flushed the events because the Event Breaker buffer timed out while processing them. These timeouts can be due to large incoming events, backpressure, or other causes. See Event Model: Internal Fields for more information.
Change Field Displays
In the Capture Data and Live Data modals, use the Fields sidebar to streamline how events display. You can toggle among All fields, None (to reset the display), and check boxes that enable or disable individual fields by name.
Within the right Preview pane, each field’s type is indicated by one of these leading symbols:
| Symbol | Meaning |
|---|---|
| α | string |
| # | numeric |
| b | boolean |
| m | metric |
| {} | JSON object |
| [] | array |
On JSON objects and arrays:
| Symbol | Meaning |
|---|---|
| + | expandable |
| - | collapsible |