


Manage Workers
Learn how to manage and filter Stream Workers
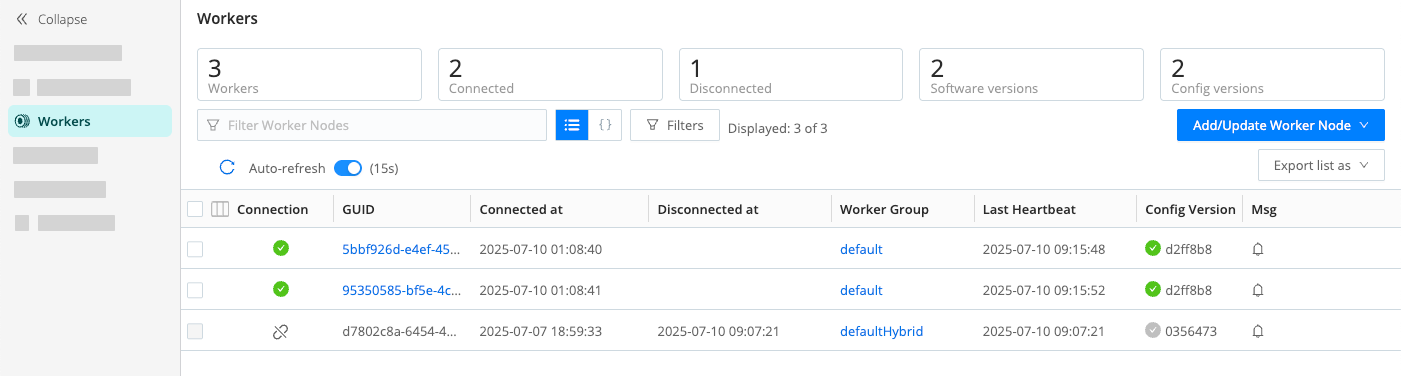
View Worker Status Information
The Workers page provides status information for each Worker Node in the selected Worker Group, as well as a UI for adding and updating Workers.
In Cribl Stream, select Workers from the sidebar.
Monitor Worker Connectivity
You can track which Worker Nodes are connected to the Leader Node in the Workers page. Disconnected Workers show an icon in the Connection column and will have information about the time the Leader last received their heartbeat.
By default, Cribl Stream will retain information about disconnected Workers between restarts. To change this behavior on-prem, toggle Disable Node persistence on in Global Settings > System > General Settings > Limits > Other. This will also affect Cribl Edge Nodes.
Disable Node persistence is a deprecated setting that will be removed in a future version. Toggling Disable Node persistence will restart the Leader Node.
You can configure how long the Leader should keep track of disconnected Worker Nodes by configuring the Time to keep disconnected Workers Worker Group setting (General Settings > Worker Group Configuration). By default the Leader retains information about disconnected Nodes for one day. You can set it to any value between 0 (which means Nodes are removed within a few minutes) and 90 days.
Filter Workers
When your Cribl Stream deployment has a large number of Workers, you may want to filter your Worker list down to a manageable subset. This can help you monitor your Stream Workers and troubleshoot any issues.
The Filters option allows you to apply filter criteria to your Worker list, so you can quickly find Workers by connection status, IP address, version, and more.
Access Worker Filters
In Cribl Stream, you can filter Workers in two places:
- In a specific Group in the Worker Groups list. Navigate to Worker Groups, then select the Workers for the Group.
- On the list of all Workers. Navigate to Workers from the sidebar.

Filter Modes
You can choose between the default form-based mode and Advanced mode when you create a Worker filter. Form-based mode contains the preconfigured fields and checkboxes you see when you select Filters.
For a table of the options and their definitions, see Form-based Filter Options.
Advanced mode is a JavaScript input field where you can create your own filter, referencing the JSON objects that are associated with a Worker Node.
You can edit the JavaScript by typing in the Expression field, but doing so disables the form-based filters unless you undo the changes. To revert back to the form-based filter, select Undo changes.
Create a Worker Filter
The Filters option lets you group a list of Workers by criteria such as IP address, install type, version, and more.
To create a Worker filter:
- Navigate to a list of Workers, either from the Workers column in a Group or from the Workers sidebar.
- Select Filters to open the Filters panel.
- Create a filter by selecting from the Worker Filter Options, or toggle Advanced on to write your own filter using JavaScript.
- Once you have selected filter criteria, you can use the Filter Worker Nodes field to further narrow down the list of visible Workers.
- Select Clear filters to undo your selections in the Filters panel. This does not clear the Filter Worker Nodes field.
Share a Filter
To share a filter with another Cribl user:
- Select the Filters button and create a filter.
- Select the link icon
 to copy the
filters to your clipboard, or copy the browser URL.
to copy the
filters to your clipboard, or copy the browser URL. - Now you can share the link with another user.
Filters are Workspace-specific, so they will only work within the Workspace where you created them.
Form-based Filter Options
You can choose from a set of preconfigured, form-based filter options, and each has an associated JavaScript property. You’ll see the JavaScript property in the Expressions field when you toggle Advanced on.
| Field | Description | JavaScript property |
|---|---|---|
Worker Group | Find Workers based on their Worker Group assignment. Visible when filtering from the Workers page. | group=='<group>' |
| Outpost | Which Outpost the Worker is connected to. | info.outpost.host.toLowerCase().includes(<outpost-host>) |
| Connection status | Whether the Worker is currently connected to the Leader. | (disconnected === <true|false>) |
| Stream version | Enter a semantic version of Cribl Stream. For example, 4.1.0. | info.cribl.version.toLowerCase() |
| Host | The host of the Worker. You can type in any part of the host string. | info.hostname.toLowerCase().includes(<host>) |
| Architecture | The processor architecture for the Worker. | (info.architecture === '<architecture>') |
| IP address | The IP address of the Worker Node. Entering a partial value returns all Nodes with matching values. For example, entering 17 will return all Nodes that have 17 somewhere in the address. | info.conn_ip.toLowerCase().includes('<ip-here>') |
Advanced Filter Options
You can use JavaScript expressions in the Advanced filter to surface more specific, granular search results. You can use any Worker Node properties and types in the Expression field.
The JavaScript expression should be in this format, in hierarchical order from parent to child:
parent.child.grandchild === 'value'
For example:
info.aws.type === 't2.medium'.
You can also automatically populate the Advanced filter Expression field:
Select the JSON view button.
Expand the Worker Node row and select the Worker property, then any applicable child properties.
Type directly in the Expression field to fine-tune the filter.

Filter Worker Nodes in JSON view
Supported Node Properties
You can filter on these Worker Node properties using a JavaScript expression. Remember
to separate the parent and child properties using a period ..
  "deployable": "boolean (Whether the Node can be deployed)",
  "disconnected": "boolean (Whether the Node is connected to the Leader)",
  "workerProcesses": "number (Number of Worker processes for this Node"),
  "id": "string",
  "status": "string (Healthy)",
  "group": "string (Group name)",
  "info": {
    "hostname": "string",
    "platform": "string (OS Platform; linux, etc.)",
    "architecture": "string (CPU Architecture; arm64, x64 etc.)",
    "release": "string (OS Kernel release)",
    "cpus": "number (Number of CPU cores)",
    "totalmem": "number (Memory in bytes)",
    "node": "string (NodeJS version)",
    "cribl": {
      "startTime": "number (Unix time in msecs when the process started)",
      "guid": "string (unique instance ID)",
      "installType": "string",
      "tags": "string array (tags configured on the Node)",
      "version": "string (Stream version)"
    },
    "freeDiskSpace": "number (Free disk space in bytes)",
    "totalDiskSpace": "number (Total disk space in bytes)",
    "conn_ip": "string (this is the IP that Cribl Leader sees; different from actual IP of the Node)",
    "localTime": "number (local Unix time on the Node in msec)"
  },
  "lastMsgTime": "number (time when Node sent the last message in msec)",
"firstMsgTime": "number (time when Node sent the first message in msec)"Example Advanced Filter Expressions
You can use these example expressions as a starting point to build your advanced filters.
Disconnected Workers whose last heartbeat was before Jul 02 2025 15:30:00
Last heartbeat (lastMsgTime) is a timestamp in Unix time, so we need to convert the human-readable date to a timestamp.
disconnected === true && lastMsgTime >= 1751463000Workers with >10 CPUs and >8 GB RAM
Because total memory is reported in bytes, we need to calculate 8GB to bytes before using it in the filter.
info.cpus >= 4 && info.totalmem >= 8388608000