


Use Packs to Get Started With REST Collection
Cribl Stream adds new Sources and Collectors regularly, but for data sources that do not yet have a dedicated Source, Cribl Stream provides the REST Collector. The REST Collector can collect data from a wide variety of upstream services, including Okta.
Because the REST Collector is flexible and versatile, integrating a new API often requires manual effort to configure, validate, and troubleshoot the unique REST API details. To eliminate this manual effort, the Cribl Dispensary provides pre-configured REST Packs for common upstream services to help speed up the configuration process. These Packs are officially supported, validated, and version-controlled in the Cribl Packs GitHub repository.
The REST Packs provide optimized, custom-made configuration settings to help you build a REST Collector for specific upstream services. The Packs:
- Ensure you can collect all the relevant log data from that data source, not just basic events.
- Provide the initial configuration to handle common data operations such as event breaking and field extraction, ensuring immediate data usability.
- Provide predefined pagination and authentication configurations that are specific that service.
- In some cases, help normalize data structures for specific Destinations.
This guide explains the end-to-end workflow for importing and using the REST Packs using the Okta REST Collector IO Pack as an example.
About the Okta REST Collector IO Pack
The Okta REST Collector IO Pack provides a pre-configured REST Collector and the necessary logic to handle JSON data collected from the Okta System Log API endpoint. It is built as a complete Source and Destination solution (which is why it has the IO prefix). This means that data collection and delivery happen entirely within the context of the Pack, eliminating the need to connect it to globally defined Sources and Destinations.
This Pack provides configurations to parse the JSON and normalize the timestamp from the proper field within each event. It also includes configurations for two types of data reduction:
- Drop, sample, or suppress events based on
eventType: You can target individual events byeventTypeusing the included lookup file Knowledge object. - Remove nested
nullvalue fields: The included Pipeline contains a Function to automatically identify and remove fields where the value is explicitlynull. This significantly reduces log volume and minimizes processing overhead for downstream Destinations.
The Pack includes pre-built Pipeline configurations for three common normalization formats:
- Normalized JSON
- OCSF (for downstream consumption by Amazon Security Lake)
- Splunk
When you install this Pack, it includes:
| Element | Description | Location in the Pack |
|---|---|---|
| Okta API REST Collector | Pre-configured to work with Okta System Log API endpoint | Sources tab |
| Okta Pipeline | Contains three example Functions for event breaking, timestamp normalization, and data reduction | Pipeline tab |
| Route filter for Okta events | Filters any data events to the Okta Pipeline | Routes tab |
| Okta lookup file | A lookup file that can be set to drop, sample, or suppress events by eventType | Knowledge > Lookups |
See the Okta REST Collector IO README for more information.
How to Use the Okta REST Collector IO Pack
This workflow involves these phases:
Before you start, ensure you have the necessary credentials and details for your Okta deployment.
Install the Okta Pack From the Cribl Dispensary
You can install the Okta Pack from inside the target Worker Group in Cribl Stream:
On the top bar, select Products, and then select Cribl Stream. Under Worker Groups, select a Worker Group.
Navigate to Processing, then Packs. Select Add Pack, then Add from Dispensary.
Search for
Okta Rest Collector IOand select it from the list to show the Pack details. Select Add Pack.
A confirmation message appears in the UI when the Pack finishes installing. When you close this drawer, you will see the Packs list page. Confirm that the Okta REST Collector IO Pack now appears in this list.
Customize the Pack Configurations for Your Environment
In this phase, you set the values that are specific to your Okta deployment, including your Okta domain name and API token:
Select the Okta Rest Collector IO from the Packs list page. This opens the Routes tab inside of the Pack context.
Within the Pack context, select the Sources tab. Under Collectors, select REST. On the list of configured REST Collectors, select in_okta_api (Okta-API) to open its configuration window.
If you see tiles in the Sources tab instead of the list view, select REST to see all REST Collectors.
In the General tab, replace these placeholder values with the correct values for your Okta account:
- Collect URL: Add the URL for your Okta domain. See the Okta documentation about how to find your domain for more information.
- Collect Headers Value: Add your Okta API bearer token, also known as your SSWS key. See the Okta documentation about how to create an API token for more information.
Save your changes, then commit and deploy the changes to your Worker Group.
Customize the Pack Variables
In this phase, you set the values for the Pack variables that are specific to this Worker Group environment:
From within the Pack context, select Knowledge from the top bar. Then, select Variables.
Select the Pack Variables tab to see which variables come bundled with this Pack.
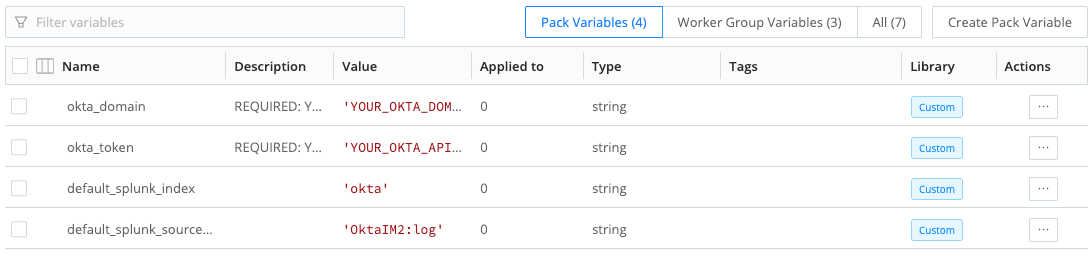
Available variables for the Okta Rest Collector IO Pack To set their values, select each variable to open their configuration window. In the Value field, assign the appropriate setting for your current environment.
To validate your custom changes, try collecting some sample data to ensure the Collector is working as expected. See Data Preview for more information.
Connect the Pack to a Destination
When you import the Okta REST Collector IO Pack, it sets the Destination as the default Destination. To change this default:
Optionally, you may need to first add a new Destination inside the Pack context and then update the Route table.
Within the Pack context, select the Routes tab.
In the cribl_okta_rest_api filter, select a configured Destination from the Destination menu.
Verify that data is flowing from the Okta API to your target Destination. Also consider exploring the Okta Pipeline to customize the Functions based on your data needs.