


Packs Publication Standards
This page outlines the process for Cribl Community members to publish Cribl Stream, Edge, and Search Packs to the Cribl Packs Dispensary. It also lists standards that apply to all publicly available Community Packs.
Publication Overview
Publishing your Pack is a five-stage process:
Prepare
- Prior to starting development, read this topic’s Pack Review Summary and Pack Review Checklist. These resources will help you create a Pack that can easily pass the review process. Decide on the problems you’re trying to solve, and determine the dataset(s), data senders, and data receivers you’re going to work with.
Develop your Pack
- You’ll generally develop Packs in your own Cribl environment, using saved sample data files to build out Stream/Edge Pipelines, or using Search Datasets to build Search Dashboards. During this stage, you might consider working collaboratively within Cribl’s Community Slack
#packschannel. When the Pack is ready for review, export it as a.crblfile, using the Cribl UI.
- You’ll generally develop Packs in your own Cribl environment, using saved sample data files to build out Stream/Edge Pipelines, or using Search Datasets to build Search Dashboards. During this stage, you might consider working collaboratively within Cribl’s Community Slack
Test your Pack
- Cribl strongly recommends that you test the Pack yourself, in your own environment. To verify that all content was exported correctly, import your Pack into a fresh Cribl environment. For Stream or Edge, this might be a newly created Docker instance, Worker Group, or Fleet. For Search, this might be a different Cribl Search Workspace. Upload the Pack, then use the Pack Review Checklist to verify that the Pack will pass review.
Submit your Pack for review
Sign into, or create an account on, the Cribl Packs Dispensary site. You can use your Cribl.Cloud account’s email address to create the Cribl Packs Dispensary account.
If you don’t have a Cribl.Cloud account, Cribl automatically creates a new one for you when you create your Cribl Packs Dispensary account.
Once you sign in, you’ll see the Dispensary page with the Publish Pack button.

Packs Dispensary controls Click Publish Pack, and then click Upload Pack.
Select the
.crblPack file you want to publish, and click Submit. You will be prompted to agree to the terms of Cribl’s Pack Developer Agreement. As a Pack author, you must electronically acknowledge that you have read the Agreement, and that you intend to adhere to its requirements.Once you’ve uploaded the Pack, Cribl will review it. The review process typically takes a week or more. Once your Pack is reviewed, you’ll receive an email from
packs@cribl.ioeither informing you that it was accepted, or providing the reason(s) why it was rejected. (In the latter case, you can address the specified issues and resubmit.)
- Once your accepted Pack is published to the Cribl Packs Dispensary, it’s time to celebrate!
Pack Review Summary
To ensure consistency across published Packs, Cribl evaluates all submitted Packs against the Pack Review Checklist. Any Pack that fails to satisfy the checklist’s requirements will be rejected. (As noted above, we will notify you of the basis for any rejection, so that you can remedy the issue and resubmit.)
Cribl recommends:
Check your Pack against the checklist before trying to submit the Pack. This way, you can avoid having your Pack rejected for something easily fixed upfront.
For Stream/Edge Packs, you can install the Syslog Pre-processing Pack as a reference - it includes clear examples of each item on the checklist.
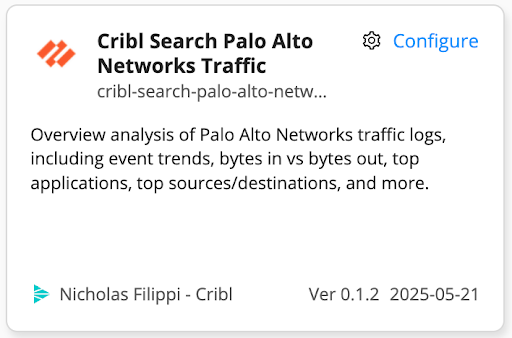
For Search Packs, you can install the Search Palo Alto Networks Traffic Pack as a reference.
Pack Review Checklist
This is a checklist for Packs you intend to submit to the Cribl Packs Dispensary. The following sections list setup requirements for product-specific Packs, and then for all Packs.
Stream/Edge Packs - Requirements
This section’s requirements apply to Packs for Cribl Stream and Cribl Edge.
Sources and Destinations
If you include a Source (or Stream Collector) in your Pack, you must also include the intended Destination, so that the Routes table is wired up to receive and deliver data all within that Pack. If you include Sources (including Collectors) or Destinations inside a Pack, you must clearly state this in the README, and your README should warn users not to insert this Pack (as a Pipeline) into the global Routes table outside of the Pack.
The benefit of tying everything together in a Pack - Sources, Pipelines, Routes, Destinations - is enabling users to take advantage of an end-to-end telemetry stream configuration. This way, users need to update only selected values (for things like endpoints and authentication details) in order to run the Pack.
Routes
A submitted Stream or Edge Pack must include at least one Route in addition to the default Route.
A Pack’s Routes page must have a Route, with an appropriate filter, routing to a Pipeline.
The filter should match only the set of data that the Pipeline is designed to process. The filter must not be set to
true.If the Pack deals with multiple data types, each data type should have its own Route/Pipeline pair. (For a good example, look at the Palo Alto Networks Traffic Pack.)
The Pack must not use the
defaultRoute to send events to a Pack-specific custom Pipeline. ThedefaultRoute may have a Pipeline set tomain,devnull, orpassthruto handle events that do not match the Pack filter(s).Each Route must include a short description of the data sample being matched.
Pairs of Routes and Pipelines should have matching names.
Pipelines
A Pack submitted must include at least one Pipeline in addition to the default Pipelines (which are apache_sample_pipeline, devnull, main, passthru, and prometheus_metrics.).
If the Pack deals with multiple data types, there must be one Pipeline (and one Route) for each data type. (For a good example, look at the Palo Alto Networks Traffic Pack.)
The Pack must not modify the default Pipelines. Leave these Pipelines unchanged.
Every Pipeline must begin with a Comment Function that gives an overview of the Pipeline’s operation as a whole. This Comment is a synopsis of what the entire Pipeline will be doing. For an example of the expected level of detail, refer to the Syslog Pre-processing Pack.
If Function Groups are used within the Pipeline, each Function Group must begin with a Comment Function that gives an overview of what will happen within that Function Group.
Every Function must have a Description that briefly explains exactly what is happening in that particular Function. During review, change the Pipeline view option to display the Description for each Function.
Using the sample files provided with the Pack, validate that the Functions work as detailed in the Comment at the top of the Pipeline.
Sample Data Files
The Pack must include at least one sample data file for each of its Pipelines.
Sample data files:
Must not have an expiration date.
Must never include PII, customer data, or customer hostnames.
Must be named to make it obvious which sample file(s) apply to each Pipeline.
Must contain samples that are adequate for a customer to use to review the operation of a Pipeline. To allow performance analysis of the corresponding Pipeline, a sample should include 20 or more events, with 100 or more recommended.
May be reused across Pipelines, but it is preferable to include multiple sample files, each specific to one Pipeline’s Route and filter.
Must work as expected on a clean installation of the Pack. This applies to all sample data files included in the Pack - Pack developers should test this before submitting the Pack.
Search Packs - Requirements
This section’s requirements apply to Packs for Cribl Search.
Lookups
Ensure that lookup files contain no sensitive data. If Cribl review discovers any sensitive information in a submitted lookup file, Cribl will automatically reject the Pack.
When formatting references to the lookup table file, use this syntax:
pack(<pack_id>).<lookup_file_name> When referencing the lookup table in queries, use this syntax:
dataset="cribl_search_sample" datatype="aws_vpcflow"
 | lookup pack(cribl-search-aws-vpc-flow-logs).protocol_codes on protocol=protocol_code
 | summarize count=count() by protocol_name
| order by count descDatatypes
Datatypes are important for Cribl Search Packs, because they provide the rules for how to process and search raw data. Adding Datatypes to Search Packs provides users with important parsing rules that enhance the overall search and Dashboard experience.
Essentially, Datatypes give structure to unstructured data, making it easier to query and explore vendor-specific datasets. Cribl strongly recommends that you implement Datatypes within Search Packs when needed. As a model, refer to the Palo Alto Datatypes ruleset that’s built into Cribl Search.
All Products - Requirements
This section lists requirements that apply to all Packs, including how you structure Pack files and how you set naming and metadata.
Pack Files and Directories
Pack archives (including exported .crbl files) and any Git-based layout you distribute must contain only regular files and directories. Symbolic links are not supported in Pack content. See Symbolic Links in Pack Content in the Packs topic.
Naming, Logo, and Tags
Every Pack must have both a unique Pack ID and a Display name.
When you view Packs in the Dispensary, the Display name appears above the Pack ID. The Pack ID must follow a specific format of sequenced tokens:
<source>-<productArea>-<dataVendor>-<dataType>.
Here:
<source>identifies who contributed the Pack, not a data source. This is eithercriblfor Cribl-developed Packs, orccfor Community-contributed Packs. (Packs not satisfying this requirement will be immediately rejected.)<productArea>is one ofstream,edge, orsearch.<dataVendor>and<dataType>identify (where applicable) the integration; and (where applicable) the focus of the transformations or configurations provided in the Pack. Examples for this pair of tokens might beokta-rest, orpalo-alto-networks-traffic, orexabeam-fortigate-firewall.
Here are examples of complete Pack IDs from the Cribl Packs Dispensary (where you can find many additional examples):
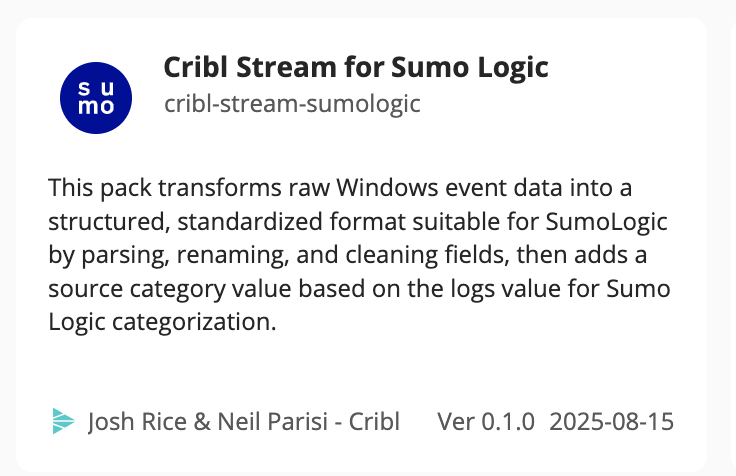
cribl-stream-sumologiccribl-search-cloudtrail-activity
The Display name is a free-text summary of the purpose of the Pack. As examples:
Cribl Stream for Sumo Logicis a Display name, whilecribl-stream-sumologicis the corresponding Pack ID.Cribl Search CloudTrail Activityis a Display name, whilecribl-search-cloudtrail-activityis the corresponding Pack ID:
Detailed requirements for both fields follow these graphical examples from Dispensary tiles.
Pack ID Requirements
The Pack ID:
Must start with either
cc-(Community-contributed) orcribl-(Cribl-contributed). Packs not satisfying this requirement will be immediately rejected.Should (by convention) be all lowercase, using hyphens (
-) as delimiters.Should not include the word “pack.”
Display Name Requirements
The Display name is a friendly, human-readable version of the Pack name that:
Omits
cc-andcribl-.Uses spaces where appropriate, and uses conventional capitalization.
Matches the vendor’s preferred spelling, spaces, and capitalization of any referenced company or product name.
Within a Pack, you can view or edit the Display name on the Pack Settings tab.
How to Review the Pack ID
This is the same procedure that the Cribl will perform when reviewing your Pack:
Extract the
.crbltarball that was submitted to the Dispensary:tar zxvf <your_filename>.crblView the
package.jsonfile:cat package.jsonCheck the value of the
namefield. This should be the Pack ID that you want.
Verifying the Pack ID
Pack Settings
You must review your Pack Settings to verify that the Pack satisfies all of the following criteria.
Display Name
A friendly, human-readable version of the Pack name, as defined above.
Version
The version number in the submitted Pack must have a corresponding entry in the README Release Notes. This number should be in SemVer (Semantic Versioning) format.
The minimum version for initial publication is
0.1.0. A Pack with a lower version will be rejected.A release that is considered “beta quality” should be designated as version
0.9.0.
Description
Use this as a brief “hook” of one to two sentences. Example:
This pack for Syslog inputs will reduce volume, and address timestamp normalization for Syslog senders that omit timezones.
Author
Community-contributed Packs may include the author’s name, a company name, or both.
All three of the following examples are valid:
Jon SmithBazookatronJon Smith - Bazookatron
Cribl-published Packs must use author’s full name, plus - Cribl. Example: Michael Donnelly - Cribl.
Data Type, Use Cases, Technologies
Select all that apply.
Tags
Tags are optional but recommended, especially where multiple Packs are intended to work together. Tag examples include: OCSF, AWS.
Logo
The logo is optional, but recommended. You can include a logo associated with the technology addressed by the Pack. As examples: a Windows logo for Windows events, or an AWS Cloudwatch logo for AWS Cloudwatch data.
You can set the logo via Pack Settings > Display.
README
The README is the documentation others will use in selecting and deploying the Pack. The README requirements ensure that others will be able to successfully deploy the Pack.
The default sections for the README, as created when you click Create Pack, do not match the required and optional sections in the checklist. You will need to delete or replace certain sections.
On the Pack’s Pack Settings > README tab, validate that the README text is correct. The following rules apply to all sections of the README:
Proper grammar will help the users of your Pack. Use a grammar and spelling checker to make sure the README is clear and readable.
If the README includes any text that looks like a placeholder, the Pack will be rejected.
Trademark or product names must be spelled and capitalized exactly as the company that owns them would dictate. This requirement also applies to Pack settings, inline comments, and other uses. Examples: Amazon (not amazon), GCP (not Gcp), CrowdStrike (not Crowdstrike).
The README must include all of the sections enumerated here, as items a through f. The README may also include additional sections, as necessary to explain the resources you’ve included in the Pack.
a. About This Pack
Think of this initial section as the first paragraph of an essay, or as the only paragraph a person will read when deciding to use the Pack. It must clearly state what the Pack does. Start with the benefits of using the Pack. In sum, this section should answer the question, Why should anyone use this Pack?
If the Pack is tied to a specific data source, dataset, or destination, spell that out clearly here - even if that source or destination is in the Pack name.
b. Deployment
This required section must include all instructions necessary to get the Pack up and running. If the Pack requires any configuration after initial installation - but before it’s put it into production - you must specify the configuration steps here.
Stream/Edge Pack Deployment
Filters: If applicable, say what filter must be used to route data to the Pack, or explain how to configure the filter. A filter based on __inputId is much more efficient than a match against _raw.
Sources: If the Pack requires a specific Source (or Stream Collector), include information on how to configure that Source. At a minimum, this needs to cover setting up the Source within Cribl. In some cases, this might include information on how to set up an external environment for collection by Cribl as well.
Destinations: If the Pack requires a specific Destination, include information on how to configure that Destination. Does it need a post-processing Pipeline tied to the Pack?
Pipelines: If the Pack includes Functions (within a Pipeline) that need to tailored, enabled, or disabled, include a full explanation and instructions.
Lookups: If the Pack includes Lookup files that need to be tailored, you must specify the configuration steps here.
Search Pack Deployment
Dataset Provider: If the Pack works with a Cribl Search built-in Dataset Provider, specify it. If the Pack requires adding a new Dataset Provider, provide specific instructions.
Dataset: Provide instructions on configuring compatible Datasets.
Datatype: Specify Datatypes to apply - whether built into Cribl Search or included in the Pack.
Macros: Provide instructions on using any custom Macros included in the Pack.
c. Upgrades
This optional section is strongly recommended if you expect others to customize their copy of the Pack and later upgrade the modified Pack.
- If included, this section should cover the usual set of problems with Pack upgrades as described in Upgrading an Existing Pack, and should explain the specifics of upgrading this particular Pack.
d. Release Notes
This required section is a list of release notes where each release note:
Starts with the version number and date of release, separated by a space, a hyphen, and a space. For example:
Version 1.2.0 - 2022-07-11.Continues with bullet points that describe what has changed and/or is new in the release.
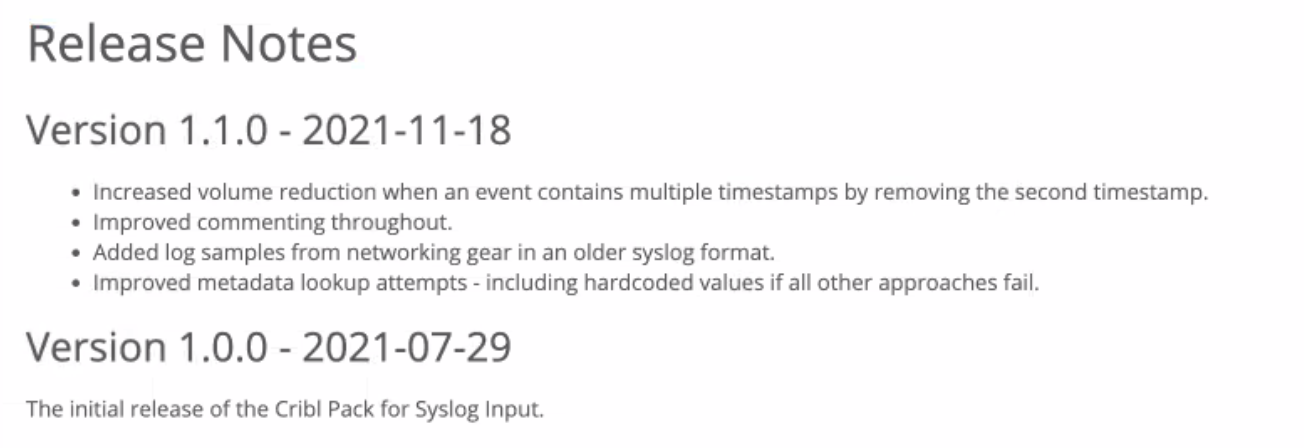
Release notes must adhere to the following rules:
Designate the initial release version
Initial release.The most current version listed must exactly match the Pack version in Pack Settings > Pack Info.
Release notes versions must be listed starting with the most recent (in descending chronological order).
e. Contributing to the Pack
This required section explains how to contribute to the Pack.
The information provided must be actionable. A section reading
[Contributor instructions go here.]would be rejected.Cribl recommends that you refer potential contributors to Cribl’s Community Slack. For example, Cribl-created Packs read as follows:
To contribute to the Pack, please connect with us on [Cribl Community Slack](https://cribl-community.slack.com/). You can suggest new features or offer to collaborate.
f. License
This required section must include text that designates and links to a legitimate license.
Community-contributed Packs must include a license that allows for use by the general public, such as Apache 2.0, MIT, or GNU.
Built-by-Cribl Packs must use the following snippet:
This Pack uses the following license: [Apache 2.0](https://www.apache.org/licenses/LICENSE-2.0).