





Optimize Destination Persistent Queues
Cribl Stream’s Destination persistent queues (PQ) supplement in-memory queues to prevent data loss during a backpressure event, such as when a downstream Destination receiver is unreachable or slow to respond. See Supported Destinations for more information about which Destinations support persistent queueing.
Read this guide to learn how to optimize your Destination persistent queue. This guide is helpful when you are in the initial planning and configuration stage and also when you have an active deployment that you want to performance tune. It explains:
- How Destination persistent queues respond to a backpressure event.
- An in-depth discussion of the Destination persistent queue configuration options and their potential impact on your system.
- The available notifications, monitoring dashboards, and troubleshooting tools for persistent queues.
See also:
On Cribl-managed Cribl.Cloud Workers with an Enterprise plan, you can enable persistent queue for supported Destinations. However, be aware that mode options and storage limits have specific restrictions in Cribl.Cloud. See Cribl.Cloud Deployments for more information.
How Destination Persistent Queues Work
Backpressure occurs when there is a temporary imbalance between the rates of inbound and outbound data that is either coming in or going out of Cribl Stream.
Different events trigger persistent queues on Destinations. For Destinations, the triggers depend on what kind of Destination it is, such as whether it is filesystem-based, TCP, UDP, and so on. See About Destination Backpressure Triggers for more detailed information.
When persistent queue engages, it writes and stores data to a persistent backing store until the backpressure event resolves. That store can either be local storage on the Worker Node or (for Cribl Stream only) a shared storage location for the full Worker Group (using an S3-compatible bucket or an NFS volume).
Destinations handle data rate imbalances using the following order of operations:
In-memory buffers store data under normal conditions. Under normal conditions, Destinations store data in in-memory buffers before sending the data to a receiver. These in-memory buffers on Destinations help absorb temporary imbalances between inbound and outbound data rates.
If inbound data rates begin to spike, data shifts to storage in all the available buffers for that Destination. Cribl Stream then attempts to output events at a more appropriate rate for the downstream receiver.
The threshold for triggering a backpressure event varies by Destination type. See About Destination Backpressure Triggers for more information.
A backpressure event triggers when buffers are full.
Backpressure behavior engages. During a backpressure event, Cribl Stream responds in one of the following ways, based on the Destination Backpressure behavior options you configured on the Destination:
Setting Description Block All data is blocked until the backpressure event has resolved. If set to Block, the output will refuse to accept new data until the receiver is ready. The system will return block signals back to the sender.
If the sender also supports backpressure response mechanisms, the sender may stop sending data. Consult the documentation for the sender to ensure you know how that specific sender handles a backpressure signal. In general, TCP-based senders support backpressure and stop sending data once Cribl Stream stops sending TCP acknowledgments back to it.Drop Events The Destination will discard all new events until the backpressure event has resolved and the receiver is ready. Persistent Queue If the Destination supports it, the Destination will engage the persistent queue behavior. If enabled, persistent queue engages. If the persistent queue behavior engages, Cribl Stream responds in one of the following ways, based on its configured backpressure mode:
Mode Description Error Queues and stores data to persistent storage when the Destination is unavailable or in an error state. Backpressure Queues and stores data to persistent storage when it detects backpressure from the Destination until the backpressure event resolves. Always On Cribl Stream immediately queues and stores all data to persistent storage for all events, even when there is no backpressure. You can configure additional settings to determine:
- Storage location: Whether to store data on the Worker Node’s local disk or (for Cribl Stream only) in shared storage for the Worker Group (an S3-compatible bucket or NFS volume).
- How much data to store in memory: The amount of data held in RAM before writing to the persistent store.
- Queue capacity limits: What happens to data when the storage reaches its configured limit (such as whether to block or drop the data).
When the backpressure event ends, data starts flowing out of the persistent queue and into the Destination. Cribl Stream begins to drain persistent queues when the receiver can accept data. In the case of load-balanced receivers, this means when at least one receiver can accept data.
By default, after data flow is re-established, the persistent queue flushes every 10 seconds. For S3-backed queues, the Node drains data directly from the shared bucket. If Optimize S3 cost is enabled, the Node may batch these operations to minimize S3 API call volume.
Persistent queues drain using FIFO (first in, first out) event forwarding, which means that Cribl Stream sends earlier queued events first when receivers recover. However, in Cribl Stream 4.1 and newer, you can instead prioritize new events by disabling Strict ordering on a Destination.
If you turn off persistent queue for a Source or Destination (or shut down the whole Source or Destination) before the queues drain, you will orphan any events still in the persistent queue store.
- If data storage is local: This data is inaccessible unless you re-enable the queue on the same Worker Node.
- If data storage is shared (NFS or S3): This data remains in the S3 bucket or NFS mount. While other Worker Nodes can potentially recover this data, you should always wait for queues to drain before disabling the feature to ensure a clean transition.
See How to Safely Disable and Clear Persistent Queues for more information.
Configure Destination Persistent Queue
To enable persistent queuing, you must configure settings at two levels: the individual Source and (for on-prem and hybrid deployments in Cribl Stream only) at the Worker Group level.
This section provides a configuration quick start for experienced users. However, new Cribl Stream users should consider reading the full architectural recommendations in this guide to understand how to design an optimal queueing strategy for your environment.
Before You Start
Determine whether persistent queue is right for your deployment. Consult When to Use Persistent Queues for an overview of benefits, trade-offs, and architectural requirements.
Enabling persistent queue on a Destination is redundant if the downstream receiver already safeguards events in its own disk buffer. Enabling persistent queue on both the Cribl Stream and the receiver could cause data latency. Check the settings for the receiver to ensure you know whether that specific receiver already safeguards against data loss.
On Cribl-managed Cribl.Cloud Worker Nodes (Enterprise plan), most configuration options are managed automatically by Cribl to optimize performance. In the UI for Cribl.Cloud, enabling persistent queue only exposes the destructive Clear Persistent Queue button. This action is destructive and should only be used as a last resort. See How to Safely Disable and Clear Persistent Queues for more information.
Configure the Storage Substrate (Shared or Local)
Before enabling persistent queueing on a Destination, you must determine where the data will be stored. For Cribl Stream, you have the option to use either a shared storage option (such as Amazon S3 or NFS) or a local storage option. By default, Cribl Stream uses local storage.
Shared storage options (S3-backed and NFS) are currently available for Cribl Stream only. Cribl Edge persistent queues must use the local filesystem storage type.
When making this decision, consider whether you require shared durability across your Worker Group. That means that if a single Node in a Worker Group goes down, the surviving Nodes can recover data from the failed Node using a shared storage location. To use shared storage, you must first configure a shared storage substrate (Amazon S3 or NFS). See Persistent Queue Shared Storage for how shared storage, orphan management, and PQ revival work.
Storage configurations are applied globally at the Worker Group level, meaning all Worker Nodes within a single Worker Group must use the exact same storage substrate. You cannot mix and match storage options within the same Worker Group environment, such as assigning Amazon S3 to some Worker Nodes and local filesystems to others. If you require different storage strategies for different data streams, you must isolate those architectures into separate, distinct Worker Groups.
For help choosing the right storage type and architecture for your environment, see:
- Where to Store Data
- How Much Disk Space to Allocate
- Whether to Compress Data
- How Much Data to Store in Memory
Configure persistent queue based on your chosen storage strategy. For local storage, you can skip this configuration step and proceed directly to Configure Persistent Queue on the Destination.
For shared storage (Amazon S3 or NFS):
On the top bar, select Products, and then select Cribl Stream. Under Worker Groups, select a Worker Group.
Navigate to Worker Group Settings, then System, then PQ Storage.
Select the Storage type. See Where to Store Data for guidance choosing a storage option.
Configure the settings based on your selection:
Based on your storage option selection, other settings will appear on this page. See Worker Group PQ Storage Fields for a description of each setting and recommendations. Configure these options for your storage option:
Network filesystem (NFS): Define the mount point, which is the local path on the Worker Group where the share is attached.
AWS S3: Define the S3 file limit, queue size limit, and compression settings. Also enter in the connection details including the S3 bucket, key prefix, and authentication methods. Optionally, you could also modify the advanced settings to provide region and endpoint connection details. The advanced settings also contain the Optimize S3 cost setting.
For both shared storage options, configure the Queue size limit and S3 file size limit. See Worker Group PQ Storage Fields for recommendations.
When using shared storage, these limits are managed at the Worker Group level to ensure consistency across the Group. When shared storage is enabled, these fields are hidden in the individual Destination settings.
Select Save. Then, Commit and Deploy your changes.
After configuring the storage substrate, proceed to Configure Persistent Queue on the Destination to enable the queue for specific data streams.
Configure Persistent Queue on the Destination
To configure persistent queue on a Destination:
Open the configuration modal for the Destination. In the General Settings tab, set the Backpressure Behavior option to Persistent Queue.
In the Persistent Queue Settings tab, select an appropriate Mode from the available options. See When to Store Data During a Backpressure Event for help choosing between Error, Backpressure, or Always On.
Configure the storage limits. For shared storage (NFS or AWS S3), these limits are defined at the Worker Group level and will not appear here. If you are using local filesystem for storage, define these settings:
Set the File size limit to specify the maximum amount of data stored in each queue file before the file closes and starts a new file. Set the Queue size limit to determine the maximum amount of disk space that Cribl allows the queue to consume on each Worker Process. See How Much Data to Store in Memory for configuration and tuning guidance.
Set the Queue file path to determine the location for the persistent queue files. See Where to Store Data for configuration and tuning guidance.
Optional: Set the Compression type to apply compression to the data before the queue file closes. See Whether to Compress Data for configuration and tuning guidance.
Set the Queue-full behavior to determine what happens when the persistent queue reaches its Queue size limit and runs out of space. See What Happens to Data when the Queue is Full for configuration and tuning guidance.
Optional: If needed, turn off Strict Ordering to more finely tune the Drain rate limit (EPS). See How to Drain Persistent Queues When Backpressure Events End for configuration and tuning guidance.
The Backpressure duration limit setting displays when the Mode is set to
Backpressure. It controls the duration for which a Destination must experience backpressure before data is queued to persistent storage. The default waiting time is30seconds. Lowering this limit strengthens data loss prevention, while increasing it helps prevent unnecessary queue activation in environments with frequent, short network interruptions.Select Save. Then, Commit and Deploy your changes.
After configuring your persistent queue settings, continue to monitor the behavior of this Destination during a backpressure event and tune these settings to improve performance as needed. See How to Optimize Persistent Queues for guidance.
Key Decisions When Configuring Destination Persistent Queues
This section includes guidance you should consider when implementing persistent queue on a Destination. It explains the benefits and tradeoffs of different configuration settings for most use cases.
When to Store Data During a Backpressure Event
Once the backpressure queue behavior engages, you need to determine how it should write data to persistent storage. You have three available options (modes) for storing data during a backpressure event:
| Mode | Description |
|---|---|
| Error | Queues and stores data to persistent storage when the Destination is unavailable or in an error state. |
| Backpressure | Queues and stores data to persistent storage when it detects backpressure from the Destination until the backpressure event resolves. |
| Always On | Cribl Stream immediately queues and stores all data oto persistent storage for all events, even when there is no backpressure. |
Consider using the Always On mode if your business has a low tolerance for data loss. However, do so with some caution. Enabling this mode could have impacts on the persistent queue optimization metrics, such as disk space, throughput, data latency, and CPU utilization.
Consider experimenting with this mode to see whether it’s right for your business needs. Establish a baseline for system performance before you enable Always On and then observe the impacts when you turn that mode on.
Ensure you have enough disk storage to store events on disk during an outage. See Estimate Queue Capacity for an Outage for a worked example, including how fanning out to multiple Destinations multiplies the disk you need.
Where to Store Data
The location of your persistent queue and the amount of disk space you need depend on whether you use local or shared storage. You must ensure the chosen location (whether local or shared) has enough capacity to handle your peak backpressure events.
Cribl Edge only allows local storage. Cribl Stream has three available storage type options:
| Option | Description | When to Use |
|---|---|---|
| Local filesystem | Stores data exclusively on the individual Worker Node’s disk. This offers the highest I/O performance but prevents other Nodes from recovering data if the Node is lost or decommissioned. | Use a local filesystem or EBS when you want the highest-performance per-node persistent queue and can manage the Node-to-volume constraints. |
| Network filesystem (NFS) | (Shared) Stores data on a shared network volume. NFS is a shared-storage option that allows multiple Nodes to access a common queue directory. | Use NFS only when your environment does not support S3-compatible object storage or when you are operating in a low-throughput environment where synchronous network-write overhead is acceptable. Avoid NFS for persistent queue when performance is important. |
| AWS S3 | (Shared) Stores data in an S3-compatible object store. This is the recommended shared storage option for elastic and cloud-native environments. It uses a local on-disk cache for high-speed writes, then asynchronously uploads data to S3. If a single Node goes down, a surviving Node can access the shared storage queue and drain queues that belonged to a dead Node. | Use S3-backed PQ when you need shared, recoverable persistent queue across Nodes in the same Worker Group, especially in environments where Nodes can be replaced, redeployed, or scaled down. This prevents persistent queue data from being stranded on a single Node. See Persistent Queue Shared Storage for orphan management and PQ revival. |
Storage locations:
- Local and Network Filesystem (NFS) (Shared): Use the Queue file path setting to determine the location for the persistent queue files. The default is
$CRIBL_HOME/state/queues. When writing data, Cribl Stream will append/<worker-id>/<output-id>to this path to keep each the data separate for each Worker Node. - AWS S3 (Shared): You specify an S3 bucket and key prefix as the primary storage location. Authentication is required.
When using AWS S3 shared storage, follow these guidelines:
- Cost Optimization: Keep the Optimize S3 cost enabled (default) to batch uploads and reduce API request volume. Only disable this if your architecture requires immediate replication and you are prepared for higher S3
PUTcosts. Continue to monitor your environment to see how frequently Nodes are replaced during maintenance or autoscaling. Use these observations to tune your settings. - Reverting Storage Types: You can switch from shared storage back to a local filesystem at any time. However, data is not automatically migrated. You must drain all shared queues or explicitly clear the queue before changing the storage type to avoid data being left behind in the bucket.
- You cannot mix and match storage options within the same Worker Group environment. Storage configurations are applied globally at the Worker Group level, meaning all Worker Nodes within a single Worker Group must use the exact same storage substrate.
How Much Disk Space to Allocate
For queuing to operate properly, you must provide sufficient disk space for the persistent substrate. The key setting to be aware of is the Queue size limit, which defines the maximum amount of disk space that the queue can consume on each Worker Process. When the queue reaches this limit, the persistent queue stops queueing data and applies the Queue-full behavior.
Each PQ-enabled Source and Destination maintains its own queue on every Worker Process. The most that persistent queues can consume on a Worker Node is therefore:
Worker Processes × the sum of the Queue size limits for every PQ-enabled Source and Destination
Treat that result as the ceiling your storage must absorb, not as a recommendation. To decide how high the ceiling should be, start from the outage you want to survive. If you set the Queue size limit lower than the volume that an outage produces, queues reach their limit and apply the Queue-full behavior before the backpressure event ends.
Estimate Queue Capacity for an Outage
To size for a specific outage, work from your throughput, the number of queues that receive each event, and how long you want to queue through. During an outage, any engaged persistent queue writes events to disk, not only queues in Always On mode. Each PQ-enabled Destination queues its own copy of an event, so fanning out to more Destinations multiplies the disk you need. See Backpressure Behavior with Multiple Destinations.
For example, consider a Worker Group that receives 240 GB/day, distributes it evenly across 8 Worker Processes, and fans out to 2 PQ-enabled Destinations:
- Volume for the outage: 240 GB/day is 10 GB/hour, so a 4-hour outage produces 40 GB.
- Volume per Worker Process: 40 GB spread across 8 Worker Processes is 5 GB each.
- Queue size limit: Each Destination queues its own copy, so both queues on a Worker Process need 5 GB. Set the Queue size limit to at least 5 GB for each Destination. That value is also the default, so a longer outage target requires raising it.
- Disk per Worker Node: 8 Worker Processes × 2 Destinations × 5 GB is 80 GB of queue data, before you add the other disk consumers.
Adjust the estimate for your own deployment:
- Filtered Routes send less data to some Destinations.
- Uneven distribution concentrates more data on some Worker Processes.
- Compression reduces the volume stored on disk, but the Queue size limit still applies to uncompressed data.
- If you enable persistent queue on both a Source and its Destinations, a full Destination queue set to Block blocks upstream, and the Source begins queueing too.
Local Sizing
The general recommendation is to size for the full backlog. You must provision enough disk space to hold the entire Queue size limit. If available disk space falls below this minimum threshold, Cribl Stream will stop maintaining persistent queues, and data loss will begin. The default minimum is 5 GB.
In customer-managed hybrid Worker Groups, this minimum disk space configuration is set on each Worker Group. You can access this setting at Worker Group Settings > General Settings > Limits > Min free disk space.
Network Filesystem (Shared) Sizing
For Network Filesystem (NFS) storage, the guidelines are the same as for Local Sizing. Provision enough disk space to cover the full Queue size limit for each Worker Process, ensuring that available disk space never falls below the minimum required threshold.
AWS S3 (Shared) Sizing
The general recommendation is to size for the worst-case outage. When using S3-backed shared storage, your local disk requirements are decoupled from your total queue capacity. Instead of sizing for the entire backlog, size for concurrency and contingency.
When things are in a normal state, you only need enough local space for a transient cache. Once data is successfully uploaded to S3, it is evicted from the local disk.
In an outage state where S3 becomes unreachable, the Worker Node will fall back to storing data locally. It will continue to do this until it hits the Queue size limit. While you do not need to pay for large local volumes for steady-state storage, ensure your local disk has enough headroom to absorb a full Queue size limit for every active queue in the event S3 goes offline.
Other Disk Consumers
In most deployments, persistent queues share a volume with other data. When you size storage, account for these consumers alongside the queues:
- Minimum free disk space: Cribl Stream stops maintaining persistent queues when free space falls below the Min free disk space threshold. Treat that threshold as reserved capacity, not as space your queues can use.
- Staging directories: Non-streaming Destinations write files to a staging directory on local disk before uploading them. Staging can consume substantial space when uploads are slow. Size it separately from your queues. For a sizing formula that applies to any object storage Destination, see Determine Staging Directory Disk Size.
- Logs and the Cribl Stream installation: Queue files default to a path under
$CRIBL_HOME, so queues, application files, and logs often share one volume.
When these consumers share a volume with your queues, size the volume for all of them together.
Whether to Compress Data
When the queue file reaches its maximum file size, you can use the optional Compression setting to apply compression to the data before the queue file closes. Currently, the only available compression codec is Gzip.
If you enable Compression and also enter a Queue size limit, be aware of how these options interact:
- Cribl Stream currently applies the Queue size limit against the uncompressed data volume entering the queue.
- With this combination, Cribl recommends that you set the Queue size limit higher than the volume’s total available disk space, not including compression. This will maximize queue saturation and minimize data loss.
Enabling compression is highly recommended if you are using either NFS or S3-backed persistent queue as your storage type for a few reasons:
- Network efficiency: Compressing data before it leaves the Node reduces the volume of data sent across the network. This is critical for high-volume streams being sent to S3 or NFS, as it prevents the storage network from becoming a bottleneck during heavy backpressure.
- Storage optimization: Smaller data sizes result in lower long-term storage costs (especially in S3) and faster write/upload times. For S3, this reduces the time data spends in the local cache before being replicated to the bucket. For NFS, this reduces the I/O load on the network mount, ensuring the Node can drain the queue more efficiently.
How Much Data to Store in Memory
When you enable persistent queues, you can configure the File size limit setting to specify the maximum amount of data stored in each queue file before the file closes and starts a new file. You can enter a value in units such as KB, MB, and more. If left unspecified, Cribl Stream defaults to 10 MB.
Additionally, you can use the Queue size limit setting to determine the maximum amount of disk space that Cribl Stream allows the queue to consume on each Worker Process. Once the queue reaches this limit, the Source stops queueing data and applies the configured Queue-full behavior. You can enter a value in units such as KB, MB, GB, or TB.
If the Queue size limit is not specified, it defaults to 5 GB. You can adjust this value to better suit your needs. For Sources with undefined Queue size limit values, queues exceeding 5 GB will trigger the configured queue-full behavior until you resize the limit.
To set a higher maximum value, navigate to Worker Group Settings > General Settings > Limits > Storage > Worker Process PQ size limit. The corresponding key in the limits.yml file is maxPQSize. (See Config Files: limits.yml for more information.) The default for this setting is 1 TB. Before increasing this limit, consult Cribl Support for guidance.
The information in this section applies only to on-prem or hybrid Worker Groups. For Cribl-managed Cribl.Cloud Organizations using persistent queue, Cribl automatically allocates up to 1 GB of disk space per Source, per Worker Process. You cannot change this limit.
This 1 GB limit applies to outbound uncompressed data, and the queue does not perform any compression. If the queue fills up, Cribl Stream blocks data flow, including outbound data.
What Happens to Data when the Queue is Full
You can use the Queue-Full Behavior setting to determine what happens when the persistent queue reaches its Queue size limit and runs out of space. There are two options:
| Setting | Description |
|---|---|
| Block | Blocks all data until the backpressure event has resolved. If set to Block, the output will refuse to accept new data until the receiver is ready. The system will return block signals back to the sender. |
| Drop new data | The Destination will discard all new events until the backpressure event has resolved and the receiver is ready. |
How to Drain Persistent Queues When Backpressure Events End
When a backpressure event ends, the persistent queue begins to drain to the downstream Destination. You can configure the order of event delivery and the rate at which Cribl Stream forwards events.
Use the Strict Ordering setting to configure the order that Cribl Stream sends data to the Destination. Toggle Strict Ordering on (default) to use FIFO (first in, first out) processing. This means Cribl prioritizes earlier queued events before sending newly arrived data. Toggle Strict Ordering off to change this behavior, prioritizing new data over the events already in the queue.
If you toggle Strict Ordering off, you must configure the Drain rate limit (EPS). This setting allows you to throttle the rate at which events drain from the persistent queue to the Destination. The default value of 0 disables throttling. Throttling the drain rate helps Cribl manage the incoming stream of live data more effectively, preventing delays caused by queue processing. It also improves the throughput of active connections by reserving additional resources for them.
The Drain rate limit (EPS) is set in Events Per Second (EPS). To determine your system’s EPS value:
Open the Monitoring page. From Cribl Stream’s sidebar, select Monitoring to access dashboards displaying data for all Worker Groups and all nodes.
Filter by a specific Worker Node. Use the Groups menu at the top to restrict monitoring data to a single Worker Node.
Adjust the time granularity. Use the time menu change the display granularity from the default
15 minto1 dayfor better accuracy.Locate the EPS metrics. On the Monitoring page, find the Events In and Out metrics group. Copy the value listed under THROUGHPUT IN (AVG). For example, a typical value might be
31,000 EPS.Cribl recommends setting the Drain Rate Limit to roughly 10% of a single Worker Process’s throughput. This ensures that the background drain doesn’t starve the live stream of CPU and network resources.
Determine EPS per Worker Process. Divide the Worker Process EPS by the number of Worker Processes (WPs). For example:
31,000 EPS / 14 WPs = 2,200 EPS per WP.Calculate 10% of EPS per Worker Process. Multiply the result by
0.10to find the recommended drain rate. For example:10% of 2,200 EPS = 220 EPS.Configure the Drain Rate Limit. In the persistent queue settings for the Destination, enter this value in the Drain rate limit (EPS) field. For example:
220.
After applying this setting, monitor the queue’s drain rate. If the queue is draining too slowly, carefully increase the Drain rate limit (EPS) while ensuring it doesn’t interfere with live data processing. Avoid setting the limit too high, as this can impact the performance of live streams. If needed, consider optimizing Worker startup connections and managing CPU load to further enhance performance at Worker Group Settings > Worker Processes.
Cribl’s guarantee for data delivery is that all data is delivered at least once, but not exactly once. Sometimes Cribl Stream sends duplicate data events when the persistent queue drains.
Destination Persistent Queue Notifications
Some Cribl licenses allow you to configure Notifications for Destination persistent queues for on-prem deployments. In general, Cribl recommends setting Notifications for these events when using persistent queue to ensure you are aware of important system events. These Notifications always appear in Cribl Stream’s user interface and internal logs. You can also send them to external systems.
You can set notifications for these scenarios:
- Persistent queue files exceed a configurable percentage of allocated storage.
- A Destination reaches the queue-full state, meaning it is running out of available disk space.
- A Destination backpressure engages, causing blocked or dropped events.
- Persistent Queue Usage (saturation).
See Notifications for information about adding Notifications for Destinations.
Monitor Destination Persistent Queues
Cribl Stream provides metrics and health indicators to monitor your Destination persistent queue through the Status tab on your Destination. Cribl Stream provides metrics and health indicators to monitor your Source persistent queue through the Status tab on your Source. The Status tab aggregates metrics and health from all Worker Processes, allowing you to assess the health of your persistent queues and the status of the Destination in real time.
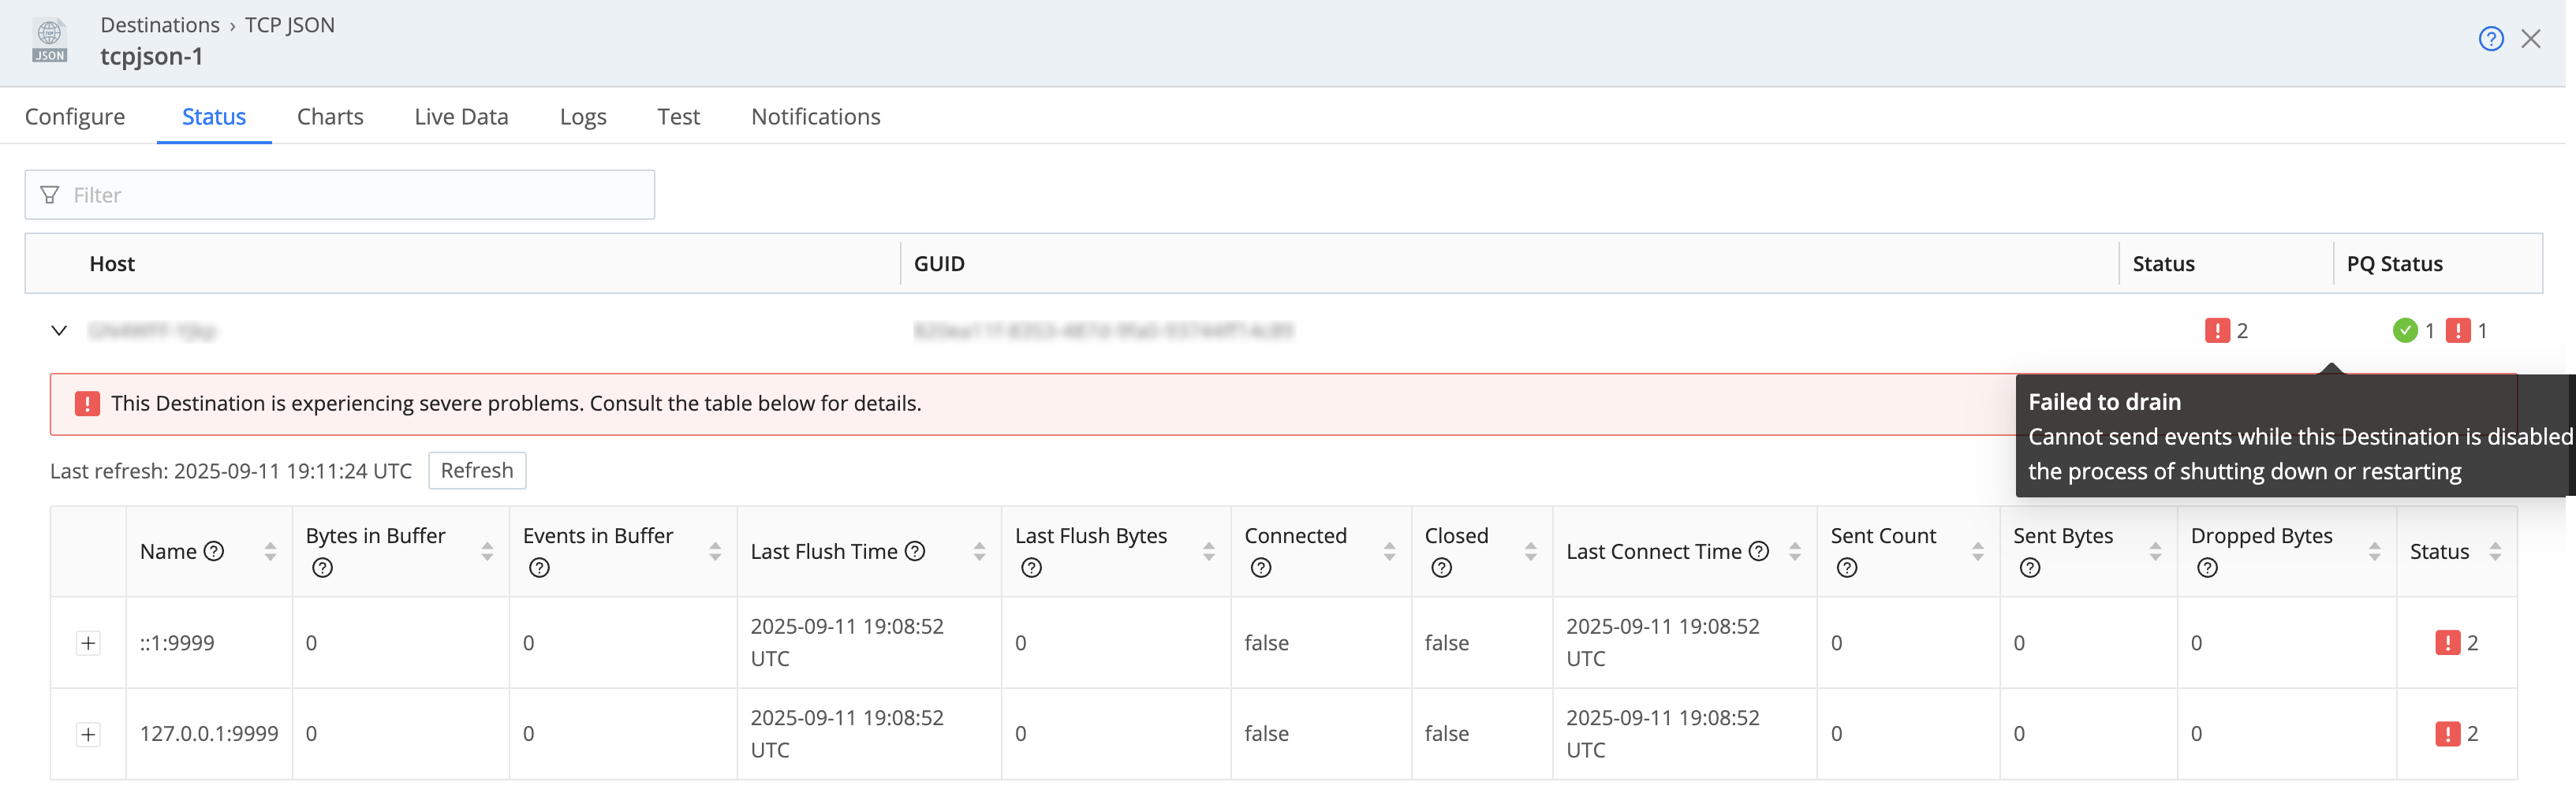
To view the Destination persistent queue metrics:
On the top bar, select Products, and then select Cribl Stream. Under Data, select Destinations.
From the sidebar, select the type of Destination you want to view.
Select the Destination from the list of currently configured Destination.
In the resulting modal, select the Status tab.
Inside this view, you can expand individual Worker Nodes for more details.
For additional analysis, you can also use Monitoring dashboards:
Navigate to Monitoring on the product sidebar.
Navigate to System > Queues (Sources) and view relevant data.
In Cribl Data Insights, the topology map can show a persistent queue sidecar on configured Destinations and open a PQ drawer with utilization and used/max bytes over a selectable time window. See Data Insights.
Troubleshooting Tools
For shared PQ storage metrics, orphan detection, and revival troubleshooting, see Persistent Queue Shared Storage.
Cribl internal logs for Cribl-managed Workers might include entries labeled Revived PQ Worker Process. These indicate where a Cribl-managed Worker was newly assigned to drain a persistent queue left over from a shut-down Worker Node. You can use these log events to troubleshoot Cloud persistent queue issues.
Reference
In Cribl Stream, some of the Destination persistent queue settings are located on the Destination and some are controlled at the Worker Group level, depending on your selected storage type. If you set the persistent queue storage mode to Network filesystem or AWS S3 at the Worker Group level (Worker Group Settings > System > PQ Storage), some of these configurations are only managed at the Worker Group level.
The shared storage settings at the Worker Group level are only available in Cribl Stream, not Cribl Edge.
Destination Persistent Queue Fields
The Persistent Queue Settings tab displays when the Backpressure behavior option in General settings is set to Persistent Queue. Persistent queue buffers and preserves incoming events when a downstream Destination has an outage or experiences backpressure.
Before enabling persistent queue, learn more about persistent queue behavior and how to optimize it with your system:
- About Persistent Queues
- Optimize Destination Persistent Queues
- About Destination Backpressure Triggers
Some of these settings might not appear if you set the persistent queue storage mode to Network filesystem or AWS S3 at the Worker Group level (Worker Group Settings > System > PQ Storage). When using these storage types, this behavior is managed at the Worker Group level. See Worker Group PQ Storage Fields for more information.
On Cribl-managed Cloud Workers (with an Enterprise plan), this tab exposes only the Mode and Backpressure duration limit settings and the destructive Clear Persistent Queue button (described at the end of this section). A maximum queue size of 1 GB disk space is automatically allocated per PQ-enabled Destination, per Worker Process. The 1 GB limit is on outbound uncompressed data, and no compression is applied to the queue.
This limit is not configurable. If the queue fills up, Cribl Stream blocks outbound data. To configure the queue size, compression, queue-full fallback behavior, and other options below, use a hybrid Group.
Mode: Use this menu to select when Cribl Stream engages the persistent queue in response to backpressure events from this Destination. The options are:
| Mode | Description |
|---|---|
| Error | Queues and stores data on a disk when the Destination is unavailable or in an error state. |
| Backpressure | Queues and stores data to a disk when it detects backpressure from the Destination until the backpressure event resolves. |
| Always On | Cribl Stream immediately queues and stores all data on a disk for all events, even when there is no backpressure. |
If a Worker/Edge Node starts with an invalid Mode setting, it automatically switches to Error mode. This might happen if the Worker/Edge Node is running a version that does not support other modes (older than 4.9.0), or if it encounters a nonexistent value in YAML configuration files.
File size limit: The maximum data volume to store in each queue file before closing it. Enter a numeral with units of KB, MB, and so on. Defaults to 10 MB. When you save the configuration, File size limit must be greater than or equal to Buffer size limit (bytes). Cribl Stream rejects invalid combinations.
Queue size limit: The maximum amount of disk space that the queue can consume on each Worker Process. When the queue reaches this limit, the Destination stops queueing data and applies the Queue-full behavior. Defaults to 5 GB. This field accepts positive numbers with units of KB, MB, GB, and so on. You can set it as high as 1 TB, unless you’ve configured a different Worker Process PQ size limit on the Worker Group/Fleet Settings page.
Queue file path: The location for the persistent queue files. Defaults to $CRIBL_HOME/state/queues. Cribl Stream appends /<worker-id>/<output-id> to this value.
Compression: Set the codec to use when compressing the persisted data after closing a file. Defaults to None. Gzip is also available.
Queue-full behavior: Whether to block or drop events when the queue begins to exert backpressure. A queue begins to exert backpressure when the disk is low or at full capacity. This setting has two options:
- Block: The output will refuse to accept new data until the receiver is ready. The system will return block signals back to the sender.
- Drop new data: Discard all new events until the backpressure event has resolved and the receiver is ready.
Buffer size limit (bytes): The maximum memory to buffer events before flushing them to persistent queue on disk. Enter a value with a unit suffix. For example: 64KB, 1MB, or 10MB. Spaces between the number and unit are allowed (such as 64 KB). Units are case-insensitive. Plain byte values (like 65536) are accepted, but decimals (like 0.5MB) are not. The valid range is 64KB to 10MB. Values outside this range are rounded to the nearest limit. Defaults to 1MB.
Deprecation Notice
The Buffer size limit (bytes) setting replaces the deprecated Buffer size limit (events) setting as of version 4.18.0 to provide more predictable memory management. For upgraded Worker Groups and Fleets, the new byte-based limit defaults to
1MB. Update your configurations to use the byte-based limit to ensure optimal memory stability.
Backpressure duration limit: Displays when Mode is set to Backpressure. Controls how long (in seconds) a Destination must experience backpressure before Cribl Stream queues data to persistent storage. Defaults to 30 seconds. Lowering this limit strengthens data loss prevention, while raising it helps prevent unnecessary queue activation in environments with frequent, short network interruptions.
Strict ordering: Toggle on (default) to enable FIFO (first in, first out) event forwarding, ensuring Cribl Stream sends earlier queued events first when receivers recover. The persistent queue flushes every 10 seconds in this mode. Toggle off to prioritize new events over queued events, configure a custom drain rate for the queue, and display this option:
- Drain rate limit (EPS): Optionally, set a throttling rate (in events per second) on writing from the queue to receivers. (The default
0value disables throttling.) Throttling the queue drain rate can boost the throughput of new and active connections by reserving more resources for them. You can further optimize Worker startup connections and CPU load in the Worker Processes settings.
Clear Persistent Queue: For Cloud Enterprise only, select this button if you want to delete the files that are currently queued for delivery to this Destination. If you select this button, a confirmation modal appears. Clearing the queue frees up disk space by permanently deleting the queued data, without delivering it to downstream receivers. This button only appears after you define the Output ID.
Use the Clear Persistent Queue button with caution to avoid data loss. See How to Safely Disable and Clear Persistent Queues for more information.
Worker Group PQ Storage Fields
Storage type: Select the underlying substrate used to store queued data during backpressure or Destination unavailability. See Where to Store Data for a more detailed explanation of benefits and tradeoffs.
| Option | Description |
|---|---|
| Local filesystem | Stores data exclusively on the individual Worker Node’s disk. This offers the highest I/O performance but prevents other Worker Nodes from recovering data if the Node is lost or decommissioned. |
| Network filesystem (NFS) | Stores data on a shared network volume. This allows for queue recovery across the Worker Group, but requires a stable, high-performance network mount to avoid latency. |
| AWS S3 | Stores data in an S3-compatible object store. This is the recommended shared storage option for elastic and cloud-native environments. It uses a local on-disk cache for high-speed writes, then asynchronously uploads data to S3 to enable group-wide queue recovery (revival) and virtually unlimited capacity. |
S3 File size limit: The maximum data volume to store in each queue file before closing it. Enter a numeral with units of KB, MB, and so on. Defaults to 10 MB.
Queue size limit: The maximum amount of disk space that the queue can consume on each Worker Process. When the queue reaches this limit, the Destination stops queueing data and applies the Queue-full behavior. Defaults to 5 GB. This field accepts positive numbers with units of KB, MB, GB, and so on. You can set it as high as 1 TB, unless you’ve configured a different Worker Process PQ size limit on the Worker Group/Fleet Settings page.
Enable compression: Determines whether Cribl Stream compresses queued data before writing it to the persistent store. When using S3-backed storage, keeping compression enabled is highly recommended. Smaller compressed slices result in faster asynchronous uploads and lower S3 PUT request costs. See Whether to Compress Data for more information.
NFS-Only Fields
These settings are only available if Network filesystem is the selected persistent queue storage type.
Mount point: The local directory path on the Cribl Stream Worker where the remote NFS share is mounted. This directory must be pre-mounted and accessible by the Cribl Stream user before enabling the queue. Ensure the mount is configured with the hard and intr options in your operating system to prevent data corruption and allow the Cribl Stream process to remain responsive if the NFS server becomes unreachable.
Buffer size limit (bytes): The maximum memory to buffer events before flushing them to persistent queue on disk. Enter a value with a unit suffix. For example: 64KB, 1MB, or 10MB. Spaces between the number and unit are allowed (such as 64 KB). Units are case-insensitive. Plain byte values (like 65536) are accepted, but decimals (like 0.5MB) are not. The valid range is 64KB to 10MB. Values outside this range are rounded to the nearest limit. Defaults to 1MB.
When you save NFS Worker Group PQ storage settings, S3 file size limit must be greater than or equal to Buffer size limit (bytes).
AWS S3-Only Fields
S3 bucket: Name of the destination S3 Bucket.
Key prefix: Root directory to prepend to path before uploading.
Authentication method: Use the Authentication method drop-down to select one of these options:
Auto: This default option uses the AWS SDK for JavaScript to automatically obtain credentials in the following order of attempts:
- Environment Variables: Loaded from environment variables
AWS_ACCESS_KEY_IDandAWS_SECRET_ACCESS_KEY. - IAM Identity Center (SSO): Loaded from AWS IAM Identity Center configuration.
- Shared Credentials File: Loaded from the shared credentials file (
~/.aws/credentials). - IAM Roles for Amazon EC2/ECS: Loaded from AWS Identity and Access Management (IAM) roles attached to an EC2 instance or ECS container.
- JSON File on Disk: Loaded from a JSON file on disk.
- Other Credential-Provider Classes: Other credential-provider classes provided by the AWS SDK for JavaScript.
The Auto method works both when running on AWS and in other environments where the necessary credentials are available through one of the above methods.
Azure-based Cribl.Cloud Worker Groups do not have AWS credentials, so Auto finds none and authentication fails. On an Azure-based Worker Group, select another authentication method and supply your own AWS credentials.
SSO Providers
When using the auto authentication method, you can leverage SSO providers like SAML and Okta to issue temporary credentials. These credentials should be set in the environment variables
AWS_ACCESS_KEY_IDandAWS_SECRET_ACCESS_KEY. The AWS SDK will then use these environment variables to authenticate.
Manual: If not running on AWS, you can select this option to enter a static set of user-associated IAM credentials (your access key and secret key) directly or by reference. This is useful for Workers not in an AWS VPC, for example, those running a private cloud. The Manual option exposes these corresponding additional fields:
Access key: Enter your AWS access key. If not present, will fall back to the
env.AWS_ACCESS_KEY_IDenvironment variable, or to the metadata endpoint for IAM role credentials.Secret key: Enter your AWS secret key. If not present, will fall back to the
env.AWS_SECRET_ACCESS_KEYenvironment variable, or to the metadata endpoint for IAM credentials.
The values for Access key and Secret key can be a constant or a JavaScript expression. Store credentials as secrets and reference them with C.Secret(): use `${C.Secret('myKeyPair', 'keypair').apiKey}` for the access key and `${C.Secret('myKeyPair', 'keypair').secretKey}` for the secret key.
Enclose values that contain special characters (like
/) or JavaScript expressions in single quotes or backticks.
Secret: If not running on AWS, you can select this option to supply a stored secret that references an AWS access key and secret key. The Secret option exposes this additional field:
- Secret key pair: Use the drop-down to select an API key/secret key pair that you’ve configured in Cribl Stream’s secrets manager. A Create link is available to store a new, reusable secret.
Enable Assume Role: When using Assume Role to access resources in a different Region than Cribl Stream, you can target the AWS Security Token Service (STS) endpoint specific to that Region by using the CRIBL_AWS_STS_REGION environment variable on your Worker Node. To specify a custom STS endpoint, set the CRIBL_AWS_STS_ENDPOINT environment variable. If both are set, CRIBL_AWS_STS_ENDPOINT takes precedence. Setting an invalid Region or endpoint results in a fallback to the global STS endpoint.
Enable for S3: Toggle on to use Assume Role credentials to access S3.
AssumeRole ARN: Enter the Amazon Resource Name (ARN) of the role to assume.
External ID: Enter the External ID to use when assuming role. This is required only when assuming a role that requires this ID in order to delegate third-party access. For details, see AWS’ documentation.
Duration (seconds): Duration of the Assumed Role’s session, in seconds. Minimum is 900 (15 minutes). Maximum is 43200 (12 hours). Defaults to 3600 (1 hour).
Advanced AWS S3 Fields
Region: Region where the S3 bucket is located.
You must grant your IAM role or user the
GetBucketLocationpermission to the S3 bucket when no Region is selected. See Amazon S3 Permissions for an example.
Endpoint: S3 service endpoint. If empty, Cribl Stream will automatically construct the endpoint from the AWS Region. To access the AWS S3 endpoints, use the path-style URL format. You don’t need to specify the bucket name in the URL, because Cribl Stream will automatically add it to the URL path. For details, see AWS’ Path-Style Requests topic.
Reuse connections: Whether to reuse connections between requests. Toggling on (default) can improve performance.
Reject unauthorized certificates: Whether to accept certificates that cannot be verified against a valid Certificate Authority (for example, self-signed certificates). Defaults to toggled on.
Optimize S3 cost: Determines whether Cribl Stream batches multiple data slices into fewer S3 upload requests to minimize API costs. When toggled on (default), Cribl Stream defers uploads for up to 10 seconds to batch smaller slices together. This significantly reduces the volume of S3 PUT requests and associated costs. This is recommended for high-volume environments where a 10-second recovery point window is acceptable. When toggled off, Cribl Stream replicates each sealed slice to the S3 bucket immediately. This ensures the shortest possible window between local ingest and shared storage durability, but will increase S3 API request costs.