


Redis
The Redis Function interacts with Redis stores, setting and getting key-hash and key-value combinations. It uses in-memory caching of these key pairs to enable large lookup tables that would be cumbersome with a CSV or binary lookup file.
You can use Cribl Stream Collectors (for example, a REST Collector) to retrieve reference data from desired endpoints, and then use this Function to store the data on Redis and retrieve it to enrich your data. By default, Cribl Stream does not cache the data returned from this Redis Function, but you can enable client-side caching.
Your Redis Function can interact with three kinds of Redis instances: Standalone (the default); Redis Cluster, which scales horizontally; or Redis Sentinel, a distributed system that provides high availability.
Managing Redis Connections
Using Redis Functions can create a large number of TCP connections to the Redis server (“Redis connections” in short). This is because Cribl Stream creates a separate TCP connection to Redis for every Redis Function and every reference to a Redis Function. This means that certain usage patterns will increase the number of Redis Connections, including:
- Sending the output of a Chain Function to a regular Pipeline that includes a Redis Function.
- Using a Redis Function in a Source’s pre-processing Pipeline.
- Using a Redis Function in a Destination’s post-processing Pipeline.
To limit the number of Redis connections, you can reuse connections that share certain properties. These properties depend on the type of the Redis instance:
- Standalone: username, password, and URL.
- Cluster: username, password, and all root node hosts and ports.
- Redis Sentinel: username, password, master name, and all root node hosts and ports.
To enable reusing Redis connections:
- In the sidebar, select Worker Groups and select the Worker Group you want to configure.
- On the Worker Group submenu, select Group Settings.
- Select General Settings > Limits > Redis > Connections.
- Toggle Reuse Redis connections on.
- Configure Connection limit and confirm with Save.
In a Single-instance deployment, the Redis connections settings are located in the main Settings menu.
When you enable Reuse Redis connections, Cribl Stream attempts to reuse an existing Redis connection instead of creating a new one if:
- A new Redis connection is necessary, and
- The new connection’s properties match those of an existing, open connection.
The example below illustrates how powerfully this can affect the demands Cribl Stream places on a Redis server.
Determining Number of Connections
Connection limit is the upper limit of connections to Redis that Cribl Stream can establish before starting to reuse them. To determine the number to configure for your deployment, consider among others:
- Type of Redis instance you’re connecting to (Standalone, Cluster, or Redis Sentinel)
- Size of the Redis server
- Number of connections the Redis server is configured to allow
- Number of other clients using the same Redis server
If you already have Redis connections established, be careful not to reduce Connection limit below the current connection number.
Example: Managing Redis Connections
Referencing a Redis Function from a Pipeline and/or another Function can dramatically multiply the number of Redis connections created, unless we mitigate this effect by applying the Reuse Redis connections control. Let’s see how this plays out in a detailed example. Suppose we do the following:
- Create a Pipeline (we’ll call it “Pipeline Zero”) that contains 10 Redis Functions that connect to the same Redis server, with identical connection properties. Cribl Stream will create 10 TCP connections to the Redis server (“Redis connections”).
- Reference Pipeline Zero in a Chain Function that’s in another Pipeline. This creates 10 more connections, for a total of 20 Redis connections.
- Reference Pipeline Zero in an additional, separate Chain Function that’s in yet another Pipeline, creating 10 more connections, for a total of 30 Redis connections.
- Use Pipeline Zero as a pre-processing Pipeline for a Source, creating 10 more connections, for a total of 40 Redis connections.
- Use Pipeline Zero as a post-processing Pipeline for a Destination, creating 10 more connections. Now we have a grand total of 50 Redis connections.
Now consider the effect of these Pipelines within Worker Nodes and their Worker Processes. For a typical deployment scenario with 10 Worker Nodes, each of which have 10 Worker Processes, the calculation looks like this:
- 50 connections times 10 Worker Processes = 500 connections, times 10 Worker Nodes = 5000 connections.
A single Redis server can be hard-pressed to handle so many connections. Apart from that, the number of connections is unnecessarily high for the expected throughput. Let’s use Reuse Redis connections to reduce the number of Redis connections.
Enable Reuse Redis connections and set Connection limit to 4. Now revise the calculation:
- 4 connections times 10 Worker Processes = 40 connections, times 10 Worker Nodes = 400 connections.
This reduces the number of connections by better than a factor of 10, making our deployment much less likely to overwhelm the Redis server.
Usage
Filter: Filter expression (JavaScript) that selects data to feed through the Function. Defaults to true, meaning it evaluates all events.
Description: Simple description of this Function. Defaults to empty.
Final: Toggle on to stop feeding data to the downstream Functions. Default is toggled off.
Result field: Name of the field in which to store the returned value. (Leave empty to discard the returned value.)
Command: Redis command to perform. Required. (A complete list of Redis commands is at: https://redis.io/commands.)
Key: A JavaScript expression to compute the value of the key to operate on. Can also be a constant such as username. This is a required field. Select the icon at right to open a validation modal.
Args: A JavaScript expression to compute arguments to the operation. Select the icon at right to open a validation modal. When the expression you enter is a plain value or an array, it resembles the options and arguments of a Redis command in the Redis CLI.
For example:
Suppose you want to
SETa key named_mascot. And, of the options that theSETcommand takes, you want to use two:GETandEX. The first,GET, takes no arguments; the second,EX, takes an integer in seconds.You want to set
_mascotto the valuegoat, andEXto 5 seconds. Here is the array you’d enter in the Args column:['goat', 'GET','EX',5 ]
Deployment Type
From the drop-down, select Standalone, Cluster, or Sentinel. Some of these options display additional controls below. Hostnames must be JavaScript expressions (which can evaluate to a constant value), enclosed in quotes or backticks. They can be evaluated only at init time.
Standalone
This is the default deployment type. Enter a Redis URL to connect to. The format is:[redis[s]:]//[[user][:password@]][host][:port][/db-number][?db=db-number[&password=bar[&option=value]]]
Example:redis://user:secret@localhost:6379/0?foo=bar&qux=baz
Example with no user specified:redis://secret@localhost:6379/0?foo=bar&qux=baz
Standalone with TLS
To enable TLS, specify a Redis URL that starts with rediss:// rather than redis://. This URL reveals the TLS section of the config UI.
Example:rediss://user:secret@localhost:6379/0?foo=bar&qux=baz
Example with no user specified:rediss://secret@localhost:6379/0?foo=bar&qux=baz
Cluster
Specify Root nodes that the cluster will connect to. A single node is sufficient, but Cribl recommends listing two or more. Each of the Root Nodes consists of a Hostname and a Port.
In multi-key commands, ensure that all keys in the command are in the same hash slot. Otherwise, the command will fail. As a workaround, you can split the multi-key command into separate commands, where each command operates only on keys from a single hash slot.
Scale Reads determines which nodes in the Redis cluster should handle read commands. This setting helps optimize read performance and manage load distribution across the cluster. The available options are:
Masters: Directs all read commands to master nodes only. This ensures strong consistency but may limit read scalability.
Replicas: Directs all read commands to replica nodes only. This can improve read scalability but may result in stale data due to eventual consistency.
Masters and Replicas: Distributes read commands across both master and replica nodes. This option balances load and improves read performance but may occasionally return stale data.
Sentinel
Specify a Master group name, plus every Sentinel in your Redis deployment. Each Sentinel consists of a Hostname and a Port.
Authentication Method
Use the Authentication method buttons to select one of the following options, some of which display additional controls below.
None: Select this option where authentication either is not required, or is provided in the URL.
Basic: This displays Username and Password fields for you to enter your Redis credentials.
User Secret: This option exposes a drop-down in which you can select a stored text secret that references a Redis username and password, as described above. A Create link is available to store a new, reusable secret.
Admin Secret: This option exposes a drop-down in which you can select a stored text secret that references a Redis admin password. A Create link is available to store a new, reusable secret.
TLS
Validate server certs: Reject certificates that are not authorized by a CA in the CA certificate path, nor by another trusted CA (such as the system’s CA). Defaults to toggled on.
Server name (SNI): Server name for the SNI (Server Name Indication) TLS extension. This must be a host name, not an IP address.
Certificate: Select an existing certificate name from the drop-down or add a new certificate by selecting Create. See Add a TLS Certificate to a Worker Group for details.
CA certificate path: Path on client containing CA certificates (in PEM format) to use to verify the server’s cert. Path can reference $ENV_VARS.
Private key path (mutual auth): Path on client containing the private key (in PEM format) to use. Path can reference $ENV_VARS. Use only if mutual auth is required.
Certificate path (mutual auth): Path on client containing certificates (in PEM format) to use. Path can reference $ENV_VARS. Use only if mutual auth is required.
Passphrase: Passphrase to use to decrypt private key.
Minimum TLS version: Optionally, select the minimum TLS version to use when connecting. The minimum TLS version for Redis is version 6.
Maximum TLS version: Optionally, select the maximum TLS version to use when connecting.
Minimum TLS Requirement
The minimum Redis version required for TLS support is version 6.
Advanced Settings
Blocking time limit: Maximum amount of time (in seconds) before assuming that Redis is down and passing events through. Defaults to 60 seconds. Use 0 to disable timeouts.
Client-side cache: Toggle on to enable. Then navigate to Settings > General Settings > Limits > Redis Cache to configure the cache, as described in the next section.
Overall Redis Cache Settings
Together, these settings determine how the Cribl Stream client-side cache behaves. We’ll start with definitions:
Key TTL in seconds: The maximum time-to-live of a key in the cache, in seconds. 0 means no limit. Defaults to 10 minutes.
Max # of keys: The maximum number of keys the cache can contain. 0 (the default) means no limit.
Max cache size (bytes): The maximum number of bytes the cache can contain. 0 (the default) means no limit.
Service period (seconds): The interval at which the cache checks whether any keys need to be evicted. Defaults to 30 seconds.
Server assisted: This feature requires Redis version 6 or newer. Toggle on to enable server-assisted caching and display the Client tracking mechanism drop-down. See the Tradeoffs section for an explanation of the available options.
Now here’s the context:
For each Redis instance your Redis Functions interact with, Cribl Stream will operate one client-side cache. That cache will be shared between all the Redis Functions instances configured to interact with it. This is why the settings are in a central location, and why you cannot configure the cache at the individual function level.
Once per Service period, the cache checks whether any keys need to be evicted. The cache will evict:
The least-recently-accessed key, if the cache has reached either (1) its Max cache size (bytes) or (2) its Max # of keys.
Any key that exceeds its Key TTL in seconds.
Any key that is stale according to a notification to Cribl Stream from your Redis instance. Redis sends these notifications (a.k.a. invalidations, or invalidation messages) only when you have enabled Server assisted caching.
The overall benefit that client-side caching provides is having fewer stale keys in your cache for less time. The greater the proportion of GET-type, as compared to SET-type (write) commands your Cribl Stream-Redis interactions have, the greater that benefit will be. When your Cribl Stream Pipelines either have no SET-type operations, or use filters to keep those operations to a minimum, you should consider client-side caching. In sum, you must decide whether more accurate data in your cache is worth the cost of memory and processing.
Tradeoffs Inherent in Server-Assisted Caching
Consider the common scenario where other applications besides Cribl Stream are writing to your Redis instance. Say one of those applications modifies a key’s value. Now the value that Cribl Stream client-side cache has for that key is stale. Cribl Stream does not “know” about this, and retains the stale value until its TTL is up. This degrades the overall accuracy of data from the client-side cache.
Server-assisted caching is a remedy for this problem. With server-assisted caching enabled, your Redis instance will notify your client-side cache when Redis determines that a key’s value has changed. Then the Cribl Stream client-side cache will immediately evict the stale key. Now the client-side cache is more accurate. Redis also has documentation about server-assisted client-side caching.
There are two mutually-exclusive ways you can have Redis notify Cribl Stream. These are the two modes (delivery mechanisms) available in the Client tracking mechanism drop-down:
In Default mode, the Redis server remembers which keys the Cribl Stream client has requested. Redis only notifies Cribl Stream when the value of one of those keys has changed. This is most efficient for Cribl Stream but needs more memory and some extra processing time from the Redis server.
In Broadcast mode, the Redis server need not remember which keys came from where, because it simply notifies Cribl Stream when the value of any key has changed. This is most efficient for Redis, but now the Cribl Stream client needs to inspect every key that Redis says has changed. This consumes some extra processing time on the client, and generates extra network activity to accommodate notifications about keys that Cribl Stream never sees.
You should select whichever of these mechanisms best suits your environment. Does it make more sense to impose the heavier burden on the Redis server (as in Default mode) or on Cribl Stream (as in Broadcast mode)?
In both scenarios, for a given key, any write operation from any application (including Cribl Stream) that’s interacting with Redis, causes Cribl to evict the key from the client-side cache when Redis notifies Cribl.
Examples
Scenario A: Set and Get
This Pipeline demonstrates the use of a pair of Redis Functions. The first Function sets two key-value pairs in Redis. The second Function gets their values, by key, into two corresponding new Result fields.
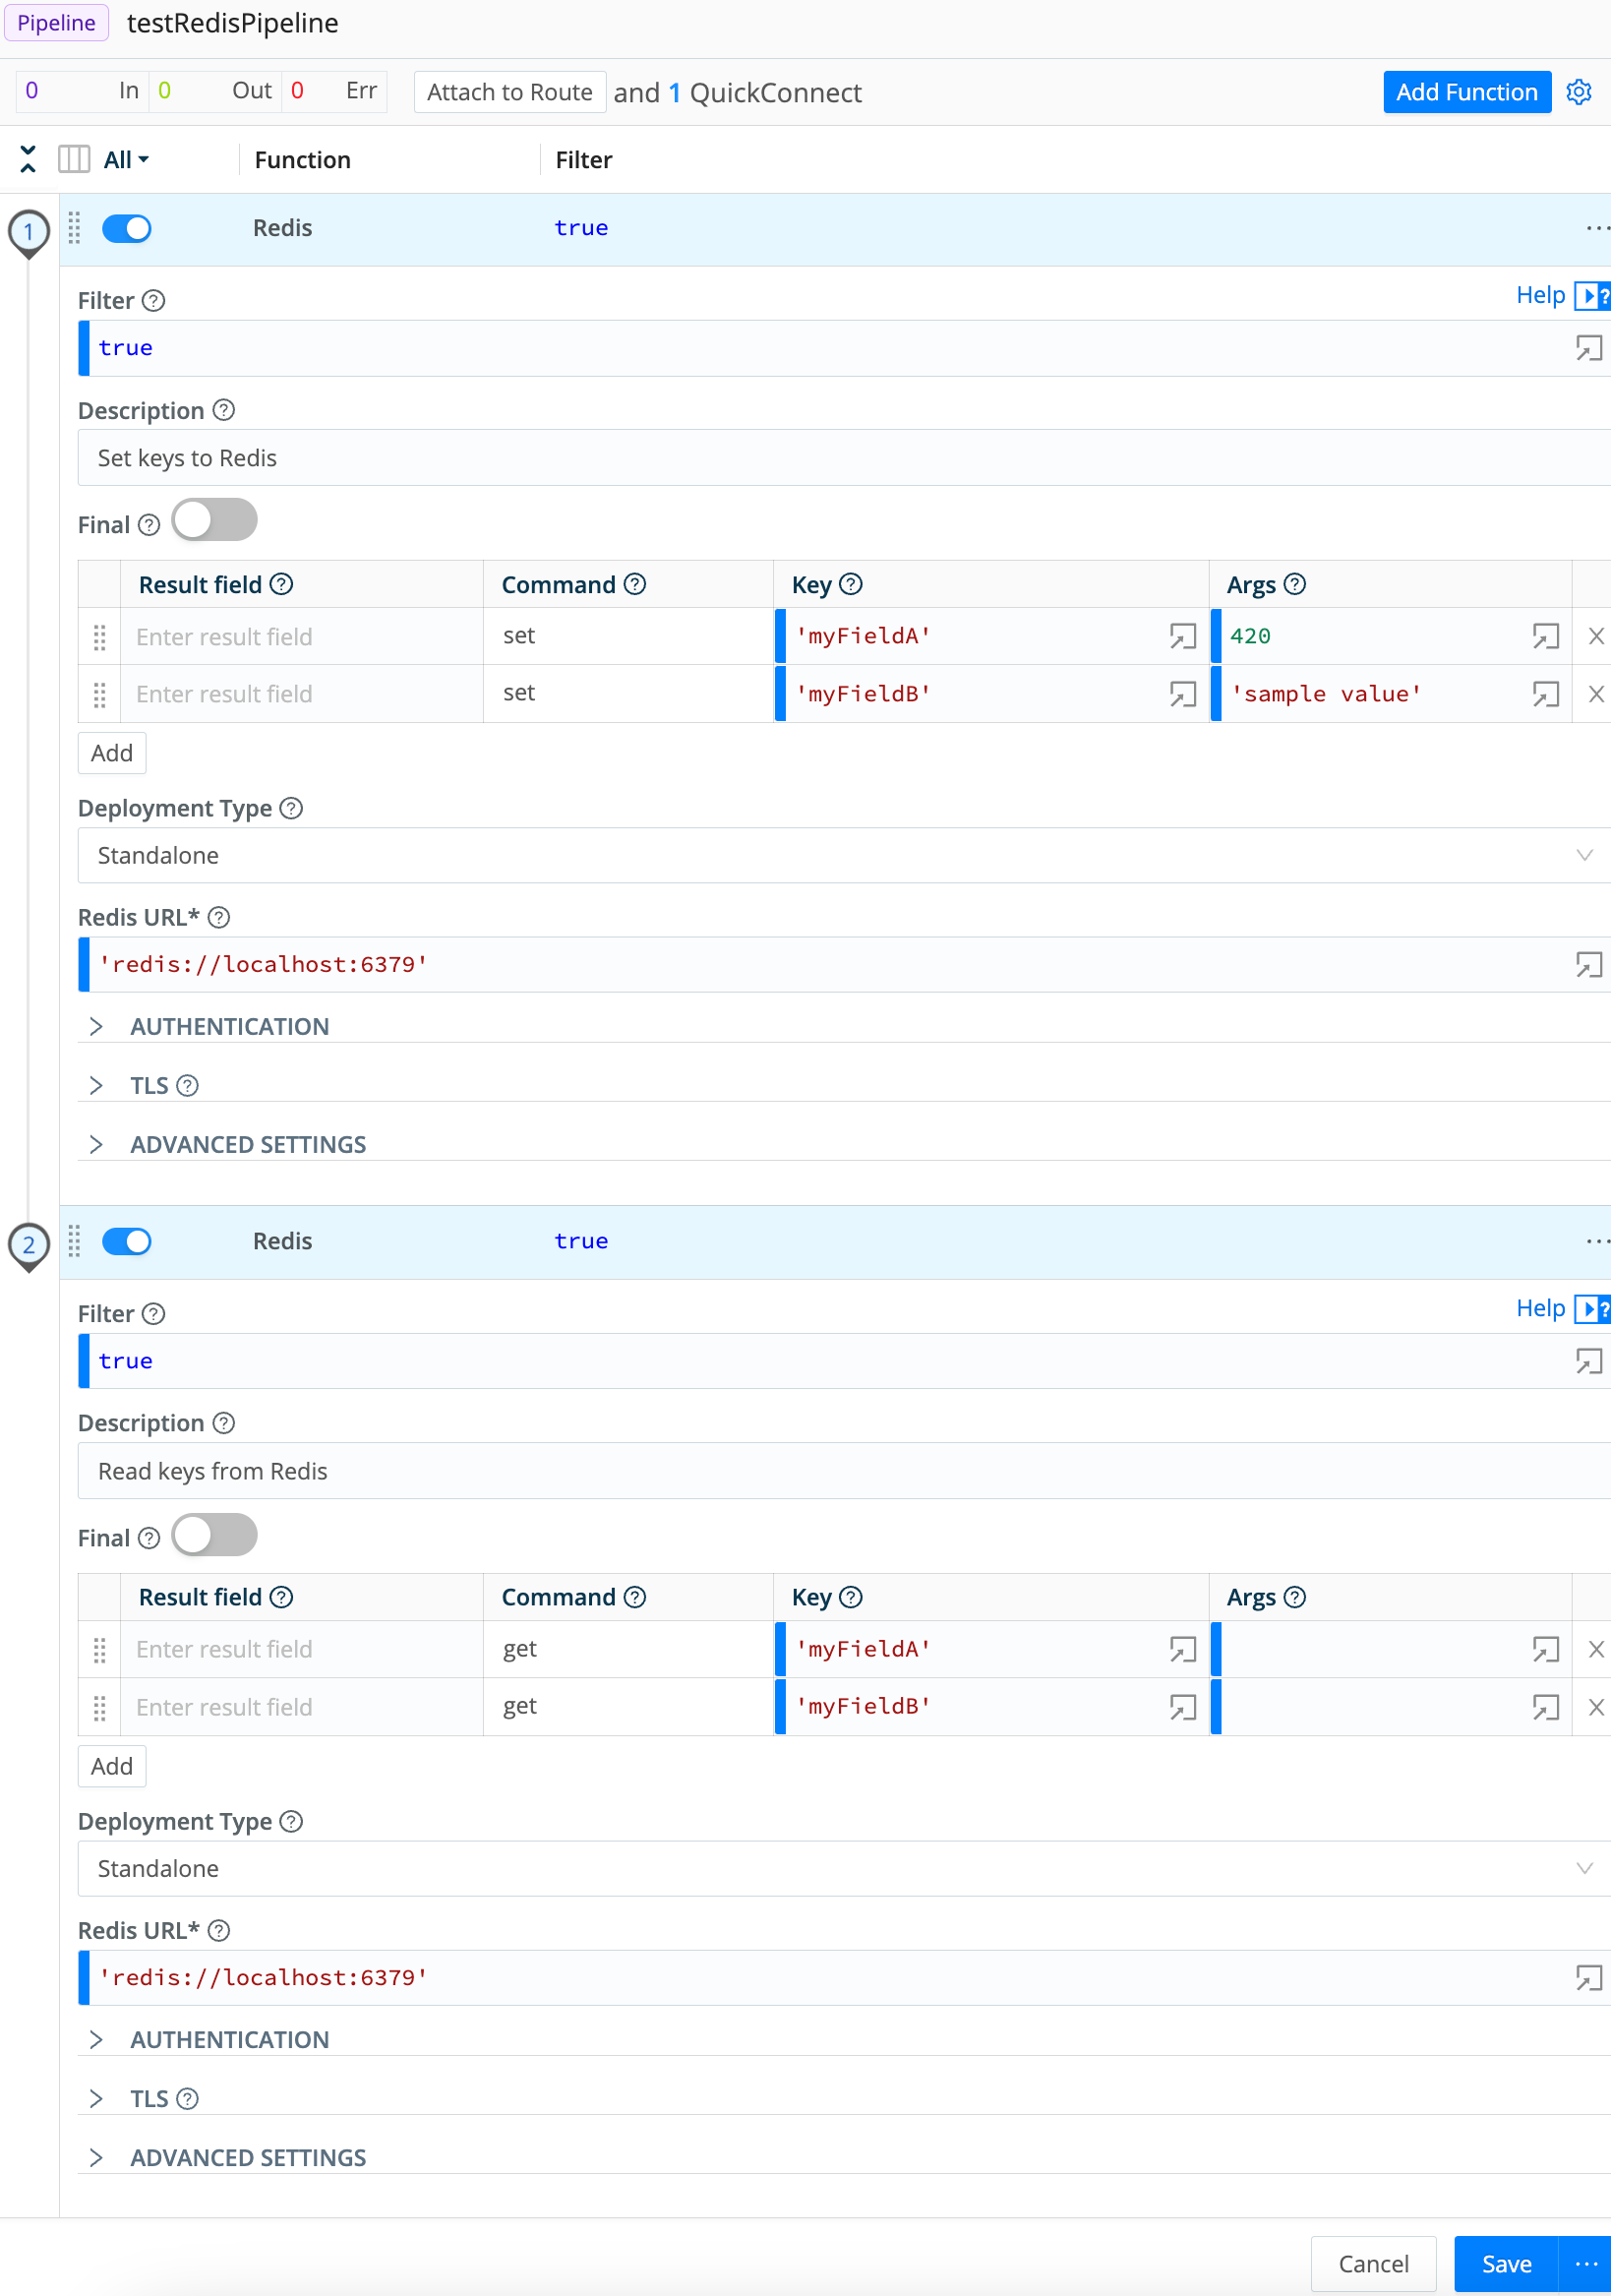
Redis Function #1
Description: Set keys to Redis
Command: set
Key: 'myFieldA'
Args: 420
Command: set
Key: 'myFieldB'
Args: 'sample value'
Redis Function #2
Description: Read keys from Redis
Result field: myField_AA
Command: get
Key: 'myFieldA'
Result field: myField_BB
Command: get
Key: 'myFieldB'
Scenario B: Multiple-Argument Arrays
This example demonstrates how to configure a Redis Function that supplies an array of multiple arguments to Redis commands (in this example, lset and lrange).
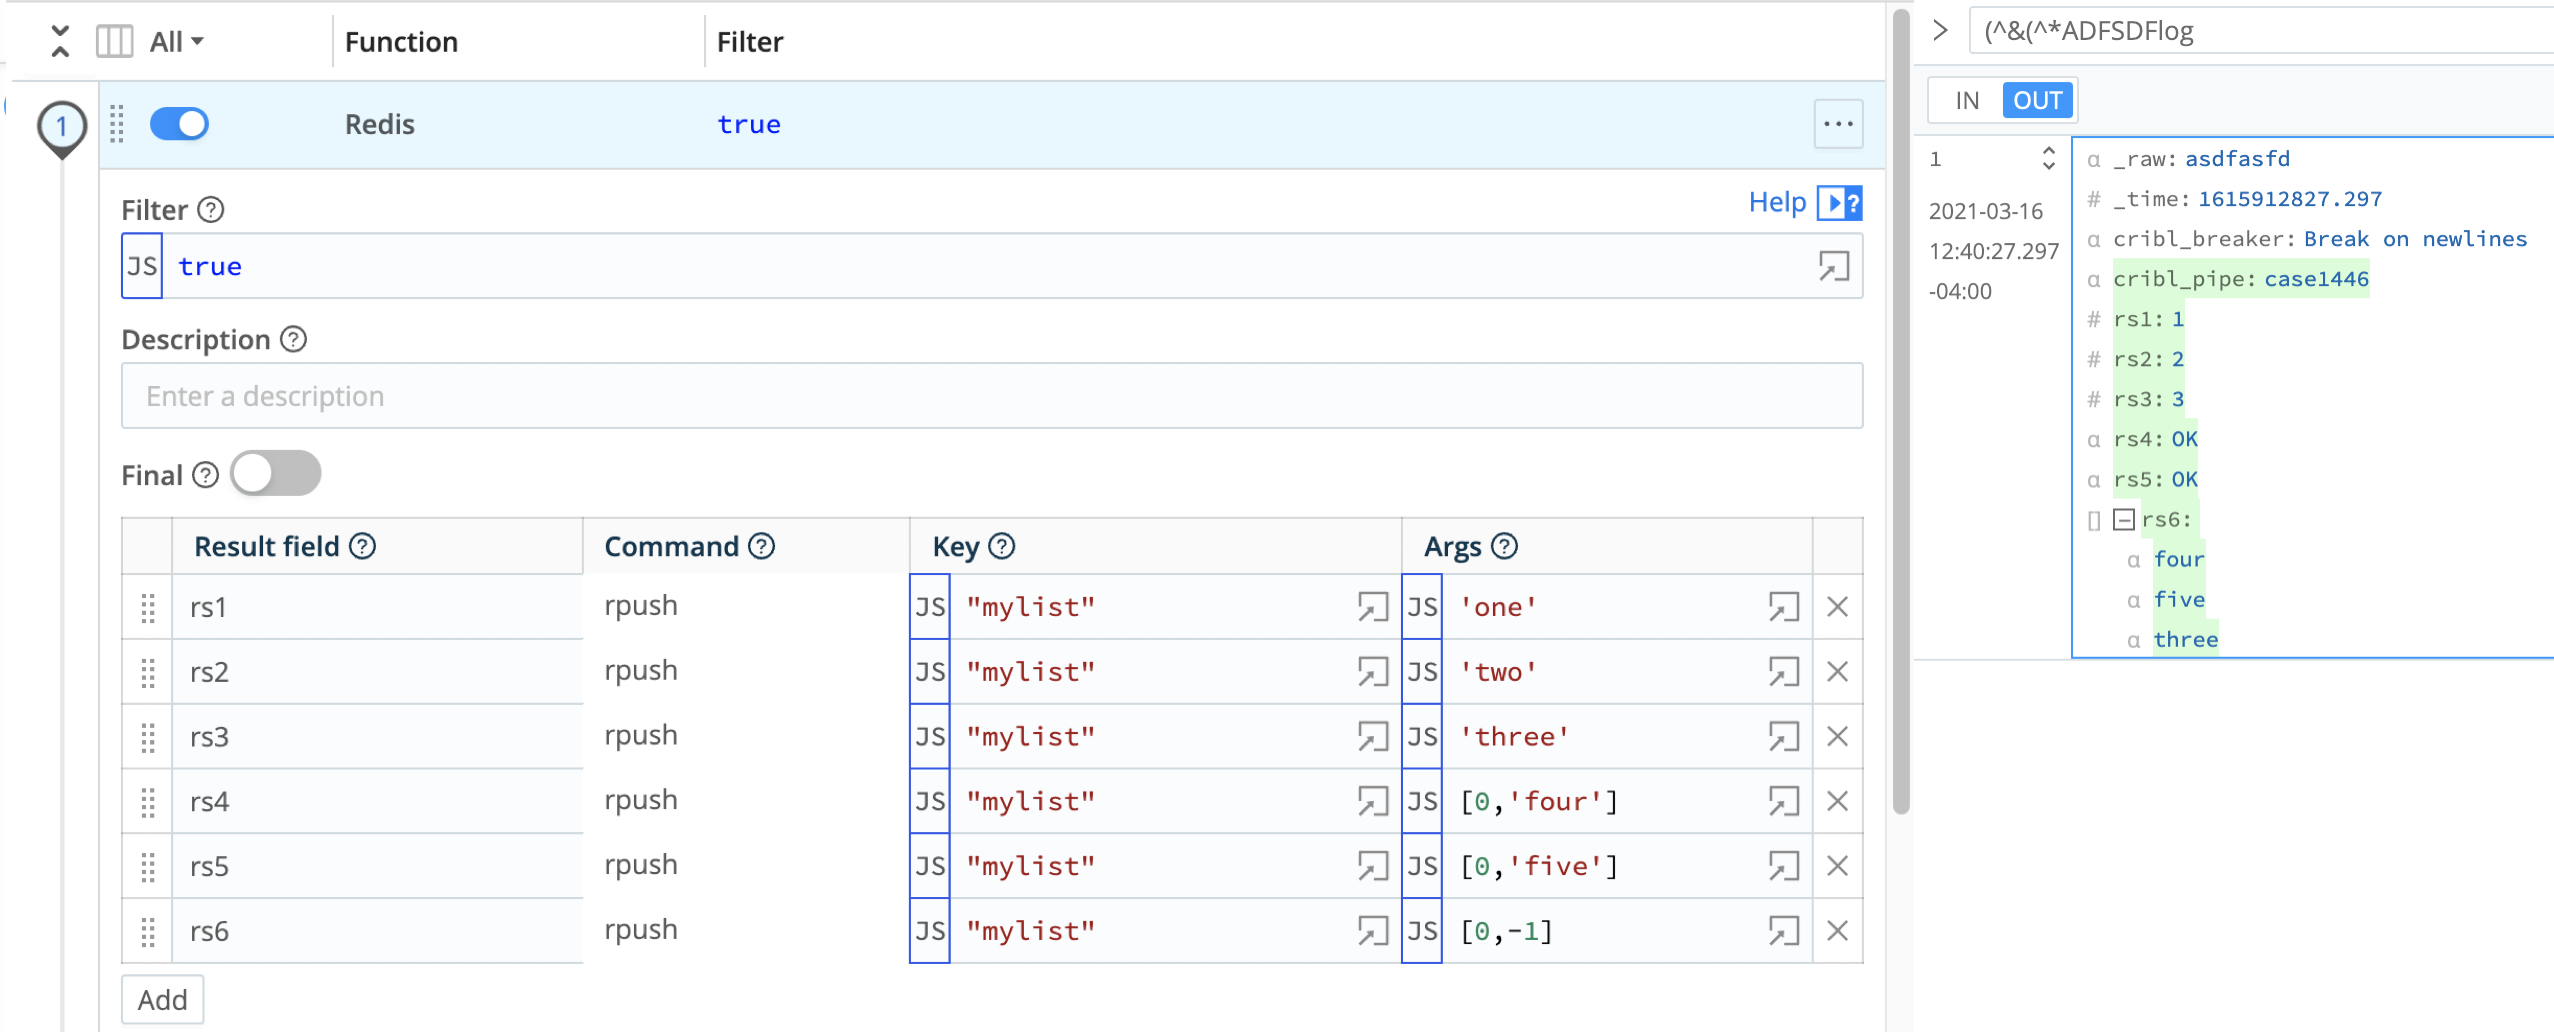
Redis Function
Description: Push arrays of multiple arguments to Redis
Result field: rs1
Command: rpush
Key: "mylist"
Args: 'one'
Result field: rs2
Command: rpush
Key: "mylist"
Args: 'two'
Result field: rs3
Command: rpush
Key: "mylist"
Args: 'three
Result field: rs4
Command: lset
Key: "mylist"
Args: [0,'four']
Result field: rs5
Command: lset
Key: "mylist"
Args: [-2,'five']
Result field: rs6
Command: lrange
Key: "mylist"
Args: [0,-1]
Try This at Home
The Pipeline below contains only this example Function. You can import it into your own Cribl Stream environment, fill in the url with your own credentials, and further modify it to meet your needs.
{
  "id": "redis-multiple-args",
  "conf": {
    "output": "default",
    "groups": {},
    "asyncFuncTimeout": 1000,
    "functions": [
      {
        "filter": "true",
        "conf": {
          "commands": [
            {
              "outField": "rs1",
              "command": "rpush",
              "keyExpr": "\"mylist\"",
              "argsExpr": "'one'"
            },
            {
              "outField": "rs2",
              "command": "rpush",
              "keyExpr": "\"mylist\"",
              "argsExpr": "'two'"
            },
            {
              "outField": "rs3",
              "command": "rpush",
              "keyExpr": "\"mylist\"",
              "argsExpr": "'three'"
            },
            {
              "command": "lset",
              "keyExpr": "\"mylist\"",
              "argsExpr": "[0,'four']",
              "outField": "rs4"
            },
            {
              "outField": "rs5",
              "command": "lset",
              "keyExpr": "\"mylist\"",
              "argsExpr": "[-2,'five']"
            },
            {
              "outField": "rs6",
              "command": "lrange",
              "keyExpr": "\"mylist\"",
              "argsExpr": "[0,-1]"
            }
          ],
          "maxBlockSecs": 60,
          "url": "redis://<your-credentials-here>"
        },
        "id": "redis",
        "disabled": false,
        "description": "Push arrays of multiple arguments to Redis"
      }
    ]
  }
}See Also
- The Redis Knowledge Pack embeds Redis Functions in sample Pipelines that you can adapt to apply to your own aggregation, enrichment, quota enforcement, suppression, and other applications.